

EMS Guide - LVAD - MyLVAD
EMS Guide - LVAD - MyLVAD
EMS Guide - LVAD - MyLVAD

You also want an ePaper? Increase the reach of your titles
YUMPU automatically turns print PDFs into web optimized ePapers that Google loves.
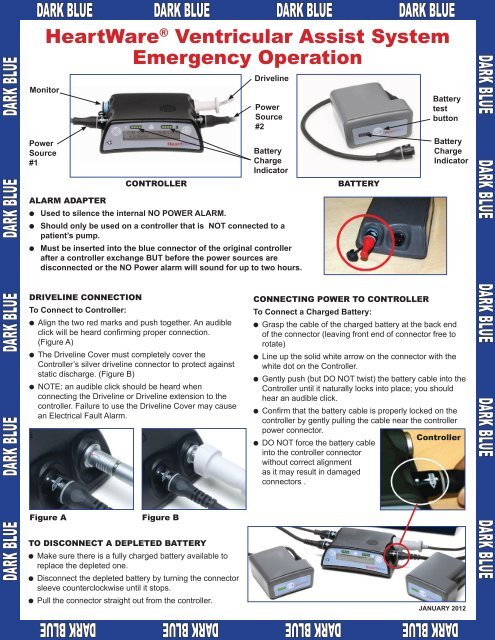
DARK BLUE DARK BLUE DARK BLUE DARK BLUE DARK BLUE<br />
HeartWare ® DARK BLUE DARK BLUE DARK BLUE DARK BLUE<br />
Ventricular Assist System<br />
Emergency operation<br />
Monitor<br />
Power<br />
Source<br />
#1<br />
ALARm ADAPtER<br />
l Used to silence the internal NO POWER ALARM.<br />
l Should only be used on a controller that is NOT connected to a<br />
patient’s pump.<br />
l Must be inserted into the blue connector of the original controller<br />
after a controller exchange BUT before the power sources are<br />
disconnected or the NO Power alarm will sound for up to two hours.<br />
DRiVELinE ConnECtion<br />
To Connect to Controller:<br />
l Align the two red marks and push together. An audible<br />
click will be heard confirming proper connection.<br />
(Figure A)<br />
l The Driveline Cover must completely cover the<br />
Controller’s silver driveline connector to protect against<br />
static discharge. (Figure B)<br />
l NOTE: an audible click should be heard when<br />
connecting the Driveline or Driveline extension to the<br />
controller. Failure to use the Driveline Cover may cause<br />
an Electrical Fault Alarm.<br />
Figure A Figure B<br />
to DiSConnECt A DEPLEtED BAttERy<br />
l Make sure there is a fully charged battery available to<br />
replace the depleted one.<br />
l Disconnect the depleted battery by turning the connector<br />
sleeve counterclockwise until it stops.<br />
l Pull the connector straight out from the controller.<br />
Driveline<br />
Power<br />
Source<br />
#2<br />
Battery<br />
Charge<br />
Indicator<br />
ContRoLLER BAttERy<br />
ConnECting PoWER to ContRoLLER<br />
To Connect a Charged Battery:<br />
Battery<br />
test<br />
button<br />
Battery<br />
Charge<br />
Indicator<br />
l Grasp the cable of the charged battery at the back end<br />
of the connector (leaving front end of connector free to<br />
rotate)<br />
l Line up the solid white arrow on the connector with the<br />
white dot on the Controller.<br />
l Gently push (but DO NOT twist) the battery cable into the<br />
Controller until it naturally locks into place; you should<br />
hear an audible click.<br />
l Confirm that the battery cable is properly locked on the<br />
controller by gently pulling the cable near the controller<br />
power connector.<br />
Controller<br />
l DO NOT force the battery cable<br />
into the controller connector<br />
without correct alignment<br />
as it may result in damaged<br />
connectors .<br />
JANUARY 2012<br />
DARK BLUE DARK BLUE DARK BLUE DARK BLUE<br />
DARK BLUE DARK BLUE DARK BLUE DARK BLUE DARK BLUE