

Bending Decking For Decorative Inlays - Deck Builders Inc Olympia ...
Bending Decking For Decorative Inlays - Deck Builders Inc Olympia ...
Bending Decking For Decorative Inlays - Deck Builders Inc Olympia ...

You also want an ePaper? Increase the reach of your titles
YUMPU automatically turns print PDFs into web optimized ePapers that Google loves.
<strong>Bending</strong> <strong><strong>Deck</strong>ing</strong> for<br />
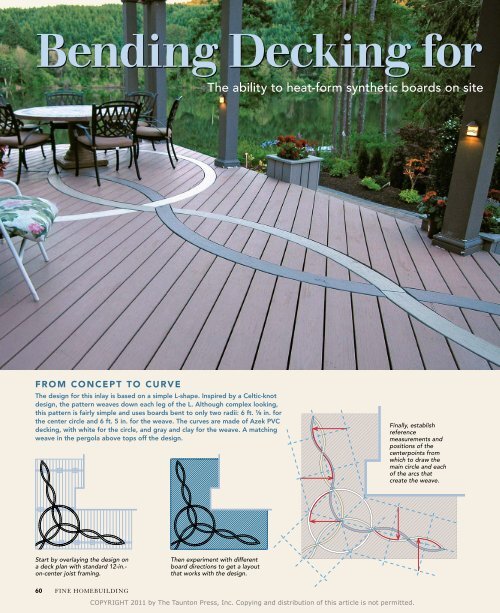
froM co n ceP t to cU rVe<br />
The design for this inlay is based on a simple L-shape. inspired by a celtic-knot<br />
design, the pattern weaves down each leg of the L. although complex looking,<br />
this pattern is fairly simple and uses boards bent to only two radii: 6 ft. 1 ⁄8 in. for<br />
the center circle and 6 ft. 5 in. for the weave. The curves are made of azek Pvc<br />
decking, with white for the circle, and gray and clay for the weave. a matching<br />
weave in the pergola above tops off the design.<br />
Start by overlaying the design on<br />
a deck plan with standard 12-in.on-center<br />
joist framing.<br />
60<br />
FINE HOMEBUILDING<br />
The ability to heat-form synthetic boards on site<br />
Then experiment with different<br />
board directions to get a layout<br />
that works with the design.<br />
COPYRIGHT 2011 by The Taunton Press, <strong>Inc</strong>. Copying and distribution of this article is not permitted.<br />
Finally, establish<br />
reference<br />
measurements and<br />
positions of the<br />
centerpoints from<br />
which to draw the<br />
main circle and each<br />
of the arcs that<br />
create the weave.
<strong>Decorative</strong> <strong>Inlays</strong><br />
paves the way to designs that can set a deck apart<br />
bY KiM KaTWiJK<br />
It wasn’t long after I<br />
started building decks<br />
full-time in 1996 that I got<br />
the opportunity to create a<br />
curve. I had designed a beautiful<br />
curved deck in cambara for<br />
a client who wanted the railing<br />
cap to follow the shape of the<br />
deck. The logical solution for<br />
most deck builders would have<br />
been to laminate thin strips of<br />
cambara into a curved rail on a<br />
bending form, but I wanted to<br />
try something completely different:<br />
Heat-form composite decking<br />
to the desired curve.<br />
Composites are made from a<br />
mixture of wood fiber and plastic.<br />
Because these plastics are not<br />
thermally stable, it’s possible to<br />
heat and bend the decking.<br />
a literal learning curve<br />
My first attempts at boardbending<br />
were with Trex. My<br />
1<br />
lay oUt the arcS<br />
and inStall Blocking<br />
FraMe and MarK THe decK<br />
After the deck is framed, the center of the circle is<br />
marked. Here, the centerpoint falls between joists, so we<br />
install a wooden cleat in the space. At the centerpoint,<br />
we insert a nail that stands ¼ in. proud so that a tape<br />
measure can be hooked over it. With a pencil held at<br />
the 6-ft. 9-in. mark, a circle is scribed on top of the joists<br />
to mark where the outside blocking will go. This blocking<br />
supports the cut ends of the field boards and runs<br />
3 in. away from both sides of the inlay. This is repeated<br />
at 5 ft. 9 in. to mark the inside blocking (the decking is<br />
5½ in. wide). Also from the center nail, three stringlines<br />
indicate the center of the weaves that will extend to the<br />
corner and down each leg of the L.<br />
MarK THe arcs<br />
A 20-ft.-long 2x4 is secured 5 ft. 7 in. away from each<br />
side of each weave’s centerline. Nails driven into these<br />
strips mark the centerpoints for each arc of the weave<br />
pattern. Using the measuring tape hooked over each<br />
nail, the layout lines for blocking are drawn on the tops<br />
of the joists at 7 ft. 2 in. and 6 ft. 2 in.<br />
bLocK in buLK<br />
When blocking for an inlay, it’s imperative that every<br />
deck board be supported within 3 in. of its cut end.<br />
Blocking a circle creates even more difficulties because<br />
some of the boards of the circle run parallel with the<br />
framing. This requires creative blocking to make sure<br />
there is support for all the ends of each of the deck<br />
boards and for the inlay boards that fall between the<br />
standard framing.<br />
An efficient way to work<br />
in a curved design, each piece of<br />
blocking is cut with two angles. The<br />
most efficient way to do this is for<br />
one person to take a piece of 2x6<br />
pressure-treated board, place it vertically<br />
over the layout lines where it will<br />
be installed, scribe it, number it, and<br />
toss it to a sawyer for cutting. using a<br />
speed square, the sawyer determines<br />
the angle of the cut, sets the chopsaw,<br />
cuts both ends at the prescribed<br />
angle, brushes the cuts with preservative,<br />
and tosses the board back to<br />
be nailed into place. it took almost a<br />
week to install the blocking for this<br />
deck project.<br />
COPYRIGHT 2011 by The Taunton Press, <strong>Inc</strong>. Copying and distribution of this article is not permitted.<br />
JUNE/JULY 2011 61
apparatus involved a 20-ft. by<br />
20-in.-dia. Sonotube laid on<br />
the flat with #3 rebar shoved<br />
through the sides to suspend the<br />
decking. Two kerosene space<br />
heaters forced heated air into<br />
each end of the tube. This method<br />
produced uneven heating and<br />
more failures than successes.<br />
Next, I tried a water-bath<br />
heater. I used a 20-ft. by 12-in.<br />
schedule-40 PVC pipe cut in<br />
half. I glued four inlets into the<br />
half-pipe, then inserted a watertank<br />
heater into each inlet. I was<br />
able to heat the water to boiling.<br />
After an hour of boiling, I was<br />
able to bend a 20-ft. composite<br />
board in a very large radius—<br />
about 15 ft. To get the 5-ft.<br />
radius I needed, I had to rip the<br />
2x6 composite boards into three<br />
strips, heat them, bend them to<br />
a 5-ft. radius, and then glue and<br />
screw them back together.<br />
On another project, I tried to<br />
get higher temperatures by insulating<br />
the pipe and capping it<br />
with rigid insulation. This succeeded<br />
so well the tank melted.<br />
I gave up on bending deck<br />
boards until I discovered the<br />
Heatcon bending system at a<br />
trade show. It consists of four<br />
8-in. by 10-ft. blankets, two<br />
control units, and two temperature<br />
probes. Working with this<br />
system, I was able to bend a flat<br />
piece of 5 1 ⁄2-in. Azek cellular-<br />
PVC decking to a radius of<br />
22 1 ⁄2 in., opening the door to new<br />
levels of artistic expression.<br />
Warranty issues<br />
It’s worth noting that manufacturers<br />
of PVC decking have not<br />
endorsed these methods to date,<br />
although Azek worked with<br />
Heatcon to develop a heating<br />
blanket for bending trim (sidebar<br />
p. 65), and offers a tutorial<br />
for trim-bending on its website.<br />
According to Danny Thomas,<br />
vice president for product application/quality<br />
at Azek, some<br />
independent tests on heat-bent<br />
cellular-PVC deck boards suggest<br />
62<br />
FINE HOMEBUILDING<br />
2<br />
3<br />
BUild <strong>Bending</strong> JigS Before heating the Stock<br />
THe Jig sTarTs WiTH a PLYWood base<br />
I lay four 16-ft. 2x12 boards on the ground 2 ft. apart and shim them level before screwing four sheets<br />
of exterior-grade ¾ -in. plywood on top. I establish a pivot point that allows the arc to fall entirely on the<br />
platform. (Depending on your curve’s radius, this point may be on the platform or on a 2x4 extending<br />
from it.) Using that point, I draw the radius on the plywood. I then scribe the radius on a series of 2x8<br />
scrap boards, and cut along the line with a circular saw. The convex half of the pattern pieces is screwed<br />
down to the plywood along the layout line to form the bending jig for the boards (photo right).<br />
heat the <strong>Bending</strong> Stock SloWly<br />
a garage FLoor<br />
is a good PLace<br />
<strong>For</strong> HeaTing<br />
We roll out the 8-in. by 10-ft. Heatcon<br />
heating blanket on top of a strip of R-13<br />
fiberglass insulation. (I put two heating<br />
blankets end-to-end to bend a 20-ft.<br />
piece of decking.) Each blanket has lines<br />
from the control unit for the heating<br />
element and a probe that monitors the<br />
board’s internal temperature. The probe<br />
is inserted in a 1 ⁄8-in. hole drilled into the<br />
side of the board. The decking is laid<br />
face down on top of the blanket; another<br />
blanket is laid on top of the board, with<br />
another layer of insulation on top.<br />
I select “decking,” then choose a goal<br />
temperature and an internal temperature<br />
(chart p. 65). The control box maintains<br />
the blankets at the goal temperature, and<br />
the probe monitors the plank’s internal<br />
temperature. When the set internal temperature<br />
is reached, the box beeps.<br />
use gLoves <strong>For</strong> saFe HandLing<br />
With the board’s temperature now at 220°F or higher,<br />
the probe is extracted, and the insulation and top blanket<br />
removed. The decking—now the consistency of a<br />
big, hot noodle—is quickly carried to the bending jig.<br />
Photos this page, facing page: courtesy of Heatcon <strong>Inc</strong>., Seattle<br />
COPYRIGHT 2011 by The Taunton Press, <strong>Inc</strong>. Copying and distribution of this article is not permitted.
4<br />
ShaPe the Board to the <strong>Bending</strong> Jig<br />
cenTer THe soFT<br />
board on THe Jig<br />
Pull lightly on each end<br />
to stretch the board<br />
slightly as it forms to the<br />
jig. When bending cellular<br />
PVC, radii down to<br />
6 ft. can be done with<br />
two people. Radii tighter<br />
than 6 ft. need an extra<br />
person to keep the center<br />
from rolling out of the<br />
pattern jig. It helps to<br />
have three when bending<br />
composite or capstock.<br />
The bending process is<br />
like a dance: It’s done<br />
best when everyone<br />
knows the steps.<br />
cHecK THe curve<br />
and cLaMP as needed<br />
Using scrap pieces of wood, the bent<br />
plank is secured with clamps at each<br />
end and, if needed, at other points<br />
around the curve. Stiffer planks need<br />
a greater number of clamps to hold<br />
them in place. The plank is smoothed<br />
out to make sure it’s flat and level<br />
with the plywood foundation. If not,<br />
the board will form waves that will be<br />
noticeable when laid on the deck. It<br />
takes about 20 minutes for the board<br />
to cool and become rigid. The process<br />
is repeated with each board used in<br />
the curved design.<br />
www.finehomebuilding.com JUNE/JULY 2011 63<br />
COPYRIGHT 2011 by The Taunton Press, <strong>Inc</strong>. Copying and distribution of this article is not permitted.
there may be a decline in some<br />
structural properties in various<br />
deck boards. Because each application<br />
and each manufacturer is<br />
unique, he recommends checking<br />
with the manufacturer to<br />
determine if heat-bending will<br />
void the warranty.<br />
I give my clients a five-year<br />
warranty on my work, but in 16<br />
years of bending deck boards,<br />
I’ve never had a problem with<br />
this method when used with a<br />
deck board from a major manufacturer.<br />
The only physical difference<br />
that I’ve noticed is an<br />
expansion in the thickness of the<br />
deck board of about 1 ⁄16 in. after<br />
heating. This is undetectable<br />
when walking on the deck.<br />
Boards that bend best<br />
I’ve used both easy-to-bend<br />
cellular-PVC boards and the<br />
more dense composites in many<br />
different applications. (See a<br />
slide show of my work by clicking<br />
on Magazine Extras at Fine<br />
Homebuilding.com.) A popular<br />
application is to ribbon the outside<br />
of a curved deck, often in a<br />
complementary or contrasting<br />
color. Inlaid deck art, like the<br />
project detailed here, is one of<br />
the most impressive ways to use<br />
curved decking. I’ve done many<br />
inlays, including compass roses,<br />
Celtic knots, and multiple deck<br />
boards woven to form artistic<br />
designs. With curved decks, the<br />
need for curved benches goes<br />
without saying, and the ability to<br />
bend deck boards takes stairs to<br />
a whole new level of expression.<br />
Even pergolas can take on new<br />
twists when you incorporate<br />
curved boards to create beautiful<br />
overhead artwork. □<br />
Kim Katwijk is president<br />
of <strong>Deck</strong> <strong>Builders</strong> <strong>Inc</strong>. (www<br />
.artistryindecks.com) in <strong>Olympia</strong>,<br />
Wash. He and his wife,<br />
Linda, write frequently on<br />
construction topics. Photos<br />
and drawings courtesy of the<br />
author, except where noted.<br />
64<br />
FINE HOMEBUILDING<br />
5<br />
PreP the decking<br />
for the inlay<br />
secure FieLd boards aLong inLaY edges<br />
With the field decking installed, the centerpoint of the<br />
main circle is marked with a small screw on the deck surface,<br />
and the centerline for the weaves is snapped with<br />
chalk. The inlay pieces are cut and positioned on the<br />
deck. (The 3 ⁄8-in. gaps between planks allow me to see the<br />
blocking.) I let the inlay ends run wild; I’ll cut them later.<br />
Trace and cuT<br />
Using a carpenter’s pencil held perpendicular to the board,<br />
I draw a cutline on each side of each inlay piece. The width<br />
of the carpenter’s pencil allows for the proper 3 ⁄8-in. gap<br />
between the main decking and the inlay pieces. I use a<br />
circular saw with a standard blade set at 1 1 ⁄16 in. to cut the<br />
decking along the line. The cut pieces are removed, and the<br />
inlay pieces are placed and screwed to the joists.<br />
Filling a tight spot<br />
With inlays, you invariably<br />
encounter the challenge of<br />
fitting in and securing small<br />
pieces of decking to make<br />
the design work. depending<br />
on the shape, you can attach<br />
them with stainless-steel<br />
screws through the side, or<br />
if blocking is needed, you<br />
can use fiberglass industrial<br />
grating as a support and<br />
glue in the piece.<br />
Leave no Loose ends<br />
With the inlay boards where I want them, I secure the main<br />
deck boards along the length of the inlay to the blocking<br />
installed earlier. In keeping with the elegance of this deck<br />
design, I used the FastenMaster Cortex Concealed Fastening<br />
System. The screws self-cut a hole and set themselves at the<br />
right depth so that a plug can be placed in the hole and hammered<br />
down to become nearly invisible.<br />
Photo right, facing page: courtesy of Heatcon <strong>Inc</strong>., Seattle<br />
COPYRIGHT 2011 by The Taunton Press, <strong>Inc</strong>. Copying and distribution of this article is not permitted.
Which boards bend best?<br />
i’ve used both cellular-Pvc decking and composites<br />
in my curved designs. Pvc bends most<br />
readily, but some composites can be heatformed<br />
to a radius as tight as 10 ft. coextruded<br />
composites (sometimes called capstock), in<br />
which composite material is encased in a lowmaintenance<br />
plastic shell, are difficult to heat<br />
evenly. urethane decking, such as Lifetime Lumber,<br />
cannot be heat-formed. composite railings<br />
also can be bent, but it’s best to gain experience<br />
before attempting these projects.<br />
because the material formulas of each deck<br />
brand vary, all react differently to heat. i’ve<br />
compiled my observations and that of other<br />
deck benders i know in the chart at right. generally,<br />
the more plastic in a board, the easier it<br />
will bend after being heated. color also plays a<br />
big role: The darker the color, the faster it heats<br />
up. a dark-gray Pvc board may heat up in 20<br />
minutes, while a white board of the same material<br />
will take more than 45 minutes.<br />
the heatcon system<br />
Heatcon has been manufacturing flexible heating<br />
blankets and controls for industrial-heating<br />
applications within the aerospace composite-repair<br />
industry for the past 30 years. customers include<br />
airlines and the military.<br />
in 2004, azek building Products hired the<br />
company to design a system to heat-form<br />
Pvc trim. introduced in 2005, this simple-touse<br />
kit has become a popular tool for many<br />
builders and contractors.<br />
almost immediately, questions started pouring<br />
in about using the kits to heat-form synthetic<br />
decking. Heatcon responded by developing a heat-forming kit for decking based on the<br />
same heating-blanket concept as the trim-bending kit. subsequent tests revealed the need<br />
for an internal temperature probe to monitor and regulate a slower heating process for the<br />
thicker Pvc and composite deck boards.<br />
The Hc99-300 deck heat-forming kit that i use retails for $3250 and can be purchased<br />
only from Heatcon. That’s a steep price, but it quickly pays for itself by bringing your deckbuilding<br />
business to a whole new price point. With it, you can heat and bend an<br />
8-in.-wide by 20-ft.-long deck board. The kit comes with four 8-in. by 10-ft. heating blankets,<br />
two 120v heat controllers, two thermocouples for monitoring internal board temperatures,<br />
two pairs of heat gloves, an operator’s manual, and two carrying cases. The kit<br />
is portable, light (30 lb.), and easy to transport. You also can purchase a half kit for $1750,<br />
which allows you to bend an 8-in. by 10-ft. board.<br />
You need at least a 20-ft.-long work area and plenty of room on the side for maneuvering<br />
the deck boards in and out of the heating-blanket area. You also need access to two separate<br />
120v, 20-amp outlets to operate the two controllers when bending any deck board<br />
more than 10 ft. long.<br />
even with the kit, it’s important to remember that bending synthetic deck or trim materials<br />
is an art learned over time. The more you use the system and learn the tricks, the better<br />
you become at it. More information about the heat-forming kits can be found at Heatcon’s<br />
website (www.heatcon.com).<br />
decking type Brand<br />
PVc<br />
internal<br />
temperature:<br />
220°f to<br />
260°f<br />
coMPoSite<br />
internal<br />
temperature:<br />
240°f to<br />
260°f<br />
caPStock<br />
internal<br />
temperature:<br />
240°f to<br />
260°f<br />
heat-forming<br />
ability<br />
tightest<br />
radius<br />
Trex Escapes Good 4 ft. 6 in.<br />
TimberTech XLM Good 3 ft. 6 in.<br />
Azek Harvest Collection Excellent 3 ft.<br />
Azek Arbor and<br />
Terra collections<br />
Good 4 ft.<br />
Fiberon Outdoor Flooring Excellent 4 ft.<br />
Trex Accents Good 10 ft. 6 in.<br />
TimberTech ReliaBoard Fair 12 ft.<br />
TimberTech TwinFinish Fair 12 ft.<br />
TimberTech DockSider Fair 13 ft.<br />
Fiberon Professional Fair 10 ft.<br />
EverGrain (Tamko) <strong><strong>Deck</strong>ing</strong> Fair 12 ft.<br />
comments<br />
Because it’s 100%<br />
plastic, cellular-PVC<br />
decking bends most<br />
readily and can make<br />
the tightest curves.<br />
All composites will<br />
have some springback<br />
when taken off<br />
the mold, so bend<br />
them tighter than the<br />
radius desired. These<br />
boards are slow to<br />
heat up.<br />
Trex Transcend Very poor 15 ft. High blanket<br />
temperatures can<br />
TimberTech<br />
Earthwood Evolutions<br />
Poor 11 ft. 6 in.<br />
Fiberon Horizon Poor 12 ft.<br />
melt the coating of<br />
these boards before<br />
the core is sufficiently<br />
heated. Low and slow<br />
heat is key here.<br />
www.finehomebuilding.com JUNE/JULY 2011 65<br />
COPYRIGHT 2011 by The Taunton Press, <strong>Inc</strong>. Copying and distribution of this article is not permitted.