

mini_sq burners.pdf - Joppa Glassworks, Inc. Home Page
mini_sq burners.pdf - Joppa Glassworks, Inc. Home Page
mini_sq burners.pdf - Joppa Glassworks, Inc. Home Page

Create successful ePaper yourself
Turn your PDF publications into a flip-book with our unique Google optimized e-Paper software.
The Second Method: Casting a Burner Block<br />
Using Castable Refractory (Mizzou, Greencast, etc.)<br />
Some craftsmen would much prefer to cast their burner blocks using refractory castables, a process<br />
capable of reproducing delicate dimension requirements with <strong>mini</strong>mal shrinkage, a process similar to casting<br />
Plaster of Paris or Portland Cement. The tools used for this operation are a table saw and a band saw, but really<br />
this is so low tech that you could use a hand saw and a hack saw blade to shape the styrofoam mold core<br />
parts. The outer parts of the mold are made of pine or plywood. I prefer using a table saw to shape these outer<br />
mold walls and casting board (see fig. 14-1). Shellac these parts using yellow shellac and when the shellac is<br />
dry, screw them together (fig. 14-2). You will need a good mold release. I make my own using micro-crystalline<br />
brown wax heated to 225 degrees, then stir in mineral spirits and let cool. Use a ratio of 2 parts wax to 1 part<br />
spirits, liquid measure. Decant mixture. Paint this mold release on the inside of the mold and let dry for at least<br />
30 minutes before casting.<br />
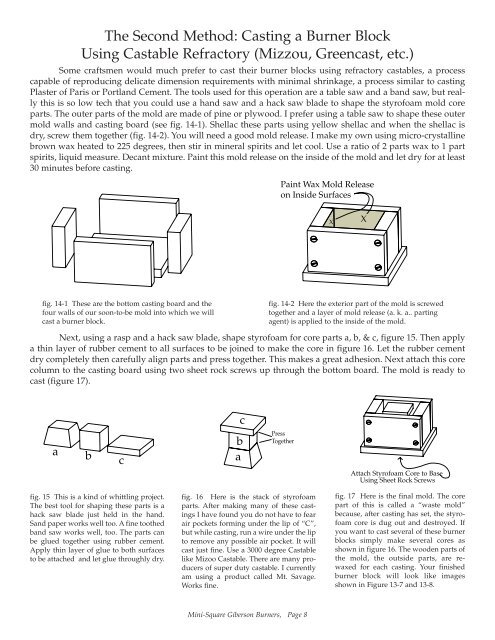
fig. 14-1 These are the bottom casting board and the<br />
four walls of our soon-to-be mold into which we will<br />
cast a burner block.<br />
Mini-Square Giberson Burners, <strong>Page</strong> 8<br />
Paint Wax Mold Release<br />
on Inside Surfaces<br />
X<br />
fig. 14-2 Here the exterior part of the mold is screwed<br />
together and a layer of mold release (a. k. a.. parting<br />
agent) is applied to the inside of the mold.<br />
Next, using a rasp and a hack saw blade, shape styrofoam for core parts a, b, & c, figure 15. Then apply<br />
a thin layer of rubber cement to all surfaces to be joined to make the core in figure 16. Let the rubber cement<br />
dry completely then carefully align parts and press together. This makes a great adhesion. Next attach this core<br />
column to the casting board using two sheet rock screws up through the bottom board. The mold is ready to<br />
cast (figure 17).<br />
b<br />
a b c a<br />
fig. 15 This is a kind of whittling project.<br />
The best tool for shaping these parts is a<br />
hack saw blade just held in the hand.<br />
Sand paper works well too. A fine toothed<br />
band saw works well, too. The parts can<br />
be glued together using rubber cement.<br />
Apply thin layer of glue to both surfaces<br />
to be attached and let glue throughly dry.<br />
c<br />
Press<br />
Together<br />
fig. 16 Here is the stack of styrofoam<br />
parts. After making many of these castings<br />
I have found you do not have to fear<br />
air pockets forming under the lip of “C”,<br />
but while casting, run a wire under the lip<br />
to remove any possible air pocket. It will<br />
cast just fine. Use a 3000 degree Castable<br />
like Mizoo Castable. There are many producers<br />
of super duty castable. I currently<br />
am using a product called Mt. Savage.<br />
Works fine.<br />
X<br />
Attach Styrofoam Core to Base<br />
Using Sheet Rock Screws<br />
fig. 17 Here is the final mold. The core<br />
part of this is called a “waste mold”<br />
because, after casting has set, the styrofoam<br />
core is dug out and destroyed. If<br />
you want to cast several of these burner<br />
blocks simply make several cores as<br />
shown in figure 16. The wooden parts of<br />
the mold, the outside parts, are rewaxed<br />
for each casting. Your finished<br />
burner block will look like images<br />
shown in Figure 13-7 and 13-8.