N1MM Logger Manual 2011-02-02 - Форум QRZ.RU
N1MM Logger Manual 2011-02-02 - Форум QRZ.RU
N1MM Logger Manual 2011-02-02 - Форум QRZ.RU

Create successful ePaper yourself
Turn your PDF publications into a flip-book with our unique Google optimized e-Paper software.
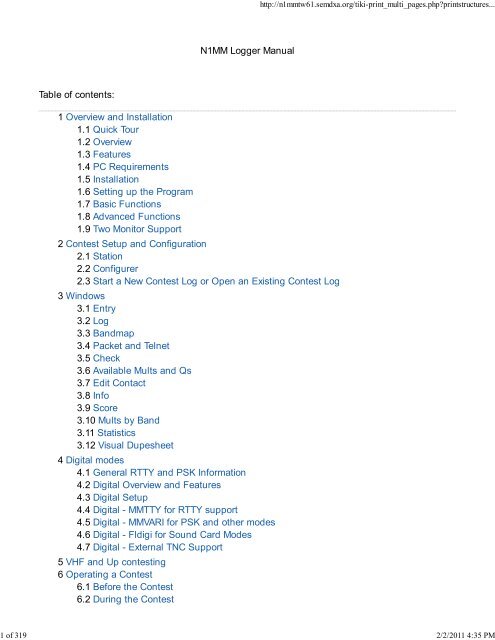
Table of contents:<br />
1 Overview and Installation<br />
1.1 Quick Tour<br />
1.2 Overview<br />
1.3 Features<br />
1.4 PC Requirements<br />
1.5 Installation<br />
1.6 Setting up the Program<br />
1.7 Basic Functions<br />
1.8 Advanced Functions<br />
1.9 Two Monitor Support<br />
<strong>N1MM</strong> <strong>Logger</strong> <strong>Manual</strong><br />
2 Contest Setup and Configuration<br />
2.1 Station<br />
2.2 Configurer<br />
2.3 Start a New Contest Log or Open an Existing Contest Log<br />
3 Windows<br />
3.1 Entry<br />
3.2 Log<br />
3.3 Bandmap<br />
3.4 Packet and Telnet<br />
3.5 Check<br />
3.6 Available Mults and Qs<br />
3.7 Edit Contact<br />
3.8 Info<br />
3.9 Score<br />
3.10 Mults by Band<br />
3.11 Statistics<br />
3.12 Visual Dupesheet<br />
4 Digital modes<br />
4.1 General RTTY and PSK Information<br />
4.2 Digital Overview and Features<br />
4.3 Digital Setup<br />
4.4 Digital - MMTTY for RTTY support<br />
4.5 Digital - MMVARI for PSK and other modes<br />
4.6 Digital - Fldigi for Sound Card Modes<br />
4.7 Digital - External TNC Support<br />
5 VHF and Up contesting<br />
6 Operating a Contest<br />
6.1 Before the Contest<br />
6.2 During the Contest<br />
http://n1mmtw61.semdxa.org/tiki-print_multi_pages.php?printstructures...<br />
1 of 319 2/2/<strong>2011</strong> 4:35 PM
6.3 After the Contest<br />
7 Help<br />
7.1 Help files and <strong>Manual</strong><br />
7.2 Tips and Tricks<br />
7.3 Troubleshooting<br />
Table of Contents:<br />
1 Quick Tour<br />
2 Overview<br />
3 Features<br />
4 PC Requirements<br />
5 Installation<br />
6 Setting up the Program<br />
7 Basic Functions<br />
8 Advanced Functions<br />
9 Two Monitor Support<br />
Overview and Installation<br />
http://n1mmtw61.semdxa.org/tiki-print_multi_pages.php?printstructures...<br />
2 of 319 2/2/<strong>2011</strong> 4:35 PM
Idea & overall design: Tom Wagner <strong>N1MM</strong><br />
Overall programming: Tom Wagner <strong>N1MM</strong><br />
Programming: Rick Ellison N2AMG<br />
Terry Gerdes AB5K<br />
Documentation/Help: Thomas Tinge PA1M<br />
Testing and proposals: Members Yahoo groups Thanks!!!<br />
Copyright 1998-2006, Tom Wagner (<strong>N1MM</strong>), Rick Ellison (N2AMG), Thomas Tinge (PA1M), Terry<br />
Gerdes (AB5K)<br />
CRC32 portion of this program Copyright (C) 2001 DI Management Services Pty Ltd.<br />
DLPORTIO is copyright 1996, Scientific Software Tools, Inc.<br />
Quick Tour (a must read!)<br />
or<br />
(and no, Tom wasn't drinking when he wrote this, many years ago. It's been updated to the<br />
current state of the program, but the jokes are all his)<br />
Ten Easy Steps to Successful Logging<br />
Step 1. Setup<br />
Quick Tour (a must read!)<br />
Step 1. Setup<br />
Step 2. Adjust Window Positions<br />
Step 3. Connect the Sound Card and the CW interface<br />
Step 4. Entering a Call<br />
Step 5. Using the Space Bar to Tab<br />
Step 6. Using the Tab Key<br />
Step 7. Bandmaps, Spots and Other Cool Stuff<br />
Step 8. Spots are Fun<br />
Step 9. Actually Logging Contacts<br />
Step 10. The Exciting Finale<br />
Step 11. CW and WAV Recordings<br />
http://n1mmtw61.semdxa.org/tiki-print_multi_pages.php?printstructures...<br />
3 of 319 2/2/<strong>2011</strong> 4:35 PM
Get your radio, packet and telnet connections set up (Config > Configure Ports, Telnet address,<br />
other). You really won't be impressed without the radio connected. The program really shines<br />
when you have a spotting connection (packet or Telnet).<br />
Step 2. Adjust Window Positions<br />
Adjust the window positions as desired by opening every window separately from the 'Window'<br />
menu.<br />
Step 3. Connect the Sound Card and the CW interface<br />
Connect your sound card to the radio so that you can play wave files or record contacts. Connect<br />
your CW interface to the parallel, serial or USB port for CW keying. See the Interfacing section<br />
for possibilities.<br />
Step 4. Entering a Call<br />
http://n1mmtw61.semdxa.org/tiki-print_multi_pages.php?printstructures...<br />
OK, now we are ready to log. By default, you should be in the DX (General) log - look at the Log<br />
Window caption.<br />
4 of 319 2/2/<strong>2011</strong> 4:35 PM
http://n1mmtw61.semdxa.org/tiki-print_multi_pages.php?printstructures...<br />
So you want to log a qso? Type in the callsign field of the Entry Window part or all of the call of<br />
the station you want to log. Let's say you type 'N1M'. Notice that the Check window shows calls<br />
with N1 in it, later N1M.... This will happen with any call or partial call that is 2 or more characters<br />
long.<br />
Use the mouse and click on <strong>N1MM</strong> in the Check window. Notice that <strong>N1MM</strong> will be transferred to<br />
the Entry Window callsign field. Hit<br />
Space once. Defaults will be set for fields that can have defaults (in this case the RST fields) and<br />
the cursor will be placed in the next field to be filled in — the name field.<br />
5 of 319 2/2/<strong>2011</strong> 4:35 PM
Step 5. Using the Space Bar to Tab<br />
Ok, that's cool, lets try it another way. Click on the Wipe button to clear the Entry Window fields.<br />
Your cursor will be positioned on the callsign field again. This time Type '<strong>N1MM</strong>' and press<br />
**SPACE**. Notice that the RST fields are again filled automatically and you are positioned to the<br />
next field to be filled in. Enter 'Tom' and press SPACE. In this case, you will not tab to the next<br />
field, since space is a legitimate character in a name. This is atypical behavior. Most contest fields<br />
do not allow any spaces in them, so the space bar will jump from field to field. You'll like this,<br />
dammit! Really, I think you will like it - particularly in contests.<br />
Step 6. Using the Tab Key<br />
So if SPACE tabs, what does Tab do? It tabs as well! But it doesn't tab like space. The Tab<br />
character (and Shift+Tab) behave like they do in most programs. They jump from field to field,<br />
without trying to be smart. So if you need to change the RST, you'll use the Tab key to get there.<br />
Step 7. Bandmaps, Spots and Other Cool Stuff<br />
http://n1mmtw61.semdxa.org/tiki-print_multi_pages.php?printstructures...<br />
Ok now the really cool part. We need to get some spots onto the bandmaps. If you have set up a<br />
radio, and you have selected SO2V in the Configurer, you should have two bandmaps, and they<br />
6 of 319 2/2/<strong>2011</strong> 4:35 PM
should be displaying the frequencies of your A and B VFOs at the top. So how do we get spots<br />
on there? We need to connect to packet or Telnet, of course. If you have an Internet connection,<br />
try Telnet, if a packet connection, well I guess you'll try packet. To pick, click on the appropriate<br />
tab in the Packet/Telnet Window. To connect to packet, just type a command in the one-line text<br />
box at the top, like "C K1TTT" and press enter. Just do your usual stuff. Then type sh/dx/100 (we<br />
want a lot of spots) if it's a weekend, otherwise just type sh/dx/30 (Why the difference? The<br />
logger won't show old spots - the default is 60 minutes).<br />
To use Telnet, you must choose a Telnet server. The easiest way to do this is to select the Telnet<br />
tab in the Packet/Telnet Window, then choose one from the drop-down list. Type your call in the<br />
input line at the top, or click the button with your call on it. Answer any questions the node asks<br />
you, and then, if it's a weekend, type sh/dx/100 (we want a lot of spots), otherwise just type<br />
sh/dx/30. (Why the difference? The logger won't show old spots - the default is 60 minutes.<br />
Step 8. Spots are Fun<br />
Spots should start appearing. Don't be afraid, there is no leopard. (Get it, spots?) Enough dumb<br />
jokes. Anyway, that's what people always tell me. So, what can we do with the spots? Lots of<br />
stuff. First note that each spot (except US and VE spots and spots from your own country) has its<br />
beam heading next to it. (Well it has the beam heading from my house, too bad if it isn't the<br />
beam heading from your house. If you really want to fix that, go to the station dialog in<br />
Config/Change Your Station Data - you'll need to enter your latitude and longitude. If you don't<br />
know your latitude and longitude, tough - this isn't geography class, kid.)<br />
Are we ever going to get to the good stuff? Sigh. OK. You have spots in your bandmaps. Try<br />
SINGLE clicking on one. Notice how the radio tunes to the frequency of the spot? Also notice that<br />
the call appears in the frame around the callsign textbox in the Entry Window. Now press that<br />
magic space bar again. The spot jumps into the call textbox! Let's try this another way. Click on<br />
the Wipe button (or press Ctrl+W). Now tune the radio to a frequency within 300 Hz of another<br />
spot. Notice that the call again appears in the frame, and again the space bar will enter the call<br />
into the call textbox.<br />
Ok, try Wiping again (either way). Now double click on a spot. Notice that again, you jump to the<br />
frequency of the spot, but this time the call is entered in the callsign field and the default fields<br />
are filled in, and you are ready to copy the next empty field (in this case name).<br />
Wipe just one more time. Let's try jumping around the spots without using the mouse. Your<br />
cursor should be in the callsign field. If it isn't put it there. Now press Ctrl+Up arrow or Ctrl+Down<br />
arrow. You should jump from spot to spot on the same band. Pick one of the spots where you<br />
can hear the station. Use the up and down arrow keys (no Ctrl this time) to tune the station in.<br />
Each press of the key will go jump 100 Hz on SSB and 20 Hz on CW (configurable). You're<br />
smiling, aren't you? There is a lot more. Go look here for more keyboard tricks: Key<br />
Assignments and Key Assignments Short List<br />
Step 9. Actually Logging Contacts<br />
http://n1mmtw61.semdxa.org/tiki-print_multi_pages.php?printstructures...<br />
7 of 319 2/2/<strong>2011</strong> 4:35 PM
We need to shift attention to actually logging contacts. Enter a call in the call textbox, press<br />
Space and then type a name, well any name except 'Arthur' in the name textbox. (I'm sorry, I<br />
really cannot be responsible if you type Arthur.) You typed Arthur, and nothing happened, didn't<br />
you? Now you're angry. Here's a quarter.... Ok. Back on task. You have enough to log a contact<br />
now. Press Enter, and notice that the contact will appear in the Log Window.<br />
Now the fun part. Enter the same callsign again and press Space. Looky, looky! The usual stuff<br />
happens, but two more things happen as well. The first contact shows up in the lower part of the<br />
Log Window, and the name from the first contact appears in the name field. If you were logging a<br />
contest, like ARRL DX, the power would be filled in from the first contact. If the first contact was<br />
on the same band as this contact, then the word "DUPE" in BIG RED LETTERS would appear. I<br />
was going to put the word "Dope", but then I thought that no one would want to use the program.<br />
Really, you should probably work the dope, I mean dupe, since you might not be in his log. It's<br />
actually easier to just work him than explain "You're a dupe, dope!"<br />
Ok, press Enter and log the dupe. You don't agree with me about logging dupes? Then<br />
RIGHT-click on the Log Window entry for the dupe, and choose delete contact. No, I'm not going<br />
to tell you what to do with the dialog box that pops up. I trust you. I feel like we are already<br />
friends.<br />
Step 10. The Exciting Finale<br />
Now for the exciting finale, if I called it the boring finale, you wouldn't read it now, would you? It is<br />
kind of boring, but I really couldn't trust you to get this far, now could I? This step is about all the<br />
wonderful things you can change about this program. If I tried to explain them all, you wouldn't<br />
read it, so here is just a little bit.<br />
Look at the View menu in the Entry Window. Here you can look at your current log (or any past<br />
log that you open) in a lot of different ways, including a really flexible Statistics function. The<br />
Tools menu lets you rescore the contest, download various files from the Internet (like master.dta<br />
and .cty files, for example), and a lot of other useful things. The Config menu lets you change all<br />
the exciting Configuration options that we all know and love by now.<br />
Step 11. CW and WAV Recordings<br />
http://n1mmtw61.semdxa.org/tiki-print_multi_pages.php?printstructures...<br />
"Hey wait," you say, "You said there were 10 easy steps - what's this number 11 business?" There<br />
is a very simple answer. I lied. I wanted to write only 10, but I forgot to tell you about the CW and<br />
SSB buttons. They are preset at the factory (ok, at my house), to be very useful to only me. Try<br />
them anyway. If you have a CW interface, the CW buttons will send pretty damn good CW, even<br />
when you are doing other things like moving windows around. You had better appreciate this,<br />
because it was very hard to code, and I am very proud of it.<br />
The same buttons are used in SSB to send WAV files. While this seems much harder, it was<br />
actually quite easy, but it's ok if you are impressed. I don't care, so long as you are impressed.<br />
You don't need to hook up your radio to enjoy this wonderful feature, just hook some speakers to<br />
your sound card and listen to my melodious voice call CQ as you click on the CQ button. In a real<br />
8 of 319 2/2/<strong>2011</strong> 4:35 PM
contest, however, you'll want to hook up the output of the sound card to your microphone input<br />
through a Radio Shack audio transformer and resistor setup. The high impedance side (with a<br />
100k series resistor) goes to the microphone input, the low impedance side goes to the sound<br />
card speaker out. Of course you'll need to adjust the levels using the software that comes with<br />
your operating system or sound card. See the interface section for more info.<br />
This thing will record QSOs as well, but I'll let you find that in the <strong>Manual</strong>.<br />
I hope you have enjoyed this quick tour as much as I have enjoyed writing it. And for the second<br />
time, no, I was not drinking when I wrote this.<br />
1. <strong>N1MM</strong> <strong>Logger</strong> Discussion Groups<br />
These groups discuss features, bugs, and ideas for the <strong>N1MM</strong> Free Contest <strong>Logger</strong>.<br />
General group: Messages dealing with general program issues (including CW and SSB<br />
contest) will be posted to the General Group<br />
Digital group: Messages dealing solely with digital mode issues (including digital contests)<br />
will be posted to the Digital Group<br />
In general messages should not be cross-posted, either by users or by the development team.<br />
This is important, both to get the benefit of the subdivision and to encourage users to subscribe<br />
to both. Users are asked please to separate digital and general/non-digital issues into individual<br />
messages and post them in the right places — on the receiving side, all e-mail software has tools<br />
to sort e-mail into folders by origin, so nothing should get lost.<br />
The development team will continue to track both forums and respond on the one that seems<br />
appropriate.<br />
So if your interest is primarily digital, for example, you may want to subscribe to the general<br />
group in one of the digest formats available. If it is primarily non-digital, then you might do the<br />
same thing, in reverse.<br />
Post<br />
message<br />
General program issues Digital program issues<br />
(including CW and SSB contests) (including digital contests)<br />
<strong>N1MM</strong><strong>Logger</strong>@yahoogroups.com <strong>N1MM</strong><strong>Logger</strong>-Digital@yahoogroups.com<br />
Subscribe <strong>N1MM</strong><strong>Logger</strong>subscribe@yahoogroups.com<br />
http://n1mmtw61.semdxa.org/tiki-print_multi_pages.php?printstructures...<br />
Digital Operators<br />
Digital operators are well advised to subscribe to the general Yahoo group and the digital<br />
Yahoo group, even if not interested in CW or SSB, because general things about the program<br />
that affect them (font changes in various windows, for example), are likely to be discussed<br />
there rather than in both lists.<br />
<strong>N1MM</strong><strong>Logger</strong>-Digitalsubscribe@yahoogroups.com<br />
9 of 319 2/2/<strong>2011</strong> 4:35 PM
Unsubscribe <strong>N1MM</strong><strong>Logger</strong>unsubscribe@yahoogroups.com<br />
List owner <strong>N1MM</strong><strong>Logger</strong>owner@yahoogroups.com<br />
<strong>N1MM</strong><strong>Logger</strong>-Digitalunsubscribe@yahoogroups.com<br />
<strong>N1MM</strong><strong>Logger</strong>-Digitalowner@yahoogroups.com<br />
Everybody is allowed to read the messages from the support groups. To send messages you<br />
have to join the group. Your first post must be approved by the moderator. This prevents<br />
spammers from using the list. Over 3000 users have already joined.<br />
General<br />
<strong>N1MM</strong> <strong>Logger</strong> Features<br />
All major and many minor HF Contests are supported<br />
Including General DX logging, DXpedition, DXSatellite and VHF DX.<br />
SSB, CW and Digital support<br />
Multi-user support<br />
Rover support for QSO parties and other contests which support this.<br />
VHF and up contesting<br />
Transverter support (SHF bands supported up to 10, 24, 47, 76, 142 and 241 GHz).<br />
Dxpedition mode (Stay in Run or S&P)<br />
Key features<br />
http://n1mmtw61.semdxa.org/tiki-print_multi_pages.php?printstructures...<br />
ESM- Enter Send Message Mode - just press the Enter key to make a qso.<br />
Uses sound card for DVK but also DVK interface for W9XT and other DVK interfaces.<br />
10 of 319 2/2/<strong>2011</strong> 4:35 PM
Automatic CW generation (LPT and via USB to serial converter).<br />
Rotator control (Using <strong>N1MM</strong> Rotor, LP-Rotor or ARSWIN).<br />
Grayline program<br />
Two VFO support when using one radio, with one VFO per Bandmap.<br />
SO2R/SO2V support including $5 SO2R supporting SO2R with just sound cards.<br />
Telnet and packet support - spots from both automatically update the bandmaps.<br />
Winkey support (Serial CW keyer by K1EL).<br />
Automatic beam heading and sunrise/sunset calculations.<br />
Contact recording to wav files. Right-click on log entry to play back.<br />
Record level indicator for recording QSOs.<br />
Spot all S&P calls locally (QSYing wipes the call and spots QSO in bandmap).<br />
Digital support<br />
All major and most smaller RTTY and Digital contests<br />
AFSK and FSK with use of soundcards and terminal units (DXP-38, PK-232, Kam, etc.)<br />
Interfaces with MMTTY, MMVARI, and Fldigi<br />
SO1V, SO2V and SO2R<br />
Up to 4 parallel RX decoding windows using either MMTTY or a TU, all interacting with the<br />
Entry Window<br />
Multiplier/Dupe color coding of calls on the fly in any RX window<br />
Ability to find calls in Master.dta file in long strings of text in the RX windows (e.g., in<br />
ASDFGHJKL<strong>N1MM</strong>AS#$%WERT, <strong>N1MM</strong> would be highlighted)<br />
Multiple call Grab window that displays last 7 callsigns received in the RX window.<br />
Point and click capture of callsigns and exchanges to Entry Window<br />
Ability to complete entire QSO with mouse and never leave the RX window (With ESM<br />
turned on)<br />
Up to 24 additional macro buttons<br />
Ability to stack incoming calls and work them off the stack by using a TU/Now macro<br />
Windows<br />
http://n1mmtw61.semdxa.org/tiki-print_multi_pages.php?printstructures...<br />
Entry Window, Log, ((Packet/Telnet)), Score Summary,Info, Available Mults and Qs and the<br />
Digital Interfaces<br />
Multiplier window.<br />
Call check function , including N+1 matching<br />
Dual graphical bandmaps click to tune radio to the spot selected. The bandmap can be<br />
zoomed in or out depending on number of spots shown.<br />
Available Window keeps track of needed spots and mults on each band for easy<br />
band-change decisions. **Color-coded buttons indicate on which bands the current contact<br />
is needed.<br />
The program retains the size and position of windows as specified by the user.<br />
Click on packet spot in Packet/Telnet window, Bandmap or Available window to tune to that<br />
frequency/mode.<br />
11 of 319 2/2/<strong>2011</strong> 4:35 PM
Advanced features<br />
SO2R including Dueling CQ and selectable advanced SO2R modes<br />
Serial number server for SO2R and multi-user modes - coordinates serial numbers between<br />
radios.<br />
S&P callsign stacking.<br />
Multi user support with automatic resync on reconnect.<br />
Rotator control<br />
Antenna mapping.<br />
Radio support<br />
Radio interface to support radios from Kenwood, many Yaesu (for example: FT-1000,<br />
FT-1000MP, FT-990, FT-920 and more), Icom, Tentec Orion and Elecraft.<br />
Hardware Support<br />
LPT port functionality to control antenna switches, radio selection, and PTT (95/98/ME/NT<br />
/2000/XP).<br />
Support for microHAM and OTRSP SO2R protocols.<br />
Import/Export features<br />
Cabrillo export support.<br />
ADIF import/export support.<br />
Transaction log, which keeps all QSOs to facilitate recovery of log.<br />
Statistical reports.<br />
Many more..<br />
PC Requirements<br />
Minimum Hardware Requirements<br />
http://n1mmtw61.semdxa.org/tiki-print_multi_pages.php?printstructures...<br />
The logging program has been designed to work within the minimum configuration required by<br />
various versions of Windows - each of which differs with regard to the minimum processor model,<br />
CPU speed and RAM. You may encounter performance problems when running minimum<br />
configurations and operating CW or RTTY modes, when receiving a high volume of cluster spots,<br />
or when your PC is simultaneously running several other applications. It has not been and won't<br />
12 of 319 2/2/<strong>2011</strong> 4:35 PM
e a priority to make <strong>N1MM</strong> <strong>Logger</strong> run on clunkers.<br />
The recommended minimum graphical resolution is 1<strong>02</strong>4 by 768, with many hams running higher<br />
resolutions and dual screens. Although <strong>N1MM</strong> <strong>Logger</strong> will operate at 800 by 600, you will be<br />
unable to fit all of the windows on the screen.<br />
Radio control, CW keying and PTT can be done through a free serial or parallel port, or through<br />
Winkey (highly recommended). For PTT with MMTTY an extra serial port is needed.<br />
USB-to-serial converters and USB interface devices are supported through virtual serial ports<br />
provided by their associated driver software. SO2R "boxes" may be controlled through a<br />
hardware LPT port under 32-bit operating systems; alternatively, the MicroHam USB SO2R<br />
Control Protocol and the K1XM Open Two Radio Support Protocol are both supported, for use<br />
with devices that accommodate them. USB-to-LPT converters cannot be used for either SO2R<br />
control or CW/PTT functions.<br />
For more information see the Interfacing section.<br />
Supported Operating Systems<br />
Windows NT<br />
Windows 2000<br />
Windows XP<br />
Windows Vista 32/64<br />
Windows 7 32/64<br />
Linux and other Operating Systems will not be supported.<br />
Installing and Upgrading <strong>N1MM</strong> <strong>Logger</strong><br />
In this Section...<br />
Installing and Upgrading <strong>N1MM</strong> <strong>Logger</strong><br />
1. First-Time Installation Instructions<br />
2. Using the Program the First Time<br />
3. Subsequent Install Instructions / Upgrading to a New Program Version<br />
4. Uninstalling the Program<br />
1. First-Time Installation Instructions<br />
Not your first time?<br />
http://n1mmtw61.semdxa.org/tiki-print_multi_pages.php?printstructures...<br />
13 of 319 2/2/<strong>2011</strong> 4:35 PM
These instructions apply both for first-time users and for users who are jumping from one<br />
base version to another. That is, if you previously installed Version 9.x.x (or earlier) and want<br />
now to update to Version 10.x.x, then you need to go through this process with the Version 10<br />
Base Install before you install the latest and greatest. In particular, this is needed to update<br />
the files used for recording and playback of .wav files.<br />
Installing under Vista or Windows 7<br />
By design, version 10's default installation location is C:\<strong>N1MM</strong> <strong>Logger</strong>. If you are installing<br />
the program under Windows Vista or Windows 7, and wish to place it in the Program Files<br />
directory, you will need to take some special steps. This is because these operating systems<br />
do not approve of writing to the Program Files directory, which is how <strong>N1MM</strong> <strong>Logger</strong> works.<br />
You have three choices:<br />
Run the Base Install, the <strong>N1MM</strong> <strong>Logger</strong> program itself and any subsequent upgrades the<br />
first time as Administrator. If you have not set up individual user accounts on your<br />
computer (if you do not have to log in as a particular user) then both operating systems<br />
default to running as Administrator. If you have individual user accounts, then you will<br />
need to right-click on the program icon, and select "Run as Administrator." After you have<br />
done this once for each upgrade, it is not required in normal operation.<br />
Log in to Windows as Administrator whenever you install or run <strong>N1MM</strong> <strong>Logger</strong>. If your PC<br />
has USER or OWNER Icons upon startup and NO ADMINISTRATOR Icon, you need to<br />
enable the ADMINISTRATOR account in order to run the <strong>N1MM</strong> <strong>Logger</strong> program.<br />
Open the command prompt with Administrative privileges by opening the Start Menu,<br />
and typing cmd in the search box, and then press Ctrl+Shift+Enter or click the Start<br />
orb, All Programs, Accessories, right-click Command Prompt and select Run as<br />
administrator. Type the following in the command prompt and press Enter: net user<br />
administrator /active:yes . Restart your computer and login as Administrator. Note:<br />
You might want to set a password for the administrator's account for at least a little<br />
protection.<br />
Disable the operating system feature that normally prevents writing to the program folder.<br />
This is called User Access Control (UAC), and disabling it is not recommended.<br />
Installing on 64-bit systems<br />
http://n1mmtw61.semdxa.org/tiki-print_multi_pages.php?printstructures...<br />
14 of 319 2/2/<strong>2011</strong> 4:35 PM
If you are installing on a 64-bit computer, and you are planning to use the machine's LPT port<br />
for CW or control functions, then you will need to replace the standard DLPortio driver with a<br />
64-bit equivalent. The following explanation was provided by W4TV, and is reproduced here<br />
intact except for very minor editorial changes. Thanks, Joe!<br />
Making It Work ...<br />
1) Download the binary distribution of InpOut32 here:<br />
2) DO NOT allow the <strong>N1MM</strong> base installer to install DlPortIO (it will by default, unless you<br />
uncheck the box (see below). If DlPortIO has been installed, go into both Windows/System32<br />
and Windows/SysWOW64 and delete any copy of DlPortIO.dll found there.<br />
3) DO NOT use "InstallDriver.exe" from the "InpOutBinaries_1500.zip" package.<br />
4) Extract only Win32\inpout32.dll from the distribution package and copy it to your<br />
computer's Windows\SysWOW64 directory. Rename it as DlPortIO.dll<br />
5) Reboot after copying the DLL to Windows\SysWOW64 (may not be necessary)<br />
Download the Base Install here. Run the Base Installer<br />
Full = Base<br />
http://n1mmtw61.semdxa.org/tiki-print_multi_pages.php?printstructures...<br />
15 of 319 2/2/<strong>2011</strong> 4:35 PM
Wherever you see the terms Base Install or Base Installer and Full Install or Full Installer<br />
anywhere in this manual, they are referring to the same things. With Version 10.0.0, for the<br />
first time the Base Install will not run by itself, but rather must be immediately updated to a<br />
later incremenetal version (such as 10.2.5, for example). For that reason some felt it was no<br />
longer correct to call it a "Full" Install. That led to the term being changed in some places but<br />
not yet in others. Please bear with us!<br />
Next, you will be asked to agree to a straightforward, freeware license.<br />
Next, you will be given a choice of files to install, which looks like this.<br />
http://n1mmtw61.semdxa.org/tiki-print_multi_pages.php?printstructures...<br />
16 of 319 2/2/<strong>2011</strong> 4:35 PM
http://n1mmtw61.semdxa.org/tiki-print_multi_pages.php?printstructures...<br />
Unless you have a good reason not to, just go ahead and leave everything checked. If you plan<br />
to use parallel port(s) for CW, PTT, or SO2R control, and you are running a 32-bit operating<br />
system, be sure to install the DLPORTIO port driver. If you are running a 64-bit computer, refer<br />
back to the note above and don't install DLPORTIO<br />
In the next screen, note that the default location for installation of the program is C:\<strong>N1MM</strong><br />
<strong>Logger</strong>. This is new, and was done in order to work around operating system restrictions that<br />
caused problems for users with Vista or Windows 7. If you have previously installed <strong>N1MM</strong><br />
<strong>Logger</strong>, for instance in C:\Program Files, the default location will not be used; instead, the last<br />
previous program directory will appear here.<br />
17 of 319 2/2/<strong>2011</strong> 4:35 PM
When you click Install, the Full Installer will<br />
Install all needed files on your computer to run <strong>N1MM</strong> logger<br />
Update your system files where needed<br />
http://n1mmtw61.semdxa.org/tiki-print_multi_pages.php?printstructures...<br />
You will find that certain parts of the Full Installer installation routine take quite a long time. The<br />
installation program has not failed, so just let it run to completion. Subsequent updates are<br />
orders of magnitude faster.<br />
Do Not Overwrite Newer System Files<br />
When running the Full Installer your computer may report that certain system files are<br />
already installed on your system and are newer than the ones you are trying to install. It asks<br />
if you want to replace a newer, existing file with an older file in the Full Installer. Select 'No'.<br />
You do not want to overwrite newer system files.<br />
18 of 319 2/2/<strong>2011</strong> 4:35 PM
http://n1mmtw61.semdxa.org/tiki-print_multi_pages.php?printstructures...<br />
After the installation process is complete, if you have opted to install DLPORTIO, you will be<br />
invited to install it as a separate process. just follow the on-screen instructions.<br />
The first time you try to run the Full Install version of the program, you will be prompted to update<br />
to the latest version.<br />
Where is the program installed?<br />
For version 9 and before, the default installation location was in C:\Program Files\<strong>N1MM</strong><br />
<strong>Logger</strong>. Because this caused inconvenience for users of Vista and Windows 7, beginning with<br />
Version 10, the default location is C:\<strong>N1MM</strong> <strong>Logger</strong>.<br />
If you are making a first-time installation of the Version 10 Base Install, the installer will<br />
automatically choose this location. Thereafter, the update installer should point to the same<br />
place. However, some experienced users have chosen to continue to install to Program Files,<br />
and a few of them have reported that the update installer insists on pointing to C:\ regardless.<br />
As you can imagine, putting the Base Install in one place and updates in another can cause<br />
all sorts of problems. It's worth a double-check.<br />
Click the button at the bottom of the window to go to the web page, and download the latest<br />
version you find there. Run the version installer, and follow its simple steps to get fully up to date.<br />
Each update will take literally 2 minutes to install.<br />
If you are installing <strong>N1MM</strong> <strong>Logger</strong> on a computer that does not have internet access, you will<br />
need to download the latest version from a computer that has internet access. This procedure is<br />
19 of 319 2/2/<strong>2011</strong> 4:35 PM
described in the section "Subsequent Install Instructions / Upgrading to a New Program Version".<br />
After downloading the latest version, copy and install it on the non-internet computer.<br />
2. Using the Program the First Time<br />
http://n1mmtw61.semdxa.org/tiki-print_multi_pages.php?printstructures...<br />
The first thing to do after starting the program is setting up the station information<br />
This can be done in the 'Change Your Station data' dialog<br />
The first time the program starts automatically with this dialog<br />
This dialog can also be found under >Config >Change Your Station Data<br />
After that configure the radio and packet and/or telnet connection<br />
Choose >Config >Configure ports, Telnet Address, Other<br />
The packet buttons and main window function buttons can be changed<br />
See the Config menu<br />
Alt+H is help<br />
Space is the preferred Tab character (see Help)<br />
Read the Quick Start Guide<br />
Read the <strong>Manual</strong>, particularly the following key sections.<br />
Quick Tour<br />
Setting up the Program<br />
Entry Window<br />
Key Assignments<br />
Basic Functions<br />
Key Assignments Short List<br />
This one should be printed and placed near the radio<br />
3. Subsequent Install Instructions / Upgrading to a New Program Version<br />
An e-mail will be send out periodically to announce new versions (updates) of the program to the<br />
Yahoo reflector members.<br />
File Naming Conventions<br />
The Base Install for each year is named: <strong>N1MM</strong>-Fullinstaller.exe. The update files will be<br />
named: <strong>N1MM</strong>-newexe with a suffix that denotes the date. The annual release of the Full<br />
Installer will be given this name and replace the previous one.<br />
Download only the <strong>N1MM</strong>-newexeVx.x.xxx upgrade file (Example:<br />
<strong>N1MM</strong>-newexeV9.12.0.exe is the first update of December 2009). Use the link contained in<br />
the announcement e-mail to the Yahoo group, or open this web page and select the<br />
update you want<br />
This file contains the latest .exes and other necessary files<br />
20 of 319 2/2/<strong>2011</strong> 4:35 PM
Run this file and let it copy all the program files into the <strong>N1MM</strong> <strong>Logger</strong> program<br />
directory, replacing any old versions.<br />
When a new cty.dat file is added to the program directory, import it by selecting >Tools<br />
>Import country list from downloaded file<br />
The version number Vx.x.x is also shown in the description of the file<br />
Only the most recent update file is necessary, not all updates in between...<br />
4. Uninstalling the Program<br />
If you are thinking of uninstalling and reinstalling the program in order to fix a problem you have<br />
encountered, you should know that this is rarely the solution. Try looking at the Troubleshooting<br />
section before you do that.<br />
However ... if you want to uninstall <strong>N1MM</strong> <strong>Logger</strong> entirely, including any registry entries, the best<br />
way is to navigate to the program directory and find the program cleverly titled<br />
Uninstall<strong>N1MM</strong>.exe. Run the uninstaller and follow any prompts you see.<br />
Setting up the Program<br />
In this Section...<br />
Setting up the Program<br />
1. Setup Station Information<br />
2. Setup Radio Control<br />
3. Setup Packet/Telnet<br />
4. Setup PTT-ing the Rig/Sending CW<br />
5. Setup WAV Files (SSB)<br />
6. Sending Messages in CW<br />
7. Setup 'Sent Exchange'<br />
8. Setup the Exchanges<br />
9. Setup Function Keys for Enter Sends Message (ESM) mode<br />
10. Command Line Parameters<br />
http://n1mmtw61.semdxa.org/tiki-print_multi_pages.php?printstructures...<br />
Update philosophy<br />
Many of us are used to always being "one version behind" in our software use, in order to<br />
avoid bugs that may have been introduced in the latest version. But because <strong>N1MM</strong> <strong>Logger</strong> is<br />
updated so frequently (typically, at least 50 updates per year), the opposite is true. You are<br />
always encouraged to use the latest version — in general, bug reports and feature requests<br />
should always be made after checking to make sure the latest version does not already<br />
include the bug fix or feature that you want.<br />
When you want to use the program you need to know how to connect the radio(s), packet or<br />
Telnet etc. to the program. Also the Exchanges need to be set up for the contest. Below some<br />
21 of 319 2/2/<strong>2011</strong> 4:35 PM
information how this could be done. In addition to reading this chapter also read Basic<br />
Functions, the Key Assignments and the Quick Tour for basic program information.<br />
The Configurer<br />
1. Setup Station Information<br />
The Configurer information in >Change Your Station Data is self-explanatory. Make sure that<br />
you enter your call as the station call sign. Many of the fields in this dialog are used in creating<br />
contest entries, so do update them with their correct values. Like calculating beam headings,<br />
distances, sending a bug report via e-mail etc.<br />
2. Setup Radio Control<br />
The program really shines when a radio is connected so that is what we have to do.<br />
Check if the radio is supported by the program in the Supported Radios chapter.<br />
So it is supported<br />
It is connected right (cable from radio to a serial port from the computer)<br />
Sometimes a serial interface is needed, see the manual of the radio and the<br />
Interfacing chapter<br />
Go to the Configurer and fill in the information under the >Hardware tab<br />
Select the serial port the radio is connected to and choose the radio behind it<br />
Select the 'Set' button and choose the right setting. (baudrate, databits etc)<br />
These can be found in the manual of the radio<br />
There is also some information in the Supported Radios chapter<br />
Press OK , select VFO A and the frequency from the radio should appear in bandmap<br />
A<br />
3. Setup Packet/Telnet<br />
http://n1mmtw61.semdxa.org/tiki-print_multi_pages.php?printstructures...<br />
You will read the term The Configurer throughout this document. What is this beast? The<br />
Configurer is the uber-configuration dialog reached by selecting >Config >Configure Ports,<br />
Telnet Address, Other<br />
We need spots to fill the bandmap so the next thing to do is connect to a DX cluster. This can be<br />
done under Configurer >Hardware for telnet and packet. For Telnet an Internet connection is<br />
required. The Telnet cluster can also be selected under Configurer >Hardware.<br />
Go to Configurer >Hardware<br />
Select at the bottom a Telnet Cluster. AB5K is the default cluster and should work fine<br />
Close the Configurer, and open >Window >Packet/Telnet >Telnet in the Packet Window<br />
22 of 319 2/2/<strong>2011</strong> 4:35 PM
Cluster commands can be given here, the information from the cluster is shown in the<br />
window<br />
See the Packet window for commands, info etc<br />
Connecting to a Telnet cluster is usually done by sending your callsign<br />
When everything works fine, spots should appear in the bandmap<br />
The hardware tab in the configurer is also the place to select the right parameters for setting up a<br />
packet TNC.<br />
The TNC should be connected to a serial port from the computer<br />
The TNC could be checked with Hyperterminal to see if it responds fine<br />
Go to Configurer >Hardware<br />
Select the serial port the TNC is connected to and select the < Packet > box<br />
Press the < Set > button and choose the right settings (baudrate, databits etc) for this serial<br />
port<br />
Close the Configurer, and open >Window >Packet/Telnet >Telnet in the Packet Window<br />
Cluster and TNC commands can be given here, the information from TNC and cluster<br />
is shown in the window<br />
See the Packet window for commands, info, how to connect a cluster using a TNC<br />
with TAPR/TF or WA8DED software etc<br />
When everything works fine, spots should appear in the bandmap<br />
4. Setup PTT-ing the Rig/Sending CW<br />
Sending CW and PTT-ing the radio can be done three different ways.<br />
http://n1mmtw61.semdxa.org/tiki-print_multi_pages.php?printstructures...<br />
Using the Parallel port<br />
Add an interface to the parallel port, this can be a simple one transistor circuit (for<br />
each pin one) but also a bought interface. More on this in the Interfacing chapter. Pin<br />
16 is used for PTT and pin 17 for CW. These are fixed values and cannot be changed<br />
Go to Configurer >Hardware<br />
Select behind the LPT port to use the "CW/Other" selection box.<br />
Select the 'Set' button and choose the right settings (CW-speed, PTT-delay and<br />
the CW/Other port address).<br />
The CW/Other Port Address should be the same as used in you Windows<br />
configuration.<br />
Select the correct Radio/VFO setting (1, 2 or Both)<br />
Press < OK ><br />
PTT and CW should work now.<br />
Using the Serial port<br />
Add an interface to the serial port, this can be a simple one transistor circuit (for each<br />
pin one) but also a bought interface . More on this in the interfacing chapter. Mostly<br />
the RTS is used for PTT and DTR for CW<br />
Go to the Configurer and select the hardware tab.<br />
23 of 319 2/2/<strong>2011</strong> 4:35 PM
Select behind the serial port to use the "CW/Other" selection box.<br />
Select the 'Set' button and choose the right settings (CW-speed, PTT-delay and<br />
the CW/Other port address).<br />
Select the pin to use to PTT and CW.<br />
The CW/Other Port Address should be the same as used in you Windows<br />
configuration.<br />
Select the correct Radio/VFO setting (1, 2 or Both)<br />
When Winkey is used also select this setting. The baudrate etc. for Winkey is<br />
fixed and set by the program.<br />
Press < OK ><br />
PTT and CW should work now<br />
Using a USB port<br />
PTT via a USB port can not be done direct, a USB-to-serial converter is needed<br />
Not every Serial-to-USB can change the status of the RTS (and DTR) pins . So check<br />
before you buy<br />
When this device is setup in Windows select the serial port used by it<br />
Follow the steps for a serial port to set up for PTT-ing<br />
5. Setup WAV Files (SSB)<br />
The sound (wav) files which have to be made have some standard texts, some are contest<br />
dependent. There are two kind of sound files used by the program.<br />
Files used by the function keys<br />
Sound files used to send the callsign or numbers (in number contests)<br />
by sending single sound files for each letter and number<br />
Or by sending the full callsign or numbers when found in the wav directory<br />
6. Sending Messages in CW<br />
You need to do two things:<br />
http://n1mmtw61.semdxa.org/tiki-print_multi_pages.php?printstructures...<br />
Set the message properly in >Config >Change Packet/CW/SSB/Digital Message Buttons<br />
>Change CW Buttons. The first 12 rows are the run messages for F1 - F12. The second 12<br />
rows are the S&P messages for F1 - F12. If you have less than 9 messages, the S&P<br />
messages will just repeat the Run messages<br />
24 of 319 2/2/<strong>2011</strong> 4:35 PM
http://n1mmtw61.semdxa.org/tiki-print_multi_pages.php?printstructures...<br />
Make sure that the Configurer >Function Keys has each button set to its correct meaning.<br />
For example, if F1 is your CQ key as set in the messages (#1 above), then make sure that<br />
the "CQ Key" box is set to F1<br />
To send the serial number in any message, put the character # as part of the CW message in CW<br />
buttons above. There is a list of other characters which can be used to substitute. The macros<br />
and some examples can be found on the Macros page<br />
25 of 319 2/2/<strong>2011</strong> 4:35 PM
7. Setup 'Sent Exchange'<br />
What you put in the >File >Open Log in Database >Contest tab "Sent Exchange" field of the<br />
contest setup is what goes in the cabrillo log. It is also what will be sent if you use the {EXCH}<br />
macro (don't). For the sent exchange, simply program F2 by typing in exactly what you want sent<br />
(For example, 5NN 4 or whatever your zone is for CQWW CW) on the F-key setup window.<br />
8. Setup the Exchanges<br />
By Jamie, WW3S<br />
I'm assuming you want to set up for a RTTY contest.<br />
Go to the Configurer >Function Keys<br />
If you plan to use Enter Sends Message swap F5 and F3<br />
'End of Qso Key' to F5<br />
'His call' to F3<br />
Now go to >Config >Change Packet/CW/SSB/Digital Message Buttons >Change CW<br />
Buttons<br />
The buttons/messages are displayed in order starting with F1<br />
Change the F4 key to read &WW3S in the one column and WW3S in the other.<br />
The & just tells the button what caption to display<br />
Now change the F2 to read 599-599 and your CQ zone.<br />
Mine reads 599-599 PA PA 05 05 BK.<br />
Starting to make sense? Whatever you change here is what will be sent.<br />
If you use Enter Sends Message (ESM) the corresponding F-key also needs to be set in<br />
Configurer >Function Keys tab<br />
These keys need to match or ESM will not work!<br />
Set your F3 key for however you want your ''End of qso' to be sent<br />
Mine reads TU <strong>QRZ</strong> DE WW3S WW3S TEST<br />
F1 reads CQ CQWW TEST DE WW3S WW3S TEST.<br />
These all get changed in change digital buttons. BTW, the same logic applies in CW contests<br />
9. Setup Function Keys for Enter Sends Message (ESM) mode<br />
Below is an example of a possible ESM setup from Jose, CT1AOZ.<br />
Setup the Function Keys in Configurer >Function Keys tab<br />
Default Function Keys<br />
F1 CQ key F5 His Call Key F9<br />
F2 Exchange key F6 QSO B4 Key F10<br />
http://n1mmtw61.semdxa.org/tiki-print_multi_pages.php?printstructures...<br />
26 of 319 2/2/<strong>2011</strong> 4:35 PM
F3 End of QSO Key F7 F11<br />
F4 My Call Key F8 Again Key F12<br />
Enable all check box options except Monitor via PC speaker (but you may if you want to. NB only<br />
when using Windows 95, 98 or ME).<br />
Now set the macros in >Config >Change Packet/CW/SSB/Digital Message Buttons >Change CW<br />
Buttons. The same settings are used for the SSB and the RTTY buttons.<br />
Button<br />
Caption<br />
Running mode S&P mode<br />
CW message / .WAV file /Text to<br />
Send<br />
Button<br />
Caption<br />
CW message / .WAV file /Text to<br />
Send<br />
F1 CQ CQ CQ ** F1 QSY PSE QSY QRL *<br />
F2 Exch ># F2 Exch >#<br />
F3 TU TU * F3 TU *<br />
F4 My * F4 My *<br />
F5 His ! F5 His !<br />
F6 QSOB4 ! QSOB4 TU * <strong>QRZ</strong> F6 QSOB4 ! QSOB4 DE *<br />
F7 His/TU ! TU F7 Corr ! TU<br />
F8 Again ! AGN PSE * F8 Again ! AGN PSE *<br />
F9 F9<br />
F10 F10<br />
F11 F11<br />
F12 F12<br />
Jose writes: Try this and I'm sure you will be happy with the performance of the program and the<br />
Enter Sends Message mode...<br />
10. Command Line Parameters<br />
The program has a command line parameter to select the used '<strong>N1MM</strong> logger.ini' file.<br />
Example: "C:\Program Files\<strong>N1MM</strong> <strong>Logger</strong>\<strong>N1MM</strong> <strong>Logger</strong>.exe" SO2R.ini<br />
Basic Functions<br />
In this Section...<br />
Basic Functions<br />
http://n1mmtw61.semdxa.org/tiki-print_multi_pages.php?printstructures...<br />
27 of 319 2/2/<strong>2011</strong> 4:35 PM
http://n1mmtw61.semdxa.org/tiki-print_multi_pages.php?printstructures...<br />
1. Help<br />
2. Going Through the Entry Window Fields<br />
3. Resizing Windows<br />
4. Select New Contest<br />
5. Delete Contest<br />
6. Select Country file<br />
7. Select Master.dta file<br />
8. Changing Frequency<br />
9. Changing Band<br />
10. Changing Mode<br />
11. Changing Operator<br />
12. Setting CW Speed<br />
13. Split Operation<br />
13.1. Setting Spit Frequencies <strong>Manual</strong>ly<br />
13.2. Setting Split Frequencies Automatically by Packet Spots<br />
13.3. Resetting to non-split mode<br />
13.4. Split Operation Key Assignments<br />
14. Running Mode<br />
15. Search and Pounce Mode (S&P)<br />
15.1. How to check if you are in Running mode or in S&P mode?<br />
16. CQ Key<br />
17. Set up the Sent exchange message(s)<br />
18. Function Key Conventions<br />
19. Set Up <strong>N1MM</strong> to Record and Playback Voice Recordings (recording on the fly)<br />
19.1. Playing WAV Files<br />
19.2. Recording WAV Files<br />
19.3. Soundcard Control in Configurer<br />
20. Quick Edit<br />
21. Meaning of Colors<br />
22. Multipliers and QSOs<br />
23. Connecting to a Telnet Cluster<br />
24. How to Save the Log<br />
25. Function Key Macros<br />
26. Save and Restore Window Positions<br />
27. Editing Lookup Tables<br />
28. Backup and Restore<br />
28.1. Method 1: Full backup/restore on same computer - backup and<br />
restore the whole <strong>N1MM</strong> logger subdirectory<br />
28.2. Method 2: Partial backup/restore on same computer - make a partial<br />
backup and restore.<br />
28.3. Installing on a Different Computer<br />
29. Basic Functions for RTTY<br />
When using the program there are some standard routines like changing frequency, band and<br />
mode. Next to reading this chapter also read the Key Assignments, Setting up the Program,<br />
Entry Window and the Quick Tour to have basic program information. There are also some<br />
28 of 319 2/2/<strong>2011</strong> 4:35 PM
features which will be explained in this chapter like 'Running' mode, Search and Pounce' mode<br />
and 'Enter Sends message' mode etc. Operating tips and tricks can be found in the Tips and<br />
Tricks chapter.<br />
1. Help<br />
Almost every window has a Help function. To get to the help, right click on a window and select<br />
'Help', or click on the Help button. The Entry window help can be accessed from the Help menu<br />
at the top, or by pressing Alt+H. Also note that the Key Assignments help can be accessed<br />
directly from the Help menu on the Entry Window. Note that you can print any help topic from the<br />
help system by clicking the Print button. Most of the help files displayed will be for window in<br />
which you select the help. This makes it easier to find the topic you are interested in.<br />
Searching through the Help can be done most easily using the Find function using the PDF<br />
version of the Help file.<br />
There is a very useful facility on the Help menu if your computer is connected to the Internet<br />
called 'Searching Help using Google', you can search the latest version of the manual on the<br />
website using Google. This will give by far the quickest results and will include the most recent<br />
changes to the Help/<strong>Manual</strong>.<br />
2. Going Through the Entry Window Fields<br />
Space is preferred, rather than the Tab key, for advancing through fields in the Entry window.<br />
Space avoids fields (like RST) that don't normally need to be changed and prefills other fields.<br />
Spacebar operation is described in detail in the Key Assignments portion of the help. Using the<br />
Tab and Shift+Tab keys moves the cursor to rarely used fields.<br />
3. Resizing Windows<br />
<strong>Logger</strong>'s windows can be located where ever the user chooses and most can be made any size.<br />
The Bandmap has a minimum width. The new dimensions and positions of the windows are<br />
stored when the program is closed. Closing the Entry window will close the application. All QSOs<br />
are saved permanently to the hard drive as they are logged.<br />
4. Select New Contest<br />
http://n1mmtw61.semdxa.org/tiki-print_multi_pages.php?printstructures...<br />
To select a new contest go to the Contest selection dialog ( >File >Open Log in Database ). On<br />
the upper left of the screen a contest can be selected by clicking on it. Fill in the details for your<br />
specific situation. Which contests are supported can be found in the chapter Supported<br />
Contests. Check the website for the latest rules and check the contest setup information in<br />
chapter Contest Setup Instructions.<br />
The preferred procedure is to start with a new database for each major contest where you expect<br />
very large logs or you're running on very slow PCs.<br />
29 of 319 2/2/<strong>2011</strong> 4:35 PM
5. Delete Contest<br />
Go to the Contest selection dialog ( >File >Open Log in Database ) and highlight the contest in<br />
the Contest pane. Then press < Delete >.<br />
6. Select Country file<br />
Selecting a new country file requires not only downloading a country file to your PC but also<br />
importing it into the current database. If a new database is selected you may have to import the<br />
latest country file in the new selected database again! The country file is stored per each<br />
database.<br />
Download the latest country file under >Tools >Download latest country file (wl_cty.dat)<br />
(Internet)<br />
Choose the file named wl_cty.dat because it has extra country info<br />
Import this country file by selecting >Tools >Import country list from downloaded file<br />
Until you perform the import, the new country file is not being used by <strong>N1MM</strong><br />
7. Select Master.dta file<br />
Selecting a new master.dta file with many regular contest callsigns requires that you download<br />
the new file to your PC. No importing is needed but you have to select which master.dta file wil<br />
be used for each contest.<br />
Download a master.dta file for the selected contest under >Tools >Download Latest Check<br />
Partial file (Master.DTA) (Internet)<br />
<strong>N1MM</strong> <strong>Logger</strong> supports the CT-format master.dta file<br />
Select which master.dta file to use under >File >Open Log in Database >Associated Files<br />
tab<br />
Press the < Change > button beside 'Master.DTA filename' to select the appropriate<br />
file<br />
8. Changing Frequency<br />
http://n1mmtw61.semdxa.org/tiki-print_multi_pages.php?printstructures...<br />
Changing frequency can be done in many ways. Here is a short list with some alternatives<br />
Just turn the dial or change band on your radio, the program will follow if connected<br />
Enter a frequency in the Entry window < Callsign > field. For example, 14200,5 will jump to<br />
14.200,5 MHz. The mode will be changed when needed following the bandmap rules<br />
(depending on the Configurer >Mode Control >Settings tab)<br />
Enter an offset in the Entry window < Callsign > field. For example, if current frequency =<br />
14200 Enter +3, frequency will jump to 14.203 MHz<br />
30 of 319 2/2/<strong>2011</strong> 4:35 PM
Enter an offset from the beginning of the MHz in the Entry window < Callsign > field. For<br />
Example: Current frequency = 14200 Enter 123 and the frequency will jump to 14.123 MHz<br />
Placing a/ in front of the frequency or offset will set the second VFO (B). For example,<br />
/12200,5 /+3 /123<br />
Click on a spot in one of the bandmap windows<br />
Click on a spot in the Packet/Telnet window<br />
In the Log window, right click and select 'Jump to this frequency' to go to the logged QRG<br />
Click on one of the callsigns in the last multipliers below the 'Available Mult's and Qs'<br />
window<br />
Push one of the buttons in the 'Available Mult's and Qs' window to change band<br />
Enter an offset in the Entry window < Callsign > field to go 'split'. See the Split Operation<br />
section of this chapter<br />
Use one of the many keys below to change frequency, band or vfo/radio. Go look in the Key<br />
Assignments section to read what they all do!<br />
Ctrl+Alt+Down Arrow Ctrl+Shift+Page Down Ctrl+Down<br />
Arrow<br />
Ctrl+Alt+Q Ctrl+Left Alt+Q<br />
Ctrl+Alt+Up Arrow Ctrl+Shift+Page Up Ctrl+Page Up Page Up Ctrl+Right Alt+F8<br />
Ctrl+Shift+Up Arrow Ctrl+Shift+Down Arrow Ctrl+Page<br />
Down<br />
Ctrl+Shift+Alt+Up<br />
Arrow<br />
Need any more?<br />
Ctrl+Shift+Alt+Down<br />
Arrow<br />
Page Dn Alt+F10 Alt+F11<br />
Ctrl+Up Arrow Shift+Alt+Q Alt+F11 Up<br />
Arrow<br />
When no radio is attached and PgUp/PgDn is pressed nothing will happen. I.e. if the frequency is<br />
inaccurate, don't allow the operator to move out of band by inadvertently pressing PgUp/PgDn.<br />
When a frequency is chosen outside an amateur band a warning dialog will be shown when<br />
trying to enter information. This could happen making a typo when entering the frequency or<br />
when no radio is connected, so a kind of "radio is not working" message.<br />
9. Changing Band<br />
Below some of the possibilities how to change band.<br />
http://n1mmtw61.semdxa.org/tiki-print_multi_pages.php?printstructures...<br />
31 of 319 2/2/<strong>2011</strong> 4:35 PM
Change the band on your radio, the program will follow if connected<br />
Ctrl+PgUp - Go up one band. WARC bands are being skipped while logging for a contest<br />
Ctrl+PgDn - Go down one band. WARC bands are being skipped when logging a contest<br />
Enter a frequency in the Entry window 'callsign' field on another band. FOr example:<br />
14200,5 will jump to 14.200,5 MHz<br />
Push one of the band buttons in the 'Available Mult's and Qs' window to change band<br />
Click on one of the callsigns in the last multipliers below the 'Available Mult's and Qs'<br />
window on another band<br />
Click on a spot in the Packet/Telnet window on another band<br />
10. Changing Mode<br />
Change the mode on your radio, the program will follow if connected<br />
Change the mode in the top part of the Bandmaps windows by clicking on the mode 'field'<br />
Change the mode by typing CW, LSB, USB, RTTY, AM, FM, PSK or SSTV in the 'Entry<br />
window' callsign field<br />
When a radio is connected it could become a problem to enter PSK, RTTY or SSTV<br />
because most transceivers do not have these modes as a selectable mode on the<br />
radio. Mostly LSB should be chosen on the radio. To have the program log the right<br />
mode you have to go to >Config >Config Ports, Telnet Address, Other >Mode Control<br />
tab. Under 'Mode recorded in log' check 'Always:' and also select PSK31 (for<br />
example). See also note below<br />
Setting Mode Control<br />
How the mode will be controlled on the radio and how contacts will be logged needs to be set<br />
in Configurer >Mode Control<br />
11. Changing Operator<br />
Ctrl+O changes the callsign of the operator. If you are multi-user, you will be prompted for<br />
the operator at startup. The default is the callsign in the station information dialog. A<br />
callsign is required to be entered<br />
Entering "OPON" in the callsign field will also prompt for an operator callsign<br />
12. Setting CW Speed<br />
http://n1mmtw61.semdxa.org/tiki-print_multi_pages.php?printstructures...<br />
32 of 319 2/2/<strong>2011</strong> 4:35 PM
Setting CW speed can be done using the Entry window speed control (only shown when CW is<br />
selected) for each radio or VFO. Use PgUP and PgDn or click on the arrows beside the speed<br />
box to change CW speed.<br />
13. Split Operation<br />
Split operation is when you transmit on another frequency then you receive. This is being used<br />
when stations have huge pileups like some DXpedition's or the bandplan does not allow people<br />
making contact on the same frequency. An example is 40 meter SSB between Europe and the<br />
USA. In Europe the highest SSB frequency is 7.1 MHz while US stations may not go that low in<br />
frequency.<br />
Split operation can be recognized in the bandmaps and in the Entry window. In the bandmaps<br />
the big blue marker will indicate your receive frequency. A red marker will indicate your transmit<br />
frequency. The frequency set will become the transmit frequency! Normally only one frequency is<br />
shown in the top portion of the bandmap, when working split the transmit frequency is added and<br />
shown just below the receive frequency. In the Entry window in big gray letters Split will be<br />
shown.<br />
The entered split frequency is validated if it is within band limits before setting the VFO. If not a<br />
message is shown in the Entry Window statusbar and the split will not be set.<br />
Cliicking on the receive frequency in the top part of the bandmap will toggle split operation.<br />
13.1. Setting Spit Frequencies <strong>Manual</strong>ly<br />
http://n1mmtw61.semdxa.org/tiki-print_multi_pages.php?printstructures...<br />
Split in Running Mode<br />
When you are working split and you are in 'Running' mode moving around will not change<br />
'Running' mode into 'Search and Pounce' mode<br />
Set in the Split dialog with Alt+F7 or type directly into the Callsign textbox in the Entry Window<br />
entering it with Ctrl+Enter. Decimal points and commas are allowed in split frequencies in the<br />
callsign pane. Which one to use depends on the selected preferences in Windows. The split<br />
33 of 319 2/2/<strong>2011</strong> 4:35 PM
frequency has to be entered or an offset from the current frequency for the active radio/vfo.<br />
Enter Split Frequency or<br />
Enter offset from band bottom (the full MHz) or<br />
Enter offset from current frequency as +5, +4, 3, 6, -2, -5 etc.<br />
For examples<br />
[+]<br />
13.2. Setting Split Frequencies Automatically by Packet Spots<br />
When a station is selected in the bandmap it can happen that the program puts the radio into<br />
split automatically. This station has been entered on the packet cluster including a split offset<br />
frequency which will be used by the program.<br />
13.3. Resetting to non-split mode<br />
Resetting to non-split mode is done by moving to another frequency or band. There are many<br />
ways to do this an some are mentioned below.<br />
Click on a spot/frequency in the Bandmap<br />
Click on a spot in the Packet/Telnet window<br />
Click on a band button in the Available Mult's & Q's<br />
Press Ctrl+PgUp or Ctrl+PgDn<br />
Click on the transmit frequency in the top part of the bandmap just below the receive<br />
frequency<br />
Click on the receive frequency in the top part of the bandmap<br />
13.4. Split Operation Key Assignments<br />
http://n1mmtw61.semdxa.org/tiki-print_multi_pages.php?printstructures...<br />
Split with Icom Radios<br />
Icom radios can't report VFO B without being set to VFO B. The program polls VFO A, but not<br />
VFO B. You can only set VFO B from the computer. To set split, press Alt+F7 and enter +3 or<br />
215 or 7215. You can also enter those from the call textbox by pressing Ctrl+Enter. Only turn<br />
Split on/off from the keyboard/program and not on the radio so it stays in sync with the<br />
program.<br />
Alt+F7 - Set split frequency or offset from current frequency for the active radio. When hitting<br />
Enter or click OK with nothing on the line split will be cleared. Press ESC or click Cancel to exit.<br />
Alt+S - When your rig is in the split mode, Alt+S will reset the receive frequency back to your<br />
34 of 319 2/2/<strong>2011</strong> 4:35 PM
transmit frequency, but the split mode is preserved. Application: Many operators will run a pileup<br />
with the rig in split mode. With a radio which has VFO A/B they use the 2nd VFO as an RIT. This<br />
is done since many RIT knobs are small or hard to get at, while some find it more natural to use<br />
the main VFO to tune in a caller rather than use the RIT. By running split, you can use the main<br />
knob to tune in the caller, while your TX frequency doesn't change. The Alt+S acts like an<br />
â€Ã“RIT clear†when you are running split. Operates on VFO-A<br />
only! With a Main/Sub radios like the Icom 756/7800 series you can not RX on SUB without<br />
receiving on both VFO’s. In this case put RX on Main and TX on SUB for<br />
Alt+S to work.<br />
â€Ã“Reset RX freq when running split" is an associated feature to the Alt+S<br />
function (found in the CONFIG menu). When invoked, the program will automatically do an Alt+S<br />
as you log each QSO. This gives you an automated â€Ã“RIT<br />
clear†after every QSO when you are running split. The exact logging sequence<br />
when you hit the Enter key is: move RX frequency to TX frequency, log QSO, and then send the<br />
TU message. For additional background, see the Alt+S feature<br />
Ctrl+S - When not in split mode it will first put the radio in split mode after that Ctrl+S will toggle<br />
the RX frequency between the split RX frequency and the RX/TX frequency while maintaining<br />
split mode. Application: This was designed primarily to help SSB operators run on 40 or 80m,<br />
where split operation is widely used. For example, "CQ CQ de <strong>N1MM</strong> listening on this frequency<br />
(7183) and 7068". Use the Ctrl+S key to toggle between 7183 and 7068 to check for both USA or<br />
DX callers.<br />
Ctrl+Alt+S - Toggle Split mode on the radio. 'Split' will be shown in the Entry window.<br />
Ctrl+Enter - Entering a frequency or offset in the callsign field and entered with Ctrl+Enter will<br />
set a split frequency.<br />
Toggle split operation - Click on the receive frequency in the top part of the bandmap and it will<br />
toggle split operation.<br />
When in split please check out the @ macro (which will voice the receive frequency).<br />
14. Running Mode<br />
http://n1mmtw61.semdxa.org/tiki-print_multi_pages.php?printstructures...<br />
A Split Example<br />
Don't click on spots in the packet window. Click on spots in the bandmap or available window.<br />
Then look at the bandmap or the Entrywindow title bar to see if you are going to transmit<br />
out-of-band. I presume we are talking about 40 or 80 meters. If you SINGLE-click on a spot,<br />
and don't see split indication, then wait for the station to announce their frequency. If they say<br />
"listening 214.5" type 214.5 in the callsign and press control enter. You are ready to call<br />
them. Good typists can do this and call them by the time they finish their CQ.<br />
Running mode means that you are calling CQ and stations are coming back to you. The<br />
35 of 319 2/2/<strong>2011</strong> 4:35 PM
frequency you are on is 'fixed' and you are not searching for stations. The program marks this<br />
frequency with the text CQ-frequency in the Bandmap window and the 'Running' indicator is<br />
marked on the 'Entry Window'. A part of this feature is that 'Running' mode has it's own set of<br />
Function keys. They will be automatically placed under the keys F1 to F12. There is also a set of<br />
function keys for Search and Pounce' mode, these function keys will swap to Shift+F1 until<br />
Shift+F12 so they are still available.<br />
The "Running" switch is automatically marked when:<br />
The operator clicks on CQ-frequency in the Bandmap window<br />
The frequency of the radio is in tuning range of your CQ-frequency (on that band)<br />
Pressing Shift+Function key when in Search and Pounce mode (this can be changed on<br />
the Function Keys tab from the Configurer dialog<br />
CQ-key (as set in Configurer) is pressed<br />
When leaving the 'Running' frequency the indicator on the 'Entry Window' will be unmarked and<br />
the Function keys will be swapped for F1 to F12 in the 'Search and Pounce' keys.<br />
When moving away from the 'Running' frequency the program will place you automatically in<br />
Search and Pounce mode. Going back to the 'Running' frequency will automatically select<br />
'Running' mode (the 'Running' indicator is selected again). Clicking on 'CQ-frequency' in the<br />
bandmap will also place the program in 'Running' mode. An exception is when working split i.e.<br />
transmit on one VFO and receive on the other. Moving around will not change 'Running' mode<br />
into Search and Pounce mode.<br />
There is only one CQ-Frequency per band. If swapping VFOs, it is possible to swap between<br />
'Running' and Search & Pounce mode.<br />
Often used keys in Running mode (CW)<br />
Insert or ; - Sends His Call key followed by the Exchange key<br />
' - Sends TU message and enter in log<br />
F4 - Sends my call<br />
15. Search and Pounce Mode (S&P)<br />
'Search and Pounce' mode (S&P) is the opposite of 'Running' mode. The program is always in<br />
one or in the other. S&P mode means searching for stations on the bands and not calling CQ.<br />
The frequency used is not 'fixed'. The 'Running' indicator is not marked on the 'Entry Window'.<br />
The function keys under F1 until F12 are the keys programmed for Search and Pounce' mode,<br />
the 'Running' mode function keys are swapped to Shift+F1 until Shift+F12 so they are still<br />
available.<br />
Function Keys Change for Run vs S&P<br />
http://n1mmtw61.semdxa.org/tiki-print_multi_pages.php?printstructures...<br />
36 of 319 2/2/<strong>2011</strong> 4:35 PM
When pressing Shift, the labels will change (when made different) and the text from the<br />
"Running" keys become the text from the "Search & Pounce" keys and vice versa. SHIFT<br />
REVERSES THE MEANING OF THE ABOVE <strong>RU</strong>LE.<br />
When in Search and Pounce mode, to call CQ, the CQ-key as configured is used, usually F1. No<br />
need to press Shift+F1. Pressing F1 will send CQ and place the program in Run mode. From that<br />
point on F1 will call CQ (in Running mode). If you want to sent CQ without shifting to Run mode,<br />
use the S&P CQ macro to stay in S&P mode.<br />
When entering a call in the S&P mode and the call is a dupe, changing frequency (QSY) will<br />
automatically enter the dupe callsign into the band map and clear the Entry Window..<br />
15.1. How to check if you are in Running mode or in S&P mode?<br />
* Running checkbox checked/unchecked.<br />
* Textboxes are white in running, yellow in S&P and blue in quickedit.<br />
* The green ball shows "Ru" for running, "SP" for S&P.<br />
* You can put different labels on the textboxes for Running & S&P.<br />
* "CQ-Frequency" will show on the callframe if you are Running.<br />
* "CQ-Frequency" appears next to the frequency arrow on the bandmap when going into<br />
Running mode.<br />
Another possibilitiy is to is give F1 Running and F1 S&P a more meaningful name. So in the F1<br />
title put the caption "F1 - <strong>RU</strong>N", and in the F1 for S&P (F13..) put the caption "F1 - S/P". This<br />
way the first macro location will tell which set of macros are enabled. Because F1 is always the<br />
CQ key (when defined) there is no need for CQ in the title to make that clear.<br />
16. CQ Key<br />
http://n1mmtw61.semdxa.org/tiki-print_multi_pages.php?printstructures...<br />
If "Running" is checked, the Run messages are shown on the Function Keys. Otherwise, the<br />
Search and Pounce messages are shown on the Function Keys.<br />
Tip<br />
When a frequency is busy it can be marked with Mark (Alt+M). This could be used when the<br />
station on that frequency is not in the contest, may not be worked in the contest or seldom<br />
says his callsign to have the frequency marked in the bandmap. Press Alt+M, and move on.<br />
That frequency is busy, so you won't want to stop there again.<br />
The program uses the CQ Key as defined in Configurer >Function Key tab. This means that<br />
when F1 is pushed it will send a CQ as defined in the CQ-key (most often F1). This happens<br />
both when in Run and in S&P mode. N.B. So when pressing F1 in S&P mode would give CQ and<br />
change to Run mode. When using F1 in S&P mode to call a station (so the content of the S&P<br />
F1 key holds your own callsign) and you want to stay in S&P then use the {S&P} macro to not<br />
37 of 319 2/2/<strong>2011</strong> 4:35 PM
change to Run mode and stay in S&P mode.<br />
* In cases where users desire more than one CQ F-key, include the new {CQ} macro which<br />
identifies the F-key as an additional CQ F-key<br />
* Use the {S&P} macro to stay in S&P mode<br />
17. Set up the Sent exchange message(s)<br />
Every contest has it's own specific exchange. The sent exchange could be fixed (CQWW - zone),<br />
a serial number (001 etc.) a combination and sometimes very exotic.<br />
What to set up in the 'Sent exchange' can be found in the manual in the chapter Setup<br />
Contests. Sometimes some creativity is needed to get it all working and more than one solution<br />
is often possible. For some contest a special sent exchange macro has been added (like TIME2<br />
for some digital contests).<br />
Below an example how to set up a serial number exchange followed by a fixed exchange (in the<br />
same exchange). Example 599 <strong>02</strong>3 40 (serial number <strong>02</strong>3 and zone 40).<br />
There's more than one way to do this. In your exchange message (usually F2), you can use 599<br />
{EXCH}, which will send what you have entered into the "Sent exchange" box (001 will be<br />
converted into a serial number and the rest will be sent literally), OR you can instead program F2<br />
to include the individual elements of the exchange, e.g. 599 # # 04 (e.g. if you wanted to send the<br />
serial number twice and the zone only once).<br />
Some things to watch for:<br />
1. The {EXCH} macro does not include the 599, so you need to program that into your exchange<br />
message(s). The "Sent exchange" box is used to generate the Cabrillo file regardless of whether<br />
you use the {EXCH} macro. Therefore you can't put the 599 in the "Sent exchange" box because<br />
that will screw up your Cabrillo file. In stead of hard coding 599 in the exchange message(s) also<br />
the macro {SENTRST} or {SENTRSTCUT} could be used.<br />
2. If you like to send a slightly different message when S&Ping than when you are running, then<br />
you will need to program the Run F2 (2nd message in the list) and the S&P F2 (14th message in<br />
the list) with separate messages. For example, you might program the Run F2 with: {TX} 599 # #<br />
04 {RX} and the S&P F2 with: {TX}{ENTER} ! TU 599 # # # 04 {RX}<br />
Note that in Run mode, the exchange is actually sent as F5 and F2 in succession; F5 normally<br />
contains the other station's call sign (!) and F2 normally contains just the exchange. In S&P<br />
mode, the exchange is sent only as F2, so if you want your S&P exchange to include the other<br />
station's call sign (some people do, some don't) you have to include a ! in the S&P message.<br />
3. If you want to always send three-digit serial numbers, go to >Config >Configure Port, Telnet<br />
Address, Other >Function Keys and check the box "Send leading zeros in serial numbers (e.g.<br />
TT7)"<br />
18. Function Key Conventions<br />
http://n1mmtw61.semdxa.org/tiki-print_multi_pages.php?printstructures...<br />
38 of 319 2/2/<strong>2011</strong> 4:35 PM
There is a function key "convention" used by <strong>N1MM</strong> logger and most other logging programs.<br />
That is: F1=CQ, F2=exchange, F3=TU/QSL/<strong>QRZ</strong>, F4=your call and F5=his call. ESM is built<br />
around this convention.<br />
If you are already using ESM on CW it probably is wise to stay with the same keystroke pattern<br />
when you are on SSB. For example:<br />
ESM mode: S&P - CW or SSB ESM mode: Run - CW or SSB<br />
1. sends F4, your call 1. sends F1, "CQ"<br />
2. sends F2, your exchange and logs<br />
the QSO<br />
2. type call, sends F5(his<br />
call)+F2(exchange)<br />
*NOTE* - for SSB, put a single blank space in the F5 message - speak the callsign instead -<br />
because of the blank, <strong>N1MM</strong> will skip F5 and send the F2 message<br />
3. type his exchange, sends F3<br />
(QSL/<strong>QRZ</strong>/TU) and logs QSO<br />
3. type his exchange, sends F3<br />
(QSL/<strong>QRZ</strong>/TU) and logs QSO<br />
"...This whole business of hitting F1 automatically (and unwantedly) putting you in Run mode<br />
seems extremely awkward..." - When you understand that F1 is almost universally the "CQ" key<br />
in contest logging programs, it becomes very logical. And by definition, when you are "CQing"<br />
you are "Running". In other words, if you don't want to be in the "Run" mode, don't call "CQ"<br />
(don't hit F1!)<br />
"...is it possible to have DIFFERENT macros in CW? There I do need "agn" and "hiscall" whereas<br />
in phone I don't..."<br />
Macros are MODE-specific, not CONTEST-specific. So, yes, you must have different macros on<br />
CW and SSB. However, just because you might use 8 or 9 F-keys on CW doesn't mean you have<br />
to use 8 or 9 on SSB. Use only what you need for that particular mode (and contest).<br />
73, Ted W4NZ<br />
http://n1mmtw61.semdxa.org/tiki-print_multi_pages.php?printstructures...<br />
19. Set Up <strong>N1MM</strong> to Record and Playback Voice Recordings (recording on<br />
the fly)<br />
The usual way is to route your microphone through the sound card to the radio. Most sound<br />
cards support this, as well as a selectable 20 dB pre-amp for Heil and similar mikes.<br />
To set up the program to record and playback voice recordings do the step below:<br />
1. Plug your microphone into the sound card mic input<br />
2. Plug your headset into the sound card speaker output<br />
3. Select default devices on the Configurer Audio setup Tab<br />
4. Open the windows volume control on the playback controls, set mic audio so you can hear<br />
yourself talking through the sound card.<br />
5. Change the windows volume control to select the recording controls.<br />
1. Select the microphone as the recording source.<br />
6. In <strong>N1MM</strong> logger make sure you are set for SSB, and in Run mode, and have a file name in<br />
39 of 319 2/2/<strong>2011</strong> 4:35 PM
7.<br />
8.<br />
9.<br />
the F1 key definition<br />
Do Ctrl+Shift+F1, immediately say something, like a short CQ, then immediately do<br />
Ctrl+Shift+F1 again. The bottom status line of the entry window should have said 'recording<br />
started' then 'recording saved'<br />
Press F1 and the recording should play back in your headset<br />
Adjust audio level on the volume control so when you record it has the same volume as the<br />
mic audio when you aren't recording<br />
OK, now you are on your own. the program records and plays back through the sound card. Now<br />
you have to figure out how to get that audio to and from your radio via your rigblaster, some other<br />
adapter, and whatever plugs on your radio that you choose to use. but the program is set up and<br />
working at this point.<br />
19.1. Playing WAV Files<br />
The program can play wav files in SSB for giving CQ, sending default reports etc. For this to work<br />
wav files have to be made with the text to send. These wav files could be placed anywere on your<br />
disk but easy would be to use the wav\ directory under the program directory. To call a wav file<br />
edit the SSB function keys as in the examples below. It is also possible to send a callsign by<br />
sending it's letters and numbers. NB. The full file path is needed before the wav file.<br />
Use the SSB function keys to send wav files. For example:<br />
http://n1mmtw61.semdxa.org/tiki-print_multi_pages.php?printstructures...<br />
Play CQ: C:\Program Files\<strong>N1MM</strong> logger\wav\cq.wav<br />
Play default exchange: C:\Program Files\<strong>N1MM</strong> logger\wav\5905.wav<br />
Play the callsign entered in the callsign entry field will be send by the soundcard: !<br />
This example uses the macro: ! (Send his call)<br />
Play the serial number to sent from Entry window by the soundcard: #<br />
Don't play call from station in callsign field: Use a single space (mostly used in F5)<br />
Possible are strings like: ##!C:\Program Files\<strong>N1MM</strong> logger\wav\{operator}\thanks.wav<br />
With or without leading zeros specified<br />
Only one wav file can be played per string and only at the end of the string<br />
Some examples using the macro {OPERATOR}, let each operator have his own wav files. You can<br />
specify wav files like: wav\{OPERATOR}\cq.wav As you change operators in a multi operator<br />
contest, the wav files will change as well. You will have to name them consistently. Note that wav<br />
directory syntax indicates a subdirectory under the Install directory. You can also fully qualify,<br />
like: "C:\wavfiles\cq.wav". {OPERATOR} is a string substitution only implemented for SSB<br />
buttons.<br />
Play CQ with operators voice: C:\Program Files\<strong>N1MM</strong> logger\wav\{OPERATOR}\cq.wav<br />
Play call with operators voice: {OPERATOR}\! (The wave file should be put it in the directory<br />
set in the Files tab for the letters directory in the Configurer)<br />
Play default exchange with operators voice: C:\Program Files\<strong>N1MM</strong> logger\wav<br />
\{OPERATOR}\5905.wav<br />
40 of 319 2/2/<strong>2011</strong> 4:35 PM
It is possible to play more .wav files right after the other by separating the wav files with a comma.<br />
For example: C:\Program Files\<strong>N1MM</strong> logger\wav\{operator}\blank.wav,C:\Program Files\<strong>N1MM</strong><br />
logger\wav\{operator}\number.wav#<br />
More examples can be found in the Macros chapter under {OPERATOR} macro examples and in<br />
the Sweepstakes contest setup.<br />
For those with problems with wav files playing from the Function keys... Make sure that under the<br />
tab 'Contest' in the >File >Open Log in Database >Mode Category has been set to SSB (or<br />
Mixed) and not set to CW. Check out the Audio tab in the Configurer.<br />
When in split please check out the @ macro (which will voice the receive frequency).<br />
19.2. Recording WAV Files<br />
The first thing to try is to plug the microphone (mic) directly into the sound card. Then open the<br />
sound playback control panel, make sure the mic channel is displayed and see if you can get the<br />
mic to come out the speakers. Once you do that then plug the mic into the rigblaster and the<br />
rigblaster into the mic input on the sound card and make sure it still comes out. Then go from the<br />
sound card to the rigblaster and make sure you can hear it in the speakers connected to the<br />
rigblaster, then go from the rigblaster to the mic on the radio. That all verifies the audio paths.<br />
Note that none of this uses the logger yet.<br />
Now change the volume control to show the recording controls. Make sure the mic input is<br />
displayed and select it as the recording source. Open the windows 'sound recorder'. Yes, I know<br />
it is a dumb program, but its main advantage is that it is simple. Try to record using the sound<br />
recorder and then play it back, the trace should show if audio is getting into the recording.<br />
Now you are ready to try the logger. Watch the status line on the bottom of the entry window<br />
when pressing Ctrl+Shift+Fx, make sure it says that recording is started and then that the file is<br />
saved. Pressing the same keys again (Ctrl+Shift+Fx) to stop recording. Note the confirmation<br />
start/saved messages on the status line at the bottom of the Call Entry window.<br />
If the above steps verified the audio paths then the only thing left is to make sure the PTT keys<br />
the radio when you send the file. Note, that you can key manually or turn on the VOX just to<br />
make sure that the audio is getting to the rig even if the PTT doesn't work.<br />
<strong>N1MM</strong> logger only supports standard PCM format files. Some editors use ADPCM instead and<br />
you have to convert them to standard PCM to have them played.<br />
More info on recording in the chapter Before the contest.<br />
Use <strong>N1MM</strong> <strong>Logger</strong> to Record Your WAV Files<br />
Record with <strong>N1MM</strong> logger because it will put the file in the same place it expects to play them<br />
from, and it records only with the formats that it can also play back.<br />
Realtek HD Soundcards<br />
http://n1mmtw61.semdxa.org/tiki-print_multi_pages.php?printstructures...<br />
41 of 319 2/2/<strong>2011</strong> 4:35 PM
If the soundcard is a Realtek HD, you won't be able to do on-the-fly recording with <strong>N1MM</strong><br />
<strong>Logger</strong>. You'll need to use an external application, such as Windows Sound Recorder or<br />
Audacity.<br />
19.3. Soundcard Control in Configurer<br />
The soundcard has to be set up when playing wav files. This is done in >Config >Configure Port,<br />
Telnet Address, Other >Audio tab. Check out the settings for it in the Configurer chapter.<br />
Common Soundcard Problems<br />
The most common problem occurs when no sound is heard when playing wav files. Check for<br />
a non existing wav file and the correct path in the program. Always check the wav file in a<br />
media player so see if it can be heard from the speakers!<br />
When play SSB wav files, the play volume can be adjusted by the Windows play control sliders.<br />
20. Quick Edit<br />
Do you ever log a contact with a mistake in the callsign? Want to bring it back, so you can<br />
change it? You can do it with "Edit last contact (Ctrl+Y)", but that dialog is complicated and not<br />
the right tool for the heat of a contest.<br />
There is an alternative called "Quick Edit" (Ctrl+Q). Quick edit will return the last entered qso to<br />
the entry window to allow you to change it. Pressing enter will log the changes, ESC will<br />
abandon them. The Entry window text boxes change to blue to let you know you are in quick edit.<br />
Was the mistake three QSOs ago? Then just press Ctrl+Q three times to get to it. The same rules<br />
about saving/abandoning apply here as well.<br />
Quick Edit 'Feature<br />
There is no check to ensure that the Quick Edit entered contents are valid like is done when a<br />
QSO is entered normally. So check thoroughly what you type.<br />
21. Meaning of Colors<br />
http://n1mmtw61.semdxa.org/tiki-print_multi_pages.php?printstructures...<br />
The meaning of the colors is where possible consistent across all windows. The table below will<br />
give the meaning per window.<br />
42 of 319 2/2/<strong>2011</strong> 4:35 PM
22. Multipliers and QSOs<br />
The program shows at many place if a callsign is a multiplier, a qso or a dupe. Please study the<br />
table with the meaning of colors above.<br />
The windows<br />
Entry Window<br />
Callsign in callsign field : the color of the entered call will tell Qso, Dupe or<br />
Multiplier(s)<br />
Callsign on the call-frame: the color of the entered call will tell Qso, Dupe or<br />
Multiplier(s)<br />
Available Mults and Qs window - the button colors will tell Qso, Dupe or Multiplier(s)<br />
Check window - the callsign colors will tell Qso or Dupe status<br />
Mul: - multiplier on this band<br />
Q: - qso on this band<br />
Example: Mul: 15 20 Q: 160 80 40 10 - multiplier on 15 and 20 meter and a<br />
qso on the other bands<br />
Bandmap - the callsign colors will tell Qso, Dupe or Multiplier(s)<br />
The colors<br />
Blue: QSO<br />
Red: Single Multiplier Example: CQWW - qso is either zone or country multiplier<br />
(one multiplier)<br />
Green: Double or better Multiplier Example: CQWW - qso is a zone and a country<br />
multiplier (two multipliers)<br />
Gray: Dupe<br />
23. Connecting to a Telnet Cluster<br />
http://n1mmtw61.semdxa.org/tiki-print_multi_pages.php?printstructures...<br />
Select the tab: Telnet in the packet window.<br />
Select a telnet cluster from the list in the upper right corner<br />
This list can be changed in Configurer at >Config >Configure Ports, Telnet Address,<br />
Other >Hardware tab, Select < Edit > next to Telnet Cluster<br />
Click the button marked with your callsign, on the far lower right, or type your callsign in the<br />
left field at the top of the telnet tab. Do not click the CONN button, that's solely for RF<br />
packet<br />
43 of 319 2/2/<strong>2011</strong> 4:35 PM
24. How to Save the Log<br />
Well, there isn't a 'save' function because it is not necessary. Every change you make to the<br />
database is stored 'on the fly', hence the absence of a 'save log' function. The ham.mdb file<br />
(default name) on your hard disk is the database where every contest is stored, along with lots of<br />
other information used by the program. Also there is no need to make a new file for each contest.<br />
Each new contest is stored in one and the same file. Just go to >File >New Log in Database and<br />
pick one out of the list, and you're all set to go. After a couple of years, there are dozens of<br />
contests in the database, for a total of a couple of thousand QSOs.<br />
Now, you can make new databases, as many as you want. You can have separate databases for<br />
separate calls, separate contests etc. Most users however, only need 1 database. You can copy it<br />
to backup etc. Just be sure what you're doing when messing with files...<br />
25. Function Key Macros<br />
You can't skip function key numbers. It is the position of the macro, not the number you identify it<br />
with.<br />
The first 12 macros are <strong>RU</strong>N macros. If you then only fill in 7 S&P macros then 8 thru 12 will be<br />
the same macros as the ones you filled in for <strong>RU</strong>N. So in your example if you set up your {WIPE}<br />
macro for F11 in <strong>RU</strong>N and your S&P F11 was blank then the {WIPE} F11 key would work in both<br />
<strong>RU</strong>N and S&P.<br />
If you want to fill in a blank macro enter the function key comma and a space. You have to put<br />
the space as you cannot create a blank macro.<br />
If you want to go from S&P to <strong>RU</strong>N is a single keystroke then set the first S&P macro to CQ<br />
(without F1 in the description) and put the<br />
command QRL? in the macro (Pete's trick). CQ,QRL? So hitting F1 would send QRL? and put<br />
you in <strong>RU</strong>N and start your auto CQ if turned on.<br />
26. Save and Restore Window Positions<br />
http://n1mmtw61.semdxa.org/tiki-print_multi_pages.php?printstructures...<br />
Save and Restore window positions is under >Tools >Save Window Positions' and >Tools<br />
>Restore Window Positions<br />
For example:<br />
New operator PA1M: Hit Ctrl+O and enter: PA1M and after this he presses 'Save Window<br />
Positions' in the Tools menu. The window positions for PA1M are now saved.<br />
Next operator comes in and does the same for his call.<br />
PA1M is again the operator and wants his window positions back: PA1M does Ctrl+O and enters:<br />
PA1M and after that selects 'Restore Window Positions'. The window positions will immediately<br />
change to the saved positions. PA1M has his window positions back!<br />
44 of 319 2/2/<strong>2011</strong> 4:35 PM
27. Editing Lookup Tables<br />
Lookup tables are used widely throughout the program. Example tables are the function keys,<br />
telnet stations, exchange abbreviations etc. These tables can be updated by the user and mostly<br />
lines can be added at the bottom of the list or deleted where needed.<br />
To Delete a row, click on the row "handle" - the gray arrowhead - the 'pensil' will move to it<br />
and the row will be selected, press Delete<br />
To Insert/Add a row, click on the icon with the 'star', a new row will be added. A row can only<br />
be added if all columns are filled<br />
The column values will automatically be assigned a space so directly adding a new<br />
row is possible<br />
To edit an entry select the field to update and enter the new information.<br />
28. Backup and Restore<br />
http://n1mmtw61.semdxa.org/tiki-print_multi_pages.php?printstructures...<br />
Substituting Mode for Callsign<br />
Instead of inserting your callsign, enter the mode - RTTY, CW, or SSB. This will save / restore<br />
window positions based on your preferences for each mode. This obviously won't work in a<br />
Multi-op environment but very usable in the single operator multi mode shack.<br />
Information used by the program is partly stored in the database, partly in ini files and in some<br />
additional subdirectories. Examples are the WAV files (for the function keys) but also in the<br />
Letters directory. So when making a backup not only backup the MDB files but also some text<br />
files / or sub-directories. The best solution is to backup and restore the whole <strong>N1MM</strong> logger<br />
subdirectory. Backup/restore proposal 2 is a partial backup/restore.<br />
28.1. Method 1: Full backup/restore on same computer - backup and restore the<br />
whole <strong>N1MM</strong> logger subdirectory<br />
Backup the whole <strong>N1MM</strong> logger subdirectory<br />
Restore the data is more or less the other way around. Restore the whole <strong>N1MM</strong> logger<br />
subdirectory<br />
28.2. Method 2: Partial backup/restore on same computer - make a partial backup<br />
and restore.<br />
Storing all these settings (exported text files, wav files etc) next to all databases (mdb files) on a<br />
diskette, CD/RW or USB-pen in case of a computer crash would not be a bad idea<br />
45 of 319 2/2/<strong>2011</strong> 4:35 PM
Backup all database (*.mdb) files<br />
In the database files are all contests with QSOs but also the function keys content,<br />
Station information etc. Compress the database to get them small<br />
<strong>N1MM</strong> <strong>Logger</strong>.ini<br />
Windows Settings, radio settings, port settings, RTTY settings etc. i.e.<br />
everything in Configurer but also last contest used are are stored in the <strong>N1MM</strong><br />
<strong>Logger</strong>.ini file<br />
Wav files<br />
Which can be used by the program (SSB mode). They are in the WAV directory<br />
(for the function keys) and and in the Letters directory (sending callsigns etc)<br />
Recorded QSOs are stored in subdirectories under the <strong>N1MM</strong> logger program<br />
directory (and can become very big)<br />
More?<br />
* Restoring on the same computer - Restoring the data is more or less the other way around.<br />
o Restore All database (*.mdb) files<br />
+ Restore the database file(s) back in the program directory (which is the default place but not<br />
necessary).<br />
o <strong>N1MM</strong> <strong>Logger</strong>.ini<br />
+ Copy the saved file in the Program directory.<br />
o Wav files<br />
+ Create the directories WAV and Letters directory and other directories needed.<br />
+ Copy the wav files in them.<br />
o More?<br />
28.3. Installing on a Different Computer<br />
With a new / different computer you first have to perform a Full Install to get all dll , ocx files etc.<br />
copied and registered. After that you may overwrite/add all *.mdb files, settings etc. in the <strong>N1MM</strong><br />
logger program directory by copying and importing settings. See the restore procedure above.<br />
You have to watch out if the settings like serial ports, directory structure, screen resolution etc.<br />
are different on the second computer. This could/will give trouble.<br />
Copy, zip, cd/rw etc.<br />
http://n1mmtw61.semdxa.org/tiki-print_multi_pages.php?printstructures...<br />
Backup and Restore is not a Copy Function<br />
Backup / Restore will not move the program to a new computer. You must always start with a<br />
Full Install on a new or different computer<br />
Compressing the database files for backup/restore with a program like WinZip really helps, these<br />
databases (but also Word files, Excel files etc.) compress a lot, mostly down to 10-25 percent of<br />
it's original size. This means that a 4 MB database fits easily on a diskette.<br />
46 of 319 2/2/<strong>2011</strong> 4:35 PM
The database can be also compressed with File/Copy and compact database. This is not a zip<br />
compression. It recovers space from deleted rows. Most database engines do not recover deleted<br />
rows until a reorganization is done. They just mark them deleted. This is not the same<br />
compression as mentioned above when using zip compression. When doing a compact database<br />
the database can still be used afterwards by the program. Using zip compression is only for<br />
backup/restore purposes.<br />
It is wise to make a regular backup of the whole <strong>N1MM</strong> logger subdirectory including all<br />
subdirectories to a CD recordable. Copying it to another hard disk (in the same computer but<br />
better on another computer when you have a network) is also a good idea.<br />
29. Basic Functions for RTTY<br />
Here are 4 RTTY Operating tips from Rick, N2AMG<br />
1.<br />
1.<br />
1.<br />
1.<br />
Use your mouse to grab everything just click on the call sign and it will get passed on to<br />
the entry window and click on the exchange it will get sent to the exchange field. Or use the<br />
Insert key to grab a call from the grab window and send your call that saves time also<br />
When you click on a callsign do you still need to press the space bar to advance things?<br />
You don't! Go to >Window >Digital Interface, then in the digital screen select >Setup<br />
>Settings >Send space after callsign click. Turn that setting on and you will be all set.<br />
Also select >Setup >'Rt click= Return NOT Menu'<br />
Try turning on >Setup >Rt click= Return NOT Menu. What this does is makes the right<br />
click of the mouse button while the mouse pointer is in the RX window act like the ENTER<br />
key and will step thru the ESM keys without hitting the keyboard. Your hand never leaves<br />
the mouse for the whole Q<br />
Hover mode: Let's you grab the callsign just by pointing your mouse on the callsign, no<br />
click... this way. It's faster then to click right to reply. Hover mode can be found in the Digital<br />
window >Setup >'Turn Hover Mode On/Off'<br />
Advanced Functions<br />
In this Section...<br />
Advanced Functions<br />
1. Mobile/Rover Support<br />
http://n1mmtw61.semdxa.org/tiki-print_multi_pages.php?printstructures...<br />
47 of 319 2/2/<strong>2011</strong> 4:35 PM
1.1. How Mobile/Rover Works<br />
2. Call History Lookup<br />
2.1. The Call History Text File<br />
2.1.1. Menu options<br />
3. Spot Filtering<br />
4. Transmit on same band with two radios<br />
5. Big Gun versus Little Pistol switch<br />
5.1. So you are a big station<br />
5.2. So you are a little pistol<br />
6. Staying in Run Mode (great for Dxpeditions) or in S&P mode<br />
7. Auto Send<br />
8. Enter Sends Messages (ESM) Mode<br />
8.1. Basic ESM Functionality<br />
8.2. How to Prevent the Cursor from Moving to the Next Exchange Field<br />
8.3. How to Skip Sending the Callsign or Exchange Field (SSB)?<br />
9. QSYing Wipes the Call & Spots QSO in Bandmap<br />
10. Single Operator Call Stacking<br />
10.1. Additional SOCALLSTACK Information<br />
10.2. Digital Call Stacking<br />
10.3. How to Tell Visually Which Call Will be Put in Next<br />
11. Call Stacking (same or different bands) - Multi-User Mode<br />
12. Serial Number Server<br />
13. Contest Reporting Application<br />
14. Starting a Contest with a Number Other Than 001<br />
15. Single Operator 2 Radios (SO2R)<br />
16. Footswitch Support<br />
In the 'Basic Functions' section the more standard routines like changing frequency, band and<br />
mode can be found. In this section the more advanced features are addressed. Not needed for<br />
everybody but nice when you think you need them<br />
1. Mobile/Rover Support<br />
<strong>N1MM</strong> logger supports Rover operation in at least the ARRL VHF contests and all QSO parties.<br />
For this to work the "Rover" category has be selected and the "RoverQTH" set. This gives a<br />
mobile/rover in a QSO party/VHF contest a quick, easy way of changing counties and<br />
re-programming F-key messages in one step. You will also have a complete, composite log. No<br />
cutting and pasting Cabrillo files anymore.<br />
1.1. How Mobile/Rover Works<br />
First, set File > Open Log in Database > Contest tab > Mode Category = "Rover"<br />
Your initial or subsequent RoverQTH can be set<br />
http://n1mmtw61.semdxa.org/tiki-print_multi_pages.php?printstructures...<br />
48 of 319 2/2/<strong>2011</strong> 4:35 PM
in the Station Data window. This box will automatically update when you use any of the<br />
other methods of setting RoverQTH<br />
by right clicking on the county or grid in the Multiplier window<br />
by typing CTRL+H<br />
or by typing ROVERQTH in the Entry Window callsign box and hitting Enter. This pops up a<br />
window for you to input the county designator, typically 3 or 4 characters, and then hit Enter<br />
again. This sets or resets the current RoverQTH, which is displayed in the top border of the<br />
Entry window, beside the frequency display.<br />
The {ROVERQTH} macro, when placed in your F-key messages will always send the current<br />
county designator or RoverQTH. If, for example, your F2 key is defined as "5NN{ROVERQTH}",<br />
then the "RoverQTH" column in the log window will reflect your current QTH for each QSO..<br />
RoverQTH can be 10 characters long but most Cabrillo output is five or six characters long.<br />
When a new ROVERQTH is set in the Entry window, the program checks with the list of accepted<br />
county designators for the current QSO party or contest. If for some reason an unlisted county<br />
designator is required, it can be entered in Config > Change Your Station Data<br />
2. Call History Lookup<br />
Please note - this section is work in progress, and WILL be changing repeatedly in the<br />
coming weeks<br />
Big Improvements in Version 10.8.3<br />
Beginning with Version 10.8.3, the Call History Lookup function is much improved. This is a<br />
very good reason to update, if you haven't done so already. The following user instructions<br />
assume that you are running 10.8.3 or later.<br />
As far as we can tell, the idea of storing information about a station from past contests, for recall<br />
during the current running, began with N6TR's TRLog, which used an extension of the Super<br />
check Partial master.dta file to capture and display a variety of information, such as name,<br />
Sweepstakes check, and ARRL section or state.<br />
Since its early days, <strong>N1MM</strong> <strong>Logger</strong> has used Call History text files to store contest-specific<br />
information. To use Call History Lookup, you must load the text file into the current database and<br />
enable the Lookup (on the pull-down Config menu).<br />
Only One Call History Table at a Time<br />
http://n1mmtw61.semdxa.org/tiki-print_multi_pages.php?printstructures...<br />
49 of 319 2/2/<strong>2011</strong> 4:35 PM
When a callsign is typed into the Entry window and the Space bar is pressed (or Enter, in the<br />
ESM case), the database table is searched and if the callsign is found, the associated call history<br />
is displayed. If the information is relevant to the current contest, it is pre-filled in the appropriate<br />
exchange field in the Entry window. Otherwise, it is displayed as text in the "beam heading" line<br />
of the Entry window. Here are two examples:<br />
In VHF contests, the grid square from the Call History table is used to calculate the beam<br />
heading reported in the Bandmap.<br />
2.1. The Call History Text File<br />
http://n1mmtw61.semdxa.org/tiki-print_multi_pages.php?printstructures...<br />
There can be only one call history table actually present in a given database at a time, and it<br />
remains active regardless of the contest unless replaced with another or unless you turn off<br />
the lookup function.<br />
The first few lines of the text file (shown below in bold type) are comments, denoted by the #<br />
character at the start of each line. None of these lines are required, but they are a helpful<br />
reminder when you are working with a text file. They are automatically added when exporting a<br />
Call History file.<br />
50 of 319 2/2/<strong>2011</strong> 4:35 PM
#Comment lines do not have to be removed for import.<br />
#Field names and size: Call(15), Name(20), Loc1(6), Loc2(6), Sect(8), State(8), CK(#),<br />
Birthdate(date), Exch1(12), Misc(15), LastUpdateNote(Optional,40)<br />
#Current contest: YOHFDX<br />
The next line gives the order in which fields in the text file are read into the database.<br />
Surrounding the word "Order" with two "!!" characters tells the program to treat it as an<br />
instruction, not as data<br />
!!Order!!, Call, Name, Loc1, Loc2, Sect, State, CK, BirthDate, Exch1, Misc, LastUpdateNote<br />
Finally, we get down to the data.<br />
N2YO,,,,,,,1900-01-01,364,,Log update no change<br />
As you can see, each comma denotes a field. Successive commas mean empty fields. In this<br />
case, we have the Call, a whole flock of empty fields, the default Birthdate (provided by the<br />
program, for technical reasons), and then Exch1, which is the number N2YO gave me in the<br />
contest.<br />
As you can imagine, making sure you have the right number of commas between actual data in<br />
the text file can be a problem. Fortunately, the !!Order!! command offers a simple solution. For<br />
example, you create a text file that looks like this:<br />
!!Order!!, Call, Name, CK, Sect<br />
N4ZR, Pete ,54 ,WV<br />
N3OC, Brian, 67, MDC<br />
When you load it into the current database, the data will be put in their proper places in the Call<br />
History table, and when you operate in Sweepstakes, for example, with Call History Lookup<br />
enabled, the program will pre-fill the check and section in the Exchange field, and will display the<br />
name and all the other data in the Bearing line of the Exchange Window. This redundancy is<br />
deliberate, because if you set out to edit the Exchange and then realize that the pre-filled data<br />
were correct, they are there for ready reference.<br />
What this change has done is to make it much easier to generate Call History text files for loading<br />
into <strong>N1MM</strong>. For example, you could generate a file that contains calls, names, checks and<br />
sections for everyone you worked last year in Sweepstakes, and by writing the correct !!Order!!<br />
line, like this:<br />
!!Order!!,Call,Name,CK, Sect<br />
http://n1mmtw61.semdxa.org/tiki-print_multi_pages.php?printstructures...<br />
you can make sure the information loads into the correct places in the database. The only thing<br />
you have to be careful about is to use the database field names exactly as shown above. For<br />
example, you must use Sect, not sect or sec or Sec, and CK, not Check.<br />
51 of 319 2/2/<strong>2011</strong> 4:35 PM
2.1.1. Menu options<br />
>Config >Call History Lookup<br />
Check to enable Call History Lookup.<br />
>File >Import >Import Call History<br />
Select the file to be imported. All information in the Call History table in the database<br />
is erased, and the imported information substituted.<br />
>Tools >Update Call History with Current Log<br />
Update the Call History table with the QSOs from the current log. Callsigns and<br />
contact data will be added, when new, or updated when already in the Call History<br />
table. Note that nothing is erased from the table other than data associated with a<br />
callsign in the log, and then only when different.<br />
For the 2 grid fields the behavior is a bit different. When both grid fields are filled and a new grid<br />
has been logged, the second grid (oldest) will be removed, and replaced by the contents of the<br />
first field. The new grid will be added to the first position. The same change in position will<br />
happen when only the first grid is filled and a new grid has to be added from the log. A 4 digit<br />
grid will be overwritten by a 6 digit grid when the first 4 characters are the same. move to VHF<br />
section<br />
>File >Export >Export Call History<br />
Exports the information in the Call History table. It is very important, particularly if you<br />
have changed the Call History table, to re-export the data as a Call History text file.<br />
Otherwise, any changes will be lost. You are given the opportunity to rename the text<br />
file so that, for example, a 2008 SS file can be renamed 2009 SS, to indicate that it<br />
has been updated.<br />
You can import any Call History file that you formerly used, without the need for the !!Order!!<br />
directive. When you export a Call History text file, the program fills in the commas that are<br />
necessary to fit the default order, as well as -1 for each empty CK and 1900-01-01 for each empty<br />
Birthdate. This is necessary to ensure compatibility with your old Call History files.<br />
3. Spot Filtering<br />
http://n1mmtw61.semdxa.org/tiki-print_multi_pages.php?printstructures...<br />
There are three levels of spot filtering available. The first of these is at the DX cluster node, using<br />
whatever filtering capabilities are built into the node. Because <strong>N1MM</strong> <strong>Logger</strong> stops processing<br />
52 of 319 2/2/<strong>2011</strong> 4:35 PM
telnet messages when CW is being sent, users who are connected to a very high volume node,<br />
such as the Reverse Beacon Network's Telnet node, may find it advantageous to block some of<br />
the less useful spots (for US users, you might not want spots from VK, for example).<br />
The second level of spot filtering is accessible from the right-click menu of the Packet/Telnet<br />
window, and decides which spots received from the cluster node should be forwarded to the<br />
Bandmap and the Available window. If too many spots are forwarded, depending on how fast<br />
your computer is, you may encounter brief delays in execution of commands (such as sending of<br />
CW messages) while the program catches up,. See the section on the Packet and Telnet window<br />
for specifics.<br />
The third level of filtering is set in the right-click menu of the Available Mults and Qs window, and<br />
it only governs which spots are shown in that window's lower pane. For example, if you decide<br />
only to list CW spots, the bandmaps will continue to display all spots, and the top pane of the<br />
Available window will continue to display overall spot numbers for each band, but the lower<br />
pane's list of spots will contain only CW spots. You can quickly switch back and forth between<br />
showing all spots, just those on the current band, only CW or SSB or digital spots, or any other<br />
band/mode combination.<br />
4. Transmit on same band with two radios<br />
In some contests (like IA<strong>RU</strong> contest) it is allowed to transmit on CW/SSB at the same time on the<br />
same band. To set this up make sure that Operator Category is set to Multi-Multi and Mode<br />
Category to Mixed. Both can call CQ at the same time without blocking each other. Also Config ><br />
Multi User Tools > Force Other Station to Stop Transmitting when I Transmit should not be<br />
checked!<br />
Interlock method works fine with packet delays up to 400 ms. If two operators push F1 at the<br />
same time both stations will begin transmitting but in less then 100 ms they both will check if any<br />
other station transmits on the same band/mode and if this is the case station with higher number<br />
will stop transmitting and display a message to the operator "Another station is already sending".<br />
Obviously the higher the packet delay is, the longer both stations will be transmitting at the same<br />
time but in reality it is never longer then 100-200 ms (PTT delay should be subtracted). And this<br />
only happens when there are two or more stations on the same band/mode (Run and Mult<br />
stations) and two operators managed to hit F1 (or any other Fx button) at the same time.<br />
5. Big Gun versus Little Pistol switch<br />
http://n1mmtw61.semdxa.org/tiki-print_multi_pages.php?printstructures...<br />
One of the settings in Configurer >Function Keys tab is 'ESM only sends your call once in<br />
S&P, then ready to copy received exchange'. When selected and in Enter Sends Message<br />
mode, the cursor moves to the Exchange field when there is something in the Callsign field and<br />
Enter is pressed and does not keep the cursor in the callsign field. If you don't usually get a<br />
station on the first call then deselect this option.<br />
53 of 319 2/2/<strong>2011</strong> 4:35 PM
5.1. So you are a big station<br />
* Stations normally come back to you on the first call<br />
* In >Configurer >Function Keys tab, check 'ESM only sends your call once in S&P, then ready<br />
to copy received exchange'.<br />
5.2. So you are a little pistol<br />
* You have to call mostly several times to get through to being answered<br />
* In >Configurer >Function Keys tab, uncheck 'ESM only sends your call once in S&P, then<br />
ready to copy received exchange'.<br />
Big Gun Tip<br />
One little trick to use with the Big Gun switch on is to program my call in F8 instead of<br />
"again". This way, when you don't get the guy on the first call, hit Enter again to repeatedly<br />
send my call until he answers (and the cursor is always in the right place when he does<br />
answer). 73 de Ted W4NZ<br />
6. Staying in Run Mode (great for Dxpeditions) or in S&P mode<br />
During DXpeditions it could be very useful to stay in Run mode all the time and not jump<br />
inadvertently to S&P mode. Or stay in S&P mode if you choose. This behavior can be toggled<br />
using the Alt+F11 key. The following message will be given in the statusbar when DXpedition<br />
mode i.e. S&P mode is disabled "Run/S&P auto-toggle disabled" = Dxpedition mode. Back to<br />
normal show the message 'S&P and Run Mode enabled'.<br />
7. Auto Send<br />
Autosend ( Ctrl+Shift+M ) will start sending the callsign before you have finished copying a full<br />
callsign. i.e. starting after a certain number of characters has been typed AFTER the last number<br />
in the callsign. The minimum threshold is 1. Zero will turn off the feature. Only when in <strong>RU</strong>N<br />
mode.<br />
The rules are:<br />
1. Find the first letter in the call<br />
2. Find the last number after the first letter<br />
3. Find the Nth letter after step 2<br />
For example: Threshold set to 2<br />
W4WYP would start sending at Y<br />
http://n1mmtw61.semdxa.org/tiki-print_multi_pages.php?printstructures...<br />
54 of 319 2/2/<strong>2011</strong> 4:35 PM
S57AD would start sending at D<br />
KH6/WA4WYP would start sending at Y (using the "/" rule as well)<br />
WA4WYP/4 would start at Y (/4 will not be looked at)<br />
WYP, WWYP and WAWYP do not meet the criteria for autosend to begin.<br />
Prefixes like KH6/ are ignored and do not themselves trigger the autosend threshold.<br />
8. Enter Sends Messages (ESM) Mode<br />
Setting the option "Enter Sends Messages" in the Config dialog will enable a mode that allows<br />
you to make entire QSOs without using the function keys. ESM works for both running and S&P<br />
mode, but the messages are different for each mode. To set ESM, go to Config, and check Enter<br />
Sends Messages (ESM mode), or use the shortcut Ctrl+M.<br />
8.1. Basic ESM Functionality<br />
When running, pressing Enter with the callsign textbox empty will send CQ. If someone answers<br />
you, type in his callsign. Hit Enter again, and the program will send the exchange. After entering<br />
the other stations info, hitting Enter again will send the end of QSO message (TU/<strong>QRZ</strong>) and<br />
automatically log the contact. See the chart below for a detailed list of what is sent at various<br />
states of the QSO.<br />
Here's a typical scenario where <strong>N1MM</strong> is calling CQ in the CQ WW CW Contest:<br />
Hit Enter - sends CQ <strong>N1MM</strong><br />
PA1M calls in - type "PA1M"<br />
Hit Enter - sends "PA1M 5NN T5", note that PA1M's zone is filled in for you.<br />
PA1M sends "599 14" (zone matches what program filled in)<br />
Hit Enter - logs QSO & sends "TU de <strong>N1MM</strong>"<br />
That's 3 keystrokes + typing PA1M's callsign. Slick!<br />
On the other end, the S&P station (PA1M) can also use ESM. During the same QSO:<br />
You hear <strong>N1MM</strong> calling CQ - type "<strong>N1MM</strong>"<br />
Hit Enter - sends "PA1M", note that <strong>N1MM</strong>'s zone is filled in for you<br />
<strong>N1MM</strong> sends "PA1M 5NN T5" (zone matches what program filled in)<br />
Hit Enter - sends "599 14"<br />
<strong>N1MM</strong> sends "TU de <strong>N1MM</strong>", completing the QSO and logging it<br />
http://n1mmtw61.semdxa.org/tiki-print_multi_pages.php?printstructures...<br />
Once again, that's 3 keystrokes + typing <strong>N1MM</strong>'s callsign. In some other contests, like CQ WPX,<br />
you will also have to type in the exchange, but in any contest ESM cuts the effort required to<br />
complete a QSO to a minimum.<br />
Keeping track of which ESM "state" you are in can be confusing when things get hectic. To help<br />
you understand which state you are in, the function keys on the Entry Window will change color<br />
55 of 319 2/2/<strong>2011</strong> 4:35 PM
(aqua blue) to alert you which message will be sent next. The goal here is that it should always<br />
be obvious what will happen next.<br />
There will be times when you get out of sync, or where you need to send something different<br />
than what the next Enter will send. Don't panic. Just press the correct function key(s) (F2, F4, etc<br />
as needed). If you finished out the QSO with the F-keys, just hit Alt+Enter, which will log the<br />
QSO without sending anything, and you are ready for the next QSO (and ESM is reset to the<br />
beginning state).<br />
The cursor is kept in the callsign if you have entered a callsign that does:<br />
not have a prefix and at least one characters suffix<br />
prefix is a letter followed by a number<br />
prefix is a letter followed by a number, letter, number combo.<br />
When ESM is on, the Space bar is used only when you need intelligent tabbing mostly between<br />
the callsign and the exchange field for instance to correct a call.<br />
When the copy is solid, and no copying mistakes are made, ESM will just send the basic<br />
messages in the previous example. Depending on what information is in the Call window and<br />
Exchange window and what state the QSO is in, different messages can be sent. The chart<br />
below outlines the possible combinations of information in the Entry window, and what will be<br />
sent in each situation.<br />
Running mode S&P mode<br />
Callsign field Exchange field Enter sends Enter sends<br />
Empty Empty CQ (F1) My Call (F4)<br />
New Call (1st time) Empty or invalid His Call + Exch (F5 +<br />
F2)<br />
My Call (F4)<br />
New Call (repeat) Empty or invalid Again? (F8) My Call (F4)<br />
New Call Valid (before sending<br />
exchange)<br />
New Call Valid (after sending<br />
exchange)<br />
His Call + Exch (F5 +<br />
F2)<br />
End QSO + Log (F3<br />
+ Log It)<br />
Duplicate Call Empty or invalid QSO B4 (F6) nothing<br />
Duplicate Call Valid (before sending<br />
exchange)<br />
Duplicate Call Valid (after sending<br />
exchange)<br />
http://n1mmtw61.semdxa.org/tiki-print_multi_pages.php?printstructures...<br />
Interrupting a CQ<br />
If a CQ is being sent, typing a character in the callsign field while in ESM will stop sending a<br />
CQ message being transmitted (this can be set in >Configurer >Function Keys >ESM only<br />
sends your call once in S&P, then ready to copy received exchange<br />
Exchange (F2) +<br />
Log It<br />
Send Nothing +<br />
Log It<br />
QSO B4 (F6) Exchange (F2) +<br />
Log It<br />
End QSO + Log (F3<br />
+ Log It)<br />
nothing<br />
56 of 319 2/2/<strong>2011</strong> 4:35 PM
Dupe (1st time), Work Dupes<br />
unchecked<br />
Dupe (repeat), Work Dupes<br />
unchecked<br />
Dupe, Work Dupes checked Valid (before sending<br />
exchange)<br />
Dupe, Work Dupes checked Valid (after sending<br />
exchange)<br />
Empty or invalid His Call + Exch (F5 +<br />
F2)<br />
QSO B4 (F6)<br />
Empty or invalid Again? (F8) QSO B4 (F6)<br />
His Call + Exch (F5 +<br />
F2)<br />
End QSO + Log (F3<br />
+ Log It)<br />
Exchange (F2) +<br />
Log It<br />
Send Nothing<br />
Again? (F8)<br />
When in ESM and in S&P, If the cursor is not in the call textbox and the Exchange is not<br />
finished, the program will send " Again? (F8)"}<br />
When a dupe callsign is in the callframe, the call is put in the call textbox and highlighted.<br />
The actual messages sent by each of those function keys (e.g. CQ Key, Exchange Key, My Call<br />
Key, etc.) are set in the configuration dialog ('Config | Change Packet/CW/SSB Digital Message<br />
Buttons'). There are 24 messages that can be set: the first 12 messages are for Running mode,<br />
and the second 12 for S&P mode. Each mode (CW, SSB, Digital) can have a separate set of<br />
messages, which are saved by the program. If the program is sending the wrong message, check<br />
here first! In the middle of the contest, you can also change the messages for the current mode<br />
by right-clicking on (one of) the message buttons in the Entry window.<br />
8.2. How to Prevent the Cursor from Moving to the Next Exchange Field<br />
In ESM mode when running and trying to send a partial call entered in the callsign field, the<br />
cursor jumps to the report field before you can finish typing the call...<br />
Solution 1 - When you press Enter in ESM mode while running, the cursor will be placed<br />
highlighting the ?. If you type a letter, say "J", the ? will be changed, and you will have G4UJS in<br />
the callsign. Whenever you press the space bar, and the cursor is placed in the callsign, the ?<br />
will be highlighted, ready to be replaced without typing Del or Backspace.<br />
Entering ? as a Callsign<br />
When you are Running with ESM enabled and while entering you place a ? in the callsign<br />
field the cursor will not move to the exchange field but stay in the callsign field highlighting<br />
the ?<br />
8.3. How to Skip Sending the Callsign or Exchange Field (SSB)?<br />
http://n1mmtw61.semdxa.org/tiki-print_multi_pages.php?printstructures...<br />
To avoid PTT when setting up ESM on SSB without sending a callsign or exchange put in SSB a<br />
57 of 319 2/2/<strong>2011</strong> 4:35 PM
single space or the path to Empty.wav as the wav file for the callsign and/or the exchange<br />
buttons. The program will not assert PTT and immediately simulate the space bar being pressed.<br />
Watch that Turquoise Button<br />
The next button to be sent when pressing Enter shows in turquoise. If you don't like what<br />
ESM will send, you may choose another.<br />
9. QSYing Wipes the Call & Spots QSO in Bandmap<br />
If you set >Config >QSYing Wipes the Call & Spots QSO in Bandmap, it will spot stations in the<br />
bandmap which you haven't worked yet or don't want to work all. These stations are not spotted<br />
on packet/telnet but only locally. Any call greater or equal to 3 characters that you don't work but<br />
have entered in the callsign field will be automatically spotted in the bandmaps when you turn<br />
the VFO to another frequency. This way you can place stations on the bandmap which you can't<br />
work direct (big pileup?) so want to store them somewhere. Also useful when you want to add<br />
stations to the bandmap who you don't want to (or may not) work but like to have the callsign in<br />
the bandmap so when searching for stations you know who is on that frequency so you can turn<br />
on.<br />
All bandmap features work on these 'spotted' stations so they are easy accessible if needed. Self<br />
spotted stations are easy recognized because they are shown in bold. This feature is also very<br />
useful in a M/S or M/M environment. Often there is a MULT station that is tuning the bands, but<br />
may not want to post the spot until the QSO has been worked by their own <strong>RU</strong>NNING station. (I<br />
do not wish to get into an ethics discussion, but this is done quite often) This feature allows the<br />
MULT station to build a band map full of calls for the <strong>RU</strong>NNING station to work when it gets a<br />
chance.<br />
That means you can do the following:<br />
Tune to 21200.<br />
Enter VU2PTT.<br />
Tune off.<br />
VU2PTT is "spotted" at 21200, and the Entry Window is cleared.<br />
Tune to 21208.<br />
Enter G4UJS.<br />
Tune off.<br />
G4UJS is "spotted" at 21208, and the Entry Window is cleared.<br />
Repeat as long as desired.<br />
Go back and work all of them using Ctrl+Up and Ctrl+Dn to navigate.<br />
http://n1mmtw61.semdxa.org/tiki-print_multi_pages.php?printstructures...<br />
Spot All S&P QSOs<br />
There is also a >Config >Spot all S&P QSOs option. It has a number of rules, but will spot<br />
everything you WORK on packet, if it has not already been spotted on the same frequency.<br />
58 of 319 2/2/<strong>2011</strong> 4:35 PM
10. Single Operator Call Stacking<br />
http://n1mmtw61.semdxa.org/tiki-print_multi_pages.php?printstructures...<br />
Macros and keystrokes used for call stacking are {SOCALLSTACK}, {STACKANOTHER},<br />
CTRL+ALT+G, {LOGTHENPOP}, and ALT+D. The first three are used to place calls onto the<br />
stack and the last two are used to take calls off the stack. The macros only operate in <strong>RU</strong>N mode<br />
and stacked callsigns appear in the Bandmap on your <strong>RU</strong>N frequency. SOCallstacking is<br />
functional in CW, phone, and digital modes and is compatible with manual key operation or ESM.<br />
It can also be used in SO1V, SO2V and SO2R modes and in multi-station environments.<br />
{SOCALLSTACK} or {STACKANOTHER} or CTRL+ALT+G<br />
The operator can stack a full callsign or a partial callsign that may include a "?" and it will be<br />
highlighted when that callsign is removed from the stack. The operation of the {SOCALLSTACK}<br />
and {STACKANOTHER} macros differ slightly.<br />
{STACKANOTHER} or the keystroke short cut, CTRL+ALT+G, simply pushes callsigns onto the<br />
stack and clears the Entry Window callsign box.<br />
{SOCALLSTACK} functions as a single level stack macro. The first execution of<br />
{SOCALLSTACK}, stacks the first callsign and clears the Entry Window callsign line. When a<br />
second callsign is entered and {SOCALLSTACK} is executed again, the two callsigns are<br />
exchanged. If the callsign window is empty when {SOCALLSTACK} is executed, the callsign is<br />
removed from the stack and placed into the callsign Entry Window.<br />
{LOGTHENPOP}, ALT+D<br />
The stacked callsigns can be removed from the stack with several methods. Logging the current<br />
call, unstacking the next callsign with {LOGTHENPOP} or manually removing the stacked<br />
callsign with the keystroke ALT+D. The ALT+D keystroke is useful if a callsign appears on the<br />
stack via a telnet spot. The next callsign on the stack is displayed on the callframe when the<br />
CQ-Literal is not present. Pressing Space will move a stacked call from the Callframe to the<br />
callsign box and remove it from Bandmap.<br />
ESM Automation<br />
The Configurer, Function Key tab, Next Call Key is used to select the function key that contains<br />
the {LOGTHENPOP} macro along with the message string for ESM automation. If a Next Call Key<br />
has been specified, then when Enter is pressed to finish a QSO and there is another call sign on<br />
the callsign stack, the Next Call Key will be sent instead of the TU(F3) Key. The last option in the<br />
drop down menu for the Next Call Key allows the ESM SOCallstacking automation to be<br />
disabled.<br />
SOCALLSTACK ESM Example<br />
Program F9 key to: {STACKANOTHER} or {SOCALLSTACK}<br />
Program F10 key to: {LOGTHENPOP}TU NW {F5} {F2}<br />
The appropriate SSB wave file can be inserted into the F10 message in place of the " TU NW"<br />
letters above.<br />
For example: {LOGTHENPOP}C:\Program Files\<strong>N1MM</strong> logger\wav\{operator}\TnxNow.wav {F5}<br />
{F2}<br />
59 of 319 2/2/<strong>2011</strong> 4:35 PM
Set >Config >Function Key tab >"Next Call Key" to F10<br />
Select <strong>RU</strong>N mode and turn ESM on. For this example two stations are calling, N2IC and K3CT<br />
Type K3CT, press F9, type N2IC and press Enter<br />
Copy N2IC's report and press Enter. This will log N2IC, send the TU, unstack K3CT, and send<br />
the exchange<br />
SOCALLSTACK Non-ESM Example<br />
Program the function keys as listed above.<br />
Select <strong>RU</strong>N mode.<br />
Type K3CT, press F9, type N2IC and press the exchange key programmed in Configurer, usually<br />
";". This key is programmed to F5 & F2.<br />
Copy N2IC's report and press F10. This will log N2IC, unstack K3CT, and send the exchange<br />
If multiple callsigns are stacked, ESM will continue to unstack the callsigns. The same is true in<br />
non-ESM mode as F10 is pressed. Should a logging error occur such as a bad call, the<br />
sequence will be interrupted until the error is corrected. When no calls remain on the stack, the<br />
TU message is sent. If there are multiple callsigns on the stack, the order that they are removed<br />
or exchanged with {SOCALLSTACK} depends on the internal sorting order and not the order they<br />
were stacked.<br />
10.1. Additional SOCALLSTACK Information<br />
It is important that the contest callsign is entered in the Config, Station Information window. That<br />
way, the station callsign will not appear in the Bandmap via a telnet spot and the SOCALLSTACK<br />
code will not place the station callsign or the Busy literal (ALT+M) into the callsign box.<br />
If a callsign appears on the callsign stack via a telnet spot that you want to remove, use the<br />
ALT+D keystroke to remove it without popping it off the stack.<br />
SOCallstacking does overlap slightly with multi-operator call stacking. Multi-operator call stacking<br />
is the program feature that allows a second operator to listen to the run radio and send calls to<br />
the run operator’s Entry Window.<br />
10.2. Digital Call Stacking<br />
http://n1mmtw61.semdxa.org/tiki-print_multi_pages.php?printstructures...<br />
To turn this off or on there is a menu selection in the Setup dropdown menu in the Digital<br />
Interface.<br />
With it turned off everything operates the way it is before Call Stacking was added.<br />
Only works in <strong>RU</strong>N Mode and only with a valid callsign.<br />
Single Click on Call in Digital RX window or Alt+G when grabbing a call<br />
If there is no callsign in the call box of Entry Window it will function just like it normally does<br />
by placing the callsign in the call box.<br />
If there is a call already in the call box then clicking on another call orhitting ALT+G to use<br />
60 of 319 2/2/<strong>2011</strong> 4:35 PM
the grab window will move the call that is currentlythere up to the bandmap and call frame<br />
of the entry window and place thecurrently clicked or grabbed call into the call box.<br />
The usage here is if a two stations call you can then stack one call and work the other. Then<br />
instead of hitting enter if in ESM to send F3 or LOG. You would then hit the F-Key that contains :<br />
{TX}{ENTER}! {LOGTHENPOP} TU NW {F5}{F2}{RX}<br />
Alt+Single Click on Call in Digital RX window or Ctrl+Alt+G when grabbing a call. This will take<br />
the clicked on callsign and place it directly to the stack in the bandmap. Any number of calls can<br />
be placed here for working one after another.<br />
The usage is 3 or 4 stations call you at the same time do a single click or Alt+G on the first call to<br />
place it in Entry window. Then do and ALT+Click or Ctrl+Alt+G (to pull from grab window) to place<br />
the others on the stack. Then use the F-key that contains: {TX}{ENTER}! {LOGTHENPOP} TU<br />
NW {F5}{F2}{RX} to work them all in a row until the last call is off the stack then you would use<br />
F3 or hit enter in ESM to log the final one.<br />
{LOGTHENPOP} will not function if CQ-Frequency is in the Call Frame.<br />
Double Click on Call in Digital RX window: The function of the Double click does not change and<br />
will over ride whatever callsign is in the Entrywindow Call Box with the clicked on callsign.<br />
Macro Substitution: {LOGTHENGRAB} This will log the current contact and Grab the top callsign<br />
that is in the grab window of the DI. Will only work in Run Mode Digital use of macro Substitution:<br />
{STACKANOTHER} This acts just as Ctrl+Alt+G for the grab window but allows it to be called by<br />
a macro. If you hit the F-key that contains {TX}{ENTER}! {LOGTHENPOP} TU NW {F5}{F2}{RX}<br />
while there are no calls stacked it will send your TU key.<br />
10.3. How to Tell Visually Which Call Will be Put in Next<br />
If "CQ Frequency" is on the call frame, then look at the Bandmap.<br />
http://n1mmtw61.semdxa.org/tiki-print_multi_pages.php?printstructures...<br />
The {LOGTHENPOP} calls the {SOCALLSTACK} routine. {SOCALLSTACK} will remove the<br />
CQ-Literal ("CQ Frequency") and take the next callsign listed on the Bandmap's run frequency.<br />
There are cases where the CQ-Literal string will replace the callsign on the call frame. The<br />
stacked callsign isn't lost, look at the Bandmap.<br />
The same is true when you are spotted. Your callsign will appear in the call frame but the routine<br />
will not pop it into the callsign box. If you find that it does, you don't have "your callsign" entered<br />
into Station Data window. When you use {LOGTHENPOP}or {SOCALLSTACK} they remove the<br />
station callsign and discard the callsign, then grab the next call on the stack.<br />
If you have {SOCALLSTACK} programmed to an F-key, pressing it once at any time will exchange<br />
the current callsign with the next callsign on the stack. If there is no callsign on the stack, then it<br />
stacks the call and gives you an empty callsign window to enter one. Pressing the F-key again<br />
will reverse them again.<br />
61 of 319 2/2/<strong>2011</strong> 4:35 PM
11. Call Stacking (same or different bands) - Multi-User Mode<br />
A callsign can be stacked from one radio to another when in 'Multi-User Mode'. It does not<br />
matter if the target station is on a different band or the same band. A second operator can<br />
stack a call on your PC, and he could find stations and stack them for you to work.<br />
To indicate which station you want to stack for, right click on it's "cue-ball" in the info<br />
window, and select the option "Target for call stacking"<br />
A maximum of one callsign can be stacked. If the stack is empty another one may be<br />
stacked<br />
After the target station pops the call into the entry window callsign area, the partner station<br />
needs to manually wipe his entry line before entering another call. It doesn't automatically<br />
clear<br />
Stacking within same band but not on the same frequency - Use the bandmap by tuning off a<br />
station whose callsign you copied.<br />
Additional functionality when on the same CQ frequency (within tuning tolerance) then you will<br />
see the other station keystrokes in your callframe and vice-versa.<br />
12. Serial Number Server<br />
<strong>N1MM</strong> logger supports a single sequence of serial numbers for SO2R, MS, M2 and MM.<br />
The serial number is reserved in<br />
S&P mode when the cursor leaves the callsign field or the Exchange key (F2 default) is<br />
sent<br />
Either through spacing, tabbing, or hitting Enter in ESM or pressing the Exchange key<br />
This is needed so you can enter calls to check for dupes while not reserving a serial<br />
number<br />
<strong>RU</strong>N mode as soon as you enter a letter in the call-sign field<br />
This because on SSB people frequently talk before they type, and they need to see<br />
the serial number displayed earlier. A serial number is not assigned in S&P mode until<br />
the space bar is pressed, so you can do dupe and check multipliers without<br />
committing a serial number to it, by entering it in the callsign field without pressing<br />
Enter or Space<br />
In SO2R and SO2V, typing Alt+W (wipe) after a serial number has been reserved or wipe<br />
through QSY will "un-reserve" that number.<br />
Because of the way the serial number server works, there are a few cautions:<br />
http://n1mmtw61.semdxa.org/tiki-print_multi_pages.php?printstructures...<br />
Serial numbers issued by the second radio may be out of time sequence with those issued<br />
62 of 319 2/2/<strong>2011</strong> 4:35 PM
http://n1mmtw61.semdxa.org/tiki-print_multi_pages.php?printstructures...<br />
by the main one. This occurs because certain program actions cause a serial number to be<br />
reserved for the use of a station, and if that station does not use that number until after the<br />
other station has made several QSOs, when the log is viewed in chronological order the<br />
serial number will appear to be out of order. I don't think there is anything to be done about<br />
this<br />
For similar reasons, depending on operator actions at one or the other station, such as<br />
shutting down the program while a number is reserved, there may be some gaps (numbers<br />
not issued) when reviewing the final log<br />
The most important aspects of serial numbering are that the serial sent to a station be<br />
correctly logged, and that there be no duplicate serial numbers sent; <strong>N1MM</strong> logger seems<br />
to meet both these criteria<br />
Sometimes it's possible a number will be skipped when given out but not used (example:<br />
QSO not made after all or deleted). Contest committees do accept this behavior!<br />
The maximum sent number to give is 32767. The maximum receive number is 99999<br />
What Do Sponsors Look For?<br />
Most sponsors are more interested in serial number accuracy than in serial number time<br />
order. If you think about it, it is impossible to guarantee the order of serial numbers in a two<br />
radio situation. This assumes that you always log the time when the QSO is added to the log,<br />
which is the right time from a rules point of view. i.e. end of contact.<br />
Addendum by Steve, N2IC&&&<br />
Let me say a few words about the way serial numbers are "reserved" in <strong>N1MM</strong> <strong>Logger</strong>. For the<br />
sake of this discussion, I'll assume that ESM is being used.<br />
When you enter a callsign in the Entry Window, and hit the Enter or Space key, a serial number<br />
is reserved and locked-in to that QSO. If it turns out that the QSO is not completed and logged,<br />
that serial number is "lost", and will be not used for a subsequent QSO.<br />
This gets to be especially interesting with SO2R and SO2V. Let's say you are running on Radio 1,<br />
and search-and-pouncing on Radio 2. You enter a call on Radio 2, and hit the Enter key,<br />
reserving a serial number on Radio 2. You get beaten out on Radio 2, and go back to running<br />
stations on Radio 1, advancing the serial number beyond the number reserved on Radio 2. A few<br />
minutes pass, and you finally work the station on Radio 2. Your log now appears to have<br />
non-sequential serial numbers. If you never work that station on Radio 2, the reserved serial<br />
number on Radio 2 is lost, and will not be used for any subsequent QSO.<br />
I can't speak for all contest sponsors, but for Sweepstakes and CW/SSB WPX, this is not an<br />
issue. There is no problem for these log adjudicators if your serial numbers are out-of-sequence,<br />
or if there are missing serial numbers in your log. Your log will be correctly processed. In addition,<br />
the <strong>N1MM</strong> <strong>Logger</strong> Summary window reports the correct number of successfully completed<br />
QSO's.<br />
In summary, stop fretting about out-of-sequence or missing serial numbers. The software is<br />
working as designed<br />
63 of 319 2/2/<strong>2011</strong> 4:35 PM
13. Contest Reporting Application<br />
The Contest Reporting Application (Realtime score reporting) can be started by checking "Start<br />
Contest Reporting Application" on the Other tab of the configurer. With this application you can<br />
show your contest efforts in real time during a contest to the world. Next to this contest reporting<br />
application a website is needed where everyone can see the scores. This application does<br />
automatically upload your scores from the current selected contest to the configured website.<br />
These websites are published on the several reflectors.<br />
When the application has been started the dialog below will be shown.<br />
http://n1mmtw61.semdxa.org/tiki-print_multi_pages.php?printstructures...<br />
Stop Score Reporting<br />
Note that this will keep reporting everything until you uncheck it. Doesn't matter if you are<br />
testing, or operating in a contest. It will be reported. So either close it or click "Stop Send" if<br />
you don't want that.<br />
In the middle a countdown counter in seconds will be shown which can be set in the Setup (see<br />
below). When the counter reaches 0 your score will be sent to the configured website.<br />
The status field next to it will give status information (like error messages). A small button to right<br />
of status field shows response from last upload and creates a file with sent and received data for<br />
debugging problems. Version information is shown in the middle of the dialog.<br />
Stop Send / Send Score - Stop the sending of scores to the configured website.<br />
Get Scores - Clicking this button will open the configured website in your browser so you<br />
can view your and other stations scores.<br />
Setup - will open the Setup dialog below.<br />
Note that the score will be send to the website for the first time at program startup.<br />
64 of 319 2/2/<strong>2011</strong> 4:35 PM
The setup dialog configures the realtime scoring application.<br />
Score Post Time (min) - Set the timer how often your score will be uploaded to the<br />
configured website. The possible times to set are: 2, 5, 10,15,30 and 60 minutes. Also a<br />
manual mode possibility can be selected. To send the score the 'Send Score' button has to<br />
be pressed.<br />
Score Posting URL - The url of the website to post your scores to.<br />
Score Reading URL - The url where the scores are displayed.<br />
Listening IP - Shows the IP address on which <strong>N1MM</strong> logger is running. By default this is<br />
the same computer as where the real time scoring application is running on. This setting is<br />
set by <strong>N1MM</strong> logger.<br />
Listening Port - Shows the port from which <strong>N1MM</strong> logger will send the information to the<br />
real time scoring program. This setting is set by <strong>N1MM</strong> logger.<br />
Defaults - Fill the dialog with default values.<br />
Cancel - Cancel the entered values and close the dialog.<br />
OK - Save the values and close the dialog.<br />
http://n1mmtw61.semdxa.org/tiki-print_multi_pages.php?printstructures...<br />
During major contests several real time score reporting web sites will be up and running. An<br />
example website from Gerry, W1VE below.<br />
65 of 319 2/2/<strong>2011</strong> 4:35 PM
By Gerry, W1VE:<br />
http://n1mmtw61.semdxa.org/tiki-print_multi_pages.php?printstructures...<br />
Through the encouragement of many, I decided to take on the project of creating a usable web<br />
portal for realtime score reporting. The result is now ready.You can view the portal at:<br />
http://live.getscores.org<br />
The scoring upload to the site is based on work by Bruce, WA7BMN, with his Contest XML<br />
schema, and scoring trials last year by Tom, <strong>N1MM</strong> and the <strong>N1MM</strong> logger.<br />
The latest version of <strong>N1MM</strong> fully supports score posting. If any other contest software vendor<br />
supports the HTTP POST method of score reporting, it is immediately compatible with<br />
getscores.org. Additionally, getscores.org supports a SOAP-based Web Service API. The<br />
success of the site will depend on participation and the support of software vendors. There are<br />
links on the live.getscores.org site for FAQs.<br />
The viewing site supports many filters, so that you can look at only what you want to look at.<br />
Filter by Class, Power, CQ Zone, IA<strong>RU</strong> Zone, State/Prov and lots more. Your filter preferences<br />
are saved as a cookie by your browser for up to 7 days. The page automatically refreshes every<br />
60 seconds with score information.<br />
the website will support many contests as listed on the site.<br />
The window is by Score with the highest score first within the operating class, Power Class and<br />
mode. The general idea here is not to look at everything: apply a filter and you'll get a more<br />
representative view of you are looking for.<br />
A scoring period is a rolling window of 72 hours. If you post for a particular contest during the 72<br />
hour period, any time you post an update, you will simply update your score for that contest. This<br />
way, if there are two supported contests over a weekend, you can submit to both. The unique key<br />
is the name of the contest and the callsign.<br />
By the way, I want everyone to know that getscores.org is not an "<strong>N1MM</strong>" effort. In fact, I want to<br />
ensure it is not. I'm sure that Tom would agree. We must get as many of the contest authors to<br />
66 of 319 2/2/<strong>2011</strong> 4:35 PM
participate, otherwise, this type of site is useless. We need to see lots of scores, not just those<br />
from the <strong>N1MM</strong> logger. That said, BIG KUDOS to K1TTT and <strong>N1MM</strong> for getting the posting<br />
software in great shape quickly, and to all of you users for testing — that's a great way to get the<br />
site in good shape for CQWW.<br />
If you have any questions or suggestions about the site, please send them to me at the email<br />
addresses provided on the site, or via gerry@w1ve.com.<br />
The ethics<br />
Tom, <strong>N1MM</strong>: I don't see any issue with reporting your score. You are not "spotting" yourself, there<br />
is not a frequency specified other than the bands you have operated on.<br />
14. Starting a Contest with a Number Other Than 001<br />
Some contests which have more parts/sessions there is the need to start a next session with the<br />
next number given in the previous part. So how not to start with 001?<br />
There are two workarounds:<br />
1. Start second part as a separate contest and make the first QSO with number 001 and log it,<br />
then correct (Ctrl+Y) to proper sent number<br />
2. Start second part as a separate contest, enter fake QSO, open QSO in EDIT window,<br />
change SENT number from 001 to last number you sent in the previous part of the contest,<br />
save changes, et voila, it's done. When a couple of real contacts have been entered, delete<br />
the fake QSO<br />
15. Single Operator 2 Radios (SO2R)<br />
Single Operator 2 Radioa (SO2R) is an operating technique that when done properly, can add<br />
many extra QSOs and multipliers to your log. This is accomplished by increasing your efficiency<br />
during "dead" time, specifically when you are sending on one radio. Efficiency is increased by<br />
listening on a 2nd receiver while you are transmitting on the 1st radio. On the 2nd radio you are<br />
scanning the bands for needed QSOs and multipliers. If you find a new station to work on the<br />
2nd radio, you leave it staged on the 2nd Entry Window until you get a free moment to work this<br />
station. Even adding a few QSOs an hour will greatly boost your score.<br />
A complete chapter has been devoted to SO2R.<br />
16. Footswitch Support<br />
Footswitch support has been added for multiple distributed stations.<br />
http://n1mmtw61.semdxa.org/tiki-print_multi_pages.php?printstructures...<br />
In IA<strong>RU</strong> contest headquarter station is allowed to use multiple stations located within one IA<strong>RU</strong><br />
zone but the rule of one signal per band/mode still in effect. So there are often 2 (one running<br />
67 of 319 2/2/<strong>2011</strong> 4:35 PM
station and another looking for multiplier) or more stations on the same band and same mode<br />
and they should keep only one TX signal on this band at any time. Now you can hook up a<br />
footswitch to the LPT port 15 (LPT port should be enabled even though the only purpose for it will<br />
be to have a footswitch, no any special check box to turn footswitch feature on/off). If the station<br />
is not in multi-multi operator category the footswitch will directly control PTT just like Alt+T. If it is<br />
a multi-multi station (connected to other stations on LAN or via the Internet in Multi User mode) it<br />
will be blocking TX of any other station from the group on the same band (and mode if mode<br />
category is "Mixed").<br />
Yes, for now a quite exotic feature.<br />
Two Monitor Support<br />
Original by Joe Natale, K1JN, with major revisions (so don't blame him)<br />
General Two Monitor Operation<br />
Using two monitors is easy and once you have used two you won't want to go back to using one<br />
The operating system (Windows XP or later) takes care of everything. Just think of the two<br />
monitors as one, whether side by side or top and bottom. You only need one mouse and<br />
keyboard. The mouse will move quite smoothly between the two screens. To jump from a<br />
program on one monitor to one on the other, just click a window of the program you want to use.<br />
All of the Windows setting and commands are available to both monitors and can be different for<br />
each.<br />
Two Monitor Setup<br />
http://n1mmtw61.semdxa.org/tiki-print_multi_pages.php?printstructures...<br />
Install hardware - Many new computers already have two video outputs on the video card.<br />
In that case adding an extra card with a video output is not needed<br />
Shut down Windows<br />
Open the case<br />
Install a second video card (when needed)<br />
Attach a monitor<br />
Any card/monitor will do, they don't have to be same as the one already<br />
installed, I used a Windows 95 era ATI Rage video card and an old Gateway<br />
2000 CrystalScan monitor<br />
Close the case<br />
Software<br />
Start the computer and reboot<br />
Windows should find the new card and monitor and install the software<br />
You will get a message on the 2nd monitor that says if you can read this, you<br />
can extend your desktop onto this monitor<br />
You do that by right clicking on the desktop and click on properties. Click on the<br />
settings tab. There will be icons for two monitors. Click on the one numbered 2 and<br />
68 of 319 2/2/<strong>2011</strong> 4:35 PM
check the box that says extend my Windows desktop onto this monitor<br />
Drag the monitor icons to set which is left and which is right<br />
The second monitor is actually an extension of your desktop, it will have the<br />
same wallpaper and color scheme. If you move the mouse cursor off the right<br />
edge of the left monitor, it shows up on the right monitor. The screen saver runs<br />
on the main monitor, but not the 2nd one here<br />
As far as the windows sticking, it varies by program. Luckily, in the case of <strong>N1MM</strong> <strong>Logger</strong>, they<br />
stick!<br />
Example Setup<br />
The picture below is a setup example from K1JN during the CQ WPX CW contest.<br />
The left monitor is a 17" set to 1<strong>02</strong>4 x 768 resolution, the right monitor is a 15" set to 800 x 600<br />
resolution.<br />
Left screen windows Right screen windows<br />
Both Bandmaps Packet/telnet window<br />
Log window Info window<br />
Entry window Available mult's and Q's window<br />
Check partial window Score Summary window<br />
Table of Contents:<br />
Contest Setup and Configuration<br />
1 Station<br />
2 Configurer<br />
3 Start a New Contest Log or Open an Existing Contest Log<br />
http://n1mmtw61.semdxa.org/tiki-print_multi_pages.php?printstructures...<br />
69 of 319 2/2/<strong>2011</strong> 4:35 PM
Station Dialog<br />
Select Config >Change Your Station Data<br />
Your Station Dialog window will be similar to this one.<br />
http://n1mmtw61.semdxa.org/tiki-print_multi_pages.php?printstructures...<br />
The information in this dialog is self-explanatory. Be aware that in order for the logger to calculate<br />
accurate beam headings, you will need to put your longitude and latitude into the appropriate<br />
fields. Also make sure that you enter your call as the station call sign. Many of the fields in this<br />
dialog are used when creating contests or during contests, so have them updated with the<br />
correct values.<br />
ARRL Section entered and the State field are used in some contests and QSO parties to<br />
determine if you are in or outside a state or province<br />
Latitude and Longitude are used to calculate the distance and bearing to another<br />
station/country (for HF contests)<br />
For VHF contests (having VHF in the contest name) the Grid Square field (4 or 6 digit) in<br />
the Station dialog is used as your bearing and not the entered Latitude and Longitude<br />
Contents of the Latitude and Longitude fields update when the Grid Square field is<br />
changed and vice versa<br />
Club normally has to be spelled out completely, so not YCCC but Yankee Clipper Contest<br />
Club (the dialog above is just a bad example!) to have it accepted (and counted) by the<br />
contest committee<br />
E-mail address and SMTP server address are used for sending a bug report via e-mail.<br />
70 of 319 2/2/<strong>2011</strong> 4:35 PM
Your e-mail address and SMTP server address can be found in your e-mail program<br />
Help - Show the help file for this window.<br />
Configurer Dialog<br />
In this Section...<br />
Configurer Dialog<br />
1. Configurer >Hardware tab<br />
1.1. Hardware setup<br />
1.2. Set button examples<br />
1.3. Other Information<br />
1.4. Windows NT/2000/XP (32 bit OS)<br />
2. Configurer >Telnet Cluster tab<br />
3. Configurer >Files Tab<br />
3.1. Files Field Descriptions<br />
4. Configurer >Function Keys Tab<br />
4.1. Function Keys Field Descriptions<br />
4.2. Remapping Function Keys<br />
5. Configurer >Digital Modes Tab<br />
5.1. Digital Modes Field Descriptions<br />
6. Configurer >Other Tab<br />
6.1. Other Tab Field descriptions<br />
7. Configurer >Winkey Tab<br />
7.1. Winkey Field Descriptions<br />
7.2. How to Set Up Winkey in <strong>N1MM</strong> <strong>Logger</strong><br />
8. Configurer >Mode Control Tab<br />
8.1. Mode Control Field Descriptions<br />
9. Configurer >Antennas Tab<br />
10. Configurer >Audio Tab<br />
http://n1mmtw61.semdxa.org/tiki-print_multi_pages.php?printstructures...<br />
The Configurer is our name for the tabbed dialog that appears when you click Config on the<br />
Entry Window top menu, and then choose Configure Ports, Telnet Addresses, Other. The<br />
Configurer has many tabs with program settings influencing all aspects of the behavior of the<br />
program. Be careful in setting up items on the different tabs, to be sure that you understand that<br />
the option you are choosing is what you want.<br />
All settings are remembered by the program in "<strong>N1MM</strong> <strong>Logger</strong>.ini". Function key definitions,<br />
telnet clusters, call history, and country information are not saved in the .ini file, but in the<br />
database that was in use when you loaded them. That means, for example, that function key<br />
definitions loaded or modified when you are using one database will only appear in that<br />
database. You will need to export them from that database and load them into another database<br />
before they would show up there. The "<strong>N1MM</strong> <strong>Logger</strong>.ini" file contains the name of the .mdb file<br />
you were last using, which the program will load when it is started, as well as the name of the<br />
71 of 319 2/2/<strong>2011</strong> 4:35 PM
current contest and other recently-opened contests.<br />
If you have not unchecked "Hide extensions for known file types" in Windows Explorer Options,<br />
you will not see "<strong>N1MM</strong> <strong>Logger</strong>.ini". You will see "<strong>N1MM</strong> <strong>Logger</strong>" with a Type of "Configuration<br />
Settings". Also, do not be confused by the file "<strong>N1MM</strong> <strong>Logger</strong>.ini.init". This is used by the<br />
program during installation. You should not modify this file, because if you ever have to delete<br />
your .ini file and start over (to resolve a configuration problem, for example), it provides the basis<br />
for starting a new one<br />
Multiple ini files<br />
You can invoke an ini file whose name is different from <strong>N1MM</strong> <strong>Logger</strong>.ini by using the file<br />
name as a command-line argument when the program is started.<br />
For example, suppose you wanted to be able to choose between two separate configurations,<br />
one for SO2R and one for SO1V, perhaps using different radios and with different settings.<br />
You could create two new copies of your <strong>N1MM</strong> <strong>Logger</strong>.ini file in the <strong>N1MM</strong> <strong>Logger</strong> program<br />
folder and rename them to, for example, SO2R.ini and SO1V.ini.<br />
Create two desktop shortcuts for <strong>N1MM</strong> <strong>Logger</strong> by right-clicking in an unused area of the<br />
screen and selecting New > Shortcut. Use the Browse button to find your <strong>N1MM</strong> <strong>Logger</strong><br />
program folder and click on the <strong>N1MM</strong> <strong>Logger</strong>.exe file. You will notice that the file name<br />
appears in the location box within quotation marks, e.g.<br />
"C:\Program Files\<strong>N1MM</strong> logger\<strong>N1MM</strong> <strong>Logger</strong>.exe" . Click just to the right of this file name<br />
within the box after the closing " , press the space bar once and add the name of one of your<br />
new ini files, e.g. SO2R.ini<br />
"C:\Program Files\<strong>N1MM</strong> logger\<strong>N1MM</strong> <strong>Logger</strong>.exe" SO2R.ini<br />
Note that if the name of your new ini file contains a space, such as "RTTY SO2R.ini", you will<br />
need to enclose the file name in quotation marks as well, e.g. "C:\Program Files\<strong>N1MM</strong><br />
logger\<strong>N1MM</strong> <strong>Logger</strong>.exe" "RTTY SO2R.ini"<br />
Click Next, choose a name for the shortcut, e.g. <strong>N1MM</strong> <strong>Logger</strong> SO2R, and click Finish.<br />
Repeat this procedure for other specific shortcuts.<br />
Each of these shortcuts will now start up the <strong>Logger</strong> using the ini file named in the shortcut.<br />
Any configuration changes you make will be stored in the named ini file, thus enabling you to<br />
save different configurations in the two files and to choose which configuration to use by<br />
starting the program from the appropriate desktop icon.<br />
1. Configurer >Hardware tab<br />
http://n1mmtw61.semdxa.org/tiki-print_multi_pages.php?printstructures...<br />
The Hardware tab is used to set up your radios, packet interfaces, telnet connections, CW/PTT<br />
/digital ports and the interfaces to other devices, such as SO2R controllers, multi-purpose<br />
interfaces, and keyers, if they require serial or parallel ports. Set the values appropriate to your<br />
station. If you do not have one of the items listed connected to a port, make sure the port<br />
72 of 319 2/2/<strong>2011</strong> 4:35 PM
selection is 'None' and the check boxes are not checked for that port.<br />
Why only 8 COM ports?<br />
One of the first things people notice when they begin setting up <strong>N1MM</strong> <strong>Logger</strong> is that there<br />
are only COM ports 1-8 available. This is a limitation of some of the components used in the<br />
programming, and cannot be changed at this point without a prohibitive amount of effort.<br />
In helping people who say "but my lower-numbered COM ports are all committed to other<br />
things", we have found that it often turns out that some of these ports, though seemingly in<br />
use, are in fact relics of the past. As an example, COM3 used to be the standard port for<br />
built-in modems, and even though those modems have largely gone the way of the dinosaur,<br />
many computers still show COM 3 as committed to that use.<br />
If you are familiar with the use of Device Manager, you can always set up several hardware<br />
profiles, including one for ham radio that deletes the devices that are getting in your way<br />
(printers and so on). That way, you are only a reboot away from being ready to go for radio or<br />
being back in everyday mode.<br />
Sometimes, though, ports will not seem to be committed, but when you try to create virtual<br />
serial ports (with a USB-to-serial adapter, for example) Windows will inexplicably skip some<br />
lower number ports. Ron Rossi, KK1L, has contributed the following note about how to track<br />
down and eliminate these phantoms. Be aware that it involves a little beyond the basic<br />
user-level skills, so ask for expert local help if you're not comfortable with what he suggests.<br />
Often there are ports assigned which no longer have devices connected to them. These are<br />
called "phantom ports". These can be discovered and removed. It may then be possible to<br />
move ports around to accommodate the program.<br />
Here is how to have Device Manager show any "phantom" ports...<br />
1. Click Start<br />
2. Click Run<br />
3. Type cmd.exe in the textbox and click OK<br />
4. Type set devmgr_show_nonpresent_devices=1 and hit ENTER<br />
5. Type cd\windows\system32 and hit ENTER<br />
6. Type start devmgmt.msc and hit ENTER<br />
7. When the device manager opens, click the View menu<br />
8. Click Show Hidden Devices<br />
9. Click on the + sign next to the Ports to see the full list of Com ports being used<br />
10. Highlight the port you wish to delete and then press delete<br />
Accept when asked to do so and continue with any more that you wish<br />
to delete.<br />
http://n1mmtw61.semdxa.org/tiki-print_multi_pages.php?printstructures...<br />
Here's what the Device Manager looks like before you delete the phantom ports:<br />
73 of 319 2/2/<strong>2011</strong> 4:35 PM
If you want, you can right-click on any of the shaded ports and examine their properties. Each<br />
one will show up as a "device no longer connected to this computer."<br />
1.1. Hardware setup<br />
http://n1mmtw61.semdxa.org/tiki-print_multi_pages.php?printstructures...<br />
74 of 319 2/2/<strong>2011</strong> 4:35 PM
http://n1mmtw61.semdxa.org/tiki-print_multi_pages.php?printstructures...<br />
The program supports 8 serial ports (COM1 - COM8) and 3 parallel ports (LPT1 - LPT3).<br />
Set up each port depending on what equipment is connected and enter the appropriate<br />
information.<br />
Radio - The radio used and controlled by the program using radio control (CAT control).<br />
Select 'None' if no radio is connected to this port for this purpose<br />
Digital - Means this port is used for digital communication (MMTTY/MMVARI engine or TNC)<br />
Use this to indicate the port that is used for a TU or TNC that is being used for RTTY<br />
Use it also to indicate the port that will be used for PTT in digital modes<br />
Exception: if you do PTT on the radio control port or from a Winkey, do not<br />
check the Digital box for that port<br />
Packet - This port is used for packet radio (TNC) if selected. Do not select if no TNC is<br />
connected for packet radio<br />
CW/Other - This port is used for CW, PTT, footswitch, DVK or an SO2R controller. This<br />
selection may be made in combination with a Radio, Digital or Packet selection provided the<br />
uses are compatible (e.g. Winkey and radio control cannot use the same serial port,<br />
because both use serial communications)<br />
Details - The Set button in this column can be used to open a window with a set of controls<br />
depending on what is selected in the preceding columns (Radio, Digital, Packet,<br />
CW/Other). To the right of the details column is a summary of the detailed settings. See<br />
below for details<br />
75 of 319 2/2/<strong>2011</strong> 4:35 PM
SO1V - Single Operator 1 VFO i.e. one radio and one VFO used<br />
In SO1V mode, the backslash, Pause, Ctrl+Right-arrow, grave accent(`) and<br />
Ctrl+Alt+K keys are disabled to prevent opening the second Entry window. If the<br />
second Entry window and/or Bandmap window were open, they will be closed when<br />
exiting the Configurer after selecting SO1V<br />
SO2V - Single Operator 2 VFO i.e. one radio and two/both VFO used<br />
Permits using two separate entry windows, one for each VFO<br />
SO2R - Single Operator 2 Radio (2 radios used by one operator)<br />
Permits using two separate entry windows, one for each radio<br />
1.2. Set button examples<br />
http://n1mmtw61.semdxa.org/tiki-print_multi_pages.php?printstructures...<br />
76 of 319 2/2/<strong>2011</strong> 4:35 PM
COM7 details shown when Radio selected (serial port)<br />
COM5 details shown when CW/Other selected for Winkey (serial port)<br />
COM3 details shown when Digital selected (serial port)<br />
LPT1 details shown when CW/Other selected (parallel port)<br />
http://n1mmtw61.semdxa.org/tiki-print_multi_pages.php?printstructures...<br />
There are many more possible combinations than the pictures above are showing.<br />
Speed - The speed of the serial port to radio/if-interface link (check the manual of your<br />
radio/TNC)<br />
Parity - The parity used (check the manual of your radio/TNC)<br />
Data Bits - The number of data bits used (check the manual of your radio/TNC)<br />
Stop Bits - The number of stop bits used (check the manual of your radio/TNC)<br />
DTR - The following selections can be made (pin 4 on DB9 connector):<br />
PTT - used for keying the radio<br />
CW - used for sending CW to the radio<br />
Always on - DTR is always 'high'<br />
Always off - DTR is always 'low'<br />
Handshake - DTR is used for handshaking<br />
RTS - The following selections can be made (pin 7 on DB9 connector):<br />
PTT - used for keying the radio<br />
Always on - RTS is always 'high'<br />
Always off - RTS is always 'low'<br />
Handshake - RTS is used for handshaking<br />
77 of 319 2/2/<strong>2011</strong> 4:35 PM
http://n1mmtw61.semdxa.org/tiki-print_multi_pages.php?printstructures...<br />
Windows 98 Users<br />
If you are having trouble getting your radio working... Windows 98 used to enforce handshake<br />
if the port were set for it even if the application did not request it. Go into the Windows Control<br />
Panel, select the serial port, advanced settings and mark the port for XON/XOFF or "NONE"<br />
handshaking. That should allow receive data from the radio to pass without handshake lines<br />
connected and pulled high.<br />
Icom Addr (hex) - The address for the radio used, enter without the H i.e. 26 not 26H. (This<br />
field is only shown when Icom is the selected radio)<br />
Radio Nr - The radio controlled from this port<br />
In SO1V (one radio, one VFO used) Radio Nr = 1<br />
In SO2V (one radio, two VFOs) Radio Nr = 1<br />
In SO2R select the radio (1 or 2) connected to or controlled by this port<br />
If one LPT "CW/Other port" is set up as Radio=Both, and another LPT<br />
"CW/Other port" is set up as Radio=2, route band data for second radio to<br />
second port<br />
When using CW/Other with an external SO2R controller the lowest numbered<br />
(first) LPT port must be assigned RADIO=BOTH (toggles pin 14)<br />
I.e. When using LPT-2 and LPT-3 then LPT-2 must have Radio=Both<br />
Dig Wnd Nr - Set this to indicate which Digital Interface window uses this port for PTT<br />
and/or FSK keying (only shown when Digital is checked)<br />
If only one DI window is used, select 1<br />
If two DI windows are used, select the DI window number this port will be used for<br />
If the port is being used for FSK keying, you will also have to configure it in the<br />
MMTTY Setup window<br />
PTT Delay (mSec) - The time between keying the radio and starting to send CW, a wav file<br />
or transmit a digital mode (only shown when PTT or Winkey selected)<br />
Radio PTT via command - Select when using a software command via the control link to<br />
the radio to key PTT.<br />
Use only one PTT Method at a Time<br />
Do not select PTT via DTR or RTS in addition to Radio PTT via Command. Whether on<br />
the same port or another, doing so can result in conflicts that may cause PTT<br />
lockups or other malfunctions. If these occur, a first troubleshooting step is to verify<br />
that you do not have more than one PTT method checked.<br />
When checked, the radio will be set to transmit 40 milliseconds (default) before beginning the<br />
message, this is configurable using 'PTT delay (mSec)'<br />
Allow ext. interrupts - Allow external interrupts from this port (serial port - DSR pin 6;<br />
parallel port - pin 15), e.g. from a footswitch. An interrupt on this line will bring focus to the<br />
Entry window and stop a CQ in progress<br />
Winkey - Select when using a Winkey keyer. Speed, Parity, Data bits, Stop bits or<br />
Handshake settings do not have to be adjusted; they are fixed and set by the program.<br />
78 of 319 2/2/<strong>2011</strong> 4:35 PM
http://n1mmtw61.semdxa.org/tiki-print_multi_pages.php?printstructures...<br />
Settings for the keyer can be done on the Winkey tab in the Configurer. If you select<br />
Winkey, DO NOT set DTR to CW.<br />
Not possible if the port is used for radio control, digital or SO2R control (incompatible<br />
uses)<br />
Note: Only one Winkey is supported, but a single Winkey can key two radios<br />
Two Radio Protocol - Support for the MK2R or other SO2R controller from microHAM<br />
(using control protocol on COM port). USB-only SO2R (no LPT port required) with the<br />
MK2R/MK2R+. Protocol used may be either the MK2R proprietary protocol or OTRSP (Open<br />
Two Radio Switching Protocol)<br />
Disabled when selection for CW/Other is turned off or when a radio is selected<br />
OTRSP forces the port speed etc. to 9600,N,8,1<br />
More info in chapter Supported Hardware under MK2R<br />
CW/Other Port Addr - specify port address for serial and parallel ports<br />
Note: For real ports, the address here should be the same as used for this port in<br />
Windows<br />
For USB-to-serial adapters, the address here can be ignored<br />
When both RTS and DTR are set to PTT they will both be keyed for PTT with the set<br />
PTT delay<br />
Packet uses as handshaking RTS + XON/XOFF<br />
When using a self-powered interface set the handshaking to always on (DTR), always<br />
on (RTS) to supply power to the interface<br />
LPT Port Numbers<br />
With <strong>N1MM</strong>, SO2R and LPT CW, the LOWEST number port must have the CW output for<br />
BOTH radios if it is used with a conventional LPT SO2R box (DXD, KK1L, N6BV, etc.) or<br />
microHAM MK2R/MK2R+ in LPT (Classic auto control) mode, The LPT with CW, PTT and the<br />
TX/RX/Split controls must be connected to the SO2R controller. If <strong>N1MM</strong> is configured for CW<br />
on TWO LPT ports (first port: Radio=1, second port Radio=2) then CW will be present only on<br />
the port representing the radio with transmit focus.<br />
DVK - DVK interface for MK2R, W9XT & other DVK's. Also recording is supported by the<br />
program<br />
When DVK is selected, the Antenna selection via the LPT port is disabled<br />
Note: The DVK pins and the antenna pins on the LPT port overlap<br />
When using an external DVK, all of the Run and S&P SSB function keys should be<br />
set to empty.wav and not left blank<br />
microHAM MK2R: if DVK is checked, <strong>N1MM</strong> <strong>Logger</strong> will use the DVK in Router instead<br />
of its own DVK support<br />
FootSwitch mode - Pin 6 on the serial ports and pin 15 on parallel ports. The combo box<br />
options are:<br />
None - No footswitch<br />
ESM Enter - Pressing Footswitch will cause the same action as pressing Enter key in<br />
ESM mode<br />
79 of 319 2/2/<strong>2011</strong> 4:35 PM
Typing Focus - Pressing Footswitch will switch typing focus<br />
Switch Radios - Pressing Footswitch will switch the radios (in SO2R)<br />
Normal - Pressing the footswitch it will behave if it was connected to the PTT of the<br />
active transmitter and is automatically connected to the proper (active) radio.When the<br />
footswitch is released the focus will be set to main Entry window<br />
F1 - Pressing Footswitch will cause the same action as pressing functionkey F1<br />
F2 - Pressing Footswitch will cause the same action as pressing functionkey F2<br />
F3 - Pressing Footswitch will cause the same action as pressing functionkey F3<br />
F4 - Pressing Footswitch will cause the same action as pressing functionkey F4<br />
F11 - Pressing Footswitch will cause the same action as pressing functionkey F11<br />
F12 - Pressing Footswitch will cause the same action as pressing functionkey F12<br />
Band lockout - Implemented mostly for multi user stations to block second signal on<br />
the same band/mode. It may be useful for single user as well. This mode should allow<br />
you to control PTT for both radios (in case of SO2R) in different modes (SSB/CW).<br />
The advantage of using it (compared to the foot switch directly connected to the radio)<br />
is - it stops AutoCQ and Dueling CQ's<br />
It is possible to hook up a footswitch to a serial or parallel port. This should help users with only<br />
one or no serial ports (when a USB to serial adapter is used) to get the footswitch connected to<br />
the computer. A pull up resistor is needed between DSR input (pin 6 on both DB9 and DB25) and<br />
+12 VDC and for the parallel port, between pin 15 and +12 VDC. Multiple footswitches (one per<br />
parallel or serial port) can be used where different settings may be used for each one.<br />
1.3. Other Information<br />
It is possible to have the PTT on the same serial port as the radio with interfaces that support this<br />
(e.g. with a keying circuit connected between RTS and the radio's PTT input).<br />
If the type of CW/Other port chosen is LPT1, LPT2 or LPT3, additional information will be present<br />
on the parallel port. See Radio Interfacing for more detailed info.<br />
1.4. Windows NT/2000/XP (32 bit OS)<br />
Under 32 bit Windows operating systems, using the parallel and the serial ports requires a<br />
special dll which will be installed using the program: Port95nt.exe. A link to this file can be found<br />
in the Installation chapter.<br />
2. Configurer >Telnet Cluster tab<br />
http://n1mmtw61.semdxa.org/tiki-print_multi_pages.php?printstructures...<br />
Telnet Cluster - The default telnet cluster to connect in the Telnet Window<br />
80 of 319 2/2/<strong>2011</strong> 4:35 PM
Ctrl+D - delete a row in the table or use right click menu<br />
Edit button - Change Telnet Cluster List<br />
File<br />
Import... - Import a text file with Packet/Telnet cluster nodes into the program<br />
Export... - Export the the Packet/Telnet cluster nodes to a text file<br />
3. Configurer >Files Tab<br />
The files Tab is used to set the path to the Buckmaster callsign database if present, and to wav<br />
files used for SSB message macros.<br />
3.1. Files Field Descriptions<br />
http://n1mmtw61.semdxa.org/tiki-print_multi_pages.php?printstructures...<br />
Callsign database path - Used to identify the directory of the Buckmaster callsign<br />
database to be used by the logging program. Be sure to include a trailing '\' in the directory<br />
name. Make sure that the path to the CD is set correctly. You can set the path to the<br />
Buckmaster database here and type in the full path to the Buckmaster database on your<br />
CD. For example: If your CD-ROM is mapped to the 'E' drive, the full path is: E:\HAM0\<br />
81 of 319 2/2/<strong>2011</strong> 4:35 PM
Don't forget the back-slash '\' at the end of the path! Also, make sure to copy the<br />
HAMCAL32.DLL from the CD to the program directory where <strong>N1MM</strong> <strong>Logger</strong> is<br />
installed. On older CDs, this file is located in the \API\WINDOWS directory. It may be<br />
located elsewhere on newer CDs<br />
Recorded wav file path - The full path where the recorded wav files should be placed on<br />
your harddisk. In this path the directory with the contest name will be created<br />
Letters file path - The full path to the letters directory. Example: C:\program Files\<strong>N1MM</strong><br />
<strong>Logger</strong>\wav\{operator}\ This provides the ability to have a separate letters file for each<br />
operator. The decimal point (.) should be specified as Point.wav<br />
4. Configurer >Function Keys Tab<br />
Function keys for each message are set here.<br />
4.1. Function Keys Field Descriptions<br />
http://n1mmtw61.semdxa.org/tiki-print_multi_pages.php?printstructures...<br />
Monitor via PC speaker (Win98/ME only) - The CW sent by the program plays via the PC<br />
speaker (only for Windows 95, 98, ME, disabled for NT/2000/XP machines)<br />
82 of 319 2/2/<strong>2011</strong> 4:35 PM
http://n1mmtw61.semdxa.org/tiki-print_multi_pages.php?printstructures...<br />
Send Corrected Call (Before End of QSO Msg) - Send Corrected Call (Before End of<br />
QSO Message) - If the callsign is corrected after answering a call, then the corrected call<br />
will be sent before the End of QSO message (as configured by the End of QSO Key). E.g.<br />
'PA1M TU DE <strong>N1MM</strong>' instead of 'TU DE <strong>N1MM</strong>'<br />
Send Partial Calls - Only CW. When sending a partial corrected call only the corrected<br />
part will be send (prefix or suffix). If not checked the whole call will be sent<br />
Work Dupes when Running - Work dupes is for ESM in Run mode and don't send the<br />
QSO B4 Key. All it does is determine what is sent when a dupe calls you AND YOU PRESS<br />
ENTER. Normally you do want to work dupes. See the chapter Off topic for a discussion<br />
Use Contest Word Spacing for CW - The box is defaulted ON for "Use Contest Spacing<br />
for CW". This setting changes the spacing between words in your CW, where "<strong>N1MM</strong> 599<br />
5" is 3 words. Default is 6 bits for "contest spacing". When box is not checked, 7 bits<br />
between words is used, which is "normal spacing"<br />
Send Cut Numbers - Ctl+G is cut number mode toggle. This is a toggle function and the<br />
new status is shown on the bottom left of the entry window. The cut number style can be<br />
set at the bottom of this dialog. The characters that can be entered into a serial number<br />
field are: A, N, T, O, E, S, U, W, G, and D. Some contests do not use a serial number field<br />
due to length or because the exchange can contain characters. In these contests the<br />
conversion from letters to numbers will not function<br />
Send leading zeros in serial numbers - Send leading zeros to make into 3 digit number.<br />
In CW: Select leading T with the Cut Number Style selector. RTTY: In RTTY zeros will be<br />
added, so 1 will become 001<br />
Stop Sending CQ when Callsign changed - Typing a character in the callsign field will<br />
stop a (repeated) CQ<br />
ESM only sends your call once in S&P, then ready to copy received exchange - This is<br />
many times called the "Big Gun versus Little Pistol switch" . When selected and in Enter<br />
Sends Message mode the cursor moves to the Exchange field when there is something in<br />
the Callsign field and Enter is pressed (so it does not keep the cursor in the callsign field). If<br />
you don't usually get a station on the first call then deselect this option<br />
String to use on CW between his call key and exchange key (default is one space) -<br />
Just as it says. Example ' ur '<br />
Keycode of Ins Key Substitute - Enter the number for the Ins Key substitute as mapped<br />
below in this configurer dialog. Defaults to 186, the ; character. The program can<br />
automatically enter the keycode in this field . Place the cursor in the keycode field and<br />
press the key you want to substitute, it will put the correct keycode in. 186 is an extended<br />
key code. Not all keyboards map keys the same way. Note that you can't use a Shift, Ctrl,<br />
Alt etc. key. I would not advise using a key like Numeric + that is already in use. It may or<br />
may not work. In this case Numeric +, does NOT work<br />
Keycode of TU/Log Key Substitute - Enter the number for the TU/Log Key substitute as<br />
mapped below in this configurer dialog. Defaults to 222, the ' character. The program can<br />
automatically enter the keycode in this field . Place the cursor in the keycode field and<br />
press the key you want to substitute, it will put the correct keycode in. 222 is an extended<br />
key code. Not all keyboards map keys the same way. Note that you can't use a Shift, Ctrl,<br />
Alt etc. key. I would not advise using a key like Numeric + that is already in use. It may or<br />
may not work. This particular case (Numeric +) does NOT work<br />
Cut Number Style - the following cut number styles can be chosen:<br />
83 of 319 2/2/<strong>2011</strong> 4:35 PM
T1234567890 (leading T) - leading 0 will be replaced with a T. So 007 will become TT7<br />
and 030 will become T30<br />
O1234567890 (leading O) - leading 0 will be replaced with a O. So 007 will become<br />
OO7 and 030 will become O30<br />
T123456789T (all T) - all zeros will be replaced with a T. So 007 will become TT7 and<br />
030 will become T3T<br />
O123456789O (all O) - all zeros will be replaced with a O. So 007 will become OO7<br />
and 030 will become O3O<br />
T12345678NT (TN) - all zeros will be replaced with a T, all nines with a N. So 097 will<br />
become TN7 and 090 will become TNT<br />
T12345678NT (ON) - all zeros will be replaced with a O, all nines with an O. So 097<br />
will become ON7 and 090 will become ONO<br />
TA2345678NT (TAN) - all zeros will be replaced with a T, all nines with a N, all ones<br />
with an A So 091 will become TNA and 190 will become ANT<br />
TA234E678NT (TAEN) - all zeros will be replaced with a T, all nines with a N, all ones<br />
with an A, all fives with an E So 091 will become TNA and 1590 will become AENT<br />
TAU34E67DNT - the zero, one, two, five, eight, nine s will be replaced with a T, A, U,<br />
E, D, N or T<br />
4.2. Remapping Function Keys<br />
Select which function keys to send messages. Each type of message has a combo box for you to<br />
set the appropriate function key. If the program is sending the wrong message check here first.<br />
The only restriction is that a key must mean the same thing in Running and in S&P. Function<br />
keys do not have to be unique for a selected message. There is little reason to do so although if<br />
you want it can be done. For the following messages a function key can be selected<br />
ESM<br />
Mode<br />
CQ Key - defaults to F1<br />
Exchange Key - defaults to F2<br />
End of QSO Key - defaults to F3<br />
His Call Key - defaults to F5<br />
My Call Key - defaults to F4<br />
QSO B4 Key - defaults to F6<br />
Again Key - defaults to F8 (can be disabled)<br />
Next Call Key - defaults to Disabled<br />
Work<br />
dupes<br />
when<br />
running<br />
On don't work<br />
dupes<br />
Mode QSO B4<br />
Key<br />
Again<br />
Key<br />
Run Disabled F-key DUPE callsign<br />
entered<br />
http://n1mmtw61.semdxa.org/tiki-print_multi_pages.php?printstructures...<br />
Action Result action<br />
Send AGN message when<br />
Enter pressed<br />
84 of 319 2/2/<strong>2011</strong> 4:35 PM
On don't work<br />
dupes<br />
On don't work<br />
dupes<br />
On don't work<br />
dupes<br />
Run Disabled Disabled DUPE callsign<br />
entered<br />
S&P Disabled F-key DUPE callsign<br />
entered<br />
S&P Disabled Disabled DUPE callsign<br />
entered<br />
On work dupes Run - Disabled DUPE callsign<br />
entered. Mistake<br />
with received<br />
QSO data<br />
On don't work<br />
dupes<br />
Run - Disabled Mistake with<br />
received QSO<br />
data<br />
On - S&P - Disabled Mistake with<br />
received QSO<br />
data<br />
5. Configurer >Digital Modes Tab<br />
http://n1mmtw61.semdxa.org/tiki-print_multi_pages.php?printstructures...<br />
Send the EXCH when Enter<br />
is pressed, station will be<br />
worked and logged with<br />
Enter, Enter<br />
Pressing Enter does<br />
nothing, no blue buttons in<br />
the Entry window<br />
Pressing Enter does<br />
nothing, no blue buttons in<br />
the Entry window<br />
Send EXCH when Enter is<br />
pressed<br />
Send EXCH when Enter is<br />
pressed<br />
Send EXCH when Enter is<br />
pressed. After the user<br />
corrects the entry, it will log<br />
and not send anything<br />
85 of 319 2/2/<strong>2011</strong> 4:35 PM
The Digital modes tab is used to set up the interfacing to external Controllers (TNCs), or for PTT<br />
control using MMTTY/MMVARI for sound card digital modes.<br />
In SO1V mode, there is only one Digital Interface window, DI-1. In SO2V and SO2R modes, there<br />
are two Digital Interface windows, DI-1 and DI-2. Each DI window is associated with one of the<br />
two Entry windows. Each DI window is opened from the Window > Digital Interface menu item in<br />
the corresponding Entry window. The Digital Modes tab in the Configurer is used to configure<br />
both Digital Interface windows.<br />
5.1. Digital Modes Field Descriptions<br />
http://n1mmtw61.semdxa.org/tiki-print_multi_pages.php?printstructures...<br />
Digital Interface 1 / 2<br />
TU type<br />
None<br />
Other: like the KAM, PK232, PTC and any other external TNC<br />
Soundcard: when using MMTTY or MMVARI soundcard software<br />
Port, Speed, Parity, Data Bits, Stop Bits, Flow Control - Have to be set if<br />
'CW/Other' has been chosen as well<br />
DI-1 MMTTY Mode | DI-2 MMTTY mode<br />
When using MMTTY, select whether AFSK or FSK is being used<br />
86 of 319 2/2/<strong>2011</strong> 4:35 PM
If AFSK is selected the serial port (if any) with a check in the Digital check box and<br />
with Dig Wnd Nr corresponding to the DI window number will get passed to MMTTY<br />
when the DI window is opened, so that MMTTY can use it for PTT control.<br />
If FSK is selected the serial port will not get passed to MMTTY. The serial port for FSK<br />
has to be set in the MMTTY Setup. This is necessary in order to allow for the<br />
possibility of using EXTFSK in MMTTY. More information in the MMTTY support<br />
chapter<br />
DI-1 MMTTY Path | DI-2 MMTTY Path<br />
The path to the MMTTY engine goes here including the file name of the program<br />
It's not necessary that MMTTY be in the same directory as <strong>N1MM</strong> logger<br />
Via the 'Select' buttons the path and file name can be selected<br />
It is possible to select two instances of MMTTY in two separate folders. You must do<br />
this if you want the MMTTY settings in the two instances to be different (e.g. left vs.<br />
right channel, different sound cards, etc.)<br />
DI-1 Fldigi Path | DI-2 Fldigi Path<br />
The path to the Fldigi engine goes here including the file name of the program<br />
Via the 'Select' buttons the path and file name can be selected<br />
DI-1 MMVARI RTTY Mode | DI-2 MMVARI RTTY Mode<br />
When using MMVARI for RTTY, select whether AFSK or FSK is being used<br />
If AFSK is selected the serial port (if any) with a check in the Digital check box and<br />
with Dig Wnd Nr corresponding to the DI window number will get passed to MMVARI<br />
when the DI window is opened, so that MMVARI can use it for PTT control<br />
If FSK is selected, the port to be used for PTT control is defined in a separate setup<br />
window<br />
DI-1 MMVARI FSKPort | DI-2 MMVARI FSKPort<br />
Choose FSK8250 if you are using a true serial port or a device that can simulate a<br />
serial port and handle 5-bit codes at 45.45 baud (this does not include most USB-toserial<br />
adapters, but it does include some commercial interfaces designed to support<br />
FSK RTTY)<br />
When MMVARI is opened for FSK RTTY, a small window labelled<br />
FSK8250/16550 1.03 will open, or appear on the Windows Task bar. In this<br />
window you select the COM port number and the signal line to be used for PTT<br />
(RTS or DTR). FSK keying will be done on the TxD line. If this is a USB device<br />
that simulates a serial port, check Limiting speed. You can use the _ box at the<br />
top right to minimize this window after completing the setup<br />
Choose EXTFSK if you are using a regular USB-to-serial adapter<br />
When MMVARI is opened for FSK RTTY, a small window labelled EXTFSK 1.05a<br />
will open, or appear on the Windows Task bar. In this window you select the<br />
COM port number and the signal lines to be used for FSK keying (normally TxD)<br />
and PTT (RTS or DTR). You can use the _ box at the top right to minimize this<br />
window after completing the setup<br />
6. Configurer >Other Tab<br />
http://n1mmtw61.semdxa.org/tiki-print_multi_pages.php?printstructures...<br />
87 of 319 2/2/<strong>2011</strong> 4:35 PM
The Other tab is used to set up default values and select special modes and functions.<br />
6.1. Other Tab Field descriptions<br />
http://n1mmtw61.semdxa.org/tiki-print_multi_pages.php?printstructures...<br />
Packet Spot Time (min) - Indicates how long (in minutes) spots are kept in the bandmaps.<br />
The default is 60 minutes, any integer may be specified<br />
Repeat time in millisecs - Specify the repeat interval (CW or SoundBlaster) in the Entry<br />
window (Auto-CQ). The default value is 1.8 seconds. Enter a value in seconds or<br />
milliseconds. The maximum value is 32767. This is the same as Ctrl+R or 'Config | Set CQ<br />
repeat time' in the Entry Window<br />
Default # Spots in SH/DX/# - The number of returned spots by the SH/DX command in the<br />
bandmap window. The default value is 30 spots. The number of returned spots for the<br />
SH/DX command in the Packet / Telnet window is not affected by this value and has to be<br />
changed in the Entry window under 'Config menu | Edit Packet/Telnet Buttons'<br />
SSB Tuning Tolerance (Hz) - SSB mode: Clicking on or next to a station in the bandmap<br />
window will put the call on the callsign frame (if the callsign field is empty) of the Entry<br />
window. This value gives the maximum frequency distance to the call on the bandmap<br />
when it will be put on the callsign frame. The value has to be between 0 and 20000 (20<br />
kHz). The default value is 300<br />
CW Tuning Tolerance (Hz) - CW mode: Clicking on or next to a station in the bandmap<br />
88 of 319 2/2/<strong>2011</strong> 4:35 PM
http://n1mmtw61.semdxa.org/tiki-print_multi_pages.php?printstructures...<br />
window will put the call in the callsign frame (if the callsign field is empty) of the Entry<br />
window. This value gives the maximum frequency distance to the call on the bandmap<br />
when it will be put on the callsign frame. The value has to be between 0 and 20000 (20<br />
kHz). The default value is 300<br />
RTTY Tuning Tolerance (Hz) - RTTY mode: Clicking on or next to a station in the bandmap<br />
window will put the call on the callsign frame (if the callsign field is empty) of the Entry<br />
window. This value gives the maximum frequency distance to the call on the bandmap<br />
when it will be put on the callsign frame. The value has to be between 0 and 20000 (20<br />
kHz). The default value is 300<br />
CW Weight - Adjusts the CW weight (between 30-70% limits). The default value is 50. Thie<br />
weight command not only works for serial or lpt CW but also for Winkey<br />
SSB Up/Down Arrow Incr (kHz) - This value gives the frequency jump amount in SSB by<br />
the up/down arrow keys. NB. Never make it smaller than the smallest step your radio can<br />
make in SSB. Older Icom rigs are known to have a smallest step of 100 Hz which is quite<br />
big. When the step is made smaller than the minimum step size the Up/Down Arrows don't<br />
seem to work. Also controls the amount of each frequency change when tuning the RIT on<br />
radios that support doing so from the computer.<br />
CW Up/Down Arrow Incr (kHz) - This value gives the frequency jump amount in CW and<br />
digital modes by the up/down arrow keys. NB. Never make it smaller than the smallest step<br />
your radio can make in CW. Most rigs have a smallest step in the order of 10 Hz. When the<br />
step is made smaller than the minimum step size the Up/Down Arrows don't seem to work.<br />
Also controls the amount of each frequency change when tuning the RIT on radios that<br />
support doing so from the computer.<br />
PgUp/PgDn Incr (kHz) - This value gives the frequency jump amount for the {PGUP}<br />
{PGDN} macros (Note: the PgUp and PgDn keys are not used for this; the {PGUP} and<br />
{PGDN} macros must be used in function key macros. These macro names are holdovers<br />
from early versions of the program)<br />
Primary CW speed Step - The primary speed step is used with PgUp/PgDn button or the<br />
speed adjust in the Entry Window<br />
Secondary CW speed Step -The secondary speed step is used when Shift+PgUp/PgDn is<br />
pressed. Alt+PgUp/PgDn adjusts the CW speed of the inactive radio/VFO in SO2R/SO2V<br />
mode<br />
Clear populated exchange on callsign change - When selected (default is Off), if the<br />
callsign in the Entry window is changed by the operator, this option clears the contents of<br />
exchange fields in the Entry window that were populated (filled in) from a CallHistory file,<br />
from previous QSOs in the contest, or from a Telnet spot. Does not affect exchange data<br />
that have been manually filled in.<br />
Keep log of all QSOs to facilitate recovery of log - This is the transaction back-up log<br />
file. This journaling back-up text file has all QSOs from the contest in it. So if the database<br />
for some reason would become corrupt it is possible to import this file in a new database<br />
and go on with the contest<br />
When this option is selected the transaction log is created for each contest you log to<br />
The file is closed after each transaction and reopened to force the data to be written to<br />
disk<br />
To keep things simple and foolproof, you are not allowed to change the name of the<br />
transaction log<br />
89 of 319 2/2/<strong>2011</strong> 4:35 PM
The name is used to make sure you are loading it properly, and to prevent<br />
mixing logs of two contests<br />
Example name: 'ham.mdb - CQWWCW - 2005-09-19.TRN' i.e.: Used database<br />
name - contest name - date log created<br />
When importing you MUST import the transaction log into an NEW (empty) database<br />
Why? To prevent a user recovering from a database problem making the<br />
problem worse. This will prevent any issues from duplicate contacts and a<br />
number of other problems<br />
Use 'File, Import, Recover QSOs from a Transaction Log' to import the<br />
transaction log file<br />
As you load the transaction log, a new transaction log is automatically made with the<br />
transactions in the first log. Thus you should never have to merge logs. You always<br />
use the last one<br />
Start Contest Reporting Application - Start the contest reporting application. With this<br />
application you can show your contest efforts in real time during a contest to the world. Next<br />
to this application a website is needed where everyone can see the score. This application<br />
does automatically upload scores from the current selected contest to the configured<br />
website<br />
Mute mic on supported radios - Mute the microphone during transmit. Normally used to<br />
enter audio via an other radio input then the microphone. Default is to not mute<br />
Tentec Orion: If "Mute" is checked, it causes the Orion's mic input to be muted and the<br />
Aux input to un-mute during voice keyer events<br />
Supported radios are: Tentec Orion and Elecraft K3<br />
Format for DXSpider Cluster - This will send the right SH/DX message for DXSpider<br />
clusters from the button in the top of the bandmaps (Example: SH/DX/30 on 20). Also<br />
SH/<strong>QRZ</strong> will be sent instead of SH/BUCK. Only select this when connecting a DXSpider<br />
cluster. Connect the cluster and send: SH/VER A DX-spider cluster will say something like:<br />
DX Spider Cluster. The 'normal' setting is not selecting this option<br />
Auto-Completion Mode - Auto-completion of callsigns. It works like Internet Explorer's<br />
address bar. If you type in a partial callsign, the program will attempt to match it with a call<br />
that you have already logged or is uniquely identified in the check window. If it matches, the<br />
rest of the call will be added to the callsign textbox and highlighted. You can then either<br />
accept the call as displayed, or keep typing. If you keep typing, the highlighted portion will<br />
be replaced by what you type<br />
Use Reverse CW - When selecting CW send a command to the radio to use Reverse CW<br />
7. Configurer >Winkey Tab<br />
http://n1mmtw61.semdxa.org/tiki-print_multi_pages.php?printstructures...<br />
90 of 319 2/2/<strong>2011</strong> 4:35 PM
The Winkey tab is used to control functions of the K1EL Winkey keyer chip. Winkey is designed<br />
by K1EL and G3WGV. It is only active when the Winkey box has been checked on a serial<br />
port, and that port (whether real or virtual), has been connected either to a stand-alone<br />
keyer or to a device that embeds the Winkey chip, such as various MicroHAM products and<br />
RigExpert. Consult your unit's manual along with the Winkey chip manual for more<br />
information on these settings.<br />
Winkey is fed ASCII characters from <strong>N1MM</strong> <strong>Logger</strong> (via COM or USB Ports), and converts the<br />
ASCII to timed CW. For more info see the links page and the Supported Hardware page. The<br />
pot speed range is from a minimum of 10 wpm to a maximum of 55 wpm. Winkey can also be<br />
used to control PTT. Winkey PTT can be used on modes other than CW. Note: This only works<br />
for Winkey versions 10, and 21 and greater.<br />
7.1. Winkey Field Descriptions<br />
http://n1mmtw61.semdxa.org/tiki-print_multi_pages.php?printstructures...<br />
Keying Mode - Select the keying mode. Choices are: Iambic A, Iambic B, Ultimatic and<br />
Semi-Automatic. The default is Iambic-B<br />
Autospace - Select when the autospace feature should be used. When using the paddles<br />
to send, if a pause of longer than one 'dit' time is detected, THREE dit times of pause will<br />
91 of 319 2/2/<strong>2011</strong> 4:35 PM
http://n1mmtw61.semdxa.org/tiki-print_multi_pages.php?printstructures...<br />
be inserted before the next character. See the manual for more information<br />
Pot is wired with two leads - Select when the potentiometer on the board is wired only<br />
with two instead of three wires. Under normal operation, leave unchecked. Unless you've<br />
built the keyer yourself, or your keyer vendor recommends this, leave unchecked<br />
Pin 5 Function - Select the function of pin 5. Unless your keyer's manual tells you<br />
otherwise, the default of PTT is likely what you want here. Other choices include PTT,<br />
Sidetone, 2nd CW (second output) or None. The Winkey manual is also a good reference.<br />
The choices are:<br />
PTT (default)<br />
Sidetone<br />
2nd CW (second output)<br />
None<br />
Sidetone Frequency - Select the sidetone frequency. The default sidetone frequency is<br />
469 Hz<br />
Reverse Paddles - Reverse the left and right paddle<br />
Ignore Winkey Speed Pot - Ignore the setting of the Winkey potentiometer<br />
Lead Time - Set the lead time value in 10ms Increments (up to 2.55 seconds). This value<br />
reflects the amount of time that the Winkey PTT will be asserted BEFORE keying<br />
commences<br />
If when sending CW you are missing the first dot or dash, or if paddle-sent CW<br />
doesn't seem responsive (again, missing the first character) set this to at least 10<br />
mSec<br />
NOTE that this field denotes 10 mSec intervals — '1' in this box means 10 mSec<br />
IF Pin 5 function is set to PTT, set this value to at least 1 (10 mSec)<br />
Tail Time - Sets the tail time in 10 mSec Increments (up to 2.55 SECONDS). This value<br />
reflects the amount of time that the Winkey PTT line will be held after keying stops. Tail<br />
Time = 1 results in a tail time of one dit time (v2.2; 10 msec in earlier versions of Winkey),<br />
Tail Time = 2 adds 10 msec to that, Tail Time = 3 adds another 10 msec, and so on. If Tail<br />
Time is set to zero, then Hang Time is used instead<br />
First Character Extension - Sets the extension time in 10 mSec steps (up to 2.55<br />
seconds). Normally ONLY used with older, slower-keying rigs at speeds above 25 wpm, this<br />
setting will add time to the first element sent to help with the lack of T/R speed of those rigs.<br />
This value is usually set by experimentation. See the Winkey manual for more information<br />
on setting this value<br />
Keying Compensation - Normally only used with high speed (>30 wpm) QSK operation.<br />
Adds time (in 1 mSec increments) to both dashes and dots to adjust for rig switching delays<br />
(however slight). See the Winkey manual for more information<br />
Hang Time - Provides a CW-Speed dependent means of holding PTT after CW sending is<br />
finished. Hang Time can be used to set a CW-speed dependent delay of 1, 1.33, 1.67 or 2<br />
letterspaces (not dit spaces). Tail Time must be set to zero to use Hang Time<br />
Winkey 2<br />
Sidetone - Gives a sidetone when sending CW (when using paddle and computer<br />
input)<br />
Paddle only sidetone - Gives a sidetone only when sending by paddle<br />
Use 2nd output - Use the second output from the Winkey 2<br />
92 of 319 2/2/<strong>2011</strong> 4:35 PM
Setting CW Speed in Winkey<br />
The CW sending speed can be changed to any value by typing over the provided field in the<br />
Main Entry window. Using the scroll bars on the CW speed entry field, or using the speed<br />
control connected to the Winkey chip changes the speed in 2 wpm steps.<br />
Setting the speed using the speed control pot changes BOTH the paddle speed and the<br />
<strong>N1MM</strong> sending speed. Setting the speed using the entry window changes both the paddle<br />
sending speed and <strong>N1MM</strong> sending speed but ONLY UNTIL the next time the speed pot is<br />
adjusted, i.e. the absolute position of the speed pot then overrides any changes made in the<br />
entry window.<br />
Setting CW Weight in Winkey<br />
CW weight for Winkey can be set up on the Other tab using the same 30-70% limits.<br />
7.2. How to Set Up Winkey in <strong>N1MM</strong> <strong>Logger</strong><br />
Identify the port to control it. Check " CW/Other" on that port. Click Set. Check Winkey. Now go to<br />
'Config|Configure ports, CW/Other', and on the Winkey tab, make the relevant choices. The only<br />
subtlety is that if you are using Winkey's PTT you need to set a lead-time value of other than<br />
zero, and a tail time or hang time value as desired (e.g. sufficient to make Winkey hold in<br />
between characters of hand-sent CW). That's it.<br />
8. Configurer >Mode Control Tab<br />
http://n1mmtw61.semdxa.org/tiki-print_multi_pages.php?printstructures...<br />
93 of 319 2/2/<strong>2011</strong> 4:35 PM
The mode control tab determines how the mode will be controlled on the connected radio,<br />
whether the program sets the mode when changing frequency or not, and what mode it<br />
changes it to. This dialog also gives you control over how contacts will be logged.<br />
8.1. Mode Control Field Descriptions<br />
http://n1mmtw61.semdxa.org/tiki-print_multi_pages.php?printstructures...<br />
Mode recorded in log - Set how to determine the mode that will be entered in the log<br />
Use radio mode (default) - use the mode received from the radio<br />
In digital modes, the mode in the log will be RTTY if using the MMTTY engine or<br />
a TNC<br />
When using the MMVARI engine, the mode will be as selected in the MMVARI<br />
window<br />
Follow band plan - use the mode the internal bandplan gives for this frequency<br />
Use contest mode or bandplan - if the contest is a single mode, use that mode. If<br />
mixed, use the bandplan (as above)<br />
Use contest or radio mode - if the contest is a single mode, use that mode. If mixed,<br />
use the mode from the radio (as above)<br />
Always: - always log the mode selected here (CW, SSB, RTTY, PSK31, PSK63,<br />
PSK125)<br />
Mode sent to radio - Select how to determine the mode sent to the radio<br />
94 of 319 2/2/<strong>2011</strong> 4:35 PM
This applies only for digital modes. See the note below for details<br />
Digital Mode Selection<br />
Every radio seems to have a different range of choices and names for digital modes. Some<br />
radios have no modes specialized for digital modes, some have only one digital mode for FSK<br />
RTTY (for sound-card digital modes, you use USB or LSB), some add to this a separate mode<br />
intended for sound-card digital modes like AFSK RTTY and PSK31, and some radios have<br />
three separate digital modes for FSK RTTY, AFSK RTTY, and other sound-card digital modes<br />
like PSK31. There may also be two versions of each of these, one "normal" and one "reverse"<br />
(opposite sideband). Every manufacturer uses different names for these specialized modes.<br />
For simplicity, <strong>N1MM</strong> <strong>Logger</strong> has its own radio-independent terminology. The <strong>Logger</strong> uses<br />
RTTY for the radio mode normally used for FSK RTTY (which is usually but not always called<br />
FSK or RTTY on the radio). If the radio has a mode that is designated for AFSK RTTY, the<br />
<strong>Logger</strong> calls it AFSK. AFSK-R is the "reverse" of this AFSK mode, i.e. on the upper sideband<br />
instead of LSB. If there is a mode intended for sound card data modes that is different from<br />
the AFSK-R mode, it will be called PSK in the <strong>Logger</strong>. Not all radios have all of these modes,<br />
so not all choices will necessarily be available, depending on what radio(s) is/are configured.<br />
The translation between the mode name used on the radio and the mode name used in<br />
<strong>N1MM</strong> <strong>Logger</strong> is described at Click here to see the table<br />
For RTTY, if you are using FSK, you should normally select RTTY. If you are using AFSK,<br />
you should normally select AFSK or LSB/USB, depending on whether your radio offers a<br />
specialized AFSK mode or not.<br />
For PSK, the choice would normally be one of: PSK (if available), AFSK-R (on some radios),<br />
or USB.<br />
9. Configurer >Antennas Tab<br />
http://n1mmtw61.semdxa.org/tiki-print_multi_pages.php?printstructures...<br />
95 of 319 2/2/<strong>2011</strong> 4:35 PM
http://n1mmtw61.semdxa.org/tiki-print_multi_pages.php?printstructures...<br />
The Antennas tab gives control over which antenna should be automatically selected when<br />
selecting a new band. The parallel port is being used to give the needed code to an external<br />
Top-Ten type device box. The code to send to the box is setup in this dialog. To replicate the<br />
default Top-Ten behavior see the example setup in the Interfacing chapter.<br />
When you press Alt+F9, you will toggle through all the antennas FOR THAT BAND. If there is<br />
only one, then no toggling will occur. When you change bands, the antenna switch will be<br />
changed to the antenna with the lowest code for that band. The selected antenna will show in the<br />
status pane. Commas are not allowed as separator if that's the decimal separator (in Windows).<br />
Code - The code which will be presented on the LPT port<br />
Each code represents ONE ANTENNA not a band<br />
Code is binary code on the parallel port using the pins 9, 8, 7 and 2<br />
Antenna - Free text to describe the antenna, give a meaningful name here<br />
Bands - The bands on which this antenna should be used<br />
Use bands in MHz e.g. 1.8, 3.5, 7 etc.<br />
Bands should be separated by a comma for multi band antennas<br />
An antenna may be used on any number of bands<br />
Rotor Port(s) - setup the serial port used with <strong>N1MM</strong> rotor<br />
Has to be set up to the ports used in <strong>N1MM</strong> Rotor<br />
More than one port can be selected (separate using comma). Great when turning a<br />
stack with more rotators<br />
96 of 319 2/2/<strong>2011</strong> 4:35 PM
Offset - This offset is added to the rotor position to determine the antenna position. This is<br />
useful for antennas that are mounted at 90 degrees for pattern interference reasons, or for<br />
antennas that have simply turned some in the wind over the winter. The offset can also be<br />
entered for the selected rotor in the rotor program<br />
Bidirect - Set to 1 if the antenna can be set bidirectional (0 = not bidirectional, 1 =<br />
bidirectional) (e.g. Steppir)<br />
Start UDP port for Rotor Program - Set the UDP which is used in communication between<br />
the Rotor program and <strong>N1MM</strong> logger. Defaults to UDP port 12040 and has to be set up the<br />
same in both programs to work<br />
Start Rotor Program - Start rotor program automatically by <strong>N1MM</strong> <strong>Logger</strong> main program.<br />
You will need to stop it manually<br />
LPT Port Conflict<br />
When DVK is selected on the used LPT port, the antenna selection on the pins is not working<br />
because the DVK pins and the antenna pins do overlap.<br />
10. Configurer >Audio Tab<br />
http://n1mmtw61.semdxa.org/tiki-print_multi_pages.php?printstructures...<br />
97 of 319 2/2/<strong>2011</strong> 4:35 PM
For the Two Sound Card SO2R ($5 SO2R) check the SO2R chapter.<br />
Select at the top of the page the configuration to use. (example picture how to connect can be<br />
found in the SO2R chapter.)<br />
1 - Single Card - One radio, No Sound Card SO2R<br />
One radio and one sound card to play wav files and record new messages and mute the<br />
microphone when playing wav files<br />
Only the top part of the dialog above (Tx Sound Card and QSO recording) has to be set up.<br />
Bottom part is deselected<br />
2 - Single Card - Two radio, No Sound Card SO2R<br />
Not SO2R but two radios and one sound card to play wav files and record both radios<br />
Only the top part of the dialog above (Tx Sound Card and QSO recording) has to be set up.<br />
Bottom part is deselected<br />
3 - Single Card - Two radio, Sound Card SO2R, CW Only<br />
SO2R with one sound card for CW only<br />
The drawback here is that no switching of the headphones is done<br />
You will have to wire a cable to the cd or aux input of a sound card in order to make use of<br />
this feature<br />
You'll need to define your radios as SO2R in the Hardware tab<br />
Both the top and bottom part of the dialog above (Tx Sound Card and QSO recording + Rx<br />
Sound Card) have to be set up<br />
The TX Radio Input Port in the top part of the dialog is deselected<br />
4 - Dual Cards - Two radio, Sound Card SO2R<br />
http://n1mmtw61.semdxa.org/tiki-print_multi_pages.php?printstructures...<br />
Full SO2R with audio switching where two soundcards are needed<br />
Switching of the headphones is done<br />
You will have to wire a cable to the cd or aux input of a sound card in order to make use of<br />
this feature<br />
You'll need to define your radios as SO2R in the Hardware tab<br />
Both the top and bottom part of the dialog above (Tx Sound Card and QSO recording + Rx<br />
Sound Card) have to be set up<br />
The TX Radio Input Port in the top part of the dialog is deselected<br />
Not All Sound Cards are Created Equal<br />
The Configurer lets you pick parameters that your sound card may not support... usually 16<br />
bit, 11<strong>02</strong>5 Hz/sec is safe for all cards.<br />
98 of 319 2/2/<strong>2011</strong> 4:35 PM
Tx Sound Card and QSO Recording Setup - It is best to choose the default card for the<br />
Tx Sound card. This is because the CD input is not used for Tx and can be used normally.<br />
If you do use the default card for Rx, try connecting one of the radio inputs to an unused<br />
input like 'Aux'<br />
Select Device - Select the soundcard to use for sending Wav files (DVK) and<br />
recording QSOs<br />
Select Input Line - Select the Input line for recording. If your microphone is<br />
connected to the soundcard this will be the 'Mic input'<br />
Select Line to Mute - Select the line to mute when playing wav files. This is also<br />
mostly the Mic input<br />
Recording Bits - Select 8, 16 or 24 bit recording. NB Your soundcard should support<br />
this or an Error 4 will appear when starting to record<br />
Select 8 bits or 16 bits and it will probably always work and make the smallest<br />
files (and good enough quality recordings)<br />
Recording Sample Rate - Select the sample rate to record. The lower the rate the<br />
smaller the files but less quality recording<br />
Selecting 11<strong>02</strong>5 is a good starting point<br />
Radio Input Port - Select the Radio Input Port which receives the audio from the<br />
radio. Mostly Line In. Only when configuration 1 or 2 selected, otherwise grayed out<br />
Max Recording Length (secs) - This is the maximum recording length of a wav file,<br />
when the recording is longer the first part will be discarded so always the last 30<br />
seconds (in this example) will be recorded<br />
Recording channels - Select the number of channels to record, 1 or 2<br />
The output for Wave files from the computer to the radio/radios is always the 'Speaker Out' from<br />
the soundcard.<br />
Rx Sound Card Setup (used for SO2R Headphone Switching) - Two line-level inputs are<br />
required for SO2R. With almost all cards, you will have to use one of the internal inputs like<br />
'CD' or 'Aux'. You will need to make a custom stereo cable. This part can only be selected<br />
with configuration 3 or 4, otherwise grayed out<br />
Device - Select the (second) soundcard to use<br />
Left Radio Input Port - Select the Left Radio Input Port which receives the audio from<br />
the radio. Mostly Line In, CD or Aux<br />
Must be different from Right Radio Input Port<br />
Right Radio Input Port - Select the Right Radio Input Port which receives the audio<br />
from the radio. Mostly Line In, CD or Aux<br />
Must be different from Left Radio Input Port<br />
Start a New Contest Log or Open an Existing Contest Log<br />
http://n1mmtw61.semdxa.org/tiki-print_multi_pages.php?printstructures...<br />
99 of 319 2/2/<strong>2011</strong> 4:35 PM
In this Section...<br />
Start a New Contest Log or Open an Existing Contest Log<br />
1. Start a new contest log<br />
2. Open an Existing Contest Log<br />
3. Contest Specific Information<br />
3.1. Contest Tab<br />
3.2. Tab: Associated Files<br />
Databases versus Logs<br />
http://n1mmtw61.semdxa.org/tiki-print_multi_pages.php?printstructures...<br />
100 of 319 2/2/<strong>2011</strong> 4:35 PM
http://n1mmtw61.semdxa.org/tiki-print_multi_pages.php?printstructures...<br />
Before starting your first contest, you should understand how <strong>N1MM</strong> <strong>Logger</strong> stores contests<br />
and contacts. The two keys terms are Databases and Logs. As an analogy, think of your PC's<br />
hard disk as a large room containing computer stuff. Into this room, <strong>N1MM</strong> <strong>Logger</strong> places File<br />
Cabinets (Databases) and within those File cabinets, <strong>N1MM</strong> <strong>Logger</strong> adds individual Folders<br />
(Logs). For each contest that you operate, you will add a new Log to hold the contacts for<br />
that contest. Your large room with computer stuff can hold as many File Cabinets<br />
(Databases) and as many Folders (Logs) as you want - until, of course, your hard drive is full.<br />
Continuing our File Cabinet and Folder analogy, there are many methods by which you can<br />
arrange your file cabinets (Databases). Here are three examples:<br />
1. DATABASE PER CONTEST TYPE - Some hams prefer to create a Database for each major<br />
contest type. Your \<strong>N1MM</strong> <strong>Logger</strong> directory would contain databases (>File >New Database)<br />
named CQ WW. MDB, ARRL DX.MDB, ARRL 160.MDB and CQ WPX.MDB. When setting up<br />
each contest, you >File >Open the Database corresponding to the contest to be operated,<br />
then >File >New Log (folder) for that particular contest. So, one of these databases would<br />
contain CW, Phone, and RTTY logs from 2007, 2008, and 2009... for that particular contest.<br />
You might want to add a database like MISCELLANEOUS.MDB for the smaller contests or<br />
contests that you only plan to operate a couple of times.<br />
2. DATABASE PER CALENDAR YEAR - Some hams create a new Database each year. At the<br />
beginning of each year, you would >File >New Database a database named K8UT<br />
2008.MDB, K8UT 2009.MDB or K8UT 2010.MDB. In each database would be the Logs<br />
(folders) for every contest you operate during that year. When setting up each contest, you<br />
would >File >Open Database for the correct year, then >File >New Log (folder) for that<br />
particular contest. So, this database would contain all contests (CQ WW, ARRL DX, CQ<br />
WPX...) worked during that year.<br />
3. DATABASE PER EACH CONTEST - Some hams create a new Database each time they<br />
operate a contest. Your \<strong>N1MM</strong> <strong>Logger</strong> directory would contain lots of databases - one for<br />
each contest that you operate. When setting up each contest, you would >File >New<br />
Database, and then within that database you would >File >New Log. Although some hams<br />
may find this the easiest method to understand, managing all of those files after many years<br />
may become a problem.<br />
These aren't your only Database/Log options, but perhaps one of them matches the way your<br />
brain works. How about organizing your logs by mode: CW.MDB, PHONE.MDB,<br />
DIGITAL.MDB? <strong>N1MM</strong> <strong>Logger</strong> can do any of these - choose the method that provides the<br />
easiest way for you to create new logs before the contest and find your old logs after the<br />
contest.<br />
101 of 319 2/2/<strong>2011</strong> 4:35 PM
Sent Exchange<br />
Do not enter the signal report as part of the exchange on this setup page.<br />
1. Start a new contest log<br />
To start a new contest select >File >New Log in Database.<br />
http://n1mmtw61.semdxa.org/tiki-print_multi_pages.php?printstructures...<br />
Initially, you'll see the name of the contest last used by the program. Click the downwardpointing<br />
arrow to the right of the current contest name (called the "handle") to drop down<br />
the list of all supported contests.<br />
You can search alphabetically by pressing the first letter of a contest's short name, and then<br />
scrolling to find the right one.<br />
A list of supported contests can be found in the Supported Contests chapter. Check the contest<br />
website for the latest rules and check the contest setup information in the Contest Setup<br />
Instructions chapter.<br />
1<strong>02</strong> of 319 2/2/<strong>2011</strong> 4:35 PM<br />
*
2. Open an Existing Contest Log<br />
To open an existing contest log in the currently selected database. Select >File >Open Log in<br />
Database<br />
In the top part of the dialog the currently available contest logs can be selected by clicking<br />
on the down arrow to the right of the textbox. Note that the textbox is captioned "Select<br />
Existing Log"<br />
Contest specific changes can be made in the Contest and Associated Files tabs. More<br />
information in the paragraph below<br />
To delete a contest, click on the contest in the contest pane, as shown above, so it is selected.<br />
Then press Delete.<br />
For example, the CQWWSSB in the picture above is selected and can be deleted by pressing the<br />
Delete key.<br />
3. Contest Specific Information<br />
http://n1mmtw61.semdxa.org/tiki-print_multi_pages.php?printstructures...<br />
Default entry category information will be used on new contests to that of the currently open<br />
103 of 319 2/2/<strong>2011</strong> 4:35 PM
contest.<br />
3.1. Contest Tab<br />
http://n1mmtw61.semdxa.org/tiki-print_multi_pages.php?printstructures...<br />
Operator Category: Make a choice for your situation. Choices are:<br />
SINGLE-OP<br />
SINGLE-OP-ASSISTED<br />
MULTI-ONE<br />
In CQWW contests, a prompt is issued asking whether this station is a Run or a<br />
Mult station<br />
MULTI-TWO<br />
An identifier is needed for Station 1 and Station 2 that must be specified when<br />
setting up initially. Each time the program is loaded or contest changed the<br />
program asks to set Station 1 or 2<br />
MULTI-MULTI<br />
SCHOOL-CLUB<br />
CHECKLOG<br />
SINGLE-OP-PORTABLE<br />
ROVER<br />
when going Rover or Mobile and use different QTHs select this for additional<br />
functionality<br />
MULTI-UNLIMITED<br />
MULTI-LIMITED<br />
Band Category: Make a choice for your situation. Choices are:<br />
ALL<br />
160M<br />
80M<br />
40M<br />
20M<br />
15M<br />
10M<br />
LIMITED<br />
CHECKLOG<br />
Power Category: Make a choice for your situation. Choices are:<br />
HIGH<br />
LOW<br />
QRP<br />
MEDIUM<br />
Mode Category: Make a choice for your situation. Choices are:<br />
CW<br />
SSB<br />
RTTY<br />
PSK<br />
MIXED - the Available Mults and Qs window will show one column each for CW and<br />
SSB. The number of band/mode buttons may be limited by the contest rules. For<br />
104 of 319 2/2/<strong>2011</strong> 4:35 PM
instance, in a mixed mode contest that has mults once per band and a dupe type of<br />
Each Band (mode independent), there is no need to display more than one column of<br />
mode buttons.<br />
MIXED+DIG = CW & SSB & Digital (defined by the contest) Could be RTTY & PSK or<br />
RTTY<br />
DIGITAL = no CW & SSB, just RTTY & PSK, or RTTY (defined by the contest)<br />
Overlay Category: Used in relatively few contests. Choices are:<br />
N/A (default)<br />
ROOKIE<br />
BAND-LIMITED<br />
TB-WIRES (tri-bander and wires)<br />
OVER-50<br />
HQ<br />
NOVICE-TECH<br />
EXPERT - The EXPERT overlay category in contests where it exists must be selected<br />
for the 5 minute band change counter to be inactive for SINGLE-OP stations<br />
In CQ WPX CW and CQ WPX SSB, category overlay may be any combination of ROOKIE,<br />
BAND-LIMITED, TB-WIRES. In STEW-PERRY,category overlay may be OVER-50. In IA<strong>RU</strong>-HF,<br />
category overlay may be HQ. In PACC category overlay may be NOVICE-TECH.<br />
Sent Exchange: Contest-dependent, mostly a number, zone, state etc<br />
without the RS(T)__<br />
No RST in the Exchange<br />
Do not put a signal report in the sent exchange. It will cause incorrect Cabrillo output.<br />
Typically, the program will warn you if you make this mistake.<br />
Operators: Enter here all the operators' callsigns. Clicking the button 'Update Ops from<br />
Log' will do this for you (most useful after the contest..).<br />
Update Ops from Log - Clicking this button will transfer all operators from the contest<br />
log to the operators field.<br />
Soapbox comments: Your comments on the contest, results, propagation etc. This text is<br />
cleared when selecting a new contest.<br />
Section Lists<br />
http://n1mmtw61.semdxa.org/tiki-print_multi_pages.php?printstructures...<br />
105 of 319 2/2/<strong>2011</strong> 4:35 PM
Selection list: State for Log Type QSOPARTY<br />
*** These selection buttons are only shown when the contest has a selection list (like QSO<br />
parties).<br />
In the example above the QSO party for the state CA (California) has been<br />
selected which has 2 contacts/qso's in it.<br />
Button: Import Section List: Importing the contest section file for the selected<br />
contest.<br />
This section list is used to determine multipliers (States, Provinces etc.) for the<br />
contest which will be shown in the Multiplier window.<br />
The name of the list is hardcoded and will be shown while importing the file.<br />
Example name: IOTA.SEC<br />
Button: Edit Section List: Edit the contest section table for the selected contest.<br />
This is used to edit the section table in the current database. It does NOT edit<br />
the section text file. If you want to export your section file after editing, use the<br />
File menu accessed from the upper left corner of the Edit Section List dialog.<br />
Button: Show Rules (Internet access required): Goes to the contest sponsor's<br />
website where the rules can be found. A frequent source of problems is when some<br />
contest sponsors change the relevant page within the website or even the whole<br />
website every year, which will make the link fail. Please contact us to update this entry<br />
when this happens.<br />
3.2. Tab: Associated Files<br />
http://n1mmtw61.semdxa.org/tiki-print_multi_pages.php?printstructures...<br />
106 of 319 2/2/<strong>2011</strong> 4:35 PM
http://n1mmtw61.semdxa.org/tiki-print_multi_pages.php?printstructures...<br />
Master.DTA Filename: Shows the selected master.dta file for this specific contest-specific<br />
(not contest instance-specific)<br />
For example, all QSO Parties will use the same master.dta filename<br />
Defaults to master.dta<br />
Use the Change button if you wish to select a file other than the basic<br />
master.dta for use in this contest.<br />
Update Your CTY.DAT File Before Each Contest<br />
In addition to these files, be sure always to load the most recent CTY.DAT file before entering<br />
a contest. This is a 2-step process. Download the most recent country file from the Internet<br />
using >Tools >Download latest country file (wl_cty.dat) (Internet). Then import it into the<br />
current database using >Tools >Import country list from downloaded file. The program will<br />
warn you if you open a database whose CTY table is less recent than the wl_cty.dat file in<br />
your <strong>N1MM</strong> <strong>Logger</strong> program directory.<br />
For each of the following Associated Files, the Change and Clear buttons have the same function<br />
- the Change button allows you to select or change the file to be used, wherever you have stored<br />
it. The Clear button lets you clear the filename if you don't wish to load one.<br />
107 of 319 2/2/<strong>2011</strong> 4:35 PM
SSB Function Key Filename - Select the SSB function keys to use with this contest.<br />
CW Function Key Filename - Select the CW function keys to use with this contest.<br />
Digital Function Key Filename - Select the Digital Interface function keys to use with this<br />
contest from the Entry Window (not the extra keys that can be set up in the Digital<br />
Interface).<br />
Call History Filename - Select a call history file to be loaded for use with this contest. This<br />
is entirely optional. See the manual section on Call history Lookup for details. If you want to<br />
use a Call History file, don't forget to turn on Call History Lookup on the Config menu.<br />
Table of Contents:<br />
1 Entry<br />
2 Log<br />
3 Bandmap<br />
4 Packet and Telnet<br />
5 Check<br />
6 Available Mults and Qs<br />
7 Edit Contact<br />
8 Info<br />
9 Score<br />
10 Mults by Band<br />
11 Statistics<br />
12 Visual Dupesheet<br />
Entry Window<br />
In this Section...<br />
Windows<br />
Entry Window<br />
1. Button Assignments<br />
2. Callsign/Exchange Editing Features<br />
3. Other Info<br />
4. Status Bar Information<br />
5. Callsign Colors<br />
6. The Red and Green dots (LEDs)<br />
7. The Entry Windows<br />
8. Other Features<br />
9. Function Keys<br />
9.1. General<br />
9.2. Running mode and S&P mode<br />
http://n1mmtw61.semdxa.org/tiki-print_multi_pages.php?printstructures...<br />
108 of 319 2/2/<strong>2011</strong> 4:35 PM
10. Other Keys<br />
11. File Menu Selections<br />
12. Edit Menu Selections<br />
13. View Menu Selections<br />
14. Tools Menu Selections<br />
15. Config Menu Selections<br />
15.1. Configure Ports, Telnet Address, Other - Also called Configurer.<br />
15.2. Change Your Station Data<br />
15.3. Change Sub Bands<br />
15.4. Clear INI file settings<br />
15.5. Find all windows (move to within 800 *600)<br />
15.6. Enter Sends Messages (ESM mode)<br />
15.7. AutoSend Threshold - Ctrl+Shift+M<br />
15.8. Spot all S&P QSOs<br />
15.9. QSYing wipes the call & spots QSO in bandmap<br />
15.10. Do not run on CQ-frequency<br />
15.11. Show non-workable spots<br />
15.12. Reset Rx freq when running split<br />
15.13. Dual Rx always on<br />
15.14. CQ Repeat - Alt+R<br />
15.15. Set CQ repeat time - Ctrl+R<br />
15.16. Call History Lookup<br />
15.17. Record QSOs<br />
15.18. Change Packet/CW/SSB/Digital Message Buttons - Alt+K<br />
15.19. Multi-User Mode<br />
15.20. Change Exchange Abbreviations<br />
15.21. SO2R<br />
15.22. WAE - Special commands for the WAE DX contest only<br />
16. Window Menu Selections<br />
17. Help Menu Selections<br />
Your entry window will be similar to this one.<br />
There are two ways to move from field to field.<br />
http://n1mmtw61.semdxa.org/tiki-print_multi_pages.php?printstructures...<br />
Tab or Shift+Tab will move through the fields one by one in the standard sequence.<br />
The Spacebar will jump from field to field in the Entry Window, filling in defaults where<br />
109 of 319 2/2/<strong>2011</strong> 4:35 PM
appropriate and skipping those fields that are unlikely to change.<br />
1. Button Assignments<br />
(hotkeys in parentheses)<br />
http://n1mmtw61.semdxa.org/tiki-print_multi_pages.php?printstructures...<br />
Tip<br />
Because it generally reduces the number of keystrokes required to log a contact, the<br />
Spacebar is the preferred way of navigating the fields of the Entry Window.<br />
Wipe (Alt+W)- Wipe Out Entry Fields. Clear information about the current contact<br />
(alternatively, Ctrl+W).<br />
Log It (Enter) - Write this contact to the database. Disabled when in Quick Edit mode.<br />
Edit - Pops up the full Edit window to edit the last contact. Use Ctrl+Q (Quick Edit) as a<br />
convenient alternative.<br />
Mark (Alt+M) - Mark the current frequency in the Bandmap as being in use. Used when<br />
you don't want to take time to enter the call of the station using the frequency.<br />
Store (Alt+O) - Spots the callsign you have entered in the callsign field on the Bandmap,<br />
where it will be shown in bold because it is self spotted. The Config menu option "QSYing<br />
wipes the call and spots QSO in Bandmap" is an easier way to do this, whether you have<br />
worked a station or not.<br />
Spot it (Alt+P) - Spot the contact on the current Packet/Telnet connection.<br />
Buck - Display information on the current call using the Buckmaster callsign database.<br />
Note: hamcal32.dll must be in the start-up and the callsign database must also be set up<br />
properly in the Files Tab from the Configurer. If hamcall32.dll is not found it will use<br />
www.qrz.com to find the call.<br />
F1 through F12 - Send the associated CW/Digital text or .wav file. Right click on the<br />
buttons to change labels and actions (or go into the menu). Running mode has 12 function<br />
keys and also S&P mode has 12 function keys. When Running the S&P keys can be found<br />
under Shift+Function key. See below for more info about the files send and the status of<br />
the Running indicator.<br />
Shift+F1 through Shift+F12 - Send the associated CW/Digital text or .wav file from the<br />
opposite mode. So when the program is in Run mode pressing Shift will show the labels<br />
(and send the associated info) from S&P mode and vice versa. Each mode has 12 function<br />
keys. When Running the S&P keys can be found under Shift+Functionkey.<br />
Esc - Stop sending. Also stops playback of recorded contacts.<br />
Running Alt+U - Toggles "Running' box". When running is checked, the behavior of Enter<br />
Sends Messages mode changes appropriately. Additionally contacts are logged as being<br />
part of a run.<br />
CW speed - The CW speed in wpm can be set using the textbox with speed & up/down<br />
buttons (only visible when CW mode is selected). Also Page Up and Page Down can be<br />
used to change the CW speed. The CW speed is limited to 98 wpm...<br />
110 of 319 2/2/<strong>2011</strong> 4:35 PM
2. Callsign/Exchange Editing Features<br />
Space Bar - moves cursor to the position the last position the cursor was in prior to leaving<br />
the Callsign or Exchange fields.<br />
Tab - Move to the next field.<br />
Shift+Tab - move to the previous field.<br />
Home - moves cursor to beginning of the field it's in.<br />
End - moves cursor to end of the field it's in.<br />
Question mark (?) - Sends a ?, and will cause the ? to be highlighted when you reenter<br />
the field. E.g. N?MM will send what is typed, but automatically highlight the ? so you can<br />
replace it. A double ?, as in DL?K?A will highlight all text in between and including the ?<br />
marks. The first keystroke entered will replace all three characters.<br />
Left/Right Arrow - moves cursor to left or right one position within the field it's in.<br />
Backspace - delete character to the left.<br />
Delete - delete character to the right.<br />
Shift+Home - will highlight from the cursor insertion point to the home (beginning) of the<br />
textbox.<br />
Shift+End - will highlight from the cursor insertion point to the end of the textbox.<br />
Shift+arrow key - will highlight as you press the keys. When you type the first character, it<br />
will delete the highlighted character.<br />
Note<br />
Check out the chapter Key Assignments for all available key assignments by the program.<br />
3. Other Info<br />
Running Alt+U - Mark this contact as being part of a run (versus S&P).<br />
"Running" is automatically checked:<br />
When you click on CQ-frequency in the Bandmap window<br />
When you are in tuning range of your CQ-frequency (on that band)<br />
When you pressing F1(= default CQ-key) (and no S&P macro has been added to Search<br />
and Pounce F1 key.<br />
When clicking on the green dot when it shows SP (Search & Pounce)<br />
4. Status Bar Information<br />
http://n1mmtw61.semdxa.org/tiki-print_multi_pages.php?printstructures...<br />
111 of 319 2/2/<strong>2011</strong> 4:35 PM
Left pane - Information<br />
After entering a callsign - Country, Zone, Continent<br />
Otherwise - Messages (like error messages, results from commands etc.)<br />
Middle pane - QSOs /multipliers (/zone) depending on the selected contest<br />
Right pane - Current score<br />
5. Callsign Colors<br />
There are two places where a callsign can be shown in the Entry Window , in the Callsign field<br />
and in the Call-frame.<br />
Red Single Multiplier Example: CQWW - qso is either zone or country multiplier (one<br />
multipliers)<br />
Green Double or better Multiplier Example: CQWW - qso is a zone and a country multiplier<br />
(two multipliers)<br />
Blue New contact<br />
Gray Dupe contact or an unworkable station in a non-workable country. This means that<br />
you don't need this station because he is a dupe or you are not even 'allowed' to work<br />
him in this contest according the contest rules.<br />
6. The Red and Green dots (LEDs)<br />
http://n1mmtw61.semdxa.org/tiki-print_multi_pages.php?printstructures...<br />
On the Entry Window below the left end of the Callsign textbox you will see either a green or a<br />
red dot (LED), or both. The LEDs are visual aids that help you keep track of what is happening on<br />
each VFO/radio when operating SO2V or SO2R. This is part of <strong>N1MM</strong>'s continuing philosophy of<br />
letting the operator easily know what's happening at any given time.<br />
Green dot/LED - This VFO/radio has Entry focus in SO2V or SO2R modes - also known<br />
elsewhere in this manual as RX (Receive) focus or Keyboard focus. This means that any<br />
information entered by keyboard goes in that window, including function keys. Depending on<br />
your SO2R switching setup, it may also denote which radio you are hearing in your headphones.<br />
Inside the green dot (or in that location if the green dot is in the other Entry Window) you<br />
will see either Ru or SP (Run/S&P). Ru means the Entry Window (and the VFO or radio that<br />
it controls) is in Running mode, and SP means it is in Search&Pounce mode.<br />
Clicking on the green LED toggles between running mode (Ru) and S&P mode (SP)<br />
Entry focus can also be toggled between the VFOs/radios by<br />
using a mouse to click on a free space in one of the two Entry Windows<br />
112 of 319 2/2/<strong>2011</strong> 4:35 PM
pressing the \ key (backslash)<br />
To move both Transmit and Entry focus<br />
press Ctrl+Left-Arrow / Ctrl+Right-Arrow to move both foci to the left or right VFO/radio<br />
press the Pause key - if the green and red LEDs are in different Entry Windows, the<br />
first press will bring them together in the window that has the Entry focus.<br />
Subsequent presses will toggle both LEDs between the two Entry Windows.<br />
Red dot/LED - This VFO/radio has Transmit (TX) focus<br />
Transmit (TX) focus can be changed between the VFOs/radios by pressing the Alt+F10 key<br />
or by pressing the Pause key (see above)<br />
To move both Transmit and Entry focus, pressing Ctrl+Left-Arrow / Ctrl+Right-Arrow will<br />
move both foci to the left or right VFO/radio, or use the Pause key, as explained above.<br />
When transmitting the TX focus can not be changed<br />
When the VFO/radio has TX focus, the LED is dark red. When that VFO/radio is<br />
transmitting, the LED changes to bright red<br />
Inside the red dot the R (Repeat) designator is shown when Repeat mode (for CQ-ing) is<br />
active<br />
Inside the red dot the D (Dueling CQ) designator is shown when Dueling CQ is active<br />
7. The Entry Windows<br />
http://n1mmtw61.semdxa.org/tiki-print_multi_pages.php?printstructures...<br />
Important note<br />
When using function keys to transmit either CW or stored voice messages, the message will<br />
be sent on the radio or VFO that has the Entry focus, not the one that has the Transmit<br />
focus. When you press the function key, the red LED denoting Transmit focus first switches<br />
to the Entry window that has the Entry (Keyboard) focus, and then the message is<br />
transmitted. On the other hand, when using either manual CW or phone, messages will be<br />
sent on the radio or VFO that has the red LED, so if you grab the microphone or paddle,<br />
that's what you'll get. After a while, it becomes second nature - we promise!<br />
The program has two Entry windows. When using both bandmaps/both VFOs, both Entry<br />
windows are needed to make QSOs on both VFOs!<br />
The standard Entry window, which is always open, is being used to transmit on VFO-A (SO2V)<br />
or the left radio (SO2R).<br />
The second Entry window is being used to transmit on VFO-B (SO2V) or the right radio<br />
(SO2R). The second Entry window can be opened by entering a backslash \ in the first Entry<br />
window.<br />
If two Entry windows take up too much space, position the second Entry window over the first<br />
Entry window. "\" will toggle you from one to the other (typing focus) or use Ctrl+right/left to move<br />
transmit and typing focus. The Entry window can be resized if the two needed Entry windows<br />
113 of 319 2/2/<strong>2011</strong> 4:35 PM
take to much screen space.<br />
Most SO2R operators get the most efficiency while CQ-ing on 1 radio, and S&Ping on the other.<br />
The Entry Window examples below reflect a typical setup: The left VFO-A is now assigned to<br />
running, and the right VFO (B) is assigned to S&P.<br />
All of the features that are available to the single radio operator also work in SO2R/SO2V. For<br />
example, when tuning the band with the S&P VFO, spots that are in the bandmap are<br />
automatically inserted into each call frame (above callsign entry window) when you tune across<br />
the frequency of the spot. Hitting the space bar will pull the callsign from the call frame into the<br />
QSO field. Then if a station calls you on the run radio, toggling back and forth between Entry<br />
Windows with the \ key or Ctrl Left/Right arrows will keep the information in each Entry Window<br />
until the respective stations are logged, wiped clean via Alt+W or Ctrl+W, or you QSY and the<br />
callsign is entered into the bandmap (if "QSYing wipes the call && spots QSO in bandmap" is<br />
selected). Most people who are comfortable with <strong>Logger</strong> tend to use the reduced size Entry<br />
Windows in the examples above. All of the vital information an operator needs is displayed in the<br />
smaller window.<br />
The second Entry window will be opened when a call is clicked in the second bandmap and it is<br />
not open.<br />
More SO2R info can be found in the SO2R chapter.<br />
http://n1mmtw61.semdxa.org/tiki-print_multi_pages.php?printstructures...<br />
Tip<br />
In SO2V (one radio - two VFOs = 'normal' operation) QSOs made on VFO-A have to be<br />
entered in the standard (first) Entry window. Making a QSO on VFO-B (so transmitting on<br />
VFO-B) has to be done by using the second (VFO) Entry window. So when using both<br />
bandmaps, both Entry windows are needed to make QSOs on both VFOs. When a call from<br />
VFO-B is entered in the first Entry window you will transmit on the wrong VFO. Select the<br />
correct Entry window!<br />
114 of 319 2/2/<strong>2011</strong> 4:35 PM
8. Other Features<br />
http://n1mmtw61.semdxa.org/tiki-print_multi_pages.php?printstructures...<br />
When a callsign is entered info about the country (bearing, distance etc.) is shown just<br />
above the status bar. Additional information from the call history lookup file may also be<br />
displayed (e.g. name, state, section, gird square, etc.). When calculating the bearing, if call<br />
history lookup is off the coordinates of the state that is the closest to the middle of the<br />
call-area is used. If call history lookup is on, the section or state from the call history is<br />
used. For VHF contests (having VHF in the contest name) the Grid Square field in the<br />
Station dialog is used as your bearing and not the entered Latitude and Longitude. If a<br />
beacons file is used, the grid square from the beacons file will be shown just above the<br />
status bar when the beacon call sign is entered.<br />
When a callsign is entered and the station is a dupe moving to another frequency will<br />
automatically clear the callsign field (and place the station on the bandmap)<br />
If in the callsign typed there is a question mark (you didn't get the complete call the first<br />
time), the cursor highlights the ?, so that when you type, it will replace it. When in Enter<br />
Sends Message (ESM) mode a ? in the callsign field Enter doesn't move focus to the<br />
Exchange field but highlights the question mark. A callsign with a question mark in it can<br />
not be logged!<br />
Clicking on the Exchange pane will have the same effect as pressing Space when the<br />
cursor is in the callsign field.<br />
When both bandmaps are closed the frequency and mode are shown on the Entry window<br />
title bar before the contest name.<br />
When tuning the band and a station on the bandmap is within tuning range, this call will be<br />
placed on the Entry window callsign frame. When the callsign field is empty, pressing the<br />
space bar will copy the callsign from the Entry window callsign frame to the callsign field.<br />
Also clicking on the callsign in the callsign frame will place the this callsign into the callsign<br />
field, replacing anything that was previously there. The tuning range can be set in the<br />
configurer (Other tab).<br />
Set Frequency in callsign field - The frequency from the first VFO (A) can be set by<br />
entering a frequency or offset into the callsign field. Decimal points and comma's are<br />
allowed in (split) frequencies in the callsign pane. Placing a / in front of the frequency or<br />
offset will set the second VFO (B). Also Split frequencies can be set here, see the chapter<br />
Basic Functions for frequency change and split frequency examples.<br />
Set Mode in callsign field - The mode can be set by typing CW, USB, LSB, SSB, RTTY,<br />
AM, FM, PSK or SSTV into the callsign field. If the contest mode is mixed or a digital mode,<br />
typing RTTY or PSK in the entry field will open the Digital Interface window and open the<br />
serial ports for which the Digital check box has been checked in the Configurer. If the<br />
contest mode is not mixed or digital, typing RTTY or PSK will result in an error message; if<br />
you really want to open the DI window in this situation, for example to use Fldigi as a CW<br />
decoder, use the Windows > Digital Interface menu item. When the DI window is open and<br />
a non-digital mode is entered in the callsign field, the Digital port(s) is/are closed so it/they<br />
can be used for CW, PTT, etc.<br />
Ctrl+P - Spot the station entered in the callsign field as a spot to the active cluster<br />
connection, either packet or telnet. You will be prompted for a comment. If no station is<br />
115 of 319 2/2/<strong>2011</strong> 4:35 PM
http://n1mmtw61.semdxa.org/tiki-print_multi_pages.php?printstructures...<br />
entered in the callsign field, the last logged station this session will be spotted. Macros are<br />
accepted in the comment sent.<br />
Ctrl+O - Change the callsign of the operator. If you are multi-user, you will be prompted for<br />
the operator at the first call logged. The default is the callsign in the station information<br />
dialog. Entering "OPON" in the callsign field will also prompt for an operator callsign.<br />
Auto-call completion - As you are typing a callsign in the callsign field, if a unique match<br />
to your log or to the check window call occurs, the remaining characters in the call are<br />
added to what you have already typed. They will be highlighted, so that if you continue to<br />
type, you will replace the characters automatically added.<br />
Auto-CQ - Alt+R toggles the CQ button to send CQ once or repeat. The on/off on the<br />
status bar signals whether the next CQ will go into repeat mode. The only way to stop the<br />
repeat (mid stream), and to get completely out of it, is to hit Escape.<br />
Ctrl+R sets the period of repeat in seconds or milliseconds.<br />
Alt+R turns repeat mode on or off.<br />
If repeat mode is on, CQ will always repeat<br />
CQ needs to be the first two letters of the text sent by the function key for<br />
CW or anywhere in the name of the wav file name for SSB or text for all<br />
Digital modes.<br />
CQ needs to be the first two letters of the caption of the function key for<br />
CW and SSB or anywhere in the caption of the function key for Digital<br />
modes.<br />
If repeat mode is off, CQ will not repeat.<br />
A 'R' will be shown in the red status 'led' when repeat mode is on.<br />
The repeat timer for CW and SSB is for the interval from when you stop sending CQ<br />
until CQ resumes.<br />
When using an External DVK there is no stop sending indication and CQ will not<br />
repeat.<br />
When using a radio with internal voice message memories, the repeat timer can be<br />
used together with a CAT macro in the “CQ†function key. Note: The<br />
repeat timer in this case starts when the radio command is sent to the radio. Users<br />
that use this function to trigger radio voice keyers must assign the radio command to<br />
abort the message to a separate function key.<br />
Ctrl+Shift+Fx - Record SSB message for the assigned function key. Pressing Ctrl+Shift+Fx<br />
again stops the recording. Fx can be F1 to F12.<br />
Ctrl+Alt+Fx - Record external DVK memory 1 to 4. Fx can be F1 to F4. An external DVK<br />
has to be connected and configured on a LPT port.<br />
When using an external DVK, all of the Run and S&P SSB function keys should be<br />
set to empty.wav and not left blank.<br />
Enter sends messages - the so called 'Enter mode' or 'ESM' mode. An entire normal<br />
contact (CQ & S&P) can be handled with the Enter key. More information is given in the<br />
chapter Basic Functions<br />
Automatically Spot all S&P QSOs - Spot the contact automatically when you log it (only<br />
when in S&P mode).<br />
"Quick Edit" (Ctrl+Q/Ctrl+A). - Quickly edit the QSOs worked before in the log.<br />
Ctrl+Q - moves back one QSO<br />
Ctrl+A - moves forward one QSO.<br />
116 of 319 2/2/<strong>2011</strong> 4:35 PM
Enter - logs the changes made and brings you back in normal logging mode.<br />
Escape - discards the changes made and brings you back in normal logging mode.<br />
If the text boxes in the Entry window are colored blue, you are in Quick Edit mode,<br />
also "QuickEdit" will be shown in as the callframe caption when re-editing QSOs.<br />
Quick Edit starts editing with the highlighted contact and you can move forward or<br />
back from there.<br />
There is no check if the entered contents is valid as is done when the QSO is entered<br />
normally. So check thoroughly what you type.<br />
The program will display a warning if it suspects that the computer time is wrong (by<br />
checking local time & time zone).<br />
Call Stacking - This command is used for callsign stacking and only available in 'Multi-User<br />
Mode'. It is described in the Advanced Functions section.<br />
Using both VFOs when 'Running' - When using the main VFO to transmit and the other<br />
to receive (split mode) after each logged QSO the RX frequency will be made equal to the<br />
TX (main VFO) frequency. It's there to let you use the main frequency control as an RIT. It<br />
resets after every <strong>RU</strong>NNING QSO.<br />
Automatic antenna selection can be used. Antennas have to be set on the Antenna tab<br />
from the Configurer dialog and can be controlled using an external box on the parallel port.<br />
When you press Alt+F9, you will toggle through all the antennas FOR THAT BAND. If there<br />
is only one, then no toggling will occur. When you change bands, the antenna switch will<br />
be changed to the antenna with the lowest code for that band. The selected antenna will<br />
show in the status pane.<br />
Alt+' (Alt+single quote) toggle between the wide and narrow filter for the selected mode<br />
(SSB, CW and Digital modes). This hot key will work whether you have changed your filter<br />
codes or not. Filter codes can be set in the the bandmap right click menu.<br />
Pause - swap radios and match keyboard to radio.<br />
Update timestamp qso - Updating the timestamp from a qso can be done from within the<br />
Entry window using the callsign field. Entries starting with "T" and four numeric digits will<br />
update the current row time in the log.<br />
A warning message will be shown if user tunes away before logging a qso in the Entry<br />
window with a correct entered exchange.<br />
Exchange field validation:<br />
CQ Zone only allow numbers, tab, space, backspace<br />
Section only allow letters/numbers<br />
Exchange only allow letters/numbers<br />
Grid only allow letters/numbers<br />
Power only allow letters/numbers<br />
http://n1mmtw61.semdxa.org/tiki-print_multi_pages.php?printstructures...<br />
K1TTT's call checking function has been implemented. When a callsign is entered it is<br />
checked against a pattern file to see if the callsign entered is a possible callsign. A warning<br />
will be given in the Check window when this is not true. The checking in done using a set of<br />
117 of 319 2/2/<strong>2011</strong> 4:35 PM
ules in the file CALLSIGN.PAT. Note that the call checking function only works for HF (no<br />
WARC) and only for CW and SSB. More information in the chapter Call Checking.<br />
When a SH/DX command is entered in the callsign field it is passed to the packet window<br />
for processing.<br />
Show windows when radio frequency changed - This function will bring the program on<br />
top when the radio frequency is changed.<br />
This only happens when there is another program on top of <strong>N1MM</strong> logger like your<br />
Internet browser, e-mail client etc.<br />
A radio is attached (to get the frequency change from).<br />
When <strong>N1MM</strong> logger is minimized nothing will happen.<br />
This function is standard behavior and is always enabled.<br />
TOUR command. A very few contests allow for multiple sessions in which you can work the<br />
same station in every session for QSO credit. You can enter TOUR into the Entry window in<br />
place of a call sign to reset dupe checking at any time before or during the contest. This<br />
command has 2 parameters that are entered into the Sent RST field, separated by a<br />
forward slash "/". The first parameter is the time when the current session begins (GMT)<br />
and the second parameter is the duration of the session. The format for both parameters is<br />
hhmm. For example, 1200/30 means the session starts at 1200Z and has a duration of 30<br />
minutes. The minimum value for the duration parameter is 10 (10 minutes). If the TOUR<br />
command is entered without any parameters, the current values of the start time and<br />
duration will be displayed. The default values are 0000/00.<br />
At the beginning of each session the start time and duration will be displayed in the<br />
status field at the bottom of the Entry Window. After the first QSO has been logged<br />
during the new session you should see the Multiplier window reset and dupes will be<br />
reset for this new session as well.<br />
Most of the contests supported by the <strong>Logger</strong> do not need this command but some<br />
(mostly Russian and Ukrainian) have it built into the contest module and do not<br />
require it entered manually.<br />
If you are planning on using TOUR command with other contests, keep in mind that<br />
settings for it will be lost when the logger is restarted. If the Snt (sent RST) field is not<br />
displayed in the Entry window, you will not be able to use this command.<br />
9. Function Keys<br />
9.1. General<br />
http://n1mmtw61.semdxa.org/tiki-print_multi_pages.php?printstructures...<br />
The program has 24 possible programmed messages assigned to the function keys. There are<br />
two sets of messages, Run messages and Search and Pounce messages. The first twelve<br />
messages you enter are presumed to be Run messages F1 to F12, the second twelve, Search<br />
and Pounce messages F1 to F12.<br />
The function keys can be redefined by right-clicking on the function key/message button array in<br />
118 of 319 2/2/<strong>2011</strong> 4:35 PM
the Entry window<br />
The function keys can be stacked. This means you can press several function keys behind each<br />
other which will all be sent in full in the selected order. For example, you could press F4 to<br />
re-send your call (if you think the other station did not get it right) and immediately press F2 to<br />
send the exchange. The program will send the two messages seamlessly.<br />
When hovering with the mouse over a function key button the text to sent is shown.<br />
9.2. Running mode and S&P mode<br />
If "Running" is checked, you will see the Run messages, if not, you'll see the Search and Pounce<br />
messages on the function keys. SHIFT REVERSES THE MEANING OF THE ABOVE <strong>RU</strong>LE.<br />
When you press Shift, the labels will change (if you made them different) and the text from the<br />
"Running" keys become the text from the "Search & Pounce" keys and vice versa.<br />
Running mode is determined by whether you are on a CQ-Frequency or when the 'Running'<br />
indicator is marked. There is one CQ-Frequency per band. Swapping VFOs may possible swap<br />
between Running mode and Search & Pounce mode. Running mode is based on the TX<br />
frequency.<br />
Moving away from the frequency on which you were in Running mode will place you<br />
automatically in Search and Pounce mode. Going back to the Running frequency will put you<br />
back in Running mode (the 'Running' indicator is marked again), clicking on the 'CQ-frequency'<br />
in the bandmap also will place the program in Running mode again. An exception is when you<br />
are working split i.e. transmit on one VFO and receive on the other. Moving around will not<br />
change Running mode into Search and Pounce mode.<br />
Default Function keys<br />
F1 CQ Key F5 His Call Key F9 ---<br />
F2 Exchange key F6 QSO B4 Key F10 ---<br />
F3 End of QSO Key F7 - F11 -<br />
F4 My Call Key F8 Again Key F12 ---<br />
http://n1mmtw61.semdxa.org/tiki-print_multi_pages.php?printstructures...<br />
The above mentioned function key assignments are the defaults. The function keys can be<br />
remapped in the 'Configurer' dialog.<br />
Just put 24 messages (for CW/Digital) or 24 wave files for SSB in order. They will map to F1-F12<br />
(first 12 are for Run mode) and Shift+F1-F12 (second 12 are for S&P mode). Keys not<br />
programmed in S&P mode take the value of that key from Running mode (if programmed). This<br />
means that when the F5 key in S&P mode isn't programmed, the F5 key from Running mode will<br />
be shown (and used) by that function key in S&P mode. If you want you can come close to CT<br />
compatibility.<br />
119 of 319 2/2/<strong>2011</strong> 4:35 PM
Therefore the text sent by and shown on the function keys depend on the Running mode<br />
indicator!<br />
More info about Running and S&P mode can be found in the {{Basic Functions}} chapter.<br />
Note that when in Search and Pounce mode, to call CQ, the CQ-key as configured is used i.e<br />
mostly F1. No need to press Shift+F1. That will place the program in Run mode and will press<br />
F1; from that point on F1 will call CQ (in Running mode). If you sent CQ, don't you want to be in<br />
Run mode? If not use the {S&P} macro to stay in S&P mode.<br />
10. Other Keys<br />
Key Send<br />
function<br />
key(s)<br />
Insert His Call and<br />
Exchange<br />
Keys<br />
Action(s)<br />
http://n1mmtw61.semdxa.org/tiki-print_multi_pages.php?printstructures...<br />
There may not be any 'holes' in the function key lines with skipped function keys. ALL<br />
preceding function keys must at least have a line in the table Example: You'd like to have a<br />
different S&P F3 key than the Run F3 key. First you have to add the 12 Run lines in the<br />
table, after that the S&P lines for F1 + F2 +F3 which you liked to change for S&P. So at<br />
least 15 lines in total have to be in the function key table (12 run + 3 S&P).<br />
The text F1 (etc.) in the left column is only text and has no intelligence/meaning for the<br />
program. You could remove it and change it to any text you like, which will show on the<br />
Function key in the Entry window. The order of lines determines what the key will do.<br />
Examples: line 5 is Run F5 , line 11 is Run F11, line 17 is S&P F5 (17-12=5) etc.<br />
Alt + F11 - Run box behavior: The behavior of the running indicator (run box) can be<br />
manipulated using the Alt+F11 toggle. Normally when you are on your CQ-frequency you<br />
will be in Run mode. Changing frequency will toggle the run box into S&P mode. With<br />
Alt+F11 this behavior can be changed and the program will stay in the Run mode or S&P<br />
mode regardless to which frequency the VFO is tuned. A message is given in the Entry<br />
window status bar what the new value is. When on a DXpedition this behavior can be very<br />
useful.<br />
Send His Call followed by the Exchange<br />
120 of 319 2/2/<strong>2011</strong> 4:35 PM
; His Call and<br />
Exchange<br />
Keys<br />
Send His Call Followed by the Exchange<br />
Alt+Enter N/A Sends the End of QSO message and logs the contact<br />
. End of QSO<br />
Key<br />
Sends the End of QSO message and logs the contact<br />
Ctrl+Alt+Enter N/A Logs a normally invalid QSO (invalid exchange, etc.). Prompts<br />
for a comment. When no comment is entered Forced QSO is<br />
added to the comment field. The receive frequency is reset to the<br />
transmit frequency. Use View>Notes to correct later<br />
Background: The ; and ' keys were added to make touch typing much easier for those who use<br />
the Insert and + keys for working and logging QSOs. It is impossible to touch type and easily hit<br />
these very often used keys. If you have ever operated at a multi-multi event with many different<br />
keyboard layouts (QWERTZ, QWERTY, German, Dutch etc.) you will have noticed that each<br />
keyboard layout has these keys in different places. Using keys like ; and ' helps standardize often<br />
used keystrokes. the keys to use can be set in the Configurer under the Function keys tab.<br />
11. File Menu Selections<br />
Note<br />
http://n1mmtw61.semdxa.org/tiki-print_multi_pages.php?printstructures...<br />
121 of 319 2/2/<strong>2011</strong> 4:35 PM
http://n1mmtw61.semdxa.org/tiki-print_multi_pages.php?printstructures...<br />
A database is a single Access 2000 database file. It has an extension of .mdb. In each<br />
database are held zero or more general or contest logs. For the time being, only one contest<br />
or general log within a database may be viewed or edited at a time.<br />
New log in database - Create a new contest log within the current database. More info<br />
((Open/New Contest Dialog|here))<br />
Open log in database - Open an existing log within the current database. More info<br />
((Open/New Contest Dialog|here))<br />
New Database - Create a new log database. Change the proposed name (new.mdb) into a<br />
meaningful name for the use or contents of this new database. From now on this database<br />
will be opened by default at startup of the program. Use Open Database to select another<br />
Database which will become the default database to open. Many contests can be stored<br />
within one database. Always use a separate database for testing new versions of the<br />
program and make regular backups of the <strong>N1MM</strong> logger directory with all it's contents but<br />
with at least the database files ( *.mdb) with 'real' contest QSOs.<br />
Open Database - Open an existing log database. A selection can be made from databases<br />
already created. Many contests can be stored within one database.<br />
Warning<br />
All setup information like station info, telnet clusters, function key information etc. is stored in<br />
the current database. When creating a new database this information is copied to the new<br />
one. Changes are always stored in the current open database. So when opening an old<br />
database all the stored information has to be checked if still valid and changed where<br />
needed. This can be facilitated by using the export and import functions for packet/telnet<br />
buttons and function keys. Just export the files, change databases, and re-import them.<br />
Copy (and Compact) Database - Copy the database to a new database file, and compress<br />
the data at the same time. Change the proposed name (new.mdb) into a meaningful name.<br />
This function can be used to reduce the size of the database after importing a new<br />
CTY.DAT file or after deleting contests. The original database is not changed, nor does the<br />
program start using the new database, unless Open Database is subsequently used to<br />
open the new database.<br />
Note: Copying a database also compresses it. If you have deleted contests from your database,<br />
you may want to copy it to reduce the space it takes up. Deleted contests and contacts are<br />
definitely gone after this action!<br />
Copy This Contest to Another Database - Copy the key/button information and QSOs<br />
from the current contest to another database. The database should exist, if not create it first<br />
with 'New database'.<br />
Repairing a corrupted database (Internet) - This is a link to the Microsoft Web site on how<br />
to fix a corrupted Access databases. A program to fix can be downloaded there<br />
122 of 319 2/2/<strong>2011</strong> 4:35 PM
http://n1mmtw61.semdxa.org/tiki-print_multi_pages.php?printstructures...<br />
(Jetcomp.exe). This file can also be download from the <strong>N1MM</strong> website under the menu item<br />
'Other files'.<br />
Generate Cabrillo File - New with Version 10.12.3, replacing Export - Cabrillo File. One<br />
fewer step to producing the Cabrillo format text file that most contests now require of<br />
entrants submitting electronic logs.<br />
Once created, the Cabrillo file can be edited using Notepad or any text editor. Make sure that the<br />
Station information 'Config > Change Your Station Data') and overall contest information (File ><br />
Open Log in Database ) is correct before creating this file. Be sure to enter the correct Sent<br />
Exchange, or else your Cabrillo file will be wrong. For Multi-op stations select the correct<br />
Operator Category in the contest setup window. This generates the correct numbers for each<br />
station; in Multi-single, the station number field (the last digit in each line) identifies the Mult and<br />
Run station.<br />
It is a good idea to rescore the contest before submitting and check to be sure that the header of<br />
the Cabrillo file is correct before submitting the log. Some contest organizers use non-standard<br />
operator categories (i.e. not in the official Cabrillo specification); in these contests you will have to<br />
edit the category by hand to make it agree with the organizer's requirements.<br />
Digital Mode Designators<br />
Note: The Cabrillo standard only supports one mode designator for digital modes: RY. In<br />
some digital or mixed-mode contests, PSK and RTTY may be considered separate modes,<br />
and the contest organizers may specify additional non-standard designators such as PK. The<br />
<strong>Logger</strong>'s Cabrillo mode export string for PSK is "PK" unless the contest considers RTTY and<br />
PSK to be a single digital mode. When this occurs the mode export string is "RY". Because<br />
the use of these mode designators is non-standard, you should always check with the<br />
organizer's file specification and if necessary, edit the Cabrillo file to meet the organizer's<br />
requirements.<br />
Import<br />
Import ADIF from file... - Load the data from an ADIF file into the current database.<br />
ADIF is being used to import into and export from many contest and logging<br />
programs. It is not possible to import a contest if the contest ID doesn't match the<br />
current contest. So the exported and imported contest have to be the same. If not look<br />
in the FAQ section what to do.<br />
Import Call History... - Some contests use exchanges which are very often the same<br />
the next contest you work a station. This table in the log database can be used by<br />
some of the contests to show information in one of the exchange fields or fill a macro<br />
when a callsign is entered. This information can be Name (RTTY friends file), Grid<br />
square, age, etc. For more information see the Before the Contest chapter and for vhf<br />
the VHF and Up Contesting chapter (VHFREG1 is a VHF contest which uses this<br />
table to fill the grid square). When importing a new file with information the contents of<br />
the CallHist table will be deleted first. So export first if you want to keep the content!<br />
Import State and Province abbreviations... - Import the state and province<br />
123 of 319 2/2/<strong>2011</strong> 4:35 PM
Export<br />
http://n1mmtw61.semdxa.org/tiki-print_multi_pages.php?printstructures...<br />
abbreviations used in many contest modules (QSO parties). Only needed to import<br />
when changes have been made to the file StatesAndProvinces.sec or internal in the<br />
program (CallAreas). When a state or province does not show up correctly in <strong>Logger</strong><br />
this menu item is a good try to resolve the problem. Do a rescore after executing this<br />
menu item when QSOs have already been logged.<br />
Import Packet/Telnet Buttons from file... - Import the contents of the Packet/Telnet<br />
buttons file (*.mc). This way a separate set of Packet/Telnet Buttons can be created<br />
for different Packet/Telnet nodes which may have different commands.<br />
Import Telnet Clusters... - Import the contents of a telnet cluster file (*.txt) into the<br />
program. This way you can import a small file with telnet clusters suited for your<br />
location/situation. The 2 items in the file (name and Telnet cluster address) are<br />
separated by a comma. A port number may be added using a : after the telnet cluster<br />
address where needed (the default is 7300). Example:<br />
GB7UJS,gb7ujs.shacknet.nu:7373 or K1TTT.NET,K1TTT.NET<br />
__Import Function Keys - Import the contents of a saved function keys file (*.mc). This<br />
file can be edited with a text editor like Notepad before importing. Note that for each<br />
mode, only one set of function key definitions can be loaded in a database at one<br />
time. However, the Associated Files tab of the Define Contest dialog provides the<br />
ability to associate a definition file with each contest, so that it will be loaded<br />
automatically when that contest is started.<br />
SSB Function Keys...- import SSB function keys.<br />
CW Function Keys... - import CW function keys.<br />
Digital Function Keys... - import the Digital Interface function keys (not the<br />
extra keys from the Digital Interface).<br />
Recover QSOs from a Transaction Log... - Import the created transaction log<br />
file. This file is created when on the 'Other' tab in the Configurer the option<br />
'Keep log of all QSOs to facilitate recovery of log' has been selected. More info<br />
in the Configurer chapter.<br />
Filename Tip<br />
When the "Save File" window prompts for a filename the default is callsign.txt. If your contest<br />
call sign was <strong>N1MM</strong>/P, put something like "<strong>N1MM</strong>_P.txt" The / and many other characters are<br />
a no go in the Windows OS.<br />
Export ADIF to file<br />
Export ADIF to file... - Create an ADIF file. This file can be used to import into a<br />
logging program or contest program (like this one). Deleted QSOs are not<br />
exported, select the 'DELETEDQS' contest to export these.<br />
Export ADIF to file by date... - Create an ADIF file from the selected contest<br />
from the date set. The first time the default date from which QSOs will be<br />
exported is 1900-01-01 (yyyy-mm-dd). The second time the default date and<br />
time will be shown by the program and will be the moment you last exported<br />
with this option. The date/time can be changed if necessary, i.e. when opening<br />
124 of 319 2/2/<strong>2011</strong> 4:35 PM
http://n1mmtw61.semdxa.org/tiki-print_multi_pages.php?printstructures...<br />
another (older) database. This function is especially useful when you liked to<br />
export the generated ADIF file into a (general) logging program to do award<br />
tracking etc. Deleted QSOs are not exported, select the 'DELETEDQS' contest<br />
to export these.<br />
Export ADIF to file by date from ALL contests... - Create an ADIF file from all<br />
QSOs in all contests when the current contest is DX. Otherwise, it exports only from<br />
the contest you are logging in. The first time the default date from which QSOs will be<br />
exported is 1900-01-01 (yyyy-mm-dd). The second time the default date and time will<br />
be shown by the program and will be the moment you last exported with this option.<br />
The date/time can be changed if necessary, i.e. when opening another (older)<br />
database. This function is especially useful when you want to export the generated<br />
ADIF file into a (general) logging program to do award tracking etc. Deleted QSOs are<br />
not exported, select the 'DELETEDQS' contest to export these.<br />
Export ADIF to file by Multi-User Station Number - Create an ADIF file from<br />
all QSOs from one station in a Multi User environment when you are currently<br />
logging DX. Otherwise, it exports only from the contest you are logging in. A<br />
station number has to be given after which a filename can be given for the ADIF<br />
file to generate.<br />
Note: When using ADIF export and the contest name contains "RTTY" or "JARTS" the export<br />
mode is set to "RTTY" even when the log file shows otherwise (i.e. LSB).<br />
125 of 319 2/2/<strong>2011</strong> 4:35 PM
http://n1mmtw61.semdxa.org/tiki-print_multi_pages.php?printstructures...<br />
Export to File (Generic)<br />
Export to File (Generic), order by QSO Time (normal)... - Creates a generic<br />
file named callsign.txt from the contest log ordered by time (and not by band). In<br />
some cases this is the file needed by the contest manager. This file can also be<br />
used to import into a spreadsheet or database program or your logging program<br />
if it can't import ADIF format. The exported file can be edited with a text editor<br />
like Notepad.<br />
Export to File (Generic), order by Band... - Creates a generic file named<br />
callsign.txt from the contest log ordered by band, per band ordered by time. In<br />
some cases this is the file needed by the contest manager (like in VHF and up<br />
contests).<br />
Export EDI to file by band... - Create an EDI (REG1TEST) file which is a regular file<br />
format used for VHF contests in Europe. A separate file will be created for each band<br />
with QSOs made on it.<br />
Print Score Summary to File... - Print a summary sheet to a file with the default<br />
name Callsign.SUM Example: <strong>N1MM</strong>.SUM The number of contacts printed on the<br />
Summary sheet is without dupe contacts. The exported file can be edited with a text<br />
editor like Notepad.<br />
Export Call History... - Exports the information in the Call History database table.<br />
This table can only be filled or revised by using Import Call History. Do your editing on<br />
the Call History text file before import.<br />
Export Packet/Telnet Buttons to file... - Export the contents of the Packet/Telnet<br />
buttons to file (*.mc). Exported Packet/Telnet buttons can be imported using the menu<br />
item 'File | Import Packet/Telnet Buttons from file...'. The exported file can be edited<br />
with a text editor like Notepad.<br />
Export Telnet Clusters... - Export the telnet clusters (*.txt) in the program. This way<br />
you can export the current entries and update it for your own location/situation.<br />
Exported Telnet clusters can be imported using the menu item 'File | Import Telnet<br />
Clusters...'. The default name for the exported file will be 'Clusters.txt'.<br />
Export Function Keys to file - Export the contents of the function keys to file (*.mc).<br />
Exported function key settings can be imported using the menu item 'File | Import<br />
Function Keys to file...'. This way for every contest a separate set of function keys<br />
could be created. The exported file can be edited with a text editor like Notepad.<br />
SSB Function Keys... - Export the SSB function keys.<br />
CW Function Keys... - Export the CW function keys.<br />
Digital Function Keys... - Export the Digital Interface function keys (not the<br />
extra keys from the Digital Interface).<br />
Recently used contests/databases - The most recently used contest/databases will be<br />
shown here with a maximum of nine.<br />
Exit Alt+F4 - Quit the program. If two Entry windows are open the program will not exit. If<br />
unlogged contacts are in the Entry window you will be prompted with the dialog below.<br />
126 of 319 2/2/<strong>2011</strong> 4:35 PM
(<br />
12. Edit Menu Selections<br />
Wipe Out Entry Fields Ctrl+W - Clear information from the current contact (equal to<br />
Alt+W).<br />
Edit Last Contact Ctrl+Y - Open a dialog to allow all fields for the last contact to be<br />
modified.<br />
Add a Note to Last/Current Contact Ctrl+N - Add a note to your the current contact in the<br />
Entry window or the last QSO logged when no callsign is shown in the Entry window.<br />
Edit Current Contact - Open a dialog to allow all fields for the current contact to be<br />
modified. Double clicking in the Log window on a contact will open the same dialog.<br />
Quick Edit Previous Contacts (Back) Ctrl+Q - Quickly edit the QSOs worked before in the<br />
log. Ctrl+Q moves back one QSO, Ctrl+A moves forward one QSO. If the text boxes in the<br />
Entry window are colored blue, you are in Quick Edit mode. To exit, press enter to save<br />
changes or Escape to abandon changes.<br />
Quick Edit Previous Contacts (Forward) Ctrl+A- Quickly edit the QSOs worked before in<br />
the log. Ctrl+Q moves back one QSO, Ctrl+A moves forward one QSO. If the text boxes in<br />
the Entry window are colored blue, you are in Quick Edit mode. To exit, press enter to save<br />
changes or Escape to abandon changes.<br />
Increase Received NR by 1 Ctrl+U - Increase the number in the exchange field by 1. You<br />
will find this useful during serial number contests when you are in a pileup and you need to<br />
keep incrementing the DX station's serial number because you can't get him in the log...<br />
Find/Find Again Ctrl+F - Find the callsign entered in the callsign field in the log. Pressing<br />
Ctrl+F again will find the next instance.<br />
13. View Menu Selections<br />
http://n1mmtw61.semdxa.org/tiki-print_multi_pages.php?printstructures...<br />
127 of 319 2/2/<strong>2011</strong> 4:35 PM
http://n1mmtw61.semdxa.org/tiki-print_multi_pages.php?printstructures...<br />
Max Rates - View 1 minute, 10 minutes and 60 minutes highest rates for the contest. The<br />
content shown can be saved as a text file by clicking on the Save button or by right clicking<br />
to the clipboard using the menu item: Copy text to Clipboard.<br />
Off Times - Show off times. Shown is the start and end of the period and the minutes off<br />
time, if the operator is known it will be shown. Also the total off time is given in minutes and<br />
days/hours/minutes. If a contest does not have an off period it is set at 30 minutes. The<br />
content shown can be saved as a text file by clicking the Save button or by right clicking to<br />
the clipboard using the menu item: Copy text to Clipboard. Off times uses time of first (last)<br />
logged QSO as the start (end) of on time. Any time between start (end) of contest and first<br />
(last) logged QSO is counted as off time. A warning will be displayed for pre-contest QSOs<br />
that cause the report to be incorrect.<br />
Runs - Shows all runs. These are the periods between band changes and includes off<br />
times. The content shown can be saved as a text file by clicking the Save button or by right<br />
clicking to the clipboard using the menu item: Copy text to Clipboard.<br />
Suspect Calls - Show suspect calls using the K1TTT's call checking function. A window will<br />
open with the results. The content shown can be saved as a text file by clicking the Save<br />
button or by right clicking to the clipboard using the menu item: Copy text to Clipboard.<br />
128 of 319 2/2/<strong>2011</strong> 4:35 PM
http://n1mmtw61.semdxa.org/tiki-print_multi_pages.php?printstructures...<br />
Suspect Zones - Show suspect zones. Zones in the USA and Canada are omitted. The first<br />
zone is the zone from this contest, the second zone is the zone from the cty.dat file loaded.<br />
A window will open with the results. The content shown can be saved as a text file by<br />
clicking the Save button or by right clicking to the clipboard using the menu item: Copy text<br />
to Clipboard.<br />
Varying Zones - Show varying zones. The first zone is the zone from this contest, the<br />
second zone is the zone from any other contest in this database or this contest. A window<br />
will open with the results. The content shown can be saved as a text file by clicking the<br />
Save button.<br />
129 of 319 2/2/<strong>2011</strong> 4:35 PM
Passed QSOs -The number of passed qsos per operator. Showing band, number of<br />
passed qsos and multipliers.<br />
Cross Check Exchanges - Will create a report of inconsistent exchanges, Grid Squares not<br />
in the call history and distances >= 700 km in VHF contests. Great to find typos after the<br />
contest.<br />
Unique calls not in Master.dta - Will create a report of unique calls which are not found in<br />
the master.dta file in the <strong>N1MM</strong> logger program directory.<br />
Notes - Open a window and display all contacts with notes. Great feature to check operator<br />
notes when checking the log after the contest. The content shown can be saved as a text<br />
file by clicking the Save button or by right clicking to the clipboard using the menu item:<br />
Copy text to Clipboard.<br />
Statistics - Show statistics for the selected contest. Many choices available. See chapter<br />
'Statistics' for more detail. When, possibly during a contest, you check the statistics and a<br />
station comes back, just start typing. The statisctics window will go to the background and<br />
every typed characters will go to the Entry Window. A Print to File output can be import in<br />
the Import Goals in the Info Window.<br />
Note<br />
http://n1mmtw61.semdxa.org/tiki-print_multi_pages.php?printstructures...<br />
130 of 319 2/2/<strong>2011</strong> 4:35 PM
All 'Show' items below can only be used when valid callsign information is entered in the<br />
callsign field or the callsign frame.<br />
Show Last 10 Spots - Show the last 10 spots for the call in the callsign field. If the callsign<br />
field is empty the callsign on the callsign field frame will be used, if any. A Packet or Telnet<br />
session with a DX cluster should be present because a query will be send to that cluster.<br />
Show Buck/Packet - Show the Buckmaster information for the call in the callsign field. If<br />
the callsign field is empty the callsign on the callsign field frame will be used, if any. A<br />
Packet or Telnet session with a DX cluster should be present because a query will be send<br />
to that cluster.<br />
Show Station - Show the station information for the call in the callsign field. If the callsign<br />
field is empty the callsign on the callsign field frame will be used, if any. A Packet or Telnet<br />
session with a DX cluster should be present because a query will be send to that cluster.<br />
Show QSL/Packet - Show the QSL information for the call in the callsign field. If the<br />
callsign field is empty the callsign on the callsign field frame will be used, if any. A Packet<br />
or Telnet session with a DX cluster should be present because a query will be send to that<br />
cluster.<br />
Show Sunrise/Sunset - Show the Sunrise/Sunset information for the call in the callsign<br />
field. If the callsign field is empty the callsign on the callsign field frame will be used, if any.<br />
The information shown is also available in the Info Window. A Packet or Telnet session with<br />
a DX cluster should be present because a query will be send to that cluster.<br />
SH/DX Current Call or Spot - Shows DX information from the current call in the callsign<br />
field or spot. If the callsign field is empty the callsign on the callsign field frame will be<br />
used, if any. A Packet or Telnet session with a DX cluster should be present because a<br />
query will be send to that cluster.<br />
Show <strong>QRZ</strong> (Internet) - Show the information that <strong>QRZ</strong>.com has for this call using your<br />
browser. An Internet connection should be present.<br />
Show Google (Internet) - Show the information that Google.com has for this call using<br />
your browser. An Internet connection should be present.<br />
Show Buck (Local) - Show the Buckmaster database information for this call. This requires<br />
installation of Buckmaster database software and Buckmaster database on the local<br />
computer.<br />
Set Font - Change the font of the Entry window text boxes and callframe text. The callframe<br />
text is the same type but not size as the textboxes. If Arial is the choosen font,the callframe<br />
remains however MS Sans Serif. A nice slashed font is Monaco.<br />
14. Tools Menu Selections<br />
http://n1mmtw61.semdxa.org/tiki-print_multi_pages.php?printstructures...<br />
131 of 319 2/2/<strong>2011</strong> 4:35 PM
http://n1mmtw61.semdxa.org/tiki-print_multi_pages.php?printstructures...<br />
Rescore Current Contest - Rescore the current contest. This is required before submitting<br />
a log if CTY.DAT has been changed (if applicable) or if contacts have been modified or<br />
deleted during the contest. It may be run at any time but is rather slow.<br />
Rescore last N Hours - Rescore the last N hours for the current contest. It may be run at<br />
any time but is rather slow.<br />
Download Latest Check Partial file (Master.DTA)(Internet) - This item will open your web<br />
browser to the web page where to download the latest version of the check partial file.<br />
Select the file to download and copy the file in the program directory(NB. <strong>N1MM</strong> logger<br />
supports the CT format master.dta file). Select the file to use in the tab 'Associated Files'<br />
under 'File | Open Log in Database' dialog. The calls in these database master files appear<br />
in the Check window after entering at least two letters of the callsign field.<br />
Tune (CW mode) Ctrl+T - Switches the radio into CW mode and using the CW keying<br />
interface, key the transmitter. The PTT line will also activate and the radio has to be in semior<br />
full-break-in mode (vox) to transmit. To stop the tuning signal, press the Esc key or Ctrl+T<br />
again. After the tuning signal ends and PTT is released, the radio will return to the original<br />
mode.<br />
Download latest country file (wl_cty.dat)(Internet) - This item will open your web browser<br />
to the web page where to download the latest wl_cty.dat file. After downloading the new<br />
country file it has to be imported in the program by selecting 'Tools>Import country list from<br />
downloaded file' which is the next menu item.<br />
Import country list from downloaded file- Load a new copy of the country file into the log<br />
database. Mostly this file is called wl_cty.dat but may have any name. Just select the right<br />
file when importing and select Open". To check which file you are using go into 'Help - About<br />
<strong>N1MM</strong> logger Vx.x.xx and look at the bottom line which tells you the current country file<br />
(mostly cty.dat or wl_cty.dat), check the date and time if it matches the file. Duplicate<br />
132 of 319 2/2/<strong>2011</strong> 4:35 PM
entries are ignored during the import so the first instance will be added.<br />
http://n1mmtw61.semdxa.org/tiki-print_multi_pages.php?printstructures...<br />
Note<br />
Always load the most current WL_CTY.DAT file before entering a contest from the Internet.<br />
Add call to country - Specify a country for the callsign in the callsign field in the Entry<br />
Window. If no callsign entered this menu item will be grayed out. This is a quick way during<br />
the heat of a contest to add a country. Added callsigns to countries are valid until you do a<br />
new 'Import country list from downloaded file'. Making changes permanent means changing<br />
the imported country file (wl_cty.dat) and importing the changed country file. This feature is<br />
for getting stations accepted by the program from countries when otherwise rejected by the<br />
program due to a faulty country file. When using the right country the program will accept<br />
the station and calculate the right (well at least a more accurate) score (points and<br />
multipliers).<br />
Tune to beacon for this band - This will change mode to CW/CW-R and tune to the<br />
NCDXF beacons on bands 10, 15 and 20 meters and displays the station transmitting and<br />
the power steps in the status bar of the focus window. Also the Short Path and Long Path<br />
bearings are shown. See: http://www.ncdxf.org/Beacon/BeaconSchedule.html<br />
Update Call History with Current Log - Update the call history file selected with the qsos<br />
from the current log file. Contacts will be added when new or updated when already in the<br />
call history file. For the 2 grid fields the behavior is a bit different. When both grid fields are<br />
filled and a new third grid has been logged, the second grid (oldest) will be removed, and<br />
replaced by the contents of the first field. The new grid will be added to the first position.<br />
The same change in position will happen when only the first grid is filled and a new grid has<br />
to be added from the log. A 4 digit grid will be overwritten by a 6 digit grid when the first 4<br />
characters are the same.<br />
Turn Rotor Alt+J - Turn rotor to bearing for the callsign in the Entry window or to the<br />
callsign in the callframe (when callsign field is empty).<br />
The statusbar will show the bearing it will turn to. Example: Turning Rotor to 123°<br />
Alt+L will turn the beam to the proper bearing for long path<br />
Stop Rotor Ctrl+Alt+J - Stop turning the rotator.<br />
Packet Window Tools - Opens the menu for the Packet Window, from the Entry window,<br />
so you don't need to look at the Packet Window<br />
Program Execution Logging (debugging only)<br />
Trace facility. Exports to a selectable file (*.trc). Tracing has been added to all program<br />
areas. If you experience problems (like a serious delay) please turn on tracing for the<br />
window/dialog giving (performance) problems. Send the recorded trace file to the<br />
programmers so they can figure out the problem/delay is in the program.<br />
Disable<br />
All<br />
.... one entry per program window/dialog (Available window, Bandmap<br />
window etc.)<br />
Save Window Positions - Save the current window positions to the .ini file.<br />
133 of 319 2/2/<strong>2011</strong> 4:35 PM
NB. window positions are automatically being saved when the program is closed.<br />
Window positions are saved per operator. Use Ctrl+O to select Operator and press<br />
'Save Window Positions'.<br />
Restore Window Positions - Restore from the .ini file the most recent saved window<br />
positions. The screen will update immediately<br />
Window positions are restored per operator (when saved first by the operator). Use<br />
Ctrl+O to select Operator and press 'Restore Window Positions'. The windows will<br />
change to their new positions immediately. This enables easy reconfiguration of the<br />
screen when changing operators at a multi-op.<br />
15. Config Menu Selections<br />
15.1. Configure Ports, Telnet Address, Other - Also called Configurer.<br />
This a very important dialog which can change the program's behavior. This menu opens the<br />
configuration dialog to modify setup options.<br />
15.2. Change Your Station Data<br />
Modify overall Station information - name, call, address, state, latitude, longitude, etc. The<br />
callsign entered here is very important for most contests, It determines what country you are in,<br />
which may in turn affect the required exchange, scoring, which stations may be worked for<br />
contest credit, etc.<br />
15.3. Change Sub Bands<br />
http://n1mmtw61.semdxa.org/tiki-print_multi_pages.php?printstructures...<br />
Note<br />
More info about rotator control can be found in the chapter {{Supported Hardware}} under<br />
'Rotator control'<br />
These are the band edges which are used when you invoke the use of a bandplan in the<br />
Configurer dialog's Mode Control tab. The Sub Bands are disabled in the default setting, which is<br />
Follow Radio Mode, because this option often causes operator confusion if it is set by mistake.<br />
You may want to set up a bandplan as an aid to the operator. For example, in Europe, you might<br />
want to set the lower band edge on 40 SSB at 7040 to help you conform to the IA<strong>RU</strong> Region 1<br />
bandplan. In that case, you need to add the frequencies (in kHz) that are used for the specific<br />
134 of 319 2/2/<strong>2011</strong> 4:35 PM
mode to the bandplan for that mode.<br />
If you click or tune to an area designated for a given mode on the bandmap and you are following<br />
a bandplan, then the program and attached radio will change modes appropriately. It is assumed<br />
that digital segments are the smallest, SSB, next, and CW the largest, and that they may overlap.<br />
For that reason, the program checks the digital sub-band list first, then SSB and finally CW.<br />
CW Sub Bands - See example below. The band 7000 to 7040 is set as CW in Europe by<br />
the IA<strong>RU</strong> bandplan. The frequencies above 7040 are automatically set to SSB if no digital<br />
sub bands are set.<br />
SSB Sub Bands - the sub bands for SSB , if nothing is set this is the default mode.<br />
Digital Sub Bands - the sub bands for the digital modes<br />
15.4. Clear INI file settings<br />
Option to clear out the '<strong>N1MM</strong> logger.ini' file. Could be used when having Configurer troubles.<br />
Radio, port etc. settings will be lost when using this item.<br />
15.5. Find all windows (move to within 800 *600)<br />
Option to force all windows onto primary 800 x 600 screen. Great when coming from a higher<br />
resolution screen or a two monitor setup and windows are 'missing on the screen'.<br />
15.6. Enter Sends Messages (ESM mode)<br />
http://n1mmtw61.semdxa.org/tiki-print_multi_pages.php?printstructures...<br />
135 of 319 2/2/<strong>2011</strong> 4:35 PM
Ctrl+M - A mode of operation frst introduced by N6TR in TRLog, and much improved in <strong>N1MM</strong><br />
<strong>Logger</strong>. The program anticipates the needed sequence of messages to complete a QSO in either<br />
Run or Search & Pounce mode, and sends each one in turn by simply hitting Enter. See ESM for<br />
further details.<br />
15.7. AutoSend Threshold - Ctrl+Shift+M<br />
Start sending the callsign after a certain number of characters typed AFTER the last number in<br />
the callsign. The minimum threshold is 1. 0 will turn off the feature. Only when in <strong>RU</strong>N mode, not<br />
in S&P. More info in the chapter Advanced Functions.<br />
15.8. Spot all S&P QSOs<br />
Spot the contact when you log it. This feature is turned off EVERY time you exit the program.<br />
This is to prevent accidental spotting of test QSOs or casual rag chew QSOs.<br />
If this option is checked, a contact is automatically spotted when:<br />
You complete the QSO in S&P mode and<br />
the spot is not already on your bandmap<br />
15.9. QSYing wipes the call & spots QSO in bandmap<br />
Very useful for S&P. If you enter a station's call in the entry window, and then tune off for any<br />
reason (he doesn't answer your call, or...) the call is shown bold in the bandmap. The setting of<br />
this feature remains as it was across program restarts.<br />
Example: Tune to 21200, Enter VU2PTT, Tune off, VU2PTT is "spotted" on your bandmap at<br />
21200. Repeat as long as desired. Go back and work all of them using Ctrl+Up and Ctrl+Dn to<br />
navigate.<br />
15.10. Do not run on CQ-frequency<br />
When selected and you QSY back to an old Run frequency, the mode stays in S&P. F1 and<br />
Alt+Q continue to switch to Run mode. This is most useful in Sprint-like contests, where you QSY<br />
frequently and want to avoid unexpected switches to Run mode<br />
15.11. Show non-workable spots<br />
This allows non-workable spots and logged contacts to be hidden. . If you hide spots, you will<br />
likely never utilize the program to its full advantage, especially S&P. If you don't know why I am<br />
saying this, then don't hide spots.<br />
15.12. Reset Rx freq when running split<br />
http://n1mmtw61.semdxa.org/tiki-print_multi_pages.php?printstructures...<br />
136 of 319 2/2/<strong>2011</strong> 4:35 PM
When using the main VFO to transmit and the other to receive (split mode) after each logged<br />
QSO the RX frequency will be made equal to the TX (main VFO) frequency. It resets after every<br />
<strong>RU</strong>NNING QSO. Using a radio with VFOs A and B, this feature is ithere to let you use the main<br />
frequency control as an RIT. With Main/Sub radios like the Icom 756/7800 series you can not RX<br />
on SUB without receiving on both VFOs. In this case put RX on Main and TX on SUB for Alt+S to<br />
work.<br />
15.13. Dual Rx always on<br />
Yaesu FT-1000 series, Icom IC-756 series, IC-781 ,IC-775 and IC-7800, Elecraft K3 with subRX<br />
only: Selects the mode for Dual Receive toggle (Alt+F12).<br />
When selected -<br />
Yaesu FT-1000 series: The sub receiver will be left on (blinking green RX led)<br />
Icom IC-756 series, IC-781 ,IC-775 and IC-7800 only: Dual watch is not turned off<br />
when you switch from SUB to Main with Ctrl+Left Arrow or PAUSE<br />
Elecraft K3: The sub receiver will be left on<br />
Not selected - The sub receiver will switched off (RX led off)<br />
15.14. CQ Repeat - Alt+R<br />
Toggle for repeat CQing.go into repeat mode. With Winkey, beginning to enter a call-sign in the<br />
Entry Window terminates the CQ, but the program remains in CQ repeat mode. The function is<br />
automatically turned off when no longer on the CQ-frequency and the mode changed to S&P<br />
mode.<br />
15.15. Set CQ repeat time - Ctrl+R<br />
Specify the repeat interval (CW or SSB with sound card) in seconds. The default value is 1.8<br />
seconds.<br />
15.16. Call History Lookup<br />
When selected, a callsign entered in the entry Window is checked against a Call History file. For<br />
further details see Call history Lookup<br />
15.17. Record QSOs<br />
Record current contacts when in CW or SSB; disabled for other modes. The path set in<br />
'Configurer', tab: Files is being used. More info can be found in the chapter Tips and Tricks.<br />
15.18. Change Packet/CW/SSB/Digital Message Buttons - Alt+K<br />
http://n1mmtw61.semdxa.org/tiki-print_multi_pages.php?printstructures...<br />
137 of 319 2/2/<strong>2011</strong> 4:35 PM
Change the contents of the Packet/CW/SSB/Digital message buttons (Elsewhere called Function<br />
Key definitions). The maximum length of text in each Packet, CW, SSB and RTTY button is 255<br />
characters. Alt+K will access the relevant list of definitions, depending on the mode you are in, or<br />
you can right-click in the button area to get there . The first 12 rows are for Run mode definitions<br />
(F1-F12), and the second 12 are for S&P mode. (also F1-F12). The row-to-key association is fixed<br />
— that is, the third row in the table is Run F3, and the 14th is S&P F2. Empty rows must have<br />
something in them - it can be a single space, for example.<br />
If you wish, you can supply a single set of definitions (12 rows), and the program will use it for<br />
both Run and S&P mode. Alternatively, you can supply S&P F1 and F2, for example, and leave<br />
the remainder empty - the program will substitute only the first two S&P definitions when in S&P<br />
mode<br />
Also note that if you use a "&" character in a button caption, such as "S&P Exchange", you need<br />
to double it (S&&P) to avoid problems with a reserved Windows function.<br />
Change CW Buttons - Change the contents of the CW buttons.<br />
Change SSB Buttons - Change the contents of the SSB buttons (.wav files). Please use<br />
the file chooser buttons to the right of each row.<br />
Change Digital Buttons - Change the contents of the Digital buttons.<br />
15.19. Multi-User Mode<br />
Start the networked mode of <strong>N1MM</strong> logger (Multiple computers connected to each other).<br />
Multi-User Tools - Menu with Multi User stations tools. For more detailed info see the<br />
chapter on Multi-User Support.<br />
Edit Station Computer Names - Associate the computer numbers (starting with 0 for the<br />
master station) with their IP-addresses for use in Multi-User mode..<br />
Change Operator - Ctrl+O - Change the callsign of the operator. If you are multi-user, you<br />
will be prompted for the operator at startup. The default is the callsign in the station<br />
information dialog. Entering "OPON" in the callsign field will also prompt for an operator<br />
callsign.<br />
15.20. Change Exchange Abbreviations<br />
http://n1mmtw61.semdxa.org/tiki-print_multi_pages.php?printstructures...<br />
<strong>N1MM</strong> <strong>Logger</strong> recognizes a number of alternative forms for the standard abbreviations used in<br />
Cabrillo logs to denote multipliers. The tables accessed from these relate the alternative and<br />
standard forms. Here is an example:<br />
138 of 319 2/2/<strong>2011</strong> 4:35 PM
This table is edited the same way as the function key definitions tables, but since it is unlikely<br />
that you would ever need more than one table, any changes are saved in the database and<br />
cannot be exported. If you use multiple databases, you will need to make the same changes in<br />
each. Note that the right column is the official abbreviations. normally, you should not edit this<br />
column unless the contest sponsor changes its official abbreviations. The left column, on the<br />
other hand, can be changed at will, so long as each left column entry is associated with a rightcolumn<br />
official abbreviation. The the example, for example, YT NT and VY1 are both equated to<br />
the official abbreviation NWT.<br />
Change ARRL Section Abbreviations - Change table of ARRL Section abbreviations.<br />
Change QSO Party Abbreviations - Change the table of county abbreviations for a given<br />
QSO Party. you must have previously selected a particular QSO Party in the contest Setup<br />
dialog. Again, be extremely cautious in changing the right-hand column unless you are sure<br />
that the QSO party sponsor has made a change.<br />
15.21. SO2R<br />
http://n1mmtw61.semdxa.org/tiki-print_multi_pages.php?printstructures...<br />
More info about Single Operator Two Radio operation of the program can be found in the chapter<br />
SO2R<br />
Dueling CQ's - Ctrl+B - SO2R feature that alternates sending CQ on each radio in turn,<br />
listening on one while transmitting on the other. Supported for both CW and SSB.<br />
Changing either radio in frequency more than 200 Hz will terminate Dueling CQ.<br />
Set Dueling CQ Repeat Time - Adjusts time after CQ ends on one radio before it starts on<br />
the other. In seconds.<br />
139 of 319 2/2/<strong>2011</strong> 4:35 PM
Advanced SO2R - Ctrl+Shift+I - toggle 'Advanced SO2R' mode. See Advanced SO2R<br />
Advanced SO2R Delay Time - Ctrl+Shift+N - Adjustable delay for Advanced SO2R.<br />
Focus on Other Radio - Ctrl+Shift+K - FocusOther, See FocusOther<br />
FocusOther Always Swap - Focus always switches to the other radio when one radio is<br />
transmitting, and always switches back to the original radio when transmission is<br />
completed.<br />
Toggle CTRLFx Macro - Ctrl+Shift+L - When enabled and present in one of the function<br />
key definitions, the {CTRLFx} macro executes Fx (Function key definition x) on the opposite<br />
radio. An example is TU{CTRLF1} in Radio 2's F3 slot, which sends TU and then sends the<br />
other radio's F1, used to get quickly back to the Run radio and call CQ after finishing an<br />
S&P QSO on Radio 2.<br />
TX Lockout (Digital) - Select a lockout option. Also MIXED mode category is supported i.e.<br />
blocks second TRX on the same band and mode. This doesn't prevent RX overload. For<br />
digital modes only.<br />
Multi-TX - This is the default setting. Start CQ on radio A, next a CQ on radio B, both<br />
are active. (no lockout)<br />
First one wins - Start CQ on radio A, pause, Start CQ on radio B. The radio B CQ is<br />
ignored since radio A is already active, so if you press a F-key for the second radio<br />
while radio1 is transmitting, the radio B F-key is ignored.<br />
Last one wins - Start CQ on radio A (CQ starts), pause, Start CQ on radio B. The CQ<br />
on radio A will aborted and the CQ on radio B will start so if you press a F-key for the<br />
second radio while radio A is transmitting, the radio A transmission is interrupted and<br />
radio B transmits.<br />
Toggle SO2R Mode (Soundcard) - Ctrl+I - Used only with soundcard-based SO2R also<br />
called "$5 SO2R"<br />
15.22. WAE - Special commands for the WAE DX contest only<br />
Toggle WAE QTC mode - Ctrl+Z - Toggle the WAE QTC mode between QSO and<br />
sending/receiving QTCs. See Contest Setup Instructions .<br />
WAE Received QTC Confirmation - Enter the WAE confirmation string or .WAV file<br />
16. Window Menu Selections<br />
http://n1mmtw61.semdxa.org/tiki-print_multi_pages.php?printstructures...<br />
Available Mult's and Q's - Display the Available Mult's and Q's window. More info in the<br />
Available Mults and Qs Window chapter<br />
Bandmap Ctrl+B - Display the Bandmap window. In SO2R/SO2V each Entry window has<br />
its own Bandmap window. More info in the Bandmap Window chapter<br />
Check - Display the Check window. More info in the Check Partial Window chapter<br />
CW Key Ctrl+K - Display the CW Key window. Pressing Ctrl+K again or Enter will close the<br />
window but will continue sending the message. Pressing Escape will stop sending the<br />
140 of 319 2/2/<strong>2011</strong> 4:35 PM
message. The windows is multiline (for pasting in text) and can be resized. The font type<br />
and size is the same as used in the Entry Window<br />
Digital Interface - Displays the Digital (RTTY/MMTTY/PSK) Interface window. In<br />
SO2R/SO2V each Entry window has its own Digital Interface window (DI1 and DI2<br />
respectively). More info in the Digital modes chapters<br />
Entry Window - Display the Entry Window<br />
Gray Line - Open the optional to install Gray line program (only for Windows NT, 2000, XP<br />
or newer). More info in the Gray Line chapter<br />
Info - Display the Info window. More info in the Info Window chapter<br />
Log Ctrl+L - Display the Log window (toggles between open and minimized). More info in<br />
the Log Window chapter<br />
Multipliers by Band - Display the multipliers by band window. More info in the Multipliers<br />
by Band Dialog chapter<br />
Packet - Display the Packet/Telnet window. More info in the Packet Window chapter<br />
Score Reporting - Start the realtime score reporting application. More info in the Advanced<br />
Functions chapter under Contest Reporting Application<br />
Score Summary - Display the score summary window. More info in the Score Summary<br />
Dialog chapter<br />
Visible Dupesheet - Display the Visible Dupesheet window. More info in the Visible<br />
Dupesheet chapter<br />
Ctrl+Tab toggles between the Entry window and Packet windows. If other windows are added<br />
that have text boxes, then they will be accessed in a round-robin basis via Ctrl+Tab.<br />
17. Help Menu Selections<br />
http://n1mmtw61.semdxa.org/tiki-print_multi_pages.php?printstructures...<br />
Help Alt+H - Show this help file. Note that pressing Alt+H in any window will show the help<br />
specific to that window. You have to download the help file separately from the <strong>N1MM</strong><br />
homepage and copy the file into the directory that contains the <strong>Logger</strong> program. The<br />
Windows Help file and <strong>Manual</strong> are maintained separately from the program and follow it as<br />
close as possible. So when checking for a new program version also check if a new version<br />
of the Help/<strong>Manual</strong> is present. The revision number and revision date are shown on the first<br />
page of the Help/<strong>Manual</strong>.<br />
Search Help using Google (Internet) - Search help using Google on the Internet.<br />
Key Assignments Help - Show this Key Assignments chapter of the help file.<br />
<strong>Manual</strong> - Show the PDF version of the help file, this version can easily be printed. You have<br />
141 of 319 2/2/<strong>2011</strong> 4:35 PM
http://n1mmtw61.semdxa.org/tiki-print_multi_pages.php?printstructures...<br />
to download the manual separately from the <strong>N1MM</strong> homepage and copy the file into the<br />
directory that contains the <strong>Logger</strong> program. At that point, clicking on Help-><strong>Manual</strong> should<br />
launch the Adobe Acrobat Reader and display the <strong>Manual</strong>.<br />
Contest rules for this contest (Internet) - Go to the web site from the contest sponsor on<br />
the Internet where the rules can be found.<br />
ARRL Contest Calendar Page(Internet) - Go to ARRL contest calendar site on the<br />
Internet.<br />
<strong>N1MM</strong> <strong>Logger</strong> Home Page(Internet) - Go to the <strong>N1MM</strong> logger Home page.<br />
Download Help (English version) (Internet) - Download the Help file from the <strong>N1MM</strong><br />
logger Home page.<br />
Yahoo Discussion Group (Internet) - Go to the Yahoo Discussion Group page on the<br />
Internet.<br />
Report Bugs/Request Features/Request Support(Internet) - Go to the <strong>N1MM</strong> logger web<br />
site to report bugs or request features.<br />
Email Problem Report(Internet) - Send a problem report by E-mail to Tom, <strong>N1MM</strong>. The<br />
Report gives detailed info about the problem and some program (configuration information)<br />
and computer information (speed, processor etc.). To send a report some questions must<br />
be answered.<br />
Long description of the problem<br />
Enter your smtp server name. (Only first time)<br />
Just check your e-mail program and look for the name of the outgoing e-mail<br />
server that you use. Use that name for the smtp server name. Example:<br />
smtp.freeler.nl<br />
View Revision History (Internet) - Shows the revision history from the program on the<br />
Internet.<br />
View Revision History (last downloaded) - Shows the last downloaded revision history on<br />
the harddisk. This avoids the need for an Internet connection.<br />
View Error Log - View the latest 'Errorlog.txt' file generated by the program. The program<br />
creates and updates the contents of this file when the program generates an error. This<br />
could be used to help pinpointing a problem in the program.<br />
Report Score to 3830 (Internet) - Go to the 3830 score reporting site on the Internet.<br />
About <strong>N1MM</strong> logger Vx.x.xxx - Show the About Dialog. See Tom, <strong>N1MM</strong>'s tower with a<br />
Cushcraft X9 at the top!<br />
142 of 319 2/2/<strong>2011</strong> 4:35 PM
Log<br />
Your Log window will be similar to this one.<br />
http://n1mmtw61.semdxa.org/tiki-print_multi_pages.php?printstructures...<br />
The top grid is the log<br />
The bottom grid shows the contacts in yellow that match the partial or full call entered in<br />
the Entry window. It is sorted by band, call, date & time.<br />
The separator bar is set at a percentage of window size. When shrinking the window, both<br />
sections get smaller. After resizing the window, decide how much space to allocate to<br />
dupes by setting the separator bar.<br />
The upper pane gives date and time (in UTC) and the selected contest.<br />
When a Multi operator mode (Multi-One, Multi-Two, Multi-Multi) is selected:<br />
The operator name is shown in the log window<br />
The radio number is shown in the log window<br />
Group edits are not allowed while in multi-user mode.<br />
Editing a qso is only allowed from the station who did make the qso, not from other<br />
stations.<br />
A column will be added to the log window with Run1Run2<br />
The relative sizes of the grids can be adjusted by clicking and dragging the gray bar between the<br />
grids. The adjusted window size and the column width are saved by the program.<br />
In a serial number contest the serial numbers in the log window will be displayed without any<br />
leading zeros even when zeros are entered before the number (like 001). When printing the<br />
leading zeros will be added again and printed.<br />
143 of 319 2/2/<strong>2011</strong> 4:35 PM
Keyboard Assignments<br />
Enter - Edit the contact which is selected.<br />
Delete (Ctrl+D) - Delete the contact which is selected.<br />
Mouse Assignments<br />
http://n1mmtw61.semdxa.org/tiki-print_multi_pages.php?printstructures...<br />
Left mouse button click<br />
Single click on column title - Change log sort order using the selected column.<br />
Second click on a column will sort descending.<br />
Double click on a contact - Quick Edit the contact.<br />
Right mouse button click<br />
Right-click on a contact - Displays a menu:<br />
Quick Edit Contact - Quickly edit the current contact using the Entry window<br />
fields. Ctrl+Q moves back one qso, Ctrl+A moves forward one qso. If the<br />
textboxes background in the Entry window are colored blue, you are in Quick<br />
Edit mode. To exit, press enter to save changes or Escape to abandon changes.<br />
Quick Edit starts editing with the highlighted contact and you can move forward<br />
or back from there. Enter logs the changes made and Escape discards the<br />
changes bringing you back in normal logging mode.<br />
Edit Contact - Edit the contact.<br />
Delete Contact (Ctrl+D) - Remove the contact from the log.<br />
Play Contact - This selection will be gray, if there is no .WAV recording file for<br />
this contact. If it is not gray, the selection can be chosen and the contact audio<br />
will play on your default sound player. (Make sure you don't have the sound<br />
card hooked up at that moment to your microphone!)<br />
Jump to this frequency - Jump to the frequency logged with this contact<br />
Graph Q rates up to this entry - For a historical display of rates from an<br />
existing log with QSOs in it, the procedure is to decide the point at which you<br />
want to examine your rate in the preceding 30 or 60 minutes. Highlight that point<br />
in the log window, and then right-click. Look for the option "Graph Q rates up to<br />
this entry" and click OK. That will open a new window, on which you can<br />
right-click for the same options as in the real-time window.<br />
144 of 319 2/2/<strong>2011</strong> 4:35 PM
Menu items:<br />
The period<br />
30 minutes / 60 minutes<br />
The number of bars to show<br />
6, 10, 15, 20<br />
Raw QSO count<br />
Hourly rate (Q's/hr)<br />
10 min moving avg<br />
20 min moving avg<br />
30 min moving avg<br />
http://n1mmtw61.semdxa.org/tiki-print_multi_pages.php?printstructures...<br />
www.qrz.com - Ask information about this station using www.qrz.com (name, address<br />
etc.). An Internet session should be available.<br />
Change All Contact Timestamps by a Fixed Amount -this will fix a log where all QSOs<br />
are off by a common amount of time<br />
Put mouse over log window and right click<br />
Select 'Change All Contest Timestamps by a Fixed Amount'<br />
Dialog box will open, and enter offset time (+ or -) in minutes<br />
The date will automatically adjust if the offset rolls a QSO into a different day.<br />
The time is entered in minutes, and can be a negative time to go backwards.<br />
(You might need a calculator to determine the offset in minutes if your date was<br />
off by many days, months, or years)<br />
NOTE: While you can easily adjust for a mistake by doing another offset, it is<br />
advisable that you backup your log before making any changes.<br />
Change Operator - Change operator callsign for this contact (Multi-user). The default<br />
is the station callsign. When selecting several rows, the change will be applied to all<br />
rows. This operation is not reversible. See example picture.<br />
145 of 319 2/2/<strong>2011</strong> 4:35 PM
Bandmap<br />
In this Section...<br />
http://n1mmtw61.semdxa.org/tiki-print_multi_pages.php?printstructures...<br />
Change Mode - Change the mode for this contact. When selecting several rows, the<br />
change will be applied to all rows. This operation is not reversible. See example<br />
picture above.<br />
Change Rx Tx Frequency (and band) - Change the RX and TX frequency for this<br />
contact. When selecting several rows, the change will be applied to all rows. This<br />
operation is not reversible. See example picture above.<br />
Change Station Number - Change the station number for this contact (Multi-user). The<br />
Master station always has number 0. When selecting several rows, the change will be<br />
applied to all rows. This operation is not reversible. See example picture above.<br />
Find all contacts with a station - Search a call (station) in the logged contacts from this<br />
contest.<br />
Set Start Interpolation Time Row - Set the start row and time from where the time<br />
interpolation has to begin. An example how to use can be found in the chapter 'After<br />
the contest'.<br />
Set Stop Interpolation Time Row - Set the stop row and time from where the time<br />
interpolation has to stop. This menu item is only highlighted when a start time has<br />
been entered. An example how to use can be found in the chapter 'After the contest'.<br />
Rescore from this point on - Rescore the contest starting with this logged contact till<br />
the end of the log.<br />
Delete custom column widths - Delete the custom column widths and go back to the<br />
default column widths as set per contest (by the programmer).<br />
Show Mode - Select or deselect showing the mode behind all other columns in the log<br />
window.<br />
Show Date - Select or deselect showing the date in front of the time (first column log<br />
window).<br />
Select All - Select all QSOs in the log (for copy and paste actions)<br />
Copy<br />
Copy Generic Print String - Copy generic print string to clipboard<br />
Copy ADIF String - Copy ADIF string to clipboard<br />
Set Font - Set the font for the Log window, a selection window will appear.<br />
Help - Show the help file for this window.<br />
146 of 319 2/2/<strong>2011</strong> 4:35 PM
Bandmap<br />
1. One radio scenario<br />
2. Two radio scenario<br />
3. Other<br />
4. Colors of the incoming spots:<br />
5. Keyboard Assignments<br />
6. Button Assignments<br />
7. Mouse Assignments<br />
8. Example bandmap usage<br />
Your Bandmap window will be similar to these.<br />
The Bandmap Window represents a VFO or a radio. There are three scenarios: one radio with 1<br />
VFO displayed (SO1V); one radio with 2 VFOs displayed (SO2V); or two radios with one VFO<br />
shown for each radio (SO2R). The bandmap is made zoomable to the complete band size.<br />
1. One radio scenario<br />
http://n1mmtw61.semdxa.org/tiki-print_multi_pages.php?printstructures...<br />
With one radio in SO1V mode, only one bandmap can be displayed. With one radio in SO2V<br />
mode, two bandmaps may be displayed,m one for each Entry window. Each bandmap holds one<br />
VFO. Typically, VFO-A will be on the left and VFO-B will be on the right. If you want to change<br />
147 of 319 2/2/<strong>2011</strong> 4:35 PM
VFOs, just use the mouse to click on one of the spots in the bandmap or use the Ctrl+left &<br />
Ctrl+right arrow keys to change VFOs. The radio information box at the top of the bandmap will<br />
change colors as you change VFOs. The selected Bandmap or Entry window will have a blue<br />
top.<br />
2. Two radio scenario<br />
With two radios the operation is exactly the same, except that each bandmap represents one of<br />
the radios. It is best if one orients the bandmaps in the same position as the radios, left-right or<br />
top-bottom. This will make operation more intuitive.<br />
3. Other<br />
http://n1mmtw61.semdxa.org/tiki-print_multi_pages.php?printstructures...<br />
It is well worth your time to quickly review the Mouse Assignments below in order to become<br />
familiar with the functions that the Bandmap provides.<br />
Also important! The usefulness of the Bandmap is greatly enhanced by reading the Key<br />
Assignments<br />
The text CQ-Frequency will be shown on the bandmap when running stations. It is<br />
automatically marked when you press the CQ-button (mostly the F1-key).<br />
When a spot is less than three minutes old NEW will be placed behind the call and bearing in the<br />
bandmap. When the station works split the receive frequency (QSX frequency) will be shown<br />
behind the bearing after the spot is three minutes old, there is not enough room to give both<br />
NEW and the QSX frequency. Splits are shown as 3 digits on HF. The bearing to a station is<br />
shown only for stations outside your own country with exceptions for USA and Canada. When<br />
calculating the bearing the section or state from the callhistory is being used otherwise the<br />
coordinates of the state that is the closest to the middle of the callarea is used.<br />
On the title bar of the bandmap you can see what type of radio is connected. It will show<br />
<strong>Manual</strong> - A when no radio is connected or as an example Kenwood VFO A when a Kenwood<br />
radio is connected. It will show a B for the other bandmap/VFO.<br />
Normally only one frequency is shown in the top portion of the bandmap. This is the receive<br />
and transmit frequency. When working split the transmit frequency is added and shown just<br />
below the receive frequency in a smaller font.<br />
Busted spots (calls with "BUST" in the comment) are not shown on the bandmaps (when<br />
coming in via packet/telnet).<br />
When both bandmaps are closed the frequency and mode is shown on the title bar of the<br />
Entry window before the contest name.<br />
During busy contests the default zoom is too dense. Use the right-click menu to zoom or<br />
use the numeric pad +/- keys.<br />
New calls will show up first in the bandmap, ahead of old calls on the same frequency.<br />
A zone only multiplier will be shown in red (except "non-workables"). The exception means<br />
that in CQWW, your own country will show as gray, even if it is a multiplier.<br />
148 of 319 2/2/<strong>2011</strong> 4:35 PM
Country of unknown callsign (like TX5A in 2006) will be made equal to the prefix to force it<br />
to be a new country.<br />
Better a broken callsign then missing a multiplier.. If it is a broken callsign the user<br />
can delete the spot.<br />
A sunrise/sunset indicator (¤) is shown for spots from stations where applicable.<br />
CW Skimmer spots are marked with "#" in spotter's callsign as skimmer spot in the<br />
bandmaps (see picture at right above). If spotter's callsign contains your (Station dialog)<br />
callsign, then the spots are marked with a "!".<br />
4. Colors of the incoming spots:<br />
Blue: QSO<br />
Red: Single Multiplier Example: CQWW - QSO is either zone or country multiplier (one<br />
multiplier)<br />
Green: Double or better Multiplier Example: CQWW - QSO is a zone and a country<br />
multiplier (two multipliers)<br />
Gray: Dupe<br />
Bold - This is a self spotted call ('Stored' or by using the feature 'QSYing wipes the call &<br />
spots QSO in bandmap') and is not coming from the cluster.<br />
5. Keyboard Assignments<br />
Mouse wheel - Zoom in or out the bandmap which has KEYBOARD focus.<br />
Numeric keypad + key - Zoom In to show less spots from the bandmap which has<br />
KEYBOARD focus.<br />
Numeric keypad - key - Zoom out to show more spots from the bandmap which has<br />
KEYBOARD focus.<br />
Shift - Numeric keypad + key - Zoom In to show less spots from the bandmap which does<br />
NOT have KEYBOARD focus.<br />
Shift - Numeric keypad - key - Zoom out to show more spots from the bandmap which<br />
does NOT have KEYBOARD focus.<br />
Jump to Spots on active radio/VFO<br />
http://n1mmtw61.semdxa.org/tiki-print_multi_pages.php?printstructures...<br />
Ctrl+Down Arrow - Jump to next spot higher in frequency.<br />
Ctrl+Up Arrow - Jump to next spot lower in frequency.<br />
Ctrl+Alt+Down Arrow - Jump to next spot higher in frequency that is a multiplier.<br />
149 of 319 2/2/<strong>2011</strong> 4:35 PM
Ctrl+Alt+Up Arrow - Jump to next spot lower in frequency that is a multiplier.<br />
Jump to Spots on non active radio/VFO<br />
Ctrl+Shift+Down Arrow - Jump to next spot higher in frequency on the inactive radio/VFO.<br />
This will skip over CQ-Frequency when radios/VFOs are on the same band. Proper<br />
keystroke operation is radio dependent. Disabled for SO1V.<br />
Ctrl+Shift+Up Arrow - Jump to next spot lower in frequency on the inactive radio/VFO. This<br />
will skip over CQ-Frequency when radios/VFOs are on the same band. Proper keystroke<br />
operation is radio dependent. Disabled for SO1V.<br />
Shift+Ctrl+Alt+Down Arrow - Jump to next spot higher in frequency on the inactive<br />
radio/VFO that is a multiplier. If you are operating single mode, your mode won't change<br />
when jumping between spots. Disabled for SO1V.<br />
Shift+Ctrl+Alt+Up Arrow - Jump to next spot lower in frequency on the inactive radio/VFO<br />
that is a multiplier. If you are operating single mode, your mode won't change when<br />
jumping between spots. Disabled for SO1V.<br />
Shift+Alt+Q - Jumps to your last CQ frequency on the inactive VFO/radio. Disabled for<br />
SO1V.<br />
6. Button Assignments<br />
Narrow/Wide - Toggle the radio filters from Wide to Narrow, or vice versa. The label<br />
indicates the current state. The label is not shown for some radios (like FT-817) and manual<br />
radios.<br />
CW/USB/LSB/RTTY/PSK/AFSK/AM/FM - Click this label to toggle from USB/LSB (band<br />
sensitive) via RTTY to CW/PSK/AFSK/AM/FM (radio dependent).<br />
RIT Offset (-0.08) - Click this label to clear the RIT offset.<br />
RIT - Click this label to toggle the RIT on and off.<br />
XIT - Click this label to toggle the XIT on and off.<br />
7. Mouse Assignments<br />
Left-click menu<br />
http://n1mmtw61.semdxa.org/tiki-print_multi_pages.php?printstructures...<br />
Click on frequency - Jump with the active VFO/radio to that frequency.<br />
Shift+Click on frequency (SO2R only) in Inactive Bandmap - Program the non active radio<br />
without changing window focus. Allows you to be active and sending on one radio and<br />
change the frequency on the non active radio without changing Entry window focus.<br />
Shift+Click on bandmap callsign (SO2R only) in Inactive Bandmap - Same as Shift+Click on<br />
150 of 319 2/2/<strong>2011</strong> 4:35 PM
Frequency with the addition that the callsign is placed on the non active radio's callsign<br />
frame.<br />
Click on call - Jump to that frequency and place the call on the Entry window callsign<br />
frame. When the callsign field is empty, giving space will copy the callsign from the Entry<br />
window callsign frame to the callsign field. Also clicking on the callsign in the callsign frame<br />
will place the call into the callsign field, replacing anything that was previously there.<br />
Double-Click call - Jump to that frequency, place call into Entry window callsign field,<br />
replacing anything that was previously there. Spots with 'Busy' in the call will be ignored<br />
(placed in the bandmap when using Alt+M).<br />
Click dial ticks - Jump to that frequency.<br />
Click frequency label - Jump to that frequency.<br />
Right Click call - Display the right-click menu for the selected call (see Right-Click menu<br />
below).<br />
The selected call will be shown italic and underlined when right-clicking on it<br />
Right Click anywhere else - Display the right-click menu with some options grayed out<br />
which are call related.<br />
Right-click Menu Options<br />
http://n1mmtw61.semdxa.org/tiki-print_multi_pages.php?printstructures...<br />
If you right click in the Bandmap Window the right-click menu will appear. In the left-hand<br />
illustration, the menu is shown as it appears when you click on the window, not on a particular<br />
spot. The right-hand illustration shows how the menu looks if you right-click on a specific spot.<br />
151 of 319 2/2/<strong>2011</strong> 4:35 PM
http://n1mmtw61.semdxa.org/tiki-print_multi_pages.php?printstructures...<br />
Remove Selected Spot - equivalent to Alt+D with the spot callsign in the call-frame.<br />
Blacklist callsign - if you click on this option, then subsequent spots of that station will not<br />
be displayed on the Bandmap or in the Available window. Used to get rid of busted spots<br />
that recur often, such as LW3LPL. To edit the list of blacklisted spots, or to remove a call<br />
from the list, use the Right-click menu in the Packet/Telnet window.<br />
Blacklist all spots from spotter - designed in particular for use when an RBN station is<br />
feeding spots that are badly off-frequency (due to I/Q image problems) or otherwise<br />
defective. Could also be used for the occasional harasser on traditional DX clusters. Again,<br />
the blacklist can be edited from the Packet/Telnet window.<br />
152 of 319 2/2/<strong>2011</strong> 4:35 PM
http://n1mmtw61.semdxa.org/tiki-print_multi_pages.php?printstructures...<br />
Zoom In (Numeric Pad + or Ctrl+Scroll wheel if using a mouse.) - Show a wider frequency<br />
range on the Bandmap that has entry/RX focus.<br />
Zoom Out (Numeric Pad - or Ctrl+Scroll wheel) - Show a narrower frequency range on the<br />
Bandmap that has entry/RX focus.<br />
Go to Bottom of Band - Go to the bottom of this SSB/CW subband.<br />
Go to Top of Band - Go to the top of this SSB/CW subband.<br />
Remove Spots, This Band Only, Leave Self Spots<br />
Remove Spots, This Band Only<br />
Remove Spots, ALL BANDS, Leave Self Spots<br />
Remove Spots, ALL BANDS<br />
Show Last 10 Spots - click this option (which is gray unless a callsign has been clicked on)<br />
and the cluster will be asked for the last 10 spots of that station. These are displayed in<br />
the Packet/Telnet window.<br />
Show Buck/Packet - requiests address information from the DX cluster<br />
Show Station - sends the SH/STA [callsign] command to the DX cluster<br />
Show QSL/Packet - sends the SH/QSL [callsign] command to the DX cluster<br />
Show Sunrise/Sunset - sends the SH/SUN [callsign] command to the DX cluster<br />
Show Buck/Internet - opens <strong>QRZ</strong>.COM in your default browser for manual entry of the<br />
callsign.<br />
Show Buck Local - opens a call-sign database installed on the same computer as <strong>N1MM</strong><br />
<strong>Logger</strong>l<br />
Set transceiver offset frequency - This is for transverter supporting transverters. The<br />
transverter offset is saved when the program closes and read again when opened.<br />
Remember to enter the frequency of the transceiver and not that of the transverter when<br />
going into split mode (Alt+F7). Information how to fill in this table (which frequencies to<br />
enter and how to calculate the IF frequency) can be found in the chapter 'VHF and Up<br />
contesting'.<br />
Set transceiver timeout time - Timeout value for each radio (default is 10 seconds). Entering<br />
a value of zero will disable the timeout. Entering a negative number will set the time out<br />
153 of 319 2/2/<strong>2011</strong> 4:35 PM
http://n1mmtw61.semdxa.org/tiki-print_multi_pages.php?printstructures...<br />
value to 10 seconds. Entering a number that is too large for the program variable will set the<br />
timeout to the program maximum. The positive minimum is 5 seconds.<br />
Set transceiver filter codes - You will be prompted for the wide or narrow string to set the<br />
filters. For Kenwood, it's pretty easy. You just look up in your manual the string you want<br />
and enter it. For other radios, like FT-1000MP, its harder. You must enter a series of spacedelimited<br />
codes in DECIMAL. Therefore, when an FT-1000MP filter code of 0 0 0 0 8C is<br />
required, you must enter 0 0 0 0 140 (8C hex).<br />
To reset to the default values in the program enter a space and press the OK button. It is possible<br />
to use {CR} in the filter codes which will be replaced with the return character. These selection<br />
are disabled when manual radio is selected (i.e. no radio selected).<br />
CW Wide<br />
CW Narrow<br />
SSB Wide<br />
SSB Narrow<br />
Digi Wide<br />
Digi Narrow<br />
Bring to foreground when made active - This brings the active bandmap to the foreground.<br />
When not having enough real estate on the monitor screen it is possible to place both<br />
bandmaps on top of each other. The active bandmap will be shown hiding the non-active<br />
bandmap.`<br />
Reset Radios - Allow manual reset all attached radios. When contact with a radio is lost the<br />
dialog below will appear. Select 'Retry' to restore the connection with all attached radios or<br />
Right-Click on the bandmap and choose "Reset Radios" to restart the connection.<br />
Packet Spot Timeout - Indicates how long (in minutes) spots are kept in the Bandmaps. The<br />
default is 60 minutes, any integer may be specified. For use with the Reverse Beacon<br />
Network (RBN), a very short timeout (10-15 minutes) is recommended to avoid overloading<br />
the program with the spot volume.<br />
Why don't I see spots? (Show packet filters) - Click and a window will open showing the<br />
current spot settings in effect.<br />
154 of 319 2/2/<strong>2011</strong> 4:35 PM
Note icon<br />
Help - Show the help file for this window.<br />
When a command is sent to the packet window, it is sent to whichever connection is active.<br />
Note icon<br />
When the connected cluster is a DXSpider cluster, select on Tab: Other in the Configurer 'Format<br />
for DX Spider cluster'.<br />
Hovering with the mouse over a spot<br />
Hovering with the mouse over a spot in the Bandmap gives the following info about the spotted<br />
station:<br />
Exact frequency sent by spotter.<br />
Callsign of spotter.<br />
The time in minutes since the station was placed on the DX cluster network.<br />
Comments sent with the spot.<br />
The 'standard' country prefix from the spotted station<br />
Hovering with the mouse over RX arrow<br />
Hovering with the mouse over the RX arrow shows the frequency.<br />
8. Example bandmap usage<br />
by Tom, <strong>N1MM</strong><br />
http://n1mmtw61.semdxa.org/tiki-print_multi_pages.php?printstructures...<br />
In Search & Pounce (S&P) the callframe will show you each spotted station as you come within<br />
"tuning tolerance" (user settable) of that station. I'm terrible at remembering whether I worked a<br />
station and on what frequency. With worked stations in the bandmap, the program will tell you<br />
that they are not workable again. You can tune by them more quickly. The same feature is useful<br />
in contests with unworkable stations.<br />
155 of 319 2/2/<strong>2011</strong> 4:35 PM
In a contest like CQ WPX, with (basically) no value multipliers, here is how I use the bandmap.<br />
Whenever I can't get a run going I start S&P on a band with a lot of unworked stations (use the<br />
available window). I use Ctrl+Up and Ctrl+Down arrow to go to the next station. If that station is at<br />
the beginning of a QSO, I move to the next one. If the QSO is near the end, I wait and work the<br />
station. Then I move on. If I reach the top of the band, I start coming back down the band,<br />
working the ones I missed on the way up. If there is no station at a frequency, that's my new<br />
running frequency!<br />
In contests with valuable multipliers, you should use Ctrl+Alt up/down to get the multipliers first,<br />
then go back and get the QSOs.<br />
If the rate drops fairly low, sweep the band using your VFO. That is where the old calls in the<br />
bandmap come in useful. If you copy a call, but it seems like it is going to take a long time to<br />
work him, tune to the next guy. If you have "QSYing wipes the call & spots QSO in bandmap"<br />
turned on, the call will be spotted in bold, so you can Ctrl+Up/Ctrl+Down to him later.<br />
Remember: if a call is in the callframe, space will load it into the call textbox.<br />
If all this seems very unfamiliar, you haven't read the Key Assignments help (and/or the Key<br />
Assignments Shortlist).<br />
Reading that single item is your single best time investment in using this program.<br />
Spots and the time shown<br />
When you hover with the mouse over a spot in the bandmap, it will show the relative age of a<br />
spot in minutes. The time shown here depends on the spot format. There are two formats for<br />
spots. One is for current spots, one is for SH/DX spots. Some clusters allow to show old spots in<br />
the current spot format. The program handles the two types of spots differently.<br />
Current spots go into the bandmap with the computer's local (converted to UTC) time. This<br />
is to remove variations in cluster times and order the spots into the time they were received.<br />
Old spots are logged with the originating cluster's time with the provision that it cannot be<br />
later than the current local (UTC) time.<br />
With AR-Cluster you can display old spots with SH/DX or SH/FDX. It is recommended to use<br />
SH/DX, as it will be recognized as an old spot. Other cluster software may have similar<br />
capabilities.<br />
Red lines indicating US license frequencies<br />
On the bandmap there are red lines to indicate extra, advanced and general portions of each<br />
band. Since US hams can operate only in their section and the sections of lower class licenses, it<br />
is in your interest to operate some in the higher portions of each band. Otherwise there are some<br />
US hams you will not ever be able to work.<br />
The lines can be found on:<br />
SSB: 3775, 3850, 7225, 14175, 14225, 21225 and 21300.<br />
CW: 3525, 7<strong>02</strong>5, 14<strong>02</strong>5 and 21<strong>02</strong>5.<br />
http://n1mmtw61.semdxa.org/tiki-print_multi_pages.php?printstructures...<br />
156 of 319 2/2/<strong>2011</strong> 4:35 PM
No lines on 160 and 10 meters.<br />
Packet and Telnet<br />
In this Section...<br />
Packet and Telnet<br />
1. Colors used<br />
2. Initial Button Assignments<br />
3. Keyboard Assignments<br />
4. Mouse Assignments<br />
5. Right Click Menu<br />
5.1. Packet Filters<br />
6. Special keys:<br />
7. Macro keys<br />
8. How to add/edit/delete a Telnet cluster<br />
9. How to setup and connect a Telnet cluster<br />
10. How to setup and connect to a Packet cluster using a TNC<br />
11. Auto connecting to a cluster<br />
12. Spotting stations<br />
13. Multi-User setup<br />
14. Computers on a LAN<br />
15. Packet via the soundcard<br />
16. Supported Packet clusters:<br />
17. CW Skimmer and the Reverse Beacon Network (RBN)<br />
http://n1mmtw61.semdxa.org/tiki-print_multi_pages.php?printstructures...<br />
Your Packet/Telnet window will be similar to this one, with Packet and Telnet tabs. The former is<br />
used only when connecting to an RF packet cluster node. Unless specifically differentiated,<br />
references in this manual to packet also apply to Telnet. For example, "Packet Filters" and<br />
"Packet Spot Timeout" also apply to Telnet.<br />
157 of 319 2/2/<strong>2011</strong> 4:35 PM
The button values can be changed by right clicking on them or going into the menu: 'Config ><br />
Change Packet/CW/SSB/Digital Message Buttons > Change Packet/Telnet Buttons'.<br />
Connect and other messages are shown in the bottom pane from the Entry window. Status info<br />
for Telnet is given in the Telnet window title. Focus is set to the Entry window when one of the 12<br />
buttons is clicked.<br />
All incoming DX spots are placed on the bandmaps. Also the spots requested with commands<br />
like SH/DX etc. Split information given in the spot comment will be recognized. When such a spot<br />
is selected the transceiver will go into split mode (if applicable). The program recognizes: UP, U,<br />
DOWN, DN, D and the word QSX. Examples: QSX 3.838, QSX 4, UP 5, DOWN 2, U 5, D4, U4,<br />
DN4, UP4, DOWN4, QSX7144 etc.<br />
Where possible mode, state/section, grid etc. are extracted from comments on incoming spots.<br />
Grid square from spot comment is used to calculate bearing reported in Bandmap, Available<br />
window, Info window and Entry window.<br />
When telnet is selected a Telnet DX-cluster can be chosen from the top of this window. By<br />
clicking the 'Close Port' button the current connection will be closed. A telnet cluster can be<br />
updated in the configurer dialog (Tab: Hardware).<br />
Packet/Telnet has a nine minute stay-alive function which sends a CR every nine minutes (not<br />
configurable). The timer is restarted when you send a message to the cluster.<br />
1. Colors used<br />
Blue - 'Normal' incoming spots<br />
Red - (Talk) Messages<br />
Magenta - WWV messages<br />
Black - All other messages like cluster welcome messages, SH/DX responses, messages<br />
sent to the cluster, prompts etc.<br />
2. Initial Button Assignments<br />
Below are the default button assignments for the Packet/Telnet buttons. A maximum of 12<br />
buttons are available for packet and Telnet. Adding more lines in the edit window will not lead to<br />
more buttons (12 is a fixed value). The contents and texts shown on the buttons can be changed<br />
to anything you like.<br />
Button<br />
text<br />
http://n1mmtw61.semdxa.org/tiki-print_multi_pages.php?printstructures...<br />
Command Description Packet Telnet<br />
BYE BYE Log off cluster OK OK<br />
158 of 319 2/2/<strong>2011</strong> 4:35 PM
CONN C PE1M-7 Connect to the (non telnet) packet cluster. Example: C<br />
PE1M-7 You have to set your cluster's call under 'Tools<br />
>Change Packet Buttons'.<br />
DI/N DI/N Show new messages (CLX needs the full:<br />
directory/new)<br />
Connect -<br />
OK OK<br />
SH/DX SH/DX/30 Show last DX spots OK OK<br />
USERS SH/U Show cluster users OK OK<br />
WWV SH/WWV Show WWV spots OK OK<br />
10M SH/DX/30<br />
10<br />
15M SH/DX/30<br />
15<br />
20M SH/DX/30<br />
20<br />
40M SH/DX/30<br />
40<br />
80M SH/DX/30<br />
80<br />
Show last 10M spots OK OK<br />
Show last 15M spots OK OK<br />
Show last 20M spots OK OK<br />
Show last 40M spots OK OK<br />
Show last 80M spots OK OK<br />
PA1M {MYCALL} Connect to the Telnet DX cluster by sending your call to<br />
the Telnet cluster. Most Telnet clusters expect your<br />
callsign as the first text received. The callsign used with<br />
the macro {MYCALL} is taken from the station<br />
information dialog<br />
Close Port - Close the current Telnet connection.<br />
3. Keyboard Assignments<br />
- Connect<br />
Ctrl+C - Sends Ctrl+C to the TNC which is used by TAPR TNC's.<br />
Ctrl+Z - Sends Ctrl+Z to the TNC which is used by TAPR TNC's.<br />
Shift+Escape - Places an Escape character on the command line which is send to the TNC<br />
after pressing Enter. The Escape character is being used by WA8DED/ TF firmware TNC's.<br />
The Packet/Telnet window must be active and the cursor must be on the command line.<br />
N.B. The Escape key (without the Shift key) makes the Entry Window active.<br />
4. Mouse Assignments<br />
http://n1mmtw61.semdxa.org/tiki-print_multi_pages.php?printstructures...<br />
159 of 319 2/2/<strong>2011</strong> 4:35 PM
Left mouse button<br />
Single click - Tune the active radio to the frequency of the spot.<br />
Shift+click - Tune the inactive radio to the frequency of the spot.<br />
Double click - The spot under the cursor will be placed in the callsign field in the Entry<br />
window and gets focus.<br />
Ctrl+Single click - Tune the non-active radio to the frequency of the spot and make it<br />
active.<br />
Right mouse button - Displays a menu - see below<br />
5. Right Click Menu<br />
http://n1mmtw61.semdxa.org/tiki-print_multi_pages.php?printstructures...<br />
Split operation<br />
If you click on a spot that has a QSX (listening) frequency given, your radio is under program<br />
control, and your radio can accept split commands, then the required QSX will be set.<br />
Why don't I see spots? (Show packet filters) - A window will open showing the current<br />
spot settings in effect.<br />
Configure Ports, Telnet Address, Other - Displays the 'Configurer' dialog.<br />
160 of 319 2/2/<strong>2011</strong> 4:35 PM
5.1. Packet Filters<br />
http://n1mmtw61.semdxa.org/tiki-print_multi_pages.php?printstructures...<br />
Edit Telnet Cluster List - Displays the 'Change Packet Cluster List' dialog. Here you<br />
can add, edit or delete telnet cluster sites.<br />
Change Packet/Telnet Buttons - Change the label and contents of the packet/telnet<br />
buttons. Note that the use of '&' in the Button Caption will cause the following lettered<br />
key to become a "Alt+Hotkey."<br />
Close Port - Close the packet or Telnet connection (depends on the selected Tab)<br />
Specify Comment for All Spots - Enter the text you want appended to every spot.<br />
Lasts for the session only. Exit clears it. Example: PACC<br />
Auto logon - Automatically connect to a cluster when the program starts. When<br />
running Telnet, auto logon will send the right-most button (which by default contains<br />
the {MYCALL} macro). When running packet, auto logon will press the second button:<br />
"C call". When running both, only the one that was in focus the last time before<br />
closing the program will be re-started.<br />
Packet Spot Timeout - Indicates how long (in minutes) spots are kept in the<br />
Bandmaps. The default is 60 minutes, but any integer may be specified.<br />
Remove Packet Spots, Leave Self Spots - Remove all spots coming in via packet or<br />
Telnet but leave all self spots in the Bandmap.<br />
Remove all spots - Remove all spots from the Bandmaps. This means that also all<br />
information on the Available Mults and Q's window is cleared.<br />
Allow HF - When selected all spots on the HF bands ( < 30 MHz) are passed to the<br />
161 of 319 2/2/<strong>2011</strong> 4:35 PM
http://n1mmtw61.semdxa.org/tiki-print_multi_pages.php?printstructures...<br />
Bandmaps. See note below.<br />
Allow WARC - When selected all spots are passed to the Bandmaps from the WARC<br />
bands. See also note below.<br />
Allow VHF - When selected all spots on the VHF bands (> 30 MHz) are passed to the<br />
Bandmaps. See note below.<br />
Allow spots from my country only - When selected only spots originated from your own<br />
country will be shown in the Bandmaps and Available window. See note below.<br />
Allow spots from my continent only - When selected only spots originated from your own<br />
continent will be shown in the Bandmaps and Available window. See note below.<br />
Allow only spots from specified call areas - When selected only spots originated from<br />
specified call areas will be shown in the Bandmaps and Available window. See note below.<br />
The spots can be specified at the next menu item. A call area is the country prefix + the first<br />
number in the call. Example: Call: WB1KK Call area: K1 (K + 1)<br />
Enter call areas) - Call area filter for the menu item above. Enter list of call areas to<br />
pass separated by spaces. Example: K1 K2 K3 K4 and select the OK button. To clear<br />
the list enter only a space and press the OK button.<br />
Allow spots for this contest's mode(s) only - Only allow spots where the mode is equal to<br />
the mode set in the contest setup.<br />
When the mode is mixed the selection will be anything "not digi".<br />
Filter Blacklisted Packet Spot Calls - Used to block spots of specific calls from being added<br />
to the bandmap. Could be used to filter out persistent busted spots.<br />
Edit Packet Spot Blacklist - Just what it sounds like, for adding to or deleting from the list of<br />
blacklisted spot callsigns<br />
Filter Spots from Blacklisted Spotters - For use any time you do not want to receive spots<br />
from a particular spotter. For example, if an RBN station's receiver were to be severely off<br />
calibration, you could opt to block spots from that station rather than chase phantoms all<br />
weekend.<br />
Edit Spotter Blacklist - Again, just what it sounds like. Add or delete spotters whose spots<br />
you wish to be blocked.<br />
Change Subbands for mode filter - These are the definable band edges. The frequencies<br />
added (in kHz) are used for the specific mode. Note that no band edges are defined for<br />
Digital. What you will want to do for digital is add say 7060 7090 for band edges. That range<br />
will show as magenta in the Bandmap. If you click in that area and you are following the<br />
band plan , then the mode will change appropriately. Make sure you have the desired mode<br />
control defined in the config dialog ('Config | Configure Ports, Telnet Address, Others | Tab:<br />
Mode Control | Follow band plan (default)'). The bandplan is computed as follows: Is it<br />
Digital? If not, is it CW? If not then is it SSB.<br />
Note: The default US bandplan is used by the program. Non-US stations have to make changes<br />
to that bandplan. An example is 40 meters for Europe where the CW part of the band is mostly<br />
much smaller.<br />
Change CW Bands - The band 7000 to 7035 is set as CW (Europe), the frequencies<br />
above are automatically set to SSB if no digital sub bands are set.<br />
Change SSB Bands - The sub bands for SSB , if nothing is set this is the default<br />
mode.<br />
Change Digital Bands - The sub bands for the digital modes<br />
162 of 319 2/2/<strong>2011</strong> 4:35 PM
Set Font - Change the font of the Packet/Telnett text boxes. Fixed fonts (like Fixedsys,<br />
Courier, Anadale Mono which has slashed zeros etc.) are recommended, so that columns<br />
will line up.<br />
Copy - Mark a part of the Packet/Telnet window with the left button, then right-click and<br />
choose copy. The selection will disappear before you choose copy, but that doesn't matter.<br />
You can then paste the selected area into Word or Notepad or whatever you like.<br />
Help - Show the help file for this window.<br />
Note: Allow spots and Allow HF/VHF/WARC filter settings.<br />
These settings have nothing to do with what shows in the Packet/Telnet window. They are not<br />
commands to the DX cluster, instead telling the program whether to use the spots in the<br />
Bandmaps and the Available window.<br />
Clear spots will take all the spots that appear in those two windows and delete them. It does<br />
nothing to the Packet/Telnet window. The spots shown in the Packet/Telnet window itself will not<br />
be filtered; you would have to do that at the cluster node. Learn your cluster's filtering<br />
commands. This is the best way to accomplish what you want.<br />
6. Special keys:<br />
Ctrl+key - Holding the Ctrl key while clicking in the packet window will jump the non-active<br />
radio to that frequency and make it active<br />
7. Macro keys<br />
Macro key substitution is supported by the buttons in the Packet window and also in the<br />
comments send with a spot (using Shift+F9).<br />
The macros which can be used and some examples can be found on the macros page.<br />
In the substitutions you can include things like {CTRL-M}. There is also a {WAIT} macro that waits<br />
5 seconds and macros for {GRIDSQUARE}, {MODE}, {ZONE} and {QTH}.<br />
So if you needed to press CTRL+M, then wait for a prompt, then C PE1M-7 then enter your<br />
callsign, you could change the button to send:<br />
{CTRL-M}{WAIT}C PE1M-7{WAIT}PA1M<br />
Enter is sent automatically after each command. This may cause a problem with some systems.<br />
8. How to add/edit/delete a Telnet cluster<br />
http://n1mmtw61.semdxa.org/tiki-print_multi_pages.php?printstructures...<br />
163 of 319 2/2/<strong>2011</strong> 4:35 PM
There are three places where you can get to the 'Change Telnet Cluster List' dialog. Select one of<br />
them.<br />
Right click in the "Packet /Telnet window" and select 'Edit Telnet Cluster List' or<br />
Select 'Config | Change Telnet Cluster List or<br />
Select 'Config | Configure Ports, Telnet Address, Others | Hardware tab' and click on the<br />
'Edit' button.<br />
The 'Change Telnet Cluster List' dialog will appear. You can go to the bottom of the list and add<br />
what you want. Look at the already entered Telnet clusters to see what to enter. To delete a row,<br />
click on the row "handle" - the gray arrowhead - and press the 'Delete' button on your keyboard.<br />
To edit an entry select the field to update and enter the new information.<br />
9. How to setup and connect a Telnet cluster<br />
1. Add the Telnet address to 'Config | Change Telnet Cluster List'.<br />
NB. Use gb7ujs.shacknet.nu as a model for how to specify a port other than 23.<br />
2. Click on the Telnet tab in the Packet/Telnet window.<br />
3. Choose the address to use from the drop-down box left from the button "Close Port".<br />
4. To connect, click on the F12 button with your callsign in it.<br />
*This presumes that the cluster you are using is looking for your callsign as the first thing to be<br />
sent (which it usually is).<br />
5. Now you should be connected to the cluster.<br />
10. How to setup and connect to a Packet cluster using a TNC<br />
1. Click on the Packet tab in the Packet/Telnet window.<br />
2. Set up the connect string for your local packet cluster under the F2 (Conn) button.<br />
3. Click on the F2 button (Conn).<br />
4. Now you xhould be connected to the cluster.<br />
*In general, setting up the connect string and the possible use of intermediate relay nodes to<br />
reach the cluster causes most problems..<br />
11. Auto connecting to a cluster<br />
http://n1mmtw61.semdxa.org/tiki-print_multi_pages.php?printstructures...<br />
Set up your packet or Telnet to the cluster, to connect as explained above<br />
Right click in the Packet/Telnet window text area and select Auto Logon in the men:<br />
From now on the program will connect to the selected cluster automatically when the<br />
program starts<br />
Auto Logon works only at program startup.<br />
Button 1 or button 12 is sent to the cluster, depending on whether you are using<br />
164 of 319 2/2/<strong>2011</strong> 4:35 PM
packet or Telnet.<br />
There is a "stay-alive" timer that sends a CR every 9 minutes.<br />
If the connection drops spontaneously, you will have to re-connect manually.<br />
12. Spotting stations<br />
Spotting stations has to be done from the Entry window. The station entered in the callsign field<br />
will be spotted. If the callsign field is empty the last qso made will be spotted.<br />
Alt+P spots stations.<br />
Ctrl+P spots with a comment.<br />
Spot all S&P QSOs under 'Config'.<br />
The frequency from the spotted station is rounded to one decimal place by the program.<br />
13. Multi-User setup<br />
When running in Multi-user mode (more computers connected in a network) only the Master<br />
station has to be connected to the DX-cluster. The master station will send all information from<br />
the cluster to all connected computers and also send info received from the connected<br />
computers running <strong>N1MM</strong> logger to the DX-cluster.<br />
14. Computers on a LAN<br />
It is possible to connect to Telnet hosts when the Internet connection is on a LAN via proxy server<br />
or router. First try to access the Telnet cluster via the Telnet program in Windows, if this works it<br />
should also work from within <strong>N1MM</strong> logger. It does not matter if the proxy is in software or<br />
hardware. Port 23 (=telnet) should be open.<br />
15. Packet via the soundcard<br />
Many hams use AGWPE for packet using the soundcard. <strong>N1MM</strong> logger is not able to direct use<br />
this package but there are ways using additional software to get <strong>N1MM</strong> logger and AGWPE work<br />
together. Basically you telnet from inside <strong>N1MM</strong> to either of these applications. They are in turn<br />
linked to AGWPE. Links to these programs can be found in the links section.<br />
TelMgr by LU7DID<br />
Telnet interface by IZ4AFW<br />
http://n1mmtw61.semdxa.org/tiki-print_multi_pages.php?printstructures...<br />
165 of 319 2/2/<strong>2011</strong> 4:35 PM
16. Supported Packet clusters:<br />
AR-Cluster by AB5K<br />
Clusse by OH7LZB (not fully supported, only incoming spots)<br />
To make Clusse more compatible give the command SET/PCMODE YES (typed in<br />
uppercase).<br />
Only incoming spots will be decoded by <strong>N1MM</strong> logger (not the response to the List<br />
command)<br />
The List command (SH/DX) has a different format and will not be decoded.<br />
CLX by DJ0ZY and DL6RAI<br />
DX-spider by G1TLH<br />
DX-spider uses a different SH/DX format, check in 'Configurer / Other' the setting<br />
'Format for DX-spider support'. This will send the right SH/DX message from the<br />
button in the top of the bandmaps.<br />
DXnet by F5MZN (Unknown if fully supported but it probably is)<br />
PacketCluster by AK1A<br />
Wincluster Lite by KH2D<br />
More?<br />
17. CW Skimmer and the Reverse Beacon Network (RBN)<br />
http://n1mmtw61.semdxa.org/tiki-print_multi_pages.php?printstructures...<br />
CW Skimmer version 1.1 and up has a built in Telnet server which allows <strong>N1MM</strong> <strong>Logger</strong> to receive<br />
spots from it. Add an entry to your Telnet list with the address: 127.0.0.1:7300 if you are running<br />
Skimmer on the same machine as <strong>N1MM</strong> <strong>Logger</strong>. If running on a different PC on the same<br />
network, use that machine's internal IP address in the same format.<br />
The Reverse Beacon Network's Telnet server (telnet.reversebeacon.net:7000) makes all of the<br />
RBN's Telnet spots available to the program. Because of the huge volume of spots on a major<br />
contest weekend - at least ten times as many as the conventional cluster network - we highly<br />
recommend that you use the Telnet server's filtering capabilities to manage the quantity actually<br />
sent to you. The server uses the DXSpider software, which has very flexible filtering capabilities. It<br />
will be helpful to use a short Packet Spot Timeout (set on the right-click menu of either Bandmap)<br />
- 15 minutes should be more than adequate, because CW Skimmer re-spots stations that remain<br />
on the same frequency every 10-12 minutes.<br />
Skimmer spots can be merged with spots from conventional DX clusters using software such as<br />
WintelnetX, freeware by K1TTT. In that case, Skimmer spots are distinguished from regular spots<br />
by the addition of unique markers. In the Bandmaps, Skimmer or RBN spots are identified with<br />
"#" after the callsign and bearing; spots from your own Skimmer, identified by the callsign set in<br />
166 of 319 2/2/<strong>2011</strong> 4:35 PM
your Station Data), are marked with "!"<br />
Check<br />
In this Section...<br />
1. Features<br />
Check<br />
1. Features<br />
2. Colors of the callsigns<br />
3. Keyboard Assignments<br />
4. Mouse Assignments:<br />
5. Wildcard search<br />
The Check window displays all the callsigns from the MASTER.DTA file and worked calls<br />
from the current log, which match the input in the callsign field of the Entry window.<br />
The Check window is not cleared until a character is typed in the callsign field in the Entry<br />
window, so clearing the callsign field won't clear the Check window.<br />
All callsigns are shown in upper case.<br />
In order for the Check window to be active, there must be a valid master.dta file in the<br />
program file directory. A variety of such files may be downloaded from this site . For<br />
example, master.dta files are available comprising only US and Canadian callsigns. The<br />
master.dta file used for a given contest is selected on the Associated Files tab of the<br />
Contest set-up window.<br />
The title bar shows Mul: or Q: followed by the band.<br />
2X: - This station would be a Double Multiplier on this band (this country and zone)<br />
Mul: - This station would be a Multiplier on this band (country, section, etc.)<br />
Q: - This station would be a new QSO on this band<br />
Example: Mul: 15 20 Q: 160 80 40 10 - This station would be a new Multiplier on 15 and 20<br />
meters, or just a new QSO on 160, 80, 40 and 10<br />
Note: For the title bar to operate correctly, the "Available Mults and Q's" window must be<br />
open.<br />
The Check window is divided into two areas:<br />
Upper area: callsigns found in this contest log<br />
QSOs made in this contest<br />
Lower area: callsigns found in the selected master.dta file<br />
http://n1mmtw61.semdxa.org/tiki-print_multi_pages.php?printstructures...<br />
167 of 319 2/2/<strong>2011</strong> 4:35 PM
When the program is started<br />
and no callsign is entered the<br />
Check window will show the<br />
date, time and length of the<br />
MASTER.DTA file.<br />
When the master.dta file for<br />
the selected contest is not<br />
found or missing a warning<br />
will be given, Use 'Download<br />
latest Check partial file<br />
(Master.DTA) (Internet)' under<br />
'Tools' to download the file<br />
from the Internet<br />
When there are no matches<br />
found Unique will be shown in<br />
big red letters<br />
When the station entered is a<br />
dupe it will be shown in black<br />
and the text Dupe! will be<br />
added in red<br />
http://n1mmtw61.semdxa.org/tiki-print_multi_pages.php?printstructures...<br />
On this window's right-click menu, shown above, there is the option to select "Show N+1 calls." If<br />
this option is checked, callsigns will be shown that are one letter or number different from the<br />
callsign entered in the Entry Window, as in this example. This can be very helpful when listening<br />
under difficult conditions where you are not sure of the callsign.<br />
168 of 319 2/2/<strong>2011</strong> 4:35 PM
When a callsign entered matches a call in the log, the callsign in the Check partial window<br />
will be set to bold and 12 point font (PA1M below).<br />
Entering PA1M in the callsign field will give PA1M, PA1MR, PA1MV and all others with PA1M<br />
in the callsign (picture below left). When N+1 is selected also all callsigns with one<br />
character difference will be shown (picture below right).<br />
N+1 not selected PA1M entered in Entry<br />
window<br />
2. Colors of the callsigns<br />
Blue New contact on this band<br />
No QSOs match the entered<br />
call in the log so the window<br />
starts with a blank line. When<br />
a callsign matches the<br />
master.dta file or the log it will<br />
be set to bold and 12 point<br />
font (Example: PA1M)<br />
When N+1 selected,PA1K is<br />
found in the log and many<br />
more callsigns differing by<br />
only one character are found<br />
in the master.dta file. The<br />
differing character is shown<br />
bold<br />
N+1 selected<br />
Black Dupe contact or a station in a non-workable location.<br />
This means that you don't need this station because he is a dupe or you are not allowed<br />
to work him by the contest rules.<br />
3. Keyboard Assignments<br />
http://n1mmtw61.semdxa.org/tiki-print_multi_pages.php?printstructures...<br />
Alt+Y - will "yank" the first call from the Check window into the callsign field of the Entry<br />
Window that has the entry focus.<br />
169 of 319 2/2/<strong>2011</strong> 4:35 PM
4. Mouse Assignments:<br />
Left mouse key clicking on a callsign in the listbox<br />
Click on call - Enter the call into the callsign field on the Entry window replacing<br />
whatever was there.<br />
When clicking on a call with spaces, only the first token will be loaded as<br />
callsign<br />
Right mouse key clicking, a menu will appear<br />
Show N+1 Calls - show all callsigns with one character difference from the callsign<br />
entered in the Entry window callsign field. The different character will be shown bold.<br />
Set Font - Set the font for the Check Partial window, a selection window will appear.<br />
Help - Show the help file for this window.<br />
5. Wildcard search<br />
If one or more characters are not known a ? may be used in the callsign field in the Entry<br />
Window. It needs two sequential characters like N?MM or N1? to find the call. So M?M will not<br />
work!<br />
Searching for leading wildcards is also implemented. I.e. ?1M matches KN1M as well as <strong>N1MM</strong>.<br />
N+1 will do this automatically for one ? im place of each expected character in the call.The use of<br />
two question-marks is also allowed, for example ??1M<br />
Examples:<br />
PA?M will match PA1M, PA7MM etc.<br />
P?1M will match PA1M, PG1M, PF1MO etc.<br />
P?3 will match no callsigns because there are no two sequential characters<br />
?1M will match <strong>N1MM</strong>, KN1M, PA1M etc.<br />
Available Mults and Qs<br />
In this Section...<br />
http://n1mmtw61.semdxa.org/tiki-print_multi_pages.php?printstructures...<br />
170 of 319 2/2/<strong>2011</strong> 4:35 PM
http://n1mmtw61.semdxa.org/tiki-print_multi_pages.php?printstructures...<br />
Quick Tour (a must read!)<br />
Step 1. Setup<br />
Step 2. Adjust Window Positions<br />
Step 3. Connect the Sound Card and the CW interface<br />
Step 4. Entering a Call<br />
Step 5. Using the Space Bar to Tab<br />
Step 6. Using the Tab Key<br />
Step 7. Bandmaps, Spots and Other Cool Stuff<br />
Step 8. Spots are Fun<br />
Step 9. Actually Logging Contacts<br />
Step 10. The Exciting Finale<br />
Step 11. CW and WAV Recordings<br />
Installing and Upgrading <strong>N1MM</strong> <strong>Logger</strong><br />
1. First-Time Installation Instructions<br />
2. Using the Program the First Time<br />
3. Subsequent Install Instructions / Upgrading to a New Program Version<br />
4. Uninstalling the Program<br />
Setting up the Program<br />
1. Setup Station Information<br />
2. Setup Radio Control<br />
3. Setup Packet/Telnet<br />
4. Setup PTT-ing the Rig/Sending CW<br />
5. Setup WAV Files (SSB)<br />
6. Sending Messages in CW<br />
7. Setup 'Sent Exchange'<br />
8. Setup the Exchanges<br />
9. Setup Function Keys for Enter Sends Message (ESM) mode<br />
10. Command Line Parameters<br />
Basic Functions<br />
1. Help<br />
2. Going Through the Entry Window Fields<br />
3. Resizing Windows<br />
4. Select New Contest<br />
5. Delete Contest<br />
6. Select Country file<br />
7. Select Master.dta file<br />
8. Changing Frequency<br />
9. Changing Band<br />
10. Changing Mode<br />
11. Changing Operator<br />
12. Setting CW Speed<br />
13. Split Operation<br />
13.1. Setting Spit Frequencies <strong>Manual</strong>ly<br />
13.2. Setting Split Frequencies Automatically by Packet Spots<br />
13.3. Resetting to non-split mode<br />
13.4. Split Operation Key Assignments<br />
171 of 319 2/2/<strong>2011</strong> 4:35 PM
http://n1mmtw61.semdxa.org/tiki-print_multi_pages.php?printstructures...<br />
14. Running Mode<br />
15. Search and Pounce Mode (S&P)<br />
15.1. How to check if you are in Running mode or in S&P mode?<br />
16. CQ Key<br />
17. Set up the Sent exchange message(s)<br />
18. Function Key Conventions<br />
19. Set Up <strong>N1MM</strong> to Record and Playback Voice Recordings (recording on the fly)<br />
19.1. Playing WAV Files<br />
19.2. Recording WAV Files<br />
19.3. Soundcard Control in Configurer<br />
20. Quick Edit<br />
21. Meaning of Colors<br />
22. Multipliers and QSOs<br />
23. Connecting to a Telnet Cluster<br />
24. How to Save the Log<br />
25. Function Key Macros<br />
26. Save and Restore Window Positions<br />
27. Editing Lookup Tables<br />
28. Backup and Restore<br />
28.1. Method 1: Full backup/restore on same computer - backup and<br />
restore the whole <strong>N1MM</strong> logger subdirectory<br />
28.2. Method 2: Partial backup/restore on same computer - make a partial<br />
backup and restore.<br />
28.3. Installing on a Different Computer<br />
29. Basic Functions for RTTY<br />
Advanced Functions<br />
1. Mobile/Rover Support<br />
1.1. How Mobile/Rover Works<br />
2. Call History Lookup<br />
2.1. The Call History Text File<br />
2.1.1. Menu options<br />
3. Spot Filtering<br />
4. Transmit on same band with two radios<br />
5. Big Gun versus Little Pistol switch<br />
5.1. So you are a big station<br />
5.2. So you are a little pistol<br />
6. Staying in Run Mode (great for Dxpeditions) or in S&P mode<br />
7. Auto Send<br />
8. Enter Sends Messages (ESM) Mode<br />
8.1. Basic ESM Functionality<br />
8.2. How to Prevent the Cursor from Moving to the Next Exchange Field<br />
8.3. How to Skip Sending the Callsign or Exchange Field (SSB)?<br />
9. QSYing Wipes the Call & Spots QSO in Bandmap<br />
10. Single Operator Call Stacking<br />
10.1. Additional SOCALLSTACK Information<br />
10.2. Digital Call Stacking<br />
172 of 319 2/2/<strong>2011</strong> 4:35 PM
10.3. How to Tell Visually Which Call Will be Put in Next<br />
11. Call Stacking (same or different bands) - Multi-User Mode<br />
12. Serial Number Server<br />
13. Contest Reporting Application<br />
14. Starting a Contest with a Number Other Than 001<br />
15. Single Operator 2 Radios (SO2R)<br />
16. Footswitch Support<br />
Configurer Dialog<br />
1. Configurer >Hardware tab<br />
1.1. Hardware setup<br />
1.2. Set button examples<br />
1.3. Other Information<br />
1.4. Windows NT/2000/XP (32 bit OS)<br />
2. Configurer >Telnet Cluster tab<br />
3. Configurer >Files Tab<br />
3.1. Files Field Descriptions<br />
4. Configurer >Function Keys Tab<br />
4.1. Function Keys Field Descriptions<br />
4.2. Remapping Function Keys<br />
5. Configurer >Digital Modes Tab<br />
5.1. Digital Modes Field Descriptions<br />
6. Configurer >Other Tab<br />
6.1. Other Tab Field descriptions<br />
7. Configurer >Winkey Tab<br />
7.1. Winkey Field Descriptions<br />
7.2. How to Set Up Winkey in <strong>N1MM</strong> <strong>Logger</strong><br />
8. Configurer >Mode Control Tab<br />
8.1. Mode Control Field Descriptions<br />
9. Configurer >Antennas Tab<br />
10. Configurer >Audio Tab<br />
Start a New Contest Log or Open an Existing Contest Log<br />
1. Start a new contest log<br />
2. Open an Existing Contest Log<br />
3. Contest Specific Information<br />
3.1. Contest Tab<br />
3.2. Tab: Associated Files<br />
Entry Window<br />
1. Button Assignments<br />
2. Callsign/Exchange Editing Features<br />
3. Other Info<br />
4. Status Bar Information<br />
5. Callsign Colors<br />
6. The Red and Green dots (LEDs)<br />
7. The Entry Windows<br />
8. Other Features<br />
9. Function Keys<br />
http://n1mmtw61.semdxa.org/tiki-print_multi_pages.php?printstructures...<br />
173 of 319 2/2/<strong>2011</strong> 4:35 PM
http://n1mmtw61.semdxa.org/tiki-print_multi_pages.php?printstructures...<br />
9.1. General<br />
9.2. Running mode and S&P mode<br />
10. Other Keys<br />
11. File Menu Selections<br />
12. Edit Menu Selections<br />
13. View Menu Selections<br />
14. Tools Menu Selections<br />
15. Config Menu Selections<br />
15.1. Configure Ports, Telnet Address, Other - Also called Configurer.<br />
15.2. Change Your Station Data<br />
15.3. Change Sub Bands<br />
15.4. Clear INI file settings<br />
15.5. Find all windows (move to within 800 *600)<br />
15.6. Enter Sends Messages (ESM mode)<br />
15.7. AutoSend Threshold - Ctrl+Shift+M<br />
15.8. Spot all S&P QSOs<br />
15.9. QSYing wipes the call & spots QSO in bandmap<br />
15.10. Do not run on CQ-frequency<br />
15.11. Show non-workable spots<br />
15.12. Reset Rx freq when running split<br />
15.13. Dual Rx always on<br />
15.14. CQ Repeat - Alt+R<br />
15.15. Set CQ repeat time - Ctrl+R<br />
15.16. Call History Lookup<br />
15.17. Record QSOs<br />
15.18. Change Packet/CW/SSB/Digital Message Buttons - Alt+K<br />
15.19. Multi-User Mode<br />
15.20. Change Exchange Abbreviations<br />
15.21. SO2R<br />
15.22. WAE - Special commands for the WAE DX contest only<br />
16. Window Menu Selections<br />
17. Help Menu Selections<br />
Bandmap<br />
1. One radio scenario<br />
2. Two radio scenario<br />
3. Other<br />
4. Colors of the incoming spots:<br />
5. Keyboard Assignments<br />
6. Button Assignments<br />
7. Mouse Assignments<br />
8. Example bandmap usage<br />
Packet and Telnet<br />
1. Colors used<br />
2. Initial Button Assignments<br />
3. Keyboard Assignments<br />
4. Mouse Assignments<br />
174 of 319 2/2/<strong>2011</strong> 4:35 PM
5. Right Click Menu<br />
5.1. Packet Filters<br />
6. Special keys:<br />
7. Macro keys<br />
8. How to add/edit/delete a Telnet cluster<br />
9. How to setup and connect a Telnet cluster<br />
10. How to setup and connect to a Packet cluster using a TNC<br />
11. Auto connecting to a cluster<br />
12. Spotting stations<br />
13. Multi-User setup<br />
14. Computers on a LAN<br />
15. Packet via the soundcard<br />
16. Supported Packet clusters:<br />
17. CW Skimmer and the Reverse Beacon Network (RBN)<br />
Check<br />
1. Features<br />
2. Colors of the callsigns<br />
3. Keyboard Assignments<br />
4. Mouse Assignments:<br />
5. Wildcard search<br />
Available Mults and Qs<br />
1. The Header<br />
2. The Band Buttons<br />
3. Spot List Box<br />
4. Band button Assignments<br />
5. Band button background colors<br />
6. Mouse Assignments<br />
7. Right-Click menu<br />
8. Multi-mode contests<br />
http://n1mmtw61.semdxa.org/tiki-print_multi_pages.php?printstructures...<br />
The Available Mults and Qs window for single-mode contests is similar to this example (beginning<br />
with release 9.12.5).<br />
175 of 319 2/2/<strong>2011</strong> 4:35 PM
This window consists of three parts, the header, the band buttons and at the bottom the<br />
multiplier list box.<br />
1. The Header<br />
The header shows the number of Available Multipliers and QSO's. (Example 4 Mults 12 Qs), and<br />
also reports on some of the right-click menu items that may affect what happens when you click<br />
on a spot. See below for specifics.<br />
You will note that this window does not appear to have the entry focus except when you have<br />
right-clicked to access the context menu to change the window's settings. This is as designed,<br />
because keyboard/mouse click focus should normally be on the Entry Window. Nonetheless,<br />
mouse clicks on band buttons and individual spots will be acted upon, as outlined below.<br />
2. The Band Buttons<br />
http://n1mmtw61.semdxa.org/tiki-print_multi_pages.php?printstructures...<br />
176 of 319 2/2/<strong>2011</strong> 4:35 PM
The top part of this window indicates the number of multipliers (left column) and potential<br />
contacts (right column) available on each band. The two numbers in the right column reflect the<br />
number of workable (non-dupe) QSOs available, and the total number - the latter is useful to<br />
determine relative band opening quality in a contest, like Sweepstakes, where late in the contest<br />
you may have worked most of the active stations. For example, the right column might display<br />
"2/47", indicating a wide-open band but with only two stations you have not already worked.<br />
Red numbers indicate the band with the largest number of contacts (QSOs) available. The<br />
WARC bands only appear when DX (the default general logging contest) is the active contest. A<br />
VHF version will appear when a VHF contest is selected.<br />
For a contest such as FD that allows HF and VHF, the lack of band buttons for VHF+ means (i)<br />
there will be no available spot totals displayed for the VHF+ bands; and (ii) there is no single click<br />
to QSY to VHF. You must either type in a frequency or QSY the radio manually to get to a VHF+<br />
band. Even though the HF button set is shown, VHF spots that are workable in a particular<br />
contest will still appear in the lower pane of the available window (and on the band map); like<br />
other spots, those VHF+ spots are clickable to QSY (assuming radio support).<br />
Each of the band buttons changes color when a callsign is entered in the callsign field or, in the<br />
case of contests where the multiplier cannot be determined from the callsign, when the exchange<br />
is copied. The color (green, red, blue or none) denotes whether that station is needed on that<br />
band as a double multiplier (green), a single multiplier (red), a valid non-duplicate QSO (blue) or<br />
not needed (none). The intention is to let you know whether you need that current station's<br />
multiplier on other bands, so that you can move him if you wish.<br />
The active band's button text is shown in bold.<br />
3. Spot List Box<br />
http://n1mmtw61.semdxa.org/tiki-print_multi_pages.php?printstructures...<br />
177 of 319 2/2/<strong>2011</strong> 4:35 PM
The list box (the lower section of the window) shows spots received via Packet or Telnet. There<br />
are 4 columns: Call, Frequency, Bearing (Dir), and Time (TS) in the format "mm-dd hhmm".<br />
Clicking on the selected column title will sort the column, clicking again will reverse the sort<br />
order. An indicator of split spots (a "±") appears next to frequency. Spots coming from a local<br />
Skimmer are shown with a (!) to the right of the bearing, and those from a non-local Skimmer with<br />
(#).A sunrise/sunset indicator (a "¤") is shown to the right of the bearing for spots where<br />
applicable, as an aid to determining which spots may either be "perishable" or particularly suited<br />
to a gray-line QSO.<br />
The color codes described are applied to each call listed; however, duplicate QSOs are not<br />
displayed.<br />
4. Band button Assignments<br />
Left click on band button - Set the left radio or VFO-A to the first spot on the band specified.<br />
Right click on band button - Set the right radio or VFO-B to the first spot on the band<br />
specified.<br />
Note: When both Entry windows are open on the same band (in SO2V), then clicking<br />
on a call will bring this call to the window without transmit focus. Select the correct<br />
radio/VFO by right or left clicking the band button. You should not be able to select<br />
the same band on both radios in SO2R, unless you deliberately do it on the radios'<br />
front panels. For obvious reasons, this is not a good idea,<br />
5. Band button background colors<br />
Blue: Available QSO<br />
Red: Single Multiplier. Example: CQWW - QSO is either zone or country multiplier (one<br />
multiplier)<br />
Green: Double or better Multiplier. Example: CQWW - QSO is a zone and a country<br />
multiplier (two multipliers)<br />
Gray: Dupe<br />
6. Mouse Assignments<br />
http://n1mmtw61.semdxa.org/tiki-print_multi_pages.php?printstructures...<br />
178 of 319 2/2/<strong>2011</strong> 4:35 PM
Left mouse key clicking on a callsign in the list box<br />
SO1V<br />
Single Left click - Always send the spot to VFO-A.<br />
Shift + Single Left click - No action.<br />
SO2V + set for "Basic VFO Selection" (set in the Right-Click menu explained below)<br />
The selection Basic VFO Selection" or "Advanced VFO Selection" can be<br />
set/seen in the right click menu.<br />
When set for "Advanced VFO Selection" the window title tells you the setting of<br />
this option.<br />
Single Left click - Send the spot to VFO-A.<br />
Shift + Single Left click - Send the spot to VFO-B.<br />
SO2V + set for "Advanced SO2V VFO Selection" (set in the Right-Click menu<br />
explained below)<br />
Single Left click<br />
If both VFO's are not on the spot band, send the spot to the Active VFO.<br />
The spot VFO Entry Window and Bandmap wil be made active.<br />
If either VFO is on the spot band, use the VFO which is on the spot band<br />
checking the active VFO first. The spot VFO Entry Window and Bandmap<br />
wil be made active.<br />
Shift + Single Left click - reverse the VFO selection determined above.<br />
SO2R + set for "SO2R Focus Follows Spot" (set in the Right-Click menu explained<br />
below)<br />
The radio that the spot is sent to will be made active if "SO2R Focus Follows<br />
Spot" is checked. If the option is un-checked, the window focus will not change.<br />
Single Left click<br />
If both radios are not on the spot band, send the spot to the inactive radio.<br />
If either radio is on the spot band, send the spot to that radio.<br />
Shift + Single Left click - Reverse the VFO selection determined above if the<br />
selection will not place both radios on the same band.<br />
Double click - Go to the frequency with the active VFO. The callsign on which you<br />
have clicked is placed in the callsign field in the Entry window overwriting anything<br />
that was in there!<br />
Left mouse button clicking on column title<br />
Toggle the sort order of the spot list between ascending and descending based on the<br />
column selected (Call, Frequency, Bearing (Dir), Time (TS).<br />
7. Right-Click menu<br />
http://n1mmtw61.semdxa.org/tiki-print_multi_pages.php?printstructures...<br />
The following screen-shot shows the right-click menu effective with version 10.8.0<br />
179 of 319 2/2/<strong>2011</strong> 4:35 PM
http://n1mmtw61.semdxa.org/tiki-print_multi_pages.php?printstructures...<br />
If you right click in the Available Window these menu items will appear. Not all menu items are<br />
always selectable.<br />
Delete Spot - Delete selected spot from the list of spots. This option is only selectable<br />
when you right-click on a call-sign in the lower list box.<br />
Advanced SO2V VFO Selection (radio dependent) - Determines the SO2V single left click<br />
behavior on a spot in the bandmap. See the details above. The option is grayed out when<br />
SO2V isn't selected and the window title tells you the setting of this option. Added because<br />
not all radios will work with the Advanced setting.<br />
Enable right click QSY on spot - When checked a right click on a spot will cause the<br />
inactive radio or VFO to be programmed without changing the Entry window focus. If a split<br />
spot is selected in SO2V mode, the TX frequency will not be programmed because it will<br />
change a potential <strong>RU</strong>N frequency. When this occurs, a message is printed at the bottom of<br />
the Entry window. Right clicking on a spot in SO2R mode that would place both radios on<br />
the same band is ignored. This option needs to be unchecked to allow spots to be deleted<br />
or the rotor to be turned from the Available window. This option is grayed out, not available<br />
in SO1V mode.<br />
SO2R Focus Follows Spot - Determines the SO2R single left click behavior on a spot in<br />
the bandmap. See the details above. The option is grayed out when SO2R isn't selected<br />
and the window title tells you the setting of this option.<br />
Turn Rotor - Turn rotator to bearing for selected callsign<br />
The remaining options operate at all times. Note that none of the following options affect the<br />
180 of 319 2/2/<strong>2011</strong> 4:35 PM
contents of the bandmap(s). Only the list of calls in the Available window will change.<br />
Show Q's_Mults - toggle between showing all spots or just multipliers<br />
1 - Show Focus Radio/VFO - Show only spots on the band of the VFO or Radio which has<br />
entry focus.<br />
2 - Show Non-Focus Radio/VFO - Show only spots on the band of the the VFO or Radio<br />
which does not have entry focus.<br />
3 - Show Both Radios/VFOs - Show spots on the bands of both VFOs or Radios.<br />
4 - Show All Bands - Show spots on all bands.<br />
160 - Show only 160 meter spots.<br />
80 - Show only 80 meter spots.<br />
40 - Show 40 meter spots.<br />
20 - Show only 20 meter spots.<br />
15 - Show only 15 meter spots.<br />
10 - Show only 10 meter spots.<br />
Beginning with version 10.8.0, this menu permits setting of spot filters by mode. The options are:<br />
All Modes<br />
CW Mode<br />
SSB Mode<br />
RTTY Mode<br />
PSK Mode<br />
Contest Mode Category<br />
Only one of these options can be selected at a time. The first three are self-explanatory. Since<br />
many spots The program distinguishes between RTTY and PSK spots based on the Comments<br />
field in the spot - BPSK, PSK31, or any other word containing "PSK". If "Contest Mode Category"<br />
is selected, the program will only display spots in the Available window that conform to the<br />
Contest Mode Category selected in the Select Log Type dialog (also called the Contest Setup<br />
dialog).<br />
Filtering notes<br />
http://n1mmtw61.semdxa.org/tiki-print_multi_pages.php?printstructures...<br />
181 of 319 2/2/<strong>2011</strong> 4:35 PM
.<br />
Help - Shows this section of the manual from the web site. Internet required<br />
Hovering with the mouse over a spot in the list will show a tooltip with more info about the spot<br />
(frequency, spotter, time, comments)<br />
8. Multi-mode contests<br />
http://n1mmtw61.semdxa.org/tiki-print_multi_pages.php?printstructures...<br />
There are three levels of spot filtering available. The first of these is at the DX cluster node,<br />
using whatever filtering capabilities are built into the node. Because <strong>N1MM</strong> <strong>Logger</strong> stops<br />
processing telnet messages when CW is being sent, users who are connected to a very high<br />
volume node, such as the Reverse Beacon Network's Telnet node, may find it advantageous<br />
to block some of the less useful spots (for US users, you might not want spots from VK, for<br />
example).<br />
The second level of spot filtering is accessible from the right-click menu of the Packet/Telnet<br />
window, and decides which spots received from the cluster node should be forwarded to the<br />
Bandmap and the Available window. If too many spots are forwarded, depending on how fast<br />
your computer is, you may encounter brief delays in execution of commands (such as<br />
sending of CW messages) while the program catches up, so it is probably a good idea to use<br />
some filtering at one or both of these levels.<br />
The third level of filtering is in the Available window, and it only governs which spots are<br />
shown in the window's lower pane. For example, if you decide only to list CW spots, the<br />
bandmaps will continue to display all spots, and the top pane of the Available window will<br />
continue to display overall spot numbers for each band, but the lower pane's list of spots will<br />
contain only CW spots. You can quickly switch back and forth between showing all spots, just<br />
those on the current band, only CW or SSB or digital spots, or any other band/mode<br />
combination.<br />
Beginning with version 10.7.2, this window will display one column of band buttons for each<br />
mode in multi-mode contests. Operation is otherwise similar to that in single-mode contests. If the<br />
contest's rules specify that multipliers only count once per band, the colors of both modes'<br />
buttons for that band will change in unison; if multipliers count once per band and mode, then<br />
the band button colors will show the status, as described below, on each band/mode<br />
combination.<br />
182 of 319 2/2/<strong>2011</strong> 4:35 PM
Edit Contact<br />
Your Edit Contact Dialog will be similar to this one.<br />
http://n1mmtw61.semdxa.org/tiki-print_multi_pages.php?printstructures...<br />
183 of 319 2/2/<strong>2011</strong> 4:35 PM
This screen gives the possibility to update contacts after they have been logged.<br />
The fields 'Country Prefix', 'Mult 1' and 'Mult 2' can't be updated because they are recalculated<br />
after each contact update.<br />
In this Section...<br />
Edit Contact<br />
1. Button Assignments<br />
2. How to permanently delete a contact?<br />
3. How to recover a deleted QSO?<br />
4. Why move and not delete?<br />
The following modes are allowed to be entered in the 'Mode' field:<br />
http://n1mmtw61.semdxa.org/tiki-print_multi_pages.php?printstructures...<br />
CW, CW-R, LSB, USB, RTTY, rtty-L, rtty-U, RTTY-R, AM, FM, PSK31, PKT, PAC2, GTOR,<br />
FSK31, PSK31, PSK63, PSK125,<br />
MT63, DIGI, BPSK, bpsk, SSTV, mfsk-L, mfsk-U, MFSK, MFSK8, MFSK16, HFSK, MTTY, THRB,<br />
ASCI, HELL, Q15, PCW.<br />
To what country the program assigns a contact doesn't really matter, except for the *claimed*<br />
score. The assigned country does not appear in Cabrillo. You are not penalized for an incorrect<br />
claimed score.<br />
The main reason for tracking down these things is for better information about what countries are<br />
needed during the contest.<br />
184 of 319 2/2/<strong>2011</strong> 4:35 PM
Tip<br />
When the program doesn't allow you to log a contact the way you want it, log it as the<br />
program expects it and edit the contact in this screen.<br />
Example: A KG4 station calls and gives a state as exchange, this KG4 is in the USA. The<br />
program expects this KG4 to be in Guantanamo Bay and doesn't allow entering a state but<br />
wants a number. Enter a number which the program expects and edit the contact in this<br />
screen. Of course you have to update CTY.DAT to add the KG4 station so this won't happen<br />
again. See the Tips and Tricks section how to do this. Make a note using Ctrl+N so you can<br />
update the qso later.<br />
When a contact has been updated and you are moving on to the next/previous qso with the up or<br />
down arrow keys the following screen will be shown.<br />
Yes - Save the changes made and move on to the next or previous qso in the log.<br />
No - Don't save the changes made and move on to the next or previous qso in the log.<br />
Cancel - Go back to the qso which has been changed but not saved.<br />
Updating the timestamp from a qso can be done from within the Entry window callsign<br />
field. Entries starting with "T" and four numeric digits will update the current row time in the<br />
log. Check out the chapter 'After the contest' for more information.<br />
1. Button Assignments<br />
http://n1mmtw61.semdxa.org/tiki-print_multi_pages.php?printstructures...<br />
Update - Update the log entry and exit the dialog returning to the last qso in the log.<br />
Delete - Removes a log entry from the current selected contest and exits the dialog<br />
returning to the last qso in the log.<br />
When pressing the deleted button in a contest the following message will appear:<br />
Yes, will move the qso to the DELETEDQS 'contest'<br />
No, will cancel deleting the qso.<br />
185 of 319 2/2/<strong>2011</strong> 4:35 PM
When using multi-user mode it is only possible to delete a qso made on the station<br />
which made the qso.<br />
Message: "You may not delete contacts logged by another station while in<br />
Multi-User mode. Ask station #radionumber to delete it. Delete not performed!"<br />
Help - Show the help file for this window.<br />
Exit - Exit this dialog without updating the log entry.<br />
Up Arrow - Go to the next entry towards the beginning of the log. Updated log entries can<br />
be saved.<br />
Down Arrow - Go to the next entry towards the end of the log. Updated log entries can be<br />
saved.<br />
2. How to permanently delete a contact?<br />
http://n1mmtw61.semdxa.org/tiki-print_multi_pages.php?printstructures...<br />
Delete one QSO<br />
Select a qso to delete in the log window<br />
When pressing the deleted button the following message appears:<br />
Yes, will delete the qso permanently from the DELETEDQS 'contest'<br />
No, will cancel deleting the qso<br />
It is not possible to select more than one qso and delete them. Deleting has to<br />
be done per qso.<br />
Delete all QSOs<br />
Select the DELETEDQS 'contest'<br />
File, Open Log in database, Select the DELETEDQS 'contest' in the 'Select<br />
Existing Log' dialog.<br />
Delete the "DELETEDQS" contest by pressing the 'Delete' key. It will reappear with no<br />
QSOs.<br />
A confirmation will be asked.<br />
186 of 319 2/2/<strong>2011</strong> 4:35 PM
3. How to recover a deleted QSO?<br />
This is not easily done. A possibility is to export the 'DELETEDQS' contest. Then import it into the<br />
contest from which it was deleted (ADIF). Before or after exporting you have to remove all the<br />
QSOs which you don't want to have imported. Always backup everything first.<br />
Open the DELETEDQS contest in the database.<br />
Left click on the contact you want to restore, then right click, select 'Copy/ADIF String'.<br />
Open the contest you want to paste it into.<br />
Right click in the log window and select 'Paste contacts'.<br />
4. Why move and not delete?<br />
A deleted contact in a contest is not permanently deleted but moved to the 'contest'<br />
DELETEDQS. This way a qso can be recovered when accidentally deleted. Permanently deleting<br />
the 'deleted' QSOs can be done in the 'DELETEDQS' contest. The technical reason to put the<br />
QSOs in another contest is that Access does not free space until you compact. It doesn't do any<br />
good to delete a qso, so why not just move it?<br />
Info<br />
Your Info window will be similar to this one.<br />
http://n1mmtw61.semdxa.org/tiki-print_multi_pages.php?printstructures...<br />
187 of 319 2/2/<strong>2011</strong> 4:35 PM
The info window can be found in the Entry Window dialog under the menu 'Window | Info'.<br />
In this Section...<br />
Info<br />
1. General<br />
1. General<br />
2. Mouse Assignments<br />
3. Rate information section<br />
4. Buttons<br />
5. Real Time graphical rate display<br />
6. Setting a goal for the contest<br />
7. Setting the QSO numbers<br />
8. Multi-User information<br />
8.1. General<br />
8.2. Mouse Assignments<br />
The following information currently appears in this window:<br />
http://n1mmtw61.semdxa.org/tiki-print_multi_pages.php?printstructures...<br />
Own callsign and Sent Exchange (statusbar)<br />
The next QSO number will be shown on the title bar if it is a serial number contest.<br />
Example: Exch: 59 0<strong>02</strong><br />
188 of 319 2/2/<strong>2011</strong> 4:35 PM
*<br />
*<br />
Callframe spot (line 1) - Info from spot from bandmap<br />
CountryInfo (line 2 & 3) - CallCountry, Zone, Continent, Bearing (short path), Distance<br />
(miles & km), Bearing (long path)<br />
From the station in the call window, or if nothing is there, the call in the call frame.<br />
If there is nothing in either, it shows the last info that was displayed there.<br />
Sunrise/Sunset(line 4) - Sunrise/sunset times, Local time<br />
Local time is not shown for K, VE, UA and VK because of the multiple time zones in<br />
these countries.<br />
Messages (line 5) - Packet spot information, packet talk messages (appear in red)<br />
WWV Messages (line 6) - WWV statistics<br />
Rates Section<br />
Rates (left)- Rate information /goal information (colors) / band change information<br />
The band change information and the band timer are hidden when Single<br />
operator or Multi-multi are selected.<br />
Real Time graphical rate display<br />
Import and setting Goals button<br />
Graph (middle) - shows graphical information regarding qso count, hourly rates or<br />
moving averages per 30 or 60 minutes.<br />
Record level indicator (middle) - for recording QSOs. For this indicator to show<br />
'Record QSOs' under the 'Tools' menu must be on.<br />
Info section (right)<br />
Callsign of the operator in lower right corner (bold). Set with Ctrl+O.<br />
Band change counter (contest and section dependant)<br />
band timer (contest and section dependant)<br />
Band Chgs - Band change counter (only shown in certain contests and Operator Category<br />
dependant )<br />
10 min band timer - 10 minute band timer. Counts down after band change.<br />
The band change timer does not start until the first band change of the contest.<br />
The band change counter has a "stop light" (red/yellow/green) colored background.<br />
Mult-Run indicator - Shows MULT or <strong>RU</strong>N when Multi-One or 1 or 2 when Multi-Two<br />
selected<br />
Shown only when Multi-User and Operator Category = Multi-One<br />
Multiplier or Run station can be toggled with key combination Ctrl+Alt+M<br />
Multi-User Section - Multi user information (more information below)<br />
Only shown when Multi-User Mode is selected.<br />
http://n1mmtw61.semdxa.org/tiki-print_multi_pages.php?printstructures...<br />
189 of 319 2/2/<strong>2011</strong> 4:35 PM
Messages Section<br />
Computer name, IP-address and port info when in multi-user.<br />
Winkey version info<br />
Messages between stations have a big font so that multis would easily see messages<br />
to each other.<br />
Pass frequencies > 100000 kHz will be shown without decimals.<br />
When you are being spotted on a cluster this will be shown in the message area<br />
including spotter and comment. Nice to know ;-)<br />
More..<br />
2. Mouse Assignments<br />
Right-click in most parts of the window - Clicking on an item will select or deselect showing<br />
the selected information. Someparts have a menu of it's own.<br />
Callframe spot - Show country and spot info from the station on the callsign field<br />
frame<br />
NOT the callsign in the entry window but in the callframe above the callsign<br />
field!<br />
CountryInfo - Show country info from the station in callsign field<br />
Sunrise/Sunset - Show Sunrise/sunset times, Local time from the station in the<br />
callsign field.<br />
Messages - Show packet talk messages<br />
WWV Messages - Show the WWV messages<br />
Rates Section - Show the rates section<br />
Multi-User Section - Show the multi-user section<br />
Help - Show the help file for this window<br />
Clear Message Window - Clears the message part of the Info window<br />
When Multi-User Mode is selected, clicking on a red or green icon in the Multi-user part of the<br />
window will give an extra menu. See the Multi-User information below.<br />
3. Rate information section<br />
The rate information is shown on the middle part of the info window. Dupe QSOs are included in<br />
the count. A zero rate will be shown as a blank.<br />
Shown is the following information.<br />
Left part<br />
Top of rates frame - QSOs per multiplier info ( x mult = y.y Q's)<br />
Last 10 Q's - Rate last 10 QSOs (QSOs per hour)<br />
http://n1mmtw61.semdxa.org/tiki-print_multi_pages.php?printstructures...<br />
190 of 319 2/2/<strong>2011</strong> 4:35 PM
Last 100 Q's- Rate last 100 QSOs (QSOs per hour)<br />
Since hh:mm - Rate one hour back in GMT (QSOs per hour)<br />
Since hh:00 - Number of QSOs since the start of the current clock hour<br />
Middle part<br />
Real Time raphical rate display (middle) - see information below.<br />
Record level indicator (middle) - for recording QSOs. For this indicator to show<br />
'Record QSOs' under the 'Tools' menu must be on.<br />
Right part<br />
Band Chgs - Number of band changes since beginning of the contest for multi-single<br />
operators.<br />
Resets to 0 at top of hour and is free.<br />
Counts band changes for each computer only if in Multi-Two<br />
Band changes are not counted if the worked station on the other band is a<br />
multiplier<br />
xx min band timer - Count down timer from xx minutes to 0 which starts after the first<br />
logged qso after a band change.<br />
NB There is one band change counter and it works for the Run station. The<br />
multiplier station will have to keep track of changes manually.<br />
Background colors rate information<br />
The background colors change depending on the goal you have set for this contest.<br />
Red - < 50% of goal<br />
Yellow - < 51-99% of goal<br />
Green - 100+% of goal<br />
4. Buttons<br />
http://n1mmtw61.semdxa.org/tiki-print_multi_pages.php?printstructures...<br />
Import Goals - Use this button to import hourly rates from the current contest to be used as<br />
goal. If the contest you want as a goal is not the current contest, open it, then set the goal.<br />
Import Goals will import a text file created by Print to File in View, Statistics.<br />
Goal = - <strong>Manual</strong>ly edit the hourly rate goals to be used in this contest. Hours should be<br />
from 0-23. If an hour is missing the next lower hour will be used.<br />
191 of 319 2/2/<strong>2011</strong> 4:35 PM
5. Real Time graphical rate display<br />
The purpose of the graph is to provide tactical data to a contester or team lead, to allow quick<br />
decisions on band changes, antenna selection, etc.<br />
As such, the intention is to visualize small changes in ==relative== Q rates over short<br />
periods. There is no scale information on the graph for getting a sense of raw numbers<br />
(assumption being that the numeric rates on the Info window are better at providing exact<br />
numbers). For current data, the graph does show the current hour's goal as a black line,<br />
again to provide an at-a-glance sense of how things are progressing.<br />
Some values are selectable (via right-click) for graphing.<br />
The period shown can be either 30 or 60 minutes.<br />
The graph can have 6, 10, 15, or 20 bars.<br />
Each bar can represent the raw Q count for that timeslice, the hourly rate, or a<br />
moving average over the last 10, 20, or 30 minutes.<br />
The bars show rates for just this station. In the case of a single SO2R station, the bars<br />
show radios 1 and 2 in different colors, stacked, to show each radio's overall contribution.<br />
For multi operations, the rates of other stations are not displayed, nor are the contributions<br />
of other operators at this station displayed differently.<br />
Since the graph is intended to be updated in (almost) real-time, the feature set is<br />
intentionally minimal. The code draws the graphs one line at a time - this yields very dull<br />
graphics, but does not require any additional DLL files or controls, and runs well for me on<br />
an older, slower PC.<br />
The real-time graphical rate display has options accessible by right-clicking on the graph<br />
area. This display will not show anything until you start making QSOs in your current log.<br />
The horizontal line is the goal value marking line.<br />
6. Setting a goal for the contest<br />
http://n1mmtw61.semdxa.org/tiki-print_multi_pages.php?printstructures...<br />
Most people want to make each year more QSOs than the year before. So for most of us that is<br />
our goal!<br />
It's always nice to know what number of QSOs you had last year so you can see where your<br />
weak spots are. If this information is not available or you think these numbers are wrong (to low?)<br />
set your own! You can set the number of QSOs you want to make on an hourly basis and the<br />
program will show them on the 'Goal = ' button.<br />
If you have the contest from last year available you can import the number of QSOs and adjust<br />
afterwards if necessary.<br />
The only difference importing QSOs from a previous contest is what database you have loaded in<br />
<strong>N1MM</strong> logger during setup of the goal numbers. If you have the previous contest (from last year)<br />
loaded the program will calculate the QSOs per hour and display them. These numbers can be<br />
192 of 319 2/2/<strong>2011</strong> 4:35 PM
updated to set a new (higher) goal.<br />
7. Setting the QSO numbers<br />
You can set the number of QSOs per hour.<br />
http://n1mmtw61.semdxa.org/tiki-print_multi_pages.php?printstructures...<br />
Select button 'Import Goals' on the Info window. Selects the bands to import using a<br />
previous contest log or a text file.<br />
Import Bands<br />
Select bands to import for the selected contest<br />
Choices are: All, 160m, 80m, 40m, 20m, 15m and 10m<br />
Log - Import from a previous contest Log<br />
Load or have loaded the previous contest (mostly from last year) in the program.<br />
Use 'Choose a File' and select in the database the contest you want.<br />
Select a contest in the selected database using 'Select Contest'.<br />
Another type of contest is allowed to get some figures and hours imported.<br />
Have an empty contest loaded or make a new contest with 'File, Open Log<br />
in Database'.<br />
Text File - import goal from a text file<br />
Text file can be either a whitespace delimited file (.txt) or a comma separated file<br />
(.csv).<br />
User selects which file type in the Choose a File dialog box.<br />
Contents of the text file are: 1st field/column is the day/hour as dhh, 2nd<br />
field/column is the all band houtly rate.<br />
For importing goals by band, 1st field/column is the day/hour as dhh and<br />
the subsequent fields/columns are the hourly rate on 160, 80, 40, 20, 15 &<br />
10.<br />
Select button 'Goal ' on the Info window. A screen will appear where you can enter the<br />
QSOs to make per hour. If you have not imported a contest the dialog will be empty<br />
otherwise it will be pre-filled.<br />
Goals need to be in the form of dhh, where d is 1, 2 or 3, and hh is from 0-23.<br />
The hh is the Z time for the first, second or third *calendar* day of the contest. d is the<br />
193 of 319 2/2/<strong>2011</strong> 4:35 PM
calendar day number starting with 1. ARRL Sweepstakes starts on Saturday at 2100z,<br />
so the first hour goal would be for 121. The last hour starts at <strong>02</strong>00z on Monday, so<br />
the goal would be set for 3<strong>02</strong>. With the other change made, these rates can be<br />
extracted from other contests in other databases, avoiding the necessity of first<br />
loading the contest, extracting the goals and then reloading the current contest. Now<br />
you can just choose the database and contest to use for your goals.<br />
The goals can also be set manually, using the scheme above. Note that goals hold for<br />
the hour they are set, and each subsequent hour until a new goal is set.<br />
Example below: 112 means day 1 and 12 UTC. The last line is day 2 and 09 UTC.<br />
8. Multi-User information<br />
8.1. General<br />
http://n1mmtw61.semdxa.org/tiki-print_multi_pages.php?printstructures...<br />
Tip<br />
The goal is set per database and not per contest in the database, so it is not possible to set<br />
different goals for more contests in one database. For some, another reason to use a<br />
separate database for each (major) contest.<br />
In the bottom part of the Info window all information needed during contesting is displayed. See<br />
the picture below.<br />
194 of 319 2/2/<strong>2011</strong> 4:35 PM
*<br />
Green or Red station icon<br />
Green means connected<br />
Red means not connected, and the other computer is being actively polled. Users<br />
may experience delays and stutters in this state.<br />
Blue means not connected, and the other computer is not being actively polled. The<br />
connection will be automatically reestablished when the other computer becomes<br />
reachable. Users will not experience delays and stutters in this state.<br />
Light Red means that the program has not been able to contact the other machine for<br />
a while.<br />
This is a transient state, and the program will try to solve this problem, if it<br />
returns to green, then everything is ok.<br />
At startup it is not an issue. If during a contest, with lots of RF, this might mean<br />
you have RF in your network cables.<br />
Right clicking on these icons brings up a menu<br />
Station<br />
Name from the station as entered under 'Config / Edit Station Computer names'<br />
Pass frequency<br />
Frequency where the station likes to receive it's passed stations.<br />
Pass frequencies > 100000 kHz will be shown without decimals.<br />
Run<br />
Selected means running<br />
Not selected means he is Searching & Pouncing<br />
Operator<br />
Who is operating the station<br />
This call will change to red while transmitting<br />
Last 10<br />
Rate information from the station over last 10 QSOs<br />
Last 100<br />
Rate information from the station over last 100 QSOs<br />
Current Freq<br />
Operating frequency<br />
Mode indication like CW, SB, FM (only when in Mixed mode)<br />
8.2. Mouse Assignments<br />
Right-click on the red or green station icon - opens a menu window.<br />
http://n1mmtw61.semdxa.org/tiki-print_multi_pages.php?printstructures...<br />
Call for Help - On the selected station the following message will be shown: "Station x<br />
needs assistance". This way an operator can call for assistance without leaving the chair by<br />
sending a message to another (operating) position. The file "Assist.wav" from the program<br />
195 of 319 2/2/<strong>2011</strong> 4:35 PM
Score<br />
directory will be played on the target station.<br />
Help - Show the help file for this window.<br />
Send Message - Send a message to this station. The message will be shown in the Info<br />
window from the selected station and appears in red.<br />
Target for Call stacking - The stacked callsign will be put on the 'stack' for this station. See<br />
the Entry Window for more information about call stacking.<br />
Pass current/last QSO - Pass the current qso in the Entry window or the last qso when the<br />
Entry window is empty to this station.<br />
Show Status - Show status of all connections. See image below (no connection set up<br />
here).<br />
Close Connection - Close the network connection from this station.<br />
Open Connection - Open the network connection from this station (only selectable when<br />
dot is red).<br />
Prevent Automatic Reconnect Attempts - Prevent automatic reconnect attempts every 30<br />
seconds by the program.<br />
Here are three examples of the Score window, which is formatted automatically when you select a<br />
contest.<br />
CQWWSSB PACC VHFREG1<br />
http://n1mmtw61.semdxa.org/tiki-print_multi_pages.php?printstructures...<br />
196 of 319 2/2/<strong>2011</strong> 4:35 PM
In this Section...<br />
Score<br />
1. Mouse Assignments:<br />
The Score Summary dialog displays the score for the current contest with the points that have<br />
been achieved by band (as a single band entry). Totals for points, multipliers and score are<br />
shown. The dialog can be found under the Window menu item. The scores are updated when<br />
contacts are added/deleted.<br />
The first and last example pictures above are single mode contests (SSB), the example in the<br />
middle is a mixed mode contest and where necessary the modes will be shown by band. The<br />
points are shown in the caption of the dialog.<br />
1. Mouse Assignments:<br />
Right mouse click, a menu will appear<br />
Copy all - Copy all info to the Windows clipboard.<br />
Print to file - Print the score summary to a file.<br />
Help - Show the help file for this window.<br />
Note:The number of contacts shown on screen and printed on the summary sheet are after<br />
duping.<br />
Multipliers by Band<br />
Your Mults by Band Dialog window will be similar to these.<br />
http://n1mmtw61.semdxa.org/tiki-print_multi_pages.php?printstructures...<br />
197 of 319 2/2/<strong>2011</strong> 4:35 PM
In this Section...<br />
Multipliers by Band<br />
1. Keyboard Assignments<br />
2. Mouse Assignments<br />
3. Radio Button Assignments<br />
4. Colors<br />
http://n1mmtw61.semdxa.org/tiki-print_multi_pages.php?printstructures...<br />
This dialog gives a band by band breakdown of worked and wanted countries/zones/sections<br />
(contest dependent) per continent when Country is selected. Each continent has it's own Tab, the<br />
last Tab gives a total for all bands. In the title bar the number of worked and the total of possible<br />
countries/zones/sections is shown. The Multipliers by Band dialog can be found under the<br />
Multipliers item under Windows. A scroll bar at the bottom is added for convenience.<br />
The blocks shown can be bands or modes depending on the contest. The number of shown<br />
blocks depends on the selected contest and selected mode (CW, SSB, Mixed).<br />
In most contests all multipliers are shown (like countries, sections etc.). There are a few contest<br />
with many possible multipliers to much to fit in the multiplier window. In that case (like IOTA<br />
198 of 319 2/2/<strong>2011</strong> 4:35 PM
contest) ony the multipliers worked are shown (and when starting the contest the Sect or Other<br />
tab shows an empty dialog and every new multiplier will add a line in the dialog.<br />
If unknown sections are logged they will be shown under the callarea "UNK".<br />
The number of blocks shown per band depends on the 'Mode category' which can be<br />
found on the tab 'Contest' under 'File>Open Log in Database dialog.<br />
CW, SSB, RTTY - will give one block per band<br />
MIXED - will give two blocks per band<br />
white = CW, gray = SSB<br />
The bands shown depend on:<br />
The selected contest, each contest has its own default which mostly will be the 6 HF<br />
bands.<br />
The setting of the band filter box in the Multiplier by Band dialog.<br />
A combination of the Band filter box and the Mode filter box gives many possibilities.<br />
Mode filter Auto means that it uses the 'Mode category' which can be found on the tab<br />
'Contest' under 'File | Open Log in Database dialo'.<br />
Examples:<br />
Bandfilter: Auto Mode filter: Auto<br />
default per contest, mostly the 6 major HF bands (160 80 40 20 15 10)<br />
Used in all major contests like CQWW, ARRL DX etc<br />
Single mode contests (CW or SSB)<br />
2 blocks - possible CW and SSB (mixed mode contests)<br />
Used in contests like ARRL 10 meter etc.<br />
White = CW, Gray = SSB<br />
Mixed is selected<br />
Bandfilter: HF+WARC Mode filter: SSB<br />
9 blocks - all 9 HF bands (160 80 40 30 20 17 15 12 10)<br />
used in contests like DX etc.<br />
Bandfilter: HF+WARC Mode filter: Mixed<br />
18 blocks - 2 blocks per band for all 9 HF bands (160 80 40 30 20 17 15 12 10)<br />
used in contests like DX etc.<br />
Grid square overview<br />
Shown when a VHF or up contest is selected<br />
Clicking on a grid will center the window on that grid<br />
The own station gridsquare will be shown in white/dark green<br />
http://n1mmtw61.semdxa.org/tiki-print_multi_pages.php?printstructures...<br />
199 of 319 2/2/<strong>2011</strong> 4:35 PM
1. Keyboard Assignments<br />
Ctrl+J - Toggle through the Countries, Zones, Sections & Other windows<br />
When the Multiplier window is not open, it will be opened.<br />
Ctrl+Shift+J - Opens or minimizes the Multiplier-by-band window<br />
Ctrl+Alt+J - Toggles through continents.<br />
2. Mouse Assignments<br />
Left-click on multiplier/abbreviation<br />
Click on the abbreviations and it will populate the Entry Window exchange filed with<br />
the correct syntax. It will overwrite the current exchange so be careful!<br />
It will only work for contests where Exchange1 is used for the county or section, which<br />
is many contests, but not all.<br />
Right-click in the window - a menu will appear<br />
Show Zones/Countries :<br />
Countries selected: Shows the zone for a selected country.<br />
Zones selected: Shows the countries in the selected zone.<br />
Show Calls Worked - Shows all calls worked in this country or zone, or in this county<br />
(QSO parties only).<br />
Set Grid center - Shows a dialog in which you can enter the desired grid square (4<br />
digits long) on which to center the grid square view (grid square contests only).<br />
Help - Show the help file for this window.<br />
3. Radio Button Assignments<br />
http://n1mmtw61.semdxa.org/tiki-print_multi_pages.php?printstructures...<br />
Country - Show the countries worked for the band chosen.<br />
ZN - Show the zones worked for the band chosen.<br />
Sect - Show the sections or states worked for the band chosen.<br />
Other - Show the other possible multipliers worked for the band chosen.<br />
in VHF contests a Grid square overview will be shown.<br />
Auto - Band filter<br />
Auto - Shows the bands for the selected contest (mostly the major 6 HF bands)<br />
HF - shows all 6 major HF bands<br />
200 of 319 2/2/<strong>2011</strong> 4:35 PM
VHF - shows all VHF and up bands (50 MHz and up)<br />
HF + WARC - shows all HF bands<br />
All separate bands - 1.8, 3.5, 7 .... up to 241 GHz<br />
Auto - Mode filter<br />
Auto - Shows the mode as selected for the chosen contest (CW, SSB, Mixed, Digi)<br />
one block per band when a single mode is selected<br />
two blocks per band when Mixed is chosen as 'Mode category' which can be<br />
found on the tab 'Contest' under 'File | Open Log in Database' dialog'.<br />
CW - shows only CW contacts (one block per band)<br />
SSB - shows only SSB contacts (one block per band)<br />
Dig - shows only Digital contacts (one block per band)<br />
Rev -when not in a single mode contest this button selects the other mode (SSB<br />
versus CW) (one block per band)<br />
Reset - Resets the two filters to Auto<br />
4. Colors<br />
White - You need this one, work 'em.<br />
(light) Red - Worked country, zone, section or grid square.<br />
Statistics<br />
Statistics can be found under View > Statistics in the Entry Window.<br />
Tip<br />
During a contest, if you are checking Statistics and a station comes back, just start typing.<br />
The statistics window will go to the background and every typed characters will go to the<br />
Entry window.<br />
In this Section...<br />
Statistics<br />
1. General<br />
2. Button Assignments<br />
3. File Menu<br />
4. Example statistics<br />
http://n1mmtw61.semdxa.org/tiki-print_multi_pages.php?printstructures...<br />
201 of 319 2/2/<strong>2011</strong> 4:35 PM
1. General<br />
The statistics window has the possibility to select almost all database fields from a contest in the<br />
row or column side of the statistics table. Many different statistics can be made this way. The<br />
database fields to select from are tabulated below.<br />
Fields Row Column Remarks<br />
Band Y Y<br />
Operator Y Y compare operators, only useful when running Multi-operator<br />
Hour Y N<br />
RadioNr Y Y only useful when using more than one radio<br />
Mode Y Y useful in mixed contests<br />
CountryPrefix Y N worked number of stations per country or mode<br />
Zone Y Y<br />
Section Y Y used in many domestic or local contests - may equate to province,<br />
oblast, ARRL section, etc., depending on the contest<br />
CK Y N 2 digit number used in Sweepstakes, formally denoting the year<br />
first licensed<br />
Prec Y Y "Precedence" used in Sweepstakes to denote class of entry<br />
Points Y Y<br />
Mult1 Y Y multiplier, or first multiplier in contests with more than one<br />
Mult2 Y Y Second multiplier in contests with more than one<br />
Mult3 Y Y Third multiplier where applicable<br />
WPXPrefix Y N prefix as determined by WPX rules<br />
GridSquare Y Y 4-character of grid square<br />
Run1Run2 Y Y useful when doing SO2R<br />
MiscText Y N Contest specific information<br />
ContactType Y Y Blank = qso, "D" = dupe, "N" = non-workable station<br />
Day Y Y first or second day of the contest<br />
Mult & Band Y Y<br />
Exchange1 Y Y Use in some contests (like WAE to show QTCs)<br />
http://n1mmtw61.semdxa.org/tiki-print_multi_pages.php?printstructures...<br />
Note<br />
Old contests may not have valid values in fields that have been added since the contact was<br />
logged. The number of contacts shown on screen and printed on the summary sheet are<br />
without dupe contacts.<br />
2<strong>02</strong> of 319 2/2/<strong>2011</strong> 4:35 PM
2. Button Assignments<br />
Row - Select a row field.<br />
Column - Select a column field.<br />
Refresh - Refresh the contents of the table. The statistics are not automatically updated<br />
when a contact is logged/changed/deleted.<br />
The statistics window is refreshed when changing contests.<br />
3. File Menu<br />
Print - Print the statistics table to a printer. Font can be set by user.<br />
Print to File - Print the statistics table to a file.<br />
4. Example statistics<br />
Here are some examples|<br />
Row Column Usage Description<br />
CountryPrefix Band Always QSOs per country per band<br />
Hour Operator Multi User QSOs per hour per operator<br />
Band Operator Multi User QSOs per band per operator<br />
GridSquare Band Grid contests QSOs per gridsquare per band<br />
Band Exchange1 WAE and some other Show RQTC & SQTC info<br />
http://n1mmtw61.semdxa.org/tiki-print_multi_pages.php?printstructures...<br />
203 of 319 2/2/<strong>2011</strong> 4:35 PM
Visual Dupesheet<br />
Example Visual Dupesheet<br />
http://n1mmtw61.semdxa.org/tiki-print_multi_pages.php?printstructures...<br />
The Visual Dupesheet is a quick way to determine if a station is a dupe without having to enter<br />
the callsign in the program. The calls already worked will be indexed much like a paper<br />
dupesheet that is organized by callarea and suffix. The Visual Dupesheet is especially useful for<br />
short, high speed contests like the NA Sprint. It is closely patterned on the Visual Dupesheet<br />
used by TR Log.<br />
Each VFO/Radio/Bandmap has its own Visual Dupesheet. The VFO/Radio A sheet displays<br />
all of the contacts for the band VFO/Radio A is on. VFO/Radio B does the same for<br />
whatever your VFO B/Radio is set to even if you don't (or cannot) use VFO B.<br />
The columns signify call areas. If a call area exceeds the number of calls that will fit it will<br />
overlap into an adjacent column with some dash lines to differentiate.<br />
Each call area is sorted by suffix.<br />
To see the dupe sheet for any band, set your radio to that band.<br />
To check for a dupe, first look for the call area column, then look up the suffix, then the<br />
prefix.<br />
204 of 319 2/2/<strong>2011</strong> 4:35 PM
If you don't want both windows open, close one, position the other where you want it and<br />
then use Tool > Save Window Positions. The next time you start the program only one<br />
window will open.<br />
Unless you can copy RTTY in your head, you do not need the Visual Dupesheet for RTTY<br />
contests. Obviously RTTY calls will tell you they are dupes or not as soon as they print.<br />
The Visual Dupesheet can hold a maximum of 800 stations per band. Going above this limit<br />
will give a warning . Depending on computer speed and configuration, users may<br />
experience noticeable delays when using the Visible Dupe Sheet with logs containing more<br />
than 300 calls. Performance with 600 callsigns is acceptable with a 2.6 GHz computer<br />
running only <strong>Logger</strong>.<br />
Right-clicking on the gray area at the right of the Visual Dupesheet allows selection of a<br />
small or large font size.<br />
There are no menus in this dialog.<br />
What is the usefulness of the Visual Dupesheet?<br />
By Steve, N2IC<br />
http://n1mmtw61.semdxa.org/tiki-print_multi_pages.php?printstructures...<br />
First, let me say what this feature is not: It is NOT intended to be a step towards paper (or<br />
electronic) dupe sheet submission. A paper dupe sheet is an obsolete artifact of the pre-computer<br />
logging era.<br />
Now, I'll be perfectly honest about the utility of the Visual Dupesheet. I have been a user of<br />
TRLog for many years, as well as a fan of the NA Sprint contest. To do very well in an extremely<br />
fast-paced contest, like the NA Sprint, you have to minimize the amount of non-productive time.<br />
Any time you are not actually making a QSO is non-productive time. As you tune around a band,<br />
looking for new stations to work, you need a really fast way to determine if a station that you hear<br />
is a dupe. The fastest way to do this is to use only your brain. Some contesters have an amazing<br />
ability to keep their dupesheet completely "in their head". For the rest of us, we typically reach for<br />
the keyboard and type the call into the entry window. As soon as you do this, <strong>N1MM</strong> <strong>Logger</strong><br />
instantly tells you whether it's a dupe. Excellent. However, some of the NA Sprint operators who<br />
use TRLog have found an even faster way to check for a dupe - using TRLog's Visual Dupesheet<br />
feature. As you tune the band, you keep your eyes focused on the Visual Dupesheet. It becomes<br />
second nature to scan the Visual Dupesheet. When you hear a non-dupe that you want to call,<br />
you don't even have to enter the call in the Entry Window, yet. Just hit the Enter key. If he/she<br />
comes back to you, you now have time to enter his/her call and exchange.<br />
Obviously, in a contest where you work many, many stations on each band, this feature won't<br />
work - it takes too long to scan the Visual Dupesheet when it is crowded with calls. However, this<br />
is not the case with the NA Sprint. The winners work no more than 150 stations per band, making<br />
the Visual Dupesheet an ideal way to dupe check.<br />
205 of 319 2/2/<strong>2011</strong> 4:35 PM
Table of Contents:<br />
Digital Modes<br />
1 General RTTY and PSK Information<br />
2 Digital Overview and Features<br />
3 Digital Setup<br />
4 Digital - MMTTY for RTTY support<br />
5 Digital - MMVARI for PSK and other modes<br />
6 Digital - Fldigi for Sound Card Modes<br />
7 Digital - External TNC Support<br />
General RTTY and PSK Information<br />
In this Section...<br />
General RTTY and PSK Information<br />
1. RTTY Information<br />
1.1. Common RTTY Frequencies<br />
1.2. General RTTY Information<br />
2. PSK Information<br />
2.1. General PSK info<br />
2.2. Common PSK and Digital Frequencies<br />
Digital mode contesting is growing rapidly. <strong>N1MM</strong> <strong>Logger</strong> supports digital mode contesting, not<br />
only RTTY but also other digital modes, with a flexible interface.<br />
1. RTTY Information<br />
http://n1mmtw61.semdxa.org/tiki-print_multi_pages.php?printstructures...<br />
This section contains some general information about operating in RTTY that is not directly<br />
related to <strong>N1MM</strong> <strong>Logger</strong>. If you are new to digital mode contesting in general and RTTY in<br />
particular, this information may be helpful. If you are an old-timer at RTTY, you can probably skip<br />
this section.<br />
Before the spread of personal computers, RTTY was the most prevalent digital mode (other than<br />
CW, that is!), and was done using surplus teletype equipment - mechanical teleprinters. This<br />
equipment posed severe constraints on the RTTY mode that are still evident today. Despite these<br />
constraints, RTTY has proven to be quite well-adapted to contesting, and it is still by far the most<br />
common digital contesting mode.<br />
More recently, these mechanical teleprinters have been replaced by other devices. The first of<br />
206 of 319 2/2/<strong>2011</strong> 4:35 PM
these terminal units were self-contained microprocessor devices (modems) that converted the<br />
5-bit Baudot code used in RTTY into ASCII characters to be sent to a terminal (keyboard and<br />
CRT display). The most popular of these units were multi-mode TNCs (Terminal Net Controllers)<br />
that supported RTTY in addition to packet radio and other digital modes. TNCs are still in use<br />
today, and <strong>N1MM</strong> <strong>Logger</strong> supports the use of TNCs for RTTY.<br />
However, with the advent of the ubiquitous sound card-equipped PC, it became possible to<br />
perform the modulation and demodulation directly in a personal computer, and the majority of<br />
RTTY today is done using a sound card in a PC. <strong>N1MM</strong> <strong>Logger</strong>, of course, also supports this<br />
method of modulating and demodulating RTTY and other digital modes, using a sound-card<br />
based digital-mode "engine".<br />
An RTTY signal is a single carrier (like CW), but instead of being modulated on and off like CW,<br />
the transmitted power is kept constant, and modulation is imposed by changing the frequency by<br />
a preset amount; in amateur usage, the historical practice is to use a "shift" of 170 Hz. That is,<br />
RTTY is modulated using frequency-shift keying (FSK). The frequency shifting can be done<br />
either at RF, in radios which support this method, or at audio frequencies.<br />
The first method (usually called FSK) requires an on-off keying signal to be applied to a keying<br />
input to the radio. This keying is very similar to CW keying, except that instead of turning the<br />
carrier on and off as in CW, closing the key input shifts the transmitter's frequency. FSK therefore<br />
requires an on-off keying interface between the computer and the radio, and the radio must have<br />
the internal circuitry required to perform the frequency shifting. Radios that support this FSK<br />
mode usually have other features that assist RTTY operators, such as specialized filtering.<br />
The second method, using audio tones fed into an SSB transmitter which converts the tones to<br />
RF in exactly the same way that SSB converts audio voice frequencies to RF, is called Audio<br />
Frequency Shift Keying (AFSK). AFSK can be used with any SSB transmitter. Because the<br />
optimum filtering and other settings for RTTY operation are different from those for voice<br />
communication, some transceivers offer special AFSK or digital-mode modes, but fundamentally<br />
these are the same as SSB.<br />
Digital modes are harder on transmitting equipment than CW and SSB because of the higher<br />
duty cycle (sustained periods of full-power transmitting). As a result, it is important not to<br />
overstress the transmitter. It is also important to take steps to avoid transmitting extraneous<br />
noises or spurious signals.<br />
Here are some tips for RTTY setup and operation:<br />
Hardware interfacing:<br />
http://n1mmtw61.semdxa.org/tiki-print_multi_pages.php?printstructures...<br />
Unless your radio has a USB Codec built in (e.g. IC7200 and 7600), in order to receive<br />
RTTY you will need to connect the audio output from your radio to the input of the sound<br />
card being used with your computer, or if you are using a TNC or TU, to its audio input (see<br />
the manual for your TNC/TU for details)<br />
To transmit:<br />
For AFSK, you need to connect the audio output from your sound card or TNC/TU to<br />
an audio input on your radio (exception: radios with a built-in USB Codec), either<br />
207 of 319 2/2/<strong>2011</strong> 4:35 PM
directly or via a sound card interface<br />
For FSK, you need a keying circuit from a serial port to your radio's FSK keying input.<br />
If you are using a USB-to-serial adapter, you will probably need to use the EXTFSK<br />
plug-in in MMTTY<br />
For either AFSK or FSK, you need some way to control PTT (TX/RX switching). If you<br />
use PTT control from <strong>N1MM</strong> <strong>Logger</strong> in other modes, the same method can be used in<br />
digital modes. Alternatively, you can control PTT from a serial port with a keying<br />
circuit. In FSK, the same port can be used for PTT and FSK<br />
On the radio make sure:<br />
Audio processing is off<br />
Speech processing is off<br />
Hi boost is off (Kenwood radios)<br />
If the radio does not have an RTTY-specific mode, it should be in LSB mode<br />
RTTY-specific modes may also be called FSK, AFSK, LSB-D, PKT-LSB, ...<br />
The most often used speed is 45.45 Baud (60 words/min)<br />
Some contests use 75 Baud (100 wpm)<br />
The standard shift is 170 Hz<br />
Some TNCs use 200 Hz shift<br />
When using a TNC set 'Mark' to 2125 Hz and 'Space' to 2295 Hz<br />
Don't overrun your finals from the transceiver and/or amplifier<br />
50 percent duty cycle is mostly ok, but some transmitters may require reduced power<br />
in digital modes<br />
See the Interfacing chapter for url's and tips on interfacing<br />
The BAUDOT character-set does not have all ASCII characters so some special characters<br />
such as (~ * _ @ # =)? can not be printed/transmitted<br />
During contests narrow filters are normally used (250 - 500 Hz)<br />
1.1. Common RTTY Frequencies<br />
Contests USA (kHz) USA (kHz) Europe/Africa<br />
(kHz)<br />
Common Common DX<br />
frequency<br />
1800 - 1810/1835 -<br />
1845<br />
1800 - 1810 1838 - 1843 1838 - 1843<br />
Japan<br />
(kHz)<br />
Common Common<br />
3570 - 3600 3580 - 3600 3590 3580 - 3620 3520 - 3530<br />
7<strong>02</strong>5 - 7100 7<strong>02</strong>5-7050/7080 -<br />
7100<br />
7040 7035 - 7045 7<strong>02</strong>5 - 7040<br />
10120 - 10150 10140 - 10150<br />
http://n1mmtw61.semdxa.org/tiki-print_multi_pages.php?printstructures...<br />
208 of 319 2/2/<strong>2011</strong> 4:35 PM
14060 - 14120 14080 - 14100 14080 - 14100<br />
18100 - 18110 18100 - 18110<br />
21060 - 21150 21080 - 21100 21080 - 21120<br />
24910 - 24930 24920 - 24930<br />
28060 - 28150 28080 - 28100 28050 - 28150<br />
1.2. General RTTY Information<br />
http://n1mmtw61.semdxa.org/tiki-print_multi_pages.php?printstructures...<br />
There are two aspects of RTTY which are often confusing to newcomers to the mode.<br />
The first of these is the "polarity" of the signal. In FSK, there are two frequencies, conventionally<br />
called "mark" and "space". In amateur RTTY, the mark frequency is the higher of the two RF<br />
frequencies. Someone who is transmitting with the opposite polarity is said to be transmitting<br />
"upside down". His signal will be gibberish at the receiving station, unless the operator there<br />
inverts his receive polarity. When first setting up for RTTY, if you appear to be unable to decode<br />
any signals you receive, try inverting your receive polarity (in MMTTY, use the "Rev" button; in<br />
MMVARI, switch between RTTY-L and RTTY-U settings).<br />
In FSK, getting the polarity right involves arranging things so that the switching conventions<br />
(does closing the keying input result in mark or space?) match between the radio and the<br />
computer. Unfortunately, the switching conventions are not universal. Fortunately, almost all<br />
radios affected by this have a menu item in the radio to reverse the keying polarity. Once this<br />
option is set correctly, the radio's transmit RTTY polarity will be correct from then on. On receive,<br />
most if not all radios in FSK mode receive RTTY on the lower sideband. If software is used to<br />
demodulate the received signal, it must be set so that the lower of the two audio tones is<br />
converted to mark and the upper tone to space. This is the default configuration in software that<br />
supports FSK keying (like the MMTTY engine used in <strong>N1MM</strong> <strong>Logger</strong>). Note that in FSK, the<br />
transmit and receive polarities are determined independently, i.e. it is possible to receive correctly<br />
and yet to transmit upside down.<br />
In AFSK, getting the polarity right involves coordination between the choice of audio frequencies<br />
generated in the sound card and the choice of sideband on the radio. The most common<br />
combination is to use lower sideband on the radio, combined with an audio tone pair in which the<br />
mark tone is the lower of the two audio frequencies (e.g. the most common pair is mark = 2125<br />
Hz, space = 2295 Hz). The use of the lower sideband inverts these tones at RF to match the<br />
standard amateur convention. Software that uses the opposite convention (mark tone higher than<br />
space) is used with the radio in upper sideband. Fortunately, once the receive polarity is correct<br />
in AFSK, the transmit polarity will also be automatically correct.<br />
The second sometimes puzzling aspect is related to the RTTY character set. The digital code<br />
used in RTTY predates the ASCII code used by modern computers. Instead of 8 bits, which<br />
209 of 319 2/2/<strong>2011</strong> 4:35 PM
allows for 256 different characters, the Baudot or Murray code used in RTTY has only 5 bits. This<br />
5-bit code only has enough different characters for 26 letters plus 6 control codes, so to get<br />
numbers and punctuation the text has to be preceded with a special "FIGS" character (one of the<br />
6 control codes) to get a second set of 26 characters (10 numbers plus 16 punctuation marks).<br />
FIGS is "sticky", so there is another special "LTRS" character to switch back to the letters case.<br />
Just like any other character, these FIGS and LTRS characters can be damaged by noise, QRM,<br />
QSB, etc., and if they are, the received info is displayed wrongly until the next LTRS or FIGS<br />
character (or in some situations, the next space character) comes along and sets things right.<br />
Sometimes the opposite happens - a text character is converted by noise into a FIGS or LTRS<br />
code, with similar results.<br />
The most common problem that results is numbers being printed as letters, so with a bit of<br />
experience, many RTTY operators will get used to interpreting TOO as 599 and UE as 73. Serial<br />
numbers are slightly more difficult; PQW in the input data is most likely 012, and so on. You can<br />
see which letter corresponds to which number by comparing the top (QWERTY) row of letters on<br />
the keyboard with the numbers immediately above and to the left. Letters can also be printed as<br />
numbers and punctuation; for example, CQ TEST when converted to FIGS case becomes :1 53'5<br />
.<br />
Various software has different ways of helping out with this. When you run MMTTY stand-alone, if<br />
you right click on a "word" (delimited by spaces), the entire word changes to the opposite case.<br />
So, for example, VE4AEO is changed to ;3R-39 and vice versa. <strong>N1MM</strong>'s digital window has a box<br />
titled Letters/Figs for opposite-case display, that shows text that the mouse "hovers" over (no click<br />
necessary) in the opposite case. This requires you to move the mouse over the text that you want<br />
to convert; the unconverted text is displayed in the MouseOver box.<br />
Unshift on Space<br />
http://n1mmtw61.semdxa.org/tiki-print_multi_pages.php?printstructures...<br />
210 of 319 2/2/<strong>2011</strong> 4:35 PM
There is a common feature called Unshift on Space (UOS or USOS) whose purpose is to deal<br />
with the lost {FIGS}/{LTRS} problem. It was designed for normal text, where the majority of<br />
information is alphabetic.<br />
MMTTY has two UOS options. One of these is a button on the MMTTY main window that<br />
affects what you see in the receive window; the other is a setup option (under the Tx tab in<br />
the MMTTY setup) that affects what you transmit.<br />
The receive option in the main window simply changes the receive window's case back to<br />
{LTRS} at the beginning of every new "word", i.e. after a space, unless of course the new<br />
"word" starts with {FIGS}. This takes no extra time, but improves reliability of receipt of<br />
alphabetic text.<br />
The transmit option, on the other hand, actually transmits extra {FIGS} characters at the<br />
beginning of every numeric "word" to try to ensure greater reliability. It does not transmit an<br />
extra "LTRS" at the beginning of every alphabetic word, because using UOS on receive is a<br />
more efficient way to achieve the same end result.<br />
When you are ragchewing, you should always use UOS on both receive and transmit. UOS<br />
assumes that the majority of "words" are alphabetic, which is true of normal text.<br />
During contests, the receive UOS option is still helpful, especially when the exchange<br />
includes letters, and it does not cost anything. The <strong>N1MM</strong> <strong>Logger</strong> DI window's "Letters/Figs"<br />
line can be used to deal with those cases where receive UOS converts an intended numeric<br />
field to letters.<br />
The transmit UOS option achieves greater reliability of numeric exchanges at the cost of some<br />
extra {FIGS} characters. If you are concerned about the slight speed penalty it imposes, you<br />
can leave transmit UOS on and use dashes ("-") instead of spaces between all-numeric<br />
fields, e.g. 599-123-123 . The downside of using dashes in this way is that if the initial {FIGS}<br />
character is lost, the entire exchange will be in the wrong case, e.g. TOOAQWEAQWE.<br />
Sending spaces with transmit UOS on costs two extra {FIGS} characters but is more reliable<br />
(our example with an initial lost {FIGS} character becomes TOO 123 123). On the other hand,<br />
turning transmit UOS off results in 599 QWE QWE in any receiver using UOS, even with no<br />
errors at all. A compromise among all of these possibilities is to turn transmit UOS on and use<br />
a hybrid exchange: 599-123 123 (a dash instead of a space after the signal report, but spaces<br />
after that). A single {FIGS}/{LTRS} error will not prevent at least one copy of the exchange<br />
from being decoded correctly regardless of whether the receiving station is using UOS or not.<br />
2. PSK Information<br />
2.1. General PSK info<br />
http://n1mmtw61.semdxa.org/tiki-print_multi_pages.php?printstructures...<br />
211 of 319 2/2/<strong>2011</strong> 4:35 PM
PSK31 (and its higher-speed versions, PSK63 and PSK125) is an example of a "sound-card<br />
digital mode", i.e. a digital mode that was made possible by the use of sound cards in PCs. The<br />
advent of sound cards in PCs made these sound-card modes available for anyone to use with a<br />
minimum of expense. All that is needed is an SSB transceiver, an audio interface (which can be<br />
as simple as patch cables, or can include isolation and attenuation controls) and a means of<br />
controlling PTT.<br />
Conventionally, sound-card digital modes are communicated using USB, regardless of the band.<br />
Many PSK31 users set their radio's dial to a standard frequency (14070.0 kHz is the most<br />
common) and then look for signals anywhere within their SSB filter bandwidth (e.g. from 250 Hz<br />
to 2750 Hz or so, which would correspond to transmitted frequencies from 14070.25 kHz to<br />
14072.75 kHz). PSK31 signals are narrow-band, so there can be many different PSK31 signals<br />
simultaneously copyable within the available frequency range without changing the radio's dial<br />
setting. Tuning is often done simply by clicking on the desired signal in the waterfall display.<br />
PSK31 is short for "Phase Shift Keying, 31.25 baud". There are also higher-speed versions,<br />
PSK63 (62.5 baud - seen fairly often) and PSK125 (125 baud - rare). Actually, in addition to using<br />
phase shift keying for modulation, PSK31 also uses amplitude modulation ("waveform shaping")<br />
to minimize the bandwidth occupied by a signal. As a result, PSK31 places great requirements on<br />
the linearity of the equipment used, from the sound card generating the signal to the transmitter,<br />
and also the receiver. The peak power of a PSK31 signal can be approximately twice as high as<br />
the average power. If a transmitter is operated near its power handling capacity, it can clip these<br />
peaks, resulting in "splatter", which shows up on the waterfall as extra "tracks" in addition to the<br />
two main modulation tracks that are normally visible. To avoid having this happen, the audio<br />
levels in the sound card and in the transmitter's input audio stages must be controlled to avoid<br />
reaching power levels that would result in clipping. In most transmitters, this is equivalent to<br />
keeping the power below the level that would result in ALC action, and often this means powers<br />
below approximately half the transmitter's maximum power rating.<br />
Standard PSK31 (sometimes also called binary phase shift keying, or BPSK31) is sidebandindependent.<br />
There is a rarely-used variation called QPSK31 (or QPSK63 for the 62.5 baud<br />
speed) that uses four phases instead of two (quadrature phase shift keying). This allows for some<br />
error correction while still delivering the same text speed. QPSK31 is sideband-dependent, i.e.<br />
the transmitting and receiving station must both be using the same sideband in their radios (by<br />
convention, upper sideband).<br />
PSK31 works well even at low powers. In fact, once the transmitted power is sufficiently high to<br />
give an acceptable level of copy, there is no advantage to be gained by increasing power further.<br />
Unlike analog modes, where increasing power may make your signal louder relative to QRM and<br />
therefore easier to copy, increasing the power in PSK31 does not improve your signal's<br />
readability. It can even degrade copy by overloading the other station's receiver and creating<br />
splatter within the receiver. More importantly, a very strong signal will affect the AGC in every<br />
receiver that picks it up, causing the receiver gain to decrease and making copy of signals on<br />
other frequencies more difficult. For this reason, high-power operation is unpopular in PSK31.<br />
When you plan to run PSK:<br />
http://n1mmtw61.semdxa.org/tiki-print_multi_pages.php?printstructures...<br />
212 of 319 2/2/<strong>2011</strong> 4:35 PM
Keep your macros short.<br />
PSK is about 1/3 slower than RTTY; you can really impact your rates with wordy<br />
macros<br />
Use lower case letters wherever possible<br />
PSK is a varicode mode. That means that characters contain a variable number of<br />
bits, unlike ASCII characters that have a fixed number of bits. Most lower-case PSK<br />
characters have fewer bits in them than their upper-case equivalents, so lower-case<br />
(in general) transmits faster<br />
On the radio make sure:<br />
Audio processing is off<br />
Speech processing is off<br />
Hi boost is off (Kenwood radios)<br />
Radio should be in USB mode<br />
Some radios have modes designed for digital sound card modes, e.g. PSK, DATA A<br />
Transmitter linearity is extremely important in PSK<br />
Keep power below 1/2 the transmitter rating to avoid clipping peaks<br />
Avoid any visible ALC action (except in radios with ALC designed for PSK, e.g. Elecraft<br />
K3)<br />
See the Interfacing section of this help for url's and tips on interfacing<br />
Using lower case letters instead of all caps will increase speed and reduce TX time<br />
Only 100 Hz is needed as channel separation<br />
Example filter usage:<br />
Available 2.4 kHz / 250 Hz /100 Hz filter bandwidths<br />
2.4 kHz is used for monitoring the PSK area of band when in search and pounce<br />
mode<br />
250 Hz and 100 Hz filter bandwidths are used when in run mode<br />
2.2. Common PSK and Digital Frequencies<br />
PSK31 activity generally starts from the bottom edge of the IA<strong>RU</strong> RTTY bandplan, expanding<br />
upwards as activity increases.<br />
Band Digital Frequencies (kHz) PSK Frequency (kHz) Remarks<br />
160 meter 1800 - 1810 / 1838 - 1843 1807 / 1838 1807 in Region 2<br />
80 meter 3575 - 3585 3580<br />
40 meter 7030 - 7040 / 7060 - 7085 7035 / 7080 7080 in Region 2<br />
30 meter 10130 - 10145 10142 WARC, no contesting<br />
20 meter 14065 - 14090 14070<br />
http://n1mmtw61.semdxa.org/tiki-print_multi_pages.php?printstructures...<br />
17 meter 18100 - 18110 18100 WARC, no contesting<br />
213 of 319 2/2/<strong>2011</strong> 4:35 PM
15 meter 21060 - 21090 21080<br />
12 meter 24920 - 24930 24920 WARC, no contesting<br />
10 meter 28110 - 28125 28120<br />
Digital Overview and Features<br />
In this Section...<br />
Digital Overview and Features<br />
1. Digital Overview<br />
2. Making QSOs<br />
2.1. Make a Digital Mode Transmission<br />
2.2. Digital Need to Know<br />
3. Tips for Making QSOs<br />
3.1. Using Hover Mode<br />
3.2. The Rate Improver - Right Click = Return NOT Menu<br />
4. Do You Have... (what to check when it does not work)<br />
4.1. Insert Key Assignments<br />
4.2. Configuring the Entry Window Function Keys<br />
4.3. Macro Keys<br />
5. Name Lookup<br />
6. Output RX Data to a Text File<br />
7. Single Operator 2 Radios (SO2R)<br />
8. Additional Receive-Only Windows for RTTY<br />
The digital part of the <strong>N1MM</strong> logger program is designed, coded and maintained by Rick Ellison,<br />
N2AMG.<br />
1. Digital Overview<br />
http://n1mmtw61.semdxa.org/tiki-print_multi_pages.php?printstructures...<br />
<strong>N1MM</strong> <strong>Logger</strong> supports a variety of methods to decode and transmit digital modes, including an<br />
external TNC/TU; the MMTTY engine for RTTY (sound card on receive, either sound card AFSK<br />
or FSK keying on transmit); the MMVARI engine for RTTY (AFSK or FSK, starting with <strong>Logger</strong><br />
version 10.9.5), PSK31, PSK63, PSK125 (both BPSK and QPSK), and MFSK16; or the Fldigi<br />
engine for a broad range of sound-card digital modes including AFSK RTTY, PSK and many<br />
more. Regardless of which of these engines is used, the digital data streams pass to and from<br />
the engine via the Digital Interface (DI) window. At least one DI window must be open to operate<br />
the <strong>Logger</strong> in digital modes. Depending on your hardware configuration and operating mode, you<br />
may have either one (SO1V, SO2V) or two (SO2V, SO2R) DI windows open. Both DI windows<br />
have full receive and transmit capabilities. It is also possible to supplement the two DI windows<br />
with up to four additional receive-only windows. The user can interact with the DI windows using<br />
214 of 319 2/2/<strong>2011</strong> 4:35 PM
either the keyboard or the mouse as the primary control interface. There is a wide variety of<br />
options available to customize the operation of the digital interface.<br />
The remainder of this section describes the operation of the DI windows, including basic<br />
operation as well as advanced features that can help make operation easier and more efficient.<br />
The next section describes how to set up <strong>N1MM</strong> <strong>Logger</strong> and the DI Window for digital modes<br />
regardless of which type of digital engine is used. Engine-specific details are described in<br />
separate sections for each of the supported engines (MMTTY, MMVARI, Fldigi and external<br />
TNCs).<br />
2. Making QSOs<br />
This section explains:<br />
How to make a Digital mode transmission<br />
Keyboard, Insert key and Mouse Assignments<br />
Function keys<br />
Macros<br />
2.1. Make a Digital Mode Transmission<br />
http://n1mmtw61.semdxa.org/tiki-print_multi_pages.php?printstructures...<br />
Problems?<br />
Check out the Digital Modes part of the Frequently Asked Questions (FAQ) of this Wiki.<br />
Select 'Window | Digital Interface' and the Digital Interface will open. The Digital Interface<br />
window can be positioned and resized on your monitor as desired<br />
If an external TNC is used only the Digital Interface window is opened. When one of the<br />
sound card interfaces is chosen an extra window will appear: MMTTY, MMVARI or FLDIGI<br />
depending on which interface is selected in the DI window's Interface menu<br />
Left clicking on a call will grab the callsign. Right clicking on the RX and TX windows will<br />
show a menu (depends on a menu setting)<br />
Pressing Insert will Grab the highlighted call and sends Hiscall followed by the Exchange<br />
button<br />
Double clicking on a callsign in the callsign box from the Digital Interface sends that call to<br />
the Entry window<br />
A callsign is automatically highlighted if recognized by the program. Call signs are always<br />
recognized when they are both preceded and followed by a space. There is also an option<br />
to recognize call signs buried in garbage (without a leading or trailing space), provided that<br />
call sign is in the MASTER.DTA file<br />
215 of 319 2/2/<strong>2011</strong> 4:35 PM
2.2. Digital Need to Know<br />
If the callsign in the callsign field in the Entry window is equal to the callsign in the received<br />
text, the call in the Entry window does not get placed into the call list.<br />
Staying Focus'ed<br />
Focus is automatically returned back to the Entry window when clicking a callsign in the<br />
Receive window<br />
Pressing Ctrl while single clicking on a call will force the call into the Entry window<br />
Click in the Entry window input field you want data to go to and then hold down the Ctrl key<br />
while clicking on that data. It will paste to the field you clicked into<br />
"-" separators between exchange elements are removed automatically<br />
CQ Repeat time starts<br />
when using a sound card engine, from when the sending stops<br />
when using an external TNC, from when the message begins, as there is no way to<br />
tell when the TNC finishes sending<br />
During transmit, callsigns are not grabbed from the receive window<br />
Linefeed characters (LF) in incoming text are replaced with Carriage Return (CR) characters<br />
Auto-CQ with a TNC<br />
To get auto-CQ to work correctly with a TNC set your repeat time to at least 9 or 10 seconds.<br />
It may need to be longer if you have a longer CQ macro. This will stop the TNC buffer from<br />
receiving the next string before it finishes sending the last one.<br />
Clear the TNC Transmit Buffer<br />
It is best to add the command that your TNC uses to clear the transmit buffer to the end of<br />
your Abort Macro. If not, the transmit buffer still holds the remaining characters that were left<br />
in the sent string and will get sent the next time the TNC sends.<br />
Stop Sending CQ<br />
When using a TNC turn off Config >Function Keys >Stop Sending CQ when Callsign<br />
changed. If not every time you stop an auto-CQ and you type a callsign in the box it will send<br />
the abort string to the TNC.<br />
3. Tips for Making QSOs<br />
http://n1mmtw61.semdxa.org/tiki-print_multi_pages.php?printstructures...<br />
Callsigns and exchanges are displayed in the Digital Interface (DI) window. This information can<br />
216 of 319 2/2/<strong>2011</strong> 4:35 PM
e transferred to the Entry window's Callsign field and exchange fields with the mouse, or it can<br />
be typed in manually the same as you would do in CW and SSB. Call signs recognized in the<br />
input stream are also placed in the Grab window, and can be transferred from there to the Entry<br />
window using the Grab button, the {GRAB} macro or Alt+G on the keyboard.<br />
3.1. Using Hover Mode<br />
Hover Mode places the callsign in the callsign field in the Entry Window when you hold the<br />
mouse over a valid callsign. If you use this in combination with the 'Right click = Return<br />
NOT menu' option, you hover over the call then right click to plant the call and send your<br />
call; when the station comes back to you you click on the exchange to place it in the Entry<br />
Window. Right clicking again sends TU and logs the Q. Right click, left click,right click and<br />
you're done...<br />
Note: Your own call is excluded from being picked up.<br />
Hover mode is used in conjunction with the menu selection 'Rt Click = Return NOT<br />
menu' which will will send a Return when right clicking in the DI RX window instead of<br />
displaying a pop up menu<br />
3.2. The Rate Improver - Right Click = Return NOT Menu<br />
Select from the settings menu in the Digital window "Right Click = Return NOT menu". This<br />
setting could improve your rate greatly as your hand never leaves the mouse except for the<br />
occasional difficult exchange. Making a qso:<br />
While in Run mode<br />
Right click in the DI's RX window to sends CQ<br />
When a station replies left click on the call<br />
Right click sends your exchange<br />
As he sends his exchange left click on it<br />
Right click again to send TU and log the call<br />
Right click again starts CQ (and you're back at the first bullet)<br />
In S&P it does the same thing as hitting Enter to advance thru the ESM mode<br />
Right click takes the place of hitting Enter for ESM. Most of the time while in the contest I have<br />
one hand on the mouse and the other hand I have one finger resting on the space between the<br />
Esc and F1 keys. With that finger I can hit Esc if I have started a CQ and someone has started<br />
coming back to me. 73 Rick N2AMG<br />
4. Do You Have... (what to check when it does not work)<br />
http://n1mmtw61.semdxa.org/tiki-print_multi_pages.php?printstructures...<br />
217 of 319 2/2/<strong>2011</strong> 4:35 PM
Below are the most common mistakes made setting up or using <strong>N1MM</strong> logger in RTTY mode.<br />
Add {TX} and {RX} to each of the F Keys<br />
Set up Mode Control in the Configurer<br />
Select the DI type in the Configurer under the Tab: Digital Modes<br />
When MMTTY selected: Set up the path to MMTTY in the Configurer under the Tab: Digital<br />
Modes<br />
Set up the Dig Wnd Nr in the Configurer under Hardware for Digital ports<br />
4.1. Insert Key Assignments<br />
Mode Enter Sends Message<br />
(ESM mode)<br />
<strong>RU</strong>N and<br />
S&P<br />
Ins key or ; does the following:<br />
OFF 1. Grab Callsign from call list if callsign field empty<br />
otherwise use call in callsign field<br />
2. Prefills Exchange Boxes<br />
3. NO DUPE: Sends F5 (Hiscall) + F2 (Exchange) or<br />
DUPE: Sends Nothing<br />
4. Places cursor in next exchange field (Example: Sect)<br />
<strong>RU</strong>N ON 1. Grab Callsign from call list if callsign field empty<br />
otherwise use call in callsign field<br />
2. Prefills Exchange Boxes<br />
3. NO DUPE: Sends F5 (Hiscall) + F2 (Exchange) or<br />
3. DUPE<br />
— WorkDupes checked: Sends F5 (Hiscall) + F2<br />
(Exchange)<br />
— WorkDupes not checked:Sends F6(Dupe)<br />
4. Places cursor in next exchange field (Example: Sect)<br />
5. Highlights F8 button<br />
S&P ON 1. Grab Callsign from call list if callsign field empty<br />
otherwise use call in callsign field.<br />
2. Prefills Exchange Boxes<br />
3. NO DUPE: Sends F4 (Mycall) or<br />
3. DUPE<br />
http://n1mmtw61.semdxa.org/tiki-print_multi_pages.php?printstructures...<br />
— WorkDupes checked: Sends F5 (Hiscall) + F2<br />
(Exchange)<br />
— WorkDupes not checked:Sends F6(Dupe)<br />
218 of 319 2/2/<strong>2011</strong> 4:35 PM
4.2. Configuring the Entry Window Function Keys<br />
4. Once exchange entered INSERT sends F5-F2<br />
** Pressing INSERT again will continue to send F5-F2<br />
5. Places cursor in next exchange field (Example: Sect)<br />
The Entry window function keys support 'Running' mode and 'Search & Pounce' mode.<br />
The function keys use the same macros for PSK and RTTY.<br />
The function keys can be changed under: 'Config | Change Packet/CW/SSB/Digital<br />
Message Buttons | Change Digital Buttons'.<br />
Below example button definitions:<br />
4.3. Macro Keys<br />
http://n1mmtw61.semdxa.org/tiki-print_multi_pages.php?printstructures...<br />
There are 8, 16 or 24 extra macro keys possible on the RTTY interface<br />
A right click on the macro buttons brings up the Digital setup dialog where the macros can<br />
be configured<br />
These extra function keys support all the macros but don't support 'Running' mode and<br />
'Search & Pounce' mode<br />
Include in your macros the control keys needed to turn on the TNC and switch to RX...<br />
Macro key substitution is supported by the buttons in the RTTY window and the function<br />
keys on the Entry window<br />
The macros which can be used and some examples can be found in the macros reference<br />
section<br />
219 of 319 2/2/<strong>2011</strong> 4:35 PM
There are several additional macros for an External TNC. Please check the Digital - External<br />
TNC support chapter. Also please check the rules for macros when using MMTTY and<br />
MMVARI.<br />
5. Name Lookup<br />
The program has the possibility to lookup the name from a station entered in the Callsign field.<br />
For this to happen the following has to be done.<br />
Import a callsign versus name text file<br />
The famous 'Friend.ini' file used in the WF1B program can be directly imported<br />
Also a text file using the format for Call History import can be used<br />
Callsign Name. For example: <strong>N1MM</strong>,Tom<br />
Select >Config >Call History Lookup<br />
Use the {NAME} macro to have the name sent<br />
Note: The name is looked up in the Call History table with the cursor in the callsign<br />
field and pressing the Spacebar!<br />
Example how to import the Friend.ini file from the WF1B program.<br />
Select >File >Import >Import Call History<br />
Select your 'Friend.ini' file by changing 'Files of type:' to 'All Files (*.*)'. Otherwise only text<br />
files will be shown!<br />
Select the 'Open' button. The callsigns with names from the text file will be imported<br />
NB. Importing info in this table will delete all previous content. There is no merge option! So<br />
if there is information in it and you only want to add info, first export this info (Select >File ><br />
Export >Export Call History) and merge the data outside the program with a Text editor like<br />
Notepad. After this import the new merged file 'Friend.ini' file<br />
The program will show in the bottom pane of the Entry Window status information during<br />
importing and afterwards the number of imported callsigns<br />
6. Output RX Data to a Text File<br />
http://n1mmtw61.semdxa.org/tiki-print_multi_pages.php?printstructures...<br />
Sending your RX data to a text file can be done in <strong>N1MM</strong> logger and in MMTTY.<br />
<strong>N1MM</strong> <strong>Logger</strong>: Right click in the RX window and select >Output to Text File (this choice is<br />
not available if you have selected the 'Right Click = Return NOT menu' option)<br />
MMTTY: Doing this in MMTTY is a bit tricky. Go to the directory where MMTTY has been<br />
installed and load MMTTY in standalone mode. Click on File/Log RX and close the<br />
program. From now on every time you start MMTTY either via the logger or in standalone<br />
mode an output text file will be created and all your info will be stored in this text file. In the<br />
220 of 319 2/2/<strong>2011</strong> 4:35 PM
directory where MMTTY is located files will be created that have names like 031103.txt.<br />
MMTTY creates a new file for each day. These files are a real safety feature as you can go<br />
back through them for any info you missed or lost during a crash.<br />
7. Single Operator 2 Radios (SO2R)<br />
<strong>N1MM</strong> <strong>Logger</strong> also supports SO2R for RTTY. You can use any combination of either 2 MMTTY<br />
windows, 2 TNC windows or a combination of MMTTY and a TNC for SO2R operation. Info about<br />
MMTTY soundcard setup and SO2R can be found in the <strong>N1MM</strong> logger Help file in the SO2R<br />
chapter.<br />
8. Additional Receive-Only Windows for RTTY<br />
http://n1mmtw61.semdxa.org/tiki-print_multi_pages.php?printstructures...<br />
<strong>N1MM</strong> <strong>Logger</strong> supports up to four additional receive-only windows for RTTY. The purpose of<br />
these windows is to allow simultaneous use of more than one decoding algorithm on the same<br />
audio input. While it is possible, by using wide bandwidth filters, to use the additional windows to<br />
decode different signals from the one in the main DI windows, the normal use of the additional<br />
windows is to decode the same signal as the one in the main window, but using a different<br />
decoding method to improve the overall ability to decode signals in difficult situations.<br />
These receive-only windows can be distributed in any way between the two DI windows. These<br />
receive-only windows normally use additional copies of MMTTY, configured with different<br />
"profiles" (e.g. multipath, fluttered, different detection algorithms), or they can be used with<br />
additional TNCs or TUs. You can use any of the possible digital interface engines in the main DI<br />
window (MMTTY, MMVARI, Fldigi or a TNC/TU), but regardless of which engine is used in the<br />
main window, the additional receive-only windows can only use MMTTY or a hardware decoder.<br />
The receive-only windows are invoked from the DI window's Setup > Open Add. Rx Window (4<br />
Avail.) menu item - the number in the menu item indicates how many of these windows are<br />
unused and still available. The first time one of these windows is opened, its Setup window will<br />
be displayed.<br />
221 of 319 2/2/<strong>2011</strong> 4:35 PM
The setup information that must be entered includes the engine type (MMTTY, TNC or Dxp38),<br />
the path to the copy of MMTTY for that window (if used), and/or the COM port information for a<br />
TNC (if used).<br />
After the setup information has been entered, the window should be closed and re-opened, and<br />
then it will be available for use.<br />
Digital Setup<br />
In this Section...<br />
Digital Setup<br />
1. Setup Overview<br />
1.1. Downloading and Installing MMTTY<br />
1.2. Downloading and Installing Fldigi<br />
1.3. Setting Up the Configurer<br />
2. The Digital Interface - Window<br />
2.1. Callsign coloring<br />
2.2. Mouse Assignments<br />
2.3. Keyboard Assignments<br />
3. The Digital Interface - Menu Selections<br />
http://n1mmtw61.semdxa.org/tiki-print_multi_pages.php?printstructures...<br />
222 of 319 2/2/<strong>2011</strong> 4:35 PM
1. Setup Overview<br />
3.1. Selection: Soundcard as Interface<br />
3.2. Selection: OTHER<br />
4. The Digital Interface - Setup<br />
4.1. Tab: General/MMTTY Setup<br />
4.2. Tab: MMVARI Setup<br />
4.3. Tab: Macro Setup<br />
4.4. Tab: WAE RTTY Configuration<br />
http://n1mmtw61.semdxa.org/tiki-print_multi_pages.php?printstructures...<br />
Setting up an interface involves configuring the <strong>Logger</strong> for the selected interface. Configuring has<br />
to be done within <strong>N1MM</strong> logger in a few places, including the Configurer as well as the Digital<br />
Interface window. If you are using MMTTY for FSK RTTY, you will also have to perform some<br />
configuration from within MMTTY. If you use Fldigi, there is some configuration that must be done<br />
from within Fldigi.<br />
Before you can use MMTTY, you will have to download and install it. Likewise, before you can<br />
use Fldigi, you will have to download and install it. This process is described in the next two<br />
sub-sections. You do not need to download or install any additional files or programs to use<br />
MMVARI or a TU/TNC.<br />
A brief note about hardware connections for sound card digital modes (using MMTTY, MMVARI or<br />
Fldigi). These depend on the radio, the sound card and the interface (if any) in use, and it is<br />
impossible to cover all of the possibilities in detail, but the following general comments apply.<br />
First, you must have some means of connecting the radio's audio output to the sound card's<br />
input. The ideal connection would be from a fixed-level ("line out") output on the radio to a "line<br />
in" input on the sound card. If your radio has one receiver, this will probably use the left channel<br />
of the sound card; with dual receivers, the second receiver may use the right channel. If your<br />
sound card does not have a line level input, you may need to use a microphone input, and in this<br />
case you may need an attenuator to reduce the line level output from the radio to the lower level<br />
needed for the microphone level input on the sound card.<br />
To transmit, there must be some means to convey modulation from the computer to the radio. For<br />
FSK RTTY, this is an on-off keying signal, which is normally generated by a serial port connected<br />
to the radio's FSK keying input through a simple keying circuit. This serial port cannot be the<br />
same port that is used for radio control or for a Winkey or other serial device. If it is a USB-toserial<br />
adapter, you will probably need to use MMTTY's EXTFSK plugin. If you are using MMVARI<br />
for RTTY using FSK keying, select the appropriate plugin (FSK8250 for true serial ports, EXTFSK<br />
for USB-to-serial adapters) in the Configurer under the Digital Modes tab).<br />
For AFSK RTTY and for all other sound card digital modes (e.g. PSK31), there must be a<br />
connection from the sound card's output ("line out", or speaker or headphone output) to the<br />
radio's audio input. If the only audio input on the radio is a microphone input, you may need<br />
attenuation to reduce the level to avoid overdriving the transmitter.<br />
223 of 319 2/2/<strong>2011</strong> 4:35 PM
You also need some means to control TX/RX switching (PTT). The most common method is to<br />
use hardware PTT control from a serial or parallel port via a simple keying circuit. Hardware PTT<br />
can be controlled either from the digital "engine" (MMTTY, MMVARI or Fldigi), or from <strong>N1MM</strong><br />
<strong>Logger</strong> itself. To use serial port PTT from the digital engine, you must use a different port from the<br />
one that is used by the <strong>Logger</strong> for radio control. If you have a serial port set up for FSK keying,<br />
you can use a control line (RTS or DTR) on this same port for PTT control from the digital engine.<br />
If PTT is controlled from a digital engine rather than from the <strong>Logger</strong>, you should check the<br />
Digital box for that serial port in the Configurer and make sure to indicate the appropriate Dig<br />
Wnd Nr (1 for DI1, 2 for DI2).<br />
If you do not have a separate serial or parallel port available for PTT in digital modes, you can<br />
control PTT directly from the <strong>Logger</strong>. For example, if your radio control interface supports PTT<br />
using RTS or DTR on the radio control serial port, you can configure the <strong>Logger</strong> to use this<br />
method. If no method of hardware PTT control is available and if your radio supports PTT via<br />
radio command, you can use software PTT control from the <strong>Logger</strong>. Warning: Using both<br />
software and hardware PTT control at the same time can cause problems; do not use both<br />
methods in parallel.<br />
As an alternative to hardware and software PTT control, you may be able to use VOX. This does<br />
not work with all radios, it cannot be used for FSK RTTY, and setting of audio levels and VOX<br />
triggering levels can be tricky, but some users have found this to be the simplest method of PTT<br />
control, since it does not require any additional hardware connections.<br />
1.1. Downloading and Installing MMTTY<br />
http://n1mmtw61.semdxa.org/tiki-print_multi_pages.php?printstructures...<br />
MMTTY is not installed as part of the installation of <strong>N1MM</strong> <strong>Logger</strong>. It must be downloaded and<br />
installed separately. It is possible to use <strong>N1MM</strong> <strong>Logger</strong> in RTTY without using MMTTY (e.g. by<br />
only using an external TNC, or AFSK RTTY from MMVARI). If you intend never to use MMTTY,<br />
you can skip the rest of this section. However, most RTTY users will probably want to have the<br />
ability to use MMTTY, at least as an option. In particular, if you would like to make use of the<br />
additional RX windows for "diversity decode", you will most likely need to install MMTTY (unless<br />
you have several TUs/TNCs you can use for the purpose).<br />
If you do not have a copy of MMTTY, then before continuing with the digital setup it is<br />
recommended that you download a copy of the MMTTY installer from the MM HamSoft website at<br />
http://mmhamsoft.amateur-radio.ca/ . You can find a copy of the full installer for the current<br />
version of MMTTY at that website. This file is a self-extracting executable, similar to the <strong>N1MM</strong><br />
<strong>Logger</strong> installer. Download the file to a temporary folder and then execute it. It is recommended<br />
that you install MMTTY in its own program folder and not in the <strong>N1MM</strong> <strong>Logger</strong> program folder. By<br />
default, the installer will install MMTTY to C:\Program Files\MMTTY\ .<br />
If you already have a copy of MMTTY installed on your computer, you can use that copy from<br />
<strong>N1MM</strong> <strong>Logger</strong>. However, if you also use MMTTY stand-alone, it is possible that you may want (or<br />
need) to have a different setup for stand-alone use than with <strong>N1MM</strong> <strong>Logger</strong> (e.g. if you use the<br />
radio control port from within MMTTY stand-alone; this is not possible when MMTTY is used with<br />
224 of 319 2/2/<strong>2011</strong> 4:35 PM
the <strong>Logger</strong>). If you need a different setup with the <strong>Logger</strong> than the one you use stand-alone, then<br />
you should create a separate folder for each copy (for example, you can create a sub-folder<br />
inside either the <strong>N1MM</strong> <strong>Logger</strong> program folder or the MMTTY program folder for the second copy<br />
of MMTTY). You need to copy only the MMTTY.exe and UserProfile.ini files from the main MMTTY<br />
folder into the additional folder. MMTTY will create a separate copy of MMTTY.ini when it is run.<br />
If you plan to use two copies of MMTTY in SO2V or SO2R mode, one for each received audio<br />
stream, you will need to create two copies in separate folders with different configurations. In<br />
SO2V, one of these copies can be configured to use the left channel and the other copy to use<br />
the right channel of a single sound card. In SO2R, you can either use a stereo sound card as in<br />
SO2V, or you can use two separate sound cards, one for each radio.<br />
If you want to use MMTTY for diversity decoding in additional RX windows, you will need to create<br />
another separate sub-folder for each additional RX window. For example, you can create<br />
sub-folders called DI1, DI2, DI1RX1, DI1RX2, DI2RX1 and DI2RX2 so that you can run up to six<br />
copies of MMTTY simultaneously; one for each main DI window, plus up to 4 additional RX<br />
windows (two additional windows for each DI window). Into each of these windows, you need only<br />
copy the MMTTY.exe and UserPara.ini files from the main MMTTY program folder created when<br />
you first installed it. Each copy will then be configured to use the appropriate sound card and<br />
channel. The "Additional RX" copies use the same sound card and channel as the parent copy in<br />
the main DI window, but they can be configured to use different decoding algorithms or profiles to<br />
give you "diversity decoding", i.e. two or three different decoding methods used on the same<br />
receive audio.<br />
Note for users of Windows Vista and Windows 7: User Account Control (UAC) in these versions of<br />
Windows prevents user programs from writing configuration information into the Program Files<br />
path. Even if programs are run with Administrator privileges, UAC may interfere with the ability to<br />
use separate configuration files for separate copies of the same program. Therefore, it is<br />
suggested that the folders for the extra copies of MMTTY used in the two DI windows and the<br />
four RX windows should not be in the Program Files path. It is suggested that you create a new<br />
folder outside the Program Files path, such as C:\Ham Radio\MMTTY, and then place the<br />
individual sub-folders for the separate copies of MMTTY within that folder.<br />
Once MMTTY has been downloaded and installed, you can proceed to use the Configurer to set<br />
up <strong>N1MM</strong> <strong>Logger</strong> to use it.<br />
1.2. Downloading and Installing Fldigi<br />
http://n1mmtw61.semdxa.org/tiki-print_multi_pages.php?printstructures...<br />
FLdigi is not installed as part of the installation of <strong>N1MM</strong> <strong>Logger</strong>. It must be downloaded and<br />
installed separately. It is possible to use <strong>N1MM</strong> <strong>Logger</strong> in RTTY and PSK contests without using<br />
Fldigi. Fldigi supports a wide range of other digital modes, but most of these are rarely used for<br />
contesting. If you intend never to use Fldigi, you can skip the rest of this section.<br />
If you do not have a copy of Fldigi, then before continuing with the digital setup it is<br />
recommended that you download a copy of the Fldigi installer from the W1HKJ website at<br />
http://www.w1hkj.com/ . You can find a copy of the full installer for the current version of Fldigi<br />
225 of 319 2/2/<strong>2011</strong> 4:35 PM
at that website. This file is a self-extracting executable, similar to the <strong>N1MM</strong> <strong>Logger</strong> installer.<br />
Download the file to a temporary folder and then execute it. It is recommended that you install<br />
Fldigi in its own program folder and not in the <strong>N1MM</strong> <strong>Logger</strong> program folder. By default, the<br />
installer will install Fldigi to C:\Program Files\Fldigi-x.xx.xx\, where x.xx.xx is the Fldigi version<br />
number.<br />
Note that Fldigi cannot be configured to use a single channel of a stereo sound card; Fldigi<br />
always uses its sound card in mono mode on receive. If you want to use Fldigi in a two-receiver<br />
configuration, either SO2V or SO2R, you will have to use two separate sound cards. You will also<br />
need to install two separate copies of Fldigi in separate folders, one for each DI window, in order<br />
to be able to configure each one for a separate sound card. It is suggested that you do a full<br />
install for each copy, but do not create Start menu or Desktop shortcuts for the second copy. As<br />
with MMTTY, users of Windows Vista and Windows 7 may find it necessary to install one or both<br />
of these copies outside the Program Files path.<br />
You do not need to install separate copies of Fldigi for additional RX windows, because this<br />
feature is not implemented for Fldigi or MMVARI engines, only for MMTTY and hardware<br />
TUs/TNCs.<br />
1.3. Setting Up the Configurer<br />
http://n1mmtw61.semdxa.org/tiki-print_multi_pages.php?printstructures...<br />
There are three tabs in the Configurer that need to be set up when configuring <strong>N1MM</strong> <strong>Logger</strong> for<br />
digital modes. The first is the Hardware tab, where serial ports used for digital modes are set up.<br />
226 of 319 2/2/<strong>2011</strong> 4:35 PM
http://n1mmtw61.semdxa.org/tiki-print_multi_pages.php?printstructures...<br />
The Digital box in the main Configurer window indicates to the <strong>Logger</strong> that this port is used<br />
for digital mode control.<br />
Use this to indicate a port that is used for an external TNC<br />
Use this to indicate a port that is used for FSK keying with MMTTY<br />
A port that is used for FSK must also be configured inside the MMTTY setup.<br />
This includes ports used with EXTFSK<br />
It is possible to use a port in the range COM9-COM16 for FSK with MMTTY. In<br />
this case, there is no Digital box to be checked; the port must be configured<br />
entirely within MMTTY<br />
Use the Digital box to indicate a port that is used for PTT in AFSK RTTY or other<br />
digital modes with MMTTY, MMVARI or Fldigi<br />
Exception: If PTT is done from a radio control port or from a Winkey, do not<br />
check the Digital box for that port<br />
It is possible to share a port for both serial port CW keying (e.g. on DTR) and for<br />
PTT and FSK using MMTTY for RTTY (e.g. on RTS and TxD of the same port).<br />
In this case, check both Digital and CW/Other for that port. When in CW mode,<br />
the settings in the DTR and RTS boxes will determine how the port is used; in<br />
RTTY, it will be the settings in MMTTY that determine how the port is used<br />
227 of 319 2/2/<strong>2011</strong> 4:35 PM
In the Set window for each of these serial ports, the radio and the DI window associated with the<br />
port is configured.<br />
The Radio Nr box indicates which radio this digital interface is for in SO2R mode; in SO2V<br />
and SO1V, Radio Nr is always = 1<br />
The Dig Wnd Nr indicates whether this port is used for DI1 or DI2. This applies to SO2V<br />
and SO2R; in SO1V, Dig Wnd Nr is always = 1<br />
You must choose a Dig Wnd Nr for each port that has the Digital box checked;<br />
otherwise the program will not assign the port to a DI window!<br />
The next tab to be set up is the Digital Modes tab.<br />
http://n1mmtw61.semdxa.org/tiki-print_multi_pages.php?printstructures...<br />
228 of 319 2/2/<strong>2011</strong> 4:35 PM
MMTTY (if used)<br />
Digital Interface 1/2 (left part of window)<br />
TU Type: Soundcard<br />
DI-1/2 MMTTY Setup (upper right part of window)<br />
MMTTY Mode: Select AFSK or FSK<br />
MMTTY Path: Select path to MMTTY.EXE<br />
The path does not need to be in the <strong>N1MM</strong> <strong>Logger</strong> program directory<br />
The paths for the two DI windows do not need to be the same<br />
SO2V/SO2R in MMTTY<br />
You can use MMTTY with both receivers in a two-receiver setup with a single sound card. You<br />
will need to install two copies of MMTTY in two separate program folders in order to allow one<br />
copy to be configured to use the left channel of the sound card and the other copy to be<br />
configured to use the right channel of the sound card.<br />
MMVARI (if used)<br />
Digital Interface 1/2 (left part of window)<br />
TU Type: Soundcard<br />
DI-1/2 MMVARI Setup (bottom part of window)<br />
http://n1mmtw61.semdxa.org/tiki-print_multi_pages.php?printstructures...<br />
229 of 319 2/2/<strong>2011</strong> 4:35 PM
MMVARI RTTY Mode: Select AFSK or FSK<br />
FSKPort: (FSK only)<br />
Choose FSK8250 if you are using a true serial port or a device that can<br />
simulate a serial port and handle 5-bit codes at low speeds (this does not<br />
include most USB-to-serial adapters, but it does include some commercial<br />
interfaces designed to support FSK RTTY as well as some multi-port<br />
USB-to-serial adapters)<br />
When MMVARI is opened for FSK RTTY, a small window labelled<br />
MMVARIFSK1 1.04 will open, or appear on the Windows Task bar. In<br />
this window you select the COM port number and the signal line to<br />
be used for PTT (RTS or DTR). FSK keying will be done on the TxD<br />
line. If this is a USB device that simulates a serial port, check<br />
Limiting speed. You can use the _ box at the top right to minimize<br />
this window after completing the setup<br />
FSK8250 supports all of the RTTY speeds supported by MMVARI and<br />
the selected COM port or device<br />
Choose EXTFSK if you are using a regular USB-to-serial adapter<br />
When MMVARI is opened for FSK RTTY, a small window labelled<br />
EXTFSK 1.06 will open, or appear on the Windows Task bar. In this<br />
window you select the COM port number and the signal lines to be<br />
used for FSK keying (normally TxD) and PTT (RTS or DTR). You can<br />
use the _ box at the top right to minimize this window after<br />
completing the setup<br />
The only RTTY speed supported by EXTFSK is 45.45 baud<br />
SO2V/SO2R in MMVARI<br />
You can use MMVARI with both receivers in a two-receiver setup with a single sound card. In<br />
the DI Window's Digital Setup dialog box under the MMVARI Setup tab, simply configure the<br />
DI1 SoundCard to use the left channel and the DI2 SoundCard to use the right channel.<br />
Fldigi (if used)<br />
Digital Interface 1/2 (left part of window)<br />
TU Type: Soundcard<br />
DI-1/2 Fldigi Setup (lower right part of window)<br />
Fldigi Path: Select path to fldigi.exe<br />
The paths for the two DI windows do not need to be the same<br />
SO2V/SO2R Limitation in Fldigi<br />
http://n1mmtw61.semdxa.org/tiki-print_multi_pages.php?printstructures...<br />
230 of 319 2/2/<strong>2011</strong> 4:35 PM
http://n1mmtw61.semdxa.org/tiki-print_multi_pages.php?printstructures...<br />
There is a basic limitation in the Fldigi engine which can make it harder to use in dual-receiver<br />
situations (SO2R and SO2V). Fldigi always receives in mono mode. If you are using a stereo<br />
sound card to decode two receivers, with one receiver in the left channel and the other<br />
receiver in the right channel, Fldigi will combine the two receivers in its waterfall. It doesn't<br />
matter whether Fldigi is the interface engine in DI1 or DI2, it will see the audio from both<br />
receivers.<br />
Therefore, if you want to use Fldigi with both receivers in a two-receiver setup, you will need<br />
to use two separate sound cards for the two receivers. You will also need to install two copies<br />
of Fldigi in two separate program folders in order to allow a different sound card to be<br />
configured in each copy.<br />
External TNC (if used)<br />
Digital Interface 1/2 (left part of window)<br />
TU Type: Other<br />
Set other parameters appropriately for the TNC in use (Example settings: 9600,<br />
8, N, 1, Xon-Xoff)<br />
The third tab to be set up is the Mode Control tab, which determines what mode the radio will be<br />
set to use in RTTY and PSK.<br />
231 of 319 2/2/<strong>2011</strong> 4:35 PM
The available choices in the list boxes under Mode sent to radio will depend on the particular<br />
radio type. For FSK RTTY, the correct choice will normally be RTTY. For AFSK RTTY, depending<br />
on the radio the appropriate choice might be AFSK or LSB/USB. For PSK and other sound card<br />
modes, the radio mode would be PSK (if available), AFSK-R (on some radios) or USB on most<br />
radios. For more information, see the Configurer page under the Config >Mode Control tab.<br />
2. The Digital Interface - Window<br />
http://n1mmtw61.semdxa.org/tiki-print_multi_pages.php?printstructures...<br />
The Digital Interface window is nearly the same regardless of which type of interface (MMTTY,<br />
MMVARI, FLDIGI or TNC) is being used. Its appearance (foreground and background font colors)<br />
can be customized using the Settings > Setup menu item.<br />
232 of 319 2/2/<strong>2011</strong> 4:35 PM
http://n1mmtw61.semdxa.org/tiki-print_multi_pages.php?printstructures...<br />
The Digital Interface is opened from the Entry window's Window > Digital Interface menu item. If<br />
you are using two entry windows (SO2V/SO2R), each entry window has a separate DI window<br />
associated with it - DI1 with the VFO A/Radio 1 Entry window, and DI2 with the VFO B/Radio 2<br />
Entry window. Each DI window is opened from its corresponding Entry window's menu bar.<br />
The Digital Interface caption displays either the offset frequency (radio's dial frequency +/- audio<br />
frequency) or the radio's dial frequency, depending on what you have chosen in the Digital<br />
Setup.<br />
TX - Indicator to show which window has transmit focus (useful when using two sessions<br />
like SO2R)<br />
Letters/Figs - Shows the text under the mouse in reverse case (letters/figures switched)<br />
MouseOver - Shows the text under the mouse; this is the text that would be selected by a<br />
mouse click<br />
Top RX window - This is the receive window. This is the window used for making QSOs.<br />
There are 2 ways of placing a callsign into the callsign window of the <strong>Logger</strong>. You can<br />
single click on a callsign and it will transfer over to the main logging window, or, whenever a<br />
callsign is detected in the RX window it will be sent to the callsign grab window for easy<br />
movement to the logging window by clicking the Grab button. By clicking on the colored bar<br />
on the left you can pause input to the receive window to scroll back through the (last 2000<br />
lines of) text using the scroll bars. When the window is paused the color of the bar will turn<br />
Yellow. To turn input to the window back on click in the bar again and everything that was to<br />
be printed to the window will now enter the window. When the receive window is paused it<br />
is possible to select and copy text in the window.<br />
Bottom TX window - This is the transmit window, a free form typing window. If you click on<br />
the TX button the cursor will be placed into this window and what ever is typed will be sent.<br />
The size is static and doesn't change size (2 lines). For TNC users: when not transmitting,<br />
anything typed in the TX Window will be sent to the TNC. Used to change settings etc.<br />
Callsign Textbox and Grab - When a callsign is encountered in one of the receive<br />
windows it will be placed in this textbox and when you press the Grab button it will transfer<br />
the callsign over to the main Entry window. The grab callsign window holds the last 10<br />
233 of 319 2/2/<strong>2011</strong> 4:35 PM
callsigns seen in the RX window. The most current one is at the top and is highlighted.<br />
Dupe callsigns will not be shown in the grab window. The Sort Order in the grab window<br />
can be selected by right-clicking; you can choose either Last In First Out or First In First Out<br />
as the sort order<br />
Callsign not added to grab List<br />
If the callsign in the callsign field in the Entry window is the same as the callsign in the<br />
received text, the call in the Entry window does not get placed into the grab call list.<br />
Macro buttons - These buttons on the Digital Interface are (max.) 24 extra macro buttons<br />
for preprogrammed messages. Configuring these macro buttons is done in the Digital<br />
Interface window under 'Setup | Settings' or by right clicking on them which brings up the<br />
Digital setup dialog. The macro buttons widths dynamically adjust in relation to the width of<br />
interface<br />
Clr RX - Clear the receive window (also possible using the right click menu)<br />
Align (MMTTY and Fldigi only) - This is used to move the signal that you are copying into<br />
the pass band of your filters. Set the frequency in the setup area. For example, if your filters<br />
are centred on 2210 Hz, RTTY signals close to the 2125/2295 Hz pair will be copied well,<br />
but signals at higher or lower frequencies may not make it through the filters. If you click on<br />
such a signal to decode it, it may not decode very well. After clicking on the signal, if you<br />
click on the Align button your transceiver will be retuned to line the signal up on the<br />
configured frequency. This is essential in FSK where the transmit frequencies are fixed in<br />
the radio, and useful also in AFSK if you want to use narrow filters<br />
Note that when you are using the MMVARI interface engine, the Align button appears<br />
on the MMVARI window instead of on the Digital Interface window<br />
TX - Start the RTTY transmission, the transceiver is keyed. Will be colored Red when<br />
transmitting<br />
RX - Stop the RTTY transmission - the transceiver changes back to receive. Will be colored<br />
Green when in receive<br />
AFC (MMTTY only) - Can be used to turn MMTTY's AFC on or off (colored background<br />
means AFC is on)<br />
HAM (MMTTY only) - Restore the MMTTY frequency and shift settings to the HAM default<br />
Lock (Fldigi only) - Locks the transmit frequency at the current location. If you move the<br />
receive frequency, e.g. by clicking elsewhere in the waterfall, the transmit frequency does<br />
not change. Used for operating split<br />
Rev (Fldigi only) - In sideband-sensitive modes like RTTY, reverses the tones (e.g. opposite<br />
sideband)<br />
Grab - Transfer the selected callsign in the Callsign textbox to the callsign field on the main<br />
logger window. Once the callsign is filled, whatever you click on next will fill the next box to<br />
have info entered in. When the Digital Interface is in transmit, calls are not added to the<br />
Grab window<br />
CLR - Clear the Grab list<br />
2.1. Callsign coloring<br />
http://n1mmtw61.semdxa.org/tiki-print_multi_pages.php?printstructures...<br />
234 of 319 2/2/<strong>2011</strong> 4:35 PM
When a callsign is recognized in the receive input stream the callsign will be colored and brought<br />
to the Grab window. Valid callsigns that are separated by spaces are always recognized, and<br />
optionally the Search routine can be used to search for known call signs from the Master.dta file<br />
in garbage text strings. When the search in garbage text is enabled and two calls are found in<br />
the same string, only the last one gets highlighted. Also, if the call sign being copied contains a<br />
shorter call sign that is in the Master.dta file, using the search in garbage feature may result in<br />
the shorter call sign being recognized instead of the longer one. The highlighted calls in text<br />
strings are clickable.<br />
If the "Use Generic Routines" option is chosen in the Digital Setup, anything that looks like a<br />
callsign will be highlighted with a color that indicates its multiplier status using the same colors as<br />
in the Bandmap and Entry window. If the "Use Master.dta File" option is chosen, only call signs in<br />
the Master.dta file will be colored according to the multiplier status; callsigns that are not in the<br />
Master.dta file will be given a different highlight color to indicate that they were not found in<br />
Master.dta. Regardless of which option is chosen, any callsign that passes the check routines will<br />
be placed in the Grab window.<br />
2.2. Mouse Assignments<br />
http://n1mmtw61.semdxa.org/tiki-print_multi_pages.php?printstructures...<br />
Left mouse key clicking<br />
Single clicking on a callsign grabs it and places it in the Callsign field on the Entry<br />
Window dialog<br />
Single clicking on Exchange info etc. grabs it and places it in the Exchange field on<br />
the Entry Window dialog<br />
NB. The callsign field must be filled first!<br />
Double clicking on a callsign grabs it and overrides the current information in the<br />
Callsign field on the Entry Window dialog<br />
Ctrl+Single clicking - will force what ever you are clicking to be sent to Entry window.<br />
(Must click first in Entry window where you want to place the new data)<br />
Shift+Single clicking - will cause the moused over text to be Letter/Figs converted on<br />
the fly while sending to Entry Window (only in RTTY Mode)<br />
Alt+Single clicking - if Digital Call Stacking is enabled, will transfer the call sign<br />
being clicked on to the Bandmap call stack (see Single Operator Call Stacking for<br />
more information)<br />
Right mouse key clicking on RX window<br />
Will give a menu only when the menu item 'RT Click = Return NOT menu' is NOT<br />
selected!<br />
Clear RX - Clear the receive window. This receive buffer can contain a maximum<br />
of 10,000 characters<br />
Output to Text File - Output the received text to a text file named RTTY1.txt<br />
Help - Show the help file for this window<br />
Right mouse key clicking on TX window<br />
Will give a menu only when the menu item 'RT Click = Return NOT menu' is NOT<br />
selected!<br />
235 of 319 2/2/<strong>2011</strong> 4:35 PM
Clear TX - Clear the transmit window<br />
Paste - Place the TX text in the Paste buffer<br />
Right mouse key clicking in GRAB window<br />
Gives a menu:<br />
Clear List - Clear the entire grab window<br />
Clear Selected Call - Clear the selected call in the grab window<br />
2.3. Keyboard Assignments<br />
Alt+T - Toggle TX/RX, when in TX the cursor will be set to the TX window of the active<br />
interface<br />
Ctrl+K - Toggle TX/RX, and displays the CW/Digital Keyboard window to send manual<br />
information using the keyboard<br />
Alt+G - Grab most recent callsign from callsign textbox. Upon grabbing that callsign gets<br />
deleted from the grab list<br />
Ctrl+Left/Right arrows - When 2 radios are configured and 2 digital windows are open<br />
(SO2V or SO2R), pressing Ctrl+Left arrow or Ctrl+Right arrow will swap from one active<br />
Digital Interface to the other. Digital Interface 1 will follow VFO A/Radio 1, Digital Interface 2<br />
will follow VFO B/Radio 2<br />
3. The Digital Interface - Menu Selections<br />
The digital interface has a menu at the top which is also a little different per type of interface<br />
selected. As the differences are minimal, the menu items for all interfaces can be found below.<br />
3.1. Selection: Soundcard as Interface<br />
http://n1mmtw61.semdxa.org/tiki-print_multi_pages.php?printstructures...<br />
Setup<br />
Settings - Setting up the Digital Interface, see the paragraph 'Setting up the Digital<br />
Interface' below<br />
Turn AutoTRXUPdate On/Off<br />
If your radio's dial displays the actual transmitted frequency (i.e. the Mark<br />
frequency in FSK RTTY), you would turn this option off<br />
If your radio's dial displays the suppressed carrier frequency (e.g. SSB mode),<br />
you would turn this option on. This causes the program to add (USB) or subtract<br />
(LSB) the audio frequency from the digital engine to/from the radio's dial<br />
frequency so that the frequency that appears in the Entry window, the<br />
Bandmap, the log and spotted to the DX cluster is the actual transmitted<br />
frequency, not the suppressed carrier frequency<br />
Bring to Foreground when made Active - Bring the Digital Interface and Engine to<br />
236 of 319 2/2/<strong>2011</strong> 4:35 PM
http://n1mmtw61.semdxa.org/tiki-print_multi_pages.php?printstructures...<br />
the foreground when its Entry window has focus<br />
This adds ability to stack Digital Interfaces and Engines and have the correct<br />
one on top when the associated Entry window has focus<br />
SoundCard<br />
Receive Mixer - Shows the Record control mixer dialog from the Windows<br />
operating system. Only for Windows versions XP and earlier<br />
Transmit Mixer - Shows the Play control mixer dialog from the Windows<br />
operating system. Only for Windows versions XP and earlier<br />
These menu items are not available when using the Fldigi engine<br />
Setup MMTTY - The MMTTY setup is shown. This menu item is only visible when<br />
MMTTY is selected<br />
AFC On/Off with CQ - If set then the AFC will turn on with CQ message or TU<br />
messages<br />
NET On/Off with Run Change - Option to turn Net function on in S&P and off in<br />
Running mode<br />
Turn Hover Mode On/Off - With hover mode when you hold the mouse over a valid<br />
call sign it places the callsign in callsign field in the Entry Window without having to<br />
click on it<br />
Where this works in use with 'Right click send Enter' is you hover over the call<br />
then right click to plant the call and send your call when the station comes back<br />
to you you click on the exchange to place it in Entry Window. Right click again<br />
send TU and logs the Q. Right click, left click,right click and you're done...<br />
Note: Your own call is excluded from being picked up<br />
Hover mode is used in conjunction with the menu selection 'Rt Click= Return<br />
NOT menu'<br />
RT Click = Return NOT menu - When selected right clicking in the DI RX window will<br />
send a Return instead of displaying a pop up menu<br />
Check the menu item Hover mode for additional information<br />
Send Text File - Send a text file. A file section dialog will open<br />
Enable Digital Call Stacking - Used together with the {LOGTHENPOP} macro. See<br />
Single Operator Call Stacking for more information<br />
Open Add. RX Window (4 Avail.) - This allows you to open an auxiliary RX window<br />
for diversity decoding of the same RTTY signal, e.g. by using a TNC in the main DI<br />
window and MMTTY in the auxiliary window, or by using a different copy of MMTTY<br />
with a different decoding algorithm to decode the same audio input<br />
There are up to 4 such windows available. They can be called up from either DI1<br />
or DI2<br />
Interface<br />
MMTTY - Select MMTTY or Other (TNC) as the interface<br />
Requires MMTTY to be installed and the DI-1/2 path(s) to MMTTY to be set up in<br />
the Configurer<br />
MMVARI - Select MMVARI as the interface<br />
No other installation required - the MMVARI engine is installed during the <strong>N1MM</strong><br />
<strong>Logger</strong> install<br />
Fldigi - Select Fldigi as the interface<br />
Requires Fldigi to be installed and the DI-1/2 path(s) to Fldigi to be set up in the<br />
237 of 319 2/2/<strong>2011</strong> 4:35 PM
Configurer<br />
Help - Shows help file<br />
3.2. Selection: OTHER<br />
Setup<br />
Settings - Setting up the Digital Interface, see chapter below (Setting up the Digital<br />
Interface)<br />
Load TNC Settings File - Ability to load the TNC settings file named 'SETTINGS.TXT'<br />
to the TNC. An example file which can be used for the PK-232 can be found on the<br />
website when selecting 'Other Files'<br />
Mode<br />
RTTY - Select RTTY as mode<br />
PSK - Select PSK as mode<br />
Help - Shows help file<br />
4. The Digital Interface - Setup<br />
This setup dialog is for both MMTTY and MMVARI, this means that some settings are only for<br />
MMVARI, MMTTY or both. When selecting 'Setup | Settings' in the Digital Interface window a<br />
dialog like the one below will shown. Any changes made in the setup form must be saved by<br />
clicking the Save Configuration Button located on the bottom of the form. Any changes made and<br />
saved will be changed as soon as the setup area closes.<br />
4.1. Tab: General/MMTTY Setup<br />
http://n1mmtw61.semdxa.org/tiki-print_multi_pages.php?printstructures...<br />
This interface has general setup information for ANY type of interface (Soundcard of external<br />
TNC) and some specific settings for MMTTY, MMVARI and Fldigi.<br />
238 of 319 2/2/<strong>2011</strong> 4:35 PM
http://n1mmtw61.semdxa.org/tiki-print_multi_pages.php?printstructures...<br />
Display Radio Freq and not Exact Freq in DI Caption<br />
Check this option if you are using a radio mode that displays the actual transmitted<br />
frequency rather than the suppressed carrier frequency (e.g. FSK RTTY)<br />
Note that this setup option only affects the frequency that is displayed in the DI<br />
window. To change the frequency that is sent to the Entry window and recorded in the<br />
log, see the DI window's Setup > Turn AutoTRXOffset On/Off menu item<br />
Add Callsign to Bandmap on Alt+G - (MMTTY and PSK) Option to send callsign from<br />
station in callsign field (Alt+O) when doing a grab (Alt+G)<br />
Remove Excess Linefeeds from RX Window - Ability to strip excess linefeeds from RX<br />
Window<br />
Send Space on Using Grab - Setting for sending space after grabbing call from grab<br />
window<br />
(MMTTY) Send HamDefault on Run to S&P change - (MMTTY only) Ability to have Ham<br />
Default(MMTTY) sent when going from Run to S&P to reset Mark Frequency. Select to<br />
enable<br />
(MMTTY-MMVARI) Turn AFC Off when switching to S&P - (MMTTY and PSK) Ability to<br />
Turn AFC Off when going from Run to S&P. Select to enable. Many people when in<br />
Running mode will leave the Net Off and turn on AFC to find people coming back to them a<br />
239 of 319 2/2/<strong>2011</strong> 4:35 PM
http://n1mmtw61.semdxa.org/tiki-print_multi_pages.php?printstructures...<br />
little off frequency. So to turn the AFC back off when you go to S&P (without forgetting) this<br />
setting comes in handy<br />
Do Not add Dupes to Grab Window - Setting for adding dupes to Grab window or Not<br />
Send Space on Using Grab - when doing a grab from the grab window it will also send a<br />
space press command to Entry window to advance the cursor<br />
If QSY Wipes call is checked Clear Grab Window on QSY - If QSY Wipes and Spot call<br />
is checked then Clear the Grab window on wipe of callsign.<br />
QSY will clear Grab Window - Changing frequency will clear the Grab window<br />
Clear Grab Window On CQ - sending CQ will clear the Grab window<br />
Callsign Validity Routines<br />
Use Generic Routines - the generic routines will highlight anything that passes the<br />
check routines (and probably will look like a callsign)<br />
Use master.dta File - when selected only the callsigns in the master.dta file will be<br />
highlighted<br />
Highlight Color for non-Master.dta calls will be shown in the shown color.<br />
Use Search routine to find Master.dta in Garbage Text - ability to turn off checking<br />
for callsigns in garbage text in digital modes<br />
Highlight Foreground Text - call sign text will be in the highlight color on the normal<br />
background<br />
Highlight Background of Text - background color surrounding call sign will be<br />
changed to the highlight color<br />
Digital Interface Window Colors<br />
The RTTY receive and transmit window background colors, RX text color and own<br />
callsign color in RX window can be changed here<br />
Digital Interface RX Window Font Selection - Change the font and character size for the<br />
RX channels. Press the 'Set Font' button to get a selection window<br />
You must close the Digital Window and reopen it so the changes can take effect<br />
MMTTY Window Settings<br />
Normal - The normal size MMTTY window is shown, including waterfall/spectrum,<br />
menu bar and control buttons<br />
Small - The small size MMTTY window is shown, i.e. waterfall/spectrum display only<br />
Control Menu's - Shows waterfall/spectrum plus menu bar<br />
Control Button's - Shows waterfall/spectrum plus control buttons<br />
Give MMTTY Help Starting - Turn MMTTY kick-starts off and on<br />
240 of 319 2/2/<strong>2011</strong> 4:35 PM
http://n1mmtw61.semdxa.org/tiki-print_multi_pages.php?printstructures...<br />
Having trouble getting MMTTY to start?<br />
If you are having trouble getting MMTTY to initialize when the DI window starts up, here are<br />
some things to try: First, upgrade to the latest version of MMTTY. Several cases of failure to<br />
start have been solved by updating to version 1.68A. Next, if that doesn't work, try checking<br />
the Give MMTTY Help Starting check box. If this box is already checked, try unchecking it.<br />
Preferred RTTY Interface - Select the preferred RTTY interface. Choices are: MMTTY,<br />
MMVARI, TNC or Fldigi<br />
Preferred PSK Interface - Select the preferred interface for PSK (and other sound card<br />
modes). Choices are MMVARI and Fldigi<br />
On Top Settings<br />
MMTTY always on Top - MMTTY is always in front of all other <strong>N1MM</strong> logger windows.<br />
A restart of <strong>N1MM</strong> logger is needed to activate this function. Minimizing the <strong>N1MM</strong><br />
logger program will not minimize the MMTTY engine<br />
MMVARI always on Top - MMVARI is always in front of all other <strong>N1MM</strong> logger<br />
windows. A restart of <strong>N1MM</strong> logger is needed to activate this function. Minimizing the<br />
<strong>N1MM</strong> logger program will not minimize the MMVARI engine<br />
Fldigi always on Top - Fldigi is always in front of all other <strong>N1MM</strong> logger windows. A<br />
restart of <strong>N1MM</strong> logger is needed to activate this function. Minimizing the <strong>N1MM</strong><br />
logger program will not minimize the Fldigi engine<br />
Shift Frequency Compensation - for radios which use/need Shift Frequency<br />
Compensation<br />
Enabled - Select to enable Shift Frequency Compensation<br />
Offset Frequency - the frequency offset<br />
Alignment Frequency - frequency used by the Align button = preferred audio frequency<br />
MMTTY - RTTY alignment frequency. This is the Mark frequency<br />
MMVARI - Alignment frequencies for MMVARI<br />
RTTY - RTTY alignment frequency in MMVARI<br />
NB Add 85 to place Mark Frequency on desired frequency. Example: For<br />
2125 Mark, enter 2210<br />
Other - alignment frequency for other modes than RTTY<br />
FLdigi - Alignment frequencies for Fldigi<br />
RTTY - RTTY alignment frequency in Fldigi<br />
NB Add 85 to place Mark Frequency on desired frequency. Example: For<br />
241 of 319 2/2/<strong>2011</strong> 4:35 PM
2125 Mark, enter 2210<br />
Other - alignment frequency for other modes than RTTY<br />
Save Configuration - Save the made configuration changes. If the changes made should<br />
not be saved select the X in the upper right corner to close the window<br />
4.2. Tab: MMVARI Setup<br />
http://n1mmtw61.semdxa.org/tiki-print_multi_pages.php?printstructures...<br />
MMVARI Engine<br />
Waterfall/Spectrum/Misc Color palette - The colors that make up the color palette<br />
can be changed to represent whatever colors you would like. The colors go from the<br />
weakest signal on the left to the strongest signal on the right. There is a color palette<br />
setting for the Waterfall, Spectrum and for Miscellaneous colors. The Default button<br />
changes the colors back to the default colors<br />
Squelch Level - This level represents the noise level where you would like the<br />
interface to start copying signals. 0 indicates an open squelch and everything will be<br />
decoded<br />
High Pass Filter - Select 'Use High Pass Filter' to use the internal high pass filter for<br />
242 of 319 2/2/<strong>2011</strong> 4:35 PM
http://n1mmtw61.semdxa.org/tiki-print_multi_pages.php?printstructures...<br />
RX. Although this is unnecessary with most soundcards, it sometimes is effective for<br />
eliminating hum in the input audio<br />
Spectrum Lower Frq - the lower frequency to display when the Spectrum view or<br />
Waterfall is active<br />
Spectrum Upper Frq - the upper frequency to display when the Spectrum view or<br />
Waterfall is active<br />
CW ID<br />
Enable - If this check box is checked (Enabled) the interface will send the string<br />
entered in the field (Enter CWID String) in CW after every transmission. A * will<br />
be substituted by SK, + by AR and = by BT<br />
AFC Search Range - This is how far in Hz the interface will track a drifting signal i.e<br />
the frequency sweeping width (+/-Hz) for the AFC<br />
Sense Level - specifies the S/N level (dB) for the wide AFC. When the search<br />
range is less than or equal to 50 Hz, the wide AFC does not function. The sense<br />
level is applied to all the RX channels<br />
Use TNC Software for control - When selected <strong>N1MM</strong> logger will release the serial<br />
port for the TNC so the soundboard in the TNC can have control. When using an<br />
external TNC the internal soundboard can be used<br />
Digital Output Level - specifies the digital output level in the range of 0 to 32767. The<br />
default value is 16384<br />
DI1/DI2 MMVARI Soundcard<br />
MMVARI Soundcard #<br />
Input Soundcard# - Select the input soundcard to be used when there is more<br />
than one soundcard in your computer (maximum 4)<br />
Input Channel - Select the input channel. Mono, Left channel or Right channel<br />
Output Soundcard# - Select the output soundcard to be used when there is<br />
more than one soundcard in your computer (maximum 4)<br />
FIFO<br />
RX - specifies the depth of the RX FIFO. Valid values are 4 to 32<br />
TX - specifies the depth of the TX FIFO. Valid values are 4 to 32<br />
Clock - Soundcard Clock adjustment<br />
RX - specifies the tuning parameters of the RX clock adjustment function<br />
TX Offset - the offset of the TX frequency compared to the RX frequency<br />
Graphical Adjustment - Graphical RX clock adjustment<br />
The computer clock itself is not very accurate (+- 100 ppm); that is why to<br />
use WWV or another precision source to calibrate the soundcard<br />
1. Tune to WWV or another Time Mark; adjust so tick is on 1000 Hz in<br />
Spectrum of MMVARI<br />
2. Wait for line to appear in display and adjust Clock Freq so line appears<br />
straight and not at an angle<br />
3. Click button to save new frequency when line is straight up and down<br />
243 of 319 2/2/<strong>2011</strong> 4:35 PM
MFSK (MFSK only)<br />
Handling Center Frequency - When selected the center frequency is used for the<br />
carrier frequency. When not selected the base tone frequency is used for the carrier<br />
frequency<br />
Use Metric Level Squelch - Select to use the metric level for the squelch. When not<br />
selected the S/N level is used for the squelch<br />
# of MMVARI channels - Number of MMVARI channels to use. Choices are 1, 2, 3 or 4<br />
Note that if this is set to 1, you have the option to select the Multi-Channel Rx menu<br />
item in the MMVARI menu bar, but when it is set to 2, 3 or 4 this option is not available<br />
Save Configuration - Save the made configuration changes. If the changes made should<br />
not be saved select the cross in the upper right corner to close the window<br />
4.3. Tab: Macro Setup<br />
http://n1mmtw61.semdxa.org/tiki-print_multi_pages.php?printstructures...<br />
Digital Macro Set Select Interface Type and Window Number to begin - Update the macros<br />
definitions and button texts<br />
Select an interface (TNC or soundcard DI) from the drop down menu. Choices are:<br />
MMVARI - macros for the MMVARI interface<br />
MMTTY,Fldigi - macros for the MMTTY and Fldigi interfaces<br />
Other - macros for the TNC<br />
244 of 319 2/2/<strong>2011</strong> 4:35 PM
Dxp38 - macros for a DXP38<br />
Click on the macro button which has to be updated<br />
Type the macro text in the field 'Macro Text'<br />
Type the button text in the field 'Macro Caption'<br />
Click on the 'Save Macro' button when satisfied<br />
The selected macro caption text will be shown on the button<br />
Available macros are shown in the box 'Available Macros'. First select a macro button<br />
to see them all<br />
The Macro buttons below (for TNC use only) have to be configured as TX/RX buttons.<br />
Enter what control codes are needed to turn on and off your TNC<br />
Only visible when Other is selected<br />
RX - Receive macro, this will become the contents of the macro {RX}<br />
TX - Transmit macro, this will become the contents of the macro {TX}<br />
ESC - Abort macro, used when pressing the Escape key<br />
Load Macros - Load saved macros from a saved file (*.mc) to the selected Digital Macro<br />
Set<br />
Save Macros - Save macros from the Digital Macro Set to a file (*.mc)<br />
# of Macros - Select the number of macro buttons. You can select 0, 8, 16 or 24<br />
Macro Setup<br />
Macro Text - Area where to create the macro text for the selected macro<br />
Macro Caption - Macro caption from the button<br />
Available Macros - Shows the available macros. Clicking on a macro will transfer it to<br />
the macro text area<br />
Save Macro - Save the created macro<br />
Save Configuration - Save the made configuration changes. If the changes made should<br />
not be saved select the cross in the upper right corner to close the window<br />
4.4. Tab: WAE RTTY Configuration<br />
http://n1mmtw61.semdxa.org/tiki-print_multi_pages.php?printstructures...<br />
This menu item will only show when the WAE RTTY contest has been selected and the<br />
information in this tab is only valid for the WAE RTTY contest.<br />
245 of 319 2/2/<strong>2011</strong> 4:35 PM
RQTC - Under RQTC are the 4 messages to send when receiving a QTC<br />
SQTC - Under SQTC are the 4 messages to send when sending a QTC<br />
Default Number of QTC to Send - maximum of 10 QTC's<br />
When sending request for single QTC do what?<br />
Clear all data for that QTC<br />
Clear only Bad Data<br />
Do nothing just send request<br />
Save Configuration - save the made configuration changes. If the changes made should<br />
not be saved select the cross in the upper right corner to close the window<br />
Digital - MMTTY for RTTY support<br />
In this Section...<br />
Digital - MMTTY for RTTY support<br />
1. MMTTY Windows<br />
2. Download, Configure and Test MMTTY<br />
2.1. Download MMTTY<br />
http://n1mmtw61.semdxa.org/tiki-print_multi_pages.php?printstructures...<br />
246 of 319 2/2/<strong>2011</strong> 4:35 PM
2.2. Configure MMTTY<br />
2.2.1. FSK KEYING<br />
2.2.1.1. Using the RIGblaster Interface for FSK with<br />
<strong>N1MM</strong>/MMTTY Combination<br />
2.2.2. AFSK KEYING<br />
3. Testing MMTTY<br />
4. Dual Receiver/Dual Radio Setup<br />
5. Using MMTTY<br />
5.1. How to Tune RTTY<br />
5.2. When Should I Use AFC<br />
5.3. When Should I Use the NET Option: NET On/Off with Run Change<br />
5.4. Why to Use "Auto Update TRX Offset w/Mark Freq."<br />
5.5. Using MMTTY for 75 baud RTTY<br />
The MMTTY soundcard interface is based on the MMVARI engine by Makoto Mori, JE3HHT.<br />
1. MMTTY Windows<br />
When using MMTTY two windows will open.<br />
the Digital Interface window<br />
is similar for MMTTY, MMVARI, Fldigi and external Interfaces (TNCs or TUs). More<br />
information about external interfaces in the chapter 'Digital - External TNC Support'<br />
the MMTTY engine window -<br />
there are four versions which can be selected in the Digital Interface menu under<br />
Settings.<br />
Small version MMTTY engine window<br />
Normal, or Large version MMTTY engine window<br />
http://n1mmtw61.semdxa.org/tiki-print_multi_pages.php?printstructures...<br />
247 of 319 2/2/<strong>2011</strong> 4:35 PM
Control Menus - small window plus the menu bar (View, Option, Setup)<br />
Control Buttons - large window minus the menu bar<br />
2. Download, Configure and Test MMTTY<br />
2.1. Download MMTTY<br />
Download the current release of MMTTY (see Links chapter for URL)<br />
At least version 1.64 is needed; version 1.68A is recommended<br />
Run the setup program and install this to your computer (preferable) in its own directory<br />
Don't install in the <strong>N1MM</strong> logger directory when using a MMTTY version from before<br />
July 7 20<strong>02</strong>. When uninstalling MMTTY all files in the install directory will be deleted<br />
and with that also <strong>N1MM</strong> logger. MMTTY version 1.64 uses a new installer and does<br />
not have this problem anymore<br />
The NewExe contains the file XMMT.ocx needed for MMTTY version 1.64 or higher and<br />
should be in the <strong>N1MM</strong> <strong>Logger</strong> directory after an update.<br />
2.2. Configure MMTTY<br />
2.2.1. FSK KEYING<br />
http://n1mmtw61.semdxa.org/tiki-print_multi_pages.php?printstructures...<br />
248 of 319 2/2/<strong>2011</strong> 4:35 PM
1. Select >Config >Ports, Telnet Address, Other >Digital Modes tab<br />
Select Soundcard as your Interface type<br />
Select for the selected Digital Interface as MMTTY, Mode FSK<br />
Select the path to your MMTTY directory (for DI-2 if you are configuring for the second<br />
DI window)<br />
Select the 'Hardware' tab<br />
Place a check mark under the Digital column beside the port that you are using for the<br />
digital port<br />
Click on the Set button and set the Dig Wnd Nr to 1 (or 2 if you are configuring for<br />
DI-2)<br />
2. Save and exit<br />
If MMTTY is already loaded you will probably get an error message about not being able to<br />
open port xxxx<br />
3. Open the Digital Interface window (under the Window menu)<br />
http://n1mmtw61.semdxa.org/tiki-print_multi_pages.php?printstructures...<br />
Select the Interface > MMTTY menu item in the DI window<br />
Select: Option > Setup in the MMTTY window, or use the DI window's Setup > Setup<br />
MMTTY menu item<br />
Select the TX tab and under PTT, set the serial port that you will be using for FSK<br />
keying and data; this should be the same port that you checked the Digital box for in<br />
the Configurer<br />
If you are using a USB-to-serial adapter, or a control line other than TxD to do<br />
FSK keying, you will have to select EXTFSK as the serial port and configure the<br />
port and signal line information in the EXTFSK window<br />
Select the Misc tab and check COM-TxD(FSK) for the Tx Port<br />
If you are using a USB device to do FSK keying, click on the USB Port button<br />
and set the option to C. Limiting Speed<br />
Select the Sound Card tab (in MMTTY version 1.66G) and choose the correct sound<br />
card for Reception (the Transmission sound card is not used in FSK)<br />
Close the Setup dialog<br />
Close the 'Digital Interface' to have the <strong>Logger</strong> and MMTTY save the settings<br />
2.2.1.1. Using the RIGblaster Interface for FSK with <strong>N1MM</strong>/MMTTY Combination<br />
The default for FSK via MMTTY is TXD. You'll need to change the jumpers when using a<br />
Rigblaster. Also, make sure you get MMTTY working as a standalone first. Then you should just<br />
be able to specify MMTTY (select Soundcard) in the Digital Interface config in <strong>N1MM</strong> and it<br />
should take off. If you are lucky enough to have a radio where PTT is asserted via radio control (<br />
Kenwood is one) then leave the PTT unchecked in the port setup and checked in the PTT via rig<br />
249 of 319 2/2/<strong>2011</strong> 4:35 PM
control portion.<br />
2.2.2. AFSK KEYING<br />
1. Open the Configurer (Configure Ports, Telnet Address, Other in the Config menu).<br />
Select the Digital Modes tab<br />
Select Soundcard as your Interface type.<br />
Select for the selected Digital Interface as MMTTY, Mode AFSK<br />
Select the path to your MMTTY directory (for DI-2 if you are configuring for the second<br />
DI window)<br />
Select the 'Hardware' tab<br />
Place a check mark under the Digital column beside the port that you are using for the<br />
digital port<br />
Click on the Set button and set the Dig Wnd Nr to 1 (or 2 if you are configuring for<br />
DI-2)<br />
2. Save and exit.<br />
3. Open the Digital Interface window (under the Window menu)<br />
Select the Interface > MMTTY menu item in the DI window<br />
Select: Option > Setup in the MMTTY window, or use the DI window's Setup > Setup<br />
MMTTY menu item<br />
Select the TX tab and under PTT, set the serial port that you will be using for PTT;<br />
this should be the same port that you checked the Digital box for in the Configurer<br />
Select the Misc tab and check Sound for the Tx Port<br />
Select the Sound Card tab (in MMTTY version 1.66G) and choose the correct sound<br />
card for both Reception and Transmission<br />
Close the Setup dialog<br />
Close the 'Digital Interface' to have the <strong>Logger</strong> and MMTTY save the settings<br />
3. Testing MMTTY<br />
MMTTY is also a stand alone application. So testing can be done outside <strong>N1MM</strong> logger.<br />
4. Dual Receiver/Dual Radio Setup<br />
http://n1mmtw61.semdxa.org/tiki-print_multi_pages.php?printstructures...<br />
In a dual-receiver setup (SO2R or SO2V), you may wish to be able to copy two separate RTTY<br />
signals (e.g. on two separate bands) simultaneously. To do this, you would open two Entry<br />
windows (VFO A/Radio 1 and VFO B/Radio 2) and open the Digital Interface window from each<br />
250 of 319 2/2/<strong>2011</strong> 4:35 PM
Entry window. You can then run MMTTY from each of these DI windows.<br />
The two audio streams from the two receivers can either be decoded by two separate sound<br />
cards, or in a single stereo (two-channel) sound card using the left and right channels for the two<br />
receivers. In either of these situations, the two copies of MMTTY must have different<br />
configurations. In the case of a dual radio setup, if you are using FSK on both radios and/or if<br />
MMTTY is used to control PTT on both radios, each copy of MMTTY would also have to have<br />
access to its own serial port for PTT & FSK. This is also true in SO2V setups in order to enable<br />
transmitting from either VFO.<br />
These serial ports are configured in two places: in the <strong>Logger</strong>'s Configurer and in MMTTY. In the<br />
Configurer, you indicate which serial ports are used with check marks in the Digital column (Note:<br />
in order to check two Digital mode ports in the Configurer, you must be in SO2V or SO2R mode).<br />
You must also click on the Set button for each port in the Configurer and set the Dig Wnd Nr to 1<br />
or 2, to indicate which of the two DI windows that serial port will be associated with. You must<br />
also set up each copy of MMTTY to use its respective serial port by choosing the relevant serial<br />
port in the PTT & FSK Port box under the TX tab in the MMTTY Setup window.<br />
In order to support separate configurations for the two copies of MMTTY, each copy must be<br />
located in a separate folder. You can either use the main MMTTY program folder for one copy<br />
and a separate subfolder for the other copy, or you can create two subfolders for use by the<br />
<strong>Logger</strong>, leaving the copy in the main MMTTY program folder for stand-alone use. These<br />
subfolders must each contain, at a minimum, a copy of the MMTTY.exe file and the UserPara.ini<br />
file from the main MMTTY program folder. A copy of MMTTY.ini will be created the first time<br />
MMTTY is run from the folder. Other files from the main MMTTY program folder may also be<br />
copied to the subfolders, but they are not used.<br />
The <strong>Logger</strong>'s DI windows have an additional RX window feature as well. Up to four additional<br />
RX-only windows can be invoked from the Setup menus in the two DI windows. These additional<br />
windows can be distributed in any way between the two DI windows. They can use either<br />
hardware decoders or MMTTY, but the most common use is for separate copies of MMTTY using<br />
different decoding algorithms or profiles. Because they are receive-only, these windows do not<br />
need access to serial ports and are not configured in the Configurer. However, to be fully useful<br />
they do need to have separate setups from the main copy of MMTTY (e.g. to use a different<br />
decoding algorithm or profile). Therefore, if you wish to use these additional RX-only windows<br />
with MMTTY, you will need to create additional folders. one for each additional window,<br />
containing copies of the MMTTY.exe and UserPara.ini files. These additional folders do not have<br />
to be created at the time you first install MMTTY; you don't need to do this until you are ready to<br />
use the additional RX windows.<br />
5. Using MMTTY<br />
http://n1mmtw61.semdxa.org/tiki-print_multi_pages.php?printstructures...<br />
The macros for the Interface using MMTTY are different from the way they work with the<br />
TNC . What ever you put in the macro will get transmitted. There is a macro keyword<br />
needed to turn TX ON {TX} or TX OFF {RX}.<br />
There is no special abort macro needed for use with MMTTY just using the ESC key will<br />
stop transmitting.<br />
251 of 319 2/2/<strong>2011</strong> 4:35 PM
The TX and RX buttons are for the free form typing in the TX window.<br />
When MMTTY loads it loads the last used settings when the Interface was closed.<br />
5.1. How to Tune RTTY<br />
Use the VFO on your radio and dial in the peaks to match the 2 yellow lines on the<br />
spectrum<br />
Click view and the X-Y scope to see a crossed-ellipses tuning display<br />
If the X-Y display seems to rotate in the wrong direction, open the MMTTY Option ><br />
Setup window (or the DI's Setup > Setup MMTTY menu item), select the Font/Window<br />
tab and check (or uncheck) the Reverse rotation button<br />
Make sure you click the "HAM" button for proper shift etc.<br />
The default values for the HAM setting can be changed under the Demodulator tab in<br />
the MMTTY Option > Setup window<br />
It's better to set AFC off when you are in a crowded section of the band and manually tune<br />
the signals; if you leave AFC on, nearby strong signals may pull the tuning away from the<br />
signal you want to copy<br />
Also in crowded sections it can be helpful to use the built-in notch and bandpass filters<br />
If you are using AFSK, normally you would use LSB on the radio<br />
If you use USB, make sure you click the "Rev." button in MMTTY<br />
If you are using FSK, you need to be aware that NET does not work, and that tuning in a<br />
received signal by clicking in the waterfall or by allowing AFC to tune in the signal will result<br />
in your receive frequency being different from the transmit frequency. The "HAM" button will<br />
restore the correct audio frequency in your receive decoder but without retuning the radio.<br />
The "Align" button in the DI window can be used to retune your radio so that the received<br />
signal is lined up with your radio's transmit frequency<br />
Periodically you may get a lost sound indication in the MMTTY window and the program may quit<br />
responding to RTTY.<br />
This should never happen but if it does, try increasing the priority with which MMTTY runs<br />
from its default "high" to "highest". This is one step below the maximum "critical". This<br />
setting is in MMTTY under Options, Setup MMTTY and the MISC tab..... Another effect this<br />
has is to make the transition from RX-TX-RX smoother.<br />
5.2. When Should I Use AFC<br />
http://n1mmtw61.semdxa.org/tiki-print_multi_pages.php?printstructures...<br />
Use AFC (automatic frequency control) when MMTTY should automatically track the<br />
incoming RTTY signal.<br />
252 of 319 2/2/<strong>2011</strong> 4:35 PM
With AFC and NET turned on, MMTTY will track the incoming signal and also keep your<br />
transmitter frequency locked to the received signal when using AFSK.<br />
When MMTTY is set to transmit FSK, AFC will work on receive only. When in "Running" mode,<br />
you want to keep your TX frequency stable, but with RX AFC set on you can pick up stations who<br />
reply a bit off your frequency and copy the exchange without losing your TX spot. Just don't let<br />
the AFC spread get too far from where you're transmitting.<br />
A nice option to use is: AFC On/Off with CQ - If set then the AFC will turn on with CQ<br />
message or TU messages. This way when Running the AFC is on and during S&P the AFC<br />
is off. Check it.<br />
5.3. When Should I Use the NET Option: NET On/Off with Run Change<br />
NET only operates in AFSK. If you are using FSK, your transmit frequency is fixed by your<br />
transmitter, and the NET software feature does not work.<br />
When in 'Search and Pounce' mode the program will check the NET option so that once<br />
you tune a signal in, you will transmit on the same frequency you are receving him on<br />
(Warning: this doesn't work in FSK)<br />
When in 'Running' mode the program will uncheck the NET option, which allows your<br />
receive decoder to follow an off-frequency caller while still leaving your transmit frequency<br />
unchanged<br />
5.4. Why to Use "Auto Update TRX Offset w/Mark Freq."<br />
If you are using FSK RTTY, most radios display the actual mark frequency on the tuning dial. A<br />
few even do this in AFSK RTTY. If your radio is like this, you don't need to use this option. The DI<br />
window title bar will display an offset frequency (radio dial (+/-) audio), but if this option is turned<br />
off the offset frequency will not be logged and you can ignore it.<br />
If you are using AFSK RTTY, especially with the radio in LSB or USB mode, as well as when you<br />
are doing a sound card digital mode like PSK (using MMVARI or Fldigi), the radio probably<br />
displays the suppressed carrier frequency on its dial. This is different from the mark frequency. If<br />
you are using the default mark frequency of 2125 Hz, the radio's dial display will be 2125 Hz too<br />
high (LSB) or too low (USB) as compared with the actual mark frequency. By checking this<br />
option, <strong>N1MM</strong> <strong>Logger</strong> will perform the correction automatically and display the actual mark<br />
frequency in the Entry window and the Bandmap window, as well as in the DI window title bar.<br />
5.5. Using MMTTY for 75 baud RTTY<br />
http://n1mmtw61.semdxa.org/tiki-print_multi_pages.php?printstructures...<br />
253 of 319 2/2/<strong>2011</strong> 4:35 PM
There are some RTTY contests that specify 75 baud (100 wpm) RTTY instead of the usual 45.45<br />
baud (60 wpm) speed. MMTTY can be used for 75 baud RTTY, but there are a few quirks:<br />
In the MMTTY Setup window, select the Decode tab, and at the top of the window, for<br />
BaudRate select 75<br />
The MMTTY HAM Default button cannot be used in 75 baud RTTY; if you press HAM, the<br />
speed will be reset to 45.45 baud. Besides not pressing the HAM button in the MMTTY<br />
window, there are a couple of other setup items you need to take care of:<br />
In the DI Setup window, under the General/MMTTY Setup tab, make sure the<br />
following item is NOT checked:<br />
(MMTTY)Send HamDefault on Run to S&P Change (if you forget to uncheck<br />
this item, you will be switched back to 45.45 baud every time you switch from<br />
Run to S&P)<br />
If you are using FSK with a true serial port or with an interface that supports FSK<br />
without using EXTFSK (e.g. a microHAM microKeyer), turn AFC off in the MMTTY<br />
window, and make sure the following item in the DI Setup window is NOT checked:<br />
(MMTTY - MMVARI)Turn AFC On/Off on Run Change (if you forget to uncheck<br />
this item, AFC will pull your receive frequency off your transmit frequency and<br />
you will be unable to use the HAM button to correct the situation)<br />
In the DI Window's Setup menu, UNcheck AFC On/Off with CQ (same reason)<br />
If you use EXTFSK for FSK keying (e.g. via a standard USB-to-serial adapter), you will<br />
not be able to use this combination for 75 baud. EXTFSK does not support 75 baud.<br />
Instead, you must reconfigure for AFSK<br />
If you are using AFSK and like to use AFC, you may continue to do so, provided you<br />
are careful to ensure that your transmit and receive frequencies stay together. The<br />
HAM button is not available to re-align your transmit and receive frequencies.<br />
Therefore if you are using AFC, you should have NET on as well, to keep your<br />
transmit and receive frequencies together. (Note: NET does not work in FSK)<br />
After the 75 baud contest is over, press the HAM button in the MMTTY window to restore<br />
the 45.45 baud speed. You can also restore any of the configuration options you changed<br />
for 75 baud in order to restore normal functioning<br />
Digital - MMVARI for PSK and Other Modes<br />
In this Section...<br />
Digital - MMVARI for PSK and Other Modes<br />
1. The MMVARI Interface<br />
1.1. The MMVARI Interface Window<br />
1.2. The Waterfall or Spectrum Window<br />
1.3. Macros<br />
2. Setting Up the Digital Interface<br />
http://n1mmtw61.semdxa.org/tiki-print_multi_pages.php?printstructures...<br />
254 of 319 2/2/<strong>2011</strong> 4:35 PM
3. MMVARI Example: Make a PSK Transmission<br />
4. MMVARI - Other<br />
1. The MMVARI Interface<br />
The MMVARI soundcard interface is based on the MMVARI engine by Makoto Mori, JE3HHT.<br />
Supported are all modes from the MMVARI engine including bpsk (e.g. PSK31 and PSK63),<br />
qpsk-L (LSB), qpsk-U (USB - e.g. QPSK63), also RTTY-L (LSB), RTTY-U (USB), MFSK-L (LSB)<br />
and MFSK-U (USB) as well as non-standard modes GMSK (HF), FSK (V/UHF), FSK-W (V/UHF,<br />
satellite).<br />
RTTY<br />
In <strong>Logger</strong> versions before 10.9.5, MMVARI supported RTTY using AFSK keying only. As of<br />
version 10.9.5, MMVARI is now capable of using FSK keying for RTTY (selected from the<br />
Configurer under the Digital Modes tab). Note, however, that the "FSK" mode in the MMVARI<br />
mode box is an entirely different mode - it is not FSK RTTY.<br />
The MMVARI engine does not have to be installed separately, it is included in the <strong>N1MM</strong> logger<br />
program program/update files and is the default digital engine when loading the digital window<br />
for the first time.<br />
1.1. The MMVARI Interface Window<br />
http://n1mmtw61.semdxa.org/tiki-print_multi_pages.php?printstructures...<br />
255 of 319 2/2/<strong>2011</strong> 4:35 PM
http://n1mmtw61.semdxa.org/tiki-print_multi_pages.php?printstructures...<br />
The Digital Interface window when using the MMVARI engine is broken into several areas which<br />
will be covered from the top down.<br />
TX - Indicator to show which DI window the transmit is going to take place from (useful<br />
when using two DI windows for SO2R/SO2V)<br />
Letters/Figs - Shows the text under the mouse in the other case (FIGS/LTRS - RTTY only)<br />
MouseOver - Shows the text which would be selected where the mouse is positioned over<br />
Receive Windows - The MMVARI engine supports from 1 to 4 receive windows. The<br />
number of receive windows is selected from the DI window's Setup > Settings menu item in<br />
the Digital Settings window under the MMVARI Setup tab at the lower right corner (# of<br />
MMVARI Channels). All of these windows operate in the same manner and you are able to<br />
grab callsigns from any of them and place them into the Entry window. Note that when the<br />
# of MMVARI Channels is set to 1, a different method of multiple RX channels becomes<br />
available (see The Waterfall or Spectrum Window below)<br />
There is a colored pane on the left side of each receive window. By clicking on the colored pane<br />
you can pause input to the receive window to scroll back through the (last 2000 lines of) text<br />
using the scroll bars. When the window is paused the color of the pane will turn Yellow. To turn<br />
input to the window back on click in the pane again and everything that was to be printed to the<br />
window will now enter the window. When the receive window is paused it is possible to copy text<br />
in the window.<br />
256 of 319 2/2/<strong>2011</strong> 4:35 PM
http://n1mmtw61.semdxa.org/tiki-print_multi_pages.php?printstructures...<br />
If you click on a callsign using your mouse it will be put into the callsign field in the Entry window.<br />
Also, whenever a callsign is printed to any of the receive windows followed by a space it will be<br />
sent to the callsign grab window for easy movement to the logging window by clicking the Grab<br />
button.<br />
You can select any exchange info by single clicking on the sent info. This info will be transfered<br />
over to the logger Entry window item by item after the callsign is filled in.<br />
The top receive pane is the window used for making QSOs. Selecting another frequency for this<br />
window is done by left clicking in the Waterfall or Spectrum window. Changing the frequency of<br />
the other three receive windows is done by moving the numbered marker above the waterfall to<br />
the desired location. You can also use the Swap buttons in the lower part of the Waterfall window<br />
to exchange the selected window with the top receive window.<br />
Transmit window - This is a free form typing window. If you click on the TX button the<br />
cursor will be placed into this window and whatever is typed will be sent. The size of this<br />
window is fixed at 2 lines<br />
Callsign Textbox and Grab - When a callsign is encountered in one of the receive<br />
windows (followed by a space) it will be placed in this textbox and when you press the Grab<br />
button it will transfer the callsign over to the main logger window. The grab callsign window<br />
holds the last 10 callsigns seen in the RX window. The most current one is at the top and is<br />
highlighted. A right click in this box brings up a menu to clear list or selected callsign. Dupe<br />
callsigns will not be shown in the grab window<br />
Note: If the callsign in the callsign field in the Entry window is the same as the callsign in the<br />
received text, the call in the Entry window does not get placed into the call list.<br />
Clr RX - Clear all receive windows<br />
TX - Places the interface into transmit, the transceiver is keyed, and places the cursor into<br />
the TX window for input. See the Radio Interfacing section for Parallel and Serial port info<br />
on configuring for hardware PTT<br />
RX - This will place the interface back into receive mode after all the characters in the<br />
transmit buffer have been sent. To abort transmit immediately without waiting for remaining<br />
characters to be sent, press the Esc key<br />
Macro buttons - These buttons on the Digital Interface are up to 24 extra Macros for<br />
preprogrammed messages. Configuring these macros is done in the Digital Interface<br />
window under 'Setup, Settings' or by right clicking on them which brings up the Digital<br />
Setup window. The macro buttons widths dynamically adjusts in relation to the width of the<br />
DI window<br />
Grab - Transfer the selected callsign in the callsign text box to the callsign field on the main<br />
logger window. The cursor advances to the exchange box ready to accept the exchange<br />
when you click on it<br />
CLR - Clears the grab window<br />
257 of 319 2/2/<strong>2011</strong> 4:35 PM
1.2. The Waterfall or Spectrum Window<br />
http://n1mmtw61.semdxa.org/tiki-print_multi_pages.php?printstructures...<br />
The MMVARI digital engine window - This window uses the MMVARI control from Makoto Mori,<br />
JE3HHT. Across the top the title bar shows either the offset frequency (radio (+/-) audio) or the<br />
radio's dial frequency, depending on a setup option. As you tune your radio this will update and<br />
the numbers will change.<br />
The screen shot here shows the window with four receive channels selected in the Digital Setup.<br />
There are cursors corresponding to each of the receive windows. The inverted triangle cursor,<br />
filled in in light blue, is for the main receive window. If NET is on, this is also your transmit<br />
frequency. If NET is off, there will be another inverted triangle filled in in dark blue indicating your<br />
transmit frequency. If you have more than one receive window enabled, a cursor with a number in<br />
it (1, 2, ...) corresponds to each additional receive window. To change frequency for the main<br />
receive window you can place your mouse pointer over a signal trace and click with your left<br />
mouse button. To change frequency for one of the other receive windows, you can click on the<br />
numbered cursor and drag it to the desired location in the waterfall.<br />
TX Frequency and NET in FSK RTTY<br />
Note that if you are using FSK keying in RTTY, MMVARI has no control over your transmit<br />
frequency. Your transmit frequency in FSK RTTY is fixed by the radio. Therefore, moving the<br />
dark blue transmit indicator does not change your actual transmit frequency in FSK RTTY.<br />
Likewise, the NET function is inoperative in FSK RTTY.<br />
Buttons above the waterfall<br />
TX - Start the transmission, the transceiver is keyed and places the cursor into the TX<br />
window for input. See the Radio Interfacing section for Parallel and Serial port info for<br />
TX/RX switching (PTT)<br />
RX - Stops the transmission, the transceiver changes back to receive after all the<br />
characters in the transmit buffer have been sent. To abort immediately, press the Esc<br />
258 of 319 2/2/<strong>2011</strong> 4:35 PM
http://n1mmtw61.semdxa.org/tiki-print_multi_pages.php?printstructures...<br />
key<br />
AFC - Turns AFC on or off. Selected (white) means AFC on (Note: This button is<br />
greyed out and disabled when the Multi-Channel RX browser feature is enabled)<br />
NET - Turns NET on or off. Selected (white) means NET on. When NET is on the TX<br />
frequency follows the RX frequency (this function is inoperative in FSK RTTY)<br />
Align - This is used to move the signal under the receive indicator to the Alignment<br />
Frequency set up in the Digital Setup window. This can be used in most sound card<br />
modes to center the received signal in your filter bandpass, and in FSK RTTY it is<br />
used to align the received signal with your transmitter's signal<br />
Example: Suppose the center of the filter pass band is 2200 Hz. When clicking on a signal at<br />
about 1400 Hz the signal may be difficult to copy unless you are using wide filters. To move the<br />
signal to the center of your filter bandpass, click Align and the rig shifts and the spectrum<br />
frequency shifts and places the station on the frequency that was initialized in the Digital Setup<br />
window in the Alignment Frequency area. This allows you to narrow your filter bandwidth around<br />
the selected signal. If you are using FSK keying for RTTY and if your receive frequency is not<br />
exactly on the center frequency of your radio's mark/space tone pair (e.g. 2210 Hz for the<br />
standard 2125/2295 "high" tone pair), then you can use the Align button to retune your radio so<br />
your receive and transmit frequencies will be aligned correctly.<br />
Mode selection - Select the mode to use by clicking on this button. The Speed<br />
selections are mode dependent. Selections are:<br />
GMSK - MBCS experiment (HF) - Possible speed selections: 31.25, 62.5, 125,<br />
250<br />
not used for contests<br />
FSK - MBCS experiment (V/UHF) - Possible speed selections: 31.25, 62.5, 125,<br />
250<br />
not used for contests<br />
Do not confuse this mode with FSK RTTY - MMVARI's "FSK" mode is not<br />
FSK RTTY. Starting with <strong>Logger</strong> version 10.9.5, MMVARI does support FSK<br />
RTTY, but this can only be selected from the Configurer, not from the<br />
MMVARI window<br />
FSK-W - MBCS experiment (V/UHF, satellite) - Possible speed selections: 31.25,<br />
62.5, 125, 250<br />
not used for contests<br />
BPSK - MBCS experiment (HF) - Possible speed selections: 31.25, 62.5, 125,<br />
250<br />
for contesting purposes, BPSK and bpsk are equivalent<br />
bpsk - Standard BPSK (e.g. PSK31) - Possible speed selections: 31.25, 62.5,<br />
125, 250<br />
rtty-L - BAUDOT RTTY (LSB) - Possible speed selections: 45.45, 50, 56, 75,<br />
100, 110, 150, 200<br />
rtty-U - BAUDOT RTTY (USB) - Possible speed selections: 45.45, 50, 56, 75,<br />
100, 110, 150, 200<br />
You may choose either AFSK or FSK keying method for RTTY in the<br />
259 of 319 2/2/<strong>2011</strong> 4:35 PM
Configurer under the Digital Modes tab<br />
mfsk-L - MFSK (LSB) - Possible speed selections: 15.625, 31.25<br />
mfsk-U - MFSK (USB) - Possible speed selections: 15.625, 31.25<br />
qpsk-L - QPSK (LSB) - Possible speed selections: 31.25, 62.5, 125, 250<br />
qpsk-U - QPSK (USB) (e.g. QPSK63)- Possible speed selections: 31.25, 62.5,<br />
125, 250<br />
Speed selection - Select the speed to use in bps by clicking on this button. The<br />
speed to select is mode dependent as described above<br />
Main Channel receive frequency - audio frequency<br />
In RTTY, MMVARI displays the center frequency, not the mark frequency as<br />
displayed in MMTTY<br />
Main Channel transmit frequency - audio frequency<br />
Main Channel S/N reading<br />
The Waterfall<br />
At the top of the waterfall offset frequency (radio (+/-) audio) labels and tick marks are<br />
displayed<br />
Receive channel markers<br />
Top markers (tag cursors)<br />
1,2,... - frequency receive channel 1,2,...<br />
N - indicates a notch filter<br />
The light blue colored marker (inverted triangle on the waterfall) indicates the<br />
main RX frequency<br />
The dark blue colored marker (waterfall) indicates the TX frequency if it is<br />
different from the main RX frequency (only possible if NET is off)<br />
Mouse key clicking<br />
Left mouse key clicking - single clicking in the waterfall will change the main RX<br />
frequency<br />
Right mouse key clicking - the audio frequency at the point clicked on will be<br />
shown. Also a menu will show:<br />
Set notch on here - adds a new notch filter on the selected frequency<br />
indicated by a N in a yellow area. Multiple notches can be set; you can<br />
clear an individual notch by right-clicking on the N<br />
Delete all notches - all set notches will be removed<br />
Set TX Carrier on here - can be used to set the TX frequency (with NET<br />
off)<br />
Turn Off Bandpass Filter - Turns the BPF off<br />
RX 1 (2,3) Freq Here - can be used to set the RX 1, 2, or 3 frequency here<br />
(only if the # of MMVARI Channels is greater than 1)<br />
The left vertical indicator shows the signal level meter (green) and the squelch level (yellow line).<br />
Biy clicking on it the squelch level can be changed.<br />
Receive channels below the waterfall<br />
http://n1mmtw61.semdxa.org/tiki-print_multi_pages.php?printstructures...<br />
260 of 319 2/2/<strong>2011</strong> 4:35 PM
http://n1mmtw61.semdxa.org/tiki-print_multi_pages.php?printstructures...<br />
If you have chosen to use more than one MMVARI channel, below the waterfall the<br />
additional receive channels will be shown. The number of additional channels below<br />
the main waterfall is one less than the total number of MMVARI Channels set, i.e.<br />
there can be up to three additional channels (up to four MMVARI channels in total - to<br />
display more than four channels, see the Multi-Channel RX feature below)<br />
Mode - Select the mode to use for this receive channel<br />
Speed - Select the speed to use for this receive channel<br />
Receive channel frequency<br />
Receive channel S/N value<br />
AFC - Turns AFC on or off for the selected channel. Selected (white) means AFC on<br />
Squelch indicator - The squelch can be adjusted by dragging the line indicator to<br />
where you want it and turning off the squelch by dragging it all the way left<br />
Miniature waterfall display - shows within 500 hz of the signal that that channel is<br />
on. You can click anyplace in this miniature waterfall or drag the indicator to where<br />
you want it<br />
Swap - Exchanges this receive window with the main receive window. While working<br />
one station, you can dial the second station in via a second receive window and after<br />
you finish the first contact just hit swap button and then call the other station. See<br />
below for an alternative method of multi-channel receive<br />
Menu at the Top<br />
BPF - Used to enable/disable an internal audio Band Pass Filter. The BPF filter has<br />
steep skirts and 80db of rejection outside the bandpass. However, because it is in the<br />
sound card and not in the radio, it has no effect on unwanted signals inside the radio,<br />
i.e. a strong unwanted signal inside the radio's IF filter bandpass can still trigger the<br />
radio's AGC and cause gain blocking, even though the signal has been rejected in the<br />
sound card by the BPF. You can only prevent this by selecting narrow filters in your<br />
radio<br />
Enable/Disable BPF - turns BPF on or off<br />
Wide 1000 Hz, Middle 500 Hz, Narrow 250 Hz, Ultra Narrow 100 Hz, Custom -<br />
filter bandwidth settings (grayed out when the BPF is disabled)<br />
To set Custom width after enabling the BPF, left click in the waterfall where<br />
you want the BPF bandpass to start. Drag your mouse with the left button<br />
held down and release it where you want the BPF bandpass to end. The<br />
waterfall display will immediately relect the chosen Bandpass. This makes<br />
it simple to eliminate an offending station on the fly<br />
The minimum width of the BPF that can be set is 100 Hz<br />
The BPF can be turned off by selecting Disable BPF on the BPF menu or by<br />
right-clicking in the waterfall and selecting Turn off bandpass filter<br />
The BPF settings are retained when you close and reopen the digital engine<br />
window<br />
ATC - Used to turn Automatic Timing Control (ATC) on or off. It is recommended to<br />
keep ATC on all the time for better signal decoding<br />
when RTTY is selected ATC is always off<br />
261 of 319 2/2/<strong>2011</strong> 4:35 PM
http://n1mmtw61.semdxa.org/tiki-print_multi_pages.php?printstructures...<br />
in MFSK mode ATC is always on<br />
FFT - FFT is Fast Fourier Transform, which is a method of extracting the spectrum out<br />
of a waveform. That is the basic tool that gives the waterfall and spectrum scope<br />
displays<br />
FFT Type - Select the FFT display method. Selections are: Spectrum, Waterfall,<br />
Sync or Wave Input<br />
FFT Width - Select the display width (frequency range). Selections are: 250 Hz,<br />
500 Hz, 1000 Hz, 2000 Hz, 3000 Hz or User Defined. User Defined width is set in<br />
the Digital Setup window<br />
FFT Scale - Select the vertical scale to use. Selections are: 100 dB, 60 dB,<br />
Square Amplitude<br />
Waterfall AGC - Turn the waterfall AGC on or off<br />
Align after Left Click - Automates the Align process. Any time a signal is clicked<br />
on in the waterfall, an automatic Align operation is performed to re-center the<br />
audio frequency on the Alignment Frequency you have selected in the Digital<br />
Setup window<br />
SHIFT - Shift selections. The choices are 170 Hz, 200 Hz, 23 Hz or User Defined<br />
Only in RTTY-L, RTTY-U and GMSK<br />
RTTY Demodulator - select either IIR or FFT decoder. Depending on conditions, one<br />
may decode better than the other<br />
Only in RTTY-L and RTTY-U<br />
Multi-Channel Rx - This feature is only available when the # of MMVARI<br />
Channels in the Digital Setup window under the MMVARI Setup tab is set to 1. It<br />
is an alternative method of receiving multiple signals simultaneously with<br />
MMVARI<br />
Enable (or Disable) Multi Channel RX - turns this feature on or off<br />
When the Multi-Channel RX feature is turned on, there will be several<br />
numbered tag cursors at the top of the waterfall, and a separate browser<br />
window will open (see below). The number of channels is user-selectable<br />
(from 2 to 24)<br />
Each line in the browser window shows text decoded under the<br />
corresponding numbered cursor<br />
There is only one RX pane in the Digital Interface window, which displays<br />
262 of 319 2/2/<strong>2011</strong> 4:35 PM
http://n1mmtw61.semdxa.org/tiki-print_multi_pages.php?printstructures...<br />
text from the main RX signal under the light blue inverted triangle cursor<br />
You can move the main RX cursor to the position of any of the numbered<br />
tag cursors simply by clicking in the corresponding small text window<br />
You can use this feature to keep track of several separate signals being<br />
received. You can work each one in turn by clicking in the corresponding<br />
numbered text window to move the main RX/TX frequency (with NET on) to<br />
each numbered cursor position in turn<br />
Set Number of RX Channels - you can select from 2 to 24 channels to display<br />
in the browser window<br />
Set AFC Search Level - Used to set the signal level (S/N ratio) used to<br />
determine whether a signal is strong enough to activate the AFC and cause the<br />
RX frequency to move to it (can be set from 1 to 20 dB)<br />
Set AFC Search Range - Each extra RX channel has AFC (automatic frequency<br />
control) which moves the cursor to keep it centered on a signal if the frequency<br />
changes slightly. This menu item is used to set the frequency range over which<br />
this feature operates (can be set from 100 to 500 Hz)<br />
Set Spectrum Search Frequencies - Allows you to set the lower and upper<br />
limits for the browser channels. The lower limit can be 250 Hz or higher, and the<br />
upper limit can be 2700 Hz or lower<br />
The Multi-Channel RX method allows you to keep track of more channels than the older # of<br />
MMVARI Channels method that you set up from the Digital Setup window. The displayed<br />
"memory" for each channel is less (only the size of the small scrolling text window, instead of one<br />
of the RX panes in the main DI window). You cannot click directly on call signs in the small<br />
scrolling windows; you have to first change the main RX window to the chosen signal and then<br />
click in the DI window. The older method also allows you to change modes in the extra channels<br />
independently (i.e. to receive signals in two different modes simultaneously). However, although<br />
this newer method is less full-featured than the older method, you may find it easier to use,<br />
especially in a contest situation. Try them both to see which you prefer. (For yet another way to<br />
do multiple receive in PSK only, you can also try the PSK Browser in Fldigi).<br />
263 of 319 2/2/<strong>2011</strong> 4:35 PM
Browser window for Multi-Channel RX<br />
Setup menu<br />
Set On Top - check this if you want to ensure that the browser window is always on<br />
top of other windows<br />
Set AFC Width - set the frequency range for AFC in each browser channel<br />
Set AFC Level - set the signal level that activates AFC<br />
1.3. Macros<br />
http://n1mmtw61.semdxa.org/tiki-print_multi_pages.php?printstructures...<br />
The macros for the Interface using MMVARI are different from the way they work with the<br />
TNC . What ever you put in the macro will get transmitted. There is a macro keyword<br />
needed to turn TX ON {TX} or TX OFF {RX}<br />
There is no special abort macro needed for use with MMVARI just using the ESC key will<br />
stop transmitting<br />
264 of 319 2/2/<strong>2011</strong> 4:35 PM
The TX and RX buttons are for the free form typing in the TX window<br />
When MMVARI loads, it loads the last used settings when the Interface was closed<br />
2. Setting Up the Digital Interface<br />
The setup dialog is for both MMTTY and MMVARI, this means that some settings are only for<br />
MMVARI, MMTTY or both. When selecting 'Setup | Settings' in the Digital Interface window a<br />
dialog wil be shown which is both for MMTTY and MMVARI. Please check the setup information in<br />
the Digital Setupchapter.<br />
3. MMVARI Example: Make a PSK Transmission<br />
We need to make room for the Digital Interface so for now minimize the <strong>Logger</strong><br />
Telnet/Packet window<br />
Now select 'Window | Digital Interface' and the Digital Interface and the Waterfall/Spectrum<br />
window will open. The Digital Interface dialog can be positioned and resized on your<br />
monitor as desired<br />
Left clicking on a call will grab the callsign. Right clicking on the RX and TX window will pop<br />
a menu (S&P mode) or send the Exchange function key in Running mode<br />
Pressing Insert will Grab the highlighted call and sends His call followed by the Exchange<br />
button<br />
Double clicking on a callsign in the callsign box from the Digital Interface sends that call to<br />
the Entry window<br />
A callsign is automatically highlighted if recognized by the program. For that to happen it<br />
needs to have a space before and a space after the callsign. If the first thing on a new line<br />
in the Digital Interface window is a valid callsign, it is not highlighted or added to the grab<br />
list<br />
4. MMVARI - Other<br />
The Radio Frequency display on the Waterfall and Spectrum display follows the active<br />
Radio Frequency<br />
The last PSK mode used is remembered, so the next time the last used mode is selected.<br />
Getting (PSK) object errors during program start or starting PSK?<br />
During transmit, callsigns are not grabbed from the receive window.<br />
Digital - Fldigi for Sound Card Modes<br />
In this Section...<br />
http://n1mmtw61.semdxa.org/tiki-print_multi_pages.php?printstructures...<br />
265 of 319 2/2/<strong>2011</strong> 4:35 PM
Digital - Fldigi for Sound Card Modes<br />
1. The Fldigi interface<br />
2. Download and Configure Fldigi<br />
2.1. Download Fldigi<br />
2.2. Fldigi Initial Configuration<br />
3. The Fldigi Interface Window<br />
1. The Fldigi interface<br />
The Fldigi sound card interface is based on the fldigi code by Dave Freese, W1HKJ.<br />
Fldigi supports a wide variety of digital modes, including not only AFSK RTTY and PSK, but also<br />
other less common modes such as MFSK, MT63, Olivia, Throb, etc.<br />
Fldigi does not support keying outputs on serial or parallel ports, as used by <strong>N1MM</strong> <strong>Logger</strong> for<br />
CW and FSK keying. However, although it does not support transmitting in CW mode, Fldigi can<br />
be used as a CW receive decoder within the <strong>Logger</strong>.<br />
Fldigi is a stand alone application, so you can use it from outside <strong>N1MM</strong> <strong>Logger</strong> as well. Note that<br />
the configurations for Fldigi stand-alone and within the <strong>Logger</strong> are separate, i.e. changes made<br />
to the stand-alone configuration will not be applied to the configuration within the <strong>Logger</strong>, and<br />
vice versa.<br />
2. Download and Configure Fldigi<br />
2.1. Download Fldigi<br />
Download the current release of Fldigi from the W1HKJ website at http://www.w1hkj.com/<br />
. You can find a copy of the full installer for the current version of Fldigi at that website. This<br />
file is a self-extracting executable, similar to the <strong>N1MM</strong> <strong>Logger</strong> installer. Download the<br />
installer file to a temporary folder and then execute it. It is recommended that you install<br />
Fldigi in its own program folder and not in the <strong>N1MM</strong> <strong>Logger</strong> program folder. By default, the<br />
installer will install Fldigi to C:\Program Files\Fldigi-x.xx.xx\, where x.xx.xx is the Fldigi<br />
version number.<br />
2.2. Fldigi Initial Configuration<br />
http://n1mmtw61.semdxa.org/tiki-print_multi_pages.php?printstructures...<br />
266 of 319 2/2/<strong>2011</strong> 4:35 PM
After Fldigi has been downloaded and installed, open the Configurer and set up the path to Fldigi<br />
under the Digital Modes tab. After closing the Configurer, choose a contest in <strong>N1MM</strong> <strong>Logger</strong> that<br />
supports digital modes, select the <strong>Logger</strong>'s Window > Digital Interface menu item, and then in the<br />
Digital Interface window, select the Interface > Fldigi menu item.<br />
When you first open the Fldigi interface from the <strong>Logger</strong>, and also any time you install a new<br />
version of Fldigi, you will be prompted to fill in some configuration information by the Fldigi<br />
configuration wizard, as follows:<br />
Operator information - You do not need to fill in any of this information<br />
Audio devices - Under the Devices tab, check the PortAudio box and select the sound<br />
card you are using for both Capture and Playback<br />
Transceiver control - Select the XML-RPC tab, check the Use XML-RPC Program box,<br />
and click on Initialize<br />
If you are using hardware PTT controlled by the digital interface, select the Hardware<br />
PTT tab, check the Use separate serial port PTT checkbox, select the appropriate<br />
COM port in the Device: window, and check either Use RTS or Use DTR, depending<br />
on which one your hardware setup uses. If the label on the Initialize button is red,<br />
click on the button<br />
The Fldigi configuration wizard does not automatically save these settings. After you have exited<br />
the configuration wizard and the main Fldigi interface window has opened, you must save the<br />
configuration settings using the Fldigi Configure > Save Config menu item. If you don't do this,<br />
then every time you open the Fldigi window you will have to go through the configuration wizard<br />
steps again.<br />
3. The Fldigi Interface Window<br />
Menu<br />
File<br />
Exit - closes the Fldigi window<br />
Op Mode<br />
http://n1mmtw61.semdxa.org/tiki-print_multi_pages.php?printstructures...<br />
267 of 319 2/2/<strong>2011</strong> 4:35 PM
CW - receive-only<br />
PSK - select BPSK-31 for normal PSK31, BPSK-63 for PSK63, etc.<br />
RTTY - select RTTY-45 for normal 45 baud AFSK RTTY<br />
Other selections can be used for other modes - see the fldigi help for details<br />
Configure<br />
Waterfall - under the Display tab, you can select whether to show audio or RF<br />
frequencies in the scale at the top of the waterfall, and whether to display<br />
transmitted as well as received signals<br />
Rig control - XML-RPC should have been selected during the initial<br />
configuration. You can use the Hardware PTT tab to change the PTT settings<br />
for a separate hardware PTT port<br />
Sound card - you can select the sound card to be used by Fldigi under the<br />
Devices tab<br />
Modems - this is where you make configuration changes that apply to specific<br />
modes only (e.g. PSK-specific changes, or RTTY-specific changes)<br />
Save Config - use this to save the new configuration any time you make<br />
changes<br />
View<br />
PSK Browser - opens a browser window that can display up to 30 signals within<br />
the waterfall simultaneously (PSK only). To configure this browser window, use<br />
Fldigi's Configure > Modems > PSK > Viewer configuration window to set the<br />
number of channels, the starting (lowest) audio frequency (channel separation is<br />
100 Hz), and various other parameters<br />
Most Fldigi menu items not mentioned above are either not used by <strong>N1MM</strong> <strong>Logger</strong>, or perform<br />
advanced functions that are not needed for basic operation. See the fldigi help at the W1HKJ<br />
web site for more details (there is a link to the Fldigi-Help page from the download page at<br />
http://www.w1hkj.com/download.html ).<br />
Note also that when the Fldigi engine is selected, additional buttons appear in the <strong>Logger</strong>'s<br />
Digital Interface window:<br />
Align - for retuning the radio so that the desired signal is aligned on a pre-configured<br />
frequency<br />
Lock - to lock the transmit frequency at the present position in the waterfall while allowing<br />
the receive frequency to vary (for operating split)<br />
Rev - in sideband-sensitive modes like RTTY, reverses the tones<br />
SO2V/SO2R Limitation<br />
http://n1mmtw61.semdxa.org/tiki-print_multi_pages.php?printstructures...<br />
268 of 319 2/2/<strong>2011</strong> 4:35 PM
There is a basic limitation in the Fldigi engine which can make it harder to use in dual-receiver<br />
situations (SO2R and SO2V). Fldigi always receives in mono mode. If you are using a stereo<br />
sound card to decode two receivers, with one receiver in the left channel and the other<br />
receiver in the right channel, Fldigi will combine the two receivers in its waterfall. It doesn't<br />
matter whether Fldigi is the interface engine in DI1 or DI2, it will see the audio from both<br />
receivers.<br />
Therefore, if you want to use Fldigi with both receivers in a two-receiver setup, you will need<br />
to use two separate sound cards for the two receivers. You will also need to install two copies<br />
of Fldigi in two separate program folders in order to allow a different sound card to be<br />
configured in each copy.<br />
Digital - External TNC Support<br />
In this Section...<br />
Digital - External TNC Support<br />
1. The Digital Interface<br />
2. Setting Up the TNC in the Configurer<br />
3. Test Your External TNC<br />
4. Additional Macros for the External TNC Interface<br />
5. HAL DXP38 Setup<br />
5.1. Hardware Setup<br />
5.2. Software Setup in <strong>N1MM</strong> logger<br />
5.3. Known Problems<br />
6. HAL ST-8000 Setup (not supported)<br />
7. KAM Setup<br />
8. PK-232 Setup<br />
8.1. Setting up the PK-232<br />
9. SCS PTC Setup<br />
The Digital Interface will not only work with MMTTY, MMVARI and external TNC's like the PK232,<br />
HAL DXP38 but with ANY TNC.<br />
This is because the commands for the TNC are not hard coded into the program. This has to be<br />
done by the user of the program<br />
Information about the following external TNCs can be found below but as already stated ANY<br />
TNC can be used with <strong>N1MM</strong> logger which uses serial communication.<br />
1. The Digital Interface<br />
The Digital Interface can be used with any external TNC.<br />
http://n1mmtw61.semdxa.org/tiki-print_multi_pages.php?printstructures...<br />
269 of 319 2/2/<strong>2011</strong> 4:35 PM
Using a TNC will show an interface like the one above.<br />
2. Setting Up the TNC in the Configurer<br />
1. Start the <strong>N1MM</strong> <strong>Logger</strong> application<br />
2. On the <strong>Logger</strong> Main Window select >Config >Configure Ports, Telnet Address, Other<br />
>Digital Modes tab<br />
3. In Digital Setup<br />
1. Choose Other for Interface<br />
2. Set other parameters accordingly (Example settings: Com 4 ,9600 ,8 ,N ,1, RST-Xon)<br />
3. Save the configuration < OK ><br />
4. Load the Digital Interface from the Window menu<br />
5. Create your Abort macro (This should be in the upper left corner) by right clicking on it. This<br />
will open up the RTTY setup area. Click on the same macro and enter what ever key<br />
sequence you need to abort transmission and save the macro<br />
Example PK-232: {Ctrl-C}R{ENTER} Save the macro<br />
1.<br />
You should be ready to copy RTTY make sure your interface is set to copy 45 baud and 170<br />
shift. You can configure a macro key to change this or you can type the key sequence<br />
needed in the transmit window and it will get sent to the TNC<br />
That should be it. You will need to add the CTRL keys that turn on and off the TNC<br />
Example CQ macro for the PK-232: X{ENTER} CQ CQ CQ TEST DE {MYCALL} {MYCALL} K<br />
{Ctrl-D}<br />
3. Test Your External TNC<br />
http://n1mmtw61.semdxa.org/tiki-print_multi_pages.php?printstructures...<br />
Test stand-alone<br />
See the separate sections for the PK-232, KAM, HAL etc. If your TNC is not mentioned<br />
please set it up like the other mentioned TNC's<br />
270 of 319 2/2/<strong>2011</strong> 4:35 PM
Make sure your radio and TNC work on your computers serial port by testing them with an<br />
existing terminal program. Connect your TNC/Radio into your computers serial port. The<br />
Hyperterm terminal program is included with Windows and works well. Make sure you note all<br />
COM port parameters. You should be able to tune in a RTTY signal and print it using the<br />
Hyperterm program. The Windows Hyperterm is geared toward modem communications and is<br />
not especially intuitive for direct COM port use. As stated previously, you can use any number of<br />
terminal emulator programs. For example, the Tera Term Pro 3.1.3 by Ayera Technologies is a<br />
small, open source, free terminal emulator that is available for download.<br />
The interface has been tested with the three mentioned TNC's below and works fine with them.<br />
Any other TNC should also work as long as you place the right commands for that TNC in the<br />
macros.<br />
4. Additional Macros for the External TNC Interface<br />
The Digital Interface will accept all of the Macro keywords that can be used in the Packet window<br />
and other places in the <strong>Logger</strong> and will also accept the following:<br />
Ctrl+A Ctrl+B Ctrl+C Ctrl+D Ctrl+E Ctrl+F Ctrl+G<br />
Ctrl+H Ctrl+I Ctrl+J Ctrl+K Ctrl+L Ctrl+M Ctrl+N<br />
Ctrl+O Ctrl+P Ctrl+Q Ctrl+R Ctrl+S Ctrl+T Ctrl+U<br />
Ctrl+V Ctrl+W Ctrl+X Ctrl+Y Ctrl+Z Esc Enter<br />
Macro keywords can be used in any of the macro buttons or the <strong>Logger</strong> function keys..<br />
The TX window will accept all control key commands except for the Esc key, this must be sent as<br />
a Shift+Escape combination.<br />
Remember that when to set up a macro key that is not a TNC command you will need to include<br />
the sequence to key the TNC before it sends. If you click on the macro without the TNC<br />
transmitting, your TNC will think it is a command being sent to it and not know how to process it.<br />
TNC users have to enter in whatever CTRL characters are needed to turn on and off your specific<br />
TNC.<br />
To use the free form typing in the TX window you need to create a macro that will key your TNC<br />
and another to Turn it off. Click the macro that starts transmitting and then click in the TX<br />
window. Whatever you type will be sent out… then click the macro to turn things<br />
off after you are done.<br />
5. HAL DXP38 Setup<br />
By Brian, K3KO<br />
http://n1mmtw61.semdxa.org/tiki-print_multi_pages.php?printstructures...<br />
271 of 319 2/2/<strong>2011</strong> 4:35 PM
The following instructions will get the HAL DXP38 TNC up and running for FSK in <strong>N1MM</strong><strong>Logger</strong>. I<br />
admit to not trying AFSK but it should work. This implementation is not elegant but does work<br />
with some 'features' of its own. There is a built-in tuning indicator accessible through macro<br />
toggles. The implementation is very basic but is working, there are other programs around if you<br />
want all the bells and whistles. Thanks go to N2AMG for making the program changes necessary<br />
to accommodate HAL commands.<br />
Since there is essentially only one way communication between <strong>N1MM</strong>logger and the DXP38 in<br />
the command mode, don't expect error checking or error detection. It is assumed that turning on<br />
the DXP38 properly loads the internal software. No capability exists here to do such. No capability<br />
exists to update the internal programs. This must be done with the HAL software. My unit uses<br />
the latest update .LOD and .S28 files from the HAL website http://www.halcomm.com. It is not<br />
clear that the updated files are needed here. However, the reason given for the update was to fix<br />
a PTT error with another program. So if you are having problems with PTT activation, these<br />
updates may be appropriate. Unless you alter the attached initialization macro, you must use LSB<br />
RTTY for FSK or LSB for AFSK..<br />
There are three distinct phases - Hardware setup, Software Setup, and Use. The last section<br />
discusses two problems that have cropped up and solutions found.<br />
5.1. Hardware Setup<br />
It is recommended that one first get the DXP38 running with WF1B, HAL or a known 'tried and<br />
true' software package first. Doing so eliminates the need to troubleshoot both hardware and<br />
software when configuring <strong>N1MM</strong><strong>Logger</strong>. Hardware setup:<br />
1. Connect the PTT and FSK lines to the rig<br />
2. Connect the COM port (1 for HAL software) to the TNC<br />
3. Connect audio input to the DXP-38<br />
4. Connecting the power<br />
5. Connecting AFSK output to the rig (AFSK only)<br />
6. Consult the DXP-38 manuals for the details. The rig must be set FSK RTTY (LSB) or LSB<br />
for AFSK<br />
5.2. Software Setup in <strong>N1MM</strong> logger<br />
There are three parts in setting up <strong>N1MM</strong> logger to work with the HAL DSP38. Make sure the<br />
version of <strong>N1MM</strong><strong>Logger</strong> being used supports the DXP38 hexadecimal commands.<br />
Port configuration - The DXP38 port should have checkmarks in digital and set. DTR/RTS<br />
should be set to always on.<br />
Digital configuration - On the digital configuration dialog<br />
http://n1mmtw61.semdxa.org/tiki-print_multi_pages.php?printstructures...<br />
272 of 319 2/2/<strong>2011</strong> 4:35 PM
Choose a free port and configure it for 9600 baud, N,8,1 and no handshaking<br />
It works fine on the first port but was not tried yet on the second channel. Nor have I<br />
tried using two channels<br />
I have been able to get the DXP38 to run on the first port and MMTTY on the second<br />
port<br />
Macro Creation required to initialize and control the DXP38<br />
http://n1mmtw61.semdxa.org/tiki-print_multi_pages.php?printstructures...<br />
These macros are the 24 box macros not the function keys<br />
Important. This process is error prone. Go to the <strong>N1MM</strong> logger directory and create a<br />
backup of the MDB file in use. If you don't, the results of an error in the macros could<br />
be unpleasant. The program may give one a 'type mismatch' error which may not be<br />
correctable without either a whole new logging file or somehow editing the .MDB file<br />
(using Access) to remove the error. If one does cause this error to happen, just copy<br />
the backup file to the original file name. It is a good idea to do the macro creation in<br />
steps with backups along the way. N2AMG has some coding in place to help avoid the<br />
unpleasantness<br />
Command structure<br />
The HAL DXP38 expects commands in the form of two hexadecimal bytes. The first<br />
byte is hexadecimal 80 and the second is the hexadecimal command number. Some<br />
commands require a second set of two bytes giving the value of a parameter being<br />
set. These commands look like {H8084} on the macro page. The {} tell <strong>N1MM</strong> it is a<br />
function, not text. The H triggers the routine which reads what follows as two<br />
hexadecimal, one byte numbers and sends them to the DXP38. The first number is<br />
always 80. Note: Only the numerals 0-9 and the letters A-F can be used to define the<br />
hexadecimal number. Use of any other characters within {} will produce a type<br />
mismatch and unpredictable operation. Any text character not in {} is considered text<br />
to be sent by the DXP38. As such, it will put the TNC into the transmit mode. The TNC<br />
will not return to the receive mode at the end of the macro unless a {RX} is present<br />
Common errors: the use of ( >s instead of {, the letter O for a zero, lower case L for a<br />
1<br />
Macro programming<br />
Right click on an empty macro box on the RTTY TNC screen. This will open the macro<br />
editing screen which has to be edited. Make sure the commands are of the form<br />
{H80xx}. Be very careful with the syntax. There must be four digits and a leading H.<br />
Save the macro file and save the configuration. The example uses the macro 'Other 1'<br />
and saved the file under 'Other 1.mc'<br />
The HAL command set included in the DSP4100 TNC technical documentation at the<br />
HAL website<br />
The printout of the macro file below shows an example<br />
The ESC macro under the TX, RX definition box and (it is no longer the first<br />
macro box)<br />
The INIZE macro is the initialization macro<br />
Although shown on two lines in most editors, it is programmed as just a<br />
series of commands in <strong>N1MM</strong><br />
The last command is a return to RX (in hexadecimal). This initialization<br />
273 of 319 2/2/<strong>2011</strong> 4:35 PM
http://n1mmtw61.semdxa.org/tiki-print_multi_pages.php?printstructures...<br />
macro establishes the following TNC characteristics: FSK, BAUDOT, 45<br />
baud, normal FSK mark, normal tones, USOS on, force to letters, TX/RX<br />
polarity the same, diddles on, squelch level set to 15, PTT delay =200 ms<br />
for XMIT and 100 ms for RX, transmit text echo and tuning indicator on<br />
There are three levels of squelch control provided. The second word in the<br />
macro contains a 80nn. The nn is the squelch level. Zero is the lowest and 99 is<br />
the highest. You may have to tailor these to your particular radio. RXnorm and<br />
RXinv permit inversion of received signals. Echo y (echo yes) and Echo n (echo<br />
no) permit echoing of the transmitted characters as they are sent in the received<br />
screen area<br />
Fnar, Fmid, Fwide are the filter width selection macros (55Hz, 75Hz, 100Hz)<br />
B45 sets the baud rate to 45 baud. If you want another rate change the 8000<br />
command to 800x, where x =1, 2, 3, 4, 5 for 50, 57, 75, 100, 110 baud<br />
respectively<br />
Tun on and Tun off control the tuning indicator. The tuning indicator is a freq<br />
offset bar indicator with a center zero position. Turn the radio knob towards the<br />
bar until it aligns with the center mark. This indicator currently has one problem.<br />
It can't be used with call capture. The frequency offset data being sent back<br />
confuses the call capture logic<br />
Turn On using {H805D}<br />
Turn Off using {H804D}<br />
An Example Macro file (other 1.mc) is available for download from the <strong>N1MM</strong> website<br />
(Other files)<br />
274 of 319 2/2/<strong>2011</strong> 4:35 PM
First time startup<br />
Start up <strong>N1MM</strong> logger first<br />
After the program loads, make sure focus is on the TNC received text screen. Then<br />
turn on the DXP38. If the data link is OK , an @ will be printed on the screen. You will<br />
have to create the macros the first time, save the configuration and save the macros to<br />
the file. I saved them to the 'Other 1.mac'<br />
Subsequent startups<br />
Turn on the DXP38. Start <strong>N1MM</strong> logger. Click on the INIZ macro. One should see a<br />
text rendition of the initialization process on the screen. See the picture above. If the<br />
function keys have not been defined yet, do so. Almost without exception, end with an<br />
{RX}. The call sign in the S&P mode might not have the {RX} command. Now use the<br />
program as one would a CW or SSB contest. Call capture as well as the insert key<br />
work just like the CW mode Note: The initialization macro puts the TNC and rig in the<br />
transmit mode. No other macros do unless one embeds text characters, spaces or a<br />
{TX} command.<br />
5.3. Known Problems<br />
I have experienced some occasional problems on start-up and shutdown.<br />
Startup - Sometimes the DXP38 and <strong>N1MM</strong> logger just don't want to communicate. The TNC<br />
won't accept the initialization commands. The cure is to shut off the TNC and wait about 45<br />
seconds. Shutdown <strong>N1MM</strong> logger. Start up the TNC and wait until it has finished its internal<br />
initialization. (LED indicators have stopped flashing). Restart <strong>N1MM</strong><strong>Logger</strong>. This may be a<br />
problem I have with the COM3 port here and you may never see it.<br />
Shutdown - About half the time the DXP38 will go into the transmit mode when <strong>N1MM</strong><strong>Logger</strong> is<br />
shutdown. The cure is to turn off the DXP38. Hopefully a more graceful shutdown can be<br />
developed.<br />
6. HAL ST-8000 Setup (not supported)<br />
The HAL ST-8000 TNC is not supported and will not work with <strong>N1MM</strong> <strong>Logger</strong> as the baud rate<br />
used by the HAL is 45 baud and the serial port control in <strong>N1MM</strong> only will go as low as 110 baud...<br />
7. KAM Setup<br />
http://n1mmtw61.semdxa.org/tiki-print_multi_pages.php?printstructures...<br />
Launch Hyperterm and set its parameters to 9600 bps, 8 databits, no-parity, 1 stopbit and<br />
no flow control<br />
Connect the KAM to the port configured in Hyperterm<br />
Turn on the KAM<br />
When you see the message 'Press (*) to set Baud Rate, press the "*" button'<br />
275 of 319 2/2/<strong>2011</strong> 4:35 PM
Then set your callsign as prompted<br />
To place the unit into RTTY mode type "RTTY"<br />
Also make sure the unit is set up for software handshaking XFLOW = ON<br />
Once you are communicating with the KAM and have it in the RTTY mode, you can also<br />
tune in a RTTY signal and it will decode and print on the Hyperterm window<br />
Now try to transmit by typing a Ctrl+C and a "T" on the keyboard followed by several<br />
characters that you wish to transmit. To get back to receive, type a Ctrl+C and a "R"<br />
If you have problems, consult your KAM manual<br />
Now exit the Hyperterm program and start <strong>Logger</strong><br />
Below are sample RTTY settings for the KAM TNC<br />
AUTOCR 0 AUTOLF ON AUTOSTRT OFF<br />
BKONDEL ON CD SOFTWARE CRADD OFF<br />
DIDDLE ON ECHO ON FILTER OFF<br />
FSKINV OFF INVERT OFF LFSUP OFF<br />
LOWTONES OFF MARK 2125HZ RBAUD 45<br />
SHIFT 170 SPACE 2295HZ USOS ON<br />
XFLOW ON XMITECHO ON<br />
There are three parts in setting up <strong>N1MM</strong> logger to work with the KAM.<br />
1. Port configuration<br />
2. Digital configuration<br />
The KAM should have a checkmark in digital<br />
On the digital configuration dialog<br />
Choose a free port and configure it for 9600 baud, N,8,1 and none<br />
3. Macro Creation required to control the KAM<br />
http://n1mmtw61.semdxa.org/tiki-print_multi_pages.php?printstructures...<br />
Set the TX macro to: {Ctrl-C}T<br />
will go into transmit<br />
Set the RX macro to: {Ctrl-C}E<br />
return to receive after the message is completed<br />
Set the ESC macro to: {Ctrl-C}R<br />
this will immediately return the system to receive before sending any text<br />
For example<br />
CQ macro: {TX} CQ CQ CQ DE W3PP W3PP W3PP KKK {RX}<br />
276 of 319 2/2/<strong>2011</strong> 4:35 PM
8. PK-232 Setup<br />
Make sure the PK-232 autobaud is set and the unit is set to RTTY mode<br />
Launch Hyperterm and set its parameters to 1200 baud, 8-data, no-parity, 2 stop bits, and<br />
no flow control<br />
Connect the PK-232 to the port configured in Hyperterm<br />
Turn on the PK-232<br />
Type a few "*" characters so your PK-232 will autobaud to the 1200 baud rate<br />
Now place the PK-232 in the RTTY mode by typing the command "BAUDOT". It should<br />
respond OPMODE now BAUDOT<br />
Turn the threshold pot full clockwise and make sure the LED is on<br />
Also make sure the unit is set up for software handshaking XFLOW = ON<br />
Once you are communicating with the PK-232 and have it in the BAUDOT mode, you can<br />
also tune in a RTTY signal and it will decode and print on the Hyperterm window<br />
Now try a transmit by typing a "X" on the keyboard followed by several characters that you<br />
wish to transmit. To get back to receive, type a Ctrl+C and a "R"<br />
If you have problems, consult your PK-232 manual<br />
Now exit the Hyperterm program and start <strong>Logger</strong><br />
8.1. Setting up the PK-232<br />
By John VK4WPX / VK4CEJ<br />
Setting up the PK-232 for RTTY is very simple and straightforward.<br />
http://n1mmtw61.semdxa.org/tiki-print_multi_pages.php?printstructures...<br />
First, open the 'Configurer' (On the main logging window click Config, Configure Ports,<br />
Telnet addresses, Other)<br />
Click the Hardware tab<br />
Click in the box adjacent to the COM port that you have your PK-232 connected to in<br />
the column labeled 'Digital'<br />
See picture below, the example here shows the PK-232 on COM-2<br />
277 of 319 2/2/<strong>2011</strong> 4:35 PM
http://n1mmtw61.semdxa.org/tiki-print_multi_pages.php?printstructures...<br />
Next, click on the Digital Modes tab and set up the Digital Interface 1 parameters<br />
The example in the picture below shows that the PK-232 is set for 9600 baud, no<br />
parity and 8 data bits<br />
278 of 319 2/2/<strong>2011</strong> 4:35 PM
Setting up macros and the main logging window "F" keys for the PK-232 is also really very<br />
simple.<br />
Modify any existing macros that came pre-configured by replacing every instance of ' {TX} '<br />
with ' {Ctrl-C}Xmit{ENTER} '<br />
I found that the command did not work every time unless it was followed by the<br />
{ENTER}<br />
or, if the macro does not have {TX} or {RX} in it and you want it to start transmitting or<br />
go to receive, add those commands and, replace every instance of {RX} with {Ctrl-D}<br />
Example: F1 "CQ" macro would therefore be " {Ctrl-C}Xmit{ENTER}CQ CQ CQ DE * * *<br />
K{Ctrl-D} "<br />
Example: F5 macro "Hiscall" would be " {Ctrl-C}Xmit{ENTER}! "<br />
Which would leave the rig in transmit mode so that you could type more info in the<br />
transmit window<br />
To return to receive, press Ctrl+D (hold down the Ctrl key and press D)<br />
9. SCS PTC Setup<br />
http://n1mmtw61.semdxa.org/tiki-print_multi_pages.php?printstructures...<br />
Take the PTC as you use it for other digimode programs e.g. ALPHA (by DH7RG), XPWIN<br />
(By KF7XP), LOGGER (by K4CY)<br />
Set the PTC to SERBAUD 19200 (not AUTO ! ) > switch the PTC OFF<br />
279 of 319 2/2/<strong>2011</strong> 4:35 PM
Start <strong>N1MM</strong><strong>Logger</strong> and go to 'Config | Configure Ports, Telnet Address, Other', Select the<br />
tab 'Digital Modes'. Set 'Digital Interface 1 TU Type' to 'CW/Other', set the used serial port to<br />
19200 Baud, N-8-1-none. Set the 'Digital Interface 2 TU Type' to 'None'. Save with 'OK'<br />
Click on Windows and select Digital Interface<br />
Be sure that the PTC is connected to the right serial port and switch it ON and the start info<br />
will appear in the upper window finished by the prompt cmd: If you can't see anything<br />
check serial port and settings<br />
Click in the lower window, enter with the keyboard 'Escape+Shift bau 45 ENTER' the PTC<br />
will switch to RTTY (look at the PTC mode display). Add 'Escape+Shift term 1 ENTER' to<br />
switch the PTC to echo the transmitted signs in the upper window. Note : Escape without<br />
Shift will switch the cursor to the main window<br />
In the open Digital Interface select 'File | Settings' and select Tab: 'Macro Setup'. Select<br />
behind 'Digital Macro Set' 'Other 1'. Now three buttons appear with TX, RX and ESC on it.<br />
These buttons have to filled with the sequence to put the PTC in TX and RX and to get a<br />
correct function for canceling the AUTO-CQ function or make a break with the ESC-key on<br />
the keyboard<br />
Digital Macro Set: Other 1<br />
TX button: {Ctrl-Y} NB. in capital letters<br />
Now the macro {TX} can be used to switch the TX ON<br />
RX button: {Ctrl-Y} NB. in capital letters<br />
Now the macro {RX} can be used to switch the TX OFF<br />
ESC button: {ESC}CLR{ENTER}{Ctrl-D}{ENTER}<br />
The macro will reset the PTC-2 to PACTOR, clear the TX buffer and switch the<br />
PTC-2 back to RTTY<br />
There are a maximum of 24 extra functionkeys. One of them may be configured to switch<br />
the PTC-2 from the default state PACTOR to RTTY<br />
Name button: RTTY<br />
Contents button: {ESC}clear{ENTER}{ESC}bau 45{ENTER}{ESC}term 1{ENTER}<br />
Every time you start the PTC-2 you may click on this key to start the<br />
RTTY-mode. You need 'term 1' to get a delayed echo on the RX-window when<br />
your text is transmitted<br />
You may generate more macros with simple QSO texts using the installed <strong>N1MM</strong><strong>Logger</strong><br />
macros as !, *, DATE, TIME etc<br />
Don't forget to start a functionkey with {TX} and at the end place {RX} to switch back to<br />
receive<br />
See for some macro examples at macros page<br />
VHF and Up Contesting<br />
In this Section...<br />
VHF and Up Contesting<br />
1. VHF Options<br />
2. Gridsquare Key Assignments (VHF and up)<br />
http://n1mmtw61.semdxa.org/tiki-print_multi_pages.php?printstructures...<br />
280 of 319 2/2/<strong>2011</strong> 4:35 PM
2.1. Call History Lookup<br />
2.2. Updating the Call History File<br />
3. VHF master.dta File<br />
3.1. Transverter Support<br />
4. VHF Beacons<br />
5. Example Contest Setup<br />
5.1. Create (days) Before the Contest<br />
6. Before Starting the Program<br />
7. After Starting the Program<br />
<strong>N1MM</strong> logger has some features which will be appreciated especially by VHF and up contesters.<br />
The program supports bands up to the SHF bands 10, 24, 47, 76, 142 and 241 GHz<br />
1. VHF Options<br />
http://n1mmtw61.semdxa.org/tiki-print_multi_pages.php?printstructures...<br />
The frequency is shown in the Bandmap and in the Entrywindow. When the frequency is above 1<br />
GHz the band will be shown in cm, not the exact frequency in the Entry window. When entering<br />
QSOs it's easy this way to recognize the band in which you log.<br />
281 of 319 2/2/<strong>2011</strong> 4:35 PM
2. Gridsquare Key Assignments (VHF and up)<br />
Alt+equal (=) - Search entered info from both the Callsign field and the Gridsquare field in<br />
the call history table<br />
The results will be shown in the Check window<br />
Alt+minus (-) - Toggle through call history and entered grid squares (max 3) in the grid<br />
square entry field<br />
When no grids are found in the call history there is nothing to toggle<br />
2.1. Call History Lookup<br />
More information about this can be found in the Before the Contest chapter.<br />
This feature is very useful in VHF contests. Lookup examples are lookups for names (Friends file<br />
in RTTY contests), gridsquares for VHF contests, ages in All Asian DX contests etc. With the<br />
importing and exporting options the call history table can be updated.<br />
Call history lookup is enabled with the option >Config >Call History Lookup. If enabled, it will look<br />
up in VHF contests: Grid Square (max 2) and Name.<br />
2.2. Updating the Call History File<br />
The program itself does have a function to export the log file to (update) the call history table<br />
under >Tools >Update Call History with current log'. This function will fill the call history table with<br />
the contents of the currently selected log.<br />
Another method used which gives more control is the separate program called Thucydides by<br />
Carel, PC5M. Check it out in the Links chapter chapter and the Third Party Software chapter..<br />
3. VHF master.dta File<br />
For HF there are several master.dta files which contain callsigns of active contesters. Select the<br />
Master Callsign database link on the download page. There are separate files for RTTY and for<br />
VHF and up contesting. A very nice tool to create a master.dta file has been written by Alex,<br />
VE3NEA. This tool can be downloaded from his site (see the Links chapter) and is freeware! A<br />
text file with callsigns is needed. An example master.dta file for VHF is available from the <strong>N1MM</strong><br />
website in the 'Other Files' menu under 'Downloads'.<br />
3.1. Transverter Support<br />
http://n1mmtw61.semdxa.org/tiki-print_multi_pages.php?printstructures...<br />
<strong>N1MM</strong> logger has transverter support in the form that per band an offset frequency can be set.<br />
Right click on the bandmap and select >Set transceiver fffset frequency. The offset value is saved<br />
by the program so after a restart the offset is still there.<br />
282 of 319 2/2/<strong>2011</strong> 4:35 PM
Band (kHz) - enter the transmit frequency of the transverter<br />
IF Freq (kHz) - the frequency used between the radio and the transverter<br />
An offset can also be added to adjust the transverteror radio to the exact frequency (like when the<br />
oscillator is a bit off).<br />
See the 432000,12 example where a correction is being made of 120 Hz. Great to have to be right<br />
on the packet cluster spots!<br />
Bandup/Banddown<br />
If you have a radio that has 160-2m, and you want to use bandup/banddown, you'll need to put<br />
entries in for bands that you do not have transverters for, if there are gaps in bands that the<br />
radio/transverters cover. You would really have to put a lot of transverters offsets in if you want<br />
the frequencies to "wrap".<br />
It does not work if your radio does not accept the calculated frequency. For example, set up<br />
for Band: 144000 and IF freq: 28000 and you put in 146100 and your radio can't go to<br />
30100, you will get strange results<br />
Remember to enter the frequency of the transceiver and not that of the transverter when<br />
going into split mode (Alt+F7).<br />
4. VHF Beacons<br />
http://n1mmtw61.semdxa.org/tiki-print_multi_pages.php?printstructures...<br />
Next Offset Band<br />
If the next band is not defined as offset to a frequency that my radio can handle and<br />
bandup/down is used, it goes to an HF frequency (without offset).<br />
<strong>N1MM</strong> logger is capable to show beacons in the bandmaps for a defined period of time. Normally<br />
every spot in the bandmaps will disappear after the 'Packet Spot Timeout' which is valid for every<br />
spot in the bandmap. The same for beacons coming in as spots. So an extra import option has<br />
been added for beacons with where the spot timeout can be set to a much higher value (like days<br />
283 of 319 2/2/<strong>2011</strong> 4:35 PM
or even weeks).<br />
Importing beacons and showing them in the bandmaps for the bands can be done by importing a<br />
text file in a specific format. Enter the text BEACONS in the Entry window callsign field and a file<br />
selection dialog will open where a .txt file (with beacons in the correct format) can be imported.<br />
An example beacons text file can be found in the <strong>N1MM</strong> logger program directory (called<br />
Beacons.txt). In the beacons text file lines with a # are remarks, the first line in the text is the<br />
timeout for all beacons in hours. Every line with a beacon must contain callsign, frequency (in<br />
kHz) and grid locator (4 or 6 digit). The frequency may be in either US (50000.25) or European<br />
(50000,25) format. A comment per beacon is optional. Note the ; as separator (don't forget one or<br />
it won't import). Below an example beacons.txt file.<br />
# Hours to stay in bandmap (mostly > 24 or > 48)<br />
60<br />
# Call beacon;Frequency;Grid;Comments<br />
OZ7IGY/B;144471,1;JO55WM;<br />
PI7CIS/B;144416,2;JO22DC;Should always be heard<br />
DL0PR/B;144486,3;JO44JH;Switches power!<br />
GB3VHF/B;144430.4;JO01DH;QRG with a .<br />
ON0VHF/B;144418,5;JO20;4 digit grid<br />
A file with beacons in the correct format for Europe (Region I) can be found on the <strong>N1MM</strong> website<br />
under 'Other Files' in the 'Download' menu.<br />
The NCDXF/IA<strong>RU</strong> Beacon Network<br />
No need to add the NCDXF/IA<strong>RU</strong> Beacon Network on 14.100, 18.110, 21.150, 24.930 and<br />
28.200. They are already incorporated in the program and the beacon transmitting at that<br />
time (when your PC clock is correct) will be shown in the Entry window statusbar when you<br />
are listening on one of these frequencies.<br />
5. Example Contest Setup<br />
Additions are welcome!<br />
5.1. Create (days) Before the Contest<br />
http://n1mmtw61.semdxa.org/tiki-print_multi_pages.php?printstructures...<br />
284 of 319 2/2/<strong>2011</strong> 4:35 PM
New master.dta file<br />
Use tool from Alex, VE3NEA, see the Links chapter<br />
Create '<strong>N1MM</strong> logger.ini' to use during the contest<br />
Setup all the program setting and place the windows as you like them during the<br />
contest (on the computer to use)<br />
Don't forget the tab 'Mode Control' in the Configurer.<br />
After closing the program it has created a file called '<strong>N1MM</strong> logger.ini 'with all the<br />
settings<br />
Copy '<strong>N1MM</strong> logger.ini' (not .init) to ' VHFsettings.ini'.<br />
Text file with contents Function keys for SSB/CW<br />
As a start:<br />
'File | Export | Export Function Keys to file... | SSB Function Keys'<br />
Give a name like: VHFssbfunctionkeys.mc<br />
'File | Export | Export Function Keys to file... | CWFunction Keys'<br />
* Transverter support<br />
As a start:<br />
'File | Export | Export Function Keys to file... | SSB Function Keys'<br />
Give a name like: VHFssbfunctionkeys.mc<br />
'File | Export | Export Function Keys to file... | CWFunction Keys'<br />
Give a name like: VHFcwfunctionkeys.mc<br />
Update these text files if needed<br />
Check possible macros in the Macros chapter<br />
Packet/Telnet button text file<br />
As a start: >File >Export >Export Packet/Telnet Buttons to file...'<br />
Update this text file if needed<br />
Give a name like: VHFpacketbuttons.txt<br />
Check possible macros in the Macros chapter like {GRIDSQUARE}<br />
Lookup database text file for the VHF contests to use<br />
Create a text file with callsign, name, locators etc.<br />
Give a name like: VHFlookup.txt<br />
See info about CallHist file<br />
SSB: Wav files for CQ, rst, exchange etc.<br />
Create wav files for all operators<br />
See {OPERATOR} macro in the Macros chapter<br />
Download up to date country file (cty.dat)<br />
mostly a country file is not used for VHF and up contesting but the program gives<br />
information in the Info window about the logged callsign so download the latest<br />
version<br />
Check if the selected contest is still ok, make some test QSOs<br />
This should be done weeks before the contest!<br />
....<br />
6. Before Starting the Program<br />
http://n1mmtw61.semdxa.org/tiki-print_multi_pages.php?printstructures...<br />
285 of 319 2/2/<strong>2011</strong> 4:35 PM
Copy the created master.dta file in the <strong>N1MM</strong> logger program directory<br />
Copy the wav files from all operators in the WAV directory<br />
Turn off Windows sounds if using WAV files<br />
Windows >Control Panel >Sounds - Scheme: No Sounds<br />
Rename ' VHFsettings.ini'. to '<strong>N1MM</strong> logger.ini' and copy it into the program directory<br />
The program will start using the settings as set up days before the contest<br />
7. After Starting the Program<br />
Select/Check if correct database is used<br />
>File >Open Log in Database, select VHF database'.<br />
Import<br />
This has to be done only once if every time the same database is used!<br />
Each database can handle many contests and thousands of QSOs, don't use a<br />
database for every contest!<br />
Updated files (like the lookup file) have to be imported before every contest.<br />
The function keys macros (SSB/CW)<br />
>File >Import >Import Function Keys to file... >SSB Function Keys. Use file<br />
created above (Example: VHFssbfunctionkeys.mc)<br />
>File >Import >Import Function Keys to file... >CW Function Keys. Use file<br />
created above (Example: VHFcwfunctionkeys.mc)<br />
The packet/telnet buttons<br />
>File >Import >Import Packet/Telnet Buttons from file... Use file created<br />
above (Example: VHFpacketbuttons.txt)<br />
Lookup file<br />
>File >Import >Import Call History File. Use file created above (Example:<br />
VHFlookup.txt)<br />
Country file<br />
>Tools >Import country list from downloaded file. Use file<br />
downloaded/updated above<br />
Check Station dialog (>Config >Change your Station Data)<br />
The locator from this dialog is used for distance calculation so needs to be entered!<br />
Check contest ( >File >Choose Which Contest to Log)<br />
Check if entered information is correct.<br />
Enter Sent Exchange (this is contest specific, see Setup Contests chapter)<br />
Setup configuration (Rig control, PTT, CW)<br />
Check Configurer >Mode Control tab<br />
When using a transverter, enter offset for bandmap A and bandmap B<br />
....<br />
Have fun during the contest!<br />
Operating a Contest<br />
http://n1mmtw61.semdxa.org/tiki-print_multi_pages.php?printstructures...<br />
286 of 319 2/2/<strong>2011</strong> 4:35 PM
Table of Contents:<br />
1 Before the Contest<br />
2 During the Contest<br />
3 After the Contest<br />
Before the Contest<br />
In this Section...<br />
Before the Contest<br />
1. Start of the contest season<br />
1.1. All Stations<br />
1.2. Assisted or Multi-op Stations<br />
2. Check the Contest Rules and if the Contest Program Uses Them Correctly<br />
3. Update the Call History Lookup File<br />
4. Importing and Exporting Message Function Keys<br />
5. Getting Ready for CQWW (and other contests)<br />
6. How to Record WAV Files for the Function Keys Used in SSB Contests<br />
6.1. Storing Voice Files<br />
6.2. Recording Letters and Numbers<br />
6.3. Turn Off Windows Sounds When Using WAV Files<br />
7. Making the Window Focus More Distinctive<br />
8. Adding a New Font to Windows<br />
1. Start of the contest season<br />
With the start of the fall it is time to get ready for the big contests. Here are some suggested<br />
steps for your station:<br />
1.1. All Stations<br />
http://n1mmtw61.semdxa.org/tiki-print_multi_pages.php?printstructures...<br />
Print out the key assignments help file and mark it up with a highlighter. Use one color for<br />
things you know how to use, and another color for keys that you didn't realize were there<br />
but are interesting.<br />
Learn how to enter frequencies from the entry window. You can type 14<strong>02</strong>2. If you are<br />
already on a band, you can type offset from the bottom of the band or the last three digits<br />
of the frequency. On 80m examples are 22 for 3522 and 795 for 3795.<br />
Learn how to set split. Use the callsign textbox if you have not already copied the call. e.g.<br />
On 40m, 214 ctl-enter will set your tx freq to 7214. Use Alt+F7 to set split when there is<br />
already a call in the textbox. A recent change allows you to clear split by pressing Alt+F7<br />
287 of 319 2/2/<strong>2011</strong> 4:35 PM
and pressing enter with no frequency entered. Esc still leaves split alone.<br />
On many radios, the up/down keys tune the radio or the rit depending on whether you are<br />
running or S&P. You can adjust the step amount in the configurer.<br />
Learn to use check partial. I find it is usually faster to make a good guess at the callsign<br />
and let them correct you than to just say what you know. I usually ask if their call is correct.<br />
On CW, use ESM. It's a skill that pays big rewards in believe it or not, reducing stress.<br />
Instead of thinking all the time "what key next", the program does it for you. Also learn to<br />
use the = key. It means, send the last message. Another good trick when you are tired.<br />
Make sure you understand how the bandmap and callframe work even if you are not<br />
assisted. As you work stations, they will be "spotted" in your local bandmap. This allows<br />
you to skip over them during your next S&P trip through the band. This saves a lot of time.<br />
The call will appear in grey in the callframe as the station gets within the user-definable<br />
tuning tolerance. Grey means you worked them. Tune on.<br />
Make sure you load the lasted wl_cyt.dat and check partial files prior to the contest. Note<br />
that the wl_cty.dat has to be imported into the program. A step many forget.<br />
During the contest, if you work a station that is not handled properly by the country file, just<br />
put the correct prefix in front of it like (W8/N8SS), then log with Ctrl+Alt+Enter. You can put<br />
a note to check it later. You don't want to take a lot of time to fool with it during the contest.<br />
The other approach is to use Tools/Add call to country. To use this, you need to know the<br />
base countries in cty.dat. A printed copy at the operating position is helpful in this.<br />
1.2. Assisted or Multi-op Stations<br />
http://n1mmtw61.semdxa.org/tiki-print_multi_pages.php?printstructures...<br />
You can use the available window to help determine band strategy. Bands with lots of<br />
available spots are likely open well to where the spots are from.<br />
Loud stations can jump from spot-to-spot and pick off many Qs. Be sure to confirm the<br />
callsign. Spot quality has been deteriorating. You don't want to get penalized for a broken<br />
call.<br />
Remove broken callsigns with Alt+D. If the call is in your callframe, Alt+D will delete it.<br />
Quick and easy. Otherwise use the right-click option from the bandmap or available list.<br />
During slow times, you may need to turn your antenna to "clean" a band of spotted stations.<br />
Clicking on the beam heading column heading lets you sort the list so you can get them<br />
with minimum rotor movement. Note that clicking all of the headings works. Click a second<br />
time to reverse the sort. Default sort is descending on spotted time (last column - usually<br />
hidden. Scroll over to see it.)<br />
Be sure to adjust the spot timeout and the filtering based on time of day and conditions. If<br />
times are slow, I allow more spots through. At peak times, I want last 20 min, North<br />
American spots only.<br />
Try "call stacking" mode. In multi-op, you can specify another computer as the "target for<br />
call stacking". If both stations set this to each other (recommended) they can see what each<br />
other types in their call textbox in the callframe. This *only* works if they are on a run<br />
frequency. The idea is that you have two ops with headphones listening to a run. If the<br />
secondary op copies the callsign, the primary op can wipe his and just press enter (in ESM<br />
mode). Since the correct call is in the callframe, it will be pulled into the call textbox and be<br />
288 of 319 2/2/<strong>2011</strong> 4:35 PM
sent as part of the exchange. This mode has not been used a lot, so I would recommend<br />
some ambitious souls try it out and let me know what needs changing. Also note that this<br />
function works across the internet. Now there aren't many contests that allow this - IA<strong>RU</strong> for<br />
HQ stations is the only one I know of - but wouldn't it be an interesting kind of entry class?<br />
You could have one big gun and lots of listening stations supporting it. If you do this across<br />
the internet with stations exceeding the contest's separation limit, you must submit your log<br />
as a check log. The internet mode is useful for practicing with your Multi-op partner without<br />
the necessity of going to a single location.<br />
73, Tom - <strong>N1MM</strong><br />
http://n1mmtw61.semdxa.org/tiki-print_multi_pages.php?printstructures...<br />
2. Check the Contest Rules and if the Contest Program Uses Them<br />
Correctly<br />
But of course the program should keep up with all the rules for the contests it logs... but there is<br />
just one problem, there are so many of them! And you know what?? If there is an obvious bug<br />
like that found during the contest it is there for one, and only one, reason. YOU didn't test the<br />
software before the contest! (no Tom, not just you, I'm pointing at all the users out there)<br />
Remember, the <strong>N1MM</strong> logger is free, written by volunteers, tested as much as we can before it<br />
gets out to users, but none of the relatively small group of writers and beta testers has time to try<br />
out every contest, all the possible scenarios, and all the combinations of them. Look at the list of<br />
contests supported, multiply by something like 1.5 for contests that have different rules 'in state'<br />
vs 'out of state' (or country, or continent, or whatever), then multiply by at least 4 or 5 for entry<br />
classes with unique rules, then multiply by 3 or 4 again for the different types of multiplier lists,<br />
points to assign, qso's that do count or don't count in each set of rules, and then multiply by a<br />
couple more things... and you get LOTS of combinations. In the software profession the logger<br />
would be considered virtually untestable for a single release, let alone for release after release<br />
adding new features, changing contest modules to update for the latest rule changes, updating<br />
country lists, county lists, list lists, and there isn't enough time in the year for anyone to even<br />
begin to test it all.<br />
So, its up to YOU, the users, to test. Yes, YOU. YOU are the ones that know the rules, YOU are<br />
the ones that will be depending on it working for a whole weekend... and if you add up all the<br />
YOU's out there who are using the software every weekend it adds up to enough man power to<br />
do a reasonable job of covering the critical parts of the program.<br />
The key is, if you are planning to operate in a contest a couple weeks from now, lets say, cqww<br />
ssb... Load the latest software NOW, create a dummy database, and sit down with your radio,<br />
computer, cluster connection, keyers, and whatever else you use, and log a couple dozen<br />
contacts as if you were running(fake them, type and hit function keys as fast as you can and see<br />
if it responds reasonably quickly)... then log a few more in S&P mode, make sure your messages<br />
and macros work as expected, make sure you can record and playback ssb messages on the fly,<br />
make sure the multipliers you think should be counted are scored right, log some contacts that<br />
shouldn't be multipliers or points and make sure they aren't. grab some spots, make some spots,<br />
make sure the spots show up in the right colors for the contest rules. Use the new feature to save<br />
289 of 319 2/2/<strong>2011</strong> 4:35 PM
your screen layout so you can get it back later. Then create a Cabrillo file and make sure that<br />
looks ok... make detailed notes of problems and put in bug reports well in advance. If everyone<br />
did that on some evening, or rainy day, or some morning when you wake up and can't get back to<br />
sleep, we would stand a chance of catching simple things like multipliers that aren't counted right<br />
BEFORE the contest weekend.<br />
So get out there and TEST!<br />
David Robbins K1TTT<br />
3. Update the Call History Lookup File<br />
In some contests part of the exchange is known if the callsign is known. So it would be easy to<br />
have this information shown (or already prefilled) if the callsign is entered. Lookup examples are<br />
names (Friends file in RTTY contests), gridsquares for VHF contests, ages in All Asian DX<br />
contests etc. In all cases the possibility to use this lookup function means changes in the contest<br />
class by the programmer. A lookup is only done when the cursor is in the callsign field in the<br />
Entry window and SPACE or TAB is pressed.<br />
Update the Call History file or create a new one if the contest supports this and the exchange<br />
could be/is known.<br />
More information about Call History can be found in the Advanced Functions chapter.<br />
4. Importing and Exporting Message Function Keys<br />
The CW messages and SSB wav file messages are not contest-specific, but rather portable<br />
between contests.<br />
When you get the message keys set up for a particular contest do the following: >File >Export<br />
>Export Function Keys to >File >CW Function Keys (for example). This saves the message key<br />
setup as a Macro file. Name it after the contest. You can recall that set of function keys any time<br />
you like by importing them: >File >Import >Import Function Keys from File >CW Function Keys<br />
(for example) > (select file)<br />
This way you can make and reuse different files for all the different contests. Just import the<br />
message keys for the contest de jour.<br />
5. Getting Ready for CQWW (and other contests)<br />
Top contesters have a checklist of things to do prior to a major contest. Please consider adding<br />
these logging program related items to your list:<br />
1.<br />
http://n1mmtw61.semdxa.org/tiki-print_multi_pages.php?printstructures...<br />
Make a few dozen test contacts in the contest. Make several QSOs in 'running' mode and<br />
several QSOs in S&P mode. Press the CQ function key to set yourself to 'running' mode. If<br />
it does not, make sure the 'Configurer | Function Keys tab' matches your button setup<br />
290 of 319 2/2/<strong>2011</strong> 4:35 PM
2. If you plan to use any of the following features, make sure they work as you expect:<br />
1. Enter sends messages<br />
2. Autocompletion<br />
3. Multi-op<br />
4. Send leading zeros<br />
5. Send corrected call<br />
6. Radio interface<br />
7. Packet connection<br />
8. Telnet connection<br />
3. Get the latest CTY.DAT and install & test it. The About window will tell you the version you<br />
are using<br />
4. Get the latest MASTER.DTA and put it in your install directory. The Check window at startup<br />
will tell you the version you are using<br />
5. Prepare your CW function keys, SSB wav files, or CQ/RTTY messages. Test them!<br />
6. Make sure that RF does not get into your cabling<br />
7. Make sure you have selected the correct options in the contest setup dialog. For CQWW<br />
your exchange field should contain only your zone. Read the contest rules so you know<br />
how to setup the contest, Function keys etc<br />
8. Run Cabrillo output and check for proper generation<br />
9. Sync your time with an Internet time standard, if possible. I use a freeware program called<br />
Dimension 4 and resync periodically (every hour?) during the contest<br />
10. Review "Key Assignments" in the help. Print it out or print out a keyboard template which<br />
can be found on the <strong>N1MM</strong> website under 'Downloads', select in the 'Download' menu,<br />
'Other Files'.<br />
73, & GL in the contests<br />
Tom Wagner - <strong>N1MM</strong><br />
6. How to Record WAV Files for the Function Keys Used in SSB Contests<br />
By Tom, <strong>N1MM</strong>.<br />
http://n1mmtw61.semdxa.org/tiki-print_multi_pages.php?printstructures...<br />
1. I use Cool Edit 96, but there are later versions<br />
2. Record **all** of the messages on one wav file. Make sure you have a quiet room. Record<br />
each message at least TWICE. Sound excited!<br />
3. Leave 5 seconds of empty space at the beginning of the recording<br />
4. Record<br />
5. Save the recording as "Raw CQ" or some such<br />
6. Use Cool's noise reduction feature. Mark the blank part of the wav, and set the noise<br />
reduction, then noise reduce the whole wav file<br />
7. Save the recording as "Noise reduced CQ"<br />
8. Perform bass reduction, treble boost or whatever other transformations and save them as<br />
you do them<br />
9. You can use compression, but I don't recommend it<br />
291 of 319 2/2/<strong>2011</strong> 4:35 PM
10. Split the wav file into the separate messages, saving the best of the two recorded<br />
Recording ALL your messages in one recording and afterwards splitting them up using a WAV<br />
editor will avoid the pops at the start and end of recording, as well as making it more likely that all<br />
the messages will be recorded at the same volume level and sound the same.<br />
Don't ask why you need Cool Edit. Just get it.<br />
Another nice program is Audacity and this one is freeware. This program can scale the peak<br />
amplitude of all the audio files to be the same. In order to set the audio level out of the computer,<br />
I recorded 10 seconds of a 800 Hz tone. Scaled the amplitude (peak = mean) and assigned it to<br />
F7. I call it cal.wav. I turn off the speech processor, and turn up the computer volume just until<br />
full output is reached. Although not guaranteed, the peak amplitude of my audio files should now<br />
be in the dynamic range of my transceiver. Afterwards I turn the processor on again.<br />
P.S. OK then, I admit to sometimes turning the volume just 1 or 2 ticks higher to be on the safe<br />
side......... - Thanks PA5DD<br />
6.1. Storing Voice Files<br />
Place the WAV files you have made in the \wav subdirectory of the <strong>N1MM</strong> <strong>Logger</strong> program<br />
directory. Call the files whatever you wish. One way is to label them as:<br />
CQ C:\Program Files\<strong>N1MM</strong> logger\WAV\cq.wav<br />
<strong>N1MM</strong> C:\Program Files\<strong>N1MM</strong> logger\WAV\n1mm.wav<br />
Exch C:\Program Files\<strong>N1MM</strong> logger\WAV\59.wav<br />
6.2. Recording Letters and Numbers<br />
The recording process for individual letters and numbers is the same, but these individual letter<br />
files must be placed in the \letters subdirectory of the <strong>N1MM</strong> program directory. Do NOT put them<br />
in \WAV\letters.<br />
Examples:<br />
letters\1.wav<br />
letters\2.wav etc<br />
? = letters\query.wav<br />
/ = letters\stroke.wav<br />
http://n1mmtw61.semdxa.org/tiki-print_multi_pages.php?printstructures...<br />
It is extraordinarily difficult to achieve fully natural voiced callsigns or serial numbers, because our<br />
inflection varies so much depending on whether a letter or number occurs at the beginning, in the<br />
292 of 319 2/2/<strong>2011</strong> 4:35 PM
middle of, or at the end of a callsign or serial number. This is particularly true with serial<br />
numbers, where being able to say the number 595 as "five hundred ninety five" instead of "five<br />
nine five" is a big aid to intelligibility.<br />
One option is to use voiced callsigns only while running, to save your voice and confirm the call<br />
of the station you are answering, and not to use voiced serial numbers at all.<br />
6.3. Turn Off Windows Sounds When Using WAV Files<br />
Open >Windows >Control Panel<br />
Double-click the Sounds folder<br />
Click on the Sounds Tab<br />
Select scheme: No Sounds<br />
7. Making the Window Focus More Distinctive<br />
By Pete, N4ZR<br />
The standard Windows XP color scheme does not make the active window (among many)<br />
distinctive enough for quick recognition during a contest. This can be an issue particularly in<br />
SO2R operation. Fortunately, this can be fixed. You can do the same thing with Windows 98 as<br />
well, just by right-clicking on the desktop and proceeding as outlined.<br />
In Windows XP the specific process is as follows:<br />
Open >Windows >Control Panel >Appearance and Themes<br />
Click on Display<br />
Click on the Appearance Tab<br />
Under Windows and Buttons, select Windows Classic<br />
Click the Advanced Button<br />
Under Item, select the Active Title Bar and choose a color for it<br />
I use dark red for the active window and gray for the inactive<br />
Then select Active Window Border and choose a color for it<br />
You will probably want to fool around for a while before you settle on what you like best. Once<br />
you have done that, back out to the Themes tab under Display Properties. Click the Save As<br />
button and name this theme and save it to your settings.<br />
From now on, all you need to do to switch to your <strong>N1MM</strong> setup is to right-click somewhere on<br />
your desktop, select Properties, and then choose your <strong>N1MM</strong> theme.<br />
8. Adding a New Font to Windows<br />
http://n1mmtw61.semdxa.org/tiki-print_multi_pages.php?printstructures...<br />
293 of 319 2/2/<strong>2011</strong> 4:35 PM
Select Windows >Control Panel >Fonts folder<br />
Select >File >Install New Font<br />
In the Drives box, click the drive and select the folder that contains the fonts<br />
Click the font you want to add. To select more than one font at a time, press and hold down<br />
the Ctrl key while you click each font<br />
Click to select the Copy Fonts To Fonts Folder check box (mostly already selected)<br />
Click < OK ><br />
Done!<br />
During the Contest<br />
In this Section...<br />
1. The Scenario<br />
During the Contest<br />
1. The Scenario<br />
2. Bugs Encountered During a Contest<br />
During a contest you should know all the basic functions of the program like changing frequency,<br />
band and mode. The program should have no secrets any more. Your only concern is making<br />
QSOs, working multipliers, having a good strategy. The manual is lying next to you but you don't<br />
need it, the key assignments (shortlist) has been printed and is hanging within visual range so<br />
when you might forget you can take a peek.<br />
You know there are no bugs in your version because you tested it, made test QSOs. You have<br />
reported bugs long before the contest and of course these have been solved long before the<br />
contest starts.<br />
Long before the contest you have read the Key Assignments, Basic Functions, Setting up the<br />
Program, Entry Window and the Quick Tour to have basic program information. So questions<br />
have been asked and answered, the manual has been read several times.<br />
You have made a clean database, recorded your WAV files and programmed your CW messages,<br />
etc. weeks before the contest.<br />
Nothing can happen to you, you have prepared!<br />
2. Bugs Encountered During a Contest<br />
http://n1mmtw61.semdxa.org/tiki-print_multi_pages.php?printstructures...<br />
When a bug was missed during testing and comes out during the contest please report it right<br />
after the contest or during the contest if it is a show stopper. Tom participates in many contests<br />
294 of 319 2/2/<strong>2011</strong> 4:35 PM
ut he also reads the mail during contests and can give hints or sometimes bring out a new<br />
version. In addition to Tom there are many other hams available who can help solving problems,<br />
giving hints etc.<br />
Rather than writing down problems during the contest, try the following:<br />
1. Use Alt+N to write a Note that will be attached as a comment to the QSO. For example,<br />
"This call not in master.dta."<br />
2. At the end of the contest, use the menu option >View >Notes to see all the notes you have<br />
made during the contest<br />
After the contest<br />
When the contest is over we are not ready yet. The points have to be calculated and the log has<br />
to be submitted.<br />
In this Section...<br />
After the contest<br />
1. Entering QSOs After the Contest<br />
1.1. Enter QSOs<br />
1.2. Change Time/Date for a Single Hand-Entered QSO<br />
1.3. Change TIme/Date for Multiple Hand-Entered QSOs<br />
2. Change All QSOs Time/Dates by a Fixed Amount<br />
3. How to Create Cabrillo Files<br />
4. How to Print the Log<br />
5. How to Get Statistics<br />
6. Submitting E-mail Logs for ARRL/CQ Contests<br />
6.1. ARRL Contest Robot<br />
7. Printing QSL Cards<br />
8. Importing a Contest Log into Your General Logging Program<br />
1. Entering QSOs After the Contest<br />
Made a paper log during (part of) the contest? The QSOs have to be entered after the contest.<br />
The program has some nice features that will allow rapid QSO entry, and allow you to easily set<br />
the date and time via interpolation. (Remember, exact QSO times are not critical for contest<br />
sponsors, just within reason) This feature is most useful if you have a bunch of QSOs to enter. If<br />
you have one or two QSOs on paper you might as well do it the old way...<br />
1.1. Enter QSOs<br />
Suggested way to enter QSOs<br />
http://n1mmtw61.semdxa.org/tiki-print_multi_pages.php?printstructures...<br />
295 of 319 2/2/<strong>2011</strong> 4:35 PM
Example:<br />
Type frequency/band, hit Enter<br />
Continue entering calls and exchange as long as they are on the same band (type as fast<br />
as you can and don't worry about the times, they will be fixed later)<br />
If the band changes, type new frequency/band, and finish typing calls on that band<br />
7000 Enter<br />
W1ABC 35 CT Enter<br />
W2XYZ 55 MA Enter<br />
14000 Enter<br />
W5JOE 42 TX Enter<br />
...<br />
1.2. Change Time/Date for a Single Hand-Entered QSO<br />
Updating the timestamp from a qso can be done from within the Entry window using the callsign<br />
field. Entries starting with "T" and four numeric digits will update the current row time in the log.<br />
Example: T1234 will enter the time 12:34. When entering qso's after the contest, first enter the<br />
qso information and enter the qso in the log. Then update the time using Txxxx and the tiem of<br />
the last entered qso will be updated.<br />
1.3. Change TIme/Date for Multiple Hand-Entered QSOs<br />
To change time/date of a series of the hand-entered QSOs:<br />
http://n1mmtw61.semdxa.org/tiki-print_multi_pages.php?printstructures...<br />
Make a Copy of Your Log<br />
Make a copy of your log, and only use the copy for this process! You cannot (automatically)<br />
reverse the time interpolation process below. You have been warned!<br />
Put mouse over the first QSO you want to change the time/date and single click to highlight<br />
the row<br />
With mouse over log window, right click<br />
Select >Set Start Interpolation Time Row<br />
Enter desired start time, and hit < OK ><br />
Put mouse over the last QSO you want to change the time/date and single click to highlight<br />
the row<br />
With mouse over log window, right click<br />
Select >Set Stop Interpolation Time Row<br />
296 of 319 2/2/<strong>2011</strong> 4:35 PM
Enter desired stop time, and hit < OK ><br />
Changing QSO TIme and Date<br />
The utility will average out the time for each QSO in the group of QSOs you have selected.<br />
Remember there is no "undo" feature, so make a copy of your log before using this utility. If<br />
you have a large gap in time in your hand log, enter the first batch of QSOs, and do the<br />
interpolation. Then enter the second group of QSOs and do a 2nd interpolation (by breaking<br />
up the interpolation, you can better accommodate gaps in the log).<br />
2. Change All QSOs Time/Dates by a Fixed Amount<br />
Backup Your Log<br />
While you could easily recover from a mistake during the following adjustment by performing<br />
another offset, it is advisable that you backup your log before doing any changes.<br />
This will fix a log where all QSOs are off by a common amount of time<br />
Put the mouse over the log window and right click<br />
Select >Change All Contest Timestamps by a Fixed Amount<br />
A dialog box will open, and enter offset time (+ or -) in minutes<br />
The date will automatically adjust if the offset rolls a QSO into a different day. Time is entered in<br />
minutes, and can be negative time to go backwards. (You might need a calculator to determine<br />
the offset minutes if your date was off by many days, months, or years). For example, entering<br />
+1440 will shift a complete day forward; -2880 two days back.<br />
3. How to Create Cabrillo Files<br />
Cabrillo is used by all major contests.<br />
http://n1mmtw61.semdxa.org/tiki-print_multi_pages.php?printstructures...<br />
Select >File >Export >Export Cabrillo to file...<br />
This creates a Cabrillo file for contest log submission<br />
Make sure that the Station information >Config >Change Your Station Data, and<br />
overall contest information (>File >Choose Which Contest to Log ) is correct before<br />
creating this file<br />
It is also a good idea to >Tools >Rescore Current Contest before submitting<br />
A Cabrillo file will be created named .LOG in the <strong>N1MM</strong> logger program<br />
directory<br />
In the Technical Information chapter there is additional information about files the program can<br />
produce. (Cabrillo, summary sheet, log, ADIF etc.)<br />
297 of 319 2/2/<strong>2011</strong> 4:35 PM
4. How to Print the Log<br />
Well, there is no print function 'as such', and I don't think many of us print logs. Paper? Ouch! ;o)<br />
Go to >File >Export, where you see a broad variety of choices. Make an ADIF file for importing in<br />
another program, to import the contest QSOs in the general DXlog. It is possible to make a<br />
summary sheet, save the file, open it in WordPad and then print it. CSV (comma separated value)<br />
format is also an option.<br />
5. How to Get Statistics<br />
The program does have very nice statistics by itself. Also there is a external tool from I8NHJ.<br />
Some alternatives are listed below:<br />
Select >View >Statistics. Take your pick<br />
Export to ADIF and import in a general DX log. Use the statistics from that program<br />
Use the Cabrillo output format, needed by most (if not all) contest sponsors<br />
Use the brilliant I8NHJ's tool (also free!) to analyze the log afterwards<br />
More info about this tool is given in the Third Party Software chapter.<br />
6. Submitting E-mail Logs for ARRL/CQ Contests<br />
ARRL and CQ require Cabrillo log files for each contest.<br />
The Cabrillo log file named: .LOG Example: <strong>N1MM</strong>.log<br />
Select >File >Export >Export Cabrillo to file...<br />
Submitting the files<br />
http://n1mmtw61.semdxa.org/tiki-print_multi_pages.php?printstructures...<br />
Check the Cabrillo file with Notepad. Read the the first part (header) of the log file to<br />
check if all is correct<br />
Enter the appropriate e-mail address for this contest. See the ARRL and CQ Web sites<br />
ARRL at http://www.arrl.org/contests/email.html<br />
CQ at http://www.cqww.com<br />
Enter the correct e-mail subject line:<br />
ARRL: Contest, Yourcall, Class and Power<br />
For example E-mail subject line: ARRL DX CW <strong>N1MM</strong> SOA HP<br />
CQ: Callsign and the mode (SSB or CW)<br />
For example E-mail subject line: <strong>N1MM</strong> CW<br />
Attach the Cabrillo file named < yourcall >.* . DO NOT send as text but as attached files<br />
Press < Send ><br />
You'll receive an automated reply from the contest email robot (answering computer),<br />
acknowledging receipt of your log. Please save this message<br />
298 of 319 2/2/<strong>2011</strong> 4:35 PM
Remember that logs received after the deadline will be considered check logs only!<br />
6.1. ARRL Contest Robot<br />
Log files to the ARRL have to be Cabrillo files and need to be sent as attachments (not as text)!<br />
Below is a typical, automated response from the ARRL contest Robot.<br />
Thank you for your participation in the contest and for submitting your log in Cabrillo format.<br />
While the robot appears to be able to process your log, it appears to have discovered<br />
irregularities in your log. These do not affect its ability to be processed but correcting these<br />
problems will help ensure the entry is properly scored. These irregularities appear in a report at<br />
the bottom of this message. You are encouraged to review and fix these irregularities. You may<br />
then re-send it to dxcw@arrl.org. You may have to resubmit your log two or three times to get<br />
everything just right. Don't worry, the robot replaces the previous file as long as the callsign<br />
remains the same. We want to make sure that we have your information right! If you have any<br />
questions regarding this, please contact me at n1nd@arrl.org or by phone at 860-594-<strong>02</strong>32.<br />
Your tracking number is 3044.dxcw. Please save this receipt until verifying that your log appears<br />
on the Logs Received web page at<br />
http://www.arrl.org/contests/claimed/<br />
Thanks for your cooperation.<br />
73 Dan Henderson, N1ND<br />
5<br />
ARRL Contest Branch Manager<br />
ARRL DX CONTEST LOG WARNING MESSAGE REPORT FROM THE ROBOT<br />
CATEGORY-OVERLAY: N/A%%<br />
Line 7 was discarded. The CATEGORY-OVERLAY: tag is not used in ARRL contests. You may<br />
delete this line from your log.<br />
Delete the line and send the log again. Now the log is accepted without warning messages.<br />
7. Printing QSL Cards<br />
http://n1mmtw61.semdxa.org/tiki-print_multi_pages.php?printstructures...<br />
<strong>N1MM</strong> logger doesn't have a QSL cards sent/received feature. Why? If every general logging<br />
feature people want has to be implemented, the program would be neither a good contest<br />
program, nor a good general logging program. It has been decided early that this was to be a<br />
contest program with a few general logging features. To print QSL cards use a dedicated QSL<br />
manager (like BV) or use your daily logging program. Almost all logging programs who can print<br />
299 of 319 2/2/<strong>2011</strong> 4:35 PM
QSL card can accept ADIF input.<br />
8. Importing a Contest Log into Your General Logging Program<br />
By Franki, ON5ZO<br />
<strong>N1MM</strong><strong>Logger</strong> can be used for DX-logging but this is not where it was written for. You are missing<br />
some basic features of course, like award and country tracking and QSL'ing options. There is no<br />
way around this than using a specific DX logger for DX, or at least to do the "bookkeeping"<br />
afterwards. You can do this by exporting your <strong>N1MM</strong> log to ADIF and importing this file in the DX<br />
logger.<br />
What I mean is this: <strong>N1MM</strong><strong>Logger</strong> provides the ADIF-export feature. This creates a simple and<br />
plain ASCII file from your log-database. You can open and edit this file with any ASCII-editor, like<br />
the old DOS "Edit", Windows' Notepad or WordPad. In this file, the different parts that define a<br />
"QSO" (time, QRG, call, reports etc. etc.) are separated by field identifiers or tags that are<br />
defined in the standard of the ADIF-format. Read all about it at: http://www.hosenose.com<br />
/adif/adif.html<br />
You cannot simply use this file for DX logging, but you can import this file in any casual DX<br />
logging program.<br />
When I entered a contest, and I made -let's say- 300 QSOs, I export this file to an ADIF file. ADIF<br />
specifies a field named "comment", so I put a comment like "QSO in ARRL DX CW 20<strong>02</strong>" in the<br />
first QSO and save this. Then I have WordPad replace all the 299 empty "COMMENT" tags by<br />
"QSO in ARRL DX CW 20<strong>02</strong>", so each of these 300 QSOs gets this comment<br />
added. When I import this file in my general DX-log containing a few thousand QSOs, these are<br />
marked with the specific comment. This is what I mean with "interacting". Other feature is that, in<br />
that same contest, the RST from the American stations, i.e. their state, is automatically filled in, in<br />
the "state" field in DX4WIN.<br />
I never log a rag chew QSO or a DXpedition with <strong>N1MM</strong><strong>Logger</strong>, and I never enter a contest with<br />
my DX-logging software. Yet all my contest contacts end up in my "general DX log", with a<br />
special note indicating what contest it was.<br />
Table of Contents:<br />
1 Help files and <strong>Manual</strong><br />
2 Tips and Tricks<br />
3 Troubleshooting<br />
Help<br />
http://n1mmtw61.semdxa.org/tiki-print_multi_pages.php?printstructures...<br />
300 of 319 2/2/<strong>2011</strong> 4:35 PM
Help Files and <strong>Manual</strong><br />
This wiki-based manual is now maintained in real-time by volunteer authors who make changes<br />
to this document as the program changes. If you are reading this on the web, you are guaranteed<br />
to get the absolute latest version of the <strong>N1MM</strong> <strong>Logger</strong> manual.<br />
However, you may need to access the <strong>N1MM</strong> <strong>Logger</strong> manual from a location without Internet<br />
access; or you may prefer the material in a different format (Adobe PDF, Windows .CHM Help); or<br />
you may require a non-English version of the manual.<br />
To make your own off-line copies of the current English manual (either printed paper copies, or<br />
electronic PDF / HTML copies), see the Off-line Copies of Wiki Documentschapter in the wiki<br />
Users Guide.<br />
<strong>N1MM</strong> <strong>Logger</strong> Tips and Tricks<br />
This chapter gives some tips and tricks on using the program. All tips are from Tom, <strong>N1MM</strong><br />
unless otherwise mentioned. The tips are examples how you could use the program, not how you<br />
should use it, that is up to you!<br />
In this Section...<br />
http://n1mmtw61.semdxa.org/tiki-print_multi_pages.php?printstructures...<br />
<strong>N1MM</strong> <strong>Logger</strong> Tips and Tricks<br />
1. Bandmaps, Entry Windows and the Mysteries Thereof...<br />
2. Bandmaps, What are They Good For...<br />
3. <strong>N1MM</strong> <strong>Logger</strong> Contest Technique<br />
4. Start of the Contest Season<br />
4.1. Testing<br />
4.2. Key Assignments<br />
4.3. Enter Sends Messages (ESM) Mode<br />
4.4. Dual Entry Windows<br />
4.5. Configurer Options<br />
4.6. Autocompletion Mode<br />
5. Log Editing<br />
6. Force to Log Whatever Heard<br />
7. Country Not Found When Logging Contact (no mulitplier credit)<br />
8. Having F1 NOT Always Send CQ<br />
9. Silence the Function Keys<br />
10. How I Recommend to S&P on a New Band<br />
11. Setting Contest Goals<br />
12. Problems During a Contest<br />
13. Using Up/Down Arrows to Tune<br />
14. CW Tips<br />
301 of 319 2/2/<strong>2011</strong> 4:35 PM
14.1. CW Macro Tip<br />
14.2. Contest Spacing for CW<br />
15. Working Dupes<br />
16. What Setting Should I Use for Packet Spot Timeout?<br />
17. How Should I Really Use this Program if I am Single Operator Assisted<br />
(SOA)?<br />
18. How to Find a Worked Station in the Log When I Missed Parts?<br />
19. Databases versus Contests<br />
20. How to Upgrade the Database to a Newer Version?<br />
21. Deleting QSOs (especially important for Multi-User)<br />
22. QSYing Wipes the Call & Spots QSO in Bandmap<br />
23. Exchange Abbreviations<br />
24. Too Many Calls on the Bandmap!<br />
25. Gray Line Openings<br />
26. QSO Confirmation<br />
27. Serial Number Contest<br />
28. Dead Radio at Startup<br />
29. Read the Update Log<br />
30. Packet/telnet Button Setup<br />
31. Slow PC Syndrome<br />
32. Move RX Frequency from the Keyboard<br />
33. Recording QSOs<br />
1. Bandmaps, Entry Windows and the Mysteries Thereof...<br />
Two Entry Windows<br />
Here is what you should be able to do:<br />
Change keyboard focus with backslash \<br />
Change keyboard and transmit focus with Ctrl+left/right arrow<br />
http://n1mmtw61.semdxa.org/tiki-print_multi_pages.php?printstructures...<br />
With one vfo on one band, and another on the same or second band, you should be able to jump<br />
from spot-to-spot using Ctrl+up/down arrow on the main vfo. With Ctrl+Shift+Up/Down arrow ,<br />
you should be able to jump from spot to spot on the secondary vfo. If your radio has dual receive<br />
(Orion, FT-1000 series), you should be able to listen to both VFOs at once. Alt+F12 swaps MAIN<br />
and SUB receiver.<br />
With the Orion and FT-1000 series, the way I envision this being used in S&P: You would find a<br />
station on the main vfo, and wait for it. In dual receive, you would used Ctrl+Shift Up/Down<br />
arrow to find another station that is ready to be worked. You would call whichever station is ready<br />
first. This could be done on two bands (SOA), or on a single band (MM). If one has spotted a<br />
number of calls locally (QSYing wipes the call & spots QSO in bandmap), one could use it on<br />
one or more bands in SO.<br />
3<strong>02</strong> of 319 2/2/<strong>2011</strong> 4:35 PM
Bandmaps - Clicking on a spot on either bandmap will set that vfo to keyboard & transmit<br />
focus, and put the call in the callframe. Double-clicking will put the call in the callsign field.<br />
Please print and read the keyboard assignments help. Your will be rewarded with greater<br />
enjoyment of the program. Trust me.<br />
2. Bandmaps, What are They Good For...<br />
The ONLY time they are to be used is for Search & Pounce AND the only thing they are good for<br />
is to do a quick match up of a partial call you hear on the radio with what you are seeing go by in<br />
the band map so you can keep moving instead of stopping to listen. That being said, the size of<br />
the band map can be kept small and well zoomed so it only shows a narrow part of the band...<br />
Now why you might ask?? I want to see multipliers that just got spotted at the bottom of the band<br />
when I'm CQ-ing up at the top of the band, or I want to see multipliers on another band. THAT is<br />
what the Available window is for! Learn to use it and it will serve you well in finding multipliers on<br />
other bands. So shrink the band maps and enlarge the Available window and<br />
be more efficient at both scanning the band yourself and grabbing spots. Now wait, what about if<br />
I want to tune up the band to the next multiplier, shouldn't I have more band map shown so I can<br />
click on the next one up the band??? NO, that is what Ctrl+Alt+Up Arrow/Ctrl+Alt+Down Arrow<br />
are for, if you want to click on mults use the Available window list instead... sort it by frequency<br />
if you must, but I prefer to go after the freshest spots first since they are most likely to still be<br />
there. 73, Dave K1TTT<br />
3. <strong>N1MM</strong> <strong>Logger</strong> Contest Technique<br />
I can't emphasize this enough. All the pretty bandmap stuff is not there to look nice. It's there to<br />
help you make Q's. Here is how to do it...<br />
When there are lots of spots in the bandmap, you can work lots of stations with S&P. Start<br />
anywhere in the band. Press Ctrl+Up. Listen. Is he CLOSE to ready to be called? If yes, call him.<br />
If not, press Ctrl+Up again. Repeat this until you work through all the available Q's. This way you<br />
don't waste time listening to endless repeats when one station is working a weak one. I have<br />
made a 90/hr rate doing this.<br />
More tips: If a spot is dead, or not in a legal part of the band, use Alt+D to delete it. You won't<br />
have to stop at it next time.<br />
If you don't want to see spots for the wrong mode, right-click Allow spots for this contest's<br />
mode(s) only in the packet window. Be careful using this one on 80 & 40.<br />
Print the Key Assignments for how to jump between mults.<br />
http://n1mmtw61.semdxa.org/tiki-print_multi_pages.php?printstructures...<br />
Variation: You are CQ'ing, but the rate is slow. Use the S&P technique to jump between spots.<br />
Then quickly return to your CQ frequency with Alt+Q.<br />
Unassisted S&P: DO NOT TURN OFF "Show non-workable spots". The only exception is for<br />
303 of 319 2/2/<strong>2011</strong> 4:35 PM
Sprint contests, such as the NA Sprint, EU Sprint and AP Sprint, where stations change their<br />
frequency after every QSO. Here is my recommendation. Tune up or down the band, listening<br />
and watching the entry window for band edges, but also for calls that you have heard before or<br />
worked before in the callframe. If the call is unworkable, speed up your tuning, and find the next<br />
station. When you come to a station who is working someone else, type in his callsign. Work him<br />
if it is quick. If not, tune on, and the guy's call will be spotted. Tune up for a short time, then<br />
return to his freq with Ctrl+Up or Ctrl+Down. If he is ready, work him, if not repeat the process of<br />
trying to find another station.<br />
The bandmaps are not supposed to be nice & clean. They are supposed to show you where<br />
stations can be worked. The bandmaps can be zoomed with the numeric +/- keys or by rightclicking<br />
on the bandmap. It is important to know if a frequency is in use to save time listening to a<br />
dupe or non-workable station.<br />
The final, dirty little secret... What do you call a spot where there is no station? Your new CQ<br />
frequency...<br />
Rate is everything...<br />
4. Start of the Contest Season<br />
Approaching CQWW SSB means the start of the main part of the contest season. Enhancements<br />
to the program will be curtailed during this part of the year to focus on eliminating any bugs or<br />
performance problems.<br />
4.1. Testing<br />
Please start testing with your favorite fall/ winter contest in the autumn. Make a copy of ham.mdb<br />
(or whatever you have called it), and use last year's contest as a test platform. Why?<br />
Some problems only appear with larger logs. Find out performance issues. I relay on the users to<br />
let me know about them.<br />
Would you like a guide to testing? Check out the website (Download | Other Files and select<br />
"TestPlan.wri". We would be interested in any improvements you would like to suggest for this<br />
form.<br />
4.2. Key Assignments<br />
Now is also a good time to review the Key Assignments. That is a good place to start to pique<br />
your interest in what the program can do. The Key Assignments Shortlist is great to print and<br />
hang beside the radio.<br />
4.3. Enter Sends Messages (ESM) Mode<br />
http://n1mmtw61.semdxa.org/tiki-print_multi_pages.php?printstructures...<br />
If you are planning to operate CW or RTTY, you MUST learn about ESM (Enter Sends<br />
304 of 319 2/2/<strong>2011</strong> 4:35 PM
Messages). It reduces fatigue and errors by sending the right message each time just by<br />
pressing Enter. It may take you a while to understand and set up ESM, so don't leave this to the<br />
last minute. Believe me, those that learn to use ESM, love it.<br />
4.4. Dual Entry Windows<br />
It would be a good idea to try those out, so you don't get frustrated during the contest. For your<br />
reference:<br />
\ backslash switches keyboard focus, Ctrl+left/right arrow changes keyboard & transmit focus.<br />
Also, Ctrl+Fn, and Ctrl+Enter send on the radio that does NOT have focus.<br />
4.5. Configurer Options<br />
Finally, make sure you understand what settings you want for the following Configurer options:<br />
SO2V/SO2R<br />
Send corrected call<br />
Send partial calls<br />
Stop sending CQ when callsign changed<br />
ESM only sends your call once in S&P, then ready to copy received exchange<br />
Config/QSYing wipes the call & spots QSO in bandmap<br />
4.6. Autocompletion Mode<br />
Later in a contest, you hear a lot of stations that you have already worked, whether on this band<br />
or another band.<br />
If you check Autocompletion mode (Configurer | Other tab) the program will match the first<br />
characters that you typed to previous callsigns. It will then pre-fill the callsign field with the rest of<br />
the call. The portion of the call that you did not type will be highlighted, and you can remove it<br />
with the delete key. However, if you press space, the call will be kept in its entirety.<br />
This function is similar the technique used in Internet Explorer to "guess" which url you are<br />
typing.<br />
Some like it, some don't. Try it with an existing log that has a large number of QSOs.<br />
5. Log Editing<br />
http://n1mmtw61.semdxa.org/tiki-print_multi_pages.php?printstructures...<br />
You should rarely/never have to use the edit window during a contest. To get back your last QSO,<br />
press Ctrl+Q. To go back another QSO, use Ctrl+Q again. To go forward, use Ctrl+A. These keys<br />
ignore QSOs made by other stations when in Multi-User mode. It is also much better, because<br />
305 of 319 2/2/<strong>2011</strong> 4:35 PM
you are using the same Entry window to edit that your fingers have gotten used to. To abandon<br />
edit of a QSO, press Escape. The background color of the text panes changes while in "quick<br />
edit"<br />
6. Force to Log Whatever Heard<br />
Ctrl+Alt+Enter will force the program to log whatever it doesn't recognize in the exchange field.<br />
The receive frequency is being reset to the transmit frequency.<br />
7. Country Not Found When Logging Contact (no mulitplier credit)<br />
1. The preferred way to handle this is to load the latest wl_cty.dat file prior to the contest<br />
2. A second way to handle it is to force a particular call to a country with >Tools >Add Call to<br />
Country<br />
Note that this addition will be wiped out on the next reload of the country file<br />
3. A third way to handle it is to add a note (Alt+N) to the QSO, and fix it later. >View > Notes will<br />
help you find those QSOs with notes<br />
8. Having F1 NOT Always Send CQ<br />
Pressing F1 will send the F1 message This when F1 is defined as CQ-key in the Function keys<br />
tab in Configurer. Pressing the CQ-key (i.e. F1) the place the program in Running mode but what<br />
if you do not want to go to running mode and want to stay in S&P mode? Here is the trick. Use<br />
the {S&P} macro in the F1 S&P key (13 th row). Easy as that.<br />
9. Silence the Function Keys<br />
If you want to 'silence' the function keys so they do not send anything and do not PTT the radio,<br />
just put a single blank space in the Fkey contents of the button you want to silence. A space is a<br />
real character, but not one that is transmitted, and the program knows not to switch the PTT in<br />
that case.<br />
10. How I Recommend to S&P on a New Band<br />
http://n1mmtw61.semdxa.org/tiki-print_multi_pages.php?printstructures...<br />
1. Look at the available window. Are there any Mults to be had? (You should already know<br />
this, since you just chose this band.)<br />
2. If there are mults to be worked, use Ctrl+Alt+Up/Down to jump to them. Look at the callsign<br />
frame for the callsign. Use your ears to decide if that's the station and that they are near<br />
ready to work you<br />
306 of 319 2/2/<strong>2011</strong> 4:35 PM
3.<br />
4.<br />
5.<br />
6.<br />
Jump through all the mults until you have worked those that you can in a reasonable time.<br />
You may need to repeat the search several times to get them all. Note that you don't want<br />
to spend a lot of time waiting for them. Just keep going up and down the band and clean<br />
'em out<br />
Repeat the process with Q's that are available (Ctrl+up/down). When you find a dead<br />
frequency, try a short cq. Maybe you can get a run going. Otherwise, clean out the QSOs<br />
Once you have worked all the spotted stations (assuming assisted), start manual S&P. Turn<br />
on "QSYing wipes the call..." option. If a station is hard to work, put in his call and tune to<br />
the next. The call will be spotted on your computer(s) only. You can use the technique in<br />
steps 1-4 to work him<br />
Spot non-workable stations if you are a good typist. It's nice to know where they are so you<br />
don't waste time on them during the next sweep<br />
11. Setting Contest Goals<br />
How do you get better at contesting? One way is to set goals for yourself.<br />
The info window supports this by allowing you to set how many QSOs per hour you want to try to<br />
accomplish. As you are contesting, the four rate panes will let you know if you are at less than<br />
50% of goal (red), between 50-100% of goal (yellow), or ahead of goal (green).<br />
Note whatever goals you set for an hour will continue until the hour for the next goal is reached.<br />
What if you want to beat last year's score?<br />
The program supports that as well. Just open LAST year's log, and click the Import Goals button.<br />
Choose the day (1 or 2) and press enter. You goals are now set to your hourly totals from last<br />
year. Don't forget to start a new log for this year! The goals will be kept until you reset them<br />
explicitly or until you LOAD A NEW DATABASE.<br />
You don't want to have a different database for each (small) contest. This is a common<br />
misconception.<br />
12. Problems During a Contest<br />
What do you do if you have problems during a contest?<br />
http://n1mmtw61.semdxa.org/tiki-print_multi_pages.php?printstructures...<br />
1. Make sure you have a previous version of the logging program around that you have used<br />
successfully in the past.<br />
2. Make sure you have tested the program ahead of time using the modes you plan to use<br />
during the contest. Log a few sample QSOs. Check all the windows you plan to use.<br />
Connect to packet or telnet if that is your plan. You might want to run through a test plan.<br />
3. If you find problems before the contest, please send the bugs in to be fixed as much<br />
before the contest as possible<br />
4. Check the update page on the <strong>N1MM</strong> website. We frequently fix problems during the<br />
307 of 319 2/2/<strong>2011</strong> 4:35 PM
contest. The problems that we try to fix are either fatal ones, or low-risk ones. Nonessential<br />
functions that present some risk to fix, are left until after the contest.<br />
13. Using Up/Down Arrows to Tune<br />
The Up and Down arrow keys can be used to tune your radio. If you are in S&P, then just use<br />
them to tune in the station you are trying to work. This is particularly good for packet spots.<br />
If you are Running, you might try this technique. Set your radio up for split, and use the up/down<br />
arrows as RIT.<br />
The amount to be tuned up/down with each keypress is set in the Configurer >Other tab.<br />
14. CW Tips<br />
14.1. CW Macro Tip<br />
Some calls have letter combinations where it's hard for to copy correctly. For example, 6Y2A is<br />
often copied as BY2A. To help make your call easier to copy, Go to >Config >Change Packet/CW<br />
/SSB/Digital Message Buttons >Change CW Buttons, and try changing the default F1 and/or F4<br />
message where * is used for your call. In this example, 6Y2A changes F4 from * to >6Config >Change Ports, Telnet Address, Other >Function Keys >Use Contest Spacing for<br />
CW. The box is default ON. This setting changes the spacing between words in your CW, where<br />
"<strong>N1MM</strong> 599 5" is 3 words. Default is 6 bits for "contest spacing". When this box is not checked, 7<br />
bits between words is used, which is "normal spacing".<br />
15. Working Dupes<br />
http://n1mmtw61.semdxa.org/tiki-print_multi_pages.php?printstructures...<br />
The default is to work them. The theory is that it's faster to work them than it is to argue, and you<br />
might really not be in there log. If that is the case, and they submit a log, you'll lose points by not<br />
working them.<br />
The "work dupes" option in the configurer is for ESM and running mode. All it does is determine<br />
308 of 319 2/2/<strong>2011</strong> 4:35 PM
what is sent when a dupe calls you AND YOU PRESS ENTER.<br />
When using Enter Send Message (ESM) mode the behavior is a follows:<br />
In S&P using ESM, if you press Enter with a dupe call in the entry window nothing will<br />
happen (intentional), but you can always work him by pressing F4 instead.<br />
In Run using ESM with "Work Dupes" checked, when you press Enter you will send his call<br />
sign and the exchange whether he is a dupe or not. If you want to send "QSO B4" you can<br />
just press F6 instead.<br />
If you don't have "Work Dupes" checked, then to work a dupe in Run mode you will have to<br />
press F5 and then F2 to send his call sign and the exchange; pressing Enter will send the<br />
F6 message.<br />
All that being said, you can work dupes in either situation (Run and S&P) by pressing the F-keys.<br />
A goal of the program is to promote good operating. Working dupes while running is good<br />
operating. That's why work dupes is the DEFAULT. It is an option because an argument was<br />
made that in a long exchange contest like SS, you might not want to automatically work dupes.<br />
What I suspect happened is that someone turned work dupes off while playing with the program.<br />
This is a complicated program. Changing options that you don't know the meaning of can lead to<br />
a lot of confusion. My advice is:<br />
1. Get the program working with your equipment<br />
2. Save the ini file<br />
3. Play with the options<br />
4. Discard that ini file and revert to the one from step 2<br />
5. Change any options you feel you truly understand and want changed<br />
6. If an option doesn't seem to "do anything" — watch out! You might want to set it back to the<br />
original setting<br />
16. What Setting Should I Use for Packet Spot Timeout?<br />
For general DX-ing, 30 minutes is not too long.<br />
http://n1mmtw61.semdxa.org/tiki-print_multi_pages.php?printstructures...<br />
For a contest, you might want to crank it down to 20 minutes, since there is more movement of<br />
stations. Also, a lower timeout will mean fewer spots are managed by the program. This may help<br />
performance for those with marginally performing machines.<br />
For testing packet spot behavior when there are few spots, or for testing performance, a timeout<br />
setting of 1000 minutes might be right.<br />
17. How Should I Really Use this Program if I am Single Operator Assisted<br />
(SOA)?<br />
309 of 319 2/2/<strong>2011</strong> 4:35 PM
Try these techniques:<br />
Connect to a telnet node. Do a sh/dx/100 to fill up the bandmap.<br />
Pick the band with the most mults as shown in the Available window.<br />
Go to that band and use Ctrl+Alt+Up arrow and Ctrl+Ctrl+Down arrow to work all the mults<br />
on the band. Don't waste too much time on each one.<br />
Go back through the band and use Ctrl+Up arrow and Ctrl+Down arrow to work all other<br />
stations on the band. If you find that a frequency is dead, do you know what you call that?<br />
You call it your new <strong>RU</strong>N frequency! Call CQ and get a run going.<br />
When the run is over, go pick up any more mults or QSOs on this band.<br />
Now, either move to another band and repeat, or try these techniques. Turn on "QSYing<br />
wipes the call & spots QSO in bandmap" Tune up or down through the band, looking for<br />
stations you haven't worked. Enter all or part of their calls, then tune off. The call will be<br />
"spotted" in the bandmap. You can use Ctrl+Up/Down arrow to work them later. Again, what<br />
do we call a dead frequency? That's right, it's a <strong>RU</strong>N frequency. ;-) (As you are doing this, if<br />
you can work the station without waiting, of course you should work it.)<br />
If you don't want to type a call, and you know you don't want to work the station, you can<br />
mark the frequency busy with the Mark button (Alt+M).<br />
As you are tuning, watch the bandmap. It will give you big hints as to whether you should<br />
waste time listening to a station. If you start hearing "grumble grumble" 2 kHz away from<br />
the frequency marked with Joe down the street's call, you know to speed right by.<br />
18. How to Find a Worked Station in the Log When I Missed Parts?<br />
There are three possibilities to find a worked call in the log. The results are shown in the bottom<br />
part of the low window below the logged QSOs.<br />
When entering the beginning of a callsign after 3 characters a worked station starting with<br />
these three characters will be shown automatically.<br />
When you have from <strong>N1MM</strong> only N?M this is also enough to show <strong>N1MM</strong> and every other<br />
station that ends with N?M.<br />
When you only have 1MM and missed the first part of the prefix you can place a * in front of<br />
the characters you have. *1MM will show <strong>N1MM</strong> and every other station that starts with 1MM<br />
in the callsign.<br />
Combinations are also possible:<br />
http://n1mmtw61.semdxa.org/tiki-print_multi_pages.php?printstructures...<br />
*1?M will show <strong>N1MM</strong> but also K1MR, J41YM etc.<br />
*3? or *3* will show all worked callsign with a 3 in the callsign<br />
*3*Z will show every station with a 3 followed by a Z somewhere in the callsign like K3ZO,<br />
VA3UZ etc.<br />
Using a * is called a "like" search in SQL. The problem is that a "like" search is very slow so on<br />
310 of 319 2/2/<strong>2011</strong> 4:35 PM
slow computers this will take some time.<br />
In VHF contests use Alt+= (equal) and the program will search everything which matches the<br />
content of the callsign and the gridsquare fields.<br />
19. Databases versus Contests<br />
There is a lot of confusion about how contests are stored in the logging program.<br />
To clear this up, let's start with a couple of definitions:<br />
Database - an Access 2000 format database file with a file extension of .mdb. Any number of<br />
contests may be stored in a database.<br />
Contest - a set of QSOs within the database. They are stored in rows in a table called DXLOG.<br />
Each contest row has a ContestNr which ties it to a ContestInstance entry.<br />
Much of the confusion comes from people thinking that they need to have only one contest in a<br />
database. This is not the case. I have only one database that I log "official" QSOs in. (Of course I<br />
have many test & backup databases.) Why? because the performance of the program is not very<br />
sensitive to database size. I currently have about 14,000 QSOs in my database.<br />
Now if you plan to go on a DXpedition and log 25,000 QSOs, I would recommend a separate<br />
database for that. For most users, no.<br />
Another thing. Did you ever notice the option"Copy (and compact) Database". This is one I bet<br />
you never use, but should use. Deleted space in most databases is not recovered automatically,<br />
and Access is no exception. If you delete a contest, or delete contacts (see tip on deleting<br />
contacts), you will need to run this option to recover the space. Do you need to run it every day?<br />
No. Maybe once every 6 months would do for most people, or before archiving a database.<br />
The most important thing to remember about databases is to BACK THEM UP. Periodically copy<br />
your database to a backup device, or zip it up and copy to a floppy. Even e-mailing it to work<br />
would do! It is your entire record for all of your QSOs using the program. Don't lose it. Also, if you<br />
are going to import data, or delete data, that is a good time to back up your database. If you don't<br />
have the data anymore, no one can help you!<br />
20. How to Upgrade the Database to a Newer Version?<br />
The best way upgrade the database to the current version by opening it with a current version of<br />
the program on the first machine. Then you can open it with the same version on the second<br />
machine, and no database upgrades will need to be done.<br />
Please do a backup first!<br />
http://n1mmtw61.semdxa.org/tiki-print_multi_pages.php?printstructures...<br />
Now what do I mean by a "database upgrade"? From time to time, I add columns, indexes, data<br />
etc. to the database. For each of those changes, I have the program query the database to see if<br />
the change has already been made. If not, I make the change. To the user of the program, this is<br />
automatic. All he will notice is that startup takes some additional time.<br />
311 of 319 2/2/<strong>2011</strong> 4:35 PM
This works very well. Haven't had any complaints. Nevertheless, a database that is a year or two<br />
since the last time it was opened will have quite a bit of updating to be done. Why not do it on a<br />
known, working machine?<br />
21. Deleting QSOs (especially important for Multi-User)<br />
This topic affects all users, but multi-user contesters the most.<br />
As part of the multi-user support, I implemented a DELETEDQS contest. When a contact is<br />
"deleted" with Alt+D or the Delete key, it is not really deleted. It is moved to the DELETEDQS<br />
contest. Yes, you could go to DELETEDQS, and remove it, but that would not be wise. Why?<br />
Because there is no reason to delete it, and there are good reasons not to. With it in<br />
DELETEDQS, you can recover it by exporting it to an ADIF file, changing the ADIF file and<br />
importing it into the original contest. That, however is not the overriding reason not to touch<br />
DELETEDQS. The main reason is a Multi-User reason.<br />
In multi-user, DELETEDQS is how I determine to "delete" a contact in the logs of other stations.<br />
Since no contact is ever really deleted, I need only gather all the QSOs and DELETEDQS logged<br />
by a station and add or update them in the other station's logs. This lets me avoid the danger of<br />
deleting rows in a database. Therefore, DON'T MESS WITH DELETEDQS during the contest.<br />
Make a backup after the contest of all the stations' logs. Then you can do anything you want, and<br />
I can help you recover, since you have a backup. If you don't follow this advice, you will not be<br />
happy.<br />
Oh, but if it is a dupe, that's different, right? NO! Log dupes. Cabrillo doesn't care, the contest<br />
sponsor doesn't care, and it doesn't hurt your score. It CAN help your score. Log those dupes,<br />
and DON'T delete them.<br />
22. QSYing Wipes the Call & Spots QSO in Bandmap<br />
Have you ever noticed that the logging program will "spot" dupes in the bandmaps. That is, if you<br />
type in the call of a dupe then tune away from it, the entry fields will be cleared (wiped) and the<br />
call placed in the bandmap.<br />
That feature is always active. There is a similar feature that you must turn on to use. It is called<br />
"QSYing wipes the call & spots QSO in bandmap". It does the same thing as the dupe spotting,<br />
but for other calls you enter. You must be in S&P mode for this to work.<br />
This option is good for combing a band for stations to work during a contest. If a station you hear<br />
is not finishing a qso, you can move on to find another. The program will spot the call in bold,<br />
and you can use Ctrl+Up/Down to go back through and work the ones you skipped.<br />
23. Exchange Abbreviations<br />
http://n1mmtw61.semdxa.org/tiki-print_multi_pages.php?printstructures...<br />
What are exchange abbreviations?<br />
Some contests require sections, counties or other entities for the exchange. These must be<br />
312 of 319 2/2/<strong>2011</strong> 4:35 PM
LOGGED with standard abbreviations. The menu item >Config >Change Exchange Abbreviations<br />
allows you to edit them.<br />
What if you don't like for example the standard ARRL abbreviations? Well, you can enter your<br />
own. Let's say you'd like to enter CONN for CT. You can ADD CONN CT in the exchange<br />
abbreviation list and if you enter CONN or CT, the program will LOG CT. Don't replace the<br />
abbreviations that are already there. It's best to just add the ones you like. (I use the presence of<br />
certain abbreviations to determine whether to reload some of the lists.)<br />
24. Too Many Calls on the Bandmap!<br />
What do you do if the calls are crowded together on the bandmap? You need to zoom in or out...<br />
There are two ways to do it. On a traditional keyboard, using the numeric pad plus (+) and minus<br />
(-) keys will zoom the current bandmap. The current bandmap is the one with the cyan frequency<br />
display. If you want to do it with the mouse, hold the cursor over the bandmap you want to zoom,<br />
then right click. Choose zoom in or zoom out.<br />
It is also possible not to show "non workable contacts". This means that only the stations are<br />
shown in the bandmaps which are valid QSOs in the contest and not have been worked before<br />
(all normally gray contacts will disappear from the bandmaps).<br />
25. Gray Line Openings<br />
Watch for gray line openings when your sunrise or sunset match the other station's sunrise or<br />
sunset. You must have entered your lat/long accurately (watch the +/-) in the Station dialog. Your<br />
sunrise & sunset times can be found in Help/About.<br />
Sunrise & sunset for a prefix or call can be found by typing it in the entry window, and looking at<br />
the Info window. Note that the sunset & sunset times are for whatever central point in that country<br />
is specified in the loaded country file (wl_cty.dat or cty.dat).<br />
26. QSO Confirmation<br />
Some contest rules state that the received exchange must be acknowledged for the QSO to<br />
count.<br />
If a contest sponsor wants you to acknowledge (i.e. confirm) the exchange, they mean for you to<br />
send "QSL", "TU", or "R" to indicate receipt.<br />
This does not mean a resend from the report back to the station. A resend would provide<br />
verification, not acknowledgment. Only under rare circumstances would you ever repeat the other<br />
stations exchange.<br />
27. Serial Number Contest<br />
http://n1mmtw61.semdxa.org/tiki-print_multi_pages.php?printstructures...<br />
When waiting to work a station in a serial number contest, you sometimes log the number, then<br />
313 of 319 2/2/<strong>2011</strong> 4:35 PM
increment it for each time you don't win in the pileup. Ctrl+U increments the received serial # by<br />
1.<br />
28. Dead Radio at Startup<br />
If you fail to turn on your radio at startup, the program will refuse to log contacts. This feature is<br />
to prevent a dead radio from causing you to log contacts on a wrong frequency. If the radio really<br />
is dead, go to the configurer and remove it.<br />
If you just forgot to turn on the radio, then turn it on. If the bandmaps do not show the frequency<br />
after 10 sec or so, you can force the program to open the radio connection by opening the<br />
configurer and pressing the "OK" button. Some people think you have to restart the program, but<br />
that is slower than the configurer approach.<br />
29. Read the Update Log<br />
Every version of the program has a revised update log with it. This log is in the zip file, and can<br />
be accessed with WordPad or from within the logging program (see the help menu). This is a<br />
good source for determining what might have made some feature start or stop working. This is a<br />
cooperative project. The more research you can help with on reporting bugs, the quicker Rick & I<br />
can fix them.<br />
Note that I occasionally change the description or credits on an item after another version has<br />
been released. If you did not get credit for reporting a bug, let me know I'll update the log. The<br />
latest version always contains the most up-to-date info, so there is no reason to save old ones.<br />
30. Packet/telnet Button Setup<br />
Here are the buttons I currently use for AR-Cluster nodes: I don't think these are necessarily<br />
optimal, but they give you an idea of what is possible.<br />
NE only means (near) New England only. (W1 & W2). The first column is the command, the<br />
second column is the button label. & in the button label makes it an Alt hotkey.<br />
Anyone want to post a similar list for other cluster software? (Please test them first.) Also, what<br />
about screening out cw or ssb spots when in a single mode contest?<br />
Note that the menu item >Tools >Clear All Spots will remove all spots from the bandmap. You<br />
might decide that there was too many unreadable stations in the bandmap. You would set a filter<br />
(below), then clear all spots. You could then use sh/dx/100 to refill the bandmap.<br />
Button text Command<br />
BYE BYE<br />
CONN C K1TTT<br />
DI/N DI/N<br />
SH/DX SH/DX/30<br />
http://n1mmtw61.semdxa.org/tiki-print_multi_pages.php?printstructures...<br />
314 of 319 2/2/<strong>2011</strong> 4:35 PM
USERS SH/U<br />
WWV SH/WWV<br />
Clear NE set/filters dxorigstate/off<br />
Yes DX set/filters dxorigcty/off<br />
NE only set/filters dxorigstate/pass ny,nj,ct,ri,ma,nh,vt,me<br />
No DX set/filters dxorigcty/pass k,ve, xe<br />
No VHF set/filters vhf/reject<br />
K1TTT {MYCALL}<br />
31. Slow PC Syndrome<br />
On some COMPAQ & Toshiba laptops with Win98, it has been seen that the PC can turn very<br />
slow after a beep (eg. CW monitor) has been given. Pulling down menu´s take forever,<br />
and the PC clock operates about 10 times slower than usual. This situation persists even when<br />
the logger is shut down, and until the next boot. The fix is simple just deactivate "Monitor via PC<br />
speaker" (Config - Configure Ports - Function Keys) and boot the PC, and it will never happen<br />
again. You only need to do this if you have noticed the behavior described above.<br />
73 Uffe PA5DD<br />
32. Move RX Frequency from the Keyboard<br />
At a local club meeting last night we watched the FO0AAA video. I've seen a number of other<br />
DXpedition videos before and they all show the operator reaching over after each or so QSOs<br />
and moving the RX frequency. Given this is standard practice for DXpeditions, both SSB and<br />
CW, I thought it would be a useful feature to have that function built into the logging program.<br />
As it turns out, it's really there already in <strong>N1MM</strong>. If one sets the radio on SPLIT and TXs on the<br />
second VFO, pressing either UP/DOWN ARROW moves the RX frequency up or down by the<br />
amount set in CONFIG/CONFIG PORT, TELNET......./OTHER window. It also works well for<br />
regular contesting. Put the radio on SPLIT SIMPLEX (A=B) and use the UP/DWN arrows instead<br />
of the RIT for those off frequency callers when you're <strong>RU</strong>NNING.<br />
Gerry VE6LB/VA6XDX<br />
33. Recording QSOs<br />
The program has the possibility to record all QSOs made. With this feature it is possible to listen<br />
back to all QSOs made.<br />
Select 'Record QSOs' under Config' to turn it on/off.<br />
http://n1mmtw61.semdxa.org/tiki-print_multi_pages.php?printstructures...<br />
315 of 319 2/2/<strong>2011</strong> 4:35 PM
The 'normal' connection would be to have your microphone to the sound card 'microphone<br />
in' and the radio audio out to the sound card 'line-in'. this way the microphone can be used<br />
to record SSB messages on the fly and the line-in can be used to record QSOs or for RTTY<br />
without having to rewire anything. Switching can be done automatically using the setup in<br />
the Audio tab for SSB recording and playback, and also works for CW qso recording.<br />
Switching to RTTY may need<br />
a manual operation on the windows volume control to select the input source for MMTTY.<br />
Beware that when using the headphone output the level will change with the volume of the<br />
radio so preferable use a fixed audio source from the radio. Also your transmitted audio<br />
level will depend on the monitor level from the send audio/sidetone. There are some nice<br />
programs which can set your audio levels and remember the settings the next time you<br />
need them. See the Links chapter.<br />
You probably want to record not only the station you work but also your own audio/sidetone.<br />
'Monitor on' is needed on most radios.<br />
A recording for a new qso will start as soon as the qso before has been logged, so a<br />
recording will stop when a qso is logged and a new recording will begin.<br />
There is a recording timer the Audio tab in the configurer.<br />
Each qso will become a separate recording (wav file). The wav file is named: '<br />
- .wav.' Example: "<strong>N1MM</strong> 10-26-03 - 22 47 45.wav"<br />
The Wav files (recordings) are stored in a directory under the program directory named after<br />
the selected contest. So when selecting CQWWCW the directory will be named<br />
CQWWCW. E.g. C:\Program Files\<strong>N1MM</strong> <strong>Logger</strong>\CQWW\....<br />
Wav files can be played from within the program by right clicking on the qso in the 'Log<br />
Window' and selecting 'Play contact'. Pressing Escape stops playback of recorded<br />
contacts.<br />
These Wav files can of course also be played outside the program with any other media<br />
player on your computer which supports WAV files.<br />
Recording uses about 1 GB per 24 hours (40-50 MB per hour) when 8 bits, 11<strong>02</strong>5 Hz/sec is<br />
used. There are programs which can compress these wav files to MP3 files but if this can<br />
be done at the same time when giving CQ depends a lot on the computer used. A clunker<br />
will surely not do it. There is of course the possibility to do this after the contest. Enough<br />
harddisk space during the contest is necessary.<br />
Recording is stopped when there is less than 40 MB space free on the current drive.<br />
Test before using this feature. To get the recording levels all the same (received and<br />
transmitted audio/cw) can be a bit tricky when not using a fixed audio level from the radio.<br />
Soundcard Settings in Configurer<br />
The Configurer lets you pick parameters that your sound card may not support... usually 16<br />
bit, 11<strong>02</strong>5 Hz/sec is safe for all cards.<br />
Troubleshooting<br />
http://n1mmtw61.semdxa.org/tiki-print_multi_pages.php?printstructures...<br />
316 of 319 2/2/<strong>2011</strong> 4:35 PM
The object of this page is to suggest how to proceed when something goes wrong. If you take<br />
these measures before posting a query on the reflector, you will greatly enhance your chances of<br />
getting good, solid, usable advice the first time around.<br />
1. Get Current<br />
Make sure you are running a recent version - no more than one or two behind. This is absolutely<br />
necessary because of the rapid evolution of the program, with typically 100 or more versions<br />
released each year. If you aren't running a recent version, update and see if the problem goes<br />
away - it could be something that was noticed and fixed while you were "away."<br />
Every year, Tom (<strong>N1MM</strong>) publishes a new "Base Install" version of the program, which contains<br />
all the files you will need to run the program. Subsequent updates contain only those files that<br />
have changed, so simply downloading and installing the most recent version won't probably be<br />
enough unless you have first downloaded and installed the Base Install on which it is based.<br />
2. Try Simplifying Your Configuration<br />
http://n1mmtw61.semdxa.org/tiki-print_multi_pages.php?printstructures...<br />
Important changes in Version 10<br />
At the beginning of 2010, Tom published version 10.0.0. Because it involves some very<br />
significant changes to the audio tab of the Configurer, it is very important that users update to<br />
10.0.0 and from there to the latest update.<br />
Problems with the program often arise as the result of changes inadvertently made to the overall<br />
configuration of the program or corruption of the database you were using the last time the<br />
program was open, so a first step is to eliminate those two possibilities.<br />
First, rename your <strong>N1MM</strong> <strong>Logger</strong>.ini file so that the program will not recognize it - <strong>N1MM</strong><br />
<strong>Logger</strong>.old is good. Try to restart the program. If it starts, though in very simplified form (one<br />
Entry window, etc.), then you know the problem was somewhere in your configuration, as stored<br />
in the .ini file. Then you can add back your personal configuration choices, one at a time. Start<br />
with radio control ports, then add PTT and CW options. Finally, set up your general options in the<br />
Configurer, and in the various specialized sub-menus that you use.<br />
If the program still won't run, then leave the simplified configuration in place and try renaming<br />
your database(s) or moving them to another directory. It should then start up and create a new<br />
empty database (at least, with no QSOs in it.). If it doesn't start up then, you should probably<br />
consider yourself cursed, and take up a new hobby.<br />
No, seriously, if the problem does seem to be in the database(s), there are a couple of options on<br />
the File menu in the entry Window, including a link to a stand-alone Microsoft utility that you can<br />
download to repair a corrupted database.<br />
317 of 319 2/2/<strong>2011</strong> 4:35 PM
If it still won't start after all that, or if the function you're having trouble with still won't work, now<br />
and only now try a reinstallation. A corrupted installation is rarely to blame for the problems<br />
people have, but recently a lot of folks have had trouble because of missing program files.<br />
Typically, this is caused by not installing version 10.0.0 before trying to install and run version<br />
10.x.x Even if you think you've done this correctly, it may be worth the few minutes necessary to<br />
reinstall.<br />
If you feel you need to reinstall, take an extra minute and uninstall your current version from the<br />
control panel. This is normally unnecessary, but recently there have been a case or two where<br />
the uninstallation was necessary to fix persistent problems that did not respond to any normal<br />
troubleshooting methods.<br />
3. Search the <strong>Manual</strong> - some tips<br />
http://n1mmtw61.semdxa.org/tiki-print_multi_pages.php?printstructures...<br />
Where is the program installed?<br />
For version 9 and before, the default installation location was in C:\Program Files\<strong>N1MM</strong><br />
<strong>Logger</strong>. Because this caused inconvenience for users of Vista and Windows 7, beginning with<br />
Version 10, the default location is C:\<strong>N1MM</strong> <strong>Logger</strong>.<br />
If you are making a first-time installation of the Version 10 Base Install, the installer will<br />
automatically choose this location. Thereafter, the update installer should point to the same<br />
place. However, some experienced users have chosen to continue to install to Program Files,<br />
and a few of them have reported that the update installer insists on pointing to C:\. As you<br />
can imagine, putting the Base Install in one place and updates in another can cause all sorts<br />
of problems. It's worth a double-check.<br />
Now that the manual is on the website in wiki format here , we are working hard to keep it up to<br />
date and to fix things that may have gotten broken along the way. You can help by letting us<br />
know when you notice things that should be changed. Drop a note to n4zr@contesting.com or<br />
k8ut@arrl.net unless you think that the subject would benefit from others' input, in which case,<br />
by all means, use the reflector .<br />
So, how best to use the manual for troubleshooting? We recommend using the search function<br />
on the web page. This is still evolving, but you'll find the latest information on using it in this<br />
section of the Website User <strong>Manual</strong>.<br />
Once you've opened a page, though, you may discover that the topic you want is nowhere to be<br />
seen. Don't despair, just hit Ctrl+F to open your browser's search routine, and enter your search<br />
phrase there. This is necessary because some of the pages in the manual are very long, and<br />
your search topic may not appear in the first screenful.<br />
If the program is so badly broken that you can't do a Google search from there, just open the<br />
manual and you should see the search box in the upper right corner of the page. If you don't<br />
see it, you are probably in full-screen mode. Just click the icon of a window with a small dot on it,<br />
318 of 319 2/2/<strong>2011</strong> 4:35 PM
which will be at the far upper right corner of the page, and the search box will come back.<br />
4. Looking for Help on the Reflector<br />
http://n1mmtw61.semdxa.org/tiki-print_multi_pages.php?printstructures...<br />
OK, so you're really stuck. You have over 3,000 fellow users out there willing to help. You can<br />
make it more likely to pay off quickly if you follow this checklist for information you provide in your<br />
first message:<br />
<strong>N1MM</strong> program version<br />
Operating system<br />
Relevant interfacing information<br />
For radio control, whether USB or hardware serial port, and what radio<br />
For CW problems, indicate whether you are using serial, parallel or other interface<br />
(Winkey, MicroHAM, etc.)<br />
For voice message problems, what interface to the radio you're using<br />
Symptoms<br />
Include any error messages you received, and be sure to quote them in full<br />
What you have already tried<br />
319 of 319 2/2/<strong>2011</strong> 4:35 PM