Setup for Antenna or Cable (no cable box) – Use cable bag only
Setup for Antenna or Cable (no cable box) – Use cable bag only
Setup for Antenna or Cable (no cable box) – Use cable bag only

Create successful ePaper yourself
Turn your PDF publications into a flip-book with our unique Google optimized e-Paper software.
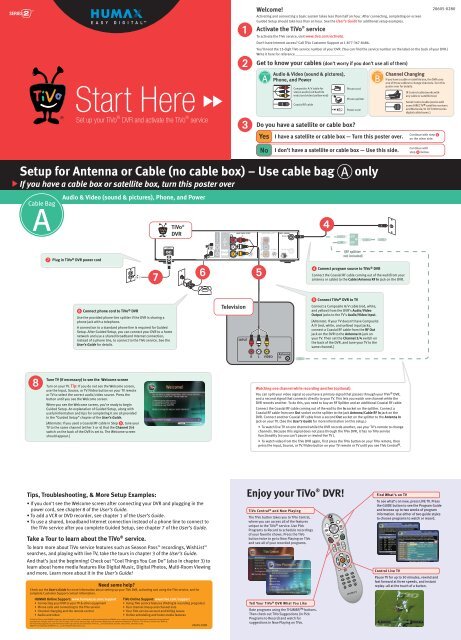
Plug in TiVo ® DVR power c<strong>or</strong>d<br />
Start Here<br />
Set up your TiVo ® DVR and activate the TiVo ® service<br />
<strong>Setup</strong> <strong>f<strong>or</strong></strong> <strong>Antenna</strong> <strong>or</strong> <strong>Cable</strong> (<strong>no</strong> <strong>cable</strong> <strong>box</strong>) <strong>–</strong> <strong>Use</strong> <strong>cable</strong> <strong>bag</strong> A <strong>only</strong><br />
If you have a <strong>cable</strong> <strong>box</strong> <strong>or</strong> satellite <strong>box</strong>, turn this poster over<br />
<strong>Cable</strong> Bag<br />
A<br />
<br />
Audio & Video (sound & pictures), Phone, and Power<br />
Connect phone c<strong>or</strong>d to TiVo ® DVR<br />
<strong>Use</strong> the provided phone line splitter if the DVR is sharing a<br />
phone jack with a telephone.<br />
A connection to a standard phone line is required <strong>f<strong>or</strong></strong> Guided<br />
<strong>Setup</strong>. After Guided <strong>Setup</strong>, you can connect your DVR to a home<br />
netw<strong>or</strong>k and use a shared broadband Internet connection,<br />
instead of a phone line, to connect to the TiVo service. See the<br />
<strong>Use</strong>r’s Guide <strong>f<strong>or</strong></strong> details.<br />
Tune TV (if necessary) to see the Welcome screen<br />
Turn on your TV. Tip: If you do <strong>no</strong>t see the Welcome screen,<br />
use the Input, Source, <strong>or</strong> TV/Video button on your TV remote<br />
<strong>or</strong> TV to select the c<strong>or</strong>rect audio/video source. Press the<br />
button until you see the Welcome screen.<br />
When you see the Welcome screen, you’re ready to begin<br />
Guided <strong>Setup</strong>. An explanation of Guided <strong>Setup</strong>, along with<br />
useful in<strong>f<strong>or</strong></strong>mation and tips <strong>f<strong>or</strong></strong> completing it are all provided<br />
in the “Guided <strong>Setup</strong>” chapter of the <strong>Use</strong>r’s Guide.<br />
[Alternate: If you used a Coaxial RF <strong>cable</strong> in Step , tune your<br />
TV to the same channel (either 3 <strong>or</strong> 4) that the Channel 3/4<br />
switch on the back of the DVR is set to. The Welcome screen<br />
should appear.]<br />
Tips, Troubleshooting, & M<strong>or</strong>e <strong>Setup</strong> Examples:<br />
• If you don’t see the Welcome screen after connecting your DVR and plugging in the<br />
power c<strong>or</strong>d, see chapter 8 of the <strong>Use</strong>r’s Guide.<br />
• To add a VCR <strong>or</strong> DVD rec<strong>or</strong>der, see chapter 1 of the <strong>Use</strong>r’s Guide.<br />
• To use a shared, broadband Internet connection instead of a phone line to connect to<br />
the TiVo service after you complete Guided <strong>Setup</strong>, see chapter 7 of the <strong>Use</strong>r’s Guide.<br />
Take a Tour to learn about the TiVo ® service.<br />
To learn m<strong>or</strong>e about TiVo service features such as Season Pass TM rec<strong>or</strong>dings, WishList TM<br />
searches, and playing with live TV, take the tours in chapter 3 of the <strong>Use</strong>r’s Guide.<br />
And that’s just the beginning! Check out “Cool Things You Can Do” (also in chapter 3) to<br />
learn about home media features like Digital Music, Digital Photos, Multi-Room Viewing<br />
and m<strong>or</strong>e. Learn m<strong>or</strong>e about it in the <strong>Use</strong>r’s Guide!<br />
Need some help?<br />
Check out the <strong>Use</strong>r's Guide <strong>f<strong>or</strong></strong> m<strong>or</strong>e in<strong>f<strong>or</strong></strong>mation about setting up your TiVo DVR, activating and using the TiVo service, and <strong>f<strong>or</strong></strong><br />
complete Customer Supp<strong>or</strong>t contact in<strong>f<strong>or</strong></strong>mation.<br />
HUMAX Online Supp<strong>or</strong>t: www.humaxusa.com/supp<strong>or</strong>t<br />
• Connecting your DVR to your TV & other equipment<br />
• Phone calls and connecting to the TiVo service<br />
• Channel changing and the remote control<br />
• Audio and video<br />
<br />
TiVo Online Supp<strong>or</strong>t: www.tivo.com/supp<strong>or</strong>t<br />
• Using TiVo service features (finding & rec<strong>or</strong>ding programs)<br />
• Your channel lineup and channel lists<br />
• Your TiVo service account and billing issues<br />
• Online scheduling and home media features<br />
©2004 by TiVo Inc and HUMAX C<strong>or</strong>p<strong>or</strong>ation. Not to be copied, used, <strong>or</strong> translated in part <strong>or</strong> whole without HUMAX’s pri<strong>or</strong> consent in writing except approval of ownership of copyright and<br />
copyright law. All rights reserved. TiVo, the TiVo logo, TiVo Central, the Jump logo, and the Instant Replay logo are registered trademarks of TiVo Inc. TiVo Series2, Season Pass, WishList,<br />
the Thumbs Up logo and text, and the Thumbs Down logo and text are trademarks of TiVo Inc., 2160 Gold Street, P.O. Box 2160, Alviso, CA 95002-2160.<br />
DIRECTV is a trademark of DIRECTV, Inc., a unit of Hughes Electronics C<strong>or</strong>p.<br />
TiVo ®<br />
<br />
DVR IN<br />
<br />
20605-0280<br />
<br />
<br />
<br />
Television<br />
INPUT<br />
R L<br />
Welcome!<br />
Activating and connecting a basic system takes less than half an hour. After connecting, completing on-screen<br />
Guided <strong>Setup</strong> should take less than an hour. See the <strong>Use</strong>r’s Guide <strong>f<strong>or</strong></strong> additional setup examples.<br />
Activate the TiVo ® service<br />
To activate the TiVo service, visit www.tivo.com/activate.<br />
Don’t have Internet access? Call TiVo Customer Supp<strong>or</strong>t at 1-877-367-8486.<br />
You’ll need the 15-digit TiVo service number of your DVR. (You can find the service number on the label on the back of your DVR.)<br />
Write it here <strong>f<strong>or</strong></strong> reference ___________________________.<br />
Get to k<strong>no</strong>w your <strong>cable</strong>s (don’t w<strong>or</strong>ry if you don’t use all of them)<br />
<strong>Cable</strong> Bag<br />
A<br />
Do you have a satellite <strong>or</strong> <strong>cable</strong> <strong>box</strong>?<br />
Yes<br />
No<br />
<br />
VIDEO<br />
Audio & Video (sound & pictures),<br />
Phone, and Power<br />
<strong>Antenna</strong><br />
In<br />
Composite A/V <strong>cable</strong> <strong>f<strong>or</strong></strong><br />
stereo audio (red & white<br />
ends) and video (yellow end)<br />
Coaxial RF <strong>cable</strong><br />
Enjoy your TiVo ® DVR!<br />
TiVo Central ® and Now Playing<br />
The TiVo button takes you to TiVo Central,<br />
where you can access all of the features<br />
unique to the TiVo ® service. <strong>Use</strong> Pick<br />
Programs to Rec<strong>or</strong>d to schedule rec<strong>or</strong>dings<br />
of your fav<strong>or</strong>ite shows. Press the TiVo<br />
button twice to go to Now Playing on TiVo<br />
and see all of your rec<strong>or</strong>ded programs.<br />
Tell Your TiVo ® DVR What You Like<br />
Rate programs using the THUMBSTM buttons.<br />
Then check out TiVo Suggestions (in Pick<br />
Programs to Rec<strong>or</strong>d) and watch <strong>f<strong>or</strong></strong><br />
suggestions in Now Playing on TiVo.<br />
Phone c<strong>or</strong>d<br />
Phone splitter<br />
Power c<strong>or</strong>d<br />
I have a satellite <strong>or</strong> <strong>cable</strong> <strong>box</strong> — Turn this poster over.<br />
OUT<br />
IN<br />
OUT<br />
(RF splitter<br />
<strong>no</strong>t included) incuded)<br />
Connect program source to TiVo ® DVR<br />
Connect the Coaxial RF <strong>cable</strong> coming out of the wall (from your<br />
antenna <strong>or</strong> <strong>cable</strong>) to the <strong>Cable</strong>/<strong>Antenna</strong> RF In jack on the DVR.<br />
Connect TiVo ® DVR to TV<br />
<strong>Cable</strong> Bag<br />
B<br />
I don’t have a satellite <strong>or</strong> <strong>cable</strong> <strong>box</strong> — <strong>Use</strong> this side.<br />
Connect a Composite A/V <strong>cable</strong> (red, white,<br />
and yellow) from the DVR’s Audio/Video<br />
Output jacks to the TV’s Audio/Video input.<br />
[Alternate: If your TV doesn’t have Composite<br />
A/V (red, white, and yellow) input jacks,<br />
connect a Coaxial RF <strong>cable</strong> from the RF Out<br />
jack on the DVR to the <strong>Antenna</strong> In jack on<br />
your TV. Then set the Channel 3/4 switch on<br />
the back of the DVR, and tune your TV to the<br />
same channel.]<br />
Watching one channel while rec<strong>or</strong>ding a<strong>no</strong>ther (optional)<br />
You can split your video signal so you have a primary signal that passes through your TiVo ® DVR,<br />
and a second signal that connects directly to your TV. This lets you watch one channel while the<br />
DVR rec<strong>or</strong>ds a<strong>no</strong>ther. To do this, you need to buy an RF Splitter and an additional Coaxial RF <strong>cable</strong>.<br />
Connect the Coaxial RF <strong>cable</strong> coming out of the wall to the In socket on the splitter. Connect a<br />
Coaxial RF <strong>cable</strong> from one Out socket on the splitter to the jack <strong>Antenna</strong>/<strong>Cable</strong> RF In jack on the<br />
DVR. Connect a<strong>no</strong>ther Coaxial RF <strong>cable</strong> from a second Out socket on the splitter to the <strong>Antenna</strong> In<br />
jack on your TV. (See the <strong>Use</strong>r’s Guide <strong>f<strong>or</strong></strong> m<strong>or</strong>e in<strong>f<strong>or</strong></strong>mation on this setup.)<br />
• To watch live TV on one channel while the DVR rec<strong>or</strong>ds a<strong>no</strong>ther, use your TV’s remote to change<br />
channels. Because this signal does <strong>no</strong>t pass through the TiVo DVR, it has <strong>no</strong> TiVo service<br />
functionality (so you can’t pause <strong>or</strong> rewind live TV ).<br />
• To watch video from the TiVo DVR again, first press the TiVo button on your TiVo remote, then<br />
press the Input, Source, <strong>or</strong> TV/Video button on your TV remote <strong>or</strong> TV until you see TiVo Central ® .<br />
Channel Changing<br />
Continue with step <br />
on the other side.<br />
Find What’s on TV<br />
To see what’s on <strong>no</strong>w, press LIVE TV. Press<br />
the GUIDE button to see the Program Guide<br />
and browse up to two weeks of program<br />
in<strong>f<strong>or</strong></strong>mation. <strong>Use</strong> either of two guide styles<br />
to choose programs to watch <strong>or</strong> rec<strong>or</strong>d.<br />
Control Live TV<br />
Pause TV <strong>f<strong>or</strong></strong> up to 30 minutes, rewind and<br />
fast <strong>f<strong>or</strong></strong>ward at three speeds, and instant<br />
replay<strong>–</strong>all at the touch of a button.<br />
20605-0280<br />
If you have a <strong>cable</strong> <strong>or</strong> satellite <strong>box</strong>, the DVR uses<br />
one of these <strong>cable</strong>s to change channels. Turn this<br />
poster over <strong>f<strong>or</strong></strong> details.<br />
IR Control <strong>cable</strong> (w<strong>or</strong>ks with<br />
any <strong>cable</strong> <strong>or</strong> satellite <strong>box</strong>)<br />
Serial Control <strong>cable</strong> (w<strong>or</strong>ks with<br />
some DIRECTV ® satellite receivers<br />
and Mot<strong>or</strong>ola/GI DCT2000 series<br />
digital <strong>cable</strong> <strong>box</strong>es.)<br />
Continue with<br />
step below.
<strong>Setup</strong> <strong>f<strong>or</strong></strong> a <strong>Cable</strong> Box <strong>or</strong> Satellite Box <strong>–</strong> <strong>Use</strong> <strong>cable</strong> <strong>bag</strong>s A & B<br />
If you don’t have a <strong>cable</strong> <strong>box</strong> <strong>or</strong> satellite <strong>box</strong>, turn this poster over<br />
<strong>Cable</strong> Bag<br />
A<br />
<strong>Cable</strong> Bag<br />
B<br />
Connect Serial Control<br />
<strong>cable</strong> from <strong>cable</strong>/satellite<br />
<strong>box</strong> to TiVo ® DVR<br />
Plug the Serial Control <strong>cable</strong><br />
into the 9-pin Serial (Data)<br />
jack (like the one below)<br />
on the back of your <strong>cable</strong> <strong>or</strong><br />
satellite <strong>box</strong>. Plug the other<br />
end into the Control<br />
Out/Serial jack (the upper<br />
control jack) on your TiVo DVR.<br />
Now continue with step .<br />
Next Steps<br />
Plug in TiVo ® DVR power c<strong>or</strong>d<br />
Make sure any equipment connected to<br />
your TiVo DVR is also plugged in.<br />
<br />
Audio & Video (sound & pictures), Phone, and Power<br />
Connect TV source to<br />
<strong>cable</strong> <strong>or</strong> satellite <strong>box</strong>.<br />
Make sure the <strong>cable</strong> from the<br />
wall is connected to the <strong>cable</strong><br />
<strong>or</strong> satellite <strong>box</strong>.<br />
Connect phone line to TiVo ® DVR<br />
Note: Your <strong>cable</strong> <strong>or</strong> satellite <strong>box</strong> may also<br />
require a phone line. To connect both the<br />
TiVo DVR and the <strong>cable</strong> <strong>or</strong> satellite <strong>box</strong> to<br />
the same phone jack, use the provided<br />
phone splitter.<br />
Channel Changing<br />
Connecting the<br />
Serial <strong>cable</strong><br />
TiVo ®<br />
DVR<br />
<strong>Cable</strong> <strong>or</strong><br />
Satellite Box<br />
RF In<br />
RF Out<br />
Television<br />
<br />
Tune TV (if necessary) to see the Welcome screen<br />
INPUT<br />
Serial<br />
R L<br />
Turn on your TV. Tip: If you do <strong>no</strong>t see the Welcome screen,<br />
use the Input, Source, <strong>or</strong> TV/Video button on your TV remote<br />
<strong>or</strong> TV to select the c<strong>or</strong>rect audio/video source. Press the<br />
button until you see the Welcome screen.<br />
When you see the Welcome screen, you’re ready to begin<br />
Guided <strong>Setup</strong>. An explanation of Guided <strong>Setup</strong>, along with<br />
useful in<strong>f<strong>or</strong></strong>mation and tips <strong>f<strong>or</strong></strong> completing it are all provided<br />
in the “Guided <strong>Setup</strong>” chapter of the <strong>Use</strong>r’s Guide.<br />
[Alternate: If you used a Coaxial RF <strong>cable</strong> in Step , tune your<br />
TV to the same channel (either 3 <strong>or</strong> 4) that the Channel 3/4<br />
switch on the back of the DVR is set to. The Welcome screen<br />
should appear.]<br />
There’s m<strong>or</strong>e on the other side!<br />
IN<br />
VIDEO<br />
Audio/Video Out<br />
TiVo ®<br />
DVR<br />
<br />
<br />
Turn this poster over <strong>f<strong>or</strong></strong>: • tips and troubleshooting<br />
• online supp<strong>or</strong>t in<strong>f<strong>or</strong></strong>mation<br />
• details about the fun features of the TiVo ® service<br />
TiVo ®<br />
DVR<br />
<strong>Antenna</strong><br />
In<br />
<strong>Cable</strong> <strong>or</strong><br />
Satellite Box<br />
IN<br />
RF In<br />
RFOut<br />
Television<br />
INPUT<br />
OR<br />
<br />
R L<br />
IN<br />
VIDEO<br />
Audio/Video Out<br />
<strong>Antenna</strong><br />
In<br />
Choose a Channel Changing <strong>cable</strong><br />
The DVR uses one of the provided channel changing <strong>cable</strong>s to change<br />
channels on your <strong>cable</strong> <strong>or</strong> satellite <strong>box</strong>. Choose which one to connect.<br />
IF YOU HAVE EITHER IF YOU HAVE<br />
· a DIRECTV ® satellite <strong>box</strong> <strong>or</strong><br />
· a DCT2000 series <strong>cable</strong> <strong>box</strong><br />
(see image below/right)<br />
and your <strong>cable</strong> <strong>or</strong> satellite <strong>box</strong><br />
has a nine-pin serial (data) jack<br />
that looks like this:<br />
use the Serial <strong>cable</strong>.<br />
Go to step<br />
any other <strong>cable</strong><br />
<strong>or</strong> satellite <strong>box</strong><br />
use the IR <strong>cable</strong>.<br />
Go to step<br />
<br />
Plug the purple end of<br />
the IR <strong>cable</strong> into the back<br />
of the TiVo ® DVR<br />
If you’re <strong>no</strong>t using the Serial<br />
<strong>cable</strong>, plug the purple end of<br />
the IR <strong>cable</strong> into the Control<br />
Out/IR jack (the lower control<br />
jack) on the back of the TiVo<br />
DVR as shown.<br />
General Instruments/<br />
Mot<strong>or</strong>ola DCT 2000 Series<br />
General Instruments/<br />
Mot<strong>or</strong>ola DCT 1000 Series<br />
Pioneer<br />
Voyager 3000<br />
Connect <strong>cable</strong> <strong>or</strong> satellite <strong>box</strong> to TiVo ® DVR<br />
Connect a Composite A/V <strong>cable</strong> (red, white, and<br />
yellow) from the Audio/Video Output jacks on the<br />
the <strong>cable</strong> <strong>or</strong> satellite <strong>box</strong> to the Audio/Video Input<br />
jacks on the TiVo DVR.<br />
Connect TiVo ® DVR to TV<br />
Connect a Composite A/V <strong>cable</strong> (red, white,<br />
and yellow) from the DVR’s Audio/Video<br />
Output jacks to the TV’s Audio/Video input.<br />
[Alternate: If your TV doesn’t have Composite<br />
A/V (red, white, and yellow) input jacks,<br />
connect a Coaxial RF <strong>cable</strong> from the RF Out<br />
jack on the DVR to the <strong>Antenna</strong> In jack on<br />
your TV. Then set the Channel 3/4 switch on<br />
the back of the DVR, and tune your TV to the<br />
same channel.]<br />
Connecting the IR <strong>cable</strong><br />
extends 1½ "<br />
IR Control Tips <strong>f<strong>or</strong></strong> Common <strong>Cable</strong> & Satellite Boxes<br />
A quick reference <strong>f<strong>or</strong></strong> finding the IR Sens<strong>or</strong> and choosing an IR code<br />
<strong>f<strong>or</strong></strong> some common <strong>cable</strong> and satellite <strong>box</strong>es.<br />
IR Sens<strong>or</strong><br />
IR Sens<strong>or</strong><br />
IR Sens<strong>or</strong><br />
Try using the serial <strong>cable</strong>.<br />
If serial doesn’t w<strong>or</strong>k, use<br />
the IR <strong>cable</strong>.<br />
Suggested IR codes:<br />
10006, 10042, 00093<br />
Suggested IR codes:<br />
10006, 10042, 00093<br />
Suggested IR code:<br />
10014<br />
<strong>Cable</strong> <strong>or</strong><br />
Satellite Box<br />
TiVo ®<br />
DVR<br />
Locate IR sens<strong>or</strong> on <strong>cable</strong> <strong>or</strong><br />
satellite <strong>box</strong><br />
The IR <strong>cable</strong>’s emitters beam<br />
channel change signals to the IR<br />
sens<strong>or</strong> on your <strong>cable</strong> <strong>or</strong> satellite<br />
<strong>box</strong><strong>–</strong>just like a remote control does.<br />
You must locate the IR sens<strong>or</strong> on<br />
the front of your <strong>cable</strong> <strong>or</strong> satellite<br />
<strong>box</strong>. It’s a tiny round bulb; if you<br />
shine a flashlight into the dark<br />
plastic “window,” you can see it.<br />
F<strong>or</strong> help, see below.<br />
Hughes Netw<strong>or</strong>k Systems<br />
E25<br />
Scientific Atlanta<br />
Expl<strong>or</strong>er 4200<br />
Scientific Atlanta<br />
Expl<strong>or</strong>er 2100<br />
Place IR emitters on the<br />
front of the <strong>cable</strong> <strong>or</strong> satellite <strong>box</strong><br />
Place the emitters in front of the IR<br />
sens<strong>or</strong> (one on top of the <strong>box</strong> and<br />
one on bottom). Be sure both<br />
emitters stick out about 1 ½ inches<br />
directly in front of the IR sens<strong>or</strong>.<br />
Then use the adhesive strips<br />
provided to keep them in place.<br />
Now continue with step .<br />
IR Sens<strong>or</strong><br />
IR Sens<strong>or</strong><br />
IR Sens<strong>or</strong><br />
Suggested IR codes:<br />
10020, 00072, 00137<br />
Suggested IR codes:<br />
00018, 00048, 00049<br />
Suggested IR codes:<br />
00018, 00048, 00049
TiVo DVR <strong>Use</strong>r’s Guide<br />
<strong>Use</strong>r’s Guide<br />
Setting up your TiVo ® Digital Video Rec<strong>or</strong>der<br />
Using the TiVo ® Service<br />
The On-Screen Menus and the Remote Control<br />
Arrow Buttons<br />
Select<br />
Select<br />
To navigate the TiVo ® DVR’s on-screen menus, use the<br />
remote control’s arrow buttons to move the highlight<br />
bar onto the option you want, then press SELECT.<br />
The LEFT arrow button often takes you to the previous<br />
screen.<br />
Two Types of On-Screen Arrows<br />
The arrows that appear beside <strong>or</strong> near<br />
the highlight bar show possible<br />
directions. F<strong>or</strong> example, on this screen,<br />
you could press the RIGHT arrow to<br />
highlight Options <strong>or</strong> the DOWN arrow to<br />
highlight “Edit Act<strong>or</strong> WishList.”<br />
Page Up<br />
Arrow<br />
Highlight Bar<br />
Arrows Near<br />
Highlight Bar<br />
When you see page up <strong>or</strong><br />
page down arrows at the top<br />
<strong>or</strong> bottom of the screen (<strong>or</strong> a<br />
list), press the CHAN<br />
UP/DOWN button to jump an<br />
entire page at a time.<br />
Page Down<br />
Arrow Chan CHAN UP/DOWN<br />
Button<br />
Page
Programming the Remote Control<br />
After you complete Guided <strong>Setup</strong> (see Chapter 2), you can program the<br />
TV POWER, VOL, and MUTE buttons to control your TV*:<br />
1. Find the four-digit codes <strong>f<strong>or</strong></strong> your television brand. To see a list of these<br />
codes, press the TiVo button to go to TiVo Central, then select Messages<br />
& <strong>Setup</strong>, then Settings, then Remote Control & DVR Front Lights.<br />
2. Prepare the remote control. Point the remote away from your TiVo Digital<br />
Video Rec<strong>or</strong>der (DVR) and cover the front end with your hand. Press and<br />
hold the TV POWER button and TiVo button simultaneously <strong>f<strong>or</strong></strong> about 5<br />
seconds (until the red light at the end of the remote control comes on,<br />
remains steady, then stays on when you release the buttons).<br />
3. Enter a code. <strong>Use</strong> the number buttons on the remote to enter a four-digit<br />
code (starting with the first code in the list on the screen). After you<br />
press the fourth digit of the code, the red light on the end of the remote<br />
control should flash three times and then go out.<br />
4. Test the code. Point the remote towards the TV and press the TV POWER<br />
button. If pressing the button turns the TV off, you're finished. If it does<br />
<strong>no</strong>t w<strong>or</strong>k, repeat steps 2 and 3 using the next code in the list. If <strong>no</strong>ne of<br />
the codes w<strong>or</strong>ks, see Chapter 6 of this guide <strong>f<strong>or</strong></strong> alternatives.<br />
*You can also program your TiVo remote to control your TV’s input settings, an<br />
A/V receiver, and a second DVR. See Chapter 6 <strong>f<strong>or</strong></strong> complete instructions.<br />
Inserting Batteries into the Remote Control<br />
Hold the remote with the battery do<strong>or</strong> facing you. Place your thumb in<br />
the depression of the do<strong>or</strong> and slide the do<strong>or</strong> towards you.<br />
Insert two AA batteries (supplied). Be sure to match the + and - marks<br />
on the batteries to the + and - marks in the compartment.<br />
Replace the battery do<strong>or</strong> by sliding it back into the case with the tabs<br />
towards the rear of the compartment. You’ll hear a click when it’s<br />
securely back in place.<br />
Remote Control Tips<br />
Press the TiVo button once to go to TiVo Central, <strong>or</strong> twice to go to<br />
Now Playing on TiVo.<br />
Press FORWARD ( ) and BACK ( ) up to 3 times <strong>f<strong>or</strong></strong> 3 speeds.<br />
Press a fourth time to resume n<strong>or</strong>mal play.<br />
INSTANT REPLAY replays the last 8 seconds of a program.<br />
Press CLEAR to delete a title in a list (like the Now Playing list) <strong>or</strong> to<br />
hide things that aren’t part of the program you’re watching (like<br />
the TiVo channel banner).<br />
INFO brings up the TiVo channel banner. Press the RIGHT arrow<br />
to switch among three versions of the banner, each with a<br />
different amount of in<strong>f<strong>or</strong></strong>mation.<br />
Press GUIDE to see the TiVo program guide, then press INFO (while<br />
the guide is visible) to see Guide Options and change the day <strong>or</strong><br />
time, <strong>or</strong> show <strong>only</strong> a categ<strong>or</strong>y of programs.<br />
CHAN UP/DOWN does m<strong>or</strong>e than change the channel—it also pages<br />
up <strong>or</strong> down through lists of programs <strong>or</strong> menu items.<br />
When you’re watching “behind” live TV (<strong>f<strong>or</strong></strong> example, if you paused<br />
live TV and later resumed watching from the paused spot),<br />
ADVANCE catches you up to the live broadcast. In a rec<strong>or</strong>ded<br />
program, press it once to jump to the end of the program, then<br />
again to jump to the beginning.<br />
If programmed, the TV POWER, VOLUME, MUTE, and TV INPUT<br />
buttons can control your TV and A/V equipment.<br />
If programmed, the DVR Switch lets you control two different TiVo<br />
Digital Video Rec<strong>or</strong>ders (DVRs) with the same remote.<br />
TiVo Button<br />
Arrow Buttons<br />
TV Power<br />
TV Input<br />
Window*<br />
Select<br />
Thumbs Down<br />
Mute<br />
Volume<br />
Play<br />
Pause<br />
Back (rewind)<br />
Slow<br />
Instant Replay<br />
Number Buttons<br />
Clear<br />
TV Input<br />
TV<br />
P o w er<br />
Window<br />
TVT V<br />
P o w er<br />
Clear<br />
Select<br />
Mute<br />
Vol Chan<br />
Rec<strong>or</strong>d<br />
P l a y<br />
Slo w<br />
1 2<br />
DVR<br />
Live<br />
Page<br />
1 2 3<br />
4 5 6<br />
7 8 9<br />
0<br />
Enter/Last<br />
Info<br />
G uid e<br />
Remote Active Light<br />
Live TV<br />
Info<br />
Guide<br />
Thumbs Up<br />
Chan Up/Down<br />
Rec<strong>or</strong>d<br />
F<strong>or</strong>ward<br />
Advance<br />
DVR Switch<br />
Enter/Last<br />
*Window button: <strong>no</strong>t<br />
active; functionality may<br />
be added in a future<br />
TiVo service update
®<br />
Welcome to TiVo !
ii<br />
20005-2200<br />
© 2004 by TiVo Inc and HUMAX C<strong>or</strong>p<strong>or</strong>ation. Not to be copied, used, <strong>or</strong> translated in part<br />
<strong>or</strong> whole without HUMAX’s pri<strong>or</strong> consent in writing except approval of ownership of<br />
copyright and copyright law. All rights reserved.<br />
TiVo, the TiVo logo, TiVo Central, TiVolution, the TiVo and Smile Design, Ipreview, the<br />
Jump logo, and the Instant Replay logo are registered trademarks of TiVo Inc. TiVo Series2,<br />
Season Pass, WishList, Overtime Scheduler, the Thumbs Up logo and text, and the Thumbs<br />
Down logo and text are trademarks of TiVo Inc., 2160 Gold Street, P.O. Box 2160, Alviso,<br />
CA 95002-2160.<br />
Product and service are covered by U.S. Pat. Nos. 5,241,428; 6,233,389; 6,327,418;<br />
6,385,739; 6,490,722; 6,642,939; 6,643,798; D435,561; and D445,80. Other patents<br />
pending.<br />
DIRECTV is a registered trademark of DIRECTV Inc., a unit of The DIRECTV Group, Inc.<br />
All other trademarks are the properties of their respective owners.
®<br />
Welcome to the TiVolution !<br />
It’s a revolution in television. We’ve pioneered an exciting new categ<strong>or</strong>y that will <strong>f<strong>or</strong></strong>ever<br />
change the way you watch TV. With a new TiVo ® Digital Video Rec<strong>or</strong>der by HUMAX in<br />
your living room, you’ll see how easy it is to watch what you want, when you want.<br />
Never miss your fav<strong>or</strong>ite shows again.<br />
The TiVo service automatically rec<strong>or</strong>ds every episode of your fav<strong>or</strong>ite series, all season<br />
long, even if the netw<strong>or</strong>k schedule changes. It can even skip reruns.<br />
No m<strong>or</strong>e interruptions.<br />
Pause live TV <strong>f<strong>or</strong></strong> as long as 30 minutes—any channel, any time. You can also rewind,<br />
instant replay, and slow-motion live <strong>or</strong> rec<strong>or</strong>ded TV. Wow!<br />
Watch m<strong>or</strong>e of what you like, less of what you don’t.<br />
Because the TiVo service is “smart,” it can automatically find and rec<strong>or</strong>d shows that<br />
feature your fav<strong>or</strong>ite act<strong>or</strong>, team, hobby, etc., so you’ll always catch the good stuff—even<br />
if you never knew it was on.<br />
No m<strong>or</strong>e videotapes.<br />
Because it’s all-digital, the TiVo DVR saves all your programs in one place so they’re<br />
ready to watch anytime. You can even start watching a show from the beginning—even<br />
while it’s still rec<strong>or</strong>ding.<br />
Netw<strong>or</strong>ked home entertainment.<br />
Schedule rec<strong>or</strong>dings on your DVR at home from any web browser, anywhere! Connect<br />
your DVR to a home netw<strong>or</strong>k and enjoy digital music and photos in your living room and<br />
transfer rec<strong>or</strong>dings to any TiVo Series2TM DVR connected to your home netw<strong>or</strong>k.<br />
At last, TV fits into your busy life, <strong>no</strong>t the other way around!<br />
iii
iv<br />
Table of Contents<br />
Using This Guide . . . . . . . . . . . . . . . . . . . . . . . . . . . . . . . . . . . . . . . . . . . . . . . . . . . . . . . . . . . . . . . . . . . . . . . . . . . . vi<br />
Chapter 1: Connecting Your DVR . . . . . . . . . . . . . . . . . . . . . . . . . . . . . . . . . . . . . . . . . . . . . . . . . . . . . . . . . . .1<br />
Getting Started . . . . . . . . . . . . . . . . . . . . . . . . . . . . . . . . . . . . . . . . . . . . . . . . . . . . . . . . . . . . . . . . . . . . . . . . . . . . . . . 2<br />
<strong>Cable</strong>s and Access<strong>or</strong>ies . . . . . . . . . . . . . . . . . . . . . . . . . . . . . . . . . . . . . . . . . . . . . . . . . . . . . . . . . . . . . . . . . . . . . . . . 3<br />
Choosing a <strong>Setup</strong> Example . . . . . . . . . . . . . . . . . . . . . . . . . . . . . . . . . . . . . . . . . . . . . . . . . . . . . . . . . . . . . . . . . . . . . 9<br />
Watching One Channel While Rec<strong>or</strong>ding A<strong>no</strong>ther (<strong>Antenna</strong> <strong>or</strong> <strong>Cable</strong>) . . . . . . . . . . . . . . . . . . . . . . . . . . . . . . . . . . 18<br />
Connecting a VCR, DVD Rec<strong>or</strong>der, <strong>or</strong> Other A/V Equipment . . . . . . . . . . . . . . . . . . . . . . . . . . . . . . . . . . . . . . . . . 20<br />
Chapter 2: Guided <strong>Setup</strong> . . . . . . . . . . . . . . . . . . . . . . . . . . . . . . . . . . . . . . . . . . . . . . . . . . . . . . . . . . . . . . . . .23<br />
Activating the TiVo ® Service . . . . . . . . . . . . . . . . . . . . . . . . . . . . . . . . . . . . . . . . . . . . . . . . . . . . . . . . . . . . . . . . . . 24<br />
Completing Guided <strong>Setup</strong> . . . . . . . . . . . . . . . . . . . . . . . . . . . . . . . . . . . . . . . . . . . . . . . . . . . . . . . . . . . . . . . . . . . . . 25<br />
TiVo Central ® . . . . . . . . . . . . . . . . . . . . . . . . . . . . . . . . . . . . . . . . . . . . . . . . . . . . . . . . . . . . . . . . . . . . . . . . . . . . . . 31<br />
Chapter 3: The Basics in 5 Sh<strong>or</strong>t Tours . . . . . . . . . . . . . . . . . . . . . . . . . . . . . . . . . . . . . . . . . . . . . . . . . . . . .33<br />
Tour One: Play with Live TV . . . . . . . . . . . . . . . . . . . . . . . . . . . . . . . . . . . . . . . . . . . . . . . . . . . . . . . . . . . . . . . . . . 34<br />
Tour Two: The Program Guide . . . . . . . . . . . . . . . . . . . . . . . . . . . . . . . . . . . . . . . . . . . . . . . . . . . . . . . . . . . . . . . . . 36<br />
Tour Three: Find and Rec<strong>or</strong>d Your Fav<strong>or</strong>ite Programs . . . . . . . . . . . . . . . . . . . . . . . . . . . . . . . . . . . . . . . . . . . . . . . 38<br />
Tour Four: Find New Programs . . . . . . . . . . . . . . . . . . . . . . . . . . . . . . . . . . . . . . . . . . . . . . . . . . . . . . . . . . . . . . . . . 40<br />
Tour Five: Now Playing . . . . . . . . . . . . . . . . . . . . . . . . . . . . . . . . . . . . . . . . . . . . . . . . . . . . . . . . . . . . . . . . . . . . . . . 42<br />
Cool Things You Can Do . . . . . . . . . . . . . . . . . . . . . . . . . . . . . . . . . . . . . . . . . . . . . . . . . . . . . . . . . . . . . . . . . . . . . . 43<br />
Chapter 4: Pick Programs to Rec<strong>or</strong>d . . . . . . . . . . . . . . . . . . . . . . . . . . . . . . . . . . . . . . . . . . . . . . . . . . . . . . . .45<br />
Season Pass, Rec<strong>or</strong>ding Options, To Do List . . . . . . . . . . . . . . . . . . . . . . . . . . . . . . . . . . . . . . . . . . . . . . . . . . . . . . 46<br />
Using the Guide to Find Programs . . . . . . . . . . . . . . . . . . . . . . . . . . . . . . . . . . . . . . . . . . . . . . . . . . . . . . . . . . . . . . . 51<br />
Find Your Fav<strong>or</strong>ite Programs . . . . . . . . . . . . . . . . . . . . . . . . . . . . . . . . . . . . . . . . . . . . . . . . . . . . . . . . . . . . . . . . . . . 53<br />
Find Programs That Match Your Interests . . . . . . . . . . . . . . . . . . . . . . . . . . . . . . . . . . . . . . . . . . . . . . . . . . . . . . . . . 58
Chapter 5: Watching Live TV and Rec<strong>or</strong>ded Programs . . . . . . . . . . . . . . . . . . . . . . . . . . . . . . . . . . . . . . . . .65<br />
Using the Control Buttons . . . . . . . . . . . . . . . . . . . . . . . . . . . . . . . . . . . . . . . . . . . . . . . . . . . . . . . . . . . . . . . . . . . . . 66<br />
The Status Bar . . . . . . . . . . . . . . . . . . . . . . . . . . . . . . . . . . . . . . . . . . . . . . . . . . . . . . . . . . . . . . . . . . . . . . . . . . . . . . 67<br />
The Channel Banner . . . . . . . . . . . . . . . . . . . . . . . . . . . . . . . . . . . . . . . . . . . . . . . . . . . . . . . . . . . . . . . . . . . . . . . . . 68<br />
Watching Live TV . . . . . . . . . . . . . . . . . . . . . . . . . . . . . . . . . . . . . . . . . . . . . . . . . . . . . . . . . . . . . . . . . . . . . . . . . . . 69<br />
Watching Programs from Now Playing . . . . . . . . . . . . . . . . . . . . . . . . . . . . . . . . . . . . . . . . . . . . . . . . . . . . . . . . . . . 72<br />
Save to VCR . . . . . . . . . . . . . . . . . . . . . . . . . . . . . . . . . . . . . . . . . . . . . . . . . . . . . . . . . . . . . . . . . . . . . . . . . . . . . . . 74<br />
Chapter 6: Messages & <strong>Setup</strong> . . . . . . . . . . . . . . . . . . . . . . . . . . . . . . . . . . . . . . . . . . . . . . . . . . . . . . . . . . . . .75<br />
Messages . . . . . . . . . . . . . . . . . . . . . . . . . . . . . . . . . . . . . . . . . . . . . . . . . . . . . . . . . . . . . . . . . . . . . . . . . . . . . . . . . . 76<br />
Settings . . . . . . . . . . . . . . . . . . . . . . . . . . . . . . . . . . . . . . . . . . . . . . . . . . . . . . . . . . . . . . . . . . . . . . . . . . . . . . . . . . . . 77<br />
Remote Control & DVR Front Lights . . . . . . . . . . . . . . . . . . . . . . . . . . . . . . . . . . . . . . . . . . . . . . . . . . . . . . . . . . . . 85<br />
Phone & Netw<strong>or</strong>k <strong>Setup</strong> . . . . . . . . . . . . . . . . . . . . . . . . . . . . . . . . . . . . . . . . . . . . . . . . . . . . . . . . . . . . . . . . . . . . . . 92<br />
System In<strong>f<strong>or</strong></strong>mation . . . . . . . . . . . . . . . . . . . . . . . . . . . . . . . . . . . . . . . . . . . . . . . . . . . . . . . . . . . . . . . . . . . . . . . . . . 97<br />
Troubleshooting . . . . . . . . . . . . . . . . . . . . . . . . . . . . . . . . . . . . . . . . . . . . . . . . . . . . . . . . . . . . . . . . . . . . . . . . . . . . . 98<br />
Restart <strong>or</strong> Reset System . . . . . . . . . . . . . . . . . . . . . . . . . . . . . . . . . . . . . . . . . . . . . . . . . . . . . . . . . . . . . . . . . . . . . . . 99<br />
Standby . . . . . . . . . . . . . . . . . . . . . . . . . . . . . . . . . . . . . . . . . . . . . . . . . . . . . . . . . . . . . . . . . . . . . . . . . . . . . . . . . . 100<br />
Chapter 7: Connecting to a Home Netw<strong>or</strong>k . . . . . . . . . . . . . . . . . . . . . . . . . . . . . . . . . . . . . . . . . . . . . . . . 101<br />
Chapter 8: Troubleshooting . . . . . . . . . . . . . . . . . . . . . . . . . . . . . . . . . . . . . . . . . . . . . . . . . . . . . . . . . . . . 119<br />
Chapter 9: Privacy, Service, Warranty, and Licenses . . . . . . . . . . . . . . . . . . . . . . . . . . . . . . . . . . . . . . . . 145<br />
Appendix A: Back Panel Reference and Specifications . . . . . . . . . . . . . . . . . . . . . . . . . . . . . . . . . . . . . . 171<br />
Index . . . . . . . . . . . . . . . . . . . . . . . . . . . . . . . . . . . . . . . . . . . . . . . . . . . . . . . . . . . . . . . . . . . . . . . . . . . . . . . 175<br />
Glossary of Icons. . . . . . . . . . . . . . . . . . . . . . . . . . . . . . . . . . . . . . . . . . . . . . . . . . . . . . . . . . .Inside Back Cover<br />
v
vi<br />
®<br />
Throughout this guide, you will see<br />
imp<strong>or</strong>tant and helpful <strong>no</strong>tes and<br />
tips in this side column.<br />
Using This Guide<br />
Getting Started<br />
1. Activate the TiVo ® service (see page 24 <strong>f<strong>or</strong></strong> m<strong>or</strong>e on activating).<br />
2. Connect your DVR using the Start Here poster and Chapter 1 of this guide.<br />
3. Complete Guided <strong>Setup</strong> following the steps provided in Chapter 2 of this guide.<br />
When you’ve finished these three steps, you’re ready to use the TiVo service. Take the<br />
tours in Chapter 3 of this guide to check out the basic features.<br />
Basic terms. These are terms used in this guide when we talk about the rest of the service:<br />
Live TV. If you’re watching a program as it’s being broadcast, you’re watching live TV.<br />
With the TiVo service, you can also watch rec<strong>or</strong>ded programs, <strong>or</strong> watch “behind” live<br />
TV (if you pause live TV, then come back later and watch from the paused spot).<br />
Icons. These are graphic symbols used in the TiVo service to provide in<strong>f<strong>or</strong></strong>mation and<br />
options you can select. You’ll find the Glossary of Icons on the inside back cover.<br />
Program In<strong>f<strong>or</strong></strong>mation screen. When you select a program title from a list, you’ll see<br />
this type of screen. From it, select actions and view the program description.<br />
Menu paths. Notes at the bottom of some pages show you how to find the screen being<br />
described. F<strong>or</strong> example, page 50 describes the To Do List. At the bottom of the page you<br />
see TiVo Central Pick Programs to Rec<strong>or</strong>d To Do List. This means you can find the<br />
To Do List by going to TiVo Central, selecting Pick Programs to Rec<strong>or</strong>d, then To Do List.<br />
Service updates. Your DVR may receive service updates which include features <strong>no</strong>t<br />
described in this guide. Details about service updates are always available at<br />
www.tivo.com/supp<strong>or</strong>t.
CHAPTER 1<br />
Connecting Your DVR<br />
Getting Started 2<br />
<strong>Cable</strong>s and Access<strong>or</strong>ies 3<br />
Choosing a <strong>Setup</strong> Example 9<br />
Watching One Channel & Rec<strong>or</strong>ding A<strong>no</strong>ther 18<br />
A<strong>no</strong>ther (<strong>Antenna</strong> <strong>or</strong> <strong>Cable</strong>)<br />
Connecting a VCR, DVD Rec<strong>or</strong>der, <strong>or</strong> Other A/V Equipment 20
2<br />
Chapter 1 Connecting Your DVR<br />
®<br />
Remember, always connect <strong>cable</strong>s<br />
from the OUT jack of one device to<br />
the IN jack of the next. Never connect an<br />
IN to an IN <strong>or</strong> an OUT to an OUT.<br />
OUT IN<br />
Getting Started<br />
Television used to be so simple: all you needed was an antenna and a TV. The antenna<br />
captured audio and video signals and sent them to your TV over a wire.<br />
As TVs have acquired m<strong>or</strong>e features, and new devices have been created to w<strong>or</strong>k with<br />
your TV, it may seem that everything has become m<strong>or</strong>e complex. You may have a VCR, a<br />
DVD player, and a game system connected to your TV, in addition to your TiVo ® Digital<br />
Video Rec<strong>or</strong>der by HUMAX. However, one thing has remained the same: you still need to<br />
get audio and video (sound and pictures) from their source (an antenna, <strong>or</strong> a <strong>cable</strong> <strong>or</strong><br />
satellite <strong>box</strong>) to your TV.<br />
Sounds and pictures travel through <strong>cable</strong>s. The choice of <strong>cable</strong>s may seem overwhelming,<br />
but they all per<strong>f<strong>or</strong></strong>m the same function: they transfer sounds and pictures to your TV at<br />
varying levels of quality.<br />
All of your equipment has connect<strong>or</strong>s, <strong>or</strong> jacks, where <strong>cable</strong>s can be connected. Some<br />
jacks are labeled “In” and some are labeled “Out.” Pictures and sounds enter audio/video<br />
(A/V) equipment through IN jacks and leave through OUT jacks.<br />
When you connect your DVR to your TV and other A/V equipment, you are simply<br />
creating a path that starts at the wall, <strong>or</strong> your <strong>cable</strong> <strong>or</strong> satellite <strong>box</strong>, and goes in (through IN<br />
jacks) and out (through OUT jacks) of your equipment until it reaches your TV.
<strong>Cable</strong>s and Access<strong>or</strong>ies<br />
Inside the carton, you will find<br />
your new TiVo ® DVR, the Remote<br />
Control, and two <strong>bag</strong>s of <strong>cable</strong>s<br />
(contents listed below), along with this<br />
<strong>Use</strong>r’s Guide and the Start Here poster.<br />
<strong>Cable</strong> Bag<br />
Audio, Video, Phone, and Power<br />
These <strong>cable</strong>s connect your DVR to your<br />
TV, power, and your home phone line.<br />
Power C<strong>or</strong>d<br />
<strong>Cable</strong> Bag<br />
Channel Changing<br />
These <strong>cable</strong>s allow your DVR to change<br />
channels on a <strong>cable</strong> <strong>or</strong> satellite <strong>box</strong>. If<br />
you don’t have a <strong>cable</strong> <strong>or</strong> satellite <strong>box</strong>,<br />
you won’t use these <strong>cable</strong>s.<br />
DVR<br />
Composite A/V <strong>cable</strong>s<br />
If you have a DIRECTV ®<br />
satellite <strong>box</strong> with a<br />
9-pin Data connect<strong>or</strong>, <strong>or</strong> a<br />
Mot<strong>or</strong>ola/GI DCT2000 series<br />
<strong>cable</strong> <strong>box</strong>, use this <strong>cable</strong>:<br />
RF Coaxial <strong>cable</strong><br />
<strong>Cable</strong>s and Access<strong>or</strong>ies<br />
Remote Control<br />
25’ Phone C<strong>or</strong>d<br />
Phone Line Splitter<br />
If you can’t use the Serial Control<br />
<strong>cable</strong> with your satellite <strong>box</strong> <strong>or</strong><br />
<strong>cable</strong> <strong>box</strong>, use this <strong>cable</strong> instead:<br />
Serial (Data) Control <strong>cable</strong> IR Control <strong>cable</strong><br />
You may need to purchase<br />
additional items <strong>f<strong>or</strong></strong><br />
some setups:<br />
OUT<br />
IN<br />
OUT<br />
RF Coaxial <strong>cable</strong> Splitter<br />
Extra Composite A/V <strong>cable</strong>s<br />
Extra RF Coaxial <strong>cable</strong>s<br />
S-Video <strong>cable</strong><br />
3<br />
1
4<br />
<br />
<br />
<br />
Chapter 1 Connecting Your DVR<br />
Composite A/V <strong>Cable</strong> and Jacks<br />
(red)<br />
(white)<br />
(yellow)<br />
Composite L/R Audio with S-Video <strong>cable</strong><br />
(red)<br />
(white)<br />
(yellow)<br />
(S-Video)<br />
Coaxial RF <strong>cable</strong> and Jack<br />
(Coaxial RF)<br />
Choosing audio and video <strong>cable</strong>s<br />
Most TVs and other audio/video devices have jacks <strong>f<strong>or</strong></strong> Composite A/V <strong>cable</strong>s ().<br />
Composite A/V <strong>cable</strong>s have three ends, two (white and red) <strong>f<strong>or</strong></strong> stereo audio (left and<br />
right), and one (yellow) <strong>f<strong>or</strong></strong> video, providing excellent audio and video quality. If your<br />
equipment has composite A/V jacks, use this <strong>cable</strong>. If your TV has <strong>only</strong> one white audio<br />
jack, connect just the white end of this <strong>cable</strong> instead of both the red and the white ends.<br />
The DVR’s back panel also includes jacks <strong>f<strong>or</strong></strong> S-Video (). S-Video provides a higher<br />
quality video signal than composite. If you have equipment that supp<strong>or</strong>ts this connection,<br />
you may want to purchase an S-Video <strong>cable</strong> to use in place of the yellow video end of the<br />
Composite A/V <strong>cable</strong>. (You should still use the red and white ends of the Composite A/V<br />
<strong>cable</strong> <strong>f<strong>or</strong></strong> stereo audio.)<br />
Some TVs and VCRs <strong>only</strong> have Coaxial RF () jacks. If your TV <strong>only</strong> has an RF jack,<br />
use the Coaxial RF <strong>cable</strong> to connect your DVR to your TV. If your TV also has other<br />
kinds of A/V jacks (composite <strong>or</strong> S-Video) and you used one of these <strong>f<strong>or</strong></strong> the DVR’s<br />
primary audio/video connection, you may want to use Coaxial RF <strong>cable</strong>s in addition<br />
depending on the setup you choose.<br />
If needed, extra audio and video <strong>cable</strong>s are available <strong>f<strong>or</strong></strong> purchase at www.tivo.com/st<strong>or</strong>e.
Choosing a Channel Changing <strong>Cable</strong><br />
Your DVR needs to be able to change channels in <strong>or</strong>der to rec<strong>or</strong>d programs and display<br />
live TV. If you are using a <strong>cable</strong> <strong>or</strong> satellite <strong>box</strong>, the DVR needs to send channel changing<br />
signals to it using either an IR (infrared) <strong>or</strong> a Serial (data) control <strong>cable</strong>. The following<br />
pages help you choose which control <strong>cable</strong> to use.<br />
If you don’t have a <strong>cable</strong> <strong>or</strong> satellite <strong>box</strong>, your DVR does <strong>no</strong>t need a channel changing<br />
<strong>cable</strong>. Skip to “Connecting to a Phone Line” on page 8.<br />
Serial/Data Control. You can use the Serial Control <strong>cable</strong> <strong>f<strong>or</strong></strong> channel changing if:<br />
You have a DIRECTV ® satellite <strong>box</strong> with a 9-pin data connect<strong>or</strong> like this:<br />
You have a Mot<strong>or</strong>ola/General Instruments DCT2000 series <strong>cable</strong> <strong>box</strong>, and your <strong>cable</strong><br />
provider has enabled it <strong>f<strong>or</strong></strong> serial control.<br />
Otherwise, use the IR Control <strong>cable</strong> (described on the next page).<br />
Some DIRECTV ® satellite <strong>box</strong>es have other connections that you may be able to try. To<br />
use one of these connections, you will need to purchase an additional <strong>cable</strong> <strong>or</strong> access<strong>or</strong>y<br />
(available from www.tivo.com/st<strong>or</strong>e):<br />
If your DIRECTV ® satellite <strong>box</strong> has a 15-pin connect<strong>or</strong> like this:<br />
you can connect the Serial Control <strong>cable</strong> by using a 15-pin adapter.<br />
Some satellite <strong>box</strong>es <strong>f<strong>or</strong></strong> the DIRECTV ® service have a Home Control connect<strong>or</strong> like<br />
this: (similar to a phone jack, but slightly smaller).<br />
To connect the Home Control <strong>cable</strong>, plug one end of the <strong>cable</strong> into the Home Control<br />
jack on your DIRECTV satellite <strong>box</strong>. This connect<strong>or</strong> is sometimes labeled “Low<br />
Speed Data.” (Don’t try to connect a Home Control <strong>cable</strong> to the satellite <strong>box</strong>’s phone<br />
jack.) Plug the other end into the Control Out/Serial jack on the DVR.<br />
<strong>Cable</strong>s and Access<strong>or</strong>ies<br />
®<br />
After setting up your DVR, including<br />
the control <strong>cable</strong> connection, you<br />
can change channels using <strong>only</strong> your<br />
DVR’s remote control.<br />
Serial Control <strong>cable</strong><br />
15-pin adapter<br />
(<strong>no</strong>t included)<br />
Home Control <strong>cable</strong><br />
(<strong>no</strong>t included)<br />
5<br />
1
6<br />
Chapter 1 Connecting Your DVR<br />
IR Control <strong>cable</strong><br />
This purple end These IR emitters<br />
plugs into your DVR.<br />
send signals to the<br />
IR sens<strong>or</strong> on your<br />
<strong>cable</strong> <strong>or</strong> satellite<br />
<strong>box</strong>.<br />
®<br />
The small “bulbs” on the IR<br />
emitters do <strong>no</strong>t visibly light up<br />
when they send an IR signal. If you find<br />
that channels are <strong>no</strong>t changing, see<br />
page 129 <strong>f<strong>or</strong></strong> troubleshooting help. If<br />
channels change unreliably <strong>or</strong><br />
inconsistently, try the tips on optimizing<br />
the IR Control connection (right).<br />
IR (infrared) Control. The IR Control <strong>cable</strong> allows the DVR to change channels on any<br />
<strong>cable</strong> <strong>or</strong> satellite <strong>box</strong> with an IR sens<strong>or</strong>. See the Start Here poster <strong>f<strong>or</strong></strong> diagrams of common<br />
<strong>cable</strong> and satellite <strong>box</strong>es, and where to find the IR sens<strong>or</strong> on each.<br />
Finding the IR sens<strong>or</strong>. To c<strong>or</strong>rectly position the IR Control <strong>cable</strong>, you need to find<br />
your <strong>cable</strong> <strong>box</strong> <strong>or</strong> satellite <strong>box</strong>’s IR sens<strong>or</strong>. To locate the IR sens<strong>or</strong>, look <strong>f<strong>or</strong></strong> a tiny<br />
round bulb behind the dark, translucent plastic “window”—the IR window—on the<br />
front of your <strong>cable</strong> <strong>or</strong> satellite <strong>box</strong>. A flashlight might help you see it. Position the IR<br />
emitters so they are centered on the IR sens<strong>or</strong> and stick out about 1.5 inches.<br />
Choosing an IR code in Guided <strong>Setup</strong>. After setting up your DVR, you’ll complete<br />
Guided <strong>Setup</strong> (see Chapter 2 <strong>f<strong>or</strong></strong> m<strong>or</strong>e in<strong>f<strong>or</strong></strong>mation). During Guided <strong>Setup</strong>, you’ll be<br />
asked to test and select an IR code. Each IR code signals a particular <strong>cable</strong> <strong>or</strong> satellite<br />
<strong>box</strong> model to change channels. If <strong>no</strong>ne of the codes changes the channel on your<br />
particular <strong>cable</strong> <strong>or</strong> satellite <strong>box</strong>, see page 129 <strong>f<strong>or</strong></strong> troubleshooting tips. If you find a<br />
code <strong>or</strong> codes that w<strong>or</strong>k, but <strong>no</strong>ne of the codes is reliable <strong>or</strong> consistent, try optimizing<br />
the IR Control connection (see below).<br />
Optimizing the IR Control connection. The IR Control <strong>cable</strong> w<strong>or</strong>ks better if its<br />
emitters and the IR window on the <strong>cable</strong> <strong>or</strong> satellite <strong>box</strong> are shaded from other infrared<br />
signals. You can create an “IR tent” to decrease the interference from other signals.<br />
This solution may help if changing channels with an IR Control <strong>cable</strong> is unreliable <strong>or</strong><br />
inconsistent, but <strong>no</strong>t if channels don’t change at all.<br />
Test whether an IR tent might be effective simply by draping a magazine, a towel, <strong>or</strong> a<br />
dark cloth over the front of <strong>cable</strong> <strong>or</strong> satellite <strong>box</strong>, including the IR emitters. (See the<br />
diagram on page 7.) Do <strong>no</strong>t block the DVR’s IR window. Try changing channels<br />
several times with the TiVo remote. If channels change m<strong>or</strong>e reliably this way, you<br />
may want to build an IR tent.
Building an IR Tent. The exact methods and materials you use to build the IR tent will<br />
depend on the shape of your <strong>cable</strong> <strong>or</strong> satellite <strong>box</strong>'s IR window and the materials you have<br />
available. However, the general procedure described below will guide you.<br />
Cover the area around the IR emitters and the <strong>cable</strong> <strong>or</strong> satellite <strong>box</strong>'s IR window with a<br />
piece of thick fabric, such as black flannel. You could create a cover using cardboard<br />
<strong>or</strong> opaque tape instead. The imp<strong>or</strong>tant point is that the material you use fits snugly over<br />
the area around the translucent IR window and the IR Control <strong>cable</strong>’s emitters.<br />
If possible, cover the entire IR window on the <strong>cable</strong> <strong>or</strong> satellite <strong>box</strong>, because signal<br />
interference can enter from anywhere in the window. F<strong>or</strong> some <strong>cable</strong> and satellite<br />
<strong>box</strong>es, covering the entire IR window will include covering the controls on the front.<br />
In that case, you won’t be able to use the controls, n<strong>or</strong> will you be able to control the<br />
<strong>cable</strong> <strong>or</strong> satellite <strong>box</strong> with its remote. However, we recommend using <strong>only</strong> your TiVo<br />
remote to change the channel. If you still need to access your <strong>cable</strong> <strong>or</strong> satellite <strong>box</strong>, use<br />
materials that are relatively easy to remove.<br />
Secure the cloth, tape, <strong>or</strong> other material (with tape <strong>or</strong> by a<strong>no</strong>ther method), making sure<br />
that it fits closely around the IR window and the IR Control <strong>cable</strong>’s emitters.<br />
<strong>Cable</strong>s and Access<strong>or</strong>ies<br />
Place a piece of opaque material—<strong>f<strong>or</strong></strong><br />
example, cloth <strong>or</strong> tape—over the IR emitters<br />
(shown on opposite page) and the IR window of<br />
the <strong>cable</strong> <strong>or</strong> satellite <strong>box</strong>.<br />
IR window<br />
DVR<br />
<strong>cable</strong> <strong>or</strong><br />
satellite <strong>box</strong><br />
Secure the material, making sure that it<br />
fits snugly.<br />
7<br />
1
8<br />
Chapter 1 Connecting Your DVR<br />
®<br />
Do <strong>no</strong>t connect the DVR to a digital<br />
PBX phone system (these allow<br />
many phones to share a single telephone<br />
number and are usually used in hotels and<br />
office buildings). Doing so may<br />
permanently damage your DVR’s modem<br />
and will void your warranty.<br />
®<br />
If your <strong>cable</strong> <strong>or</strong> satellite <strong>box</strong> is also<br />
connected to your phone line, use<br />
the provided phone line splitter so the<br />
DVR can share the same phone jack. Plug<br />
the splitter into the wall jack, then plug<br />
both phone c<strong>or</strong>ds into the splitter.<br />
Connecting to a Phone Line<br />
During Guided <strong>Setup</strong>, your DVR uses a standard analog phone line to connect to the<br />
TiVo ® service (see Chapter 2). After Guided <strong>Setup</strong>, your DVR needs to make regular<br />
connections to the TiVo service, using either a phone line <strong>or</strong> a shared broadband Internet<br />
connection. When it connects to the TiVo service, the DVR may receive:<br />
Updated program in<strong>f<strong>or</strong></strong>mation, including episode titles, plot descriptions, ratings, and<br />
schedule in<strong>f<strong>or</strong></strong>mation.<br />
Any available updates to the DVR service, including content <strong>f<strong>or</strong></strong> Showcases. (See page<br />
41 <strong>f<strong>or</strong></strong> m<strong>or</strong>e in<strong>f<strong>or</strong></strong>mation about Showcases.)<br />
Any rec<strong>or</strong>ding requests you made using TiVo Central Online. (See page 57 <strong>f<strong>or</strong></strong> m<strong>or</strong>e<br />
in<strong>f<strong>or</strong></strong>mation about Remote Scheduling.)<br />
Guided <strong>Setup</strong> Requires a Phone Line. Almost every household phone line is a standard<br />
analog line, which is what the DVR needs to complete Guided <strong>Setup</strong>. After Guided <strong>Setup</strong>,<br />
you can connect your DVR to a home netw<strong>or</strong>k and use a shared broadband Internet<br />
connection instead of a phone line <strong>f<strong>or</strong></strong> regular connections to the TiVo service. See<br />
“Connecting to a Home Netw<strong>or</strong>k <strong>f<strong>or</strong></strong> Home Media Features” on page 101 <strong>f<strong>or</strong></strong> in<strong>f<strong>or</strong></strong>mation.<br />
If you don’t have a home netw<strong>or</strong>k with a shared broadband Internet connection, the DVR<br />
must use a standard analog phone line <strong>f<strong>or</strong></strong> regular connections to the TiVo service. You<br />
should leave the phone c<strong>or</strong>d plugged in continuously in <strong>or</strong>der to keep your DVR’s<br />
program in<strong>f<strong>or</strong></strong>mation up to date.<br />
Phone Jack Location. If the phone jack isn’t close to the DVR, you can use the 25-foot<br />
phone c<strong>or</strong>d that comes with the DVR to connect it to a phone jack. Phone c<strong>or</strong>ds longer<br />
than 25 feet are readily available at most hardware <strong>or</strong> electronics st<strong>or</strong>es.
Choosing a <strong>Setup</strong> Example<br />
The rest of this chapter provides examples <strong>f<strong>or</strong></strong> connecting your TiVo DVR to your<br />
program source (antenna, <strong>cable</strong>, <strong>or</strong> satellite ), your TV, and other optional A/V equipment.<br />
From the list below, choose a basic setup based on your program source. You can add<br />
other equipment after you get your basic system w<strong>or</strong>king.<br />
Basic <strong>Setup</strong>s: Connect your DVR to your Program Source and your TV<br />
Your program source is antenna <strong>or</strong><br />
<strong>cable</strong> with <strong>no</strong> <strong>cable</strong> <strong>box</strong>.<br />
Your program source is either a <strong>cable</strong><br />
<strong>or</strong> satellite <strong>box</strong>. (If you have both, see<br />
<strong>Setup</strong> 4, below.)<br />
You have two program sources: a<br />
satellite <strong>box</strong> and an antenna; <strong>or</strong> a<br />
satellite <strong>box</strong> and <strong>cable</strong> (<strong>no</strong> <strong>cable</strong> <strong>box</strong>).<br />
You have two program sources: a<br />
satellite <strong>box</strong> and a <strong>cable</strong> <strong>box</strong>.<br />
<strong>Setup</strong> Variations: These are variations on the Basic <strong>Setup</strong>s<br />
Your program source is antenna <strong>or</strong><br />
<strong>cable</strong> with <strong>no</strong> <strong>cable</strong> <strong>box</strong> (as in <strong>Setup</strong> 1)<br />
and you want to watch one channel<br />
while rec<strong>or</strong>ding a<strong>no</strong>ther.<br />
You want to add other A/V equipment<br />
to your setup (a VCR, DVD rec<strong>or</strong>der,<br />
game console, etc.).<br />
<strong>Setup</strong> 1: <strong>Antenna</strong> <strong>or</strong> <strong>Cable</strong> (No <strong>Cable</strong> Box) p. 10<br />
<strong>Setup</strong> 2: <strong>Cable</strong> <strong>or</strong> Satellite Box p. 12<br />
<strong>Setup</strong> 3: Satellite Box & RF Program<br />
Source<br />
Choosing a <strong>Setup</strong> Example<br />
p. 14<br />
<strong>Setup</strong> 4: <strong>Cable</strong> Box and Satellite Box p. 16<br />
Watching One Channel & Rec<strong>or</strong>ding<br />
A<strong>no</strong>ther (<strong>Antenna</strong> <strong>or</strong> <strong>Cable</strong>)<br />
Connecting a VCR, DVD Rec<strong>or</strong>der, <strong>or</strong><br />
Other A/V Equipment<br />
p. 18<br />
p. 20<br />
®<br />
®<br />
The DVR is <strong>no</strong>t designed to supp<strong>or</strong>t<br />
a heavy load, such as a TV. Your<br />
DVR is <strong>only</strong> capable of supp<strong>or</strong>ting the<br />
weight of one <strong>or</strong> two common A/V<br />
components such as VCRs, DVD players,<br />
<strong>or</strong> A/V receivers (provided they have four<br />
good, broad, padded feet that distribute<br />
of the weight near the c<strong>or</strong>ners of the DVR).<br />
Also, avoid stacking your DVR on top of<br />
other electronic components—such as<br />
DVD players, A/V receivers—<strong>or</strong> the vents<br />
of your TV.<br />
Be<strong>f<strong>or</strong></strong>e you begin:<br />
Make sure all your equipment is turned off<br />
and the DVR is unplugged.<br />
9<br />
1
10<br />
Chapter 1 Connecting Your DVR<br />
®<br />
F<strong>or</strong> this setup,<br />
use <strong>cable</strong> <strong>bag</strong> .<br />
The audio/video <strong>cable</strong>s shown here are <strong>f<strong>or</strong></strong><br />
example <strong>only</strong>. F<strong>or</strong> help choosing <strong>cable</strong>s,<br />
see page 4.<br />
®<br />
F<strong>or</strong> tips on adding a VCR <strong>or</strong><br />
DVD rec<strong>or</strong>der, see page 20.<br />
If you want to add a DVD player, a game<br />
console, <strong>or</strong> any other type of A/V<br />
equipment, connect it directly to a<strong>no</strong>ther<br />
audio/video input on your TV <strong>or</strong> A/V<br />
receiver. You do <strong>no</strong>t need to connect other<br />
A/V equipment to your DVR. See page 20<br />
<strong>f<strong>or</strong></strong> m<strong>or</strong>e in<strong>f<strong>or</strong></strong>mation.<br />
<strong>Setup</strong> 1: <strong>Antenna</strong> <strong>or</strong> <strong>Cable</strong> (No <strong>Cable</strong> Box)<br />
®<br />
TiVo<br />
DVR<br />
4<br />
TCD230040<br />
BQLDT02BTCD2X0<br />
120 V~60Hz<br />
0.75A<br />
3<br />
3<br />
Television<br />
INPUT<br />
2<br />
R L<br />
IN<br />
VIDEO<br />
<strong>Antenna</strong><br />
In<br />
1
<strong>Setup</strong> 1: <strong>Antenna</strong> <strong>or</strong> <strong>Cable</strong> (No <strong>Cable</strong> Box)<br />
Connect the Coaxial RF <strong>cable</strong> coming from the wall to the <strong>Cable</strong>/<strong>Antenna</strong>-RF In jack<br />
on the DVR.<br />
Connect a Composite A/V <strong>cable</strong> from the Audio/Video Output jacks on the DVR to<br />
the Audio/Video Input jacks on the TV.<br />
If your TV doesn’t have Composite A/V input jacks, connect a Coaxial RF <strong>cable</strong> from<br />
the DVR’s RF Out jack to your TV’s <strong>Antenna</strong>/RF In jack.<br />
Connect the phone c<strong>or</strong>d (see page 8). After you complete Guided <strong>Setup</strong>, you can<br />
connect your DVR to a home netw<strong>or</strong>k and use a broadband Internet connection instead<br />
of a phone line to connect to the TiVo service. See Chapter 7.<br />
Plug in all power c<strong>or</strong>ds and turn on your TV.<br />
Set your TV to display video from the input jacks you used in step . You may have<br />
to find the c<strong>or</strong>rect TV input setting by pressing the Input <strong>or</strong> TV/Video button on your<br />
TV’s remote control until you see the Welcome screen. (F<strong>or</strong> m<strong>or</strong>e help, see page 125.)<br />
If you used a Coaxial RF <strong>cable</strong> in step , tune your TV to channel 3 <strong>or</strong> 4, matching<br />
the Channel 3/4 switch on the back of the DVR.<br />
Once you see the Welcome screen, the final steps are to activate the TiVo service and<br />
complete Guided <strong>Setup</strong> (see Chapter 2). If you want to add a VCR, DVD rec<strong>or</strong>der, <strong>or</strong><br />
other equipment, see page 20.<br />
11<br />
1
12<br />
Chapter 1 Connecting Your DVR<br />
®<br />
F<strong>or</strong> this setup,<br />
use <strong>cable</strong> <strong>bag</strong>s and .<br />
The audio/video <strong>cable</strong>s shown here are <strong>f<strong>or</strong></strong><br />
example <strong>only</strong>. F<strong>or</strong> help choosing <strong>cable</strong>s,<br />
see page 4.<br />
®<br />
F<strong>or</strong> tips on adding a VCR <strong>or</strong><br />
DVD rec<strong>or</strong>der, see page 20.<br />
If you want to add a DVD player, a game<br />
console, <strong>or</strong> any other type of A/V<br />
equipment, connect it directly to a<strong>no</strong>ther<br />
audio/video input on your TV <strong>or</strong> A/V<br />
receiver. You do <strong>no</strong>t need to connect other<br />
A/V equipment to your DVR. See page 20<br />
<strong>f<strong>or</strong></strong> m<strong>or</strong>e in<strong>f<strong>or</strong></strong>mation.<br />
<strong>Setup</strong> 2: <strong>Cable</strong> <strong>or</strong> Satellite Box<br />
®<br />
TiVo<br />
DVR<br />
6<br />
TCD230040<br />
BQLDT02BTCD2X0<br />
120 V~60Hz<br />
0.75A<br />
3<br />
1<br />
<strong>Cable</strong> <strong>or</strong><br />
Satellite Box<br />
RF In<br />
RF Out<br />
Serial<br />
Television<br />
INPUT<br />
Phone<br />
4 3<br />
R L<br />
IN<br />
VIDEO<br />
<strong>Antenna</strong><br />
In<br />
AUDIO/VIDEO<br />
OUT<br />
2<br />
6
Make sure the <strong>cable</strong> from the wall is connected to your <strong>cable</strong> <strong>or</strong> satellite <strong>box</strong>.<br />
Connect a Composite A/V <strong>cable</strong> from the Audio/Video Output jacks on the <strong>cable</strong> <strong>or</strong><br />
satellite <strong>box</strong> to the Audio/Video Input jacks on the DVR.<br />
Connect a Composite A/V <strong>cable</strong> from the Audio/Video Output jacks on the DVR to<br />
the Audio/Video Input jacks on the TV.<br />
If your TV doesn’t have Composite A/V input jacks, connect a Coaxial RF <strong>cable</strong> from<br />
the DVR’s RF Out jack to your TV’s <strong>Antenna</strong>/RF In jack.<br />
Connect the phone c<strong>or</strong>d (see page 8). After you complete Guided <strong>Setup</strong>, you can<br />
connect your DVR to a home netw<strong>or</strong>k and use a broadband Internet connection instead<br />
of a phone line to connect to the TiVo service. See Chapter 7.<br />
Connect a channel changing <strong>cable</strong> (see the diagrams to the right).<br />
Plug in all power c<strong>or</strong>ds and turn on your TV.<br />
Set your TV to display video from the input jacks you used in step . You may have<br />
to find the c<strong>or</strong>rect TV input setting by pressing the Input <strong>or</strong> TV/Video button on your<br />
TV’s remote control until you see the Welcome screen. (F<strong>or</strong> m<strong>or</strong>e help, see page 125.)<br />
If you used a Coaxial RF <strong>cable</strong> in step , tune your TV to channel 3 <strong>or</strong> 4, matching<br />
the Channel 3/4 switch on the back of the DVR.<br />
Once you see the Welcome screen, the final steps are to activate the TiVo service and<br />
complete Guided <strong>Setup</strong> (see Chapter 2). If you want to add a VCR, DVD rec<strong>or</strong>der, <strong>or</strong><br />
other equipment, see page 20.<br />
<strong>Setup</strong> 2: <strong>Cable</strong> <strong>or</strong> Satellite Box<br />
Connect a Channel Changing <strong>Cable</strong><br />
(See page 5 <strong>f<strong>or</strong></strong> help choosing a channel<br />
changing <strong>cable</strong>.)<br />
Serial Control <strong>cable</strong>:<br />
Serial<br />
Plug one end of the Serial<br />
Control <strong>cable</strong> into the<br />
Serial/Data connect<strong>or</strong> on<br />
the <strong>cable</strong> <strong>or</strong> satellite <strong>box</strong>.<br />
Plug the other end into the<br />
Control Out-Serial connect<strong>or</strong> (the upper mini jack)<br />
on the back of the DVR.<br />
IR Control <strong>cable</strong>:<br />
(a) Plug the purple end of the IR Control <strong>cable</strong> into<br />
the Control Out-IR connect<strong>or</strong> (the lower mini-jack)<br />
on the DVR. (b) Locate the IR sens<strong>or</strong> (see page 6 <strong>f<strong>or</strong></strong><br />
help). (c) Mount the IR emitters. Place one emitter<br />
on top of the <strong>cable</strong>/satellite <strong>box</strong> and the other<br />
underneath it. Be sure both emitters stick out about<br />
1.5 inches directly in front of the IR sens<strong>or</strong>. <strong>Use</strong> the<br />
provided adhesive strips to hold the emitters in place.<br />
<strong>Cable</strong> <strong>or</strong><br />
Satellite Box<br />
b<br />
®<br />
TiVo<br />
DVR<br />
c<br />
IR Control <strong>cable</strong> connection<br />
Serial Control<br />
<strong>cable</strong> connection<br />
a<br />
13<br />
1
14<br />
Chapter 1 Connecting Your DVR<br />
®<br />
F<strong>or</strong> this setup,<br />
use <strong>cable</strong> <strong>bag</strong>s and .<br />
The audio/video <strong>cable</strong>s shown here are <strong>f<strong>or</strong></strong><br />
example <strong>only</strong>. F<strong>or</strong> help choosing <strong>cable</strong>s,<br />
see page 4.<br />
®<br />
F<strong>or</strong> tips on adding a VCR <strong>or</strong><br />
DVD rec<strong>or</strong>der, see page 20.<br />
If you want to add a DVD player, a game<br />
console, <strong>or</strong> any other type of A/V<br />
equipment, connect it directly to a<strong>no</strong>ther<br />
audio/video input on your TV <strong>or</strong> A/V<br />
receiver. You do <strong>no</strong>t need to connect other<br />
A/V equipment to your DVR. See page 20<br />
<strong>f<strong>or</strong></strong> m<strong>or</strong>e in<strong>f<strong>or</strong></strong>mation.<br />
<strong>Setup</strong> 3: Satellite Box & RF Program Source<br />
(<strong>Antenna</strong> <strong>or</strong> <strong>Cable</strong>)<br />
®<br />
TiVo<br />
DVR<br />
7<br />
TCD230040<br />
BQLDT02BTCD2X0<br />
120 V~60Hz<br />
0.75A<br />
3<br />
1<br />
Satellite Box<br />
SAT In<br />
RF Out<br />
5<br />
Serial<br />
Television<br />
INPUT<br />
Phone<br />
4<br />
R L<br />
IN<br />
VIDEO<br />
<strong>Antenna</strong><br />
In<br />
AUDIO/VIDEO<br />
OUT<br />
2<br />
7<br />
3
<strong>Setup</strong> 3: Satellite Box & RF Program Source<br />
Make sure the satellite <strong>cable</strong> from the wall is connected to your satellite <strong>box</strong>.<br />
Connect a Composite A/V <strong>cable</strong> from the Audio/Video Output jacks on the satellite<br />
<strong>box</strong> to the Audio/Video Input jacks on the DVR.<br />
Connect the Coaxial RF <strong>cable</strong> from your antenna <strong>or</strong> <strong>cable</strong> source to the<br />
<strong>Cable</strong>/<strong>Antenna</strong>-RF In jack on the DVR.<br />
Connect a Composite A/V <strong>cable</strong> from the Audio/Video Output jacks on the DVR to<br />
the Audio/Video Input jacks on the TV.<br />
If your TV doesn’t have Composite A/V input jacks, connect a Coaxial RF <strong>cable</strong> from<br />
the DVR’s RF Out jack to your TV’s <strong>Antenna</strong>/RF In jack.<br />
Connect the phone c<strong>or</strong>d (see page 8). After you complete Guided <strong>Setup</strong>, you can<br />
connect your DVR to a home netw<strong>or</strong>k and use a broadband Internet connection instead<br />
of a phone line to connect to the TiVo service. See Chapter 7.<br />
Connect a channel changing <strong>cable</strong> (see the diagrams to the right).<br />
Plug in all power c<strong>or</strong>ds and turn on your TV.<br />
Set your TV to display video from the input jacks you used in step . You may have<br />
to find the c<strong>or</strong>rect TV input setting by pressing the Input <strong>or</strong> TV/Video button on your<br />
TV’s remote control until you see the Welcome screen. (F<strong>or</strong> m<strong>or</strong>e help, see page 125.)<br />
If you used a Coaxial RF <strong>cable</strong> in step , tune your TV to channel 3 <strong>or</strong> 4, matching<br />
the Channel 3/4 switch on the back of the DVR.<br />
Once you see the Welcome screen, the final steps are to activate the TiVo service and<br />
complete Guided <strong>Setup</strong> (see Chapter 2). If you want to add a VCR, DVD rec<strong>or</strong>der, <strong>or</strong><br />
other equipment, see page 20.<br />
Connect a Channel Changing <strong>Cable</strong><br />
(See page 5 <strong>f<strong>or</strong></strong> help choosing a channel<br />
changing <strong>cable</strong>.)<br />
Serial Control <strong>cable</strong>:<br />
Serial<br />
Plug one end of the Serial<br />
Control <strong>cable</strong> into the<br />
Serial/Data connect<strong>or</strong> on<br />
the <strong>cable</strong> <strong>or</strong> satellite <strong>box</strong>.<br />
Plug the other end into the<br />
Control Out-Serial connect<strong>or</strong> (the upper mini jack)<br />
on the back of the DVR.<br />
IR Control <strong>cable</strong>:<br />
(a) Plug the purple end of the IR Control <strong>cable</strong> into<br />
the Control Out-IR connect<strong>or</strong> (the lower mini-jack)<br />
on the DVR. (b) Locate the IR sens<strong>or</strong> (see page 6 <strong>f<strong>or</strong></strong><br />
help). (c) Mount the IR emitters. Place one emitter<br />
on top of the <strong>cable</strong>/satellite <strong>box</strong> and the other<br />
underneath it. Be sure both emitters stick out about<br />
1.5 inches directly in front of the IR sens<strong>or</strong>. <strong>Use</strong> the<br />
provided adhesive strips to hold the emitters in place.<br />
<strong>Cable</strong> <strong>or</strong><br />
Satellite Box<br />
b<br />
®<br />
TiVo<br />
DVR<br />
c<br />
IR Control <strong>cable</strong> connection<br />
Serial Control<br />
<strong>cable</strong> connection<br />
a<br />
15<br />
1
16<br />
Chapter 1 Connecting Your DVR<br />
®<br />
F<strong>or</strong> this setup,<br />
use <strong>cable</strong> <strong>bag</strong>s and .<br />
The audio/video <strong>cable</strong>s shown here are <strong>f<strong>or</strong></strong><br />
example <strong>only</strong>. F<strong>or</strong> help choosing <strong>cable</strong>s,<br />
see page 4.<br />
®<br />
F<strong>or</strong> tips on adding a VCR <strong>or</strong><br />
DVD rec<strong>or</strong>der, see page 20.<br />
If you want to add a DVD player, a game<br />
console, <strong>or</strong> any other type of A/V<br />
equipment, connect it directly to a<strong>no</strong>ther<br />
audio/video input on your TV <strong>or</strong> A/V<br />
receiver. You do <strong>no</strong>t need to connect other<br />
A/V equipment to your DVR. See page 20<br />
<strong>f<strong>or</strong></strong> m<strong>or</strong>e in<strong>f<strong>or</strong></strong>mation.<br />
®<br />
TiVo<br />
DVR<br />
7<br />
<strong>Setup</strong> 4: <strong>Cable</strong> Box and Satellite Box<br />
TCD230040<br />
BQLDT02BTCD2X0<br />
120 V~60Hz<br />
0.75A<br />
3<br />
1<br />
Satellite Box<br />
SAT In RF Out<br />
5<br />
Serial<br />
Television<br />
INPUT<br />
Phone<br />
4<br />
R L<br />
IN<br />
VIDEO<br />
<strong>Antenna</strong><br />
In<br />
AUDIO/VIDEO<br />
OUT<br />
2<br />
7<br />
3<br />
RF Out<br />
RF In<br />
1<br />
Serial<br />
Phone<br />
AUDIO/VIDEO<br />
OUT<br />
<strong>Cable</strong> Box<br />
7
Make sure the <strong>cable</strong>s from the wall are connected to your <strong>cable</strong> and satellite <strong>box</strong>es.<br />
Connect a Composite A/V <strong>cable</strong> from the Audio/Video Output jacks on the satellite<br />
<strong>box</strong> to the Audio/Video Input jacks on the DVR.<br />
Connect a Coaxial RF <strong>cable</strong> from the RF Out jack on the <strong>cable</strong> <strong>box</strong> to the<br />
<strong>Cable</strong>/<strong>Antenna</strong>-RF In jack on the DVR.<br />
Connect a Composite A/V <strong>cable</strong> from the Audio/Video Output jacks on the DVR to<br />
the Audio/Video Input jacks on the TV.<br />
If your TV doesn’t have Composite A/V input jacks, connect a Coaxial RF <strong>cable</strong> from<br />
the DVR’s RF Out jack to your TV’s <strong>Antenna</strong>/RF In jack.<br />
Connect the phone c<strong>or</strong>d (see page 8). After you complete Guided <strong>Setup</strong>, you can<br />
connect your DVR to a home netw<strong>or</strong>k and use a broadband Internet connection instead<br />
of a phone line to connect to the TiVo service. See Chapter 7.<br />
Channel changing <strong>cable</strong>s: First, see page 5 to check whether<br />
you can use the Serial Control <strong>cable</strong> <strong>f<strong>or</strong></strong> either your satellite <strong>or</strong><br />
<strong>cable</strong> <strong>box</strong>. If you can, connect it as shown in the diagram to the<br />
right. Then use the IR Control <strong>cable</strong> <strong>f<strong>or</strong></strong> the other <strong>box</strong>. If you<br />
can’t use the Serial Control <strong>cable</strong> <strong>f<strong>or</strong></strong> either <strong>box</strong>, you can use the<br />
IR control <strong>cable</strong> <strong>f<strong>or</strong></strong> both. See the IR diagrams at the right.<br />
Plug in all power c<strong>or</strong>ds and turn on your TV.<br />
Set your TV to display video from the input jacks you used in step . You may have<br />
to find the c<strong>or</strong>rect TV input setting by pressing the Input <strong>or</strong> TV/Video button on your<br />
TV’s remote control until you see the Welcome screen. (F<strong>or</strong> m<strong>or</strong>e help, see page 125.)<br />
If you used a Coaxial RF <strong>cable</strong> in step , tune your TV to channel 3 <strong>or</strong> 4, matching<br />
the Channel 3/4 switch on the back of the DVR.<br />
Once you see the Welcome screen, the final steps are to activate the TiVo service and<br />
complete Guided <strong>Setup</strong> (see Chapter 2). If you want to add a VCR, DVD rec<strong>or</strong>der, <strong>or</strong><br />
other equipment, see page 20.<br />
<strong>Setup</strong> 4: <strong>Cable</strong> Box and Satellite Box<br />
Serial Control<br />
<strong>cable</strong> connection<br />
Serial<br />
Connect Channel Changing <strong>Cable</strong>s<br />
IR Control <strong>cable</strong> <strong>f<strong>or</strong></strong> one <strong>box</strong>:<br />
(a) Plug the purple end of the IR Control <strong>cable</strong> into<br />
the Control Out-IR connect<strong>or</strong> (the lower mini-jack)<br />
on the DVR. (b) Locate the IR sens<strong>or</strong> (see page 6 <strong>f<strong>or</strong></strong><br />
help). (c) Mount the IR emitters. Place one emitter<br />
on top of the <strong>cable</strong>/satellite <strong>box</strong> and the other<br />
underneath it. Be sure both emitters stick out about<br />
1.5 inches directly in front of the IR sens<strong>or</strong>. <strong>Use</strong> the<br />
provided adhesive strips to hold the emitters in place.<br />
<strong>Cable</strong> <strong>or</strong><br />
Satellite Box<br />
b<br />
TiVo<br />
DVR<br />
c<br />
IR Control <strong>cable</strong> <strong>f<strong>or</strong></strong> both <strong>box</strong>es:<br />
Follow steps (a) and (b) as above. In step (c),<br />
mount the IR emitters on top of each <strong>box</strong> as shown.<br />
b<br />
®<br />
Satellite Box<br />
b<br />
<strong>Cable</strong> Box<br />
®<br />
TiVo<br />
DVR<br />
IR Control <strong>cable</strong> connection<br />
c<br />
c<br />
IR Control <strong>f<strong>or</strong></strong> <strong>Cable</strong> and Satellite<br />
a<br />
a<br />
17<br />
1
18<br />
Chapter 1 Connecting Your DVR<br />
®<br />
F<strong>or</strong> this setup,<br />
use <strong>cable</strong> <strong>bag</strong> .<br />
The audio/video <strong>cable</strong>s shown here are <strong>f<strong>or</strong></strong><br />
example <strong>only</strong>. F<strong>or</strong> help choosing <strong>cable</strong>s,<br />
see page 4.<br />
®<br />
F<strong>or</strong> tips on adding a VCR <strong>or</strong><br />
DVD rec<strong>or</strong>der, see page 20.<br />
If you want to add a DVD player, a game<br />
console, <strong>or</strong> any other type of A/V<br />
equipment, connect it directly to a<strong>no</strong>ther<br />
audio/video input on your TV <strong>or</strong> A/V<br />
receiver. You do <strong>no</strong>t need to connect other<br />
A/V equipment to your DVR. See page 20<br />
<strong>f<strong>or</strong></strong> m<strong>or</strong>e in<strong>f<strong>or</strong></strong>mation.<br />
Watching One Channel & Rec<strong>or</strong>ding A<strong>no</strong>ther<br />
(<strong>Antenna</strong> <strong>or</strong> <strong>Cable</strong>)<br />
See “Choosing a <strong>Setup</strong> Example” on page 9 be<strong>f<strong>or</strong></strong>e starting with this setup.<br />
®<br />
TiVo<br />
DVR<br />
6<br />
TCD230040<br />
BQLDT02BTCD2X0<br />
120 V~60Hz<br />
0.75A<br />
3<br />
5<br />
Television<br />
INPUT<br />
4<br />
R L<br />
IN<br />
VIDEO<br />
<strong>Antenna</strong><br />
In<br />
2<br />
3<br />
1<br />
OUT<br />
IN<br />
OUT<br />
RF Splitter<br />
(<strong>no</strong>t included)<br />
This setup w<strong>or</strong>ks best if your TV program source is antenna <strong>or</strong> <strong>cable</strong><br />
with <strong>no</strong> <strong>cable</strong> <strong>box</strong>, and you have a TV with m<strong>or</strong>e than one input.
Watching One Channel & Rec<strong>or</strong>ding A<strong>no</strong>ther<br />
Attach an RF splitter (<strong>no</strong>t included) to the Coaxial RF <strong>cable</strong> coming out of the wall<br />
(be<strong>f<strong>or</strong></strong>e it connects to any equipment).<br />
Connect a Coaxial RF <strong>cable</strong> to one of the OUT jacks on the splitter; then attach the<br />
other end to the <strong>Cable</strong>/<strong>Antenna</strong>-RF In jack on the DVR.<br />
Connect a<strong>no</strong>ther Coaxial RF <strong>cable</strong> to the splitter’s other OUT jack; then attach the<br />
other end directly to the <strong>Antenna</strong> In jack on your TV.<br />
Connect a Composite A/V <strong>cable</strong> from the Audio/Video Output jacks on the DVR to<br />
the Audio/Video Input jacks on the TV.<br />
Connect the phone c<strong>or</strong>d (see page 8). After you complete Guided <strong>Setup</strong>, you can<br />
connect your DVR to a home netw<strong>or</strong>k and use a broadband Internet connection instead<br />
of a phone line to connect to the TiVo service. See Chapter 7.<br />
Plug in all power c<strong>or</strong>ds and turn on your TV.<br />
Set your TV to display video from the input jacks you used in step . You may have<br />
to find the c<strong>or</strong>rect TV input setting by pressing the Input <strong>or</strong> TV/Video button on your<br />
TV’s remote control until you see the Welcome screen. (F<strong>or</strong> m<strong>or</strong>e help, see page 125.)<br />
Once you see the Welcome screen, the final steps are to activate the TiVo service and<br />
complete Guided <strong>Setup</strong> (see Chapter 2). If you want to add a VCR, DVD rec<strong>or</strong>der, <strong>or</strong><br />
other equipment, see page 20.<br />
If you have a <strong>cable</strong> <strong>box</strong>:<br />
In step , connect one of the Coaxial RF <strong>cable</strong>s coming from the splitter to your<br />
<strong>cable</strong> <strong>box</strong>. Then, connect a Composite A/V <strong>cable</strong> from the Audio/Video Output jacks<br />
on the <strong>cable</strong> <strong>box</strong> to the Audio/Video Input jacks on the DVR.<br />
Then continue with step . Keep in mind that you can <strong>only</strong> receive basic channels on<br />
the signal that goes directly from the splitter to your TV. Also, you will <strong>no</strong>t have TiVo<br />
service functionality on those channels.<br />
®<br />
How do I watch one channel<br />
and rec<strong>or</strong>d a<strong>no</strong>ther?<br />
In this setup, your <strong>cable</strong> <strong>or</strong> antenna signal<br />
is split and sent to two different devices:<br />
your TiVo DVR, and your TV. To watch live<br />
TV on one channel while the DVR rec<strong>or</strong>ds<br />
a<strong>no</strong>ther, use your TV’s remote to change<br />
channels. You won’t have TiVo service<br />
functionality on the signal that goes direct<br />
to your TV, so you can’t pause <strong>or</strong> rewind<br />
live TV while your DVR is rec<strong>or</strong>ding a<strong>no</strong>ther<br />
channel.<br />
To watch video from your DVR again: First,<br />
press the TiVo button so that the DVR<br />
displays TiVo Central ® . (This will <strong>no</strong>t<br />
interrupt any rec<strong>or</strong>ding in progress.) Then<br />
press the Input, <strong>or</strong> TV/Video button on your<br />
TV’s remote until you see TiVo Central.<br />
19<br />
1
20<br />
Chapter 1 Connecting Your DVR<br />
®<br />
TiVo<br />
DVR<br />
VCR <strong>or</strong><br />
DVD Rec<strong>or</strong>der<br />
Television<br />
INPUT<br />
IN<br />
R L VIDEO<br />
<strong>Antenna</strong><br />
In<br />
1<br />
2<br />
Connecting a VCR, DVD Rec<strong>or</strong>der, <strong>or</strong><br />
Other A/V Equipment<br />
You probably have other A/V equipment in your home entertainment center in addition to<br />
your TiVo DVR and your TV. If you have a VCR <strong>or</strong> DVD rec<strong>or</strong>der, you can connect it to<br />
your DVR and save your fav<strong>or</strong>ite rec<strong>or</strong>dings to video tape <strong>or</strong> DVD. Other equipment, such<br />
as a DVD player <strong>or</strong> game console, does <strong>no</strong>t connect directly to your DVR. Instead, these<br />
devices should be connected to additional inputs on your TV, <strong>or</strong> to an A/V receiver.<br />
Connecting a VCR <strong>or</strong> DVD Rec<strong>or</strong>der<br />
VCRs and DVD rec<strong>or</strong>ders tend to offer many different audio and video input and output<br />
jacks, giving you a variety of setup options. Refer to your VCR <strong>or</strong> DVD rec<strong>or</strong>der’s<br />
owner’s manual <strong>f<strong>or</strong></strong> details about setup and operation.<br />
This example is probably the easiest way to connect a VCR <strong>or</strong> DVD rec<strong>or</strong>der to your<br />
DVR. (It w<strong>or</strong>ks even if your TV <strong>only</strong> has one input.) F<strong>or</strong> best results, use the best<br />
connections available on your equipment.<br />
Connect a Coaxial RF <strong>cable</strong> from the RF Out jack on the DVR to the <strong>Antenna</strong>-RF In<br />
jack on the VCR <strong>or</strong> DVD rec<strong>or</strong>der.<br />
Connect a<strong>no</strong>ther Coaxial RF <strong>cable</strong> from the RF Out jack on the VCR <strong>or</strong> DVD rec<strong>or</strong>der<br />
to the <strong>Antenna</strong> In jack on your TV.<br />
If you do use Coaxial RF <strong>cable</strong>s as pictured here, make sure the Channel 3/4 switches<br />
on the back of each device are set to the same channel.<br />
To watch a video tape <strong>or</strong> DVD, change your TV’s input setting by pressing the Input <strong>or</strong><br />
TV/Video button on your TV’s remote control until the c<strong>or</strong>rect input is displayed. To save<br />
rec<strong>or</strong>dings from your DVR to a video tape <strong>or</strong> rec<strong>or</strong>dable DVD, use the DVR’s “Save to<br />
VCR” feature. See page 74 <strong>f<strong>or</strong></strong> in<strong>f<strong>or</strong></strong>mation about Save to VCR.
Connecting a VCR, DVD Rec<strong>or</strong>der, <strong>or</strong> Other A/V Equipment<br />
Connecting Other A/V Equipment<br />
You may have other devices in your home entertainment system which don’t necessarily<br />
connect to your DVR. The following tips can help you complete your home entertainment<br />
setup, but be sure to consult your other devices’ owner’s manuals <strong>f<strong>or</strong></strong> setup in<strong>f<strong>or</strong></strong>mation.<br />
Connecting an A/V Receiver. An A/V receiver “receives” audio and video signals from<br />
your electronic devices, and lets you send those signals to other devices (usually, video to<br />
a TV and audio to a set of loud speakers). You can add an A/V receiver to any of the basic<br />
setups described on pages 10-17. Instead of connecting audio and video from the DVR to<br />
your TV as shown in the diagrams, connect your DVR to an available input on your A/V<br />
receiver. If your A/V receiver is already connected to your TV, you’re setup is done.<br />
Connecting other A/V equipment. Other kinds of A/V equipment, such as a DVD player<br />
<strong>or</strong> game console, do <strong>no</strong>t connect to your TiVo DVR. You should connect your other<br />
devices to additional inputs on your TV <strong>or</strong> A/V receiver.<br />
®<br />
If your A/V receiver supp<strong>or</strong>ts Dolby<br />
Pro Logic <strong>or</strong> Dolby Pro Logic II,<br />
connect L/R audio <strong>cable</strong>s from your DVR<br />
to your A/V receiver and enjoy programs<br />
broadcast with Dolby ® Surround Sound.<br />
21<br />
1
22<br />
Chapter 1 Connecting Your DVR
CHAPTER 2<br />
Guided <strong>Setup</strong><br />
Activating the TiVo ® Service 24<br />
Completing Guided <strong>Setup</strong> 25<br />
TiVo Central ®<br />
31
24<br />
Chapter 2 Guided <strong>Setup</strong><br />
®<br />
Your TiVo service number is a<br />
15-digit number found on the label<br />
on the back of your DVR.<br />
®<br />
The TiVo ® DVR was designed to be<br />
used exclusively with the TiVo<br />
service. The TiVo service is required <strong>f<strong>or</strong></strong><br />
proper operation of the DVR. Without the<br />
TiVo service, your DVR will have limited<br />
functionality. No functionality is<br />
represented, warranted, <strong>or</strong> should be<br />
expected without a subscription to the<br />
TiVo service.<br />
Activating the TiVo ® Service<br />
To activate the TiVo service, visit the TiVo website at www.tivo.com/activate <strong>or</strong> call us.<br />
(See Chapter 8 <strong>f<strong>or</strong></strong> Customer Supp<strong>or</strong>t contact in<strong>f<strong>or</strong></strong>mation.) When you activate, you will<br />
provide your DVR’s TiVo service number and choose a billing option.<br />
The TiVo service consists of the program in<strong>f<strong>or</strong></strong>mation shown in the guide, features that<br />
use the guide in<strong>f<strong>or</strong></strong>mation such as Season Pass TM rec<strong>or</strong>dings, WishList TM searches, and<br />
TiVo Suggestions, as well as Showcases, Online Scheduling, and Service Updates.<br />
Home Media Features. After you activate the TiVo service and complete Guided <strong>Setup</strong>,<br />
connect your DVR to a home netw<strong>or</strong>k! Doing so gives you brand new ways to use your<br />
TiVo DVR as a digital home entertainment center. Connect to a home netw<strong>or</strong>k and enjoy:<br />
Digital Music Player — <strong>Use</strong> the home entertainment center in your living room to<br />
listen to the digital MP3 music collection st<strong>or</strong>ed on your computer.<br />
Digital Photo Viewer — <strong>Use</strong> your television to view slideshows of digital photos<br />
st<strong>or</strong>ed on your computer.<br />
Multi-Room Viewing — Rec<strong>or</strong>d programs in the living room and watch them in the<br />
bedroom. Or vice versa.<br />
F<strong>or</strong> m<strong>or</strong>e in<strong>f<strong>or</strong></strong>mation about connecting your DVR to a home netw<strong>or</strong>k to use these bonus<br />
features, see “Connecting to a Home Netw<strong>or</strong>k <strong>f<strong>or</strong></strong> Home Media Features” on page 101.<br />
F<strong>or</strong> details about using these features, download the Home Media Features Guide at<br />
www.tivo.com/guides.<br />
Activate <strong>no</strong>w! Don’t miss a single day of using the TiVo service.
Completing Guided <strong>Setup</strong><br />
After you connect your DVR to your TV and activate the TiVo service, you will need to<br />
complete Guided <strong>Setup</strong>, which takes less than an hour.<br />
Guided <strong>Setup</strong> is easy. The Guided <strong>Setup</strong> screens step you through the process. If you<br />
get stuck, look <strong>f<strong>or</strong></strong> tips and troubleshooting in this chapter. (You may <strong>no</strong>t see all the<br />
screens described here, <strong>or</strong> you may see them in a different <strong>or</strong>der, depending on your<br />
equipment.)<br />
If you make a mistake during Guided <strong>Setup</strong>, simply press the LEFT arrow to go back<br />
and fix it. You can also change your setup in<strong>f<strong>or</strong></strong>mation later in Messages & <strong>Setup</strong>. (See<br />
Chapter 6.)<br />
Guided <strong>Setup</strong> is intelligent. In Guided <strong>Setup</strong>, you tell your DVR your program<br />
source (antenna, <strong>cable</strong>, <strong>or</strong> satellite) and equipment setup. Then you <strong>only</strong> have to<br />
complete the steps that apply to your particular setup.<br />
Guided <strong>Setup</strong> requires two phone calls. Try to complete Guided <strong>Setup</strong> when you<br />
don’t need the phone <strong>f<strong>or</strong></strong> an hour <strong>or</strong> so. After you complete Guided <strong>Setup</strong>, you’ll be<br />
able to connect your DVR to a home netw<strong>or</strong>k and use a shared broadband Internet<br />
connection instead of a phone line to connect to the TiVo service. See Chapter 7.<br />
After completing Guided <strong>Setup</strong>, you can watch live TV and use TiVo service features to<br />
control live TV. You will have to wait a few hours while the DVR <strong>or</strong>ganizes in<strong>f<strong>or</strong></strong>mation<br />
be<strong>f<strong>or</strong></strong>e you can set up your Season Pass TM rec<strong>or</strong>dings and search <strong>f<strong>or</strong></strong> programs.<br />
Completing Guided <strong>Setup</strong><br />
®<br />
If you can’t find the help you need in<br />
this chapter, please visit online<br />
TiVo Customer Supp<strong>or</strong>t at<br />
www.tivo.com/supp<strong>or</strong>t <strong>or</strong> call us. (Refer to<br />
Chapter 8 <strong>f<strong>or</strong></strong> Customer Supp<strong>or</strong>t contact<br />
in<strong>f<strong>or</strong></strong>mation.)<br />
®<br />
If you need to use the phone during<br />
either of the setup phone calls, pick<br />
up your telephone, then hang it up and<br />
wait about 45 seconds. The DVR will hang<br />
up, and the next time you pick the phone<br />
up there will be a dial tone. You can<br />
complete Guided <strong>Setup</strong> later.<br />
25<br />
2
26<br />
Chapter 2 Guided <strong>Setup</strong><br />
Guided <strong>Setup</strong> Tips and Troubleshooting<br />
ZIP Code. If your program source is an antenna connected to your TV, the TiVo service<br />
uses the channel lineup of a nearby <strong>cable</strong> service to determine which channels you receive.<br />
If there is <strong>no</strong> <strong>cable</strong> company that serves your ZIP code, enter the ZIP code of a nearby<br />
community that has <strong>cable</strong> service.<br />
E-mail Address. When you provide your e-mail address, you’ll be <strong>no</strong>tified about what’s<br />
new at TiVo, including new features, tips and tricks, and TiVo exclusives. Your e-mail<br />
address will <strong>no</strong>t be sold, rented, loaned, <strong>or</strong> otherwise disclosed. F<strong>or</strong> in<strong>f<strong>or</strong></strong>mation on how<br />
TiVo safeguards your privacy, visit www.tivo.com/privacy.<br />
Phone Dialing Options. If your phone system<br />
requires special dialing options, choose “Yes.”<br />
Most people won’t need to change the settings.<br />
See page 94 <strong>f<strong>or</strong></strong> in<strong>f<strong>or</strong></strong>mation about each option.<br />
<strong>Setup</strong> Call. This toll-free call takes a few minutes<br />
to retrieve the dial-in numbers <strong>f<strong>or</strong></strong> your area code<br />
and the list of <strong>cable</strong> <strong>or</strong> satellite providers <strong>f<strong>or</strong></strong> your<br />
ZIP code. After hanging up, the DVR will take 5<br />
to 15 minutes to <strong>or</strong>ganize the in<strong>f<strong>or</strong></strong>mation. If the<br />
call doesn’t succeed, see page 126 <strong>f<strong>or</strong></strong> troubleshooting steps.<br />
Dial-In Number. The DVR will use the dial-in number you choose <strong>f<strong>or</strong></strong> phone connections<br />
to the TiVo service. The list may be too long to fit on one screen. To see m<strong>or</strong>e dial-in<br />
numbers, press the DOWN arrow <strong>or</strong> CHAN DOWN to scroll down the list.<br />
After Guided <strong>Setup</strong>, the DVR uses either a phone line <strong>or</strong> a broadband Internet connection<br />
to connect to the TiVo service, which is a local call in most areas. In some areas, local and<br />
long distance toll charges may apply. You are responsible <strong>f<strong>or</strong></strong> any telephone charges.
Dialing F<strong>or</strong>mat. Choose how you want the DVR to dial the dial-in number. (F<strong>or</strong> example:<br />
should the dial-in number be preceded by your area code and should a “1” precede the<br />
area code?) In some areas, local numbers must be dialed using the area code.<br />
Satellite Provider. If you subscribe to additional<br />
local channels <strong>f<strong>or</strong></strong> your city <strong>or</strong> a nearby city from<br />
your satellite provider, choose the appropriate<br />
option followed by the city name from which you<br />
get your local channels (<strong>f<strong>or</strong></strong> example, DIRECTV-<br />
Sacramento, CA).<br />
<strong>Cable</strong> Provider. <strong>Cable</strong> companies may have<br />
entries with very similar names, and it may be<br />
difficult to k<strong>no</strong>w which is yours. Check your<br />
channel lineup card (received during <strong>cable</strong> installation) <strong>or</strong> your <strong>cable</strong> bill. If you aren’t<br />
sure, make your best guess. Later in Guided <strong>Setup</strong>, you can check your guess on the<br />
Channels You Receive screen (see page 28). If you still don’t see your provider, go back<br />
and verify that you entered the c<strong>or</strong>rect ZIP code.<br />
<strong>Cable</strong> Lineups. A lineup is the type of subscription you purchased from your <strong>cable</strong><br />
company. Lineups usually have names like “Basic” <strong>or</strong> “Extended Basic.” Your <strong>cable</strong> bill<br />
may have this in<strong>f<strong>or</strong></strong>mation. If you still aren’t sure, make your best guess. Later in Guided<br />
<strong>Setup</strong>, you can check your guess on the Channels You Receive screen (see page 28).<br />
You may also see names like “Rebuild Basic” <strong>or</strong> “Rebuild Extended Basic.” “Rebuild” is<br />
a term used to refer to a revised lineup. Usually you would be in<strong>f<strong>or</strong></strong>med by your <strong>cable</strong><br />
company if your lineup has been revised. If your best guess at a lineup choice was <strong>no</strong>t<br />
c<strong>or</strong>rect, and a rebuild lineup with a similar name is available, try that one instead.<br />
If you have a <strong>cable</strong> A/B system, you must pick either A <strong>or</strong> B to watch with your DVR.<br />
Completing Guided <strong>Setup</strong><br />
27<br />
2
28<br />
Chapter 2 Guided <strong>Setup</strong><br />
®<br />
<strong>Use</strong> the CHAN UP/DOWN button as a<br />
sh<strong>or</strong>tcut to go up <strong>or</strong> down a whole<br />
screen at a time.<br />
Channels You Receive. First, if you had to make a guess about your provider <strong>or</strong> lineup,<br />
verify that the channel numbers match the netw<strong>or</strong>ks on this list. (F<strong>or</strong> example, if you had<br />
the lineup pictured on the left, is channel 2 actually KTVU?) If you aren’t sure, refer to the<br />
channel guide <strong>or</strong> quick-reference card from your <strong>cable</strong> <strong>or</strong> satellite company.<br />
Next, add <strong>or</strong> remove check marks—so that the list reflects the channels you actually<br />
subscribe to—by highlighting a channel and pressing SELECT. (Some types of satellite<br />
<strong>box</strong>es will get stuck on channels you don’t receive if those channels are selected here, so<br />
be sure to de-select channels you don’t receive.)<br />
You can also customize this channel list to reflect your viewing preferences. If you never<br />
watch a particular channel, and don’t plan to set up rec<strong>or</strong>dings <strong>or</strong> let TiVo search <strong>f<strong>or</strong></strong><br />
programs on it, remove the check mark next to that channel.<br />
The TiVo service will search <strong>f<strong>or</strong></strong> programs <strong>only</strong> on channels marked with a yellow check.<br />
Also, the CHAN UP/DOWN button skips channels that aren’t checked on this list.<br />
Finally, highlight Done Selecting Channels and press SELECT to continue. If you change<br />
your mind, you can easily make changes after you finish Guided <strong>Setup</strong>. (See page 77.)<br />
Channel Changing. If you have a <strong>cable</strong> <strong>or</strong> satellite <strong>box</strong>, your DVR needs to send it a<br />
signal to change channels. It can do this through an IR (infrared) <strong>or</strong> serial connection.<br />
Make sure that the connection described on this screen matches what you have used to<br />
connect your <strong>cable</strong> <strong>or</strong> satellite <strong>box</strong> to your DVR. F<strong>or</strong> help choosing and setting up a<br />
connection, see the Start Here poster and Chapter 1 of this guide. After Guided <strong>Setup</strong>, if<br />
your channels don’t change, see troubleshooting steps on page 128.<br />
Connection to DVR Screens. These screens ask what type of video <strong>cable</strong> you used to<br />
connect your <strong>cable</strong> <strong>or</strong> satellite <strong>box</strong> to your DVR. Choose your configuration from the three<br />
choices described on page 29 (Hint: the first one is the most common).
Satellite <strong>only</strong><br />
<strong>or</strong> <strong>cable</strong> with a <strong>box</strong><br />
<strong>only</strong>:<br />
Satellite & antenna<br />
<strong>or</strong> satellite & <strong>cable</strong><br />
without a <strong>box</strong>:<br />
Satellite & <strong>cable</strong> with a <strong>box</strong>:<br />
1. Highlight “Satellite<br />
Box” and press SELECT.<br />
1. <strong>Use</strong> the UP/DOWN arrows<br />
to highlight “Satellite Box”<br />
and press SELECT.<br />
2. Follow the directions<br />
at the top of this page<br />
(marked with *).<br />
Completing Guided <strong>Setup</strong><br />
* <strong>Use</strong> the UP/DOWN arrows until the picture of the DVR matches the <strong>cable</strong><br />
connection you used to connect your satellite <strong>or</strong> <strong>cable</strong> <strong>box</strong>. When the video<br />
status below the picture says “Video OK,” press SELECT to continue. If the<br />
video status says “No Video,” double-check that the video <strong>cable</strong> is firmly<br />
connected to the DVR and that you have selected the c<strong>or</strong>rect type of video<br />
<strong>cable</strong>.<br />
3. Highlight “<strong>Cable</strong> Box”<br />
and press SELECT.<br />
2. Follow the directions at<br />
the top of this page<br />
(marked with *).<br />
4. Follow the directions<br />
at the top of this page<br />
(marked with *).<br />
3. <strong>Use</strong> the DOWN arrow to<br />
highlight “Accept these<br />
input settings” and press<br />
SELECT.<br />
5. Highlight “Accept<br />
these input settings”<br />
and press SELECT.<br />
29<br />
2
30<br />
Chapter 2 Guided <strong>Setup</strong><br />
IR Code List. If you use an IR connection, the DVR will need to send a code to your <strong>cable</strong><br />
<strong>or</strong> satellite <strong>box</strong> in <strong>or</strong>der to change channels. You will need to test these codes to see which<br />
w<strong>or</strong>ks best with your connection. Each code has a slow, medium, and fast version. First,<br />
test the slow codes by highlighting them and pressing the CHAN UP/DOWN button<br />
slowly several times. When you find a slow code that changes channels every time, try a<br />
faster speed <strong>f<strong>or</strong></strong> that code. (Slow may take longer, but fast may be too fast <strong>f<strong>or</strong></strong> your <strong>cable</strong> <strong>or</strong><br />
satellite <strong>box</strong>.) You want to find the code with the fastest speed that changes the channel<br />
every time. When you find it, press SELECT to choose that code. If channels don’t<br />
change at all, see page 128 <strong>f<strong>or</strong></strong> troubleshooting steps.<br />
Program Call. During this call, the TiVo service downloads all your program<br />
in<strong>f<strong>or</strong></strong>mation—which includes program titles, times, channels, and descriptions—<strong>f<strong>or</strong></strong> up to<br />
the next two weeks. If the call doesn’t succeed, see page 126 <strong>f<strong>or</strong></strong> troubleshooting steps. If<br />
you need to use the phone during the program call, pick it up, then hang it up, then wait<br />
about 45 seconds. The DVR will hang up and you can make the program call later.<br />
Congratulations! Once you have activated your TiVo service and completed Guided<br />
<strong>Setup</strong>, you’ll see the Congratulations! screen. If you have <strong>no</strong>t yet activated your TiVo<br />
service, you will be reminded to do so at this time.<br />
You can immediately begin watching live TV and using your DVR’s features to control<br />
live TV (pause, instant replay, slow motion). The DVR w<strong>or</strong>ks behind the scenes <strong>f<strong>or</strong></strong> about<br />
four to eight hours to <strong>or</strong>ganize program in<strong>f<strong>or</strong></strong>mation <strong>f<strong>or</strong></strong> the first time. During this process,<br />
you will have to wait to search <strong>f<strong>or</strong></strong> programs, set up rec<strong>or</strong>dings, and view in<strong>f<strong>or</strong></strong>mation in<br />
the program guide. A message at the bottom of the Pick Programs to Rec<strong>or</strong>d screen will<br />
warn you if you are <strong>no</strong>t able to search <strong>f<strong>or</strong></strong> programs yet. If the message appears, try again<br />
after a few hours.<br />
Press the TiVo button on your remote control to go to TiVo Central ® to begin enjoying the<br />
TiVo service.
TiVo Central ®<br />
Almost everything you do with the TiVo service starts from TiVo Central. You can<br />
schedule rec<strong>or</strong>dings, watch live TV <strong>or</strong> rec<strong>or</strong>ded programs, read messages from the TiVo<br />
service, and access special Showcases featuring entertaining and in<strong>f<strong>or</strong></strong>mative video clips.<br />
To get to TiVo Central, press the TiVo button on your remote control.<br />
Occasionally, you will <strong>no</strong>tice special icons beside some options in TiVo Central.<br />
This icon appears if you have TiVo Messages to read. See page 76 <strong>f<strong>or</strong></strong> m<strong>or</strong>e<br />
about TiVo Messages.<br />
Choose the selection next to this icon to watch a special preview <strong>or</strong> visit a<br />
Showcase. See page 41 <strong>f<strong>or</strong></strong> m<strong>or</strong>e about Showcases.<br />
This icon appears next to selections that contains special video content. Highlight<br />
the selection and press PLAY on the TiVo remote to play the video.<br />
This icon indicates news <strong>or</strong> special offers from TiVo.<br />
You can find a complete Glossary of Icons in the inside back cover of this guide.<br />
Music & Photos. Connect your DVR to a home netw<strong>or</strong>k and you’ll be able to use your<br />
DVR to listen to digital music and view digital photos st<strong>or</strong>ed on a home computer. See<br />
“Connecting to a Home Netw<strong>or</strong>k <strong>f<strong>or</strong></strong> Home Media Features” on page 101.<br />
Take a Tour. Now you’re ready to start enjoying the TiVo service! Check out the five sh<strong>or</strong>t<br />
tours in Chapter 3 to learn m<strong>or</strong>e.<br />
TiVo Central ®<br />
Press the TiVo button on your remote<br />
to go to TiVo Central.<br />
31<br />
2
32<br />
Chapter 2 Guided <strong>Setup</strong>
CHAPTER 3<br />
The Basics in 5 Sh<strong>or</strong>t Tours<br />
Tour One: Play with Live TV 34<br />
Tour Two: The Program Guide 36<br />
Tour Three: Find and Rec<strong>or</strong>d Your Fav<strong>or</strong>ite Programs 38<br />
Tour Four: Find New Programs 40<br />
Tour Five: Now Playing 42<br />
Cool Things You Can Do 43
34<br />
Chapter 3 The Basics in Five Sh<strong>or</strong>t Tours<br />
status bar<br />
Tour One: Play with Live TV<br />
In this tour, you’ll take a look at how you can control live TV. So turn on your TV and<br />
grab your TiVo remote!<br />
P l a y<br />
Slo w<br />
First, press the PAUSE button—the program you’re watching pauses. Now you can<br />
stand up and stretch, <strong>or</strong> go to the kitchen and get a snack. You can pause live TV <strong>f<strong>or</strong></strong><br />
up to 30 minutes!<br />
But <strong>f<strong>or</strong></strong> <strong>no</strong>w, press PLAY and the program resumes.<br />
Next, press BACK—the program rewinds. Press BACK a second time—it goes<br />
faster! A third time—faster still! Both the FORWARD and BACK buttons have<br />
three speeds. Press BACK a fourth time (<strong>or</strong> press PLAY at any time) to return to<br />
n<strong>or</strong>mal speed.<br />
+ Press PAUSE once m<strong>or</strong>e, then immediately press FORWARD to move the<br />
picture a small step <strong>f<strong>or</strong></strong>ward! Press BACK to move the picture a small step back.<br />
When your show is paused, FORWARD and BACK move the program <strong>f<strong>or</strong></strong>ward <strong>or</strong><br />
back in small steps. Press PLAY to resume watching at n<strong>or</strong>mal speed.<br />
Try out the INSTANT REPLAY button. INSTANT REPLAY jumps you back 8<br />
seconds—useful <strong>f<strong>or</strong></strong> when you miss a great sp<strong>or</strong>ts play <strong>or</strong> a bit of dialog, <strong>or</strong> <strong>f<strong>or</strong></strong> when<br />
you fast <strong>f<strong>or</strong></strong>ward too far.<br />
Press INSTANT REPLAY again, then immediately press SLOW. You get your own<br />
slow-motion replay!<br />
Finally, try the ADVANCE button. Presto! You’re caught up to live TV.
Status Bar<br />
Press PAUSE to make the status bar visible. It shows a one-hour period. The green<br />
segment is the p<strong>or</strong>tion of the current hour that has been saved by your DVR.<br />
Look <strong>f<strong>or</strong></strong> the white line. It marks the part of the program you are currently watching. If the<br />
white line is anywhere back in the green segment you are “behind” real time (which is<br />
way better than being behind the times!).<br />
Now press CHAN UP. When you change channels, the saved programming from the old<br />
channel is cleared, and the DVR starts to save what is showing on the new channel.<br />
Channel Banner<br />
Press INFO (<strong>or</strong> DISPLAY if your remote does <strong>no</strong>t have an INFO button) to see the<br />
channel banner. (You can also press RIGHT arrow.) It’s <strong>only</strong> there <strong>f<strong>or</strong></strong> a few seconds, but<br />
you can bring it back by pressing INFO (<strong>or</strong> DISPLAY) again. While the banner is visible,<br />
press RIGHT arrow to switch from a small, to medium, to large banner. Note that each<br />
version has a different amount of in<strong>f<strong>or</strong></strong>mation.<br />
Keep pressing RIGHT arrow until you see the largest version of the channel banner.<br />
Notice the small icons on the right side. Each symbol represents a useful feature, like<br />
rec<strong>or</strong>ding <strong>or</strong> Parental Controls. Press the UP and DOWN arrows to highlight different<br />
icons. Pressing SELECT while an icon is highlighted will take you to that feature. (F<strong>or</strong><br />
m<strong>or</strong>e on using these icons, see page 68.)<br />
Finally, press the CLEAR button—the channel banner disappears. (CLEAR gets rid of<br />
things that aren’t part of the program you’re watching.)<br />
Now go have fun playing with live TV, then come back <strong>f<strong>or</strong></strong> the next tour!<br />
Tour One: Play with Live TV<br />
status bar<br />
channel banner<br />
This white line<br />
tells you where<br />
you are.<br />
selectable icons<br />
35<br />
3
36<br />
Chapter 3 The Basics in Five Sh<strong>or</strong>t Tours<br />
®<br />
When you rec<strong>or</strong>d from live TV, you<br />
can rec<strong>or</strong>d both the saved p<strong>or</strong>tion<br />
(up to the last half hour) and the rest of<br />
the program. See page 52 <strong>f<strong>or</strong></strong> details.<br />
Tour Two: The Program Guide<br />
Your DVR’s program guide lets you see what’s on, change channels, schedule rec<strong>or</strong>dings,<br />
and m<strong>or</strong>e—all while you’re watching live TV. Press the GUIDE button to display the<br />
program guide.<br />
Choose a Program to Watch <strong>or</strong> Rec<strong>or</strong>d<br />
See something you’d like to watch? Press the UP, DOWN, LEFT, and RIGHT arrows to<br />
move the highlight bar over a program title. (Notice that the program description at the top<br />
changes.) Then press SELECT on the highlighted channel. If the program is on <strong>no</strong>w, the<br />
channel changes and the program guide disappears. (Remember, whenever you change<br />
channels, programming saved from the old channel is cleared, and the DVR starts to save<br />
what is showing on the new channel.)<br />
If the program is upcoming, selecting it brings up a transparent screen with rec<strong>or</strong>ding<br />
options. Choose an option <strong>or</strong> press LEFT arrow to go back to the guide. You can always<br />
rec<strong>or</strong>d the program you’re watching by pressing the RECORD ( ) button on your<br />
remote control. You can also use the guide to rec<strong>or</strong>d current <strong>or</strong> future programs. (See page<br />
52 <strong>f<strong>or</strong></strong> m<strong>or</strong>e on rec<strong>or</strong>ding from live TV.)<br />
Looking Ahead<br />
While you’re in the guide, press the FORWARD ( ) button to move the displayed<br />
time ahead. Try it. To go back in time, press BACK ( ).<br />
You can also quickly change the day and time the guide shows by changing the Guide<br />
Options. To see Guide Options, press GUIDE to display the guide, then press ENTER. To<br />
change the day, use DOWN arrow to highlight the day, then press RIGHT arrow once to<br />
choose tom<strong>or</strong>row. Press SELECT. “Done changing options” becomes highlighted. Press
SELECT again and voilà!, the guide appears with tom<strong>or</strong>row’s program schedule. You<br />
k<strong>no</strong>w what this means: <strong>no</strong> m<strong>or</strong>e setting the VCR!<br />
Filter the Program Guide<br />
The guide can also find specific kinds of shows <strong>f<strong>or</strong></strong> you. Display Guide Options by<br />
bringing up the guide and pressing ENTER. Then highlight “Choose Filter.” Press<br />
SELECT and a list of categ<strong>or</strong>ies appears. <strong>Use</strong> the DOWN arrow to move down the list,<br />
and select “Interests.” Then select “Cooking” from the subcateg<strong>or</strong>y list. The Guide<br />
Options screen appears again and Filtering is “On.” Select “Done changing options.”<br />
This time when the guide appears, it <strong>only</strong> shows you channels airing cooking shows in the<br />
next six hours. It has grayed out programs that are <strong>no</strong>t about cooking. To see all the<br />
channels again, go to Guide Options (press GUIDE, then ENTER). Highlight “Filtering,”<br />
and press LEFT arrow to turn it “Off.” Then press SELECT.<br />
Other Guide Options<br />
You can also use Guide Options to customize the program guide to your preferences. F<strong>or</strong><br />
example, you can choose the way the guide displays your channels and program<br />
in<strong>f<strong>or</strong></strong>mation. Press the GUIDE button to display the guide, then press ENTER to display<br />
the Guide Options. Highlight “Style” to select one of two different guide styles. See page<br />
69 <strong>f<strong>or</strong></strong> m<strong>or</strong>e in<strong>f<strong>or</strong></strong>mation about program guide styles.<br />
Take some time to play around in the program guide (and set up some rec<strong>or</strong>dings, while<br />
you’re at it). See you in a little bit <strong>f<strong>or</strong></strong> the next tour!<br />
Tour Two: The Program Guide<br />
37<br />
3
38<br />
Chapter 3 The Basics in Five Sh<strong>or</strong>t Tours<br />
®<br />
If you just finished Guided <strong>Setup</strong><br />
and you go to Pick Programs to<br />
Rec<strong>or</strong>d, you will see a message at the<br />
bottom of the screen stating that the DVR<br />
is still indexing data. The DVR should be<br />
done indexing within 4 to 8 hours of<br />
finishing Guided <strong>Setup</strong>.<br />
Tour Three: Find and Rec<strong>or</strong>d Your Fav<strong>or</strong>ite<br />
Programs<br />
You can always rec<strong>or</strong>d the program you’re watching by pressing the RECORD button on<br />
your remote control. The TiVo service also provides many ways to quickly search large<br />
numbers of TV programs, find your fav<strong>or</strong>ites, and schedule rec<strong>or</strong>dings in advance. What’s<br />
m<strong>or</strong>e, if a program is part of a series, you can get a Season Pass TM to the series. A Season<br />
Pass automatically rec<strong>or</strong>ds every episode of the series that airs on the selected channel,<br />
even if the time slot changes.<br />
Search by Title<br />
In this tour, you’ll find a program (The Simpsons) by searching <strong>f<strong>or</strong></strong> its title. Press the TiVo<br />
button to see TiVo Central. Press the DOWN arrow to highlight Pick Programs to Rec<strong>or</strong>d<br />
and press SELECT. The Pick Programs to Rec<strong>or</strong>d screen appears.<br />
As you can see, TiVo gives you many ways to find programs. Since you k<strong>no</strong>w the<br />
program’s title, highlight “Search by Title” and press SELECT. The next screen is a<br />
categ<strong>or</strong>ies screen. It lets you limit your search to any of several categ<strong>or</strong>ies—but <strong>f<strong>or</strong></strong> <strong>no</strong>w,<br />
choose “All Programs,” then press SELECT.<br />
The next screen has a grid of letters. Notice the white <strong>box</strong> around the letter A. <strong>Use</strong> the<br />
RIGHT, LEFT, UP, and DOWN arrows to move the <strong>box</strong> among the letters. Now move it<br />
to S, then press SELECT.<br />
A list of programs that begin with “S” appears on the right side of the screen. Move the<br />
white <strong>box</strong> to the letter I and press SELECT again. The list changes. The TiVo service has<br />
searched through all available programs (usually, those airing in the next two weeks) to<br />
find those that begin with SI, then listed those programs.
Tour Three: Find and Rec<strong>or</strong>d Your Fav<strong>or</strong>ite Programs<br />
Keep on entering letters until you see “Simpsons, The” in the list on the right. (Notice, the<br />
list alphabetizes without “A” <strong>or</strong> “The.”) If you make a mistake entering text, select DEL<br />
on the screen, <strong>or</strong> press BACK on the remote. To clear all text, use CLR on the screen <strong>or</strong><br />
press the CLEAR button. Selecting SP on the screen enters a space.<br />
To get to the list of programs, press RIGHT arrow until you move off the grid of letters.<br />
Press the UP <strong>or</strong> DOWN arrow to highlight “Simpsons, The” and press SELECT.<br />
A Program In<strong>f<strong>or</strong></strong>mation screen appears. This kind of screen appears when you select a<br />
program title from a list and lets you choose to rec<strong>or</strong>d the episode, view upcoming<br />
episodes, <strong>or</strong> get a Season Pass.<br />
Get a Season Pass<br />
On the Program In<strong>f<strong>or</strong></strong>mation screen <strong>f<strong>or</strong></strong> The Simpsons, highlight “Get a Season Pass,” and<br />
press SELECT. A confirmation screen appears to make sure the DVR is doing what you<br />
want. Press SELECT again—and after a sh<strong>or</strong>t pause you have a Season Pass to The<br />
Simpsons! Every episode on the selected channel will be rec<strong>or</strong>ded automatically.<br />
You should <strong>no</strong>w be on the Search by Title screen again. Press the LEFT arrow to return to<br />
Pick Programs to Rec<strong>or</strong>d, then select the To Do List. You can see all your scheduled<br />
rec<strong>or</strong>dings here.<br />
In the To Do List, <strong>no</strong>tice the upcoming episodes of The Simpsons are marked with two<br />
check marks ( ), indicating they are part of a Season Pass. You can cancel the<br />
rec<strong>or</strong>ding of any episode by highlighting the title in the To Do List and pressing CLEAR.<br />
Set up some m<strong>or</strong>e Season Pass rec<strong>or</strong>dings <strong>no</strong>w, <strong>or</strong> go on to the next tour to learn how the<br />
TiVo service helps you find new shows you might like—s<strong>or</strong>t of like your own “smart” TV<br />
assistant.<br />
®<br />
If you schedule a lot of Season Pass<br />
rec<strong>or</strong>dings, it’s a good idea to set<br />
pri<strong>or</strong>ities <strong>f<strong>or</strong></strong> them. You do this with the<br />
Season Pass Manager; see page 49 <strong>f<strong>or</strong></strong><br />
m<strong>or</strong>e in<strong>f<strong>or</strong></strong>mation.<br />
39<br />
3
40<br />
Chapter 3 The Basics in Five Sh<strong>or</strong>t Tours<br />
®<br />
Your personal TV preferences are<br />
just that: personal. See the TiVo<br />
Privacy Policy in Chapter 9, and the<br />
Federal Trade Commission (FTC) White<br />
Paper available at www.tivo.com/privacy<br />
<strong>f<strong>or</strong></strong> m<strong>or</strong>e in<strong>f<strong>or</strong></strong>mation.<br />
The TiVo icon next to the title<br />
indicates that it was rec<strong>or</strong>ded<br />
as a TiVo Suggestion.<br />
Tour Four: Find New Programs<br />
TiVo makes it easy <strong>f<strong>or</strong></strong> you to find what you want to watch by responding to your interests<br />
and collecting the best the netw<strong>or</strong>ks have to offer.<br />
WishList TM<br />
Searches<br />
A WishList search automatically finds programs that match your tastes, passions, and<br />
whims on any channel you receive. And it keeps on searching <strong>f<strong>or</strong></strong> as long as you keep the<br />
WishList. Just enter your fav<strong>or</strong>ite act<strong>or</strong> <strong>or</strong> direct<strong>or</strong>’s name, <strong>or</strong> any keyw<strong>or</strong>d, and your<br />
DVR will find programs <strong>f<strong>or</strong></strong> you. Go to TiVo Central, then Pick Programs to Rec<strong>or</strong>d, then<br />
Search Using a WishList. F<strong>or</strong> m<strong>or</strong>e in<strong>f<strong>or</strong></strong>mation, see page 58.<br />
TiVo Suggestions<br />
TiVo Suggestions is a personalized list of shows selected to match your preferences. How<br />
is this magic possible? Any time you watch programs, live <strong>or</strong> rec<strong>or</strong>ded, <strong>or</strong> browse<br />
programs with the live guide, <strong>or</strong> in Showcases <strong>or</strong> TiVolution Magazine, you can rate them<br />
by pressing the THUMBS UPTM and THUMBS DOWNTM buttons ( ). You can<br />
give a program up to three Thumbs Up <strong>or</strong> three Thumbs Down. Also, any time you choose<br />
to rec<strong>or</strong>d a program, it automatically gets one Thumbs Up.<br />
Over time, the m<strong>or</strong>e shows you rate, the better TiVo Suggestions will be at finding<br />
programs you might like. The suggestions are listed under TiVo Suggestions in <strong>or</strong>der of<br />
how closely they match your preferences.<br />
Suggested programs based on your ratings appear in TiVo Suggestions. Go to TiVo<br />
Central, then Pick Programs to Rec<strong>or</strong>d, then TiVo Suggestions. (If you don’t see programs<br />
yet, come back later—it may take a few hours the first time.) The list of programs is<br />
ranked, so shows you are m<strong>or</strong>e likely to enjoy are near the top. If you want to rec<strong>or</strong>d a<br />
program, select it and the Program In<strong>f<strong>or</strong></strong>mation screen appears.
Auto-Rec<strong>or</strong>ding TiVo Suggestions. As an added bonus, when the DVR has available<br />
space, it automatically rec<strong>or</strong>ds TiVo Suggestions. (You can turn this feature off if you<br />
prefer; see page 84.) You will find rec<strong>or</strong>ded TiVo Suggestions on Now Playing, listed<br />
below programs you requested. Or, if you have the Groups option turned on (see page 72),<br />
TiVo Suggestions rec<strong>or</strong>dings will appear in their own group.<br />
It’s imp<strong>or</strong>tant to remember these characteristics of TiVo Suggestions rec<strong>or</strong>dings:<br />
TiVo Suggestions never replace shows you request, <strong>or</strong> prevent your requested shows<br />
from being rec<strong>or</strong>ded.<br />
TiVo Suggestions are always the first programs deleted to make room <strong>f<strong>or</strong></strong> rec<strong>or</strong>dings<br />
you request.<br />
Auto-rec<strong>or</strong>ding TiVo Suggestions is an easy way to find programs you never knew about,<br />
<strong>or</strong> old fav<strong>or</strong>ites you may have <strong>f<strong>or</strong></strong>gotten.<br />
Showcases<br />
Showcases is an interactive content area which often includes opp<strong>or</strong>tunities to schedule<br />
rec<strong>or</strong>dings of featured programs, <strong>or</strong> allows you to watch previews of upcoming movies <strong>or</strong><br />
TV shows. The programs in Showcases are grouped in theme packages, giving you “onestop<br />
shopping” convenience when browsing <strong>f<strong>or</strong></strong> programs to rec<strong>or</strong>d. Packages may<br />
include exclusive content, the inside scoop on hit movies, exciting miniseries, special<br />
events, popular series, and shows featuring the biggest stars of the screen and stage.<br />
TiVolution ® Magazine is one part of Showcases where you’ll always find something fun<br />
and different. It’s a guide to the best upcoming shows on television. Select a title to see the<br />
Program In<strong>f<strong>or</strong></strong>mation screen. If you get the channel the program airs on, you can set up a<br />
rec<strong>or</strong>ding here—it’s that easy! Showcases and TiVolution Magazine are updated during<br />
your DVR’s regular connection to the TiVo service.<br />
Tour Four: Find New Programs<br />
®<br />
If other members of your household<br />
are pressing THUMBS UP on shows<br />
you don’t care <strong>f<strong>or</strong></strong>, and vice versa, you may<br />
find that TiVo Suggestions is making<br />
some suggestions that you like, and some<br />
that are m<strong>or</strong>e appropriate <strong>f<strong>or</strong></strong> other<br />
members of your household.<br />
41<br />
3
42<br />
Chapter 3 The Basics in Five Sh<strong>or</strong>t Tours<br />
Tour Five: Now Playing<br />
Your DVR can rec<strong>or</strong>d many hours of programming (e<strong>no</strong>ugh to fill a slew of video tapes!).<br />
F<strong>or</strong>tunately, it also labels and <strong>or</strong>ganizes all those saved programs. Unlike using a VCR,<br />
the Now Playing list gives you instant access to all rec<strong>or</strong>ded programs—<strong>no</strong> need to spend<br />
time searching <strong>f<strong>or</strong></strong> an episode on that tape you thought you used.<br />
To go to Now Playing, just press the TiVo button twice. Your new DVR may already<br />
contain some entertaining sh<strong>or</strong>t programs. A netw<strong>or</strong>k logo to the right of the show tells<br />
you which netw<strong>or</strong>k brings you the program.<br />
Icons like this one to the left of the program’s title tell you the rec<strong>or</strong>ding’s current<br />
status. See the Glossary of Icons on the inside back cover <strong>f<strong>or</strong></strong> details.<br />
Programs you request will appear in Now Playing the moment rec<strong>or</strong>ding begins. You can<br />
watch any title in Now Playing—even one that is still being rec<strong>or</strong>ded—by highlighting it,<br />
then pressing the PLAY button.<br />
Try it. Highlight a program in Now Playing and press PLAY. OK, <strong>no</strong>w <strong>f<strong>or</strong></strong> the cool part:<br />
Watch the program <strong>f<strong>or</strong></strong> at least 5 minutes, then press the LEFT arrow to go back to Now<br />
Playing. Select the program again—the Program In<strong>f<strong>or</strong></strong>mation screen will <strong>no</strong>w say<br />
“Resume Playing,” instead of “Play.” Select “Resume Playing,” and return to the program<br />
from the point you left it!<br />
Feel free to watch some programs from Now Playing—but come back <strong>f<strong>or</strong></strong> “Cool Things<br />
You Can Do” on page 43.
Cool Things You Can Do<br />
Never be late <strong>f<strong>or</strong></strong> your fav<strong>or</strong>ite programs. Stuck in traffic? W<strong>or</strong>king late? Don’t w<strong>or</strong>ry!<br />
If you’ve set up an individual <strong>or</strong> Season Pass TM rec<strong>or</strong>ding, the program will be waiting <strong>f<strong>or</strong></strong><br />
you on the Now Playing list.<br />
Really! Never, ever be late <strong>f<strong>or</strong></strong> your fav<strong>or</strong>ite programs! Your co-w<strong>or</strong>ker just told you<br />
about a must-see program that’s on tonight, but you won’t make it home in time to set up a<br />
rec<strong>or</strong>ding. No problem! If your DVR is connected to a home netw<strong>or</strong>k with a broadband<br />
Internet connection, you can use TiVo Central Online (www.tivo.com/tco) to schedule<br />
rec<strong>or</strong>dings on your DVR from anywhere you have web access. See page 57 <strong>f<strong>or</strong></strong> details.<br />
Connect your DVR to your home netw<strong>or</strong>k. When you do, your DVR becomes a digital<br />
home entertainment center, with access to even m<strong>or</strong>e features (see below). Chapter 7 has<br />
instructions <strong>f<strong>or</strong></strong> connecting your DVR to a home netw<strong>or</strong>k.<br />
Multi-Room Viewing. Rec<strong>or</strong>d programs in the living room and watch them in the<br />
bedroom<strong>–</strong><strong>or</strong> vice versa. If you have m<strong>or</strong>e than one DVR connected to your home netw<strong>or</strong>k,<br />
you can transfer programs between them. If you don’t have a home netw<strong>or</strong>k, you can<br />
connect two DVRs to each other <strong>f<strong>or</strong></strong> Multi-Room Viewing. This setup is described online<br />
at www.tivo.com/supp<strong>or</strong>t. (Search <strong>f<strong>or</strong></strong> “connecting two DVRs without a home netw<strong>or</strong>k.”)<br />
Enjoy digital Music & Photos—from your sofa! Are you huddling around a computer<br />
screen in your home office to share digital photos with your family? Are you listening to<br />
digital music through a pair of tiny computer speakers? Connect your DVR to your home<br />
netw<strong>or</strong>k, and you can watch slideshows of your digital photos on your big screen TV, and<br />
listen to playlists of your MP3s on your stereo system. And you can control it all with your<br />
TiVo DVR remote. Leave the computer in the office, and enjoy your digital media in your<br />
living room. See the “Home Media Features Guide” at www.tivo.com/guides <strong>f<strong>or</strong></strong> details.<br />
Cool Things You Can Do<br />
Other DVRs connected to your home<br />
netw<strong>or</strong>k appear at the bottom of the Now<br />
Playing list.<br />
43<br />
3
44<br />
Chapter 3 The Basics in Five Sh<strong>or</strong>t Tours<br />
Make your television wishes come true with a WishList TM search. Have a fav<strong>or</strong>ite<br />
act<strong>or</strong>? A fav<strong>or</strong>ite hobby <strong>or</strong> interest? How about a fav<strong>or</strong>ite sp<strong>or</strong>ts team? If they’re on TV,<br />
chances are a WishList search will find them. F<strong>or</strong> details see page 58.<br />
Looking <strong>f<strong>or</strong></strong> good movies? Kids’ shows? Science fiction? With Search by Title, you can<br />
browse upcoming programs by categ<strong>or</strong>y and find shows you didn’t k<strong>no</strong>w were on. F<strong>or</strong><br />
details see page 53.<br />
See a good preview, rec<strong>or</strong>d the show. If you’re watching live TV and a promotion<br />
comes on <strong>f<strong>or</strong></strong> an upcoming program, you may see an Ipreview TM icon like this<br />
one: Press THUMBS UP TM while the icon is visible to see options <strong>f<strong>or</strong></strong><br />
rec<strong>or</strong>ding <strong>f<strong>or</strong></strong> the program. You don’t have to remember when it’s on—it will be rec<strong>or</strong>ded!<br />
(If you accidentally fast-<strong>f<strong>or</strong></strong>warded past the Ipreview icon, rewind until it’s visible again.)<br />
<strong>Use</strong> the Overtime Scheduler TM (and don’t miss overtime!). Programs sometimes start<br />
be<strong>f<strong>or</strong></strong>e they’re supposed to, and often end later than scheduled. You can adjust your<br />
rec<strong>or</strong>ding times to account <strong>f<strong>or</strong></strong> variations using the Overtime Scheduler. See page 48.<br />
<strong>Use</strong> the CLEAR button. The CLEAR button hides the status bar, the program guide,<br />
channel banner, and anything else on the screen that is <strong>no</strong>t part of the program. It clears<br />
text entered when using the letter grid. In the Now Playing list, press CLEAR to delete a<br />
program. In the To Do List, CLEAR cancels a rec<strong>or</strong>ding.
CHAPTER 4<br />
Pick Programs to Rec<strong>or</strong>d<br />
Season Pass, Rec<strong>or</strong>ding Options, To Do List 46<br />
Using the Guide to Find Programs 51<br />
Find Your Fav<strong>or</strong>ite Programs 53<br />
Find Programs That Match Your Interests 58
46<br />
Chapter 4 Pick Programs to Rec<strong>or</strong>d<br />
®<br />
An exception to the 28-day rule may<br />
occur if the program wasn’t watched<br />
but was automatically deleted from Now<br />
Playing to make room <strong>f<strong>or</strong></strong> a<strong>no</strong>ther<br />
rec<strong>or</strong>ding you requested—<strong>or</strong> if the<br />
program in<strong>f<strong>or</strong></strong>mation describes it<br />
inc<strong>or</strong>rectly.<br />
Season Pass, Rec<strong>or</strong>ding Options, To Do List<br />
Your TiVo DVR makes finding and rec<strong>or</strong>ding programs easy—so easy that you may find<br />
m<strong>or</strong>e programs you enjoy than you ever expected! Your DVR can help with this too, by<br />
giving you simple ways to manage your rec<strong>or</strong>dings.<br />
Season Pass and Other Repeating Rec<strong>or</strong>dings<br />
There are three types of rec<strong>or</strong>dings that repeat automatically:<br />
• Season Pass TM rec<strong>or</strong>dings. Rec<strong>or</strong>ds every episode of a series that airs on a certain<br />
channel—even if the day <strong>or</strong> time changes! It’s automatic and easy to set up. Just select<br />
a program (in the TiVo Live Guide, <strong>or</strong> search results) and choose “Get a Season Pass.”<br />
Manual Repeating Rec<strong>or</strong>ding. Rec<strong>or</strong>ds on a specific channel at a specific time, just as<br />
you would with a VCR. See page 56 <strong>f<strong>or</strong></strong> m<strong>or</strong>e in<strong>f<strong>or</strong></strong>mation.<br />
Auto-rec<strong>or</strong>ding WishList TM search. Rec<strong>or</strong>ds all programs found by a WishList search.<br />
See page 63.<br />
These three types of repeating rec<strong>or</strong>dings also have the following in common:<br />
No duplicates within 28 days. If you watch <strong>or</strong> delete a particular episode <strong>or</strong> showing,<br />
it will <strong>no</strong>t be rec<strong>or</strong>ded automatically again <strong>f<strong>or</strong></strong> 28 days. This prevents Now Playing from<br />
filling up with shows you probably don’t want. If you want to rec<strong>or</strong>d duplicates, go to<br />
Rec<strong>or</strong>ding Options, Show Type, and select “All (with duplicates).” You can also<br />
schedule a single duplicate rec<strong>or</strong>ding <strong>f<strong>or</strong></strong> a particular program.<br />
Parental Controls. If Parental Controls are on when you schedule a repeating<br />
rec<strong>or</strong>ding, the DVR checks its current program in<strong>f<strong>or</strong></strong>mation to see if any upcoming<br />
program violates a Parental Control. If it does, the DVR requires the passw<strong>or</strong>d to<br />
continue. See page 79 <strong>f<strong>or</strong></strong> m<strong>or</strong>e in<strong>f<strong>or</strong></strong>mation.
Season Pass, Rec<strong>or</strong>ding Options, To Do List<br />
Keep at Most=5. By default, five episodes of a repeating rec<strong>or</strong>ding program are kept<br />
in Now Playing. You can change this setting; see page 48.<br />
Resolving conflicts. The TiVo service resolves scheduling conflicts between<br />
repeating rec<strong>or</strong>dings by comparing rec<strong>or</strong>ding pri<strong>or</strong>ities. You can change rec<strong>or</strong>ding<br />
pri<strong>or</strong>ities with the Season Pass Manager. (See page 48 <strong>f<strong>or</strong></strong> m<strong>or</strong>e details).<br />
Rec<strong>or</strong>ding Options<br />
You can set Rec<strong>or</strong>ding Options when you set up a rec<strong>or</strong>ding, <strong>or</strong> any time later by selecting<br />
the program from the To Do List <strong>or</strong> the Season Pass Manager, and choosing “Options.”<br />
Setting Rec<strong>or</strong>ding Options. The Program<br />
In<strong>f<strong>or</strong></strong>mation screen that appears when you select<br />
a program includes choices to “Rec<strong>or</strong>d this<br />
episode” and “Get a Season Pass.” When one of<br />
these rec<strong>or</strong>ding actions is highlighted, “Options”<br />
appears to its right. To see the current Rec<strong>or</strong>ding<br />
Options, use the arrow buttons to highlight<br />
“Options,” then press SELECT.<br />
To set your Rec<strong>or</strong>ding Options:<br />
Rec<strong>or</strong>ding Options<br />
1. <strong>Use</strong> the UP/DOWN arrows to highlight an<br />
option on the Rec<strong>or</strong>ding Options screen.<br />
2. <strong>Use</strong> RIGHT and LEFT arrow to change the setting.<br />
3. When you are done, press SELECT <strong>or</strong> highlight “Rec<strong>or</strong>d with these options.”<br />
4. Press SELECT again to schedule the rec<strong>or</strong>ding with the new options.<br />
To cancel your changes, press LEFT arrow, <strong>or</strong> highlight “Don’t change rec<strong>or</strong>ding options”<br />
and press SELECT.<br />
Rec<strong>or</strong>ding Options: one-time rec<strong>or</strong>ding<br />
Rec<strong>or</strong>ding Options: repeating rec<strong>or</strong>ding<br />
47<br />
4
48<br />
Chapter 4 Pick Programs to Rec<strong>or</strong>d<br />
®<br />
Are two of your fav<strong>or</strong>ite programs on<br />
at the same time? If you use<br />
Rec<strong>or</strong>ding Options, you can create two<br />
Season Pass rec<strong>or</strong>dings <strong>f<strong>or</strong></strong> the same<br />
time. Set the first one to rec<strong>or</strong>d <strong>only</strong> First<br />
Run episodes; set the second to rec<strong>or</strong>d<br />
every episode. <strong>Use</strong> the Season Pass<br />
Manager (described on page 48) to give<br />
the first one higher pri<strong>or</strong>ity than the<br />
second. Voilà! As long as the program<br />
in<strong>f<strong>or</strong></strong>mation is c<strong>or</strong>rect, when reruns of the<br />
first program air, your DVR will ign<strong>or</strong>e<br />
them and rec<strong>or</strong>d episodes of the second<br />
program.<br />
Rec<strong>or</strong>ding Options include:<br />
Rec<strong>or</strong>d Quality. The choices <strong>f<strong>or</strong></strong> Rec<strong>or</strong>ding Quality are Basic, Medium, High, and<br />
Best. The default setting is High. (Best looks great, but keep in mind that it takes up<br />
m<strong>or</strong>e space.) These settings are described on page 83. (This option is <strong>no</strong>t available<br />
once a rec<strong>or</strong>ding starts.)<br />
Keep At Most. This option sets the maximum number of episodes to be saved—useful<br />
<strong>f<strong>or</strong></strong> keeping <strong>only</strong> the most recent nightly news <strong>or</strong> <strong>only</strong> a few of your kids’ daily<br />
programs. The default setting is 5. (This option is available <strong>only</strong> <strong>f<strong>or</strong></strong> a repeating<br />
rec<strong>or</strong>ding.)<br />
Show Type. The choices are “Repeats & first run,” “First run <strong>only</strong>,” and<br />
“All (with duplicates).”<br />
Keep Until. You can change this setting from “Space needed” (the default setting) to<br />
“Until I delete.” (This option is available <strong>only</strong> <strong>f<strong>or</strong></strong> a repeating rec<strong>or</strong>ding.)<br />
Keep At Least. You can set the minimum amount of time the DVR keeps a rec<strong>or</strong>ding.<br />
The default setting is “Until Space Needed.”<br />
The Overtime Scheduler consists of these two options:<br />
Start Rec<strong>or</strong>ding. You can choose to start rec<strong>or</strong>ding up to ten minutes be<strong>f<strong>or</strong></strong>e a<br />
program begins. The default setting is “On-time.” (This option is <strong>no</strong>t available once<br />
rec<strong>or</strong>ding starts.)<br />
Stop Rec<strong>or</strong>ding. You can set a rec<strong>or</strong>ding to continue—<strong>f<strong>or</strong></strong> a few minutes <strong>or</strong> up to<br />
three hours—after it’s scheduled to end. F<strong>or</strong> example, you can extend a rec<strong>or</strong>ding of a<br />
sp<strong>or</strong>ts event and be sure to catch the whole game—even if it goes into overtime. You<br />
can change this setting when you set up the rec<strong>or</strong>ding, <strong>or</strong> while the rec<strong>or</strong>ding is in<br />
progress! The default setting is “On-time.”
Season Pass Manager<br />
Season Pass, Rec<strong>or</strong>ding Options, To Do List<br />
Say you have a Season Pass to ER and an auto-rec<strong>or</strong>ding WishList <strong>f<strong>or</strong></strong> movies with Julia<br />
Roberts. What if a Julia Roberts movie happens to air at the same time as ER? The DVR<br />
will check the pri<strong>or</strong>ities in the Season Pass Manager to decide which program to rec<strong>or</strong>d. If<br />
the Julia Roberts WishList has a higher pri<strong>or</strong>ity than the ER Season Pass, the Julia Roberts<br />
movie will be rec<strong>or</strong>ded, and ER will <strong>no</strong>t.<br />
Changing the pri<strong>or</strong>ity <strong>or</strong>der. If you don’t change pri<strong>or</strong>ities in the Season Pass Manager,<br />
repeating rec<strong>or</strong>dings are pri<strong>or</strong>itized by the <strong>or</strong>der they were set up: the first has highest<br />
pri<strong>or</strong>ity, and so on. To change the pri<strong>or</strong>ity <strong>or</strong>der:<br />
1. <strong>Use</strong> the UP/DOWN arrows to highlight one of your repeating rec<strong>or</strong>dings.<br />
2. Press RIGHT arrow to highlight the arrows to the right of the title.<br />
3. <strong>Use</strong> the UP/DOWN arrows to move the selected title up <strong>or</strong> down in the list.<br />
Pri<strong>or</strong>ities and resolving conflicts. If a conflict occurs when you’re setting up a new<br />
repeating rec<strong>or</strong>ding, you’ll be shown which programs are involved. You’ll also be given<br />
options to resolve the conflict:<br />
Rec<strong>or</strong>d <strong>only</strong> those programs that do <strong>no</strong>t conflict with others previously scheduled to<br />
rec<strong>or</strong>d. This gives the repeating rec<strong>or</strong>ding the lowest pri<strong>or</strong>ity.<br />
Rec<strong>or</strong>d all programs requested. This gives the repeating rec<strong>or</strong>ding the highest pri<strong>or</strong>ity.<br />
Canceling a Season Pass. To cancel a Season Pass, just highlight the program’s title in<br />
the Season Pass Manager and press CLEAR. Or, from a Program In<strong>f<strong>or</strong></strong>mation screen,<br />
select “Cancel/edit the Season Pass,” then “Cancel this Season Pass.”<br />
TiVo Central Pick Programs to Rec<strong>or</strong>d Season Pass Manager<br />
49<br />
4
50<br />
Chapter 4 Pick Programs to Rec<strong>or</strong>d<br />
To Do List<br />
The To Do List shows all your scheduled rec<strong>or</strong>dings and lets you cancel <strong>or</strong> edit them.<br />
Individual rec<strong>or</strong>dings are marked with a single check mark ( ). Season Pass rec<strong>or</strong>dings<br />
and manual repeating rec<strong>or</strong>dings have a double check mark ( ), and WishList<br />
rec<strong>or</strong>dings have a star ( ). Press SELECT on any program to see available edit options.<br />
Canceling a rec<strong>or</strong>ding. To cancel an upcoming rec<strong>or</strong>ding from the To Do List, highlight<br />
the title and press CLEAR.<br />
View Rec<strong>or</strong>ding Hist<strong>or</strong>y<br />
This is an advanced feature in the To Do List <strong>f<strong>or</strong></strong> those who really want all the details.<br />
Selecting this option takes you to a list of three types of programs:<br />
Deleted. To find programs that were deleted, press the UP arrow <strong>or</strong> CHAN UP. (You will<br />
find these programs listed above the point where the highlight bar starts off.) Selecting a<br />
title will take you to a screen that tells you how and when the program was deleted.<br />
Were <strong>no</strong>t rec<strong>or</strong>ded. To find programs that were <strong>no</strong>t rec<strong>or</strong>ded, press the UP arrow <strong>or</strong><br />
CHAN UP. (You will find these programs listed above the point where the highlight bar<br />
starts off.) Selecting a title will take you to a screen that tells why it was <strong>no</strong>t rec<strong>or</strong>ded.<br />
Will <strong>no</strong>t be rec<strong>or</strong>ded. To find programs that will <strong>no</strong>t be rec<strong>or</strong>ded, press DOWN arrow <strong>or</strong><br />
CHAN DOWN. (You will find these programs listed below the point where the highlight<br />
bar starts off.) Selecting a title will take you to a screen that tells you why the program will<br />
<strong>no</strong>t be rec<strong>or</strong>ded. You can then select “M<strong>or</strong>e rec<strong>or</strong>ding options” on this screen, which will<br />
display the Program In<strong>f<strong>or</strong></strong>mation screen. You could choose “View upcoming episodes” to<br />
find an episode that doesn’t conflict with anything else, <strong>or</strong> change Rec<strong>or</strong>ding Options,<br />
which may allow the program to be rec<strong>or</strong>ded.<br />
TiVo Central Pick Programs to Rec<strong>or</strong>d To Do List
Using the Guide to Find Programs<br />
The TiVo service provides a program guide that displays up to two weeks of TV<br />
programming at the touch of a button. You can use the guide to quickly find programs and<br />
set up rec<strong>or</strong>dings by customizing the channels and filtering the types of programs shown<br />
in the guide. To view the guide, just press the GUIDE button on your TiVo remote.<br />
Customizing the Guide<br />
The guide has options that let you quickly change what programs and channels it shows.<br />
To see Guide Options, press ENTER while the guide is displayed. Available options are:<br />
Channels. Choose which channel list you want the guide to display. F<strong>or</strong> details on how to<br />
customize these channel lists, see page 77. The three channel lists are:<br />
You Receive. This is the default list. It displays <strong>only</strong> the channels you have chosen<br />
in the Channels You Receive channel list.<br />
Fav<strong>or</strong>ites. This list shows <strong>only</strong> your fav<strong>or</strong>ite channels when browsing the guide.<br />
All. This list displays all of your <strong>cable</strong> <strong>or</strong> satellite provider’s channels, even<br />
channels you don’t subscribe to.<br />
Day and Time. Sets the guide to show what’s on at a particular day and time.<br />
Style. Choose between the TiVo Live Guide and Grid Guide styles. (F<strong>or</strong> details about the<br />
differences between these two styles, see page 69.)<br />
Filtering. Turns filtering on <strong>or</strong> off. (Choosing a filter is explained below.) When you want<br />
to see all channels and programs in the guide, turn filtering off.<br />
Choose filter. <strong>Use</strong> the UP and DOWN arrows to highlight a categ<strong>or</strong>y in the list, then press<br />
SELECT. Choose a subcateg<strong>or</strong>y. The guide displays <strong>only</strong> channels with programs in that<br />
subcateg<strong>or</strong>y.<br />
Using the Guide to Find Programs<br />
®<br />
When filtering is on, the guide will<br />
show <strong>only</strong> channels that have a<br />
program in that categ<strong>or</strong>y within six hours<br />
of the day and time selected. Programs<br />
that don’t fit your categ<strong>or</strong>y are grayed out.<br />
51<br />
4
52<br />
Chapter 4 Pick Programs to Rec<strong>or</strong>d<br />
Changing a guide option. Highlight the option, then press the LEFT <strong>or</strong> RIGHT arrow to<br />
change the selection displayed. Save your changes by pressing SELECT <strong>or</strong> GUIDE. To<br />
cancel your changes, press CLEAR.<br />
Rec<strong>or</strong>ding a Program from the Guide<br />
To rec<strong>or</strong>d a program, highlight it in the guide, then press RECORD. On the transparent<br />
screen that appears, select “Rec<strong>or</strong>d this showing (Best Quality)” <strong>or</strong> “Season Pass & other<br />
options” <strong>f<strong>or</strong></strong> m<strong>or</strong>e choices. (See page 46 <strong>f<strong>or</strong></strong> m<strong>or</strong>e on Season Pass rec<strong>or</strong>dings and page 47<br />
<strong>f<strong>or</strong></strong> m<strong>or</strong>e on Rec<strong>or</strong>ding Options.)<br />
Rec<strong>or</strong>ding the Program You Are Watching<br />
You can always rec<strong>or</strong>d the program you are watching: just press the RECORD button. On<br />
the transparent screen that appears, select “Rec<strong>or</strong>d this showing (Best Quality).” Select<br />
“Season Pass & other options” <strong>f<strong>or</strong></strong> m<strong>or</strong>e choices, <strong>or</strong> to change the rec<strong>or</strong>ding quality.<br />
Rec<strong>or</strong>ding the Saved P<strong>or</strong>tion. Up to 30 minutes of the current channel’s broadcast is<br />
always being saved, even when you are <strong>no</strong>t rec<strong>or</strong>ding a program. When you change<br />
channels, the DVR clears what it has saved and starts saving again on the new channel.<br />
(So, if the saved p<strong>or</strong>tion is imp<strong>or</strong>tant to you, either rec<strong>or</strong>d it <strong>or</strong> don’t change the channel.)<br />
To rec<strong>or</strong>d the saved p<strong>or</strong>tion—in addition to the rest of the program—you must choose<br />
“Rec<strong>or</strong>d this showing (Best Quality).” If you change the Rec<strong>or</strong>ding Quality (by selecting<br />
“Season Pass & other options”), the saved p<strong>or</strong>tion of the program won’t be rec<strong>or</strong>ded.<br />
Stopping a rec<strong>or</strong>ding. You can stop any rec<strong>or</strong>ding in either of two ways: select the title in<br />
Now Playing, then select “Stop Rec<strong>or</strong>ding;” <strong>or</strong>, press the RECORD button in live TV, then<br />
choose “Stop the current rec<strong>or</strong>ding.”
Find Your Fav<strong>or</strong>ite Programs<br />
Search by Title<br />
If you k<strong>no</strong>w the name of the program you’re looking <strong>f<strong>or</strong></strong>, <strong>or</strong> even the first part of the name,<br />
choose Search By Title from Pick Programs to Rec<strong>or</strong>d. Then follow these steps:<br />
1. If you wish, you can first narrow the search with a categ<strong>or</strong>y and subcateg<strong>or</strong>y.<br />
2. The next screen has a grid with numbers and<br />
letters. Spell out the title using the arrow<br />
buttons to move, then pressing SELECT on<br />
each letter you want. (Skip “a,” “an,” <strong>or</strong> “the.”)<br />
As you select letters, an alphabetical list of<br />
programs appears on the right. Keep selecting<br />
letters until you see your program.<br />
You can use the TiVo remote <strong>f<strong>or</strong></strong> some<br />
functions too. The CLEAR button on the remote<br />
erases everything; BACK erases one letter at a time; FORWARD inserts a space.<br />
3. When you see your program, press RIGHT arrow until the highlight is in the list. To<br />
move the highlight within the list, press the UP and DOWN arrows. To move quickly<br />
up <strong>or</strong> down the list one screen at a time, press CHAN UP/DOWN.<br />
4. Press SELECT when the title you want is highlighted. The Program In<strong>f<strong>or</strong></strong>mation<br />
screen will appear. Then you can view upcoming episodes, set up a Season Pass, <strong>or</strong><br />
rec<strong>or</strong>d an individual showing.<br />
Browsing a categ<strong>or</strong>y. You can browse through programs in any categ<strong>or</strong>y and subcateg<strong>or</strong>y<br />
you choose. Numbers come be<strong>f<strong>or</strong></strong>e letters, so to start from the top of the list, enter a zero.<br />
TiVo Central Pick Programs to Rec<strong>or</strong>d Search by Title<br />
Find Your Fav<strong>or</strong>ite Programs<br />
®<br />
®<br />
If you <strong>only</strong> k<strong>no</strong>w one w<strong>or</strong>d in the<br />
title, use a Title Wishlist to find the<br />
program. See page 58 <strong>f<strong>or</strong></strong> details.<br />
Replace hyphens ( - ), slashes ( / )<br />
and periods ( . ) with spaces. F<strong>or</strong><br />
example, use 20 20 to search <strong>f<strong>or</strong></strong> the title<br />
“20/20.” Any other marks, such as<br />
apostrophes ( ’ ), asterisks ( * ) and<br />
ampersands ( & ) are ign<strong>or</strong>ed.<br />
F<strong>or</strong> example, you would use<br />
6 OCLOCK NEWS to search <strong>f<strong>or</strong></strong> the title<br />
“6 O’Clock News.”<br />
53<br />
4
54<br />
Chapter 4 Pick Programs to Rec<strong>or</strong>d<br />
Rec<strong>or</strong>d by Time <strong>or</strong> Channel<br />
Three options are available under Rec<strong>or</strong>d by Time/Channel: Browse by Time, Browse by<br />
Channel, and Manually Rec<strong>or</strong>d Time/Channel.<br />
Browse by Time. Browse by Time lets you browse all programs on a particular day and<br />
time. With Browse by Time, you can filter the list to see <strong>only</strong> programs in a particular<br />
categ<strong>or</strong>y. F<strong>or</strong> example, you can browse all the movies airing on Saturday night. To browse<br />
by time:<br />
1. <strong>Use</strong> the arrow buttons to highlight a categ<strong>or</strong>y (<strong>f<strong>or</strong></strong> example, “Movies”) to narrow the<br />
list of programs, then press SELECT.<br />
2. Press the UP and DOWN arrows to select the date you want to see, then press RIGHT<br />
arrow to move the highlight to the time column.<br />
3. Press the UP and DOWN arrows to select a time.<br />
4. Press SELECT to bring up the list of<br />
programs without leaving the time select<strong>or</strong>, <strong>or</strong><br />
press RIGHT arrow to bring up the list of<br />
programs and move to the list at the same time.<br />
5. When you find a program you want to<br />
rec<strong>or</strong>d, highlight it and press SELECT to bring<br />
up the Program In<strong>f<strong>or</strong></strong>mation screen. Then you<br />
can view upcoming episodes, set up a Season<br />
Pass, <strong>or</strong> rec<strong>or</strong>d an individual showing.<br />
TiVo Central Pick Programs to Rec<strong>or</strong>d Rec<strong>or</strong>d by Time <strong>or</strong> Channel Manually Rec<strong>or</strong>d Time/Channel Browse by Time
Browse by Channel. Browse by Channel lets you browse through programs airing on a<br />
particular channel. You can start with all channels, <strong>or</strong> just your fav<strong>or</strong>ites. To browse by<br />
channel:<br />
1. Highlight and select either “All Channels,” which includes all the channels you<br />
receive, <strong>or</strong> “Fav<strong>or</strong>ite Channels,” which includes just the channels you have selected as<br />
your fav<strong>or</strong>ites. (F<strong>or</strong> in<strong>f<strong>or</strong></strong>mation on creating your own list of Fav<strong>or</strong>ite Channels, see<br />
page 77.)<br />
2. Press the UP and DOWN arrows to select the date you want to browse, then press<br />
RIGHT arrow to move the highlight to the channel column.<br />
3. Press the UP and DOWN arrows to select a channel. (You can also use the numbers on<br />
the remote to enter a channel, then press ENTER.)<br />
4. Press SELECT to see the list of programs without leaving the channel select<strong>or</strong>, <strong>or</strong><br />
press the RIGHT arrow to see the list of programs and move to the list.<br />
5. When you find a program you want to rec<strong>or</strong>d, highlight it and press SELECT to bring<br />
up the Program In<strong>f<strong>or</strong></strong>mation screen. Then you can view upcoming episodes, set up a<br />
Season Pass, <strong>or</strong> rec<strong>or</strong>d an individual showing.<br />
Find Your Fav<strong>or</strong>ite Programs<br />
TiVo Central Pick Programs to Rec<strong>or</strong>d Rec<strong>or</strong>d by Time <strong>or</strong> Channel Manually Rec<strong>or</strong>d Time/Channel Browse by Channel<br />
55<br />
4
56<br />
Chapter 4 Pick Programs to Rec<strong>or</strong>d<br />
®<br />
<strong>Use</strong> a Manual Repeating Rec<strong>or</strong>ding<br />
to rec<strong>or</strong>d things like just the<br />
opening mo<strong>no</strong>logue of a late night talk<br />
show.<br />
Manually Rec<strong>or</strong>d Time/Channel. Manually Rec<strong>or</strong>d Time/Channel lets you schedule a<br />
rec<strong>or</strong>ding on a specific channel at a specific time (just as you would with a VCR). You can<br />
also create a manual repeating rec<strong>or</strong>ding here by setting the rec<strong>or</strong>ding to repeat every<br />
week, every day, <strong>or</strong> every weekday. To create a manual rec<strong>or</strong>ding:<br />
1. Choose the rec<strong>or</strong>ding type, using the UP and DOWN arrows to select “One Time,” <strong>or</strong><br />
“Repeating.” Then press RIGHT arrow.<br />
2. Choose the day(s) <strong>f<strong>or</strong></strong> the rec<strong>or</strong>ding, using the UP and DOWN arrows to change the<br />
current selection. If you chose “Repeating,” you can choose to repeat the rec<strong>or</strong>ding on<br />
a specified day of the week (<strong>f<strong>or</strong></strong> example., “Every Tuesday”) <strong>or</strong> several times a week<br />
(<strong>f<strong>or</strong></strong> example, “Every M - F”<strong>or</strong> “Every Day”). Then press RIGHT arrow.<br />
3. Choose a channel using the UP and DOWN arrows (<strong>or</strong> by entering a number with the<br />
remote, then pressing ENTER). Press RIGHT arrow.<br />
4. Set the hour, minute, and am/pm <strong>f<strong>or</strong></strong> the start and stop time, using the UP/DOWN<br />
arrows to change the current selection. Press RIGHT arrow to move to the next step,<br />
LEFT arrow to move back.<br />
5. Schedule the rec<strong>or</strong>ding by pressing SELECT. A confirmation screen appears. (The<br />
rec<strong>or</strong>ding will be named with a “best guess” based on program guide listings <strong>f<strong>or</strong></strong> that<br />
time and channel. This will help you find your program later in the To Do List <strong>or</strong> in<br />
Now Playing.) When you’re ready to schedule the rec<strong>or</strong>ding, just press SELECT.<br />
TiVo Central Pick Programs To Rec<strong>or</strong>d Rec<strong>or</strong>d by Time <strong>or</strong> Channel Manually Rec<strong>or</strong>d Time/Channel
Using Online Scheduling to Find Programs (TiVo Central Online)<br />
You can schedule rec<strong>or</strong>dings on your DVR at home from any computer with Internet<br />
access and a standard web browser. <strong>Use</strong> TiVo Central Online at www.tivo.com/tco to<br />
search <strong>f<strong>or</strong></strong> shows by time, title, keyw<strong>or</strong>d, <strong>or</strong> act<strong>or</strong>/direct<strong>or</strong>. You can rec<strong>or</strong>d a single episode<br />
<strong>or</strong> get a Season Pass, with all the rec<strong>or</strong>ding options you have on your DVR at home. You<br />
can even set the program <strong>no</strong>t to rec<strong>or</strong>d if it conflicts with a scheduled rec<strong>or</strong>ding that is<br />
already on your DVR.<br />
Using Online Scheduling doesn’t require any changes to your current setup. However, if<br />
your DVR is connected to a home netw<strong>or</strong>k (see Chapter 7) that includes a broadband<br />
Internet connection, it will check the TiVo service <strong>f<strong>or</strong></strong> your rec<strong>or</strong>ding requests much m<strong>or</strong>e<br />
often. With a broadband Internet connection, you can schedule a rec<strong>or</strong>ding within an hour<br />
of its air-time from any place that you have access to the Internet!<br />
To <strong>Use</strong> Online Scheduling:<br />
1. Go to www.tivo.com/tco and sign in.<br />
2. On the Welcome page of TiVo Central Online, select the name of the DVR <strong>f<strong>or</strong></strong> which<br />
you want to schedule rec<strong>or</strong>dings.<br />
3. <strong>Use</strong> the simple <strong>or</strong> advanced search of your TV listings, <strong>or</strong> browse by channel.<br />
4. From the list of search results, click the name of a program and choose:<br />
Rec<strong>or</strong>d this episode — to rec<strong>or</strong>d the program and specify the pri<strong>or</strong>ity and quality.<br />
Get a Season Pass — to rec<strong>or</strong>d this program every time it airs on this channel.<br />
You can choose to receive a confirmation e-mail sent to the e-mail address you provide.<br />
Find Your Fav<strong>or</strong>ite Programs<br />
®<br />
Each time your DVR connects to the<br />
TiVo service, it checks TiVo Central<br />
Online and schedules any rec<strong>or</strong>ding<br />
requests you’ve made.<br />
57<br />
4
58<br />
Chapter 4 Pick Programs to Rec<strong>or</strong>d<br />
Find Programs That Match Your Interests<br />
Try a WishList TM<br />
Search<br />
If you k<strong>no</strong>w what you like, WishList searches are great! A WishList search automatically<br />
finds programs that match your interests, tastes, passions, and whims on any channel you<br />
receive. And it keeps on searching <strong>f<strong>or</strong></strong> as long as you keep the WishList.<br />
F<strong>or</strong> example, you could create a Categ<strong>or</strong>y Only WishList <strong>f<strong>or</strong></strong> the categ<strong>or</strong>y “Movies” and<br />
subcateg<strong>or</strong>y “Comedy.” You could then use it occasionally to look at a list of all comedy<br />
movies airing in the next two weeks. The list would be updated each time your DVR<br />
connects to the TiVo service.<br />
You could search <strong>f<strong>or</strong></strong> something m<strong>or</strong>e specific by creating an Act<strong>or</strong> WishList <strong>f<strong>or</strong></strong> Sean<br />
Connery, and then include the categ<strong>or</strong>y “Movies,” and subcateg<strong>or</strong>y “Action.” This<br />
WishList would <strong>only</strong> find action movies starring Sean Connery.<br />
With a Keyw<strong>or</strong>d WishList, you can look <strong>f<strong>or</strong></strong> something very specific. F<strong>or</strong> example, the<br />
Keyw<strong>or</strong>d WishList GIANTS with categ<strong>or</strong>y “Football” would find Giants football (but <strong>no</strong>t<br />
baseball) games <strong>f<strong>or</strong></strong> you.<br />
Here’s a<strong>no</strong>ther example: You could create a Keyw<strong>or</strong>d WishList to find the 1986 remake<br />
of the science fiction classic The Fly, starring Geena Davis. Not <strong>only</strong> does this WishList<br />
find a specific program—it finds the specific version! The keyw<strong>or</strong>d entry would look like<br />
this: “GEENA DAVIS” FLY. (Using quotation marks in a Keyw<strong>or</strong>d WishList ensures that<br />
the search <strong>only</strong> finds programs that match the exact phrase you entered. This means that<br />
you will find The Fly, starring Geena Davis and <strong>no</strong>t a documentary about flies narrated by<br />
Davis Geena!) You could also find this movie by creating a Keyw<strong>or</strong>d WishList <strong>f<strong>or</strong></strong> the<br />
title and year. In that case, the keyw<strong>or</strong>d entry might look like this: “THE FLY” 1986.<br />
TiVo Central Pick Programs To Rec<strong>or</strong>d Search Using a WishList
After you create a WishList, you can periodically view what it finds by selecting “View all<br />
upcoming WishList programs,” <strong>or</strong> selecting an individual WishList, then selecting “View<br />
upcoming programs.” Then you can schedule rec<strong>or</strong>dings <strong>f<strong>or</strong></strong> the programs <strong>or</strong> episodes you<br />
want. (See page 63 <strong>f<strong>or</strong></strong> m<strong>or</strong>e details.)<br />
Can a WishList Do M<strong>or</strong>e Than Search?<br />
Yes it can! You can set a WishList to auto-rec<strong>or</strong>d, and it will rec<strong>or</strong>d every program the<br />
WishList finds, on any channel you receive. F<strong>or</strong> example, with the Sean Connery Act<strong>or</strong><br />
WishList, you would automatically collect Sean Connery action movies in Now Playing.<br />
Some WishList searches are better suited to browsing than to auto-rec<strong>or</strong>ding. F<strong>or</strong><br />
example, you could create a Categ<strong>or</strong>y Only WishList <strong>f<strong>or</strong></strong> the categ<strong>or</strong>y “Documentary.”<br />
This WishList would find every upcoming documentary. You might <strong>no</strong>t want to rec<strong>or</strong>d<br />
every documentary, but you could occasionally browse the WishList and choose the ones<br />
you do want to rec<strong>or</strong>d.<br />
The m<strong>or</strong>e specific a WishList is, the better suited it is to auto-rec<strong>or</strong>ding. F<strong>or</strong> example, an<br />
auto-rec<strong>or</strong>ding Keyw<strong>or</strong>d WishList with the keyw<strong>or</strong>ds LAKERS and KINGS, and categ<strong>or</strong>y<br />
“Sp<strong>or</strong>ts/Basketball” would <strong>only</strong> rec<strong>or</strong>d basketball games with both of these teams—a<br />
great way to ensure that you enjoy this season’s rivalry.<br />
TiVo Central Pick Programs to Rec<strong>or</strong>d Search Using a WishList<br />
Find Programs That Match Your Interests<br />
®<br />
If you set up an auto-rec<strong>or</strong>ding<br />
WishList <strong>f<strong>or</strong></strong> sp<strong>or</strong>ts, consider using<br />
the Overtime Scheduler (described on<br />
page 48) to make sure you don’t miss the<br />
most exciting part of the game!<br />
59<br />
4
60<br />
Chapter 4 Pick Programs to Rec<strong>or</strong>d<br />
Creating a WishList Search<br />
From Search Using a WishList, select “Create new WishList.” Next, select the type of<br />
WishList: Act<strong>or</strong>, Direct<strong>or</strong>, Categ<strong>or</strong>y Only, Keyw<strong>or</strong>d, <strong>or</strong> Title. F<strong>or</strong> most WishList<br />
searches, you use the grid of letters on the next screen to spell out what you’re looking <strong>f<strong>or</strong></strong>.<br />
As the last step, you’ll then be able to select a categ<strong>or</strong>y and subcateg<strong>or</strong>y to narrow your<br />
search. F<strong>or</strong> example, if you want movies with Harrison F<strong>or</strong>d, but <strong>no</strong>t documentaries <strong>or</strong><br />
talk shows, select “Movies.” To search every categ<strong>or</strong>y, select “Don’t specify a categ<strong>or</strong>y.”<br />
Categ<strong>or</strong>y Only WishList. <strong>Use</strong> the UP and DOWN buttons to highlight a categ<strong>or</strong>y, then<br />
press SELECT <strong>or</strong> RIGHT arrow. A subcateg<strong>or</strong>ies list appears. Highlight a subcateg<strong>or</strong>y,<br />
then press SELECT <strong>or</strong> RIGHT arrow. To search all subcateg<strong>or</strong>ies, you can also select<br />
“Don’t specify a subcateg<strong>or</strong>y.”<br />
Act<strong>or</strong> <strong>or</strong> Direct<strong>or</strong> WishList. Spell the person’s last name using the arrow buttons to move<br />
the selection <strong>box</strong> around the grid; press SELECT to enter a highlighted letter. As you<br />
select letters, a list of names appears to the right of the grid.<br />
If you see the person’s name, press RIGHT arrow<br />
until you move the highlight to a name in the list.<br />
<strong>Use</strong> the UP <strong>or</strong> DOWN arrow to highlight the name<br />
you want and press SELECT.<br />
To search <strong>f<strong>or</strong></strong> a name that is <strong>no</strong>t on the list, enter<br />
the name in the <strong>f<strong>or</strong></strong>mat: LAST NAME, FIRST<br />
NAME. You must match the spelling of the name<br />
exactly, and you must use a comma (available in<br />
the grid under the letter W).<br />
TiVo Central Pick Programs To Rec<strong>or</strong>d Search Using a WishList
Keyw<strong>or</strong>d <strong>or</strong> Title WishList. You can create a Keyw<strong>or</strong>d <strong>or</strong> Title WishList with one<br />
keyw<strong>or</strong>d <strong>or</strong> with several. F<strong>or</strong> a Keyw<strong>or</strong>d WishList, the TiVo service checks <strong>f<strong>or</strong></strong> your<br />
keyw<strong>or</strong>ds in the program <strong>or</strong> episode title, description, act<strong>or</strong>, direct<strong>or</strong>, year, and categ<strong>or</strong>y<br />
in<strong>f<strong>or</strong></strong>mation. A Title WishList w<strong>or</strong>ks very similarly, but the TiVo service <strong>only</strong> searches<br />
program and episode titles.<br />
Spell your keyw<strong>or</strong>d(s) using the arrow buttons to move around the grid; then press<br />
SELECT to enter the highlighted letter. You can enter as many characters as will fit on the<br />
screen. When you have finished, use RIGHT arrow to highlight “Done creating<br />
keyw<strong>or</strong>ds,” then press SELECT <strong>or</strong> RIGHT arrow.<br />
Using * in WishList searches. To search <strong>f<strong>or</strong></strong> similar w<strong>or</strong>ds in a Keyw<strong>or</strong>d <strong>or</strong> Title<br />
WishList, use the asterisk (*) as a special symbol that replaces the endings of w<strong>or</strong>ds. F<strong>or</strong><br />
example, the keyw<strong>or</strong>d AIRP* would find shows containing “airp<strong>or</strong>t,” “airplane,”<br />
“airplanes,” as well as the movie “Airplane!” To enter an asterisk, press the SLOW ( )<br />
button on the remote.<br />
The asterisk can be helpful when you’re looking <strong>f<strong>or</strong></strong> a range of similar w<strong>or</strong>ds, <strong>or</strong> if you’re<br />
just <strong>no</strong>t sure how something is spelled. Pop quiz: is it “irresistable” <strong>or</strong> “irresistible?” <strong>Use</strong><br />
the keyw<strong>or</strong>d IRRESIST* and don’t w<strong>or</strong>ry about it! Remember, when using the asterisk:<br />
It can <strong>only</strong> be used at the end of a keyw<strong>or</strong>d; it can<strong>no</strong>t be used to omit letters at the<br />
beginning <strong>or</strong> in the middle of a w<strong>or</strong>d. (F<strong>or</strong> example, keyw<strong>or</strong>ds like AIR*NE <strong>or</strong><br />
*PLANE will <strong>no</strong>t w<strong>or</strong>k.)<br />
Find Programs That Match Your Interests<br />
When using this symbol, be as specific as possible. F<strong>or</strong> example, do <strong>no</strong>t use keyw<strong>or</strong>ds<br />
like TH*. There will <strong>no</strong>t be e<strong>no</strong>ugh room to show all the results of a keyw<strong>or</strong>d that is<br />
too general.<br />
TiVo Central Pick Programs To Rec<strong>or</strong>d Search Using a WishList<br />
Slo w<br />
61<br />
4
62<br />
Chapter 4 Pick Programs to Rec<strong>or</strong>d<br />
®<br />
If you like music per<strong>f<strong>or</strong></strong>mances, try a<br />
keyw<strong>or</strong>d WishList <strong>f<strong>or</strong></strong> “Concert.”<br />
Choose the categ<strong>or</strong>y “Arts” and the Sub-<br />
Categ<strong>or</strong>y “Music.”<br />
Tips <strong>f<strong>or</strong></strong> entering keyw<strong>or</strong>ds:<br />
To specify an exact phrase in a Keyw<strong>or</strong>d <strong>or</strong> Title WishList, surround a set of w<strong>or</strong>ds<br />
with quotation marks (to enter quotation marks, press PAUSE ( ). F<strong>or</strong> example, the<br />
keyw<strong>or</strong>d PAUL SIMON might also turn up a documentary about Simon Bolivar with a<br />
direct<strong>or</strong> whose name is Paul. <strong>Use</strong> “PAUL SIMON” to be certain you find <strong>only</strong><br />
programs that feature Paul Simon.<br />
If you enter m<strong>or</strong>e than one keyw<strong>or</strong>d in a Keyw<strong>or</strong>d <strong>or</strong> Title WishList, it finds <strong>only</strong><br />
programs that match all of your keyw<strong>or</strong>ds (<strong>f<strong>or</strong></strong> example, “GEENA DAVIS” FLY).<br />
If you want to include an exact phrase and additional keyw<strong>or</strong>ds, there should be a space<br />
between the final quotation mark and the beginning of the next w<strong>or</strong>d. You can enter a<br />
space by selecting SP on the grid of letters <strong>or</strong> by pressing FORWARD ( ).<br />
Replace hyphens ( - ), slashes ( / ) and periods ( . ) with spaces. F<strong>or</strong> example, you<br />
would use the keyw<strong>or</strong>d 20 20 to search <strong>f<strong>or</strong></strong> the title “20/20.” F<strong>or</strong> an Act<strong>or</strong> WishList <strong>f<strong>or</strong></strong><br />
Catherine Zeta-Jones, use ZETA JONES, CATHERINE. You can enter a space by<br />
selecting SP on the grid of letters <strong>or</strong> by pressing FORWARD ( ).<br />
Any other marks, such as apostrophes ( ’ ) and ampersands ( & ), are ign<strong>or</strong>ed. F<strong>or</strong><br />
example, you would use the keyw<strong>or</strong>d phrase 6 OCLOCK NEWS to search <strong>f<strong>or</strong></strong> the title<br />
“6 O’Clock News.” (Note that commas ( , ) are also ign<strong>or</strong>ed, except in an act<strong>or</strong> <strong>or</strong><br />
direct<strong>or</strong> WishList, where they are essential.)<br />
F<strong>or</strong> dollar signs ( $ ) substitute the letter S. F<strong>or</strong> example, to find “$100,000 Pyramid,”<br />
use S100000. (In Search by Title, skip the dollar signs to find these titles.)<br />
TiVo Central Pick Programs To Rec<strong>or</strong>d Search Using a WishList
Browsing, Rec<strong>or</strong>ding, and Editing a WishList<br />
Browsing all WishList searches. Select “View all upcoming WishList programs.” This<br />
selection displays a list of up to 10 upcoming programs from each of your WishList<br />
searches—and up to 200 programs total (so it may take a long time to display). To rec<strong>or</strong>d<br />
a program, select its title; you will see the Program In<strong>f<strong>or</strong></strong>mation screen, where you can<br />
select “Rec<strong>or</strong>d this episode” and other actions.<br />
Browsing an individual WishList. Select the WishList you want to browse, then select<br />
“View upcoming programs” to see a list of up to 200 unique upcoming programs that<br />
match the WishList. To rec<strong>or</strong>d a program, select its title to see the Program In<strong>f<strong>or</strong></strong>mation<br />
screen, then select “Rec<strong>or</strong>d this episode.”<br />
F<strong>or</strong> a comprehensive list of all upcoming showings of a program, including repeats<br />
(multiple showings of the same program), select the title of the program in the “Upcoming<br />
Programs” list. On the Program In<strong>f<strong>or</strong></strong>mation screen that appears, select “View upcoming<br />
episodes/showings.”<br />
Auto-rec<strong>or</strong>ding WishList. When you create a WishList <strong>or</strong> select it, you can choose the<br />
action, “Auto-rec<strong>or</strong>d WishList programs.” This means every program the WishList finds<br />
will be automatically rec<strong>or</strong>ded.<br />
Each auto-rec<strong>or</strong>ding WishList and its upcoming rec<strong>or</strong>dings are marked with a star ( ).<br />
If you want to be sure that all the matches your auto-rec<strong>or</strong>ding WishList finds are<br />
rec<strong>or</strong>ded, give the auto-rec<strong>or</strong>ding WishList a high pri<strong>or</strong>ity in the Season Pass Manager.<br />
(See page 48 <strong>f<strong>or</strong></strong> details.)<br />
Find Programs That Match Your Interests<br />
Editing a WishList. You can change a WishList—<strong>f<strong>or</strong></strong> example, to c<strong>or</strong>rect a misspelling, <strong>or</strong><br />
to add a categ<strong>or</strong>y <strong>or</strong> subcateg<strong>or</strong>y to narrow the results. Just select the WishList, then select<br />
“Edit WishList.”<br />
TiVo Central Pick Programs to Rec<strong>or</strong>d Search Using a WishList<br />
®<br />
As you browse the upcoming<br />
program titles found by WishList<br />
searches, remember that the CHAN UP/<br />
DOWN button pages quickly through lists.<br />
63<br />
4
64<br />
Chapter 4 Pick Programs to Rec<strong>or</strong>d
CHAPTER 5<br />
Watching Live TV and<br />
Rec<strong>or</strong>ded Programs<br />
Using the Control Buttons 66<br />
The Status Bar 67<br />
The Channel Banner 68<br />
Watching Live TV 69<br />
Watching Programs from Now Playing 72<br />
Save to VCR 74
66<br />
Chapter 5 Watching Live and Rec<strong>or</strong>ded Programs<br />
®<br />
When you fast <strong>f<strong>or</strong></strong>ward too far, press<br />
INSTANT REPLAY to jump back eight<br />
seconds. Press it again if you really<br />
missed the mark.<br />
Using the Control Buttons<br />
Part of the fun of watching programs with TiVo, live <strong>or</strong> rec<strong>or</strong>ded, is using the pause,<br />
instant replay, and slow motion features. Here’s an overview of the control buttons:<br />
P l a y<br />
Slo w<br />
RECORD. Rec<strong>or</strong>ds a program when you’re watching live TV <strong>or</strong> browsing the<br />
program guide.<br />
PLAY. Plays a program at n<strong>or</strong>mal speed. Shows the Status Bar <strong>f<strong>or</strong></strong> three seconds.<br />
PAUSE. Pauses a live program <strong>f<strong>or</strong></strong> up to 30 minutes and a rec<strong>or</strong>ded program <strong>f<strong>or</strong></strong> as<br />
long as you want. To resume playing, press PAUSE again (<strong>or</strong> press PLAY).<br />
BACK. Rewinds a program. Press BACK once, twice, <strong>or</strong> three times to go<br />
backward fast, faster, <strong>or</strong> fastest. Press it a fourth time to return to n<strong>or</strong>mal speed.<br />
FORWARD. Fast <strong>f<strong>or</strong></strong>wards a program. Press FORWARD once, twice, <strong>or</strong> three<br />
times to go <strong>f<strong>or</strong></strong>ward fast, faster, <strong>or</strong> fastest. Press it a fourth time to return to<br />
n<strong>or</strong>mal speed.<br />
Frame F<strong>or</strong>ward <strong>or</strong> Back. Press PAUSE, then press the FORWARD <strong>or</strong> BACK<br />
button. The picture moves a small step <strong>f<strong>or</strong></strong>ward <strong>or</strong> backward.<br />
INSTANT REPLAY. Instantly jumps back eight seconds and resumes playing.<br />
ADVANCE. In live TV, catches up to the live broadcast. When you are fast<br />
<strong>f<strong>or</strong></strong>warding in a rec<strong>or</strong>ded program, press ADVANCE to instantly jump ahead to<br />
the next tick mark. When you are rewinding, press ADVANCE to jump back to<br />
the previous tick mark. In a rec<strong>or</strong>ded program, press ADVANCE once to jump to<br />
the end of the rec<strong>or</strong>ding, press again to jump to the beginning.<br />
SLOW. Plays the program in slow motion.
The Status Bar<br />
When you press PLAY, PAUSE, FORWARD, <strong>or</strong> BACK, the status bar appears at the<br />
bottom of the screen. In live TV, the status bar represents one hour and the white tick<br />
marks are 15 minutes apart. In rec<strong>or</strong>ded programs, the bar shows the program’s length.<br />
The tick marks are 15, 30, <strong>or</strong> 60 minutes apart, depending on the length of the program.<br />
The green segment represents the part of the program saved by the DVR. The DVR<br />
automatically saves up to 30 minutes of live TV. You can move backward and <strong>f<strong>or</strong></strong>ward<br />
through the saved p<strong>or</strong>tion of a program. (F<strong>or</strong> m<strong>or</strong>e in<strong>f<strong>or</strong></strong>mation, see page 66.)<br />
In live TV, the right edge of the green segment represents the current time. A white<br />
vertical line shows where you are in the rec<strong>or</strong>ding. If the white line is anywhere back in<br />
the green segment, you are behind live TV. If you are behind live TV, you can press the<br />
ADVANCE button to catch up.<br />
White line indicates<br />
where you are <strong>no</strong>w.<br />
Status Bar <strong>f<strong>or</strong></strong> live TV.<br />
Status Bar <strong>f<strong>or</strong></strong> a twohour<br />
rec<strong>or</strong>ded program.<br />
Tick marks (15 min. apart)<br />
This shows that the BACK<br />
button has been pressed twice.<br />
This symbol shows you are<br />
controlling live TV (here, live<br />
TV is paused).<br />
This end is where you<br />
catch up with live TV and<br />
the current time.<br />
This rec<strong>or</strong>ded program<br />
is two hours long.<br />
®<br />
The Status Bar<br />
The CLEAR button hides the status<br />
bar, the program guide, the channel<br />
banner, and anything else that is <strong>no</strong>t part<br />
of the program.<br />
®<br />
You can <strong>only</strong> rewind live TV up to 30<br />
minutes, <strong>or</strong> to the point where you<br />
last changed the channel (whichever is<br />
less). When you change the channel, you<br />
skip ahead to the current time on the new<br />
channel and start saving on that channel.<br />
If you are behind live TV and watching<br />
something you still want to see, you<br />
should <strong>no</strong>t change the channel.<br />
67<br />
5
68<br />
Chapter 5 Watching Live and Rec<strong>or</strong>ded Programs<br />
®<br />
small...<br />
Pressing RIGHT arrow switches<br />
among channel banner styles, from<br />
...to medium<br />
...to large.<br />
The Channel Banner<br />
The channel banner appears at the top of the screen when you change channels <strong>or</strong> press the<br />
INFO button <strong>or</strong> RIGHT arrow on your remote while watching live TV. (If you don’t have<br />
an INFO button, you can press DISPLAY.) This also w<strong>or</strong>ks when you’re watching a<br />
rec<strong>or</strong>ded program from Now Playing. The channel banner will disappear after a few<br />
seconds. You can also hide the channel banner by pressing CLEAR <strong>or</strong> LEFT arrow.<br />
There are three versions of the channel banner in live TV: small (with the current time and<br />
channel), medium (adds the title, running time and ratings), and large (adds a program<br />
description and icons). Press RIGHT arrow to switch among them. In rec<strong>or</strong>ded programs,<br />
<strong>only</strong> the medium and large versions are available.<br />
Channel banner icons. The large channel banner has three selectable icons on the right<br />
side. Each icon controls a different feature. To use an icon, use the UP/DOWN arrows to<br />
highlight it, then press SELECT. (See the inside back cover <strong>f<strong>or</strong></strong> a glossary of icons.)<br />
Rec<strong>or</strong>d a program (<strong>or</strong> stop a current rec<strong>or</strong>ding). If a rec<strong>or</strong>ding is in progress, the<br />
icon appears bright.<br />
Go to Parental Controls.<br />
If Parental Controls are off, the lock appears unlocked and dim.<br />
If they are on, it appears locked and bright (pictured here).<br />
If they have been turned off temp<strong>or</strong>arily, it appears unlocked and bright.<br />
Read TiVo Messages. If the symbol is bright, you have new messages from the<br />
TiVo service.
Watching Live TV<br />
When you’re watching a program as it’s broadcast, you’re watching live TV. To go to live<br />
TV from any TiVo screen, press the LIVE TV button on your remote control. You can<br />
also select “Watch Live TV” from TiVo Central. If you’ve used the pause, rewind, slow,<br />
<strong>or</strong> instant replay features and are “behind” live TV, press ADVANCE to catch up.<br />
Changing Channels<br />
There are several ways to change channels:<br />
<strong>Use</strong> the Guide. Tired of channel surfing? Choose something to watch with the<br />
program guide. To see the guide, press the GUIDE button. Then use the arrow buttons<br />
to highlight a program. To change the channel, press SELECT.<br />
<strong>Use</strong> the Number Pad. To go to a specific channel, use the numbers on your remote<br />
control, then press ENTER. (If you don’t press ENTER, the channel changes<br />
automatically after a few seconds.) To clear the number be<strong>f<strong>or</strong></strong>e the channel changes,<br />
press CLEAR.<br />
<strong>Use</strong> ENTER/LAST. To jump back to the previous channel, press ENTER/LAST.<br />
<strong>Use</strong> CHAN UP/DOWN. Of course, you can also still use the CHAN UP/DOWN button<br />
on your remote control. (CHAN UP/DOWN skips channels that are <strong>no</strong>t on the channel<br />
list selected in Guide Options. F<strong>or</strong> m<strong>or</strong>e in<strong>f<strong>or</strong></strong>mation on channel lists, see page 77.)<br />
Choosing a Guide Style<br />
You can choose between two guide styles that display your channels and program<br />
in<strong>f<strong>or</strong></strong>mation in different ways. Press the GUIDE button to display the guide, then press<br />
ENTER to see the Guide Options. Highlight “Style” to see the available options.<br />
Watching Live TV<br />
®<br />
You can use your DVR’s remote to<br />
control the power, volume, mute,<br />
and TV input settings on your TV. F<strong>or</strong><br />
in<strong>f<strong>or</strong></strong>mation on setting this up, see<br />
“Remote Control & DVR Front Lights” on<br />
page 85.<br />
69<br />
5
70<br />
Chapter 5 Watching Live and Rec<strong>or</strong>ded Programs<br />
The TiVo Live Guide<br />
The TiVo Live Guide displays program in<strong>f<strong>or</strong></strong>mation in two side-by-side lists:<br />
Left side. On its left side, the guide has a list of channels and the programs that are<br />
currently airing on them. If you want to watch a program in the list, highlight it, then press<br />
SELECT. This changes the channel.<br />
Right side. The right side has a list of upcoming programs on the highlighted channel.<br />
Moving Around the TiVo Live Guide:<br />
Press the UP and DOWN arrows to highlight channels <strong>or</strong> programs.<br />
<strong>Use</strong> the LEFT and RIGHT arrows to move between the left and right sides.<br />
Press CHAN UP/DOWN to quickly move up <strong>or</strong> down one page at a time.<br />
Press FORWARD and BACK to change the time displayed in half-hour increments.<br />
The Grid Guide<br />
The Grid Guide displays program in<strong>f<strong>or</strong></strong>mation in a channel grid similar to what you might<br />
see in your local newspaper. Channels are listed on the left side, and program titles <strong>f<strong>or</strong></strong> a<br />
90-minute time period are shown on the right.<br />
Moving Around the Grid Guide:<br />
<strong>Use</strong> the FORWARD and BACK buttons to jump through program in<strong>f<strong>or</strong></strong>mation 90<br />
minutes at a time.<br />
Press the UP, DOWN, LEFT, and RIGHT arrows to highlight channels <strong>or</strong> programs.<br />
Press CHAN UP/DOWN to quickly move up <strong>or</strong> down one page at a time.
Title, date, time the<br />
program airs, and rating<br />
Guide options (Press ENTER to set)<br />
Title, date, time the<br />
program airs, and rating<br />
Channel number and channel<br />
call letters<br />
Guide options (Press ENTER to set)<br />
TiVo Live Guide<br />
Programs during<br />
this time period<br />
Grid Guide<br />
Upcoming programs on<br />
the selected channel<br />
Program description<br />
Day and time Selected channel<br />
Channel list and categ<strong>or</strong>y<br />
filter currently in use<br />
Program description<br />
Time slots<br />
Program listings<br />
Channel list and categ<strong>or</strong>y<br />
filter currently in use<br />
Watching Live TV<br />
®<br />
®<br />
TiVo Live Guide: While the highlight<br />
is on the left side, you can press the<br />
FORWARD and BACK buttons to change<br />
the time in half-hour increments.<br />
While the highlight is on the right side,<br />
you can press the FORWARD and BACK<br />
buttons to change the selected channel.<br />
<strong>Use</strong> CHAN UP/DOWN to page through the<br />
program listings.<br />
Grid Guide: <strong>Use</strong> the FORWARD and<br />
BACK buttons to change the time in<br />
90-minute increments.<br />
<strong>Use</strong> CHAN UP/DOWN to page through the<br />
program listings.<br />
71<br />
5
72<br />
Chapter 5 Watching Live and Rec<strong>or</strong>ded Programs<br />
®<br />
A col<strong>or</strong>ed icon to the left of each<br />
title in Now Playing tells you how<br />
long the rec<strong>or</strong>ding will be saved. See the<br />
Glossary of Icons on the inside back cover<br />
<strong>f<strong>or</strong></strong> details.<br />
On a Program In<strong>f<strong>or</strong></strong>mation screen, press INFO<br />
(<strong>or</strong> DISPLAY if your remote doesn’t have an<br />
INFO button) to see the Program Details,<br />
which often has m<strong>or</strong>e about the program,<br />
such as act<strong>or</strong>s, writers, producers, etc.<br />
Watching Programs from Now Playing<br />
All the programs saved on your DVR are listed in Now Playing (<strong>no</strong> m<strong>or</strong>e searching<br />
through unlabeled videotapes!). To go to Now Playing, press the TiVo button twice.<br />
As soon as a rec<strong>or</strong>ding starts, the program’s title appears in Now Playing. You can watch<br />
any program in Now Playing, even one that is still rec<strong>or</strong>ding. Just highlight it and press<br />
PLAY. If you have watched part of the program already, it resumes from the point you<br />
stopped watching. When a program ends, you have the option to delete it. If you don’t<br />
delete it, the program is available to watch again from the beginning in Now Playing.<br />
Highlight a program title and press SELECT to see the Program In<strong>f<strong>or</strong></strong>mation screen,<br />
which offers these options:<br />
Play <strong>or</strong> Resume playing.<br />
Keep until... See page 73 <strong>f<strong>or</strong></strong> details.<br />
Delete Now <strong>or</strong> Stop Rec<strong>or</strong>ding (if rec<strong>or</strong>ding is in progress)<br />
Save to VCR. See page 74 <strong>f<strong>or</strong></strong> in<strong>f<strong>or</strong></strong>mation on using this feature.<br />
S<strong>or</strong>ting and Grouping Programs<br />
When you are in Now Playing, press ENTER on your TiVo remote to see Now Playing<br />
Options. You can also Press 1 on the remote to change the s<strong>or</strong>t <strong>or</strong>der of Now Playing<br />
programs; <strong>or</strong> press 2 to turn groups on <strong>or</strong> off.<br />
S<strong>or</strong>ting Programs. Choose how you want the programs in Now Playing to be listed:<br />
Alphabetically. Programs are listed alphabetically by title (from A to Z).<br />
By date rec<strong>or</strong>ded. Programs are listed by the date they were rec<strong>or</strong>ded, with the most<br />
recent at the top and the oldest at the bottom.
Grouping Programs. The Groups option lets you group like programs together to “tidy<br />
up” the screen. When you turn on Groups, a folder appears in Now Playing <strong>f<strong>or</strong></strong>:<br />
Each television series with m<strong>or</strong>e than one rec<strong>or</strong>ded episode;<br />
Each auto-rec<strong>or</strong>ding WishList TM with a rec<strong>or</strong>ded program;<br />
TiVo Suggestions (if you have auto-rec<strong>or</strong>ding of TiVo Suggestions turned on).<br />
A program may fit in any <strong>or</strong> all of these categ<strong>or</strong>ies, so it may appear in m<strong>or</strong>e than one<br />
group, even though <strong>only</strong> one copy of the program is actually rec<strong>or</strong>ded. F<strong>or</strong> example, say<br />
you have an auto-rec<strong>or</strong>ding WishList <strong>f<strong>or</strong></strong> an act<strong>or</strong> who also appears in a series, and you<br />
have a Season Pass TM <strong>f<strong>or</strong></strong> that series. Each episode of the series that rec<strong>or</strong>ds will appear in<br />
two folders—one <strong>f<strong>or</strong></strong> the WishList and one <strong>f<strong>or</strong></strong> the Season Pass. If you delete the program<br />
from one folder, it also disappears from the other.<br />
A number in parentheses to the right of each folder shows how many programs it contains.<br />
If you delete a program from one folder, it will disappear from all folders.<br />
Keep Until...<br />
By default, programs you rec<strong>or</strong>d are saved until space is needed <strong>f<strong>or</strong></strong> new rec<strong>or</strong>dings you<br />
request (this usually means <strong>f<strong>or</strong></strong> about two days). The oldest ones may be deleted to make<br />
room <strong>f<strong>or</strong></strong> new rec<strong>or</strong>dings you’ve scheduled. However, you always have the option to keep<br />
a program <strong>f<strong>or</strong></strong> as long as you want.<br />
To change how long a program will be saved, highlight it and press SELECT. The<br />
Program In<strong>f<strong>or</strong></strong>mation screen appears. Select “Keep Until....” On the next screen you can<br />
choose “Keep until I delete” <strong>or</strong> use the arrow buttons to highlight and change the date<br />
displayed. When you are done, press SELECT.<br />
Watching Programs from Now Playing<br />
A <strong>no</strong>te at the bottom of Now Playing tells<br />
you which s<strong>or</strong>ting option you are using<br />
and whether groups are on.<br />
®<br />
When you set up rec<strong>or</strong>dings, you<br />
can also specify how long you want<br />
to keep them by setting the “Keep<br />
Until...” Rec<strong>or</strong>ding Option. See page 48.<br />
73<br />
5
74<br />
Chapter 5 Watching Live and Rec<strong>or</strong>ded Programs<br />
®<br />
You can use the “Save to VCR”<br />
feature with a DVD rec<strong>or</strong>der. Just<br />
connect a DVD rec<strong>or</strong>der to your DVR (see<br />
page 20), and follow the same steps<br />
listed here. (See your DVD rec<strong>or</strong>der’s<br />
instructions <strong>f<strong>or</strong></strong> details on how to rec<strong>or</strong>d<br />
a DVD.)<br />
Save to VCR<br />
If you have a VCR, you can save a program from Now Playing to a videotape. Transfers to<br />
a VCR happen in real time. F<strong>or</strong> example, if a program is two hours long, it will take two<br />
hours to save it. You will <strong>no</strong>t be able to watch live TV <strong>or</strong> rec<strong>or</strong>dings while saving.<br />
Most of the buttons on your remote that control live TV w<strong>or</strong>k as usual during Save to<br />
VCR—you can fast <strong>f<strong>or</strong></strong>ward through the b<strong>or</strong>ing parts! The VCR will rec<strong>or</strong>d the video<br />
exactly as it appears, including the status bar, channel banner, and any icons on the screen.<br />
Using Save to VCR:<br />
1. Be sure your TiVo DVR is connected to your VCR (see Chapter 1 <strong>f<strong>or</strong></strong> details), and the<br />
VCR is set to rec<strong>or</strong>d input from your TiVo DVR. (See your VCR’s instructions <strong>f<strong>or</strong></strong><br />
how to set its input.)<br />
2. Insert a videotape into your VCR.<br />
3. Go to Now Playing, highlight the show you want to save, then press SELECT.<br />
4. Highlight “Save to VCR,” then press SELECT.<br />
5. Select “Start saving from the beginning.”<br />
6. A title screen appears <strong>f<strong>or</strong></strong> ten seconds. When you see it, press your VCR’s rec<strong>or</strong>d<br />
button. When the program is over, press stop on your VCR.<br />
You can cancel saving to VCR by pressing the LIVE TV <strong>or</strong> TiVo button on<br />
your remote. A videotape icon appears as a warning. Press the same button<br />
again and a confirmation screen appears giving you the option to resume<br />
saving at a later time, <strong>or</strong> cancel saving to VCR. If you choose to cancel saving, be sure to<br />
press stop on your VCR as well.
CHAPTER 6<br />
Messages & <strong>Setup</strong><br />
Messages 76<br />
Settings 77<br />
Remote Control & DVR Front Lights 85<br />
Phone & Netw<strong>or</strong>k <strong>Setup</strong> 92<br />
System In<strong>f<strong>or</strong></strong>mation 97<br />
Troubleshooting 98<br />
Restart <strong>or</strong> Reset System 99<br />
Standby 100
76<br />
Chapter 6 Messages & <strong>Setup</strong><br />
Messages<br />
Select Messages to read any messages from the TiVo service <strong>or</strong> internal alerts from your<br />
DVR. When you receive a new message, TiVo Central will show the option, “Read New<br />
Messages & <strong>Setup</strong>.”<br />
To read the messages:<br />
1. Go to TiVo Central, then select Read New Messages & <strong>Setup</strong>.<br />
2. Select Read New Messages. A list of all of your messages appears. Messages you have<br />
<strong>no</strong>t yet read are marked with an envelope icon:<br />
3. <strong>Use</strong> the UP/DOWN arrows to highlight a message, then press SELECT to read it.<br />
CHAN UP/DOWN lets you page through a message if it doesn’t fit on the screen.<br />
TiVo Central Messages & <strong>Setup</strong> Messages
Settings<br />
With the options in Settings, you can make the DVR w<strong>or</strong>k m<strong>or</strong>e to your liking. <strong>Use</strong> these<br />
screens to set your default preferences <strong>f<strong>or</strong></strong> rec<strong>or</strong>ding quality, Parental Controls, and m<strong>or</strong>e.<br />
Audio Settings<br />
Sound Effects Volume. You can change the volume <strong>or</strong> turn off the DVR’s sound effects<br />
(the tones played when you press buttons on the remote control). The default is Medium.<br />
Television Audio. This option lets you select the DVR’s default audio output option. You<br />
can choose to have the default audio in stereo <strong>or</strong> mo<strong>no</strong>, <strong>or</strong> have a secondary audio program<br />
(SAP) rec<strong>or</strong>ded when one is available.<br />
Secondary audio programs are generally audio broadcasts in a language other than<br />
English. If you choose to rec<strong>or</strong>d SAP and there is a secondary audio program, it will be<br />
rec<strong>or</strong>ded. The SAP may be in Spanish, French, Japanese <strong>or</strong> some other language.<br />
Channel Settings<br />
Channel Banner. N<strong>or</strong>mally, when you change channels, the channel banner is displayed<br />
<strong>f<strong>or</strong></strong> a few seconds. <strong>Use</strong> this setting to control how the channel banner is displayed. If you<br />
want the channel banner to disappear quickly, select “Clear banner quickly.”<br />
Channel Changing. <strong>Use</strong> this setting to make changes to the way your DVR changes<br />
channels on your <strong>cable</strong> <strong>or</strong> satellite <strong>box</strong>. You should do this if:<br />
you change the type of control <strong>cable</strong> (IR <strong>or</strong> Serial) used to change channels on your<br />
<strong>cable</strong> <strong>or</strong> satellite <strong>box</strong> (see “Choosing a Channel Changing <strong>Cable</strong>” on page 5),<br />
your <strong>cable</strong> <strong>or</strong> satellite <strong>box</strong> is replaced by a new make <strong>or</strong> model,<br />
<strong>or</strong> if you are having trouble with channel changing (see page 128 <strong>f<strong>or</strong></strong> troubleshooting.)<br />
TiVo Central Messages & <strong>Setup</strong> Settings<br />
Settings<br />
77<br />
6
78<br />
Chapter 6 Messages & <strong>Setup</strong><br />
®<br />
In the event that there is a change<br />
to your <strong>cable</strong> <strong>or</strong> satellite<br />
subscription package, a TiVo message<br />
will let you k<strong>no</strong>w what the change is. You<br />
must then use Channel Settings to ensure<br />
that the Channels You Receive list reflects<br />
the change to your lineup.<br />
Channel Lists. The DVR uses channel lists to determine which channels to display in the<br />
guide, and which channels are available <strong>f<strong>or</strong></strong> rec<strong>or</strong>ding programs. Features such as Search<br />
by Title, Search Using a WishList, and Browse By Channel <strong>only</strong> search <strong>f<strong>or</strong></strong> programs on<br />
channels you select in the Channels You Receive list.<br />
Channels You Receive. The Channels You Receive list starts with all the channels<br />
included in your service package. You can customize it to include <strong>only</strong> channels you<br />
actually subscribe to and to reflect your viewing preferences. F<strong>or</strong> example, if you<br />
never watch a channel and don’t plan to set up any rec<strong>or</strong>dings on it, <strong>or</strong> search <strong>f<strong>or</strong></strong><br />
programs on it, you can de-select it here.<br />
Fav<strong>or</strong>ite Channels. The Fav<strong>or</strong>ite Channels list is <strong>f<strong>or</strong></strong> channels you watch frequently.<br />
Include <strong>only</strong> a few channels in this list, so that you can quickly look at what’s coming<br />
up on them using the guide. See “Customizing the Guide” on page 51.<br />
To set up a custom channel list:<br />
1. Select the Channels You Receive <strong>or</strong> Fav<strong>or</strong>ite Channels list. A check mark appears to<br />
the left of channels that are part of the selected list.<br />
2. To remove <strong>or</strong> add a channel, highlight it and press SELECT. You can speed through<br />
the list with the CHAN UP/DOWN. To go directly to a specific channel, use the<br />
number buttons, then press ENTER. Your changes are saved automatically.<br />
<strong>Cable</strong> Lineup. (You won’t see the “<strong>Cable</strong> Lineup” option if your program source is <strong>no</strong>t<br />
<strong>cable</strong>.) Select this if you have changed your <strong>cable</strong> subscription, <strong>or</strong> if your channel lineup<br />
looks wrong in “Channels You Receive.” On the next screen you’ll be able to choose<br />
among available <strong>cable</strong> channel lineups based on your ZIP code.<br />
TiVo Central Messages & <strong>Setup</strong> Settings Channels
Parental Controls<br />
Parental Controls allow you to set limits on movie and television ratings, to lock specific<br />
channels, and to prevent viewing of rec<strong>or</strong>ded programs that violate Parental Controls. The<br />
padlock icon shows the current state of Parental Controls:<br />
Off. No passw<strong>or</strong>d <strong>or</strong> controls set. Padlock appears unlocked and dark.<br />
On. Passw<strong>or</strong>d and controls set. Padlock appears locked and bright.<br />
Temp<strong>or</strong>arily off. Controls set, but passw<strong>or</strong>d was entered to temp<strong>or</strong>arily turn off.<br />
Padlock appears unlocked and bright.<br />
While Parental Controls are on, you can watch a locked program <strong>or</strong> channel by pressing<br />
SELECT, then entering the passw<strong>or</strong>d. This temp<strong>or</strong>arily turns off Parental Controls.<br />
To turn on Parental Controls and define a passw<strong>or</strong>d ( ): Select “Turn on Parental<br />
Controls.” <strong>Use</strong> the number buttons on the remote control to enter a four-digit passw<strong>or</strong>d,<br />
then enter the same passw<strong>or</strong>d again <strong>f<strong>or</strong></strong> confirmation.<br />
To turn off Parental Controls ( ): Select “Turn off Parental Controls,” enter the<br />
passw<strong>or</strong>d, and press SELECT. When Parental Controls are turned off, the passw<strong>or</strong>d is<br />
deleted and anyone can view any programs <strong>or</strong> watch any channels.<br />
To temp<strong>or</strong>arily turn off Parental Controls ( ): Just enter the passw<strong>or</strong>d to watch a<br />
program <strong>or</strong> channel. Or, select “Temp<strong>or</strong>arily turn off Parental Controls” on the Parental<br />
Controls screen. When Parental Controls are temp<strong>or</strong>arily turned off, any program <strong>or</strong><br />
channel can be viewed, but the passw<strong>or</strong>d is still required to change Parental Controls<br />
settings. To re-enable Parental Controls, select “Re-enable Parental Controls.” Or, you can<br />
put the DVR into Standby mode, then take it out. To do this, select Messages & <strong>Setup</strong>,<br />
then Standby. Then press the TiVo <strong>or</strong> LIVE TV button.<br />
TiVo Central Messages & <strong>Setup</strong> Settings Parental Controls<br />
Settings<br />
The large version of the channel<br />
banner has a sh<strong>or</strong>tcut to Parental<br />
Controls; see page 68 <strong>f<strong>or</strong></strong> details.<br />
®<br />
®<br />
When you turn Parental Controls off,<br />
your passw<strong>or</strong>d is deleted. You may<br />
prefer to temp<strong>or</strong>arily turn off Parental<br />
Controls, so that a<strong>no</strong>ther person in your<br />
household does <strong>no</strong>t choose a new<br />
passw<strong>or</strong>d.<br />
79<br />
6
80<br />
Chapter 6 Messages & <strong>Setup</strong><br />
To change the Passw<strong>or</strong>d ( ): To change the passw<strong>or</strong>d <strong>f<strong>or</strong></strong> Parental Controls, Parental<br />
Controls must be on. Select “Change Passw<strong>or</strong>d” on the Parental Controls screen. Enter a<br />
new passw<strong>or</strong>d, then re-enter the new passw<strong>or</strong>d to confirm.<br />
Auto Re-lock Option. When Parental Controls are temp<strong>or</strong>arily turned off, they re-lock<br />
automatically after four hours if you don’t use your remote. Parental Controls won’t relock<br />
in the middle of a show. By default, the Auto Re-lock option is on. To turn off Auto<br />
Re-lock, go to Messages & <strong>Setup</strong>, then Settings, then Parental Controls. Press the DOWN<br />
arrow to highlight “Auto Re-lock,” then press SELECT. Enter your passw<strong>or</strong>d, then<br />
highlight and select “Auto Re-lock off.”<br />
Rating Settings <strong>f<strong>or</strong></strong> TV and Movies ( ). Movies <strong>or</strong>iginally meant <strong>f<strong>or</strong></strong> release to theaters<br />
have a different rating system from programs made <strong>f<strong>or</strong></strong> TV. You can use Parental Controls<br />
to set limits <strong>f<strong>or</strong></strong> both rating systems (see page 82). You can also set limits <strong>f<strong>or</strong></strong> specific types<br />
of TV content that may be objectionable—such as sexual content <strong>or</strong> violence.<br />
To set Rating Limits <strong>f<strong>or</strong></strong> TV and Movies: From Parental Controls, select “Rating<br />
Settings.” Enter the passw<strong>or</strong>d and select the kind of limit you want to change.<br />
The next screen contains a <strong>box</strong> listing all potential ratings. Ratings shaded in green are <strong>no</strong>t<br />
locked; those in red are locked. <strong>Use</strong> the UP and DOWN arrows to move the red shading<br />
and adjust which ratings are locked. Your changes are saved automatically. When you are<br />
done, press RIGHT <strong>or</strong> LEFT arrow to return to Parental Controls.<br />
To set Rating Limits <strong>f<strong>or</strong></strong> Specific TV Content: From Parental Controls, select “Rating<br />
Settings,” then enter the passw<strong>or</strong>d and press SELECT. Select “Block by TV Content.” A<br />
list of categ<strong>or</strong>ies appears on the next screen. Select a categ<strong>or</strong>y (<strong>f<strong>or</strong></strong> example, V-Violence).<br />
A <strong>box</strong> containing all the possible ratings appears. Ratings in green are <strong>no</strong>t locked; ratings<br />
in red are locked. (Ratings in gray do <strong>no</strong>t apply to the categ<strong>or</strong>y. F<strong>or</strong> example, a TV-Y<br />
program would <strong>no</strong>t have V-Violence content so there is <strong>no</strong>thing to block.)<br />
TiVo Central Messages & <strong>Setup</strong> Settings Parental Controls
<strong>Use</strong> the UP and DOWN arrows to adjust which ratings are locked <strong>or</strong> unlocked. The<br />
display to the right of the <strong>box</strong> will change to tell you exactly what ratings level you are<br />
allowing. Your changes are saved automatically. To return to the Parental Controls screen,<br />
press SELECT <strong>or</strong> RIGHT arrow.<br />
Broadcasters are <strong>no</strong>t required to provide ratings <strong>f<strong>or</strong></strong> specific types of<br />
content. If you want to be sure to block programs that do <strong>no</strong>t include<br />
ratings <strong>f<strong>or</strong></strong> specific types of content, you will have to use age-based<br />
ratings to block content. See “Rating Limits <strong>f<strong>or</strong></strong> TV and Movies,” above.<br />
Movies and TV Programs with No Rating In<strong>f<strong>or</strong></strong>mation. If a movie has <strong>no</strong> rating<br />
in<strong>f<strong>or</strong></strong>mation, it is treated as if it has the highest movie rating, ‘X.’ If you require a<br />
passw<strong>or</strong>d <strong>f<strong>or</strong></strong> X-rated movies, then movies without rating in<strong>f<strong>or</strong></strong>mation also require a<br />
passw<strong>or</strong>d. If a television program has <strong>no</strong> rating in<strong>f<strong>or</strong></strong>mation, it is treated as if it has the<br />
lowest TV rating, ‘TV-Y.” A passw<strong>or</strong>d is required to view it <strong>only</strong> if you set Parental<br />
Controls to require a passw<strong>or</strong>d <strong>f<strong>or</strong></strong> programs rated ‘TV-Y’.<br />
Channel Lock <strong>f<strong>or</strong></strong> Live TV ( ). You can lock individual channels so that a passw<strong>or</strong>d is<br />
required to view any program on those channels. To lock <strong>or</strong> unlock channels:<br />
1. From the Parental Controls screen, select “Channel Lock,” and enter the passw<strong>or</strong>d.<br />
2. A channel list appears with a padlock icon to the left of any locked channels. Highlight<br />
a channel and press SELECT to add <strong>or</strong> remove a padlock icon. <strong>Use</strong> CHAN UP/DOWN<br />
to move through the list quickly. You can highlight a specific channel by entering its<br />
channel number with the number buttons on the remote.<br />
3. When you are done, press RIGHT <strong>or</strong> LEFT to return to Parental Controls. Your<br />
changes are saved automatically.<br />
TiVo Central Messages & <strong>Setup</strong> Settings Parental Controls<br />
gray = does <strong>no</strong>t apply<br />
to the categ<strong>or</strong>y<br />
green = <strong>no</strong>t locked<br />
red = locked<br />
Settings<br />
81<br />
6
82<br />
Chapter 6 Messages & <strong>Setup</strong><br />
Motion Picture Association of America ratings <strong>f<strong>or</strong></strong> movies<br />
G: General Audiences. Most parents would find this material suitable<br />
<strong>f<strong>or</strong></strong> all ages.<br />
PG: Parental Guidance Suggested. Parents may find p<strong>or</strong>tions of this<br />
material unsuitable <strong>f<strong>or</strong></strong> younger children.<br />
PG-13: Parents Strongly Cautioned. This material contains p<strong>or</strong>tions<br />
many parents would find unsuitable <strong>f<strong>or</strong></strong> children under 13 years of age.<br />
Ratings <strong>f<strong>or</strong></strong> television movies and programs (including content ratings)<br />
TV-Y. All children. This program is designed to be appropriate <strong>f<strong>or</strong></strong> all<br />
children. Whether animated <strong>or</strong> live action, the themes and elements in<br />
this program are specifically designed <strong>f<strong>or</strong></strong> a very young audience,<br />
including children from ages 2-6. This program is <strong>no</strong>t expected to<br />
frighten younger children.<br />
TV-Y7. Directed to older children. This program is designed <strong>f<strong>or</strong></strong><br />
children age 7 and above. Themes and elements in this program may<br />
include mild fantasy <strong>or</strong> comedic violence, <strong>or</strong> may frighten children<br />
under the age of 7. Programs where fantasy violence that may be m<strong>or</strong>e<br />
intense <strong>or</strong> m<strong>or</strong>e combative than other programs in the TV-Y7 categ<strong>or</strong>y<br />
are designated TV-Y7-FV.<br />
TV-G. General audience. Most parents would find this program<br />
appropriate <strong>f<strong>or</strong></strong> all ages. Although this rating does <strong>no</strong>t signify a<br />
program designed specifically <strong>f<strong>or</strong></strong> children, most parents may let<br />
younger children watch this program unattended. It contains little <strong>or</strong><br />
<strong>no</strong> violence, sexual dialogue, <strong>or</strong> situations; and <strong>no</strong> strong language.<br />
R: Restricted. This material is specifically designed to be viewed by<br />
adults and there<strong>f<strong>or</strong></strong>e may be unsuitable <strong>f<strong>or</strong></strong> children under 17.<br />
NC-17: Adult Content. This material contains intense, disturbing, <strong>or</strong><br />
graphically p<strong>or</strong>trayed themes <strong>or</strong> content that are <strong>no</strong>t suitable <strong>f<strong>or</strong></strong><br />
viewing by children under 17.<br />
AO: Explicit Sexual Content. This material contains explicit sexual<br />
content and is intended to be viewed by adults ONLY.<br />
TV-PG. Parental guidance suggested. This program contains<br />
material that parents may find unsuitable <strong>f<strong>or</strong></strong> younger children. Many<br />
parents may want to watch it with their younger children. The theme<br />
itself may call <strong>f<strong>or</strong></strong> parental guidance and/<strong>or</strong> the program contains one<br />
<strong>or</strong> m<strong>or</strong>e of the following: moderate violence (V), some sexual<br />
situations (S), infrequent coarse language (L), <strong>or</strong> some suggestive<br />
dialogue (D).<br />
TV-14. Parents strongly cautioned. This program contains some<br />
material that parents would find unsuitable <strong>f<strong>or</strong></strong> children under 14 years<br />
of age. Parents are strongly urged to exercise greater care in<br />
monit<strong>or</strong>ing this program and are cautioned against letting children<br />
under the age of 14 watch unattended. This program contains one <strong>or</strong><br />
m<strong>or</strong>e of the following: intense violence (V), intense sexual situations<br />
(S), strong coarse language (L), <strong>or</strong> intensely suggestive dialogue (D).<br />
TV-MA. Mature audiences <strong>only</strong>. This program is specifically<br />
designed to be viewed by adults and there<strong>f<strong>or</strong></strong>e may be unsuitable <strong>f<strong>or</strong></strong><br />
children under 17. This program contains one <strong>or</strong> m<strong>or</strong>e of the<br />
following: graphic violence (V), explicit sexual activity (S), <strong>or</strong> crude,<br />
indecent language (L).<br />
TiVo Central Messages & <strong>Setup</strong> Settings Parental Controls
Rec<strong>or</strong>ding Settings<br />
Rec<strong>or</strong>ding Quality. You can increase the available rec<strong>or</strong>ding time on your DVR by<br />
selecting a rec<strong>or</strong>ding quality appropriate <strong>f<strong>or</strong></strong> the type of program you are rec<strong>or</strong>ding. The<br />
DVR offers four levels of rec<strong>or</strong>ding quality; set your default on this screen. The choice<br />
you make here will be used <strong>f<strong>or</strong></strong> all rec<strong>or</strong>dings unless you change it, using Rec<strong>or</strong>ding<br />
Options, when you schedule a rec<strong>or</strong>ding (<strong>f<strong>or</strong></strong> details, see page 47). Two different rec<strong>or</strong>ding<br />
qualities can<strong>no</strong>t be used on one rec<strong>or</strong>ding.<br />
The rec<strong>or</strong>ding quality choices available are Best, High, Medium, and Basic. The fact<strong>or</strong>y<br />
default is High. Basic quality takes up about one-third the space of Best quality, so it gives<br />
you about three times the amount of space <strong>f<strong>or</strong></strong> programs. You may wish to experiment<br />
with different levels and then reset your default. Some quality settings are better suited <strong>f<strong>or</strong></strong><br />
certain kinds of programs, but you should choose what looks best to you.<br />
Rec<strong>or</strong>ding Quality Suggested use<br />
Basic News<br />
Medium Daytime Talk Shows, Animation<br />
High Dramas, Films<br />
Best Sp<strong>or</strong>ts, Action Movies<br />
The DVR automatically uses Best Quality when displaying live TV. However, when it<br />
rec<strong>or</strong>ds a program, the DVR uses the Video Rec<strong>or</strong>ding Quality you specified <strong>f<strong>or</strong></strong> that<br />
program. If that quality is <strong>no</strong>t Best, you may <strong>no</strong>tice the difference when rec<strong>or</strong>ding starts.<br />
TiVo Central Messages & <strong>Setup</strong> Settings Rec<strong>or</strong>ding<br />
®<br />
Settings<br />
One hour of Best Quality equals<br />
about 3 hours of Basic Quality, 2<br />
hours of Medium Quality, and 1.5 hours of<br />
High Quality.<br />
83<br />
6
84<br />
Chapter 6 Messages & <strong>Setup</strong><br />
®<br />
If you change video sources, <strong>f<strong>or</strong></strong><br />
example, by changing from <strong>cable</strong> to<br />
satellite service, you should repeat<br />
Guided <strong>Setup</strong> (go to Messages & <strong>Setup</strong>,<br />
then Restart <strong>or</strong> Reset System, then<br />
Repeat Guided <strong>Setup</strong>).<br />
TiVo Suggestions. <strong>Use</strong> this screen to turn automatic rec<strong>or</strong>ding of TiVo Suggestions on <strong>or</strong><br />
off. When automatic rec<strong>or</strong>ding is on (the default), TiVo Suggestions may be rec<strong>or</strong>ded onto<br />
available space. Programs you have rec<strong>or</strong>ded <strong>or</strong> scheduled to rec<strong>or</strong>d will never be deleted<br />
to make room <strong>f<strong>or</strong></strong> suggestions. Also, if space is needed to save programs you have<br />
scheduled to rec<strong>or</strong>d, suggestions are the first things to be deleted. (F<strong>or</strong> m<strong>or</strong>e in<strong>f<strong>or</strong></strong>mation<br />
on TiVo Suggestions, see page 40.)<br />
Video Settings<br />
Connection to DVR. If you change the <strong>cable</strong> you use to connect video from your <strong>cable</strong> <strong>or</strong><br />
satellite <strong>box</strong> to the DVR, use this screen to in<strong>f<strong>or</strong></strong>m the DVR of the change. The next screen<br />
you see depends on whether you have one <strong>or</strong> two video sources. F<strong>or</strong> details on navigating<br />
the Connection to DVR screens, see page 28.<br />
RF Video. If you use a Coaxial RF <strong>cable</strong> as the video input to your DVR, this option is<br />
available. You can use the RF Video screen to smooth the video, which will decrease the<br />
static and improve the picture on these channels. However, it will cause images on all<br />
channels carried to your DVR on a Coaxial RF <strong>cable</strong> to lose some sharpness.<br />
TiVo Central Messages & <strong>Setup</strong> Settings Video
Remote Control & DVR Front Lights<br />
To change the settings of the lights on the TiVo ® DVR’s front panel, see page 91.<br />
F<strong>or</strong> in<strong>f<strong>or</strong></strong>mation about the individual buttons on the TiVo remote control, please refer to<br />
the Remote Control Tips on the inside front cover of this guide. Be<strong>f<strong>or</strong></strong>e programming the<br />
remote control, you must first insert the batteries and complete Guided <strong>Setup</strong>.<br />
The TiVo remote will already w<strong>or</strong>k with your DVR. You can also program some buttons<br />
on the remote to control your TV and/<strong>or</strong> A/V receiver (your stereo system).<br />
Control TV power, volume, mute, and input settings. Complete the instructions<br />
starting on on page 86 using the first column in each of the tables (TV power, volume,<br />
and mute). Then repeat the instructions using the second column (TV input).<br />
Control TV and A/V receiver power & A/V receiver volume and mute. Complete the<br />
instructions starting on on page 86 using the first column in each of the tables. Then<br />
repeat the instructions using the third column (A/V receiver power, volume, and<br />
mute). In this case, the TV POWER button turns on/off the TV and the A/V receiver at<br />
the same time. The VOL and MUTE buttons control <strong>only</strong> the A/V receiver.<br />
Control TV power and A/V receiver volume and mute. Complete the instructions<br />
starting on on page 86 using the first column in each of the tables. Then repeat the<br />
instructions using the fourth column (A/V receiver volume and mute). The VOL and<br />
MUTE buttons control <strong>only</strong> the A/V receiver.<br />
Using the DVR Switch to Control Two DVRs. If you have two DVRs in the same room,<br />
setting up the DVR SWITCH will prevent the remote control from changing channels<br />
on both DVRs, and prevent you from accidentally deleting programs you want to keep.<br />
See page 89 <strong>f<strong>or</strong></strong> instructions.<br />
TiVo Central Messages & <strong>Setup</strong> Settings Remote Control<br />
Remote Control & DVR Front Lights<br />
TV POWER<br />
TV INPUT<br />
MUTE<br />
VOLUME<br />
DVR SWITCH<br />
®<br />
TV Input<br />
TV<br />
P o w e r<br />
Window<br />
1<br />
Select<br />
Mute<br />
Rec<strong>or</strong>d<br />
2 3<br />
4 5 6<br />
7 8 9<br />
0<br />
Live<br />
T V<br />
Vol Chan<br />
Clear<br />
P l a y<br />
Sl o w<br />
1 2<br />
DVR<br />
®<br />
Page<br />
Info<br />
G uid e<br />
Enter/Last<br />
The TV INPUT button can control<br />
the video signal—<strong>or</strong> “input”—your<br />
TV displays. Changing the input will<br />
change the source of the video displayed<br />
on your TV. TV inputs can include video<br />
from a VCR, DVD player, DVR, <strong>or</strong> a video<br />
camera.<br />
85<br />
6
86<br />
Chapter 6 Messages & <strong>Setup</strong><br />
Programming the TV POWER, VOLUME, and TV INPUT Buttons<br />
1. Go to the Remote Control screen. Press the TiVo button to go to TiVo Central ® .<br />
Select Messages & <strong>Setup</strong>, then Settings, then Remote Control & DVR Front Lights.<br />
Choose which device and/<strong>or</strong> functions you want to control:<br />
To Control:<br />
Choose:<br />
TV power, volume, and<br />
mute<br />
Remote Control-TV<br />
(power, volume, mute)<br />
TV input A/V receiver power,<br />
volume, and mute<br />
Remote Control-TV<br />
(TV Input)<br />
Remote Control-<br />
A/V Stereo System<br />
A/V receiver volume<br />
and mute <strong>only</strong><br />
Remote Control-<br />
A/V Stereo System<br />
2. Select the brand of your device. Using the UP/DOWN arrows, highlight the brand of<br />
the device you wish to control, then press SELECT. (If you have been using a<br />
universal TV remote control, select your TV <strong>or</strong> A/V receiver’s brand, <strong>no</strong>t the brand of<br />
the universal remote.) Next you’ll see a screen with four-digit codes.<br />
3. Prepare the remote control. Point the remote away from your DVR and cover the<br />
front end with your hand. Refer to the table below and determine which two buttons to<br />
press to prepare the remote. Press and hold the buttons simultaneously <strong>f<strong>or</strong></strong> about 5<br />
seconds (until the red light at the end of the remote control lights up and stays on when<br />
you release the buttons).<br />
To Control:<br />
Press the:<br />
TV power, volume,<br />
and mute<br />
TV POWER and<br />
TiVo buttons<br />
TV input A/V receiver power,<br />
volume, and mute<br />
TV INPUT and<br />
TiVo buttons<br />
TV POWER and<br />
TiVo buttons<br />
A/V receiver volume<br />
and mute <strong>only</strong><br />
MUTE and<br />
TiVo buttons<br />
TiVo Central Messages & <strong>Setup</strong> Settings Remote Control
4. Enter a code. <strong>Use</strong> the number buttons on the remote control to enter a four-digit code<br />
(starting with the first code in the list on the screen). After you press the fourth digit of<br />
the code, the red light on the end of the remote control should flash. If it doesn’t, try<br />
the next code.<br />
5. Test the code. Point the remote towards the TV and test the button:<br />
To Test the:<br />
Press the:<br />
TV power, volume,<br />
and mute<br />
TV input A/V receiver power,<br />
volume, and mute<br />
If pressing the button w<strong>or</strong>ks (e.g., turns the TV <strong>or</strong> A/V receiver off, <strong>or</strong> changes the TV<br />
input), the code is c<strong>or</strong>rect. If it does <strong>no</strong>t w<strong>or</strong>k, repeat steps 3 and 4 using the next code<br />
on the list. If <strong>no</strong>ne of the codes w<strong>or</strong>ks, per<strong>f<strong>or</strong></strong>m a code search (see below).<br />
Per<strong>f<strong>or</strong></strong>ming a Code Search<br />
If <strong>no</strong>ne of the codes listed allows you to control your device, a code search may detect the<br />
c<strong>or</strong>rect code. Per<strong>f<strong>or</strong></strong>ming a code search can take up to 20 minutes.<br />
1. Prepare the remote control. Point the remote away from your DVR and cover the<br />
front end with your hand.<br />
Refer to the table below and determine which two buttons to press to prepare the<br />
remote. Press and hold the buttons simultaneously <strong>f<strong>or</strong></strong> about 5 seconds (until the red<br />
light at the end of the remote lights up and stays lit when you release the buttons).<br />
To Control:<br />
Press the:<br />
Remote Control & DVR Front Lights<br />
A/V receiver volume<br />
and mute <strong>only</strong><br />
TV POWER button TV INPUT button TV POWER button MUTE button<br />
TV power, volume,<br />
and mute<br />
TV POWER and<br />
TiVo buttons<br />
TV input A/V receiver power,<br />
volume, and mute<br />
TV INPUT and<br />
TiVo buttons<br />
TV POWER and<br />
TiVo buttons<br />
TiVo Central Messages & <strong>Setup</strong> Settings Remote Control<br />
A/V receiver volume<br />
and mute <strong>only</strong><br />
MUTE and<br />
TiVo buttons<br />
87<br />
6
88<br />
Chapter 6 Messages & <strong>Setup</strong><br />
2. Enter the search code. Refer to the table below and use the number keys on your<br />
remote control to enter the appropriate code.<br />
To Test:<br />
Enter:<br />
TV power, volume,<br />
and mute<br />
TV input A/V receiver power,<br />
volume, and mute<br />
0999 0999 1999 1999<br />
A/V receiver volume<br />
and mute <strong>only</strong><br />
After you press the fourth digit of the code, the red light on the end of the remote<br />
control will flash twice, then remain on.<br />
3. Test the remote control. Point the remote control at the TV <strong>or</strong> A/V receiver. Press<br />
CHAN UP to test the first code. The test is successful if the TV <strong>or</strong> A/V receiver<br />
responds (by powering off, changing input, <strong>or</strong> muting, depending on the function you<br />
are trying to program). If there is <strong>no</strong> response, wait two <strong>or</strong> three seconds, then press<br />
CHAN UP again. Continue doing this until the TV <strong>or</strong> A/V receiver responds.<br />
When the TV <strong>or</strong> A/V receiver does respond, press ENTER to select the current code.<br />
The red light at the end of the remote control will flash three times to indicate that the<br />
remote control is properly coded to control your device.<br />
When the red light on the end of the remote control turns off, you have reached the end<br />
of the available codes.<br />
Un<strong>f<strong>or</strong></strong>tunately, due to the great variety of TVs and A/V receivers, some makes and<br />
models are <strong>no</strong>t compatible with your DVR’s remote control. If you reach the end of the<br />
available codes without finding a code that w<strong>or</strong>ks with your device, you will need to<br />
use your TV <strong>or</strong> A/V receiver’s remote to turn it on and off, and control the volume.<br />
TiVo Central Messages & <strong>Setup</strong> Settings Remote Control
Setting the DVR Switch<br />
If you have two DVRs, you can set up the remote so that it will <strong>only</strong> send signals to one of<br />
them at a time. If you don’t, when you delete programs on one DVR, you may accidentally<br />
delete programs on the other DVR. Or you may change channels on both DVRs, when you<br />
want to change the channel on <strong>only</strong> one.<br />
To avoid sending commands to both DVRs, you can set<br />
up each side of the DVR SWITCH to send signals to <strong>only</strong><br />
one DVR.<br />
1. Prepare the DVRs. Cover the area around the shiny,<br />
dark plastic window on the front of either DVR<br />
(call this one DVR #2). You can use a dark piece of cloth <strong>or</strong> a magazine—<strong>or</strong> anything<br />
else thick and opaque. This prevents DVR #2 from receiving signals.<br />
Point the remote control at the other DVR (DVR #1) and go to TiVo Central by<br />
pressing the TiVo button. Select Messages & <strong>Setup</strong>, then System In<strong>f<strong>or</strong></strong>mation. Press<br />
the DOWN arrow until you see the item “Remote Address.”<br />
2. Prepare the remote control. Move the DVR SWITCH to 1, then point the remote<br />
away from DVR #1 and cover the front end of the remote with your hand.<br />
Press and hold the PAUSE and TiVo buttons simultaneously (<strong>f<strong>or</strong></strong> about 5 seconds)<br />
until the red light at the end of the remote control comes on, remains steady, then stays<br />
on when you release the buttons.<br />
TiVo Central Messages & <strong>Setup</strong> Settings Remote Control<br />
Remote Control & DVR Front Lights<br />
DVR SWITCH<br />
Slo w<br />
1 2<br />
DVR<br />
1 2 3<br />
®<br />
DVRs from some manufacturers<br />
don’t respond to other<br />
manufacturers’ remotes. If you have two<br />
DVRs from different manufacturers, their<br />
remotes may <strong>no</strong>t conflict—and you may<br />
<strong>no</strong>t need to set up the DVR SWITCH.<br />
DVR #2 Shield at least this<br />
much of DVR #2<br />
Remote Address<br />
89<br />
6
90<br />
Chapter 6 Messages & <strong>Setup</strong><br />
®<br />
By default, all DVRs and remote<br />
controls have a Remote Address<br />
of “0” (zero). A remote control with a<br />
Remote Address of “0” will control any<br />
DVR, even one with an assigned code. A<br />
DVR set to “0” will respond to any remote<br />
control, even one with an assigned code.<br />
This prevents you from becoming<br />
accidentally “locked out” of controlling<br />
your DVRs.<br />
3. Assign side 1 on the DVR SWITCH to DVR #1. Point the remote control at DVR #1.<br />
<strong>Use</strong> the number buttons on the remote control to enter a number “1.” Press the RIGHT<br />
arrow. On the screen, the “Remote Address” updates from “0” to “1.”<br />
Press the TiVo button and go to TiVo Central. Side 1 <strong>no</strong>w controls DVR #1 <strong>only</strong>.<br />
Continue to the next step and set up side 2 of the DVR SWITCH. If you don’t, side 2<br />
will still control both DVRs.<br />
4. Prepare the DVRs again. Press the input, source, <strong>or</strong> TV/Video button you n<strong>or</strong>mally<br />
use, until your TV displays DVR #2. Then remove the cover from the plastic window<br />
of DVR #2 and cover the plastic window of DVR #1. Finally, go to the System<br />
In<strong>f<strong>or</strong></strong>mation screen of DVR #2, and press DOWN arrow until you see “Remote<br />
Address” displayed.<br />
5. Assign side 2 on the DVR SWITCH to DVR #2. Move the DVR SWITCH to 2. Repeat<br />
steps 2 and 3, above. Assign the number “2” to DVR #2, then press the TiVo button to<br />
go to TiVo Central.<br />
Now when you set the DVR SWITCH to 1, it will <strong>only</strong> control DVR #1—and when<br />
you set it to 2, it will <strong>only</strong> control DVR #2.<br />
Resetting the DVR SWITCH<br />
1. Move the DVR SWITCH to 1.<br />
2. Press and hold the PAUSE and TiVo buttons simultaneously <strong>f<strong>or</strong></strong> about three seconds,<br />
until the red light at the end of the remote control comes on and remains steady.<br />
3. Using the number buttons on the remote control, enter 0. The red light at the end of the<br />
remote control will flash to indicate that the DVR SWITCH (either 1 <strong>or</strong> 2) is reset.<br />
4. To complete the reset, move the DVR SWITCH to 2 and repeat steps 2 and 3.<br />
TiVo Central Messages & <strong>Setup</strong> Settings Remote Control
Resetting the Programmable Buttons<br />
If you make a mistake, <strong>or</strong> are having difficulty, you can reset the programmable buttons<br />
(TV POWER, VOLUME, MUTE, TV INPUT, and the DVR SWITCH). All the remote's<br />
buttons will return to the unprogrammed state of a new remote.<br />
1. Prepare the remote control. Point the remote away from your DVR and cover the<br />
front end with your hand.<br />
Press and hold the TV POWER button and TiVo button simultaneously until the red<br />
light at the end of the remote control comes on, remains steady, then stays on when<br />
you release the buttons.<br />
2. Press THUMBS DOWN three times, then press ENTER. (To cancel, press CLEAR<br />
be<strong>f<strong>or</strong></strong>e you press ENTER.)<br />
Front Panel Lights<br />
You can change the settings of the lights on the DVR’s front panel.<br />
DVR Front - LED Lights. The DVR has LED (light emitting diode) lights on its front panel<br />
to indicate when it is receiving power and when it is rec<strong>or</strong>ding a program. You can choose<br />
to turn off these lights.<br />
Even if you choose to turn off the front panel lights, one of the LEDs on the front panel<br />
will flash briefly when a button on the remote is pressed. This indicates that the DVR is<br />
receiving a signal from the remote.<br />
TiVo Central Messages & <strong>Setup</strong> Settings Remote Control<br />
Remote Control & DVR Front Lights<br />
91<br />
6
92<br />
Chapter 6 Messages & <strong>Setup</strong><br />
®<br />
Your DVR should NOT be used with a<br />
digital PBX phone system. Doing so<br />
may permanently damage your DVR’s<br />
modem and will void your warranty. See<br />
Chapter 9 <strong>f<strong>or</strong></strong> warranty in<strong>f<strong>or</strong></strong>mation.<br />
Phone & Netw<strong>or</strong>k <strong>Setup</strong><br />
The DVR makes regular connections to the TiVo service to get updates to the TiVo<br />
service, program in<strong>f<strong>or</strong></strong>mation <strong>f<strong>or</strong></strong> the program guide, Search by Title, WishList TM<br />
searches, and updates to Showcases and TiVolution ® Magazine. The connection usually<br />
lasts less than five minutes. You may receive service updates to your DVR from time to<br />
time. In such cases, it may last longer, but this happens rarely (a few times a year).<br />
A phone connection is required <strong>f<strong>or</strong></strong> Guided <strong>Setup</strong>, but after you complete Guided <strong>Setup</strong>,<br />
you’ll be able to connect your DVR to a home netw<strong>or</strong>k and use a shared Internet<br />
connection instead of a phone line to make connections to the TiVo service.<br />
On the Phone & Netw<strong>or</strong>k <strong>Setup</strong> screen, you can see details, including the time of the last<br />
successful connection to the TiVo service and last connection attempt, as well as the status<br />
of the last connection.<br />
The Phone & Netw<strong>or</strong>k <strong>Setup</strong> screen has different selections depending on whether you<br />
have connected a netw<strong>or</strong>k adapter to your DVR. If you haven’t connected a netw<strong>or</strong>k<br />
adapter, you will see these selections:<br />
Edit phone settings. This selection takes you to the Phone Dialing Options screen.<br />
Selections on this screen are explained in detail on page 94.<br />
Test phone connection. When you select this, a test connection to the TiVo service<br />
will start automatically. You may wish to use this option <strong>f<strong>or</strong></strong> troubleshooting <strong>or</strong> other<br />
unusual circumstances. Test connections usually <strong>only</strong> take a couple of minutes. When<br />
the connection has finished, press SELECT to continue.<br />
TiVo Central Messages & <strong>Setup</strong> Settings Phone & Netw<strong>or</strong>k
Connect to the TiVo service <strong>no</strong>w. N<strong>or</strong>mally, you do <strong>no</strong>t need to connect to the TiVo<br />
service manually. However, <strong>f<strong>or</strong></strong> troubleshooting <strong>or</strong> other unusual circumstances, you<br />
may wish to use this option. After you start the connection, the status indicat<strong>or</strong> reads<br />
“Starting Up” and will change as it goes through several stages. You can watch live<br />
TV, set up rec<strong>or</strong>dings, and search <strong>f<strong>or</strong></strong> programs while the connection is in progress.<br />
Troubleshooting. This selection takes you to the Troubleshooting screen, where you<br />
will find Phone Troubleshooting and Netw<strong>or</strong>k Troubleshooting steps among other<br />
troubleshooting selections.<br />
Learn about connecting to a home netw<strong>or</strong>k. Be<strong>f<strong>or</strong></strong>e you connect a netw<strong>or</strong>k adapter<br />
to your DVR, the Phone & Netw<strong>or</strong>k <strong>Setup</strong> screen will display this selection with a<br />
yellow star. See Chapter 7 <strong>f<strong>or</strong></strong> m<strong>or</strong>e in<strong>f<strong>or</strong></strong>mation about connecting your DVR to a<br />
home netw<strong>or</strong>k.<br />
After you connect a netw<strong>or</strong>k adapter to your DVR, you will <strong>no</strong> longer see “Learn about<br />
connecting to a home netw<strong>or</strong>k.” You will have two new selections available:<br />
Change connection type. This allows you to change how the DVR connects to the<br />
TiVo service, by phone <strong>or</strong> using your home netw<strong>or</strong>k’s shared Internet connection.<br />
Edit phone <strong>or</strong> netw<strong>or</strong>k settings. The Phone & Netw<strong>or</strong>k Settings screen has selections<br />
<strong>f<strong>or</strong></strong> Phone Dialing Options (see below <strong>f<strong>or</strong></strong> details), TCP/IP Settings, and Wireless<br />
Settings. See Chapter 7 <strong>f<strong>or</strong></strong> m<strong>or</strong>e in<strong>f<strong>or</strong></strong>mation about TCP/IP Settings and Wireless<br />
Settings.<br />
TiVo Central Messages & <strong>Setup</strong> Settings Phone & Netw<strong>or</strong>k<br />
Phone & Netw<strong>or</strong>k <strong>Setup</strong><br />
93<br />
6
94<br />
Chapter 6 Messages & <strong>Setup</strong><br />
®<br />
In some areas, local and long<br />
distance toll charges may apply.<br />
You are responsible <strong>f<strong>or</strong></strong> any telephone<br />
charges.<br />
Phone Dialing Options<br />
Change Dialing Options. You can change the following settings (if you make a mistake<br />
while entering a change, use the BACK button to backspace):<br />
Set Dial-In Number. <strong>Use</strong> this to change the number the DVR uses to make test calls<br />
and daily calls. To change it:<br />
1. Select “Set Dial-In Number.” The Area Code screen appears.<br />
2. <strong>Use</strong> the number keypad on the remote to set the area code, then press SELECT. If<br />
you change the area code, <strong>or</strong> if the DVR has <strong>no</strong>t made a daily call in the last twentyfour<br />
hours, the Update Numbers screen appears and the DVR calls the TiVo service<br />
to retrieve a list of local dial-in numbers. After the phone call, press SELECT. The<br />
Dial-In Number screen appears.<br />
3. <strong>Use</strong> the UP/DOWN arrow to choose one of the listed phone numbers. The DVR will<br />
use this number to connect to the TiVo service. Then press SELECT.<br />
If your area code has <strong>no</strong> access numbers, press LEFT arrow to return to the Area<br />
Code screen and try a nearby area code.<br />
4. The Dialing F<strong>or</strong>mat screen appears after you have chosen a dial-in number. You<br />
should use this screen to tell the DVR which dialing <strong>f<strong>or</strong></strong>mat to use. F<strong>or</strong> example:<br />
should the dial-in number be preceded by your area code and should a “1” precede<br />
the area code? In some areas, even local numbers must be dialed using the area<br />
code. Press SELECT to return to the Phone Dialing Options screen.<br />
To test your new dial-in number, select “Test Phone Connection Now.” The Test<br />
Phone Connection screen appears and a test phone call begins. When the call<br />
TiVo Central Messages & <strong>Setup</strong> Settings Phone & Netw<strong>or</strong>k
completes, you should see the message “Test Succeeded!” Press SELECT to return<br />
to Phone Dialing Options.<br />
Set Dial Prefix. <strong>Use</strong> this option if you n<strong>or</strong>mally dial a prefix be<strong>f<strong>or</strong></strong>e making a phone<br />
call (<strong>f<strong>or</strong></strong> example, if you need to dial “9” to get an outside line). <strong>Use</strong> the number keys<br />
on the remote control to enter the prefix. Press the PAUSE button after you have<br />
entered the prefix. This will insert a comma, which will create a two second pause<br />
after the prefix is dialed.<br />
Set Call Waiting Prefix. If you have call waiting, you may choose to disable it while<br />
the DVR is making a call, so that the DVR’s phone call is <strong>no</strong>t interrupted. If you do <strong>no</strong>t<br />
disable it, the DVR may drop its call and allow the incoming call to ring through,<br />
depending on your phone system. The DVR will then try its call again later. The most<br />
common code that phone companies use to disable call waiting is *70 (check with<br />
your phone company to find out how to disable call waiting in your area). Press<br />
CLEAR to enter a star (*). Press the PAUSE button after you have entered the prefix to<br />
insert a comma, which creates a two second pause after the prefix is dialed.<br />
Set Tone/Pulse. If your phone system uses pulse dialing, rather than tone dialing, you<br />
can change the setting to pulse here. (Today, most phone systems are tone.)<br />
Set “Phone Avail.” Detection. When Set ‘Phone Avail.’ Detection is on, the DVR can<br />
determine whether the phone line is in use by detecting voltage on the line. This allows<br />
it to avoid disrupting a call in progress (such as a<strong>no</strong>ther modem call).<br />
This setting is off by default. With ‘Phone Avail.’ Detection turned off, if you are on<br />
the phone when the DVR tries to call, you may hear a click on the line. If you have<br />
a<strong>no</strong>ther modem call in progress (on your computer <strong>or</strong> other device), that call may be<br />
disrupted if the DVR attempts to call the TiVo service. If you have a standard dial<br />
tone, and ‘Phone Avail.’ Detection is off, turn on Dial Tone Detection (below).<br />
TiVo Central Messages & <strong>Setup</strong> Settings Phone & Netw<strong>or</strong>k<br />
Phone & Netw<strong>or</strong>k <strong>Setup</strong><br />
95<br />
6
96<br />
Chapter 6 Messages & <strong>Setup</strong><br />
®<br />
With Dial Tone Detection and<br />
‘Phone Avail.’ Detection both turned<br />
off, if you happen to be talking on the<br />
phone when the DVR tries to call you will<br />
hear the modem dial and try to connect to<br />
the TiVo service.<br />
If you are experiencing “Failed, Line unavailable” err<strong>or</strong>s, <strong>or</strong> if the DVR is <strong>no</strong>t making<br />
daily calls, you may have a low-voltage phone system that the DVR can<strong>no</strong>t detect. In<br />
this case, it’s best to have ‘Phone Avail.’ Detection off.<br />
Set Dial Tone Detection. This setting is on by default. If you leave it on, the DVR will<br />
check <strong>f<strong>or</strong></strong> a dial tone be<strong>f<strong>or</strong></strong>e it starts dialing. However, if you have a <strong>no</strong>n-standard dial<br />
tone, <strong>or</strong> a stuttering dial tone (as some voice messaging systems have), the DVR will<br />
be unable to detect the dial tone and will <strong>no</strong>t make its call.<br />
Rest<strong>or</strong>e previous options. The DVR must make a successful test phone call be<strong>f<strong>or</strong></strong>e it<br />
will accept changes to Phone Dialing Options. If you want to rest<strong>or</strong>e your previous<br />
dialing options and continue past this screen without making a test phone call, select<br />
“Rest<strong>or</strong>e previous options.”<br />
TiVo Central Messages & <strong>Setup</strong> Settings Phone & Netw<strong>or</strong>k
System In<strong>f<strong>or</strong></strong>mation<br />
The System In<strong>f<strong>or</strong></strong>mation screen provides general in<strong>f<strong>or</strong></strong>mation about your DVR, including<br />
its service number, manufacturer, model number, software version used, st<strong>or</strong>age capacity,<br />
and in<strong>f<strong>or</strong></strong>mation about recent connections to the TiVo ® service. You’ll need some of this<br />
in<strong>f<strong>or</strong></strong>mation if you contact Customer Supp<strong>or</strong>t. You can use the CHAN UP/DOWN button<br />
to see the rest of the in<strong>f<strong>or</strong></strong>mation on the screen.<br />
TiVo Central Messages & <strong>Setup</strong> System In<strong>f<strong>or</strong></strong>mation<br />
System In<strong>f<strong>or</strong></strong>mation<br />
97<br />
6
98<br />
Chapter 6 Messages & <strong>Setup</strong><br />
Troubleshooting<br />
If you’re having trouble, <strong>or</strong> have any questions about your TiVo ® DVR, consult the<br />
troubleshooting steps available in Chapter 8 of this guide.<br />
The Troubleshooting screens provide tips that may help you troubleshoot various<br />
problems. <strong>Use</strong> CHAN UP/DOWN to see all of the text on the screens.<br />
Parental Controls Troubleshooting provides instructions <strong>f<strong>or</strong></strong> using Parental Controls.<br />
Phone Troubleshooting can help if your DVR’s phone connection is unsuccessful.<br />
Channel Troubleshooting provides channel changing help if you are using a satellite <strong>or</strong><br />
<strong>cable</strong> <strong>box</strong>. The tips at the top of the screen are <strong>f<strong>or</strong></strong> <strong>cable</strong> <strong>or</strong> satellite <strong>box</strong>es that attach to the<br />
DVR through a serial connection. <strong>Use</strong> CHAN UP/DOWN to see the second set of tips,<br />
which deal with <strong>cable</strong> <strong>or</strong> satellite <strong>box</strong>es using IR (infrared) connections to the DVR. You<br />
can also find tips in Chapter 8 and at www.tivo.com/supp<strong>or</strong>t.<br />
Netw<strong>or</strong>k Troubleshooting provides tips to help you with your DVR’s netw<strong>or</strong>k<br />
connection. See Chapter 7 <strong>f<strong>or</strong></strong> m<strong>or</strong>e in<strong>f<strong>or</strong></strong>mation.<br />
Transfer Troubleshooting helps if you are having trouble with Multi-Room Viewing. F<strong>or</strong><br />
m<strong>or</strong>e in<strong>f<strong>or</strong></strong>mation about Multi-Room Viewing, refer to the “Home Media Features Guide”<br />
available at www.tivo.com/guides.<br />
TiVo Central Messages & <strong>Setup</strong> Troubleshooting
Restart <strong>or</strong> Reset System<br />
You may need to restart the DVR as a routine troubleshooting step. Other options on this<br />
screen erase in<strong>f<strong>or</strong></strong>mation <strong>or</strong> rest<strong>or</strong>e <strong>or</strong>iginal fact<strong>or</strong>y settings. Selecting any of these options<br />
displays a warning. To continue, press THUMBS DOWN TM three times, then ENTER.<br />
Restart the TiVo DVR. Shuts down the DVR and starts it up again. It will <strong>no</strong>t affect<br />
rec<strong>or</strong>ded programs, Season Pass TM rec<strong>or</strong>dings, WishList TM searches, <strong>or</strong> TiVo Suggestions.<br />
Repeat Guided <strong>Setup</strong>. You will have to repeat Guided <strong>Setup</strong> if you move <strong>or</strong> if you<br />
change your <strong>cable</strong> <strong>or</strong> satellite provider. Repeating Guided <strong>Setup</strong> will reset the Channels<br />
You Receive and Fav<strong>or</strong>ites channel lists to the fact<strong>or</strong>y settings. It will <strong>no</strong>t affect rec<strong>or</strong>ded<br />
programs, Season Pass rec<strong>or</strong>dings, WishList searches, <strong>or</strong> TiVo Suggestions.<br />
Clear Thumb Ratings and Suggestions. Removes all Thumbs Up TM and Thumbs<br />
Down TM ratings and deletes the list of TiVo Suggestions. It does <strong>no</strong>t delete TiVo<br />
Suggestions that have been rec<strong>or</strong>ded and are in the Now Playing List.<br />
Clear program in<strong>f<strong>or</strong></strong>mation & To Do List. Clears all program in<strong>f<strong>or</strong></strong>mation, cancels all<br />
Season Pass rec<strong>or</strong>dings and everything in the To Do List, and removes all Thumbs Up and<br />
Thumbs Down ratings. It does <strong>no</strong>t delete programs in the Now Playing List. The DVR<br />
acquires new program in<strong>f<strong>or</strong></strong>mation during the next connection to the TiVo service.<br />
Completing this process may take over an hour.<br />
Clear & delete everything. Clears all Season Pass rec<strong>or</strong>dings, WishList searches,<br />
Thumbs Up and Thumbs Down ratings, TiVo Suggestions, Now Playing List rec<strong>or</strong>dings,<br />
program in<strong>f<strong>or</strong></strong>mation, the To Do List and setup in<strong>f<strong>or</strong></strong>mation, including the Channels You<br />
Receive and Fav<strong>or</strong>ite Channels lists. It also clears the current passw<strong>or</strong>d and resets Parental<br />
Controls to the fact<strong>or</strong>y specified default. Completing this process may take over an hour.<br />
TiVo Central Messages & <strong>Setup</strong> Restart <strong>or</strong> Reset System<br />
Restart <strong>or</strong> Reset System<br />
99<br />
6
100<br />
Chapter 6 Messages & <strong>Setup</strong><br />
®<br />
If you used <strong>only</strong> RF coaxial <strong>cable</strong>s to<br />
connect your program source<br />
(antenna <strong>or</strong> <strong>cable</strong>) to the DVR, and also to<br />
connect the DVR to your TV, Standby<br />
mode allows RF signal pass-through. This<br />
means you can watch channels on your RF<br />
program source using your TV’s tuner<br />
instead of the DVR’s tuner—and that<br />
means you can watch one channel while<br />
rec<strong>or</strong>ding a<strong>no</strong>ther! Keep in mind, you<br />
won’t have DVR functionality in live TV<br />
(pause, rewind, etc.) while the DVR is in<br />
Standby.<br />
Standby<br />
You can put your DVR in Standby mode by selecting Standby in Messages & <strong>Setup</strong>. To<br />
return to n<strong>or</strong>mal mode from Standby, press either the TiVo button the <strong>or</strong> LIVE TV button.<br />
(On some remotes, there is a POWER button that puts the DVR in Standby mode and<br />
takes it back out.)<br />
In Standby mode:<br />
Your TV shows a black screen and the lights on the front of the DVR go out.<br />
Programs that are being rec<strong>or</strong>ded <strong>or</strong> are scheduled to rec<strong>or</strong>d will still be rec<strong>or</strong>ded. (If a<br />
program is being rec<strong>or</strong>ded, the red light will turn on.)<br />
The DVR will still connect to the TiVo ® service. (If the DVR is connecting, the yellow<br />
light will turn on.)<br />
If you temp<strong>or</strong>arily turned off Parental Controls, Standby mode re-enables them. (See<br />
page 79 <strong>f<strong>or</strong></strong> m<strong>or</strong>e on Parental Controls.)<br />
The DVR will continue to save a p<strong>or</strong>tion of live TV—up to 30 minutes of<br />
programming.<br />
If live TV was paused when Standby was selected, the DVR will remain paused <strong>f<strong>or</strong></strong> up<br />
to 30 minutes.<br />
If the TiVo Live Guide was set to display a categ<strong>or</strong>y filter, filtering will be turned off.<br />
TiVo Central Messages & <strong>Setup</strong> Standby
CHAPTER 7<br />
Connecting to a Home<br />
Netw<strong>or</strong>k <strong>f<strong>or</strong></strong> Home Media<br />
Features<br />
Introduction to Home Media Features 102<br />
Home Netw<strong>or</strong>ks 106<br />
Connecting to a Home Netw<strong>or</strong>k Using a Wireless Netw<strong>or</strong>k Adapter 108<br />
Connecting to a Home Netw<strong>or</strong>k Using Wired (Ethernet) 110<br />
Completing the DVR’s Netw<strong>or</strong>k Settings 112
102<br />
Chapter 7 Connecting to a Home Netw<strong>or</strong>k<br />
®<br />
If you do <strong>no</strong>t already have a home<br />
netw<strong>or</strong>k and you want to learn how<br />
to create one, Linksys — a leading<br />
manufacturer of wireless and always-on<br />
Internet connection netw<strong>or</strong>king<br />
equipment — provides valuable<br />
in<strong>f<strong>or</strong></strong>mation on its web site at:<br />
www.linksys.com/edu/.<br />
Other online resources also describe the<br />
steps and types of equipment used to set<br />
up a home netw<strong>or</strong>k. You can try going to a<br />
popular search engine like Google<br />
(www.google.com) <strong>or</strong> Yahoo<br />
(www.yahoo.com) and typing the phrase,<br />
“setting up a home netw<strong>or</strong>k,” in the<br />
search field. You will obtain a number of<br />
search results (links) that supply<br />
guidance to help you set up your home<br />
netw<strong>or</strong>k.<br />
Introduction to Home Media Features<br />
This chapter shows you how to connect your TiVo ® DVR to a home netw<strong>or</strong>k. Doing so<br />
gives you brand new ways to use your DVR as a digital home entertainment center.<br />
Connect it to a home netw<strong>or</strong>k and enjoy:<br />
Multi-Room Viewing <strong>–</strong> Rec<strong>or</strong>d programs in the living room and watch them in the<br />
bedroom<strong>–</strong><strong>or</strong> vice versa. See page 103.<br />
If you don’t have a home netw<strong>or</strong>k, you can connect two DVRs to each other <strong>f<strong>or</strong></strong> Multi-<br />
Room Viewing. This setup is described online at www.tivo.com/supp<strong>or</strong>t. (Search <strong>f<strong>or</strong></strong><br />
“connecting two DVRs without a home netw<strong>or</strong>k.”)<br />
Digital Music Player <strong>–</strong> <strong>Use</strong> the home entertainment center in your living room to<br />
listen to the digital MP3 music collection st<strong>or</strong>ed on your computer. See page 104.<br />
Digital Photo Viewer <strong>–</strong> View slideshows of digital photos st<strong>or</strong>ed on your computer<br />
without huddling around a small computer monit<strong>or</strong>. See page 104.<br />
These Home Media Features are included with the TiVo ® service. Connecting your DVR<br />
to a home netw<strong>or</strong>k allows you to take advantage of them. F<strong>or</strong> m<strong>or</strong>e in<strong>f<strong>or</strong></strong>mation about<br />
using these features, download the Home Media Features Guide at www.tivo.com/guides.<br />
Connect to the TiVo service via broadband. If your home netw<strong>or</strong>k includes a broadband<br />
Internet connection (<strong>f<strong>or</strong></strong> example, DSL <strong>or</strong> a <strong>cable</strong> modem), your DVR can use that<br />
connection, instead of a phone line, <strong>f<strong>or</strong></strong> regular connections to the TiVo service. (The<br />
DVR will still need a standard phone line connection <strong>f<strong>or</strong></strong> Guided <strong>Setup</strong>.)<br />
In addition, with an always-on Internet connection, you can use Online Scheduling (see<br />
page 57) <strong>f<strong>or</strong></strong> any program airing m<strong>or</strong>e than an hour after you request it. (If your DVR is<br />
using a phone line, processing an Online Scheduling request can take up to 36 hours.)
Multi-Room Viewing<br />
Multi-Room Viewing lets you transfer programs from one TiVo ® DVR in your home to<br />
a<strong>no</strong>ther DVR. To use Multi-Room Viewing, you need at least two DVRs, and:<br />
The DVRs must be on the same TiVo service account. (The TiVo service subscription<br />
<strong>f<strong>or</strong></strong> each DVR must be owned by the same person.)<br />
The DVRs must be connected to the same home netw<strong>or</strong>k. F<strong>or</strong> m<strong>or</strong>e in<strong>f<strong>or</strong></strong>mation, see<br />
“Home Netw<strong>or</strong>ks” on page 106.<br />
Each DVR must have active TiVo service, and Multi-Room Viewing enabled at<br />
www.tivo.com/manage.<br />
After you have connected the DVRs to your home netw<strong>or</strong>k, the Now Playing list of each<br />
DVR will show the names of the others.<br />
How to Transfer a Program<br />
Using Multi-Room Viewing couldn’t be easier. To transfer a program from one DVR<br />
within your home to a<strong>no</strong>ther DVR:<br />
1. In Now Playing on the receiving DVR, select the DVR containing the program you<br />
want to transfer. This will be the sending DVR.<br />
2. Press SELECT on the name of a program you want to transfer. (You can<strong>no</strong>t transfer a<br />
program while it is rec<strong>or</strong>ding on the sending DVR.) Then select “Watch on this TV.”<br />
3. On the Getting Program screen, you can choose to watch the program as it is<br />
transferring, <strong>or</strong> continue browsing Now Playing on the sending DVR. If you watch the<br />
program as it is transferring, you might experience intermittent delays in the transfer.<br />
You may want to complete the transfer be<strong>f<strong>or</strong></strong>e viewing the program.<br />
Multi-Room Viewing<br />
103<br />
7
104<br />
Chapter 7 Connecting to a Home Netw<strong>or</strong>k<br />
Digital Music & Photos<br />
The Digital Music Player and Digital Photo Viewer let you use your DVR to play MP3<br />
music files and playlists, and view photos that are st<strong>or</strong>ed on a computer. Now you can<br />
enjoy your digital music collection on the best sound system in the house, <strong>or</strong> watch<br />
slideshows of digital photos in the com<strong>f<strong>or</strong></strong>t of your living room.<br />
To use the Digital Music Player <strong>or</strong> Digital Photo Viewer, you need:<br />
A DVR with a subscription to the TiVo service.<br />
A computer connected to the DVR via a home netw<strong>or</strong>k (see page 106).<br />
The TiVo Desktop application that makes music and photos on the computer available<br />
to a DVR.<br />
TiVo Desktop<br />
The TiVo Desktop application is a small, easy-to-use program <strong>f<strong>or</strong></strong> your computer that you<br />
can download from www.tivo.com/desktop. TiVo Desktop is available <strong>f<strong>or</strong></strong> the following<br />
operating systems:<br />
Windows 98, ME, 2000, XP<br />
Macintosh OS X v10.2 <strong>or</strong> later<br />
Music File Types. TiVo Desktop plays music in the MP3 <strong>f<strong>or</strong></strong>mat, and supp<strong>or</strong>ts playlists in<br />
the following <strong>f<strong>or</strong></strong>mats used by common music players: M3U, PLS, ASX, and B4S. On a<br />
Mac, TiVo Desktop w<strong>or</strong>ks with music <strong>or</strong>ganized by iTunes 3.0 <strong>or</strong> later.<br />
Photo File Types. TiVo Desktop <strong>f<strong>or</strong></strong> Windows w<strong>or</strong>ks with digital photos in these <strong>f<strong>or</strong></strong>mats:<br />
BMP, DIB, GIF, JPG, PNG. TiVo Desktop <strong>f<strong>or</strong></strong> Mac w<strong>or</strong>ks with digital photos <strong>or</strong>ganized<br />
by iPhoto 2.0 in these <strong>f<strong>or</strong></strong>mats: JPG, GIF, BMP, TIFF, and PNG.
Playing Your Music and Viewing Your Photos<br />
Using the Digital Music Player and Digital Photo Viewer is easy. You can find Music &<br />
Photos on TiVo Central ® .<br />
Listening to music on the DVR. On your computer, use the TiVo Desktop application to<br />
“publish” music that you want to access through your DVR. (Publishing is a process that<br />
makes digital music and photos available to your DVR. It is usually as simple as selecting<br />
music and clicking a Publish button.)<br />
On your DVR, go to TiVo Central and select Music & Photos, then select the music option<br />
<strong>f<strong>or</strong></strong> your computer.<br />
You should see a list of music you published with TiVo Desktop. Select the music you<br />
want to listen to and press the PLAY ( ) button. In a few seconds, the music plays.<br />
P l a y<br />
Viewing photos on the DVR. On your computer, use the TiVo Desktop application to<br />
“publish” photos that you want to access through your DVR. (Publishing is a process that<br />
makes digital music and photos available to your DVR. It is usually as simple as selecting<br />
photos and clicking a Publish button.)<br />
On your DVR, go to TiVo Central and select Music & Photos, then select the photos<br />
option <strong>f<strong>or</strong></strong> your computer.<br />
You should see a list of the photos you published with TiVo Desktop. Select the photos<br />
you want to view and press the PLAY ( ) button. In a few seconds, the photos start to<br />
appear on your television screen.<br />
P l a y<br />
Digital Music & Photos<br />
105<br />
7
106<br />
Chapter 7 Connecting to a Home Netw<strong>or</strong>k<br />
The USB p<strong>or</strong>ts on the back of a TiVo DVR<br />
A USB Wireless netw<strong>or</strong>k adapter<br />
(yours may look different)<br />
An Ethernet USB netw<strong>or</strong>k adapter<br />
(yours may look different)<br />
Home Netw<strong>or</strong>ks<br />
When we refer to a “home netw<strong>or</strong>k,” we mean two <strong>or</strong> m<strong>or</strong>e devices (probably computers),<br />
connected to a router. Connecting DVRs to a home netw<strong>or</strong>k is the best way to take full<br />
advantage of your DVR’s home media features. (F<strong>or</strong> details about these features,<br />
download the Home Media Features Guide at www.tivo.com/guides.)<br />
USB P<strong>or</strong>ts, Wireless and Wired Netw<strong>or</strong>k Adapters<br />
On the back of your DVR, you will see two USB p<strong>or</strong>ts that can be used to connect either a<br />
wireless <strong>or</strong> a wired (Ethernet) USB netw<strong>or</strong>k adapter. Although you can use either of these<br />
p<strong>or</strong>ts, <strong>only</strong> one netw<strong>or</strong>k adapter can be connected at a time.<br />
USB netw<strong>or</strong>k adapters let a DVR use a USB p<strong>or</strong>t to communicate with other netw<strong>or</strong>ked<br />
devices. Whether you choose wireless <strong>or</strong> wired (Ethernet), you will need a netw<strong>or</strong>k<br />
adapter <strong>f<strong>or</strong></strong> each DVR you wish to connect.<br />
TiVo has recommendations <strong>f<strong>or</strong></strong> compatible models of wireless and wired (Ethernet)<br />
netw<strong>or</strong>k adapters. Be sure to check TiVo online supp<strong>or</strong>t at www.tivo.com/adapters <strong>f<strong>or</strong></strong> the<br />
latest in<strong>f<strong>or</strong></strong>mation.
Choosing Wireless <strong>or</strong> Wired (Ethernet)<br />
You can connect your DVR to your home netw<strong>or</strong>k using either a wireless <strong>or</strong> wired<br />
(Ethernet) connection. Here are some <strong>no</strong>tes to help you choose which approach you want<br />
to use.<br />
Wired (Ethernet). Ethernet connections are generally faster, less expensive, m<strong>or</strong>e<br />
reliable and less susceptible to interference than wireless netw<strong>or</strong>ks. Using Multi-Room<br />
Viewing to transfer a program is quicker over wired (Ethernet) than it would be over a<br />
wireless connection.<br />
To connect a DVR to a wired (Ethernet) netw<strong>or</strong>k, see “Connecting to a Home Netw<strong>or</strong>k<br />
Using Wired (Ethernet)” on page 110<br />
Wireless. Connecting your DVR wirelessly may be m<strong>or</strong>e convenient because you do<br />
<strong>no</strong>t have to run a <strong>cable</strong> from your DVR to a<strong>no</strong>ther device. However, wireless netw<strong>or</strong>ks<br />
are typically m<strong>or</strong>e expensive and slower than Ethernet netw<strong>or</strong>ks, and may be subject to<br />
interference from appliances such as microwaves and 2.4 GHz c<strong>or</strong>dless phones. To<br />
connect wirelessly, you must have a wireless access point <strong>or</strong> wireless router on your<br />
home netw<strong>or</strong>k. On most home netw<strong>or</strong>ks, the wireless access point is part of an<br />
integrated hub/router and home gateway.<br />
To connect a DVR to a home netw<strong>or</strong>k wirelessly, see “Connecting to a Home Netw<strong>or</strong>k<br />
Using a Wireless Netw<strong>or</strong>k Adapter” on page 108.<br />
®<br />
®<br />
Home Netw<strong>or</strong>ks<br />
Do <strong>no</strong>t use the CDs that are included<br />
with your netw<strong>or</strong>k adapters to set<br />
up your DVRs. These CDs are intended to<br />
load drivers and netw<strong>or</strong>k adapter software<br />
on your personal computer.<br />
®<br />
If you are connecting two DVRs to a<br />
home netw<strong>or</strong>k to use Multi-Room<br />
Viewing, using a wired (Ethernet)<br />
connection <strong>f<strong>or</strong></strong> one of them may speed up<br />
program transfers.<br />
Check TiVo online supp<strong>or</strong>t at<br />
www.tivo.com/adapters <strong>f<strong>or</strong></strong> the<br />
latest adapter recommendations.<br />
107<br />
7
108<br />
Chapter 7 Connecting to a Home Netw<strong>or</strong>k<br />
®<br />
<br />
The <strong>cable</strong> may already be attached<br />
to your wireless netw<strong>or</strong>k adapter.<br />
Connecting to a Home Netw<strong>or</strong>k Using a<br />
Wireless Netw<strong>or</strong>k Adapter<br />
<strong>Use</strong> this example if you have a home netw<strong>or</strong>k that includes a wireless access point (WAP)<br />
<strong>or</strong> wireless router, <strong>or</strong> <strong>f<strong>or</strong></strong> each DVR in a wireless peer-to-peer netw<strong>or</strong>k. You can leave<br />
your DVR plugged in while you connect a netw<strong>or</strong>k adapter.<br />
To connect a wireless netw<strong>or</strong>k adapter to your DVR:<br />
<br />
1. Connect to the adapter. If it is <strong>no</strong>t already attached, connect one end of the USB<br />
<strong>cable</strong> that came with your wireless netw<strong>or</strong>k adapter to the p<strong>or</strong>t located on the back of<br />
the adapter.<br />
2. Connect to the DVR. Connect the other end of the USB <strong>cable</strong> to the USB p<strong>or</strong>t on the<br />
DVR. The power light on the wireless adapter may come on be<strong>f<strong>or</strong></strong>e the <strong>cable</strong> is<br />
completely inserted into the USB slot. Make sure you push the <strong>cable</strong> all the way into<br />
the USB slot.
Connecting to a Home Netw<strong>or</strong>k Using a Wireless Netw<strong>or</strong>k Adapter<br />
3. Position the adapter. Position the adapter in an open location so that the signal is<br />
easily transmitted. F<strong>or</strong> example, you might place the adapter on top of your<br />
entertainment center. Do <strong>no</strong>t place the wireless adapter near the DVR’s power supply<br />
<strong>or</strong> on a power strip <strong>or</strong> surge protect<strong>or</strong>. Doing so can cause signal interference <strong>or</strong> reduce<br />
signal strength.<br />
4. Firmware update. When you first connect a wireless netw<strong>or</strong>k adapter to your DVR,<br />
you may see a screen that says “Firmware Update Required.” This means your DVR<br />
has a software update <strong>f<strong>or</strong></strong> the wireless netw<strong>or</strong>k adapter you have connected. Select the<br />
option to update. This should <strong>no</strong>t take m<strong>or</strong>e than a minute <strong>or</strong> two.<br />
During the update, do <strong>no</strong>t disconnect the netw<strong>or</strong>k adapter wires <strong>or</strong> the power to the<br />
DVR. Either action might damage the adapter.<br />
5. Imp<strong>or</strong>tant message. The first time you press the TiVo button after connecting a<br />
netw<strong>or</strong>k adapter, you will see an Imp<strong>or</strong>tant Message. Review it, then press SELECT<br />
on the remote control to go to TiVo Central.<br />
6. Next Step. Go to “Completing the DVR’s Netw<strong>or</strong>k Settings” on page 112.<br />
109<br />
7
110<br />
Chapter 7 Connecting to a Home Netw<strong>or</strong>k<br />
Connecting to a Home Netw<strong>or</strong>k Using Wired<br />
(Ethernet)<br />
This example shows you how to connect a DVR to a netw<strong>or</strong>k hub using a wired (Ethernet)<br />
netw<strong>or</strong>k adapter. You can leave your DVR plugged in while you connect a netw<strong>or</strong>k<br />
adapter.<br />
To connect a wired (Ethernet) netw<strong>or</strong>k adapter to your DVR and your netw<strong>or</strong>k hub, follow<br />
these steps:<br />
<br />
<br />
1. Connect to the DVR. Connect the USB end of the Ethernet adapter to the USB p<strong>or</strong>t on<br />
the DVR.<br />
2. Connect Ethernet to the adapter. Plug one end of an Ethernet <strong>cable</strong> into the Ethernet<br />
adapter.<br />
USB-<br />
Ethernet
Connecting to a Home Netw<strong>or</strong>k Using Wired (Ethernet)<br />
3. Connect Ethernet to the hub <strong>or</strong> router. Plug the other end of the Ethernet <strong>cable</strong> into<br />
your home netw<strong>or</strong>k’s hub <strong>or</strong> router.<br />
4. Imp<strong>or</strong>tant message. The first time you press the TiVo button after connecting a<br />
netw<strong>or</strong>k adapter, you will see an Imp<strong>or</strong>tant Message. Review it, then press SELECT<br />
on the remote control to go to TiVo Central.<br />
5. Next Step. If your home netw<strong>or</strong>k has DHCP, wait <strong>f<strong>or</strong></strong> a few minutes <strong>f<strong>or</strong></strong> your DVR to<br />
automatically complete its netw<strong>or</strong>k settings, and then you’re done! If your netw<strong>or</strong>k<br />
does <strong>no</strong>t have DHCP, <strong>or</strong> you are having trouble establishing a netw<strong>or</strong>k connection, go<br />
to “Completing the DVR’s Netw<strong>or</strong>k Settings” on page 112. (DHCP is described in<br />
“Basic TCP/IP Concepts” on page 116.)<br />
111<br />
7
112<br />
Chapter 7 Connecting to a Home Netw<strong>or</strong>k<br />
®<br />
Many of the screens you use to<br />
complete Wireless Settings <strong>or</strong><br />
TCP/IP Settings have the same title.<br />
However, they have different subtitles. In<br />
this section, each screen is identified by<br />
its subtitle.<br />
Screen subtitle<br />
Completing the DVR’s Netw<strong>or</strong>k Settings<br />
If your DVR is connected to a wired (Ethernet) netw<strong>or</strong>k adapter, skip to“TCP/IP<br />
Settings <strong>f<strong>or</strong></strong> a Home Netw<strong>or</strong>k” on page 116.<br />
Wireless Settings <strong>f<strong>or</strong></strong> a Home Netw<strong>or</strong>k<br />
If you have a wireless home netw<strong>or</strong>k, and have connected a wireless netw<strong>or</strong>k adapter to<br />
your DVR, as described on page 108, you are ready to complete Wireless Settings <strong>f<strong>or</strong></strong> a<br />
home netw<strong>or</strong>k.<br />
To get to Wireless Settings: press the TiVo button on the remote control to go to TiVo<br />
Central, then select Messages & <strong>Setup</strong>, then Settings, then Phone & Netw<strong>or</strong>k <strong>Setup</strong>, then<br />
“Edit phone <strong>or</strong> netw<strong>or</strong>k settings,” then Wireless Settings.<br />
Wireless Checklist<br />
This is the first Wireless Settings screen you will see. It lists in<strong>f<strong>or</strong></strong>mation you need to<br />
complete wireless settings. You can find all this in<strong>f<strong>or</strong></strong>mation in the configuration settings<br />
of your netw<strong>or</strong>k’s wireless access point <strong>or</strong> router.<br />
If your wireless netw<strong>or</strong>k does <strong>no</strong>t use encryption (WEP), then you <strong>only</strong> need to provide a<br />
wireless netw<strong>or</strong>k name; you do <strong>no</strong>t need to provide a passw<strong>or</strong>d <strong>f<strong>or</strong></strong>mat <strong>or</strong> passw<strong>or</strong>d.<br />
When you are ready to continue, press SELECT on your remote control.<br />
Wireless Connection and Wireless Netw<strong>or</strong>k Name<br />
You must <strong>no</strong>w provide the name of your wireless netw<strong>or</strong>k. Wireless netw<strong>or</strong>ks have a<br />
netw<strong>or</strong>k name (sometimes called an SSID <strong>f<strong>or</strong></strong> service set identifier). A wireless netw<strong>or</strong>k<br />
may be open <strong>or</strong> closed. Open wireless netw<strong>or</strong>ks broadcast their netw<strong>or</strong>k names, allowing
devices in their vicinity to identify them automatically. Closed wireless netw<strong>or</strong>ks do <strong>no</strong>t<br />
broadcast their netw<strong>or</strong>k names, so they can<strong>no</strong>t be identified automatically.<br />
This screen lists the names of nearby wireless netw<strong>or</strong>ks that your DVR has been able to<br />
identify. If you have a wireless router (<strong>or</strong> wireless access point) and you did <strong>no</strong>t set a<br />
netw<strong>or</strong>k name, your netw<strong>or</strong>k is probably using a name supplied by the router’s<br />
manufacturer.<br />
If your netw<strong>or</strong>k’s name is listed, select it. (You may be able to see m<strong>or</strong>e names by<br />
pressing CHAN DOWN to scroll down the screen.)<br />
Otherwise, select “Connect to a closed wireless netw<strong>or</strong>k”:<br />
On the Wireless Netw<strong>or</strong>k Name screen, enter the name of your netw<strong>or</strong>k using the<br />
arrow buttons on your remote to highlight a character. Then press SELECT.<br />
You must use capital and lowercase letters appropriately. F<strong>or</strong> example, to find a<br />
netw<strong>or</strong>k named “My Netw<strong>or</strong>k” you must capitalize the “M” and “N”; entering “my<br />
netw<strong>or</strong>k” would <strong>no</strong>t w<strong>or</strong>k. <strong>Use</strong> THUMBS UP and THUMBS DOWN to change to<br />
uppercase <strong>or</strong> lowercase. Select “Done entering text” when you are finished.<br />
If the DVR detects that your wireless netw<strong>or</strong>k does <strong>no</strong>t use encryption (WEP) you will see<br />
the Confirm Settings screen, described on page 115.<br />
Wireless Passw<strong>or</strong>d F<strong>or</strong>mat<br />
You see the Wireless Passw<strong>or</strong>d F<strong>or</strong>mat screen if there is a chance that your wireless<br />
netw<strong>or</strong>k uses WEP encryption.<br />
WEP. WEP is a kind of encryption used by wireless netw<strong>or</strong>ks to improve their security.<br />
There are different levels of WEP encryption, typically called 40-, 64-, 104-, 128-, <strong>or</strong> 256bit<br />
encryption. Encryption at higher levels offers better security. At the highest levels<br />
Completing the DVR’s Netw<strong>or</strong>k Settings<br />
113<br />
7
114<br />
Chapter 7 Connecting to a Home Netw<strong>or</strong>k<br />
(104-bit <strong>or</strong> above), WEP encryption may slow down the transfer of programs from one<br />
DVR to a<strong>no</strong>ther by a small amount. WEP is usually turned on <strong>or</strong> off through the<br />
configuration settings of a wireless access point <strong>or</strong> router. If your netw<strong>or</strong>k uses WEP, then<br />
it has a passw<strong>or</strong>d <strong>or</strong> “key.”<br />
To connect a DVR to a netw<strong>or</strong>k that uses encryption, you need to provide:<br />
A wireless passw<strong>or</strong>d <strong>f<strong>or</strong></strong>mat. WEP passw<strong>or</strong>ds may be hexadecimal (a combination of<br />
letters from A-F and numbers from 0-9), <strong>or</strong> alphanumeric (a combination of letters<br />
from A-Z and numbers from 0-9). If your netw<strong>or</strong>k has both an alphanumeric and a<br />
hexadecimal passw<strong>or</strong>d, we strongly recommend you use the hexadecimal passw<strong>or</strong>d.<br />
A wireless passw<strong>or</strong>d. It does <strong>no</strong>t matter whether the letters of a hexadecimal<br />
passw<strong>or</strong>d are uppercase <strong>or</strong> lowercase, but <strong>f<strong>or</strong></strong> alphanumeric passw<strong>or</strong>ds, capitalization<br />
is imp<strong>or</strong>tant. F<strong>or</strong> example, if the passw<strong>or</strong>d is “MyPassw<strong>or</strong>d,” then entering<br />
“mypassw<strong>or</strong>d” will <strong>no</strong>t w<strong>or</strong>k. Some hexadecimal passw<strong>or</strong>ds have <strong>only</strong> numbers.<br />
A level of wireless encryption. If you specify an alphanumeric passw<strong>or</strong>d, you must<br />
also specify a level of wireless encryption. DVRs are compatible with 40, 64, 104, and<br />
128-bit encryption; they are <strong>no</strong>t currently compatible with 256-bit encryption.<br />
Choose a <strong>f<strong>or</strong></strong>mat <strong>or</strong> select “The wireless netw<strong>or</strong>k doesn’t use a passw<strong>or</strong>d.” If you select<br />
“The wireless netw<strong>or</strong>k doesn’t use a passw<strong>or</strong>d,” you will see the Confirm Settings screen,<br />
described on page 115.
Wireless Passw<strong>or</strong>d — Alphanumeric <strong>or</strong> Hexadecimal<br />
Hexadecimal (preferred). Enter a hexadecimal passw<strong>or</strong>d using the arrow buttons on<br />
the remote to highlight a character. Then press SELECT. It does <strong>no</strong>t matter if a letter is<br />
uppercase <strong>or</strong> lowercase. Some hexadecimal passw<strong>or</strong>ds contain <strong>only</strong> numbers.<br />
Alphanumeric. Enter an alphanumeric passw<strong>or</strong>d using the arrow buttons on your<br />
remote to highlight a character. Then press SELECT. You must use capital and<br />
lowercase letters appropriately. F<strong>or</strong> example, if your passw<strong>or</strong>d is “MyPassw<strong>or</strong>d”,<br />
entering “mypassw<strong>or</strong>d” will <strong>no</strong>t w<strong>or</strong>k. <strong>Use</strong> THUMBS UP and THUMBS DOWN to<br />
change to uppercase <strong>or</strong> lowercase. Select “Done entering text” when you are finished.<br />
Wireless Encryption<br />
If you entered an alphanumeric passw<strong>or</strong>d, you will see this screen. Select the level of<br />
encryption used by your wireless netw<strong>or</strong>k. If your netw<strong>or</strong>k uses 104-bit encryption, select<br />
128-bit encryption. DVRs are <strong>no</strong>t currently compatible with 256-bit encryption.<br />
Confirm Settings<br />
Select “Accept these settings” if they are c<strong>or</strong>rect. F<strong>or</strong> steps you can take to troubleshoot<br />
issues with your wireless connection, see “Questions About Netw<strong>or</strong>king” on page 141.<br />
Change Connection Type?<br />
You see this screen if you are <strong>no</strong>t using a shared Internet connection to connect to the<br />
TiVo service. If your netw<strong>or</strong>k has access to an always-on broadband connection, select<br />
“Yes” to use it to connect to the TiVo service instead of a phone line.<br />
Completing the DVR’s Netw<strong>or</strong>k Settings<br />
115<br />
7
116<br />
Chapter 7 Connecting to a Home Netw<strong>or</strong>k<br />
Next Step<br />
You have completed wireless settings. If your home netw<strong>or</strong>k has DHCP, and you do <strong>no</strong>t<br />
have a DHCP Client ID, the DVR will automatically complete netw<strong>or</strong>k setup. We<br />
recommend that you confirm the DHCP settings of your netw<strong>or</strong>k by continuing with<br />
“TCP/IP Settings <strong>f<strong>or</strong></strong> a Home Netw<strong>or</strong>k,” below.<br />
If your home netw<strong>or</strong>k does <strong>no</strong>t have DHCP, <strong>or</strong> if you have a DHCP client ID, continue<br />
with “TCP/IP Settings <strong>f<strong>or</strong></strong> a Home Netw<strong>or</strong>k.”<br />
TCP/IP Settings <strong>f<strong>or</strong></strong> a Home Netw<strong>or</strong>k<br />
You are ready to complete TCP/IP settings if:<br />
You are connecting your DVR to your home netw<strong>or</strong>k wirelessly and have already<br />
completed “Wireless Settings <strong>f<strong>or</strong></strong> a Home Netw<strong>or</strong>k” on page 112, <strong>or</strong><br />
You have a wired (Ethernet) adapter connecting your DVR to your home netw<strong>or</strong>k.<br />
Basic TCP/IP Concepts<br />
This section describes a few basic TCP/IP concepts. If you are familiar with home<br />
netw<strong>or</strong>king, you can skip to “Begin TCP/IP Settings” on page 117.<br />
IP Address. TCP/IP settings are used to manage IP addresses on a netw<strong>or</strong>k. An IP<br />
address is a number that identifies a single device on a netw<strong>or</strong>k (in much the same way<br />
that a home address identifies a single home in a town). IP addresses use four numbers<br />
separated by periods. Each number can be from 0 to 255. Some example IP addresses<br />
are: ‘192.168.0.1’ and ‘10.8.3.25’.<br />
DHCP and Static IP Addresses. DHCP automatically assigns IP addresses to devices<br />
on a netw<strong>or</strong>k. Most home netw<strong>or</strong>ks include a router <strong>or</strong> home gateway that has DHCP.<br />
If your netw<strong>or</strong>k has DHCP, <strong>or</strong> you are creating a peer-to-peer netw<strong>or</strong>k, your DVR can<br />
obtain its IP address automatically. An IP address assigned by DHCP is called a
dynamic IP address because it may change automatically as devices are added to <strong>or</strong><br />
removed from the netw<strong>or</strong>k.<br />
If your netw<strong>or</strong>k does <strong>no</strong>t have DHCP, you must specify an IP address <strong>f<strong>or</strong></strong> your DVR. An<br />
IP address you specify is considered a static IP address, because it will <strong>no</strong>t change until<br />
you specify a new one.<br />
If you assign a static IP address to your DVR, remember that:<br />
The first three sets of numbers in the IP address usually must match the first sets of<br />
numbers in the IP address used by a<strong>no</strong>ther device on the netw<strong>or</strong>k (<strong>f<strong>or</strong></strong> example, a<br />
computer). The first three sets of numbers <strong>f<strong>or</strong></strong> IP addresses on a home netw<strong>or</strong>k are<br />
usually: ‘192.168.0’ <strong>or</strong> ‘192.168.1’.<br />
If the first three numbers match those of a<strong>no</strong>ther IP address, the last number has to be<br />
unique.<br />
F<strong>or</strong> example, two IP addresses <strong>f<strong>or</strong></strong> devices on the same netw<strong>or</strong>k might be ‘192.168.1.5’<br />
and ‘192.168.1.6’.<br />
Begin TCP/IP Settings<br />
To get to TCP/IP Settings: press the TiVo button on the remote control to go to TiVo<br />
Central, then select Messages & <strong>Setup</strong>, then Settings, then Phone & Netw<strong>or</strong>k <strong>Setup</strong>, then<br />
“Edit phone <strong>or</strong> netw<strong>or</strong>k settings,” then TCP/IP Settings.<br />
TCP/IP Connection<br />
On the first screen in TCP/IP Settings you specify how your DVR gets an IP address. On<br />
this screen you can choose to:<br />
Obtain the IP address automatically. <strong>Use</strong> this option if your router <strong>or</strong> gateway has<br />
DHCP. Continue with “DHCP Client ID,” below.<br />
Completing the DVR’s Netw<strong>or</strong>k Settings<br />
117<br />
7
118<br />
Chapter 7 Connecting to a Home Netw<strong>or</strong>k<br />
Specify a static IP address if you don’t have a DHCP server. Continue with “Static IP<br />
Address Checklist” on page 119.<br />
If you are <strong>no</strong>t sure what to select, you can try “Obtain IP address automatically.” This<br />
selection will w<strong>or</strong>k <strong>f<strong>or</strong></strong> most people. If it does <strong>no</strong>t w<strong>or</strong>k, you can return to TCP/IP Settings<br />
later and make other selections. (A brief description of IP addresses is provided in “Basic<br />
TCP/IP Concepts” on page 116.)<br />
DHCP Client ID<br />
Unless you received a DHCP Client ID from your Internet service provider (ISP), you can<br />
select “I don’t have a DHCP Client ID.” This selection will w<strong>or</strong>k <strong>f<strong>or</strong></strong> most people.<br />
If your ISP provided you with a DHCP Client ID, enter it using the arrow buttons on your<br />
remote to a highlight a character. Then press SELECT.<br />
You must use capital and lowercase letters appropriately. F<strong>or</strong> example, if your DHCP<br />
Client ID is “ID7343”, entering “id7343” will <strong>no</strong>t w<strong>or</strong>k. <strong>Use</strong> THUMBS UP and THUMBS<br />
DOWN to change to uppercase <strong>or</strong> lowercase. Select “Done entering text” when you are<br />
finished.<br />
Skip to “Confirm Settings” on page 121.
Static IP Address Checklist<br />
If you do <strong>no</strong>t have a DHCP server, you need to provide all of the following:<br />
An IP address <strong>f<strong>or</strong></strong> your DVR.<br />
A Subnet Mask <strong>f<strong>or</strong></strong> your home netw<strong>or</strong>k.<br />
An IP address <strong>f<strong>or</strong></strong> your home gateway <strong>or</strong> router.<br />
An IP address <strong>f<strong>or</strong></strong> a DNS (Domain Name Server).<br />
You will create a unique IP address <strong>f<strong>or</strong></strong> your DVR. The Subnet Mask, gateway <strong>or</strong> router IP<br />
address, and DNS IP address are usually provided by your Internet service provider (ISP).<br />
They are also usually available on the configuration screens of your home gateway <strong>or</strong><br />
router.<br />
If you have a computer on your home netw<strong>or</strong>k, you may be able find the Subnet Mask,<br />
home gateway, <strong>or</strong> router IP address, and DNS IP address in the computer’s TCP/IP<br />
settings. (If you are having trouble getting this in<strong>f<strong>or</strong></strong>mation, contact your Internet service<br />
provider.) In addition, you can use your computer’s IP address to help create an IP address<br />
<strong>f<strong>or</strong></strong> your DVR. F<strong>or</strong> example, if your computer’s IP address is ‘192.168.1.2’ then your<br />
DVR’s IP address should probably also start with ‘192.168.1’ and end with a number<br />
other than 2.<br />
IP Address<br />
The first three sets of numbers in the IP address are usually the same as other devices on<br />
your home netw<strong>or</strong>k. The final number is usually unique to a device on your home<br />
netw<strong>or</strong>k. F<strong>or</strong> example, with the IP address ‘192.168.1.12’, the first part, ‘192.168.1’,<br />
would be common to all devices on the netw<strong>or</strong>k. The last part, ‘12’, would be unique to a<br />
device on the netw<strong>or</strong>k.<br />
Completing the DVR’s Netw<strong>or</strong>k Settings<br />
119<br />
7
120<br />
Chapter 7 Connecting to a Home Netw<strong>or</strong>k<br />
Subnet Mask<br />
A subnet mask allows communication between a large netw<strong>or</strong>k (such as the Internet) and<br />
a smaller sub-netw<strong>or</strong>k (such as your home netw<strong>or</strong>k). It uses the same <strong>f<strong>or</strong></strong>mat as an IP<br />
address and is usually provided by your Internet service provider (ISP). The subnet mask<br />
<strong>f<strong>or</strong></strong> a home netw<strong>or</strong>k is usually ‘255.255.255.0’.<br />
You may also be able to find the subnet mask by inspecting the IP settings of a computer<br />
on the same home netw<strong>or</strong>k, <strong>or</strong> by contacting your Internet service provider.<br />
Gateway (Router) Address<br />
Enter the IP address of your home gateway <strong>or</strong> router. The IP address is usually available in<br />
the configuration screens <strong>f<strong>or</strong></strong> your gateway <strong>or</strong> router. Some common values <strong>f<strong>or</strong></strong> the<br />
gateway <strong>or</strong> router IP address on a home netw<strong>or</strong>k are ‘192.168.0.1’ and ‘192.168.1.1’. If<br />
you use a router supplied by your Internet service provider (ISP), your ISP should also<br />
have supplied the router’s IP address.<br />
You may also be able to find the home gateway <strong>or</strong> router IP address by inspecting the IP<br />
settings of a computer on the same home netw<strong>or</strong>k.<br />
DNS (Domain Name Server) Address<br />
If your home netw<strong>or</strong>k includes a broadband connection to the Internet, your Internet<br />
service provider (ISP) will have given you a DNS address. You may also be able to find<br />
the DNS address by inspecting the IP settings of a computer on the same home netw<strong>or</strong>k.
Confirm Settings<br />
Review the settings and select “Accept these settings” if they are c<strong>or</strong>rect.<br />
Congratulations, your DVR should <strong>no</strong>w be connected to your home netw<strong>or</strong>k!<br />
F<strong>or</strong> steps you can take to troubleshoot issues with your TCP/IP Settings, see “Questions<br />
About Netw<strong>or</strong>king” on page 141.<br />
Change Connection Type?<br />
If your DVR connects to the TiVo service over a phone line, you will see this screen<br />
anytime you complete Wireless Settings <strong>or</strong> TCP/IP Settings. Only select “Yes,” if your<br />
DVR is connected to a netw<strong>or</strong>k that includes an always-on Internet connection.<br />
Advantages of connecting to the TiVo service over the Internet are:<br />
You may disconnect your phone line from the DVR. You <strong>only</strong> need to reconnect your<br />
phone line if you repeat Guided <strong>Setup</strong>.<br />
You can use Remote Scheduling to schedule a program to rec<strong>or</strong>d an hour be<strong>f<strong>or</strong></strong>e it<br />
begins using TiVo Central Online (www.tivo.com/tco).<br />
After you select “Yes” <strong>or</strong> “No,” you see the Phone & Netw<strong>or</strong>k Settings screen. Press<br />
LEFT arrow to see the Phone & Netw<strong>or</strong>k <strong>Setup</strong> screen. The first line of Phone & Netw<strong>or</strong>k<br />
<strong>Setup</strong> should read: “Connect Via: Netw<strong>or</strong>k” if you selected “Yes.”<br />
To test the new connection, select Test Connection. On the next screen, press SELECT.<br />
Completing the DVR’s Netw<strong>or</strong>k Settings<br />
®<br />
F<strong>or</strong> steps you can take to<br />
troubleshoot issues with your<br />
connection to the TiVo service, see<br />
“Questions About the DVR’s Connection<br />
to the TiVo Service” on page 126.<br />
121<br />
7
122<br />
Chapter 7 Connecting to a Home Netw<strong>or</strong>k
CHAPTER<br />
8<br />
Troubleshooting<br />
Customer Supp<strong>or</strong>t 124<br />
Troubleshooting 125
124<br />
Chapter 8 Troubleshooting<br />
Customer Supp<strong>or</strong>t<br />
TiVo and HUMAX are dedicated to providing you with quality supp<strong>or</strong>t and customer service. When you have a question:<br />
1. <strong>Use</strong> this chapter. It contains troubleshooting <strong>f<strong>or</strong></strong> questions about:<br />
Getting Started . . . . . . . . . . . . . . . . . . . . . . . . . . . . . . . . . . . . . . . . . . . . . . . . . . . . . . . . . . . . . . . . . . . . . . . . . . . . . . . . . . . 125<br />
The DVR’s Connection to the TiVo ® Service . . . . . . . . . . . . . . . . . . . . . . . . . . . . . . . . . . . . . . . . . . . . . . . . . . . . . . . . . . . . 126<br />
Channels. . . . . . . . . . . . . . . . . . . . . . . . . . . . . . . . . . . . . . . . . . . . . . . . . . . . . . . . . . . . . . . . . . . . . . . . . . . . . . . . . . . . . . . . 128<br />
Live TV . . . . . . . . . . . . . . . . . . . . . . . . . . . . . . . . . . . . . . . . . . . . . . . . . . . . . . . . . . . . . . . . . . . . . . . . . . . . . . . . . . . . . . . . . . 131<br />
Rec<strong>or</strong>ding Programs. . . . . . . . . . . . . . . . . . . . . . . . . . . . . . . . . . . . . . . . . . . . . . . . . . . . . . . . . . . . . . . . . . . . . . . . . . . . . . . 132<br />
Rec<strong>or</strong>ding Conflicts . . . . . . . . . . . . . . . . . . . . . . . . . . . . . . . . . . . . . . . . . . . . . . . . . . . . . . . . . . . . . . . . . . . . . . . . . . . . . . . 135<br />
Now Playing . . . . . . . . . . . . . . . . . . . . . . . . . . . . . . . . . . . . . . . . . . . . . . . . . . . . . . . . . . . . . . . . . . . . . . . . . . . . . . . . . . . . . 135<br />
Parental Controls . . . . . . . . . . . . . . . . . . . . . . . . . . . . . . . . . . . . . . . . . . . . . . . . . . . . . . . . . . . . . . . . . . . . . . . . . . . . . . . . . 137<br />
Audio and Video . . . . . . . . . . . . . . . . . . . . . . . . . . . . . . . . . . . . . . . . . . . . . . . . . . . . . . . . . . . . . . . . . . . . . . . . . . . . . . . . . . 137<br />
The TiVo Service . . . . . . . . . . . . . . . . . . . . . . . . . . . . . . . . . . . . . . . . . . . . . . . . . . . . . . . . . . . . . . . . . . . . . . . . . . . . . . . . . . 140<br />
Netw<strong>or</strong>king . . . . . . . . . . . . . . . . . . . . . . . . . . . . . . . . . . . . . . . . . . . . . . . . . . . . . . . . . . . . . . . . . . . . . . . . . . . . . . . . . . . . . . 141<br />
2. <strong>Use</strong> the troubleshooting screens on your DVR. Go to TiVo Central and select Messages & <strong>Setup</strong>, then Troubleshooting. You will<br />
find troubleshooting screens <strong>f<strong>or</strong></strong> Parental Controls, your phone connection, your channels, and netw<strong>or</strong>king.<br />
3. Contact Customer Supp<strong>or</strong>t. Go online <strong>or</strong> give us a call. Refer to the contact in<strong>f<strong>or</strong></strong>mation below.<br />
HUMAX Customer Supp<strong>or</strong>t TiVo Customer Supp<strong>or</strong>t<br />
Connecting your DVR to your TV & other equipment Using TiVo service features (finding & rec<strong>or</strong>ding programs)<br />
Phone calls and connecting to the TiVo service<br />
Your channel lineup and channel lists<br />
Channel changing and the remote control<br />
Your TiVo service account and billing issues<br />
Audio and video<br />
Online scheduling and Home Media Features<br />
www.humaxusa.com/supp<strong>or</strong>t<br />
www.tivo.com/supp<strong>or</strong>t<br />
1-866-486-2987<br />
1-877-367-8486
Questions About Getting Started<br />
I don’t see the Welcome Screen when I plug in my DVR <strong>f<strong>or</strong></strong> the first time.<br />
Questions About Getting Started<br />
Make sure <strong>cable</strong>s are connected from the OUT jack of one device to the IN jack of a<strong>no</strong>ther. Never connect OUT to OUT <strong>or</strong> IN to IN.<br />
If you used an RF Coaxial <strong>cable</strong> to connect your DVR, make sure your TV (and VCR, if the DVR’s signal passes through the VCR)<br />
is tuned to the same channel (3 <strong>or</strong> 4) that you selected on the back of your DVR (using the channel 3/4 switch). You may also need to<br />
press the Input, Source, <strong>or</strong> TV/Video button on your TV’s remote to change the input (i.e., the video signal your TV is displaying).<br />
If you’re using Composite A/V <strong>cable</strong>s <strong>or</strong> S-Video <strong>cable</strong>s, make sure your TV is displaying the appropriate video source. You may<br />
need to use the Input, Source, <strong>or</strong> TV/Video button on your TV’s remote to change video sources. If you are having trouble changing<br />
the video source, refer to your TV’s owner’s manual.<br />
If you are passing the signal through your VCR (as in <strong>Setup</strong> 4 in this guide), tune your TV the way you would to watch your VCR.<br />
Also, try turning your VCR on <strong>or</strong> off. If your VCR has multiple inputs, you may need to select the c<strong>or</strong>rect input on the VCR as well.<br />
If your DVR is connected to an A/V receiver, and you are having trouble finding the c<strong>or</strong>rect input, try connecting it directly to the<br />
TV instead.<br />
The <strong>cable</strong>s you are using to connect your DVR to your TV <strong>or</strong> other equipment may be damaged <strong>or</strong> defective. Try exchanging the<br />
<strong>cable</strong>s connected to the DVR with other <strong>cable</strong>s that you k<strong>no</strong>w are w<strong>or</strong>king properly.<br />
My phone jack isn’t near the DVR.<br />
The DVR comes with a 25 foot phone c<strong>or</strong>d. Phone c<strong>or</strong>ds longer than 25 feet are available at most hardware <strong>or</strong> electronics st<strong>or</strong>es.<br />
After you complete Guided <strong>Setup</strong>, you can connect your DVR to a home netw<strong>or</strong>k and use a broadband Internet connection instead of<br />
a phone line to connect to the TiVo service. See “Connecting to a Home Netw<strong>or</strong>k <strong>f<strong>or</strong></strong> Home Media Features” on page 101 <strong>f<strong>or</strong></strong> details.<br />
My TiVo DVR remote control doesn’t control my TV’s power, volume, etc.<br />
You can program the DVR’s remote control to turn your TV on and off, and control its volume and mute functions. You can also<br />
program it to control volume and mute on an A/V receiver <strong>or</strong> stereo. See “Remote Control & DVR Front Lights” on page 85.<br />
8<br />
125
126<br />
Chapter 8 Troubleshooting<br />
My TiVo DVR remote control doesn't w<strong>or</strong>k with my DVR.<br />
Be sure you are using the DVR’s remote, and that you hold it so that the TiVo button points toward the DVR.<br />
Try changing the position of the DVR SWITCH on the remote control.<br />
Press any button on the remote. Does the red light above the TiVo button on the remote flash?<br />
If the red light does <strong>no</strong>t flash, make sure the batteries are positioned c<strong>or</strong>rectly in the remote. If they are c<strong>or</strong>rectly positioned, try a new<br />
set of batteries. See the inside front cover of this guide <strong>f<strong>or</strong></strong> instructions on installing batteries.<br />
If the red light on the remote does flash, watch the lights on the front of the DVR. Do the lights seem to respond (i.e., blink <strong>or</strong> flash)<br />
when you press any button on the remote? If lights on the front of the DVR do <strong>no</strong>t respond to the remote, restart your DVR by<br />
unplugging it, waiting 15 seconds, then plugging it back in.<br />
You may <strong>no</strong>t have the c<strong>or</strong>rect input selected on your TV. <strong>Use</strong> the Input, Source, <strong>or</strong> TV/Video button on your TV’s remote to change<br />
the input. If you are passing the signal through your VCR, you may need to select the c<strong>or</strong>rect input on the VCR as well.<br />
Questions About the DVR’s Connection to the TiVo Service<br />
Why does the DVR have to be connected to a phone line <strong>or</strong> the Internet?<br />
The DVR needs to be connected to the phone line <strong>or</strong> the Internet so that it can make periodic connections to the TiVo service. This<br />
connection downloads program in<strong>f<strong>or</strong></strong>mation, which tells the DVR when programs are scheduled to air and on what channel. The<br />
connection may also retrieve additional in<strong>f<strong>or</strong></strong>mation such as updates to the TiVo service, Showcases, and TiVolution Magazine.<br />
In addition, the connection sends a<strong>no</strong>nymous viewing in<strong>f<strong>or</strong></strong>mation back to TiVo—that is, a<strong>no</strong>nymous in<strong>f<strong>or</strong></strong>mation about viewing<br />
choices, which do <strong>no</strong>t identify you as an individual <strong>or</strong> household. TiVo has <strong>no</strong> way to access any of your personally identifiable<br />
viewing in<strong>f<strong>or</strong></strong>mation from your DVR without your pri<strong>or</strong> consent. Without your consent, the TiVo service has <strong>no</strong> way of k<strong>no</strong>wing<br />
what shows you—as an individual <strong>or</strong> household—have watched <strong>or</strong> rec<strong>or</strong>ded. F<strong>or</strong> m<strong>or</strong>e in<strong>f<strong>or</strong></strong>mation, read the TiVo Privacy Policy<br />
on page 147.
Questions About the DVR’s Connection to the TiVo Service<br />
Do I need to keep the phone connected all the time?<br />
We recommend you leave the DVR connected to the phone line all the time. The TiVo service will <strong>no</strong>t interfere with other needs <strong>f<strong>or</strong></strong><br />
the phone line, and periodic connections will keep the DVR’s program in<strong>f<strong>or</strong></strong>mation fully up to date.<br />
You can also use a broadband Internet connection to connect to the TiVo service instead of a phone line. See “Connecting to a Home<br />
Netw<strong>or</strong>k <strong>f<strong>or</strong></strong> Home Media Features” on page 101 <strong>f<strong>or</strong></strong> details.<br />
My DVR’s phone connection to the TiVo service is failing.<br />
First, verify that your phone line is w<strong>or</strong>king by connecting a phone to it, then listening <strong>f<strong>or</strong></strong> a dial tone. Make sure the phone c<strong>or</strong>d is<br />
connected to both the DVR and the phone jack. If the phone line is w<strong>or</strong>king, continue with the troubleshooting here. If it is <strong>no</strong>t<br />
w<strong>or</strong>king, contact your telephone service provider.<br />
The following tips require changing your Phone Dialing Options. To change Phone Dialing Options, go to TiVo Central, then select<br />
Messages & <strong>Setup</strong>, then Settings, then Phone & Netw<strong>or</strong>k <strong>Setup</strong>, then “Edit phone <strong>or</strong> netw<strong>or</strong>k settings,” then Phone Dialing Options.<br />
After you change a Phone Dialing Option, the DVR will make a test connection to verify whether <strong>or</strong> <strong>no</strong>t your problem was solved.<br />
Phone Connection Troubleshooting Tips:<br />
Try a<strong>no</strong>ther local dial-in number. Select “Set Dial-In Number.” Confirm your area code, then select a new number from the list of<br />
available numbers <strong>f<strong>or</strong></strong> your area.<br />
If you have voice mail on this phone line <strong>or</strong> use a<strong>no</strong>ther <strong>no</strong>n-standard dial tone, turn off “Dial Tone Detection.” (Select “Set Dial<br />
Tone Detection,” then select “Off.”)<br />
If you dial a prefix <strong>f<strong>or</strong></strong> outside lines, be sure it is entered on the Phone Dialing Options screen. To enter <strong>or</strong> change a prefix, select<br />
“Set Dial Prefix,” then follow instructions on the screen. F<strong>or</strong> example, if you must dial 9 to reach an outside line, select “Set Dial<br />
Prefix,” then press “9” then the PAUSE ( ) button. (This enters a 9, followed by a comma. The comma represents a pause.)<br />
If you have call waiting, be sure it is disabled during the daily phone call. (Select “Set Call Waiting Prefix,” then enter the c<strong>or</strong>rect<br />
prefix, usually “*70,”. You would enter “*70,” by pressing CLEAR then “7” then “0” then the PAUSE ( ) button.)<br />
Your phone line may have low voltage. Set ‘Phone Avail.’ Detection to “Off.” (Select “Set Phone Avail. Detection,” then select<br />
“Off.”) If you have a c<strong>or</strong>dless telephone, fax machine, <strong>or</strong> computer modem connected to the same line, try turning ‘Phone Avail.’<br />
8<br />
127
128<br />
Chapter 8 Troubleshooting<br />
Detection off, as well. When ‘Phone Avail.’ Detection is off, you may hear a click on the line when the DVR tries to call. This is<br />
the sound of the DVR picking up the line to see if it is free.<br />
If you use a wireless modem jack, try connecting the DVR directly to a standard wall jack.<br />
If you have a caller ID <strong>box</strong>, try removing it from the line, since some models interfere with the DVR’s ability to make a call.<br />
If you have DSL, try installing a DSL filter on your phone line.<br />
It could be that you have too much line <strong>no</strong>ise due to the length of the phone c<strong>or</strong>d. Try a sh<strong>or</strong>ter c<strong>or</strong>d, <strong>or</strong> you can buy a line <strong>no</strong>ise<br />
filter at your local electronics st<strong>or</strong>e.<br />
What if I need to use the phone while the DVR is connecting to the TiVo service?<br />
You can interrupt the connection. To do this, pick up the phone, then hang it up. Wait about 45 seconds. When you pick it up again,<br />
there should be a dial tone. Repeat this process if necessary.<br />
What if my phone line is busy when the DVR tries to connect to the TiVo service?<br />
The DVR will continue to attempt to connect several times a day until it is successful. You can check the status of the connection on<br />
the Phone & Netw<strong>or</strong>k <strong>Setup</strong> screen (from TiVo Central, select Messages & <strong>Setup</strong>, then Settings, then Phone & Netw<strong>or</strong>k <strong>Setup</strong>). The<br />
status of the most recent connection is displayed near the top of the screen.<br />
Am I charged <strong>f<strong>or</strong></strong> connections to the TiVo service?<br />
TiVo uses either a standard phone line <strong>or</strong> a broadband Internet connection to provide the TiVo service, and is available as a local call<br />
in most areas. In some areas, however, local and long distance toll charges may apply. You are responsible <strong>f<strong>or</strong></strong> any phone charges.<br />
Questions About Channels<br />
Can I watch one channel while rec<strong>or</strong>ding from a<strong>no</strong>ther?<br />
Yes. If you have <strong>cable</strong> with <strong>no</strong> <strong>cable</strong> <strong>box</strong> <strong>or</strong> an antenna, you can split the signal with an RF splitter. See “Watching One Channel &<br />
Rec<strong>or</strong>ding A<strong>no</strong>ther” on page 18. (You will <strong>no</strong>t have TiVo functionality on the channels you watch using an RF <strong>cable</strong> that goes<br />
directly to your TV.) You can always watch any program from the Now Playing list while the DVR is rec<strong>or</strong>ding a program.
I can’t get the channel to change.<br />
If you use <strong>cable</strong> with <strong>no</strong> <strong>cable</strong> <strong>box</strong>:<br />
Questions About Channels<br />
Be sure that you are using the TiVo remote and that you hold it so the TiVo button points toward the DVR.<br />
Press any button on the remote. Does the red light above the TiVo button flash? If <strong>no</strong>t, make sure the batteries are positioned<br />
c<strong>or</strong>rectly in the remote. If they are, try a new set of batteries. If the red light on the remote does flash, do the lights on the front of the<br />
DVR seem to respond when you press any button on the remote? If they do <strong>no</strong>t, restart your DVR by unplugging it, waiting 15<br />
seconds, then plugging it back in.<br />
If you have a <strong>cable</strong> <strong>or</strong> satellite <strong>box</strong> and used the IR Control <strong>cable</strong>:<br />
Make sure the <strong>cable</strong> <strong>or</strong> satellite <strong>box</strong> is turned on.<br />
Make sure you are using the DVR’s remote control, and that you hold it so the TiVo button points toward the DVR, <strong>no</strong>t at the <strong>cable</strong><br />
<strong>or</strong> satellite <strong>box</strong>.<br />
Refer to page 6 to verify that the IR Control <strong>cable</strong> is positioned c<strong>or</strong>rectly in front of the IR sens<strong>or</strong>. Also, make sure the purple end of<br />
the <strong>cable</strong> is plugged into the Control Out-IR jack on the back of the DVR.<br />
You may consider optimizing the IR Control connection as described on page 9.<br />
Press the TiVo button to go to TiVo Central, then select Messages & <strong>Setup</strong>, then <strong>Cable</strong>/Satellite Box, then Control <strong>Cable</strong> <strong>Setup</strong>.<br />
Verify the IR code you chose during Guided <strong>Setup</strong>. See page 6 <strong>f<strong>or</strong></strong> m<strong>or</strong>e on choosing an IR code.<br />
Try using the <strong>cable</strong> <strong>or</strong> satellite <strong>box</strong>’s remote to change the channel. If it doesn’t w<strong>or</strong>k, contact the manufacturer <strong>or</strong> service provider.<br />
If you have a Mot<strong>or</strong>ola/General Instruments DCT2000 series <strong>cable</strong> <strong>box</strong> <strong>or</strong> a DIRECTV ® satellite <strong>box</strong> and used the Serial Control<br />
<strong>cable</strong>:<br />
Make sure the <strong>cable</strong> <strong>or</strong> satellite <strong>box</strong> is turned on.<br />
Verify that the Serial Control <strong>cable</strong> is plugged into the data connect<strong>or</strong> on the <strong>cable</strong> <strong>or</strong> satellite <strong>box</strong> and into the Control Out-Serial<br />
jack on the back of the DVR.<br />
Unplug the <strong>cable</strong> <strong>or</strong> satellite <strong>box</strong>’s power c<strong>or</strong>d, then plug it back in. Then try changing channels with the TiVo remote again.<br />
8<br />
129
130<br />
Chapter 8 Troubleshooting<br />
Try using the <strong>cable</strong> <strong>or</strong> satellite <strong>box</strong>’s remote to change the channel. If it doesn’t w<strong>or</strong>k, contact the manufacturer <strong>or</strong> service provider.<br />
Serial control of a Mot<strong>or</strong>ola/General Instruments DCT2000 series <strong>cable</strong> <strong>box</strong> may <strong>no</strong>t be available <strong>f<strong>or</strong></strong> all customers. Check with your<br />
<strong>cable</strong> provider to find out if your <strong>cable</strong> <strong>box</strong> is enabled <strong>f<strong>or</strong></strong> serial control.<br />
Satellite Box Only: You may have inc<strong>or</strong>rectly specified the type of program guide <strong>f<strong>or</strong></strong> your DIRECTV satellite <strong>box</strong>. There are two<br />
types of program guides: MPG (Master Program Guide) and APG (Advanced Program Guide).<br />
To change this option: First, unplug the power c<strong>or</strong>d <strong>f<strong>or</strong></strong> the satellite <strong>box</strong>, wait a few seconds, then plug it back in. Next, go to TiVo<br />
Central, then Message & <strong>Setup</strong>, then Settings, the TiVo DVR <strong>Setup</strong>, then <strong>Cable</strong>/Satellite Box, then Satellite Channel Changing and<br />
select “Satellite Box.” On the Connection to Satellite screen, if you <strong>or</strong>iginally selected Serial-MPG, change your selection to Serial-<br />
APG. (If you <strong>or</strong>iginally selected Serial-APG, change it to Serial-MPG.) You can also check the manual <strong>f<strong>or</strong></strong> your satellite <strong>box</strong> (as well<br />
as the satellite <strong>box</strong>’s system setup screen) <strong>f<strong>or</strong></strong> in<strong>f<strong>or</strong></strong>mation on the type of program guide it uses.<br />
I can’t go to one of my channels.<br />
You may be using a channel list that does <strong>no</strong>t include the channel you want. <strong>Use</strong> the numbers on the remote control to enter the<br />
channel number, then press ENTER. F<strong>or</strong> m<strong>or</strong>e in<strong>f<strong>or</strong></strong>mation on using a channel list, see page 77.<br />
The channel you want may be showing a program that exceeds a limit set with Parental Controls. In this case, you will see <strong>only</strong> a<br />
black screen with a <strong>no</strong>tice that a limit has been exceeded. You will be able to tune to the channel if you use the Parental Controls<br />
passw<strong>or</strong>d. (F<strong>or</strong> m<strong>or</strong>e in<strong>f<strong>or</strong></strong>mation on Parental Controls, see page 79.) If your <strong>cable</strong> <strong>or</strong> satellite <strong>box</strong> has a feature like Parental<br />
Controls, you may have to use the satellite <strong>or</strong> <strong>cable</strong> <strong>box</strong>’s remote to disable it as well.<br />
I can’t find all the channels I receive in the Channels You Receive list.<br />
Have you changed your satellite <strong>or</strong> <strong>cable</strong> provider, <strong>or</strong> changed your subscription package? If you have, you should repeat Guided<br />
<strong>Setup</strong> to specify your current satellite <strong>or</strong> <strong>cable</strong> provider and lineup. From TiVo Central, select Messages & <strong>Setup</strong>, then Restart <strong>or</strong><br />
Reset System, then Repeat Guided <strong>Setup</strong>. Press THUMBS DOWN three times, and then press ENTER. You may need to check all of<br />
the available selections to find the right one since <strong>cable</strong> providers often change their lineups. F<strong>or</strong> complete instructions on Guided<br />
<strong>Setup</strong>, see Chapter 2 of this guide.
Questions About Live TV<br />
If you have <strong>cable</strong>, and have <strong>no</strong>t changed your <strong>cable</strong> provider, go to Messages & <strong>Setup</strong>, then Settings, then Channels, then <strong>Cable</strong><br />
Lineup. Look at your <strong>cable</strong> <strong>or</strong> satellite bill, then check the Channels You Receive list. If the channels are inc<strong>or</strong>rect, try a<strong>no</strong>ther <strong>Cable</strong><br />
Lineup. If that does <strong>no</strong>t w<strong>or</strong>k, go to www.tivo.com/supp<strong>or</strong>t.<br />
Questions About Live TV<br />
Can I watch a program while it is being rec<strong>or</strong>ded?<br />
Yes, you can watch a program as it is being rec<strong>or</strong>ded; you can even start watching from the beginning while the rest of the program<br />
is rec<strong>or</strong>ded! You can also watch any program st<strong>or</strong>ed in Now Playing while a<strong>no</strong>ther program is being rec<strong>or</strong>ded.<br />
The Channel Banner always says “To be an<strong>no</strong>unced.”<br />
Your DVR probably does <strong>no</strong>t have full program in<strong>f<strong>or</strong></strong>mation. F<strong>or</strong> details, see the question “I can’t find my program in Search by<br />
Title <strong>or</strong> Search Using a WishList, even though I k<strong>no</strong>w it’s on,” on page 132.<br />
There aren’t any shows listed in the program guide.<br />
Your DVR may <strong>no</strong>t have program in<strong>f<strong>or</strong></strong>mation. See “I can’t find my program in Search by Title <strong>or</strong> Search Using a WishList, even<br />
though I k<strong>no</strong>w it’s on,” on page 132.<br />
If categ<strong>or</strong>y filtering of the guide is turned on, but <strong>no</strong> upcoming programs in the next six hours match both your filter and your<br />
Fav<strong>or</strong>ite Channels list, <strong>no</strong> programs will appear in the guide. To view programs in the guide again, use the Guide Options to turn off<br />
filtering. (See page 51.)<br />
I can’t find my program in the guide, even though I k<strong>no</strong>w it’s on.<br />
You can choose a channel list <strong>or</strong> filter to use with the guide. Not all programs <strong>or</strong> channels will be displayed if you have chosen to use<br />
a filter <strong>or</strong> the “Fav<strong>or</strong>ites” channel list. Press GUIDE to display the live guide, then ENTER to choose “Channels You Receive” <strong>or</strong> to<br />
turn off filters. You can also add and remove channels on the “Channels You Receive” and “Fav<strong>or</strong>ites” channel lists. (See page 77.)<br />
Occasionally the program in<strong>f<strong>or</strong></strong>mation provided by the netw<strong>or</strong>ks includes err<strong>or</strong>s. We would like to hear of any inaccuracies you<br />
discover so that we can w<strong>or</strong>k with our providers to c<strong>or</strong>rect them. See the Customer Supp<strong>or</strong>t contact in<strong>f<strong>or</strong></strong>mation at the beginning of<br />
this chapter.<br />
8<br />
131
132<br />
Chapter 8 Troubleshooting<br />
Questions About Rec<strong>or</strong>ding Programs<br />
I can’t find my program in Search by Title <strong>or</strong> Search Using a WishList, etc., even though I k<strong>no</strong>w it’s on.<br />
The DVR uses the Channels You Receive list to search <strong>f<strong>or</strong></strong> programs in all the features under Pick Programs to Rec<strong>or</strong>d. To check if<br />
you’ve selected the program’s channel, go to Messages & <strong>Setup</strong>, then Settings, then Channels, then Channels You Receive. Does the<br />
channel have a check mark next to it? To give it one, highlight the channel and press SELECT. (F<strong>or</strong> instructions on personalizing this<br />
list, see page 77.)<br />
Look on the Phone & Netw<strong>or</strong>k <strong>Setup</strong> screen (from TiVo Central, select Messages & <strong>Setup</strong>, then Settings, then Phone & Netw<strong>or</strong>k<br />
<strong>Setup</strong>) <strong>f<strong>or</strong></strong> the time of the last successful connection to the TiVo service. If it was m<strong>or</strong>e than 36 hours ago, your DVR may be having<br />
trouble connecting to the TiVo service. Select “Test connection” to test the current settings. If the test connection does <strong>no</strong>t succeed,<br />
see page 126 <strong>f<strong>or</strong></strong> connection troubleshooting. Once you have made a successful test connection, start a regular connection by<br />
selecting “Connect to the TiVo service <strong>no</strong>w.” If your connection is successful, new program in<strong>f<strong>or</strong></strong>mation will be downloaded and<br />
<strong>or</strong>ganized, and become available to search in about 1 to 5 hours.<br />
Is your TiVo service account up to date? Check your account status on the System In<strong>f<strong>or</strong></strong>mation screen (from TiVo Central, select<br />
Messages & <strong>Setup</strong>, then System In<strong>f<strong>or</strong></strong>mation). If your account is suspended <strong>or</strong> closed and you wish to re-activate it, go to<br />
www.tivo.com/manage, <strong>or</strong> refer to page 124 <strong>f<strong>or</strong></strong> Customer Supp<strong>or</strong>t contact in<strong>f<strong>or</strong></strong>mation and give us a call.<br />
Occasionally the program in<strong>f<strong>or</strong></strong>mation provided by the netw<strong>or</strong>ks includes err<strong>or</strong>s. We would like to hear of any inaccuracies you<br />
discover so that we can w<strong>or</strong>k with our providers to c<strong>or</strong>rect them.<br />
I can<strong>no</strong>t use features in Pick Programs to Rec<strong>or</strong>d. The DVR says it is <strong>or</strong>ganizing program in<strong>f<strong>or</strong></strong>mation.<br />
Your DVR may <strong>no</strong>t have all its program in<strong>f<strong>or</strong></strong>mation yet. The first time you go through Guided <strong>Setup</strong>, the DVR downloads program<br />
in<strong>f<strong>or</strong></strong>mation from the TiVo service. The DVR then indexes this in<strong>f<strong>or</strong></strong>mation in the background over the next 4-8 hours. As the<br />
program in<strong>f<strong>or</strong></strong>mation gets indexed, m<strong>or</strong>e of it becomes available. After 8 hours, full in<strong>f<strong>or</strong></strong>mation (<strong>f<strong>or</strong></strong> up to 2 weeks from the time of<br />
the last successful connection to the TiVo service) is available <strong>f<strong>or</strong></strong> you to use. Wait a few hours, then try to find your program again.<br />
If the DVR loses power while it is indexing program in<strong>f<strong>or</strong></strong>mation, the indexing process will stop until the DVR makes a successful<br />
connection to the TiVo service, and then will start again. If your DVR lost power while it was indexing program in<strong>f<strong>or</strong></strong>mation, you
Questions About Rec<strong>or</strong>ding Programs<br />
can get it to start indexing again by plugging it in and then starting a connection to the TiVo service. To do this, go to TiVo Central,<br />
then select Messages & <strong>Setup</strong>, then Settings, then Phone & Netw<strong>or</strong>k <strong>Setup</strong>, then “Connect to the TiVo service <strong>no</strong>w.”<br />
What happens if a sp<strong>or</strong>ts event I have scheduled to rec<strong>or</strong>d goes into overtime?<br />
The TiVo service can<strong>no</strong>t predict whether a sp<strong>or</strong>ting event might go into overtime, but we provide a feature that lets you add from one<br />
extra minute to three hours at the end of a rec<strong>or</strong>ding just in case. We call the feature the Overtime Scheduler. The Overtime<br />
Scheduler has two options: “Start Rec<strong>or</strong>ding” and “Stop Rec<strong>or</strong>ding.” Both are available on the Rec<strong>or</strong>ding Options screen. You can<br />
even use the Overtime Scheduler to change the scheduled end of a rec<strong>or</strong>ding while the program is being rec<strong>or</strong>ded. You can use the<br />
Overtime Scheduler with any kind of program, <strong>no</strong>t just sp<strong>or</strong>ts. F<strong>or</strong> m<strong>or</strong>e in<strong>f<strong>or</strong></strong>mation on Rec<strong>or</strong>ding Options, see page 47.<br />
If you are watching a program while it’s being rec<strong>or</strong>ded, you can rec<strong>or</strong>d an overtime segment in a couple of ways. One way is to go<br />
into Now Playing, select the rec<strong>or</strong>ding, then select “Change rec<strong>or</strong>ding options.” On the Rec<strong>or</strong>ding Options screen that appears, select<br />
“Stop rec<strong>or</strong>ding.” <strong>Use</strong> RIGHT arrow to increase the length of the rec<strong>or</strong>ding by anywhere from one minute to 3 hours. Alternatively,<br />
you could choose to press the RECORD button after the regularly scheduled part of the program has finished.<br />
Is there a way to rec<strong>or</strong>d a program that will <strong>no</strong>t be aired <strong>f<strong>or</strong></strong> weeks <strong>or</strong> months?<br />
Create an auto-rec<strong>or</strong>ding WishList <strong>f<strong>or</strong></strong> programs that are <strong>no</strong>t yet listed in the guide. See page 58 <strong>f<strong>or</strong></strong> details on WishList searches.<br />
If you k<strong>no</strong>w the date, time, and channel on which the program will air, you can create a manual rec<strong>or</strong>ding to rec<strong>or</strong>d it. You can create<br />
manual rec<strong>or</strong>dings by going to TiVo Central, then selecting Pick Programs to Rec<strong>or</strong>d, then Rec<strong>or</strong>d by Time <strong>or</strong> Channel, then<br />
Manually Rec<strong>or</strong>d Time/Channel. (See page 54 <strong>f<strong>or</strong></strong> details.)<br />
How do I set the clock so that my shows are rec<strong>or</strong>ded on time?<br />
If you are missing the beginning <strong>or</strong> end of a show, it usually means that the broadcaster is <strong>no</strong>t starting <strong>or</strong> stopping the show on time.<br />
You can use the Overtime Scheduler, described on page 48, to compensate <strong>f<strong>or</strong></strong> this.<br />
The TiVo service sets your DVR’s clock during every service connection. If you set your time zone and Daylight Savings Time<br />
c<strong>or</strong>rectly in Guided <strong>Setup</strong>, you never have to w<strong>or</strong>ry! If you move to a new time zone, change your DVR’s time settings by repeating<br />
Guided <strong>Setup</strong>. To connect to the TiVo service at any time, go to TiVo Central, then select Messages & <strong>Setup</strong>, then Settings, then<br />
Phone & Netw<strong>or</strong>k <strong>Setup</strong>, then “Connect to the TiVo service <strong>no</strong>w.”<br />
8<br />
133
134<br />
Chapter 8 Troubleshooting<br />
How do I rec<strong>or</strong>d a Pay Per View event?<br />
From live TV, catch up to the present broadcast by pressing the ADVANCE button. Then, <strong>or</strong>der the program from your <strong>cable</strong> <strong>or</strong><br />
satellite provider as you n<strong>or</strong>mally would—by using your satellite <strong>or</strong> <strong>cable</strong> <strong>box</strong> remote, <strong>or</strong> by calling your <strong>cable</strong>/satellite provider. (If<br />
the program violates a Parental Control limit—<strong>or</strong> a feature like Parental Controls on your <strong>cable</strong> <strong>or</strong> satellite <strong>box</strong>—make sure to<br />
disable both TiVo Parental Controls and your satellite <strong>or</strong> <strong>cable</strong> <strong>box</strong>’s Parental Controls.) To rec<strong>or</strong>d the program, search <strong>f<strong>or</strong></strong> it in<br />
Browse by Time. If there are <strong>no</strong> listings <strong>f<strong>or</strong></strong> Pay Per View events, rec<strong>or</strong>d the showing with the Manually Rec<strong>or</strong>d Time/Channel<br />
option under TiVo Central, then Pick Programs to Rec<strong>or</strong>d, then Rec<strong>or</strong>d Time/Channel.<br />
Why wasn’t my program rec<strong>or</strong>ded?<br />
Check Rec<strong>or</strong>ding Hist<strong>or</strong>y <strong>f<strong>or</strong></strong> an explanation of why the program did <strong>no</strong>t rec<strong>or</strong>d. Rec<strong>or</strong>ding Hist<strong>or</strong>y is the first selection in the To Do<br />
List (from TiVo Central, select Pick Programs to Rec<strong>or</strong>d, then To Do List, then View Rec<strong>or</strong>ding Hist<strong>or</strong>y). Here are some reasons<br />
why a program may <strong>no</strong>t be available in Now Playing:<br />
The program may have been canceled by the netw<strong>or</strong>k.<br />
If you had two Season Pass rec<strong>or</strong>dings that were on at the same time, <strong>only</strong> the Season Pass with the higher pri<strong>or</strong>ity would be<br />
rec<strong>or</strong>ded. Pri<strong>or</strong>ities and the Season Pass Manager are described on page 49.<br />
The program may have been deleted from Now Playing by someone else in your household.<br />
There may have been a conflict when requesting a<strong>no</strong>ther program, and the proposed resolution was to delete the missing program<br />
earlier than planned. If you accepted that resolution, the program would have been deleted.<br />
There may have been a channel changing problem. See “Questions About Channels” on page 128.
Questions About Rec<strong>or</strong>ding Conflicts<br />
Can I rec<strong>or</strong>d multiple programs simultaneously?<br />
Questions About Rec<strong>or</strong>ding Conflicts<br />
No. You can watch any program in Now Playing while a<strong>no</strong>ther is rec<strong>or</strong>ding. However, you can <strong>only</strong> rec<strong>or</strong>d one program at a time on<br />
your DVR, because it does <strong>no</strong>t contain the necessary hardware to rec<strong>or</strong>d two programs at once. The DIRECTV DVR with TiVo has<br />
two tuners and can rec<strong>or</strong>d two programs at the same time.<br />
How can I rec<strong>or</strong>d a program (<strong>or</strong> programs) when there is a conflict?<br />
The DVR gives each repeating rec<strong>or</strong>ding a pri<strong>or</strong>ity. You can resolve some conflicts in fav<strong>or</strong> of preferred programs using the Season<br />
Pass Manager to change pri<strong>or</strong>ities (see page 49.)<br />
If you encounter a conflict <strong>f<strong>or</strong></strong> a single episode, use “View upcoming episodes” to see if the program <strong>or</strong> episode you want will air at<br />
a different time.<br />
You can sometimes resolve rec<strong>or</strong>ding conflicts by changing the “Stop Time” <strong>or</strong> “Start Time” Rec<strong>or</strong>ding Options. (See page 47 <strong>f<strong>or</strong></strong><br />
m<strong>or</strong>e about Rec<strong>or</strong>ding Options.) If you set a program to start rec<strong>or</strong>ding one minute early, it may conflict with a rec<strong>or</strong>ding that airs<br />
right be<strong>f<strong>or</strong></strong>e it. To resolve such a conflict, change the “Start Time” back to “On Time” on the Rec<strong>or</strong>ding Options screen.<br />
If a single episode of a repeating rec<strong>or</strong>ding conflicts with a<strong>no</strong>ther program, you can select that episode in the To Do List and change<br />
it independently of the rest of the repeating rec<strong>or</strong>ding.<br />
Questions About Now Playing<br />
Can I recover a rec<strong>or</strong>ded program that was deleted?<br />
No. There is <strong>no</strong> way to bring back a program that has been deleted from Now Playing. You can choose to keep programs as long as<br />
you want (see page 73) <strong>or</strong> save programs to video tapes <strong>or</strong> rec<strong>or</strong>dable DVDs (see page 74).<br />
Can I copy <strong>or</strong> archive programs to a Zip drive, <strong>or</strong> any other computer st<strong>or</strong>age media?<br />
The TiVo Series2 DVR does <strong>no</strong>t copy <strong>or</strong> archive rec<strong>or</strong>dings to any device other than a VCR <strong>or</strong> DVD rec<strong>or</strong>der. See page 74.<br />
8<br />
135
136<br />
Chapter 8 Troubleshooting<br />
I haven’t scheduled e<strong>no</strong>ugh programs to fill my DVR, but when I try to schedule m<strong>or</strong>e programs, the DVR says there<br />
isn’t room.<br />
The TiVo service includes smart scheduling features that track <strong>no</strong>t <strong>only</strong> how much space you currently have on your DVR, but also<br />
how much space will be needed in the future to rec<strong>or</strong>d all of the programs you have scheduled. If your DVR will be full at some point<br />
in the future, the TiVo service in<strong>f<strong>or</strong></strong>ms you and suggests options—such as allowing some programs to be deleted early—that will<br />
allow you to schedule additional rec<strong>or</strong>dings. With the TiVo service, you always have the final say over what gets rec<strong>or</strong>ded and how<br />
long it is kept.<br />
In addition, the amount of rec<strong>or</strong>ding space the DVR needs varies from channel to channel and from show to show. In general, the<br />
m<strong>or</strong>e action you see on your screen, such as in fast-moving sp<strong>or</strong>ts <strong>or</strong> action movies, the m<strong>or</strong>e rec<strong>or</strong>ding space is required. Weaker<br />
video signals may also require m<strong>or</strong>e space. The amount of space required <strong>f<strong>or</strong></strong> each show you rec<strong>or</strong>d affects the total hours of<br />
rec<strong>or</strong>ding capacity in your DVR.<br />
How can I fit m<strong>or</strong>e programs in Now Playing?<br />
To make space, delete some programs in Now Playing. You delete a program by highlighting its title, then pressing CLEAR.<br />
Lowering the default rec<strong>or</strong>ding quality will allow you to fit m<strong>or</strong>e programs in Now Playing. See page 83 <strong>f<strong>or</strong></strong> details.<br />
Set up Season Pass rec<strong>or</strong>dings with the Rec<strong>or</strong>ding Option “First-run <strong>only</strong>.” You’ll collect <strong>only</strong> new episodes. You’ll also be less<br />
likely to run out of space in Now Playing and less likely to encounter conflicts.<br />
What does it mean when my DVR says programs will be deleted earlier than planned?<br />
By default, all programs are kept until space is needed. After that, programs you have <strong>no</strong>t set to save longer may be deleted to make<br />
room <strong>f<strong>or</strong></strong> other rec<strong>or</strong>dings you request. The TiVo service includes smart scheduling features that keep track of when programs<br />
become available to be deleted, and of how much free space will be available at any given time in the future. If space will <strong>no</strong>t be<br />
available to rec<strong>or</strong>d a program you request, the TiVo service gives you the option of deleting some programs early to make m<strong>or</strong>e<br />
room. However, you always have the final say on how long the DVR keeps programs. You can delete a program at any time, and you<br />
can always change how long it is saved. Just select the program in Now Playing, then select “Keep until...”
Questions About Parental Controls<br />
My Parental Controls are <strong>no</strong>t w<strong>or</strong>king.<br />
Questions About Parental Controls<br />
F<strong>or</strong> Parental Controls to w<strong>or</strong>k, they must be on (and must <strong>no</strong>t be temp<strong>or</strong>arily turned off). When you enter your passw<strong>or</strong>d to watch a<br />
program that violates Parental Controls, they are temp<strong>or</strong>arily turned off. You can re-enable them on the Parental Controls screen<br />
(from TiVo Central, select Messages & <strong>Setup</strong>, then Settings, then Parental Controls), <strong>or</strong> by putting your DVR in Standby mode and<br />
then taking it out of Standby. You can put your DVR in Standby mode by going to TiVo Central and selecting Messages & <strong>Setup</strong>,<br />
then Standby. To return to n<strong>or</strong>mal mode from Standby, press either the TiVo button the <strong>or</strong> LIVE TV button. (On some remotes, there<br />
is a POWER button that puts the DVR in Standby mode and takes it back out.)<br />
I disabled Parental Controls, but I still can’t tune to the channel I want.<br />
If your <strong>cable</strong> <strong>or</strong> satellite <strong>box</strong> has a feature like Parental Controls, make sure you have disabled them with the satellite <strong>or</strong> <strong>cable</strong> <strong>box</strong>’s<br />
remote. See your <strong>cable</strong> <strong>or</strong> satellite <strong>box</strong>’s owner’s manual <strong>f<strong>or</strong></strong> instructions.<br />
You may be using a channel list that does <strong>no</strong>t include the channel you want. <strong>Use</strong> the number buttons on the remote control to enter<br />
the channel number, then press ENTER. F<strong>or</strong> m<strong>or</strong>e in<strong>f<strong>or</strong></strong>mation on using a channel list see page 77.<br />
Questions About Audio and Video<br />
The audio and video are out of sync.<br />
The audio and video may re-sync if you change channels.<br />
You may be able to re-sync audio and video by pressing the INSTANT REPLAY button on the remote control.<br />
Press the TiVo button to go to TiVo Central, then press the LIVE TV button to return to live TV.<br />
You can also try restarting your DVR. From TiVo Central, select Messages & <strong>Setup</strong>, then Restart <strong>or</strong> Reset System, then Restart the<br />
DVR. On the Restart the DVR screen, press the THUMBS DOWN button three times, then press ENTER. You will see the Welcome<br />
screen and the system will restart within a few minutes.<br />
8<br />
137
138<br />
Chapter 8 Troubleshooting<br />
My DVR was w<strong>or</strong>king, but <strong>no</strong>w the picture does <strong>no</strong>t move<br />
Try restarting your DVR. From TiVo Central, select Messages & <strong>Setup</strong>, then Restart <strong>or</strong> Reset System, then Restart the DVR. On the<br />
Restart the DVR screen, press the THUMBS DOWN button three times, then press ENTER. You will see the Welcome screen and<br />
the system will restart within a a few minutes. You can also restart the DVR by unplugging it, waiting at least 15 seconds, then<br />
plugging it back in.<br />
I don’t get a picture <strong>no</strong>w, even though I have been able to get one in the past.<br />
Someone in your household may have placed the DVR in Standby mode. To return to n<strong>or</strong>mal mode from Standby, press either the<br />
TiVo button <strong>or</strong> the LIVE TV button. (On some remotes, there is a POWER button that puts the DVR in Standby mode and takes it<br />
back out.)<br />
Your TV may <strong>no</strong>t be set to the c<strong>or</strong>rect input. Most TVs have an input button that says either “TV/Video,” “Input,” <strong>or</strong> “Source.” It<br />
may be on the TV <strong>or</strong> on the TV remote control. Look at your TV and TV remote and try changing the input <strong>f<strong>or</strong></strong> your TV.<br />
If you have your DVR connected to a VCR, the VCR may <strong>no</strong>t be set to the c<strong>or</strong>rect input. Most VCRs have an input button that says<br />
either “TV/Video,” “Input,” <strong>or</strong> “Source.” It may be on the VCR <strong>or</strong> on the VCR remote control. Look at your VCR and VCR remote<br />
and try changing the input <strong>f<strong>or</strong></strong> your VCR.<br />
Check to make sure all of the appropriate <strong>cable</strong>s are firmly connected to your DVR, television and other audio/video equipment. F<strong>or</strong><br />
help with your <strong>cable</strong> connections, see the Start Here booklet and Chapter 1 of this guide.<br />
My audio system is set up to play in stereo, but it is <strong>only</strong> playing mo<strong>no</strong>.<br />
Make sure that “Main Audio Program (stereo)” is selected on the Television Audio screen (TiVo Central and select Messages &<br />
<strong>Setup</strong>, then Settings, then Audio, then Television Audio). And be sure you connected audio using the DVR’s L/R Audio Out jacks.<br />
I can’t select an alternate audio track.<br />
Secondary audio programs (SAP) are <strong>no</strong>t available <strong>f<strong>or</strong></strong> all programs. If you set the SAP as the default audio, programs that have SAP<br />
will use it. Only one audio track is saved with rec<strong>or</strong>ded programs. If SAP is the default audio and a program you are rec<strong>or</strong>ding has an<br />
SAP, the SAP will be the rec<strong>or</strong>ded program’s <strong>only</strong> audio. You can set the default audio on the Television Audio screen (from TiVo<br />
Central, select Messages & <strong>Setup</strong>, then Settings, then Audio, then Television Audio).
Questions About Audio and Video<br />
Rec<strong>or</strong>ded programs, such as those in Now Playing, always have <strong>only</strong> one audio track, the one they were rec<strong>or</strong>ded with.<br />
You can<strong>no</strong>t change the audio track if you are watching a live program, but are <strong>no</strong>t caught up to live TV. Catch up to live TV by<br />
pressing the ADVANCE button. Changing the audio program will clear the saved part of the program you are watching, so you will<br />
<strong>only</strong> be able to rewind live TV to the point where you changed the audio program.<br />
Programs are playing in the wrong language.<br />
You may have selected the secondary audio program (SAP) as the default audio on the Television Audio screen. Most programs with<br />
SAP use it to broadcast in an alternate language. To turn off the SAP, change the main audio program on the Television Audio screen<br />
(from TiVo Central, select Messages & <strong>Setup</strong>, then Settings, then Audio, then Television Audio).<br />
When I turn on my TV, I see a blue screen with a TiVo logo.<br />
Your DVR is having trouble tuning to the channel you are on. Follow these steps to rest<strong>or</strong>e the video:<br />
Try changing channels. If the blue screen appears on just a few channels, you may be tuned to a channel to which you do <strong>no</strong>t<br />
subscribe, <strong>or</strong> you may be experiencing a weak signal on a channel to which you do subscribe. If you do <strong>no</strong>t subscribe to the<br />
channel, you should take it off the “Channels You Receive” list. (F<strong>or</strong> m<strong>or</strong>e in<strong>f<strong>or</strong></strong>mation, see page 77.) If you do subscribe to the<br />
channel, wait 24 hours to see if the signal improves, <strong>or</strong> call your <strong>cable</strong> <strong>or</strong> satellite provider.<br />
If you have a satellite <strong>or</strong> <strong>cable</strong> <strong>box</strong>, go to Messages & <strong>Setup</strong>, <strong>Cable</strong>/Satellite Box, Connection to DVR. Verify that you chose the<br />
same <strong>cable</strong> on this screen that you used to connect your satellite <strong>or</strong> <strong>cable</strong> <strong>box</strong> to the DVR.<br />
If the blue screen appears on every channel, and you have a <strong>cable</strong> <strong>or</strong> satellite <strong>box</strong>, make sure it is turned on.<br />
You may be experiencing a temp<strong>or</strong>ary <strong>cable</strong> <strong>or</strong> satellite outage; check with your <strong>cable</strong> <strong>or</strong> satellite provider.<br />
Your video <strong>cable</strong> may have come loose. Make sure all the <strong>cable</strong> connections on the back of your DVR are secure.<br />
Verify that you are receiving a video signal by temp<strong>or</strong>arily connecting the video source directly to the TV. If you still do <strong>no</strong>t see<br />
any video, there may be a problem with your <strong>cable</strong>, satellite <strong>or</strong> antenna equipment.<br />
The <strong>cable</strong>s you are using to connect your DVR to your TV <strong>or</strong> other equipment may be damaged <strong>or</strong> defective. Try exchanging the<br />
<strong>cable</strong>s connected to the DVR with other <strong>cable</strong>s that you k<strong>no</strong>w are w<strong>or</strong>king properly.<br />
8<br />
139
140<br />
Chapter 8 Troubleshooting<br />
Restart your DVR. (From TiVo Central, select Messages & <strong>Setup</strong>, then Restart <strong>or</strong> Reset System, then Restart the DVR. Press<br />
THUMBS DOWN three times, then press ENTER. You will see the Welcome screen, and the system will restart within about 45<br />
seconds. You can also restart the DVR by unplugging it, waiting 15 seconds, then plugging it back in.<br />
Questions About the TiVo ® Service<br />
Will my DVR still w<strong>or</strong>k without the TiVo service?<br />
Without the TiVo service, your DVR will have extremely limited functionality. The DVR was designed to be used exclusively with<br />
the TiVo service. The TiVo service is required <strong>f<strong>or</strong></strong> proper operation of the DVR. No functionality is represented, warranted <strong>or</strong> should<br />
be expected without a subscription to the TiVo service. The DVR uses the program in<strong>f<strong>or</strong></strong>mation provided by the TiVo service to<br />
rec<strong>or</strong>d the programs you request, to provide Season Pass functionality, to power the program guide, to allow you to search <strong>f<strong>or</strong></strong><br />
programs by name, etc. The TiVo service may also provide you with new Showcases, TiVolution Magazine, and service updates.<br />
What happens if my DVR loses power temp<strong>or</strong>arily?<br />
Everything is saved—including your Now Playing programs—regardless of the length of time the DVR is without power. The <strong>only</strong><br />
thing you will miss is a rec<strong>or</strong>ding that was scheduled to occur during the time the power was out.<br />
Will the TiVo service collect in<strong>f<strong>or</strong></strong>mation about my viewing habits?<br />
TiVo has designed its system and instituted policies to ensure that TiVo is unable to access any of your personally identifiable<br />
viewing in<strong>f<strong>or</strong></strong>mation without your pri<strong>or</strong> consent. TiVo does collect a<strong>no</strong>nymous viewing in<strong>f<strong>or</strong></strong>mation; that is, in<strong>f<strong>or</strong></strong>mation about<br />
viewing choices made while using your DVR, which does <strong>no</strong>t identify you as an individual <strong>or</strong> household. In other w<strong>or</strong>ds, there is <strong>no</strong><br />
contact in<strong>f<strong>or</strong></strong>mation associated with the viewing in<strong>f<strong>or</strong></strong>mation that could identify the viewing in<strong>f<strong>or</strong></strong>mation as coming from you <strong>or</strong> your<br />
household. If you don’t want even your a<strong>no</strong>nymous viewing in<strong>f<strong>or</strong></strong>mation used in any way, you may simply call and tell us, and we<br />
will stop collecting it. (See page 124 <strong>f<strong>or</strong></strong> our phone number.) F<strong>or</strong> m<strong>or</strong>e in<strong>f<strong>or</strong></strong>mation, see Chapter 9 <strong>or</strong> go to www.tivo.com/privacy.<br />
How is in<strong>f<strong>or</strong></strong>mation from the TiVo service delivered to my DVR?<br />
The DVR automatically makes regular connections to the TiVo service to download program in<strong>f<strong>or</strong></strong>mation and other data.<br />
In<strong>f<strong>or</strong></strong>mation may also be delivered by a special TiVo program that is rec<strong>or</strong>ded late at night (when it does <strong>no</strong>t conflict with any of your<br />
requested rec<strong>or</strong>dings).
Questions About Netw<strong>or</strong>king<br />
I can’t find “Edit phone <strong>or</strong> netw<strong>or</strong>k settings.”<br />
Questions About Netw<strong>or</strong>king<br />
The menu item “Edit phone settings” will change to “Edit phone <strong>or</strong> netw<strong>or</strong>k settings” after you connect a netw<strong>or</strong>k adapter that the<br />
DVR recognizes to the DVR’s USB p<strong>or</strong>t. To see the Phone & Netw<strong>or</strong>k <strong>Setup</strong> screen, press the TiVo button to go to TiVo Central,<br />
then select Messages & <strong>Setup</strong>, then Settings, then Phone & Netw<strong>or</strong>k <strong>Setup</strong>.<br />
If you have attached an adapter and still see “Edit phone settings:”<br />
Make sure the USB <strong>cable</strong> between the adapter and the DVR is plugged firmly into both devices.<br />
Confirm that you are using a recommended adapter. Check the list online at www.tivo.com/adapters. You may need to use a<br />
different adapter.<br />
My DVR is <strong>no</strong>t connecting to the TiVo service.<br />
You can make the DVR connect to the TiVo service at any time. Press the TiVo button to go to TiVo Central, then select Messages<br />
& <strong>Setup</strong>, then Settings, then Phone & Netw<strong>or</strong>k <strong>Setup</strong>, then “Connect to the TiVo service <strong>no</strong>w.”<br />
Your DVR can connect to the TiVo service via a home netw<strong>or</strong>k’s always-on broadband Internet connection, <strong>or</strong> via a phone line. To<br />
change the type of connection your DVR uses to connect to the TiVo service, press the TiVo button to go to TiVo Central, then select<br />
Messages & <strong>Setup</strong>, then Settings, then Phone & Netw<strong>or</strong>k <strong>Setup</strong>, then “Change connection type.”<br />
If your DVR is having trouble connecting via a broadband Internet connection:<br />
Check that the Internet connection is available, then troubleshoot. There are two links in the chain between your DVR and<br />
the Internet: your DVR’s connection to your home netw<strong>or</strong>k, and your home netw<strong>or</strong>k’s connection to the Internet. First, confirm<br />
that the connection between your home netw<strong>or</strong>k and the Internet is w<strong>or</strong>king. Try to go online and browse a web site from a<br />
computer on the same netw<strong>or</strong>k as your DVR. If you can<strong>no</strong>t browse the Internet, you must fix the connection from your netw<strong>or</strong>k<br />
to the Internet. After you have fixed this connection, try again to make your DVR connect to the TiVo service. (Press the TiVo<br />
button to go to TiVo Central, then select Messages & <strong>Setup</strong>, then Settings, then Phone & Netw<strong>or</strong>k <strong>Setup</strong>, then “Connect to the<br />
TiVo service <strong>no</strong>w.”) If you can browse the web, then see “My DVR is <strong>no</strong>t connecting to my home netw<strong>or</strong>k,” below.<br />
8<br />
141
142<br />
Chapter 8 Troubleshooting<br />
<strong>Use</strong> a phone line. <strong>Use</strong> a regular phone line to connect to the TiVo service.<br />
If your DVR is having trouble connecting over a regular phone line:<br />
<strong>Use</strong> broadband. If you have a home netw<strong>or</strong>k with a broadband Internet connection, try allowing your DVR to use it to connect<br />
to the TiVo service over the Internet. Doing this eliminates the DVR’s need to use a phone line. See Chapter 7 <strong>f<strong>or</strong></strong> m<strong>or</strong>e details.<br />
My DVR is <strong>no</strong>t connecting to my home netw<strong>or</strong>k.<br />
Any of the steps below may fix a netw<strong>or</strong>k connection; you probably will <strong>no</strong>t have to complete each one. F<strong>or</strong> additional steps <strong>f<strong>or</strong></strong> wireless<br />
netw<strong>or</strong>ks, see “My DVR is <strong>no</strong>t connecting to my wireless home netw<strong>or</strong>k.” on page 143.<br />
1. Check netw<strong>or</strong>k adapter.<br />
The netw<strong>or</strong>k adapter <strong>or</strong> <strong>cable</strong>s could be defective. If you have a<strong>no</strong>ther adapter <strong>or</strong> USB <strong>cable</strong> available, try that adapter <strong>or</strong> <strong>cable</strong>.<br />
The netw<strong>or</strong>k adapter that you attached may <strong>no</strong>t be supp<strong>or</strong>ted. If your netw<strong>or</strong>k adapter is compatible with your DVR, and functioning<br />
properly, a MAC address—an identifier unique to the netw<strong>or</strong>k adapter you purchased—is visible on the Phone & Netw<strong>or</strong>k <strong>Setup</strong><br />
screen. To check, from TiVo Central, select Messages & <strong>Setup</strong>, then Settings, then Phone & Netw<strong>or</strong>k <strong>Setup</strong>. The MAC address<br />
should be on the top right-hand side of the Phone & Netw<strong>or</strong>k <strong>Setup</strong> screen. If you do <strong>no</strong>t see a MAC address listed, your DVR is <strong>no</strong>t<br />
recognizing the netw<strong>or</strong>k adapter you installed. The adapter is either <strong>no</strong>t compatible, <strong>no</strong>t functioning properly, <strong>or</strong> <strong>no</strong>t properly<br />
connected. If you do see a MAC address, the adapter you are using may <strong>or</strong> may <strong>no</strong>t be compatible. F<strong>or</strong> m<strong>or</strong>e in<strong>f<strong>or</strong></strong>mation, see “USB<br />
P<strong>or</strong>ts, Wireless and Wired Netw<strong>or</strong>k Adapters” on page 106.<br />
2. Check connection to the netw<strong>or</strong>k adapter. Unplug the USB <strong>cable</strong> from the back panel of your DVR and then plug it back in. Make<br />
sure the <strong>cable</strong> is pushed all the way in; sometimes lights on the adapter turn on be<strong>f<strong>or</strong></strong>e the USB <strong>cable</strong> is pushed all the way in. Unplug<br />
the side of the USB <strong>cable</strong> connected to the adapter and then plug it back in.<br />
3. Restart the DVR. Press the TiVo button on the remote control to go to TiVo Central, then select Messages & <strong>Setup</strong>, then Restart <strong>or</strong><br />
Reset System, then Restart the DVR. Press THUMBS DOWN three times, then press ENTER.<br />
4. Check physical connections. Ensure that all netw<strong>or</strong>k equipment is receiving power and all <strong>cable</strong> connections <strong>f<strong>or</strong></strong> routers, hubs,<br />
access points, and computers are w<strong>or</strong>king. Verify that the “connection” light is lit on devices connected to the netw<strong>or</strong>k.
Questions About Netw<strong>or</strong>king<br />
5. Powercycle netw<strong>or</strong>k devices. If you have a router <strong>or</strong> wireless access point, unplug it, wait a moment, and then plug it back in. This<br />
will temp<strong>or</strong>arily halt your netw<strong>or</strong>k’s Internet connection. It may take a minute <strong>f<strong>or</strong></strong> your equipment to “restart” after you plug it in.<br />
6. Check your Netw<strong>or</strong>k Settings. Verify that your Netw<strong>or</strong>k Settings are c<strong>or</strong>rect. Complete TCP/IP Settings, even if you did <strong>no</strong>t when<br />
you first connected your DVR. F<strong>or</strong> m<strong>or</strong>e in<strong>f<strong>or</strong></strong>mation, see “Completing the DVR’s Netw<strong>or</strong>k Settings” on page 112.<br />
7. Update router <strong>or</strong> home gateway firmware. If your home netw<strong>or</strong>k includes using a router, home gateway, <strong>or</strong> wireless access point, it<br />
may need a firmware update. Firmware is a software program that is loaded onto a hardware device. You can usually find any<br />
updated firmware at the Customer Supp<strong>or</strong>t web site <strong>f<strong>or</strong></strong> the manufacturer of your hardware. (F<strong>or</strong> example, if you have a Linksys<br />
device, check http://www.linksys.com/download/.) Older firmware may cause unpredictable results. It may be necessary to powercycle<br />
your device be<strong>f<strong>or</strong></strong>e and after you reinstall the firmware.<br />
8. Check Static IP Address. If you assigned an IP address to your DVR, check that its IP address is unique on your netw<strong>or</strong>k. Also,<br />
confirm that the first three sets of numbers of the DVR’s IP address are the same as those of other devices on the netw<strong>or</strong>k. (F<strong>or</strong><br />
example, if you computer’s IP address starts with “192.168.1” then your DVR’s IP address must also start with“192.168.1”.)<br />
You may have assigned a static IP address on a netw<strong>or</strong>k with a DHCP server. If your netw<strong>or</strong>k includes a DHCP server (<strong>f<strong>or</strong></strong><br />
example, as part of your router), you should <strong>no</strong>t assign static IP addresses to devices on the netw<strong>or</strong>k. Go to TiVo Central, then<br />
select Messages & <strong>Setup</strong>, then Settings, then Phone & Netw<strong>or</strong>k <strong>Setup</strong>, then Edit phone <strong>or</strong> netw<strong>or</strong>k settings, then TCP/IP Settings,<br />
then select “Obtain IP address automatically.”<br />
If you have a wireless netw<strong>or</strong>k, also try the steps below.<br />
My DVR is <strong>no</strong>t connecting to my wireless home netw<strong>or</strong>k.<br />
Connecting to the netw<strong>or</strong>k access point may take several minutes once the problem is resolved. Be certain the Phone & Netw<strong>or</strong>k <strong>Setup</strong><br />
screen has had time to update to display the true netw<strong>or</strong>k status be<strong>f<strong>or</strong></strong>e making any additional changes. To refresh the Phone & Netw<strong>or</strong>k<br />
<strong>Setup</strong> screen using the remote control, press the LEFT arrow to go to the previous screen, and then press the RIGHT arrow to return to<br />
the Phone & Netw<strong>or</strong>k <strong>Setup</strong> screen.<br />
1. Check power at wireless access point. Ensure the wireless access point <strong>or</strong> wireless router is receiving power and that the<br />
“connection” light is on.<br />
8<br />
143
144<br />
Chapter 8 Troubleshooting<br />
2. Change passw<strong>or</strong>d <strong>f<strong>or</strong></strong>mat. If you used an alphanumeric passw<strong>or</strong>d <strong>f<strong>or</strong></strong> your wireless netw<strong>or</strong>k, try using a hexadecimal passw<strong>or</strong>d<br />
instead. You can find a hexadecimal passw<strong>or</strong>d (sometimes referred to as a “Key” <strong>or</strong> “WEP Key”) in the configuration settings <strong>f<strong>or</strong></strong><br />
your wireless access point <strong>or</strong> wireless router. If m<strong>or</strong>e than one hexadecimal passw<strong>or</strong>d is listed, always use the first one. To change<br />
the passw<strong>or</strong>d <strong>f<strong>or</strong></strong>mat, follow the instructions <strong>f<strong>or</strong></strong> completing Wireless Settings at “Wireless Settings <strong>f<strong>or</strong></strong> a Home Netw<strong>or</strong>k” on<br />
page 112.<br />
3. Check signal strength. On the Phone & Netw<strong>or</strong>k <strong>Setup</strong> screen (press the TiVo button to go to TiVo Central, then select Messages &<br />
<strong>Setup</strong>, then Settings, then Phone & Netw<strong>or</strong>k <strong>Setup</strong>), check the wireless signal strength.<br />
The following may improve wireless signal strength:<br />
Make sure the wireless adapter is placed well away from the DVR’s power supply, <strong>or</strong> power strips, <strong>or</strong> surge protect<strong>or</strong>s. Any of<br />
these may cause interference and reduce signal strength. Some household appliances, such as microwave ovens and 2.4 GHz<br />
c<strong>or</strong>dless phones, may also reduce signal strength when they are in use.<br />
Verify that the wireless netw<strong>or</strong>k adapter’s antenna is fully extended.<br />
Move the wireless netw<strong>or</strong>k adapt<strong>or</strong> to a higher position, <strong>or</strong> give it a better line of sight to your wireless gateway (router).<br />
Reduce the distance between the wireless netw<strong>or</strong>k adapter and the wireless access point. Wireless netw<strong>or</strong>ks typically have a<br />
range of 100 - 300 feet, but distances can vary based on walls, flo<strong>or</strong>s, and other obstructions. It may be necessary to adjust the<br />
location adapter of your wireless access point <strong>or</strong> router to be closer to the netw<strong>or</strong>k adapter attached to your DVR(s).<br />
Consider adding a signal booster to your netw<strong>or</strong>k (available from some wireless equipment manufacturers).<br />
4. Check netw<strong>or</strong>k name. On the Wireless Settings screen (press the TiVo button to go to TiVo Central, then select Messages & <strong>Setup</strong>,<br />
then Settings, then Phone & Netw<strong>or</strong>k <strong>Setup</strong>, then Edit phone <strong>or</strong> netw<strong>or</strong>k settings, then Wireless Settings), check that the netw<strong>or</strong>k<br />
name (SSID) <strong>f<strong>or</strong></strong> your netw<strong>or</strong>k access point is listed c<strong>or</strong>rectly. To change the netw<strong>or</strong>k name, follow the instructions <strong>f<strong>or</strong></strong> completing<br />
Wireless Settings at “Wireless Settings <strong>f<strong>or</strong></strong> a Home Netw<strong>or</strong>k” on page 112.<br />
If you haven’t already done so, you should also try the steps in “My DVR is <strong>no</strong>t connecting to my home netw<strong>or</strong>k.” on page 142.
CHAPTER<br />
9<br />
Privacy, Service, Warranty,<br />
and Licenses<br />
TiVo Privacy Policy 147<br />
TiVo Service Agreement 153<br />
HUMAX DVR Limited Warranty 159<br />
FCC In<strong>f<strong>or</strong></strong>mation 161<br />
Safety Instructions 162<br />
GNU General Public License 164<br />
Linux and Other Imp<strong>or</strong>tant In<strong>f<strong>or</strong></strong>mation 169
146<br />
Chapter 9<br />
INTRODUCTION<br />
TiVo Inc. (“TiVo”) is committed to protecting the privacy of your<br />
personal in<strong>f<strong>or</strong></strong>mation. The TiVo Privacy Policy is published on the W<strong>or</strong>ld<br />
Wide Web at www.tivo.com/privacy. We have printed it here <strong>f<strong>or</strong></strong> your<br />
convenience, but we encourage you to check the web site <strong>or</strong> call us <strong>f<strong>or</strong></strong> a<br />
copy of the current Privacy Policy. This Privacy Policy applies to your<br />
use of the TiVo service.<br />
<strong>Use</strong> of your TiVo ® Digital Video Rec<strong>or</strong>der (referred to in this Privacy<br />
Policy as your “TiVo DVR”) with the TiVo service will signify your<br />
acceptance of this Privacy Policy. Thank you <strong>f<strong>or</strong></strong> using the TiVo service!<br />
SUMMARY OF THE TIVO PRIVACY POLICY<br />
TiVo k<strong>no</strong>ws how imp<strong>or</strong>tant personal privacy is to you, so we have<br />
designed our system and established strict policies to help protect the<br />
privacy of your Personally Identifiable Viewing In<strong>f<strong>or</strong></strong>mation. In<br />
summary, we want you to k<strong>no</strong>w that:<br />
The TiVo DVR collects certain types of in<strong>f<strong>or</strong></strong>mation from its users,<br />
including A<strong>no</strong>nymous Viewing In<strong>f<strong>or</strong></strong>mation, Diag<strong>no</strong>stic In<strong>f<strong>or</strong></strong>mation,<br />
Commerce In<strong>f<strong>or</strong></strong>mation, and Service In<strong>f<strong>or</strong></strong>mation (each as defined<br />
below).<br />
TiVo has <strong>no</strong> way to access any of your Personally Identifiable<br />
Viewing In<strong>f<strong>or</strong></strong>mation (as defined below) from your TiVo DVR<br />
without your pri<strong>or</strong> consent. Absent your consent, TiVo has <strong>no</strong> way of<br />
k<strong>no</strong>wing what shows you-as an individual <strong>or</strong> household- have<br />
watched, rec<strong>or</strong>ded, <strong>or</strong> rated with “Thumbs Up” <strong>or</strong> “Thumbs Down.”<br />
TiVo does collect A<strong>no</strong>nymous Viewing In<strong>f<strong>or</strong></strong>mation; that is,<br />
in<strong>f<strong>or</strong></strong>mation about viewing choices made while using your TiVo<br />
DVR, but that does <strong>no</strong>t identify you as an individual <strong>or</strong> household. In<br />
other w<strong>or</strong>ds, there is <strong>no</strong> personally identifiable in<strong>f<strong>or</strong></strong>mation<br />
associated with your A<strong>no</strong>nymous Viewing In<strong>f<strong>or</strong></strong>mation that could<br />
Privacy, Service, Warranty, and Licenses<br />
identify the A<strong>no</strong>nymous Viewing In<strong>f<strong>or</strong></strong>mation as coming from you <strong>or</strong><br />
your household.<br />
TiVo also collects Diag<strong>no</strong>stic In<strong>f<strong>or</strong></strong>mation from a small number of<br />
randomly sampled TiVo DVRs <strong>f<strong>or</strong></strong> quality control purposes. If you<br />
don't want your A<strong>no</strong>nymous Viewing In<strong>f<strong>or</strong></strong>mation and Diag<strong>no</strong>stic<br />
In<strong>f<strong>or</strong></strong>mation used in any way, simply tell us by writing to us <strong>or</strong><br />
calling us at 1-877-367-8486.<br />
If you affirmatively elect to engage in a commercial transaction such<br />
as by responding to an advertisement <strong>or</strong> promotion, TiVo will collect<br />
and disclose your Commerce In<strong>f<strong>or</strong></strong>mation (as defined below) to the<br />
commerce partner fulfilling the transaction.<br />
If you affirmatively elect to use the Remote Scheduling feature of<br />
TiVo’s Home Media Option TM package, TiVo will collect the<br />
Personally Identifiable Viewing In<strong>f<strong>or</strong></strong>mation associated with<br />
fulfillment of your individual request(s). <strong>Use</strong> of the Remote<br />
Scheduling feature, however, does <strong>no</strong>t change your privacy<br />
preferences with respect to viewing choices made in the privacy of<br />
your household.<br />
TiVo intends to make available new services in the future. These<br />
services will be governed by the privacy policies of the respective<br />
service providers.<br />
NOTE TO CUSTOMERS WITH MORE THAN ONE TIVO DVR:<br />
Generally, TiVo will cause all of the TiVo DVRs on your account<br />
receiving the TiVo service to have the same “opt” status. See Sec. 2.8<br />
of the Privacy Policy <strong>f<strong>or</strong></strong> further details.
TiVo Privacy Policy<br />
Please read this Privacy Policy carefully. It provides imp<strong>or</strong>tant<br />
in<strong>f<strong>or</strong></strong>mation on how your privacy is protected when using the TiVo<br />
service.<br />
In <strong>or</strong>der to provide you with a better, m<strong>or</strong>e satisfying television<br />
experience, TiVo Inc. (“TiVo”) collects and uses certain types of<br />
in<strong>f<strong>or</strong></strong>mation, as described in this Privacy Policy. The Subscriber<br />
In<strong>f<strong>or</strong></strong>mation (defined below) you provide to the TiVo ® Digital Video<br />
Rec<strong>or</strong>der (referred to in this Privacy Policy as your “TiVo DVR”) in your<br />
house and to us at TiVo enables your TiVo DVR to select programs you<br />
want it to rec<strong>or</strong>d and to suggest programs you might enjoy.<br />
By using your TiVo DVR and the TiVo service, you consent to the<br />
provisions of this Privacy Policy including the privacy preferences set<br />
<strong>f<strong>or</strong></strong>th in Section 4.1. This Privacy Policy explains our commitment to<br />
your privacy in the following areas:<br />
1 Our Subscriber In<strong>f<strong>or</strong></strong>mation Definitions. In discussing the kind<br />
of in<strong>f<strong>or</strong></strong>mation TiVo collects, it is imp<strong>or</strong>tant to distinguish between<br />
a<strong>no</strong>nymous in<strong>f<strong>or</strong></strong>mation and other in<strong>f<strong>or</strong></strong>mation that specifically<br />
identifies you <strong>or</strong> your household. Too often, people refer to “personal<br />
in<strong>f<strong>or</strong></strong>mation” <strong>or</strong> “personally identifiable in<strong>f<strong>or</strong></strong>mation” without really<br />
making clear what they mean. TiVo has developed the following<br />
definitions to help clarify this imp<strong>or</strong>tant issue. We use “Subscriber<br />
In<strong>f<strong>or</strong></strong>mation” as a general term that refers to any in<strong>f<strong>or</strong></strong>mation relating<br />
to you <strong>or</strong> your use of the TiVo service. The following are m<strong>or</strong>e<br />
specific types of Subscriber In<strong>f<strong>or</strong></strong>mation.<br />
1.1 “Account In<strong>f<strong>or</strong></strong>mation” means in<strong>f<strong>or</strong></strong>mation about you and your<br />
TiVo DVR, including your Contact In<strong>f<strong>or</strong></strong>mation (defined below) and<br />
other in<strong>f<strong>or</strong></strong>mation linked to your Contact In<strong>f<strong>or</strong></strong>mation such as the<br />
model and Service Number of your TiVo DVR, your ZIP code,<br />
TiVo Privacy Policy<br />
software version used, your TV programming source (<strong>cable</strong>, satellite<br />
<strong>or</strong> an antenna), the type of <strong>cable</strong> hook-up (digital <strong>or</strong> analog) and level<br />
of TiVo service, privacy preferences, and the <strong>cable</strong> <strong>or</strong> satellite <strong>box</strong><br />
model that you use. You provide us with this in<strong>f<strong>or</strong></strong>mation when you<br />
set up your TiVo DVR and when you register as a subscriber to the<br />
TiVo service. This Service In<strong>f<strong>or</strong></strong>mation (defined below) is sent to<br />
TiVo on an ongoing basis to enable TiVo to provide the TiVo service<br />
to your TiVo DVR. Account In<strong>f<strong>or</strong></strong>mation also includes in<strong>f<strong>or</strong></strong>mation<br />
we may receive about you in a communication from you <strong>or</strong> a third<br />
party. Account In<strong>f<strong>or</strong></strong>mation does <strong>no</strong>t include any Personally<br />
Identifiable Viewing In<strong>f<strong>or</strong></strong>mation, <strong>or</strong> A<strong>no</strong>nymous Viewing<br />
In<strong>f<strong>or</strong></strong>mation, as defined below.<br />
a “Contact In<strong>f<strong>or</strong></strong>mation” means in<strong>f<strong>or</strong></strong>mation that allows<br />
someone to identify <strong>or</strong> contact you, including, <strong>f<strong>or</strong></strong> example: your<br />
name, address, telephone number, and e-mail address. Contact<br />
In<strong>f<strong>or</strong></strong>mation is a subset of Account In<strong>f<strong>or</strong></strong>mation and is thus linked<br />
to your TiVo DVR’s Service Number. Your ZIP code by itself,<br />
while part of your address, is <strong>no</strong>t Contact In<strong>f<strong>or</strong></strong>mation because<br />
your ZIP code alone does <strong>no</strong>t allow someone to identify <strong>or</strong><br />
contact you.<br />
b “Service In<strong>f<strong>or</strong></strong>mation” means in<strong>f<strong>or</strong></strong>mation necessary <strong>f<strong>or</strong></strong> TiVo<br />
to provide service to your TiVo DVR. Examples of Service<br />
In<strong>f<strong>or</strong></strong>mation include your software version number, your TV<br />
programming source, level of service, and the success status of<br />
the last attempted service connection (e.g., periodic call). This<br />
in<strong>f<strong>or</strong></strong>mation is always transmitted to TiVo when your TiVo DVR<br />
is connected to the TiVo servers.<br />
147<br />
9
148<br />
Chapter 9<br />
1.2 “Personally Identifiable Viewing In<strong>f<strong>or</strong></strong>mation” means<br />
in<strong>f<strong>or</strong></strong>mation about the viewing choices that you and those in your<br />
household make while using your TiVo DVR, if that in<strong>f<strong>or</strong></strong>mation is<br />
linked to <strong>or</strong> associated with your Account In<strong>f<strong>or</strong></strong>mation. Your TiVo<br />
DVR st<strong>or</strong>es your viewing in<strong>f<strong>or</strong></strong>mation so that it may recommend<br />
viewing choices and personalize your viewing experience. We have<br />
w<strong>or</strong>ked very hard to design our system to ensure that <strong>no</strong> Personally<br />
Identifiable Viewing In<strong>f<strong>or</strong></strong>mation may be sent to TiVo without your<br />
express consent. You may choose to consent to TiVo’s collection of<br />
Personally Identifiable Viewing In<strong>f<strong>or</strong></strong>mation by changing your<br />
privacy preferences as provided in Section 4.1.<br />
1.3 “A<strong>no</strong>nymous Viewing In<strong>f<strong>or</strong></strong>mation” means in<strong>f<strong>or</strong></strong>mation about<br />
viewing choices that you and those in your household make while<br />
using your TiVo DVR, but is <strong>no</strong>t associated with <strong>or</strong> linked to any<br />
Contact In<strong>f<strong>or</strong></strong>mation. Your TiVo DVR sends A<strong>no</strong>nymous Viewing<br />
In<strong>f<strong>or</strong></strong>mation to TiVo on an ongoing basis. This in<strong>f<strong>or</strong></strong>mation allows<br />
TiVo to k<strong>no</strong>w that a TiVo service subscriber from a particular ZIP<br />
code watched certain programming but we are unable to associate<br />
those viewing choices with you. You may request that TiVo block<br />
the collection of A<strong>no</strong>nymous Viewing In<strong>f<strong>or</strong></strong>mation from your TiVo<br />
DVR as described in Section 4.1.<br />
1.4 “Diag<strong>no</strong>stic In<strong>f<strong>or</strong></strong>mation” means a log file containing detailed<br />
in<strong>f<strong>or</strong></strong>mation about the operation of your TiVo DVR, such as mem<strong>or</strong>y<br />
consumption, user interface response time, disk space, enclosure<br />
temperature, and enclosure fan speed. Diag<strong>no</strong>stic In<strong>f<strong>or</strong></strong>mation logs<br />
contain your TiVo DVR’s Service Number and are thus associated<br />
with your Account In<strong>f<strong>or</strong></strong>mation. You may request that TiVo block<br />
the collection of Diag<strong>no</strong>stic In<strong>f<strong>or</strong></strong>mation logs from your TiVo DVR<br />
as described in Section 4.1.<br />
1.5 “Commerce In<strong>f<strong>or</strong></strong>mation” means personally identifiable<br />
in<strong>f<strong>or</strong></strong>mation that enables a commerce partner to fulfill your request to<br />
Privacy, Service, Warranty, and Licenses<br />
participate in a promotion <strong>or</strong> transaction. From time to time, TiVo<br />
may present special offers and/<strong>or</strong> enable you to purchase goods and<br />
services from TiVo, <strong>or</strong> third party advertisers <strong>or</strong> promoters. You<br />
would be in<strong>f<strong>or</strong></strong>med of such offers on screen while using the TiVo<br />
service. Should you decide to take advantage of such an offer <strong>or</strong><br />
engage in a transaction, TiVo will collect and communicate your<br />
relevant Contact In<strong>f<strong>or</strong></strong>mation and your interest in a specific offer <strong>or</strong><br />
transaction to the commerce partner spons<strong>or</strong>ing the promotion <strong>or</strong><br />
transaction. In addition to fulfilling your request, that commerce<br />
partner may also use your Commerce In<strong>f<strong>or</strong></strong>mation to send you other<br />
in<strong>f<strong>or</strong></strong>mation in which you might be interested consistent with its own<br />
privacy policies. This in<strong>f<strong>or</strong></strong>mation is collected and disclosed by TiVo<br />
<strong>only</strong> upon your affirmative response to an offer. NOTE: Depending<br />
on your level of TiVo service and the model of your TiVo DVR, such<br />
features may <strong>no</strong>t be available to you.<br />
1.6 “Feature-Generated Request In<strong>f<strong>or</strong></strong>mation” means personally<br />
identifiable in<strong>f<strong>or</strong></strong>mation about television programming that you<br />
request your TiVo DVR to rec<strong>or</strong>d <strong>or</strong> identify using a feature offered<br />
by TiVo, such as Remote Scheduling. Should you decide to use such<br />
a feature, TiVo will collect the Personally Identifiable Viewing<br />
In<strong>f<strong>or</strong></strong>mation associated with the fulfillment of your rec<strong>or</strong>ding (<strong>or</strong><br />
scheduling conflict) request. TiVo may use this Personally<br />
Identifiable Viewing In<strong>f<strong>or</strong></strong>mation as described in Section 2.2. TiVo<br />
collects this in<strong>f<strong>or</strong></strong>mation <strong>only</strong> upon your affirmative choice to use a<br />
particular feature. NOTE: Depending on your level of TiVo service<br />
and the model of your TiVo DVR, such features may <strong>no</strong>t be available<br />
to you.<br />
2 <strong>Use</strong> of Subscriber In<strong>f<strong>or</strong></strong>mation<br />
2.1 Account In<strong>f<strong>or</strong></strong>mation. We use your Account In<strong>f<strong>or</strong></strong>mation to<br />
establish and provide you with your TiVo service, provide the
necessary resources to your TiVo DVR, offer you new services when<br />
they are available, and <strong>f<strong>or</strong></strong> other legitimate business purposes. F<strong>or</strong><br />
example, we use your e-mail address to communicate with you<br />
regarding new services, and to exclude you from offers <strong>f<strong>or</strong></strong> services<br />
you may already have. We also use such in<strong>f<strong>or</strong></strong>mation to create your<br />
account with TiVo and to bill you <strong>f<strong>or</strong></strong> the TiVo service. K<strong>no</strong>wing<br />
your ZIP code, programming source, and in<strong>f<strong>or</strong></strong>mation about your<br />
<strong>cable</strong> <strong>or</strong> satellite <strong>box</strong> model allows us to determine which<br />
programming in<strong>f<strong>or</strong></strong>mation (e.g., times and channels of programs) to<br />
send to your TiVo DVR.<br />
We use your Account In<strong>f<strong>or</strong></strong>mation to communicate with you about<br />
upcoming features in the TiVo service <strong>or</strong> promotions that might<br />
interest you. You may opt <strong>no</strong>t to receive communications in the<br />
future as explained in Section 4.1. We also use your Account<br />
In<strong>f<strong>or</strong></strong>mation in aggregate <strong>f<strong>or</strong></strong>m (i.e., excluding any Contact<br />
In<strong>f<strong>or</strong></strong>mation) to generate demographic profiles of our users as a whole<br />
to assist us to, <strong>f<strong>or</strong></strong> example, identify future users of the TiVo service<br />
<strong>or</strong> other services.<br />
2.2 Personally Identifiable Viewing In<strong>f<strong>or</strong></strong>mation. Your TiVo<br />
DVR uses your viewing in<strong>f<strong>or</strong></strong>mation to tune, schedule, and rec<strong>or</strong>d<br />
programs. Your TiVo DVR also uses your viewing in<strong>f<strong>or</strong></strong>mation to<br />
recommend programs <strong>f<strong>or</strong></strong> you. Your TiVo DVR may also use this<br />
viewing in<strong>f<strong>or</strong></strong>mation to select advertisements <strong>or</strong> other promotions <strong>f<strong>or</strong></strong><br />
you that you may be interested in. TiVo does <strong>no</strong>t receive the<br />
Personally Identifiable Viewing In<strong>f<strong>or</strong></strong>mation st<strong>or</strong>ed on your TiVo<br />
DVR without your consent. Absent your consent, <strong>no</strong> “tag” is added to<br />
the A<strong>no</strong>nymous Viewing In<strong>f<strong>or</strong></strong>mation transmitted from your TiVo<br />
DVR to TiVo that would enable TiVo to identify the TiVo DVR from<br />
which it came.<br />
If you expressly choose to allow TiVo to collect your Personally<br />
Identifiable Viewing In<strong>f<strong>or</strong></strong>mation, TiVo may use this in<strong>f<strong>or</strong></strong>mation <strong>f<strong>or</strong></strong><br />
TiVo Privacy Policy<br />
surveys, audience measurement, and other legitimate business<br />
purposes.<br />
2.3 A<strong>no</strong>nymous Viewing In<strong>f<strong>or</strong></strong>mation. We use A<strong>no</strong>nymous<br />
Viewing In<strong>f<strong>or</strong></strong>mation to develop rep<strong>or</strong>ts and analyses about what<br />
programs, advertisements, and types of programming our users (as a<br />
whole <strong>or</strong> in subgroups) watch <strong>or</strong> skip, <strong>f<strong>or</strong></strong> other programming <strong>or</strong><br />
advertising research, and <strong>f<strong>or</strong></strong> any other legitimate business purpose.<br />
F<strong>or</strong> example, we use A<strong>no</strong>nymous Viewing In<strong>f<strong>or</strong></strong>mation to develop<br />
inferences that people who watch show X also watch show Y. We<br />
also use A<strong>no</strong>nymous Viewing In<strong>f<strong>or</strong></strong>mation to help with the<br />
investigation of technical issues with our systems.<br />
2.4 Diag<strong>no</strong>stic In<strong>f<strong>or</strong></strong>mation. TiVo collects Diag<strong>no</strong>stic In<strong>f<strong>or</strong></strong>mation<br />
logs from a small number of randomly sampled TiVo DVRs <strong>f<strong>or</strong></strong><br />
quality control and technical troubleshooting purposes.<br />
2.5 Commerce In<strong>f<strong>or</strong></strong>mation. TiVo uses Commerce In<strong>f<strong>or</strong></strong>mation as<br />
described in Section 1.5.<br />
2.6 Feature Generated Requests In<strong>f<strong>or</strong></strong>mation. TiVo uses Feature<br />
Generated Request In<strong>f<strong>or</strong></strong>mation <strong>f<strong>or</strong></strong> the purposes described in Section<br />
1.6.<br />
2.7 Activating the TiVo Service. When you activate a TiVo DVR to<br />
receive the TiVo service, and it is the <strong>only</strong> TiVo DVR on your<br />
account receiving the TiVo service, your TiVo DVR will provide<br />
A<strong>no</strong>nymous Viewing In<strong>f<strong>or</strong></strong>mation and Diag<strong>no</strong>stic In<strong>f<strong>or</strong></strong>mation to<br />
TiVo. You may opt in to the collection of Personally Identifiable<br />
Viewing In<strong>f<strong>or</strong></strong>mation <strong>or</strong> opt out of TiVo’s collection of A<strong>no</strong>nymous<br />
Viewing In<strong>f<strong>or</strong></strong>mation and Diag<strong>no</strong>stic In<strong>f<strong>or</strong></strong>mation pursuant to the<br />
terms and conditions of this Privacy Policy.<br />
2.8 TiVo Customers with Multiple TiVo DVRs. TiVo will cause all<br />
of the TiVo DVRs on your account to have the same “opt” status.<br />
149<br />
9
150<br />
Chapter 9<br />
This means that if you opt out of our collection of A<strong>no</strong>nymous<br />
Viewing In<strong>f<strong>or</strong></strong>mation and Diag<strong>no</strong>stic In<strong>f<strong>or</strong></strong>mation from one TiVo<br />
DVR, we will <strong>no</strong>t collect A<strong>no</strong>nymous Viewing In<strong>f<strong>or</strong></strong>mation and<br />
Diag<strong>no</strong>stic In<strong>f<strong>or</strong></strong>mation from any of the TiVo DVRs on your account.<br />
If you request that TiVo collect your Personally Identifiable Viewing<br />
In<strong>f<strong>or</strong></strong>mation from one TiVo DVR, TiVo will collect Personally<br />
Identifiable Viewing In<strong>f<strong>or</strong></strong>mation from all of the TiVo DVRs on your<br />
account.<br />
3 Disclosure of Subscriber In<strong>f<strong>or</strong></strong>mation<br />
3.1 Generally. We disclose aggregated Account In<strong>f<strong>or</strong></strong>mation and<br />
aggregated A<strong>no</strong>nymous Viewing In<strong>f<strong>or</strong></strong>mation and any rep<strong>or</strong>ts <strong>or</strong><br />
analyses derived therefrom, to third parties including advertisers,<br />
broadcasters, consumer and market research companies and other<br />
<strong>or</strong>ganizations.<br />
3.2 Manufacturing and Service Provider Partners. In certain<br />
instances we will disclose to our hardware manufacturing partners<br />
and service provider partners (<strong>f<strong>or</strong></strong> example DIRECTV) the Account<br />
In<strong>f<strong>or</strong></strong>mation of users who have a DVR made by that manufacturing<br />
partner <strong>or</strong> receive a service from that service provider partner.<br />
However, TiVo contractually binds our manufacturing and service<br />
provider partners to comply with the provisions of this Privacy<br />
Policy. Our manufacturing and service provider partners are legally<br />
liable <strong>f<strong>or</strong></strong> misuse of Subscriber In<strong>f<strong>or</strong></strong>mation.<br />
3.3 Contract<strong>or</strong>s and Third Party Service Providers. We use<br />
contract<strong>or</strong>s to help with some of our operations. Some of these<br />
contract<strong>or</strong>s will have access to our databases of Subscriber<br />
In<strong>f<strong>or</strong></strong>mation on a temp<strong>or</strong>ary basis <strong>f<strong>or</strong></strong> specific tasks. TiVo also uses<br />
third parties to help with certain aspects of its operations, which may<br />
require disclosure of your Subscriber In<strong>f<strong>or</strong></strong>mation to them. F<strong>or</strong><br />
example, TiVo may use a third party to communicate with you (via<br />
Privacy, Service, Warranty, and Licenses<br />
telephone, e-mail, <strong>or</strong> letter) about your TiVo service <strong>or</strong> upcoming<br />
features <strong>or</strong> services, to mail rebate checks, to generate demographic<br />
profiles based on Subscriber In<strong>f<strong>or</strong></strong>mation of current TiVo service<br />
users, and to per<strong>f<strong>or</strong></strong>m other w<strong>or</strong>k that we may need to outsource.<br />
TiVo may additionally use a third party to process and collect<br />
payment <strong>f<strong>or</strong></strong> your TiVo service via your credit card. TiVo<br />
contractually binds these contract<strong>or</strong>s and third parties to use your<br />
Subscriber In<strong>f<strong>or</strong></strong>mation <strong>only</strong> as necessary to per<strong>f<strong>or</strong></strong>m the services<br />
they are asked to per<strong>f<strong>or</strong></strong>m. Such contract<strong>or</strong>s and third parties are<br />
legally liable <strong>f<strong>or</strong></strong> misuse of Subscriber In<strong>f<strong>or</strong></strong>mation.<br />
3.4 The “C<strong>or</strong>p<strong>or</strong>ate Family.” Although TiVo currently does <strong>no</strong>t have<br />
a parent company, any subsidiaries (other than TiVo International,<br />
Inc. and TiVo UK Ltd., which provides TiVo service in the United<br />
Kingdom), joint ventures, <strong>or</strong> other companies under a common<br />
control (collectively, “affiliates”), it may in the future. TiVo may<br />
share some <strong>or</strong> all of your Subscriber In<strong>f<strong>or</strong></strong>mation with these affiliates,<br />
in which case TiVo will require its affiliates to hon<strong>or</strong> this Privacy<br />
Policy. If a<strong>no</strong>ther company acquires TiVo, <strong>or</strong> acquires assets of TiVo<br />
that comprise <strong>or</strong> include your Subscriber In<strong>f<strong>or</strong></strong>mation, that company<br />
will possess the Subscriber In<strong>f<strong>or</strong></strong>mation collected by TiVo and it will<br />
assume the rights and obligations regarding your Subscriber<br />
In<strong>f<strong>or</strong></strong>mation as described in this Privacy Policy.<br />
3.5 Commerce Partners. When you elect to participate in a special<br />
offer <strong>or</strong> engage in a transaction with TiVo <strong>or</strong> a third party advertiser<br />
<strong>or</strong> promoter, TiVo will collect and disclose your Commerce<br />
In<strong>f<strong>or</strong></strong>mation to the commerce partner spons<strong>or</strong>ing and/<strong>or</strong> fulfilling the<br />
promotion. In addition to fulfilling your request, that commerce<br />
partner may also use your Commerce In<strong>f<strong>or</strong></strong>mation to send you other<br />
in<strong>f<strong>or</strong></strong>mation in which you might be interested consistent with its own<br />
privacy policies. This in<strong>f<strong>or</strong></strong>mation is disclosed <strong>only</strong> upon your<br />
affirmative response to an offer.
3.6 Fact<strong>or</strong>s Beyond Our Control. Your privacy is very imp<strong>or</strong>tant to<br />
us. Due to fact<strong>or</strong>s beyond our control, however, we can<strong>no</strong>t fully<br />
ensure that your Subscriber In<strong>f<strong>or</strong></strong>mation will <strong>no</strong>t be disclosed to third<br />
parties. F<strong>or</strong> example, we may be legally obligated to disclose<br />
Subscriber In<strong>f<strong>or</strong></strong>mation to local, state <strong>or</strong> federal governmental<br />
agencies <strong>or</strong> third parties under certain circumstances (including in<br />
response to a subpoena), <strong>or</strong> third parties may circumvent our security<br />
measures to unlawfully intercept <strong>or</strong> access your Subscriber<br />
In<strong>f<strong>or</strong></strong>mation.<br />
4 Your Choices Regarding Subscriber In<strong>f<strong>or</strong></strong>mation<br />
4.1 Limits on TiVo’s Collection, <strong>Use</strong>, and Disclosure of<br />
Subscriber In<strong>f<strong>or</strong></strong>mation. The default privacy preferences, to<br />
which you hereby consent, do <strong>no</strong>t allow TiVo to collect Personally<br />
Identifiable Viewing In<strong>f<strong>or</strong></strong>mation, but do allow TiVo to collect, use,<br />
and disclose A<strong>no</strong>nymous Viewing In<strong>f<strong>or</strong></strong>mation and Diag<strong>no</strong>stic<br />
In<strong>f<strong>or</strong></strong>mation logs, in addition to Account In<strong>f<strong>or</strong></strong>mation, in manners<br />
consistent with this Privacy Policy. Commerce In<strong>f<strong>or</strong></strong>mation is<br />
collected, used, and disclosed <strong>only</strong> upon your affirmative response to<br />
an offer. Feature-Generated Request In<strong>f<strong>or</strong></strong>mation is collected, used,<br />
and disclosed <strong>only</strong> upon your affirmative choice to use a particular<br />
feature.<br />
Even though A<strong>no</strong>nymous Viewing In<strong>f<strong>or</strong></strong>mation and Diag<strong>no</strong>stic<br />
In<strong>f<strong>or</strong></strong>mation do <strong>no</strong>t include any Contact In<strong>f<strong>or</strong></strong>mation, you may request<br />
that TiVo block the collection of A<strong>no</strong>nymous Viewing In<strong>f<strong>or</strong></strong>mation<br />
and Diag<strong>no</strong>stic In<strong>f<strong>or</strong></strong>mation from your TiVo DVR. You may further<br />
opt <strong>no</strong>t to receive communications that we send to you based on your<br />
Account In<strong>f<strong>or</strong></strong>mation; provided, however, that we will still send you<br />
communications TiVo deems imp<strong>or</strong>tant regarding your TiVo service.<br />
If you make this choice, you understand that we will <strong>no</strong>t be able to<br />
in<strong>f<strong>or</strong></strong>m you about any upcoming features, improvements, <strong>or</strong><br />
promotions regarding your TiVo service. In all cases, however, we<br />
TiVo Privacy Policy<br />
will collect and use your Account In<strong>f<strong>or</strong></strong>mation (including Service<br />
In<strong>f<strong>or</strong></strong>mation) to enable us to provide your TiVo DVR with the TiVo<br />
service. You may choose to change your privacy preferences to allow<br />
TiVo to collect Personally Identifiable Viewing In<strong>f<strong>or</strong></strong>mation from<br />
your TiVo DVR.<br />
If you would like to change your privacy preferences, you must either<br />
(a) send TiVo a signed written request at the address set <strong>f<strong>or</strong></strong>th in<br />
Section 8.3, <strong>or</strong> (b) call us at 1-877-367-8486 to request a change.<br />
NOTE: Please see Section 2.8 above <strong>f<strong>or</strong></strong> imp<strong>or</strong>tant provisions if you<br />
have multiple TiVo DVRs.<br />
4.2 Review and Update of Account In<strong>f<strong>or</strong></strong>mation. We believe you<br />
have a right to k<strong>no</strong>w your Contact In<strong>f<strong>or</strong></strong>mation, billing in<strong>f<strong>or</strong></strong>mation,<br />
and privacy preferences collected and st<strong>or</strong>ed by TiVo and to update<br />
<strong>or</strong> change such in<strong>f<strong>or</strong></strong>mation you believe is inc<strong>or</strong>rect. You may make a<br />
request by telephone, mail, <strong>or</strong> via the web (if and when available) to<br />
review such in<strong>f<strong>or</strong></strong>mation and we will mail you a printout of such<br />
in<strong>f<strong>or</strong></strong>mation. If you request that certain parts of such in<strong>f<strong>or</strong></strong>mation be<br />
changed, we will make the changes to the extent commercially<br />
practi<strong>cable</strong>. In addition, we will take commercially reasonable steps<br />
to propagate those changes to third parties with whom we may have<br />
shared such in<strong>f<strong>or</strong></strong>mation pursuant to this Privacy Policy.<br />
4.3 How to Delete In<strong>f<strong>or</strong></strong>mation. Should you decide to discontinue<br />
your TiVo service, you may make that request by telephone <strong>or</strong> mail<br />
and we will suspend billing <strong>f<strong>or</strong></strong> the TiVo service. After you<br />
discontinue the TiVo service, TiVo will maintain your Account<br />
In<strong>f<strong>or</strong></strong>mation <strong>only</strong> as long as necessary <strong>f<strong>or</strong></strong> business purposes. In<br />
addition, although we delete your Account In<strong>f<strong>or</strong></strong>mation from our<br />
“live” database, your Account In<strong>f<strong>or</strong></strong>mation may remain in our<br />
archives and rec<strong>or</strong>ds until they are destroyed.<br />
5 Comment Regarding Children. TiVo feels strongly about<br />
protecting the privacy of children and encourages parents to be<br />
151<br />
9
152<br />
Chapter 9<br />
involved in the television viewing of their min<strong>or</strong> children by, <strong>f<strong>or</strong></strong><br />
example, limiting the types of content min<strong>or</strong> children can watch.<br />
6 Separate Rules <strong>f<strong>or</strong></strong> the TiVo Web Site. We have a separate<br />
privacy policy that covers activities on our web site. However, if you<br />
register <strong>f<strong>or</strong></strong> TiVo service on the Web, <strong>or</strong> log in to your account<br />
preferences page (when available) to make changes to your account<br />
<strong>or</strong> request services, this Privacy Policy will apply to the Subscriber<br />
In<strong>f<strong>or</strong></strong>mation you provide to us in those instances. If you use the TiVo<br />
web site to access certain features <strong>or</strong> services such as Remote<br />
Scheduling, we may institute amendments and modifications to this<br />
Privacy Policy addressing the handling of your in<strong>f<strong>or</strong></strong>mation in<br />
providing you such features <strong>or</strong> services to which you must agree if<br />
you wish to use such features <strong>or</strong> services.<br />
7 Security of Subscriber In<strong>f<strong>or</strong></strong>mation. When you contact us by<br />
e-mail <strong>or</strong> phone regarding your TiVo service, we ask you <strong>f<strong>or</strong></strong> certain<br />
Account In<strong>f<strong>or</strong></strong>mation-in <strong>or</strong>der to verify your identity-be<strong>f<strong>or</strong></strong>e<br />
accepting requests to make changes to your TiVo service. We take<br />
these steps to ensure that <strong>only</strong> you <strong>or</strong> a household member who<br />
k<strong>no</strong>ws your Account In<strong>f<strong>or</strong></strong>mation will be able to access <strong>or</strong> change<br />
your Subscriber In<strong>f<strong>or</strong></strong>mation.<br />
TiVo uses industry-standard methods such as encryption to secure<br />
the communication of viewing in<strong>f<strong>or</strong></strong>mation from your TiVo DVR to<br />
TiVo. In addition, TiVo uses industry-standard methods of securing<br />
its databases of Subscriber In<strong>f<strong>or</strong></strong>mation, including the use of<br />
firewalls. Except as provided elsewhere in this Privacy Policy, TiVo<br />
limits access to Subscriber In<strong>f<strong>or</strong></strong>mation databases to those persons in<br />
the TiVo <strong>or</strong>ganization who have a business need <strong>f<strong>or</strong></strong> such access,<br />
including servicing your account, in<strong>f<strong>or</strong></strong>ming you of service news and<br />
special TiVo offers, <strong>or</strong> aggregating Account In<strong>f<strong>or</strong></strong>mation <strong>or</strong><br />
A<strong>no</strong>nymous Viewing In<strong>f<strong>or</strong></strong>mation <strong>f<strong>or</strong></strong> the purpose of conducting<br />
research, and targeting new users. However, you should k<strong>no</strong>w that <strong>no</strong><br />
Privacy, Service, Warranty, and Licenses<br />
company, including TiVo, can fully eliminate security risks<br />
associated with Subscriber In<strong>f<strong>or</strong></strong>mation.<br />
8 General<br />
8.1 Future Features, Services, and Amendments to this<br />
Privacy Policy. We may add to <strong>or</strong> upgrade the TiVo service to<br />
provide you with new features on an ongoing basis. We may also<br />
make available new services in the future. New services will be<br />
governed by the privacy policies of the respective service provider.<br />
To the extent that any new features <strong>or</strong> services may require<br />
amendments to this Privacy Policy to describe the treatment of<br />
Subscriber In<strong>f<strong>or</strong></strong>mation, these amendments are effective upon <strong>no</strong>tice<br />
to you. In the event that we make a substantial and material change to<br />
our treatment of Subscriber In<strong>f<strong>or</strong></strong>mation, such as a change in the way<br />
that we collect, use, <strong>or</strong> disclose Personally Identifiable Viewing<br />
In<strong>f<strong>or</strong></strong>mation, we will <strong>no</strong>tify you of such planned change and offer<br />
you the opp<strong>or</strong>tunity to alter your privacy preferences.<br />
8.2 Technical Problems. Even though TiVo has taken significant<br />
steps to ensure that your Subscriber In<strong>f<strong>or</strong></strong>mation is never collected,<br />
used, <strong>or</strong> disclosed by TiVo except as set <strong>f<strong>or</strong></strong>th by this Privacy Policy,<br />
technical mistakes are possible. If such a mistake takes place, we will<br />
take commercially reasonable steps to c<strong>or</strong>rect it.<br />
8.3 Contact TiVo. Our intention is to be diligent in protecting your<br />
privacy by strictly following our Privacy Policy. If you would like to<br />
make suggestions <strong>or</strong> find out m<strong>or</strong>e about our privacy practices,<br />
please call us at 1-877-367-8486 <strong>or</strong> send us a letter.<br />
Our mailing address is TiVo Inc., ATTN: Privacy Policy, 2160 Gold<br />
Street, P.O. Box 2160, Alviso, CA 95002-2160.<br />
8.4 Entire Agreement. The term “including” in this Privacy Policy<br />
shall mean “including without limitation.” This Privacy Policy<br />
supplements and is inc<strong>or</strong>p<strong>or</strong>ated into the TiVo Service Agreement.
This Privacy Policy constitutes the entire agreement, and replaces<br />
and supersedes all pri<strong>or</strong> agreements, between you and TiVo<br />
concerning the subject matter discussed in this Privacy Policy. <strong>Use</strong> of<br />
your TiVo DVR with TiVo service will signify your acceptance of<br />
this Privacy Policy.<br />
TiVo Service Agreement<br />
Welcome to TiVo and the TiVo service! This agreement explains the<br />
terms and conditions that will apply to your use of the TiVo service, and<br />
constitutes a legally binding agreement between you and TiVo Inc.<br />
(“TiVo”). By using the TiVo service, you agree to all the terms and<br />
conditions in this agreement (“Agreement”).<br />
THE TIVO SERVICE AND THE PRIVACY POLICY<br />
1 Terms of Service. The TiVo logo on your TiVo ® Digital Video<br />
Rec<strong>or</strong>der (your “TiVo DVR”) means that it can receive the TiVo<br />
service offered and provided by TiVo <strong>f<strong>or</strong></strong> personal, <strong>no</strong>n-commercial<br />
use on a subscription basis. Your activation and continued use of the<br />
TiVo service is subject to the terms and conditions of this<br />
Agreement. TiVo may at its discretion change the terms of this<br />
Agreement. Such changes shall be effective upon <strong>no</strong>tification by<br />
TiVo. We encourage you to check www.tivo.com/privacy <strong>or</strong> call us<br />
<strong>f<strong>or</strong></strong> a copy of the current TiVo service agreement. If you are<br />
dissatisfied with any changes to this Agreement, you may cancel<br />
your use of the TiVo service as provided in Section 15 (“Termination<br />
of Service”).<br />
2 The TiVo Service. The TiVo service consists of program guide<br />
in<strong>f<strong>or</strong></strong>mation and the following features: (a) Season Pass -<br />
automatically finds and rec<strong>or</strong>ds every episode of a series all season<br />
long; (b) WishList - finds and rec<strong>or</strong>ds programs that feature your<br />
TiVo Service Agreement<br />
BY USING THE TIVO SERVICE, I REPRESENT THAT I HAVE<br />
READ AND UNDERSTOOD THIS ENTIRE PRIVACY POLICY AND<br />
I AGREE TO ALL THE TERMS OF THIS PRIVACY POLICY AS<br />
STATED ABOVE. TiVo Service Privacy Policy v20030725A<br />
fav<strong>or</strong>ite act<strong>or</strong>, direct<strong>or</strong>, team <strong>or</strong> even topic; (c) Smart Rec<strong>or</strong>ding -<br />
automatically detects program line-up changes <strong>f<strong>or</strong></strong> your <strong>cable</strong>/<br />
satellite provider and adjusts rec<strong>or</strong>ding times so you don't have to<br />
w<strong>or</strong>ry about the details; (d) TiVo Suggestions - TiVo can be<br />
programmed to suggest and auto-rec<strong>or</strong>d programs that may match<br />
your interests; and (e) Parental Controls-lock channels <strong>or</strong> set ratings<br />
limits based on content. Each of these features is part of the “TiVo<br />
service.” The “TiVo service” means these features and any additional<br />
features and functionality that TiVo may, at its discretion and from<br />
time to time, offer.<br />
3 Changes to Your TiVo Service. TiVo may at its discretion and<br />
from time to time change, add, <strong>or</strong> remove features and functionality<br />
of the TiVo service <strong>or</strong> the TiVo DVR without <strong>no</strong>tice. If you are<br />
dissatisfied with any such changes to the TiVo service, you may<br />
immediately cancel your use of the TiVo service as provided in<br />
Section 15 (“Termination of Service”). TiVo reserves the right to<br />
discontinue one, some, <strong>or</strong> all of the features of the TiVo service you<br />
receive at any time at its discretion. TiVo may at its discretion<br />
discontinue the provision of software updates to certain TiVo DVRs.<br />
This means that while other TiVo DVRs may receive continued<br />
software updates and functionality; TiVo is <strong>no</strong>t required to provide<br />
such updates to your TiVo DVR. Additionally, the level of service<br />
TiVo provides may <strong>no</strong>t be the same on each TiVo DVR; a given TiVo<br />
153<br />
9
154<br />
Chapter 9<br />
DVR may supp<strong>or</strong>t different features and functionality, and TiVo is<br />
under <strong>no</strong> obligation to provide all features and functionality to your<br />
TiVo DVR.<br />
4 TiVo’s Privacy Policy. You must provide us with accurate and<br />
complete in<strong>f<strong>or</strong></strong>mation when you activate your TiVo service. TiVo<br />
reserves the right to terminate your account if you give TiVo<br />
inaccurate <strong>or</strong> incomplete in<strong>f<strong>or</strong></strong>mation. TiVo respects the privacy of<br />
your Subscriber In<strong>f<strong>or</strong></strong>mation (as defined in TiVo’s Privacy Policy)<br />
and will <strong>no</strong>t disclose any of your Subscriber In<strong>f<strong>or</strong></strong>mation except as<br />
permitted in TiVo’s Privacy Policy. A copy of TiVo’s Privacy Policy<br />
is included in the product manual and the latest version can always<br />
be found via our web site at www.tivo.com/privacy. Please read it<br />
carefully be<strong>f<strong>or</strong></strong>e using the TiVo service. By using the TiVo service,<br />
you agree to the terms and conditions of our Privacy Policy and<br />
affirm that you understand the options TiVo provides to you with<br />
regard to your Subscriber In<strong>f<strong>or</strong></strong>mation. TiVo will <strong>no</strong>tify you of any<br />
substantial and material changes to the Privacy Policy and the latest<br />
Privacy Policy can always be accessed through our web site at<br />
www.tivo.com/privacy.<br />
5 We Don’t Control the Nature of Television! The TiVo service<br />
gives you the ability to see and rec<strong>or</strong>d televised programs over which<br />
TiVo exercises <strong>no</strong> edit<strong>or</strong>ial <strong>or</strong> programming control (“Third Party<br />
Content”). You understand that (a) TiVo does <strong>no</strong>t guarantee the<br />
access to, rec<strong>or</strong>ding, <strong>or</strong> viewing of any particular program, (b)<br />
programming is <strong>no</strong>t under TiVo’s control, (c) <strong>cable</strong>/satellite providers<br />
may make program line-up changes too quickly <strong>f<strong>or</strong></strong> your TiVo DVR<br />
to adjust rec<strong>or</strong>ding times and this means shows affected by such<br />
changes will <strong>no</strong>t be rec<strong>or</strong>ded properly <strong>or</strong> at all, (c) TiVo is <strong>no</strong>t<br />
responsible <strong>f<strong>or</strong></strong> and has <strong>no</strong> edit<strong>or</strong>ial control over any Third Party<br />
Content, and (d) TiVo has <strong>no</strong> control over the distribution of<br />
programs. You agree that TiVo will have <strong>no</strong> liability to you, <strong>or</strong><br />
Privacy, Service, Warranty, and Licenses<br />
anyone else who uses your account, with regard to any Third Party<br />
Content.<br />
6 Television Shows Are Copyrighted. You also understand that<br />
the Third Party Content is the copyrighted material of the third party<br />
that supplies it, is protected by U.S. copyright law and other<br />
appli<strong>cable</strong> laws, and may <strong>no</strong>t be reproduced, used to prepare<br />
derivative w<strong>or</strong>ks, distributed, per<strong>f<strong>or</strong></strong>med publicly <strong>or</strong> displayed<br />
publicly without the written permission of the third party that<br />
supplied it, except to the extent allowed under the “fair use”<br />
provisions of the U.S. copyright laws, other limitations on exclusive<br />
copyrights in the U.S. copyright laws, <strong>or</strong> comparable provisions of<br />
<strong>f<strong>or</strong></strong>eign laws.<br />
7 Copy Protection of Television Shows. Third Party Content may<br />
be transmitted with a variety of copy protection mechanisms. These<br />
copy protection mechanisms are designed to protect the copyright<br />
interests of the relevant third party. These copy protection<br />
mechanisms may limit <strong>or</strong> prevent the ability of your TiVo DVR to<br />
display the Third Party Content <strong>or</strong> to rec<strong>or</strong>d such Third Party Content<br />
<strong>f<strong>or</strong></strong> later viewing. You understand that TiVo does <strong>no</strong>t control the<br />
decision of a third party to institute such copy protection<br />
mechanisms. You agree that TiVo will have <strong>no</strong> liability to you, <strong>or</strong><br />
anyone else who uses your account, with regard to the failure of your<br />
TiVo DVR to display <strong>or</strong> rec<strong>or</strong>d <strong>f<strong>or</strong></strong> later viewing any Third Party<br />
Content implementing a copy protection mechanism.<br />
ACTIVATING AND USING THE TIVO SERVICE<br />
8 Eligible Subscribers. You must be at least 18 years of age to<br />
assume the responsibilities of this Agreement. Min<strong>or</strong>s may use the<br />
TiVo service <strong>only</strong> if one of their parents <strong>or</strong> legal guardians assumes<br />
the responsibilities of this Agreement and thereby assumes full<br />
responsibility <strong>f<strong>or</strong></strong> the min<strong>or</strong>'s use of the TiVo service.
9 Subscription Fees. You agree to pay your subscription fee in<br />
advance. Your subscription fee will cover the TiVo service received<br />
via a TiVo DVR auth<strong>or</strong>ized by TiVo to enable the TiVo service. You<br />
have a choice of subscription payment options that may change over<br />
time. You may switch payment options at the end of each period. If<br />
<strong>f<strong>or</strong></strong> any reason you need to reactivate your subscription, you may be<br />
charged a reactivation fee. If you are signing up <strong>f<strong>or</strong></strong> the TiVo service<br />
under a promotional subscription fee, some additional restrictions<br />
may apply. Whatever your subscription payment option, your<br />
subscription fee does <strong>no</strong>t include any services, features <strong>or</strong><br />
functionality other than the TiVo service.<br />
10 Telephone Access and Possible Charges. The TiVo service is<br />
accessed through a standard telephone line and is available as a local<br />
call in most areas. In some areas, local and long- distance toll charges<br />
may apply. The TiVo service may also be available through the<br />
Internet with a broadband connection. However, TiVo does <strong>no</strong>t make<br />
any assurances about the availability <strong>or</strong> functionality of the TiVo<br />
service over a broadband connection. Firewall protection is strongly<br />
advised <strong>f<strong>or</strong></strong> any broadband Internet connections to protect your TiVo<br />
DVR from viruses and other harmful things. You are responsible <strong>f<strong>or</strong></strong><br />
any telephone <strong>or</strong> broadband service charges incurred as a result of<br />
using <strong>or</strong> accessing the TiVo service and ack<strong>no</strong>wledge and agree that<br />
you shall be solely responsible <strong>f<strong>or</strong></strong> all disputes with any telephone<br />
company <strong>or</strong> Internet service provider related to the same.<br />
11 Payment Auth<strong>or</strong>ization. If you choose a subscription option with<br />
recurring payments, you agree that TiVo may automatically charge<br />
the subscription fee to your credit <strong>or</strong> charge card at the beginning of<br />
each period. Your TiVo service access will <strong>no</strong>t be established until<br />
TiVo has verified that the credit card in<strong>f<strong>or</strong></strong>mation you provide us <strong>f<strong>or</strong></strong><br />
payment is accurate and that your credit card account is in good<br />
standing. TiVo may, as necessary, extend the expiration date of your<br />
TiVo Service Agreement<br />
credit card in <strong>or</strong>der to ensure continued service. TiVo may, at its<br />
discretion, change the TiVo service fees from time to time, and<br />
charge fees (which TiVo may also change) <strong>f<strong>or</strong></strong> features and<br />
functionalities that are <strong>no</strong>t a part of the TiVo service. TiVo will <strong>no</strong>tify<br />
you 30 days in advance of any fee changes <strong>or</strong> new fees; you may<br />
obtain the fees currently in effect at any time by contacting TiVo<br />
Customer Supp<strong>or</strong>t at 1-877-367-8486. TiVo reserves the right to<br />
suspend <strong>or</strong> terminate your TiVo service without <strong>no</strong>tice upon rejection<br />
of any credit card charges <strong>or</strong> if your card issuer (<strong>or</strong> its agent <strong>or</strong><br />
affiliate) seeks return of payments previously made to TiVo when<br />
TiVo believes you are liable <strong>f<strong>or</strong></strong> the charges. You agree to pay a late<br />
charge on all amounts due which remain unpaid <strong>f<strong>or</strong></strong> 30 days. The late<br />
charge will equal 1.5% of the past due amount, <strong>or</strong> the highest rate<br />
allowed by law, per month until paid. Such rights are in addition to<br />
and <strong>no</strong>t in lieu of any other legal right <strong>or</strong> remedies available to TiVo.<br />
TiVo reserves the right to refer your account to a third party <strong>f<strong>or</strong></strong><br />
collection in the event of an ongoing default.<br />
12 Using the TiVo Service. You may access and use the TiVo service<br />
<strong>only</strong> with a TiVo DVR that is auth<strong>or</strong>ized to receive the TiVo service<br />
and you agree <strong>no</strong>t to tamper with <strong>or</strong> otherwise modify your TiVo<br />
DVR. The TiVo service is provided <strong>f<strong>or</strong></strong> your personal, <strong>no</strong>ncommercial<br />
use, and may <strong>no</strong>t be resold, in whole <strong>or</strong> in part. Except as<br />
expressly provided in this Agreement, you may <strong>no</strong>t transfer the TiVo<br />
service. By using the TiVo service, you agree to receive all software<br />
updates and upgrades that TiVo sends to your TiVo DVR. If your<br />
TiVo DVR accesses the TiVo service (regardless of your payment <strong>or</strong><br />
subscription status), you ack<strong>no</strong>wledge and agree that you are a user<br />
of the TiVo service and are bound by the terms of this Agreement.<br />
13 Advertising and Promotions. The TiVo service is advertiser<br />
supp<strong>or</strong>ted. The hard disk drive of your TiVo DVR contains reserved<br />
space in addition to the advertised rec<strong>or</strong>ding capacity. TiVo reserves<br />
155<br />
9
156<br />
Chapter 9<br />
the right to send content (including advertising and promotional<br />
material) to such reserved p<strong>or</strong>tions of your TiVo DVR's hard disk<br />
drive as part of the TiVo service. In <strong>or</strong>der to send such content, you<br />
agree that TiVo may tune your TiVo DVR to a particular channel at a<br />
particular time.<br />
14 Definition of Product Lifetime Subscription. A “Product<br />
Lifetime Subscription” to the TiVo service covers the life of the TiVo<br />
DVR you buy<strong>–</strong><strong>no</strong>t the life of the subscriber. The Product Lifetime<br />
Subscription accompanies the TiVo DVR in case of ownership<br />
transfer. The subscription remains in effect if the TiVo DVR needs to<br />
be repaired <strong>or</strong> replaced due to a malfunction (see manufacturer <strong>or</strong><br />
retailer warranty details) <strong>or</strong> even if you upgrade your TiVo DVR to<br />
increase st<strong>or</strong>age capacity (though such upgrades, if <strong>no</strong>t per<strong>f<strong>or</strong></strong>med by<br />
a TiVo-auth<strong>or</strong>ized third party, will void the warranty on your TiVo<br />
DVR and constitute a breach of this Agreement). Because a Product<br />
Lifetime Subscription is linked to a particular TiVo DVR, you may<br />
<strong>no</strong>t transfer it to any other TiVo DVR unless all the following<br />
conditions apply: (a) the TiVo DVR is being replaced pursuant to the<br />
manufacturer's <strong>or</strong> retailer's warranty; and (b) the TiVo DVR being<br />
replaced is of the same make and model as the replacement TiVo<br />
DVR; and (c) you provide us with a proof of replacement by the<br />
manufacturer <strong>or</strong> retailer. TiVo reserves the right to charge you a fee to<br />
transfer Product Lifetime Service from a TiVo DVR being replaced<br />
to a replacement TiVo DVR. Each TiVo DVR purchased requires its<br />
own TiVo service subscription and activation. Of course, hardware<br />
products don’t last <strong>f<strong>or</strong></strong>ever and their lifespan will vary. TiVo makes<br />
<strong>no</strong> warranties <strong>or</strong> representations as to the expected lifetime of the<br />
TiVo DVR (aside from the manufacturer’s <strong>or</strong> retailer’s warranty).<br />
15 Termination of Service. You may terminate your account, this<br />
Agreement, and your right to use the TiVo service, at any time and<br />
<strong>f<strong>or</strong></strong> any reason <strong>or</strong> <strong>no</strong> reason, by contacting TiVo Customer Supp<strong>or</strong>t at<br />
Privacy, Service, Warranty, and Licenses<br />
1-877-367-8486. The TiVo service will be terminated within 24<br />
hours after your call and unused subscription fees are <strong>no</strong>nrefundable.<br />
Notwithstanding anything to the contrary in this Agreement, TiVo<br />
retains the absolute right to immediately suspend <strong>or</strong> terminate your<br />
account, and terminate this Agreement, if the charges to your credit<br />
card <strong>f<strong>or</strong></strong> the fees described in Section 9 (“Subscription Fees”) and<br />
Section 11 (“Payment Auth<strong>or</strong>ization”) are refused <strong>f<strong>or</strong></strong> any reason, if<br />
you breach any provision in this Agreement, if you misuse the TiVo<br />
service, and/<strong>or</strong> if you alter your TiVo DVR <strong>or</strong> use the TiVo service in<br />
such a manner as to infringe upon the intellectual property rights of<br />
TiVo <strong>or</strong> any third party. In addition, TiVo reserves the right to<br />
terminate your account and this Agreement <strong>f<strong>or</strong></strong> any other reason <strong>or</strong> <strong>no</strong><br />
reason if TiVo gives you at least 30 days advance <strong>no</strong>tice of such<br />
termination. Upon any such termination of your account, you will<br />
remain obligated to pay all outstanding fees and charges relating to<br />
your use of the TiVo service be<strong>f<strong>or</strong></strong>e termination.<br />
OWNERSHIP, OPEN SOURCE SOFTWARE, DISCLAIMERS<br />
AND LIABILITY LIMITATIONS<br />
16 Title to Software and Intellectual Property. You may need to<br />
use certain software programs to use <strong>or</strong> have full access to certain<br />
features of the TiVo service. You received certain software with the<br />
purchase of the TiVo DVR and other software programs may be<br />
provided to you by TiVo from time to time, which you are obligated<br />
to accept. Your use of such software is subject to the terms of this<br />
Agreement. TiVo retains title to and ownership of all the TiVo<br />
software and certain intellectual property rights in the TiVo DVR.<br />
TiVo also retains ownership of all TiVo copyrights and trademarks. In<br />
the case of third party software delivered by TiVo to the TiVo DVR,<br />
the appli<strong>cable</strong> third party retains title to and ownership of its<br />
software, copyrights and trademarks. Any attempt to disassemble,<br />
decompile, create derivative w<strong>or</strong>ks of, reverse engineer, modify,
sublicense, distribute <strong>or</strong> use <strong>f<strong>or</strong></strong> other purposes either the TiVo DVR<br />
<strong>or</strong> software of this system is strictly prohibited, except as expressly<br />
set <strong>f<strong>or</strong></strong>th in Section 17 (“Open Source Software”).<br />
17 Open Source Software. Certain components of the TiVo software<br />
are subject to the GNU General Public License <strong>or</strong> other so-called<br />
open source licenses (“Open-Source Software”). Open Source<br />
Software is <strong>no</strong>t subject to the restrictions in the last sentence of<br />
Section 16 (“Title to Software and Intellectual Property”), and is<br />
subject to the GNU General Public License (“GPL”) <strong>or</strong> other license<br />
terms, as appli<strong>cable</strong>. In compliance with the terms of the GPL, TiVo<br />
makes its modifications to Open Source Software that TiVo uses,<br />
modifies and distributes pursuant to the GPL available to the public<br />
in source code <strong>f<strong>or</strong></strong>m at www.tivo.com/source. You are free to use,<br />
modify and distribute Open Source Software that is subject to the<br />
GPL so long as you comply with the terms of the GPL (available in<br />
the product manual <strong>or</strong> at www.gnu.<strong>or</strong>g/copyleft/gpl.html).<br />
18 Indemnity. YOU AGREE TO DEFEND, INDEMNIFY AND<br />
HOLD HARMLESS TIVO FROM AND AGAINST ANY AND<br />
ALL CLAIMS, PROCEEDINGS, INJURIES, LIABILITIES,<br />
LOSSES, COSTS AND EXPENSES (INCLUDING<br />
REASONABLE ATTORNEYS’ FEES), INCLUDING, BUT NOT<br />
LIMITED TO, CLAIMS ALLEGING NEGLIGENCE,<br />
COPYRIGHT INFRINGEMENT AND/OR TRADEMARK<br />
INFRINGEMENT AGAINST TIVO OR THE TIVO SERVICE,<br />
RELATING TO OR ARISING OUT OF YOUR BREACH OF ANY<br />
TERM OF THIS AGREEMENT, YOUR MISUSE OF THE TIVO<br />
SERVICE, OR YOUR UNAUTHORIZED MODIFICATION OR<br />
ALTERATION OF THE TIVO DVR OR RELATED SOFTWARE<br />
(OTHER THAN AS EXPRESSLY SET FORTH IN SECTION 17<br />
(“OPEN SOURCE SOFTWARE”)).<br />
TiVo Service Agreement<br />
19 Warranty Disclaimer. YOU UNDERSTAND AND AGREE<br />
THAT THE TIVO SERVICE IS PROVIDED ON AN “AS IS” AND<br />
“AS AVAILABLE” BASIS. TIVO MAKES NO WARRANTY<br />
THAT THE TIVO SERVICE WILL MEET YOUR<br />
REQUIREMENTS, ALLOW YOU TO RECORD OR VIEW ANY<br />
PARTICULAR PROGRAMMING, OR THAT USE OF THE TIVO<br />
SERVICE WILL BE UNINTERRUPTED, TIMELY, SECURE, OR<br />
ERROR-FREE; NOR DOES TIVO MAKE ANY WARRANTY AS<br />
TO THE ACCURACY OR RELIABILITY OF ANY<br />
INFORMATION OBTAINED THROUGH THE TIVO SERVICE<br />
(INCLUDING THIRD PARTY CONTENT), THAT ANY<br />
DEFECTS IN THE TIVO SERVICE WILL BE CORRECTED OR<br />
THAT THE TIVO DVR OR TIVO SERVICE WILL BE<br />
COMPATIBLE WITH ANY OTHER SPECIFIC HARDWARE OR<br />
SERVICE. FURTHER, TIVO DOES NOT WARRANT THAT THE<br />
TIVO SERVICE OR THE TIVO SERVERS THAT PROVIDE YOU<br />
WITH DATA AND CONTENT ARE FREE OF VIRUSES OR<br />
OTHER HARMFUL COMPONENTS. YOU (AND NOT TIVO)<br />
ASSUME THE ENTIRE COST OF ALL NECESSARY<br />
MAINTENANCE, REPAIR OR CORRECTION. TIVO ALSO<br />
ASSUMES NO RESPONSIBILITY, AND SHALL NOT BE<br />
LIABLE FOR ANY DAMAGES TO, OR VIRUSES THAT MAY<br />
INFECT YOUR TIVO DVR, TIVO SOFTWARE, OR OTHER<br />
HARDWARE. TIVO AND ITS SUPPLIERS DISCLAIM ALL<br />
WARRANTIES OF ANY KIND, WHETHER EXPRESS,<br />
IMPLIED, OR STATUTORY, REGARDING THE TIVO SERVICE<br />
OR TIVO SOFTWARE, INCLUDING ANY IMPLIED<br />
WARRANTY OF TITLE, MERCHANTABILITY, FITNESS FOR A<br />
PARTICULAR PURPOSE, OR NON- INFRINGEMENT OF<br />
THIRD PARTY RIGHTS. Because some jurisdictions do <strong>no</strong>t permit<br />
the exclusion of implied warranties, the last sentence of this section<br />
may <strong>no</strong>t apply to you.<br />
157<br />
9
158<br />
Chapter 9<br />
20 Limitations of TiVo’s Liability. IN NO EVENT WILL TIVO OR<br />
ITS SUPPLIERS BE LIABLE TO YOU OR ANY THIRD PARTY<br />
FOR ANY LOST PROFITS, USE OF USER INFORMATION,<br />
LOSS OF DATA, BUSINESS INTERRUPTION, OR OTHER<br />
INDIRECT, CONSEQUENTIAL, SPECIAL, OR INCIDENTAL<br />
DAMAGES OF ANY NATURE ARISING FROM OR RELATING<br />
TO YOUR USE OF THE TIVO SERVICE OR USE OF THE TIVO<br />
SERVICE THROUGH YOUR ACCOUNT BY ANYONE ELSE,<br />
EVEN IF TIVO HAS BEEN ADVISED OF THE POSSIBILITY OF<br />
SUCH DAMAGES. IN NO CASE WILL TIVO'S TOTAL<br />
CUMULATIVE LIABILITY TO YOU AND ANYONE WHO USES<br />
THE TIVO SERVICE THROUGH YOUR ACCOUNT, FOR ANY<br />
AND ALL CLAIMS UNDER ANY THEORY OF LAW, EXCEED<br />
THE AGGREGATE AMOUNT YOU PAID TO TIVO IN THE<br />
PRECEDING TWELVE MONTHS. YOU UNDERSTAND THAT<br />
THESE LIMITATIONS OF TIVO’S AND TIVO'S SUPPLIERS’<br />
LIABILITY ARE A FUNDAMENTAL PART OF THIS<br />
AGREEMENT. Some states do <strong>no</strong>t allow the exclusion <strong>or</strong> limitation<br />
of incidental <strong>or</strong> consequential damages, so the above limitation <strong>or</strong><br />
exclusion may <strong>no</strong>t apply to you. Additionally, this provision is <strong>no</strong>t<br />
intended to limit TiVo’s liability in the event of TiVo’s willful <strong>or</strong><br />
intentional misconduct. M<strong>or</strong>eover, if TiVo mistakenly <strong>or</strong> wrongfully<br />
overcharges your account, this section does <strong>no</strong>t limit TiVo’s<br />
obligation to refund such mistakenly <strong>or</strong> wrongfully overcharged<br />
amounts.<br />
GENERAL<br />
21 Miscellaneous. This Agreement will be governed by the laws of<br />
the State of Cali<strong>f<strong>or</strong></strong>nia as such laws apply to agreements between<br />
Cali<strong>f<strong>or</strong></strong>nia residents per<strong>f<strong>or</strong></strong>med entirely within Cali<strong>f<strong>or</strong></strong>nia. The United<br />
Nations Convention on Contracts <strong>f<strong>or</strong></strong> the International Sale of Goods<br />
Privacy, Service, Warranty, and Licenses<br />
does <strong>no</strong>t apply to this Agreement. You and TiVo agree to submit to<br />
the exclusive personal jurisdiction of the courts located within the<br />
county of Santa Clara, Cali<strong>f<strong>or</strong></strong>nia. If any provision of this Agreement<br />
is invalid <strong>or</strong> unen<strong>f<strong>or</strong></strong>ceable under appli<strong>cable</strong> law, such provision will<br />
be deemed modified to the extent necessary to render such provision<br />
valid and en<strong>f<strong>or</strong></strong>ceable and the other provisions of this Agreement will<br />
remain in full <strong>f<strong>or</strong></strong>ce and effect. The official text of this Agreement <strong>or</strong><br />
<strong>no</strong>tice submitted hereunder shall be in English. In the event of any<br />
dispute concerning the construction <strong>or</strong> meaning of this Agreement,<br />
reference shall be made <strong>only</strong> to this Agreement as written in English<br />
and <strong>no</strong>t to any translation into a<strong>no</strong>ther language. This document<br />
represents the entire agreement governing your use of the TiVo<br />
service and supersedes any pri<strong>or</strong> <strong>or</strong> contemp<strong>or</strong>aneous written <strong>or</strong> <strong>or</strong>al<br />
statements by TiVo <strong>or</strong> its representatives <strong>or</strong> resellers. TiVo’s failure to<br />
en<strong>f<strong>or</strong></strong>ce any of the terms of this Agreement shall <strong>no</strong>t constitute a<br />
waiver <strong>or</strong> relinquishment of TiVo’s right to do so at any time.<br />
Sections 9 (“Subscription Fees”), 10 (“Telephone Access and<br />
Possible Charges”), 11 (“Payment Auth<strong>or</strong>ization”), 12 (“Using the<br />
TiVo Service”), 16 (“Title to Software and Intellectual Property”), 17<br />
(“Open Source Software”), 18 (“Indemnity”), 19 (“Warranty<br />
Disclaimer”), 20 (“Limitations of TiVo’s Liability”), and 21<br />
(“Miscellaneous”) shall survive any termination <strong>or</strong> expiration of this<br />
Agreement.<br />
BY USING THE TIVO SERVICE, I REPRESENT THAT I HAVE<br />
READ AND UNDERSTOOD THIS ENTIRE AGREEMENT AND I<br />
AGREE TO ALL THE TERMS OF THIS AGREEMENT AS STATED<br />
ABOVE. TiVo Service Agreement v20030725A
HUMAX DVR Limited Warranty<br />
We thank you <strong>f<strong>or</strong></strong> having bought this Humax product and hope you will<br />
enjoy it <strong>f<strong>or</strong></strong> many years. In <strong>or</strong>der to avoid any unnecessary inconvenience<br />
on your part, we suggest reading the instruction manual carefully be<strong>f<strong>or</strong></strong>e<br />
contacting our customer care department. Also keep the <strong>or</strong>iginal <strong>box</strong> and<br />
packing material in case you need to return <strong>or</strong> repair your product.<br />
LIMITED 90 DAYS WARRANTY<br />
Humax warrant the product to be free from defects in materials and<br />
w<strong>or</strong>kmanship, Humax warrant this product against defects in materials <strong>or</strong><br />
w<strong>or</strong>kmanship <strong>f<strong>or</strong></strong> a period of ninety (90) days after the date of <strong>or</strong>iginal<br />
retail purchase. During this period Humax will repair <strong>or</strong> replace a<br />
defective product <strong>or</strong> part, at its discretion, with a new <strong>or</strong> refurbished<br />
product <strong>or</strong> part without charge to you. You are responsible <strong>f<strong>or</strong></strong> all<br />
shipping and insurance charges <strong>f<strong>or</strong></strong> the unit to the Auth<strong>or</strong>ized Service<br />
Center. Upon receipt we will at our option exchange the unit with a new<br />
<strong>or</strong> refurbished unit.<br />
LIMITED ONE (1) YEAR WARRANTY<br />
Humax warrants the product to be free from defects in materials and<br />
w<strong>or</strong>kmanship, Humax warrants this product against defects in materials<br />
<strong>or</strong> w<strong>or</strong>kmanship <strong>f<strong>or</strong></strong> a period of one (1) year after the date of <strong>or</strong>iginal<br />
retail purchase. During this period Humax will repair <strong>or</strong> replace a<br />
defective product <strong>or</strong> part without charge to you, except that if a defective<br />
part is replaced after ninety (90) days from the date of the <strong>or</strong>iginal retail<br />
purchase you shall pay lab<strong>or</strong> charges involved in the replacement. You<br />
are responsible <strong>f<strong>or</strong></strong> all shipping and insurance charges <strong>f<strong>or</strong></strong> the unit to the<br />
Auth<strong>or</strong>ized Service Center. Upon receipt we will at our option exchange<br />
the unit with a new <strong>or</strong> refurbished unit.<br />
HUMAX DVR Limited Warranty<br />
CONDITIONS<br />
1. This warranty will be granted <strong>only</strong> when the <strong>or</strong>iginal invoice <strong>or</strong> sales<br />
receipt (indicating the date of purchase, product type and dealer's name)<br />
is presented together with the defective product. Humax reserves the<br />
right to refuse free-of-charge warranty service if the above document<br />
can<strong>no</strong>t be presented <strong>or</strong> if the in<strong>f<strong>or</strong></strong>mation contained in it is incomplete <strong>or</strong><br />
illegible.<br />
2. This warranty will <strong>no</strong>t reimburse n<strong>or</strong> cover the damage resulting from<br />
adaptations <strong>or</strong> adjustments which may be made to the product, without<br />
the pri<strong>or</strong> written consent of Humax, in <strong>or</strong>der to con<strong>f<strong>or</strong></strong>m to the national <strong>or</strong><br />
local technical <strong>or</strong> safety standards in <strong>f<strong>or</strong></strong>ce in any country other than the<br />
ones <strong>f<strong>or</strong></strong> which the product was <strong>or</strong>iginally designed and manufactured.<br />
3. This warranty will <strong>no</strong>t apply if the type <strong>or</strong> serial number on the product<br />
has been altered, deleted, removed <strong>or</strong> made illegible.<br />
4. This warranty covers <strong>no</strong>ne of the following:<br />
Periodic maintenance and repair <strong>or</strong> replacement of parts due to<br />
n<strong>or</strong>mal wear and tear;<br />
Any adaptation <strong>or</strong> changes to upgrade the product from its n<strong>or</strong>mal<br />
purpose as described in the instruction manual, without the pri<strong>or</strong><br />
written consent of Humax;<br />
Transp<strong>or</strong>t costs, home service transp<strong>or</strong>t cost and all risks of transp<strong>or</strong>t<br />
relating directly <strong>or</strong> indirectly to the guarantee of the product;<br />
Damage resulting from: (i) misuse, including but <strong>no</strong>t limited to (a)<br />
failure to use the product <strong>f<strong>or</strong></strong> its n<strong>or</strong>mal purpose <strong>or</strong> in acc<strong>or</strong>dance<br />
with Humax' instructions on the proper use and maintenance, and (b)<br />
installation <strong>or</strong> use of the product in a manner inconsistent with the<br />
technical <strong>or</strong> safety standards in <strong>f<strong>or</strong></strong>ce in the country where it is used<br />
and (c) improper <strong>or</strong> inc<strong>or</strong>rect installation of software; (ii) repair done<br />
159<br />
9
160<br />
Chapter 9<br />
by <strong>no</strong>n-auth<strong>or</strong>ized service stations <strong>or</strong> dealers, <strong>or</strong> the customer<br />
himself; (iii) accidents, lightning, water, fire, improper ventilation <strong>or</strong><br />
any cause beyond the control of Humax; (iv) defects of the system<br />
into which this product is inc<strong>or</strong>p<strong>or</strong>ated.<br />
5. This warranty does <strong>no</strong>t affect the consumer's statut<strong>or</strong>y rights under<br />
appli<strong>cable</strong> national laws in <strong>f<strong>or</strong></strong>ce, n<strong>or</strong> the consumer's rights against the<br />
dealer arising from their sales/purchase contract.<br />
6. THERE ARE NO EXPRESS WARRANTIES OTHER THOSE<br />
LISTED AND DESCRIBED ABOVE. AND NO WARRANTIES<br />
WHETHER EXPRESS OR IMPLIED, INCLUDING, BUT NOT<br />
LIMITED TO, ANY IMPLIED WARRANTIES OF<br />
MERCHANTABILITY OR FITNESS FOR A PARTICULAR<br />
PURPOSE, SHALL APPLY AFTER THE EXPRESS WARRATY<br />
GIVEN BY ANY PERSON, FIRM, OR CORPORATION WITH<br />
RESPECT TO THIS PRODUCT SHALL BE BINDING ON Humax.<br />
7. Humax shall <strong>no</strong>t be liable <strong>f<strong>or</strong></strong> loss of revenue <strong>or</strong> profits, failure to<br />
realize saving <strong>or</strong> other benefits, <strong>or</strong> any other special, incidental <strong>or</strong><br />
consequential damages caused by the use, misuse <strong>or</strong> inability to use this<br />
product, regardless of the legal the<strong>or</strong>y on which the claim based, and<br />
even if Humax has been advised of the possibility of such damages. N<strong>or</strong><br />
shall recovery of any kind against Humax be greater in amount than the<br />
purchase price of the product sold by Humax and causing the alleged<br />
damage. Without limiting the <strong>f<strong>or</strong></strong>egoing, purchaser assumes all risk and<br />
liability <strong>f<strong>or</strong></strong> loss, damage to purchaser and purchaser's property and to<br />
others and their property arising out of the use, misuse <strong>or</strong> inability to use<br />
this product sold by Humax <strong>no</strong>t caused directly by the negligence of<br />
Humax. This limited warranty shall <strong>no</strong>t extend to anyone other than the<br />
<strong>or</strong>iginal purchaser of this product, is <strong>no</strong>ntransferable and states your<br />
exclusive remedy.<br />
Privacy, Service, Warranty, and Licenses<br />
Where states do <strong>no</strong>t allow limitation on how long an implied warranty<br />
lasts, <strong>or</strong> the exclusion <strong>or</strong> limitation of incidental <strong>or</strong> consequential<br />
damages, the above limitations <strong>or</strong> exclusions may <strong>no</strong>t apply to you. In<br />
this case this warranty gives specific legal rights and you may also have<br />
other rights which vary from state to state.<br />
To obtain warranty service, please contact HUMAX at:<br />
HUMAX USA, Inc.<br />
3601 West Garry Ave<br />
Santa Ana, CA 92704<br />
Tel: (866) 486. 2987<br />
E-mail: Supp<strong>or</strong>t@HumaxUSA.com
FCC In<strong>f<strong>or</strong></strong>mation<br />
This equipment complies with Part 68 of the FCC Rules and the<br />
requirements adopted by ACTA. On the back of this equipment is a label<br />
that contains a product identifier in the <strong>f<strong>or</strong></strong>mat US:AAAEQ##TXXXX. If<br />
requested, this in<strong>f<strong>or</strong></strong>mation must be provided to your telephone company.<br />
A plug and jack used to connect this equipment to the premises wiring<br />
and telephone netw<strong>or</strong>k must comply with the appli<strong>cable</strong> FCC Part 68<br />
rules and requirements adopted by ACTA. A compliant telephone c<strong>or</strong>d<br />
and modular plug is provided with this product. It is designed to be<br />
connected to a compatible modular jack that is also compliant. See<br />
installation instructions <strong>f<strong>or</strong></strong> details.<br />
The REN is used to determine the number of devices that may connect to<br />
a telephone line. Excessive RENs on a telephone line may result in the<br />
devices <strong>no</strong>t ringing in response to an incoming call. In most but <strong>no</strong>t all<br />
areas, the sum of the RENs should <strong>no</strong>t exceed five (5.0). To be certain of<br />
the number of devices that may be connected to a line, as determined by<br />
the total RENs, contact your local telephone company. F<strong>or</strong> product<br />
approved after July 23, 2001, the REN <strong>f<strong>or</strong></strong> this product is part of the<br />
product identifier that has the <strong>f<strong>or</strong></strong>mat US:AAAEQ##TXXXX. The digits<br />
represented by ## are the REN without the decimal point (e.g., 03 is a<br />
REN of 0.3). F<strong>or</strong> earlier products, the REN is separately shown on the<br />
label.<br />
If your TiVo DIGITAL VIDEO RECORDER causes harm to the<br />
telephone netw<strong>or</strong>k, the telephone company will <strong>no</strong>tify you in advance<br />
that temp<strong>or</strong>ary discontinuance of service may be required. But if advance<br />
<strong>no</strong>tice isn't practical, the telephone company will <strong>no</strong>tify the customer as<br />
soon as possible. Also, you will be advised of your right to file a<br />
complaint with the FCC if you believe it is necessary.<br />
FCC In<strong>f<strong>or</strong></strong>mation<br />
The telephone company may make changes in its facilities, equipment,<br />
operations <strong>or</strong> procedures that could affect the proper functioning of your<br />
equipment. If they do, you will be <strong>no</strong>tified in advance in <strong>or</strong>der <strong>f<strong>or</strong></strong> you to<br />
make necessary modifications to maintain uninterrupted service.<br />
If trouble is experienced with this unit, <strong>f<strong>or</strong></strong> repair <strong>or</strong> warranty<br />
in<strong>f<strong>or</strong></strong>mation, please contact customer service at the address and phone<br />
listed below. If the equipment is causing harm to the netw<strong>or</strong>k, the<br />
telephone company may request that you disconnect the equipment until<br />
the problem is resolved.<br />
DO NOT DISASSEMBLE THIS EQUIPMENT. It does <strong>no</strong>t contain any<br />
user serviceable components.<br />
We recommend the installation of an AC surge arrester in the AC outlet<br />
to which this equipment is connected. Telephone companies rep<strong>or</strong>t that<br />
electrical surges, typically lighting transients, are very destructive to<br />
customer terminal equipment connected to AC power sources.<br />
HUMAX Co., Ltd.<br />
Humax Building 212-1, Yubang-Dong,<br />
Yongin-Si, Gyeonggi-Do, 449-080<br />
KOREA<br />
+82 31 331 9400, <strong>or</strong> +81 31 600 6114<br />
161<br />
9
162<br />
Chapter 9<br />
Safety Instructions<br />
This product was designed and manufactured to meet strict quality and<br />
safety standards. There are, however, some installation and operation<br />
precautions of which you should be particularly aware. Please read these<br />
instructions be<strong>f<strong>or</strong></strong>e operating the equipment and save them <strong>f<strong>or</strong></strong> future<br />
reference.<br />
1. Read Instructions—All the safety and operating instructions should be<br />
read and understood be<strong>f<strong>or</strong></strong>e the appliance is operated.<br />
2. Retain Instructions—The safety and operating instructions should be<br />
retained <strong>f<strong>or</strong></strong> future reference.<br />
3. Heed Warnings—All warnings on the appliance and in the operating<br />
instructions should be followed.<br />
4. Follow Instructions—All operating and use instructions should be<br />
followed.<br />
5. Water and Moisture—The appliance should <strong>no</strong>t be used near water -<br />
<strong>f<strong>or</strong></strong> example, near a bathtub, washbowl, kitchen sink, laundry tub, in a<br />
wet basement <strong>or</strong> near a swimming pool, etc.<br />
6. An appliance and cart combination should be moved with care. Quick<br />
stops, excessive <strong>f<strong>or</strong></strong>ce, and uneven surfaces may cause the appliance and<br />
cart combination to overturn.<br />
7. Tilt/Stability—All televisions must comply with recommended<br />
international global safety standards <strong>f<strong>or</strong></strong> tilt and stability properties of<br />
their cabinet design. Do <strong>no</strong>t compromise these design standards by<br />
applying excessive pull <strong>f<strong>or</strong></strong>ce to the front, <strong>or</strong> top, of the cabinet, which<br />
could ultimately overturn the product. Also, do <strong>no</strong>t endanger yourself, <strong>or</strong><br />
children, by placing electronic equipment/toys on top of the cabinet.<br />
Such items could unexpectedly fall from the top of the set and cause<br />
product damage and/<strong>or</strong> personal injury.<br />
Privacy, Service, Warranty, and Licenses<br />
8. Ventilation—The appliance should be situated so that its location <strong>or</strong><br />
position does <strong>no</strong>t interfere with its proper ventilation. F<strong>or</strong> example, the<br />
appliance should <strong>no</strong>t be situated on a bed, sofa, rug, <strong>or</strong> similar surface<br />
that may block the ventilation openings; <strong>or</strong>, placed in a built-in<br />
installation, such as a bookcase <strong>or</strong> cabinet that may impede the flow of<br />
air through the ventilation openings.<br />
9. Heat—The appliance should be situated away from heat sources such<br />
as radiat<strong>or</strong>s, heat registers, stoves, <strong>or</strong> other appliances (including<br />
amplifiers) that produce heat.<br />
10. Power C<strong>or</strong>d Protection—Power supply c<strong>or</strong>ds should be routed so that<br />
they are <strong>no</strong>t likely to be walked on <strong>or</strong> pinched by items placed upon <strong>or</strong><br />
against them, paying particular attention to c<strong>or</strong>ds and plugs, convenience<br />
receptacles, and the point where they exit from the appliance.<br />
11. Object and Liquid Entry—Never push objects of any kind into this<br />
product through cabinet slots, as they may touch dangerous voltage<br />
points <strong>or</strong> sh<strong>or</strong>t the parts, resulting in the risk of fire <strong>or</strong> electric shock.<br />
Never spill liquid of any kind on this product.<br />
12. Damage Requiring Service—The appliance should be serviced by<br />
qualified service personnel when:<br />
A. THE POWER SUPPLY CORD OR PLUG IS DAMAGED OR FRAYED;<br />
B. LIQUID HAS SPILLED INTO THE PRODUCT;<br />
C. THE PRODUCT HAS BEEN EXPOSED TO RAIN OR WATER;<br />
D. THE PRODUCT DOES NOT OPERATE NORMALLY WHEN YOU<br />
FOLLOW THE OPERATING INSTRUCTIONS (ADJUST ONLY THOSE<br />
CONTROLS THAT ARE DISCUSSED IN THIS GUIDE, AS IMPROPER<br />
ADJUSTMENT OF OTHER CONTROLS MAY RESULT IN DAMAGE,
OFTEN REQUIRING EXTENSIVE WORK BY A QUALIFIED<br />
TECHNICIAN TO RESTORE THE PRODUCT TO NORMAL<br />
PERFORMANCE);<br />
E. THE PRODUCT HAS BEEN DROPPED OR THE CABINET DAMAGED;<br />
F. THE PRODUCT EXHIBITS A DISTINCT CHANGE IN PERFORMANCE.<br />
13. Servicing—The user should <strong>no</strong>t attempt service to the appliance<br />
beyond that described in the Troubleshooting section of this guide. All<br />
other servicing should be referred to qualified service personnel.<br />
14. Cleaning—Unplug this product from the wall outlet be<strong>f<strong>or</strong></strong>e cleaning.<br />
Do <strong>no</strong>t use liquid cleaners <strong>or</strong> aerosol cleaners; use a damp cloth <strong>f<strong>or</strong></strong><br />
cleaning. If the product comes in contact with any liquid, unplug the<br />
phone line and the power adapter and let the unit dry th<strong>or</strong>oughly be<strong>f<strong>or</strong></strong>e<br />
plugging it back in.<br />
15. Power Source—This product should be operated <strong>only</strong> from the type<br />
of power source indicated on the marking label <strong>or</strong> in this guide. If you are<br />
<strong>no</strong>t sure of the type of power supply to your home, consult your dealer <strong>or</strong><br />
local power company.<br />
16. Overloaded Power Outlets—do <strong>no</strong>t overload wall outlets and<br />
extension c<strong>or</strong>ds, as this can result in the risk of fire <strong>or</strong> electric shock.<br />
17. Electric Shock—To reduce the risk of electric shock, do <strong>no</strong>t<br />
disassemble this product. Take it to a qualified service person when<br />
service <strong>or</strong> repair w<strong>or</strong>k is required. Opening <strong>or</strong> removing covers may<br />
expose you to dangerous voltage <strong>or</strong> other risks. Inc<strong>or</strong>rect reassembly can<br />
cause electric shock when this product is subsequently used.<br />
18. Telephone Usage—When using your telephone equipment, basic<br />
safety precautions should be always followed to reduce the risk of fire,<br />
electric shock and injury to persons. To reduce the risk of fire, use <strong>only</strong><br />
No. 26 AWG <strong>or</strong> larger telecommunication line c<strong>or</strong>d.<br />
Safety Instructions<br />
19. Moving—Avoid moving the unit while it is plugged in to avoid<br />
accumulative shock and vibration damage to the internal hard disk drive.<br />
20. CAUTION—Danger of explosion if battery is inc<strong>or</strong>rectly replaced.<br />
Replace <strong>only</strong> with the same <strong>or</strong> equivalent type recommended by the<br />
manufacturer. Dispose of used batteries acc<strong>or</strong>ding to the manufacturer’s<br />
instructions.<br />
163<br />
9
164<br />
Chapter 9<br />
GNU General Public License<br />
Version 2, June 1991<br />
Copyright (C) 1989, 1991 Free Software Foundation, Inc.<br />
59 Temple Place, Suite 330, Boston, MA 02111-1307 USA<br />
Everyone is permitted to copy and distribute verbatim copies of this<br />
license document, but changing it is <strong>no</strong>t allowed.<br />
PREAMBLE<br />
The licenses <strong>f<strong>or</strong></strong> most software are designed to take away your freedom<br />
to share and change it. By contrast, the GNU General Public License is<br />
intended to guarantee your freedom to share and change free software--to<br />
make sure the software is free <strong>f<strong>or</strong></strong> all its users. This General Public<br />
License applies to most of the Free Software Foundation's software and<br />
to any other program whose auth<strong>or</strong>s commit to using it. (Some other<br />
Free Software Foundation software is covered by the GNU Library<br />
General Public License instead.) You can apply it to your programs, too.<br />
When we speak of free software, we are referring to freedom, <strong>no</strong>t price.<br />
Our General Public Licenses are designed to make sure that you have the<br />
freedom to distribute copies of free software (and charge <strong>f<strong>or</strong></strong> this service<br />
if you wish), that you receive source code <strong>or</strong> can get it if you want it, that<br />
you can change the software <strong>or</strong> use pieces of it in new free programs; and<br />
that you k<strong>no</strong>w you can do these things.<br />
To protect your rights, we need to make restrictions that <strong>f<strong>or</strong></strong>bid anyone to<br />
deny you these rights <strong>or</strong> to ask you to surrender the rights. These<br />
restrictions translate to certain responsibilities <strong>f<strong>or</strong></strong> you if you distribute<br />
copies of the software, <strong>or</strong> if you modify it.<br />
F<strong>or</strong> example, if you distribute copies of such a program, whether gratis <strong>or</strong><br />
<strong>f<strong>or</strong></strong> a fee, you must give the recipients all the rights that you have. You<br />
Privacy, Service, Warranty, and Licenses<br />
must make sure that they, too, receive <strong>or</strong> can get the source code. And<br />
you must show them these terms so they k<strong>no</strong>w their rights.<br />
We protect your rights with two steps: (1) copyright the software, and (2)<br />
offer you this license which gives you legal permission to copy,<br />
distribute and/<strong>or</strong> modify the software.<br />
Also, <strong>f<strong>or</strong></strong> each auth<strong>or</strong>'s protection and ours, we want to make certain that<br />
everyone understands that there is <strong>no</strong> warranty <strong>f<strong>or</strong></strong> this free software. If<br />
the software is modified by someone else and passed on, we want its<br />
recipients to k<strong>no</strong>w that what they have is <strong>no</strong>t the <strong>or</strong>iginal, so that any<br />
problems introduced by others will <strong>no</strong>t reflect on the <strong>or</strong>iginal auth<strong>or</strong>s'<br />
reputations.<br />
Finally, any free program is threatened constantly by software patents.<br />
We wish to avoid the danger that redistribut<strong>or</strong>s of a free program will<br />
individually obtain patent licenses, in effect making the program<br />
proprietary. To prevent this, we have made it clear that any patent must<br />
be licensed <strong>f<strong>or</strong></strong> everyone's free use <strong>or</strong> <strong>no</strong>t licensed at all.<br />
The precise terms and conditions <strong>f<strong>or</strong></strong> copying, distribution and<br />
modification follow.<br />
GNU GENERAL PUBLIC LICENSE<br />
Terms and conditions <strong>f<strong>or</strong></strong> copying, distribution and modification.<br />
0. This License applies to any program <strong>or</strong> other w<strong>or</strong>k which contains a<br />
<strong>no</strong>tice placed by the copyright holder saying it may be distributed under<br />
the terms of this General Public License. The “Program”, below, refers<br />
to any such program <strong>or</strong> w<strong>or</strong>k, and a “w<strong>or</strong>k based on the Program” means<br />
either the Program <strong>or</strong> any derivative w<strong>or</strong>k under copyright law: that is to<br />
say, a w<strong>or</strong>k containing the Program <strong>or</strong> a p<strong>or</strong>tion of it, either verbatim <strong>or</strong><br />
with modifications and/<strong>or</strong> translated into a<strong>no</strong>ther language. (Hereinafter,
translation is included without limitation in the term “modification”.)<br />
Each licensee is addressed as “you”.<br />
Activities other than copying, distribution and modification are <strong>no</strong>t<br />
covered by this License; they are outside its scope. The act of running<br />
the Program is <strong>no</strong>t restricted, and the output from the Program is covered<br />
<strong>only</strong> if its contents constitute a w<strong>or</strong>k based on the Program (independent<br />
of having been made by running the Program). Whether that is true<br />
depends on what the Program does.<br />
1. You may copy and distribute verbatim copies of the Program's source<br />
code as you receive it, in any medium, provided that you conspicuously<br />
and appropriately publish on each copy an appropriate copyright <strong>no</strong>tice<br />
and disclaimer of warranty; keep intact all the <strong>no</strong>tices that refer to this<br />
License and to the absence of any warranty; and give any other recipients<br />
of the Program a copy of this License along with the Program.<br />
You may charge a fee <strong>f<strong>or</strong></strong> the physical act of transferring a copy, and you<br />
may at your option offer warranty protection in exchange <strong>f<strong>or</strong></strong> a fee.<br />
2. You may modify your copy <strong>or</strong> copies of the Program <strong>or</strong> any p<strong>or</strong>tion of<br />
it, thus <strong>f<strong>or</strong></strong>ming a w<strong>or</strong>k based on the Program, and copy and distribute<br />
such modifications <strong>or</strong> w<strong>or</strong>k under the terms of Section 1 above, provided<br />
that you also meet all of these conditions:<br />
a) You must cause the modified files to carry prominent <strong>no</strong>tices stating<br />
that you changed the files and the date of any change.<br />
b) You must cause any w<strong>or</strong>k that you distribute <strong>or</strong> publish, that in<br />
whole <strong>or</strong> in part contains <strong>or</strong> is derived from the Program <strong>or</strong> any part<br />
thereof, to be licensed as a whole at <strong>no</strong> charge to all third parties under<br />
the terms of this License.<br />
c) If the modified program n<strong>or</strong>mally reads commands interactively<br />
when run, you must cause it, when started running <strong>f<strong>or</strong></strong> such interactive<br />
use in the most <strong>or</strong>dinary way, to print <strong>or</strong> display an an<strong>no</strong>uncement<br />
including an appropriate copyright <strong>no</strong>tice and a <strong>no</strong>tice that there is <strong>no</strong><br />
warranty (<strong>or</strong> else, saying that you provide a warranty) and that users may<br />
GNU General Public License<br />
redistribute the program under these conditions, and telling the user how<br />
to view a copy of this License. (Exception: if the Program itself is<br />
interactive but does <strong>no</strong>t n<strong>or</strong>mally print such an an<strong>no</strong>uncement, your w<strong>or</strong>k<br />
based on the Program is <strong>no</strong>t required to print an an<strong>no</strong>uncement.)<br />
These requirements apply to the modified w<strong>or</strong>k as a whole. If<br />
identifiable sections of that w<strong>or</strong>k are <strong>no</strong>t derived from the Program, and<br />
can be reasonably considered independent and separate w<strong>or</strong>ks in<br />
themselves, then this License, and its terms, do <strong>no</strong>t apply to those<br />
sections when you distribute them as separate w<strong>or</strong>ks. But when you<br />
distribute the same sections as part of a whole which is a w<strong>or</strong>k based on<br />
the Program, the distribution of the whole must be on the terms of this<br />
License, whose permissions <strong>f<strong>or</strong></strong> other licensees extend to the entire<br />
whole, and thus to each and every part regardless of who wrote it.<br />
Thus, it is <strong>no</strong>t the intent of this section to claim rights <strong>or</strong> contest your<br />
rights to w<strong>or</strong>k written entirely by you; rather, the intent is to exercise the<br />
right to control the distribution of derivative <strong>or</strong> collective w<strong>or</strong>ks based on<br />
the Program.<br />
In addition, mere aggregation of a<strong>no</strong>ther w<strong>or</strong>k <strong>no</strong>t based on the Program<br />
with the Program (<strong>or</strong> with a w<strong>or</strong>k based on the Program) on a volume of<br />
a st<strong>or</strong>age <strong>or</strong> distribution medium does <strong>no</strong>t bring the other w<strong>or</strong>k under the<br />
scope of this License.<br />
3. You may copy and distribute the Program (<strong>or</strong> a w<strong>or</strong>k based on it, under<br />
Section 2) in object code <strong>or</strong> executable <strong>f<strong>or</strong></strong>m under the terms of Sections<br />
1 and 2 above provided that you also do one of the following:<br />
a) Accompany it with the complete c<strong>or</strong>responding machine-readable<br />
source code, which must be distributed under the terms of Sections 1 and<br />
2 above on a medium customarily used <strong>f<strong>or</strong></strong> software interchange; <strong>or</strong>,<br />
b) Accompany it with a written offer, valid <strong>f<strong>or</strong></strong> at least three years, to<br />
give any third party, <strong>f<strong>or</strong></strong> a charge <strong>no</strong> m<strong>or</strong>e than your cost of physically<br />
per<strong>f<strong>or</strong></strong>ming source distribution, a complete machine-readable copy of the<br />
165<br />
9
166<br />
Chapter 9<br />
c<strong>or</strong>responding source code, to be distributed under the terms of Sections 1<br />
and 2 above on a medium customarily used <strong>f<strong>or</strong></strong> software interchange; <strong>or</strong>,<br />
c) Accompany it with the in<strong>f<strong>or</strong></strong>mation you received as to the offer to<br />
distribute c<strong>or</strong>responding source code. (This alternative is allowed <strong>only</strong><br />
<strong>f<strong>or</strong></strong> <strong>no</strong>ncommercial distribution and <strong>only</strong> if you received the program in<br />
object code <strong>or</strong> executable <strong>f<strong>or</strong></strong>m with such an offer, in acc<strong>or</strong>d with<br />
Subsection b above.)<br />
The source code <strong>f<strong>or</strong></strong> a w<strong>or</strong>k means the preferred <strong>f<strong>or</strong></strong>m of the w<strong>or</strong>k <strong>f<strong>or</strong></strong><br />
making modifications to it. F<strong>or</strong> an executable w<strong>or</strong>k, complete source<br />
code means all the source code <strong>f<strong>or</strong></strong> all modules it contains, plus any<br />
associated interface definition files, plus the scripts used to control<br />
compilation and installation of the executable. However, as a special<br />
exception, the source code distributed need <strong>no</strong>t include anything that is<br />
n<strong>or</strong>mally distributed (in either source <strong>or</strong> binary <strong>f<strong>or</strong></strong>m) with the maj<strong>or</strong><br />
components (compiler, kernel, and so on) of the operating system on<br />
which the executable runs, unless that component itself accompanies the<br />
executable.<br />
If distribution of executable <strong>or</strong> object code is made by offering access to<br />
copy from a designated place, then offering equivalent access to copy the<br />
source code from the same place counts as distribution of the source code,<br />
even though third parties are <strong>no</strong>t compelled to copy the source along with<br />
the object code.<br />
4. You may <strong>no</strong>t copy, modify, sublicense, <strong>or</strong> distribute the Program<br />
except as expressly provided under this License. Any attempt otherwise<br />
to copy, modify, sublicense <strong>or</strong> distribute the Program is void, and will<br />
automatically terminate your rights under this License.<br />
However, parties who have received copies, <strong>or</strong> rights, from you under this<br />
License will <strong>no</strong>t have their licenses terminated so long as such parties<br />
remain in full compliance.<br />
Privacy, Service, Warranty, and Licenses<br />
5. You are <strong>no</strong>t required to accept this License, since you have <strong>no</strong>t signed<br />
it. However, <strong>no</strong>thing else grants you permission to modify <strong>or</strong> distribute<br />
the Program <strong>or</strong> its derivative w<strong>or</strong>ks. These actions are prohibited by law<br />
if you do <strong>no</strong>t accept this License. There<strong>f<strong>or</strong></strong>e, by modifying <strong>or</strong> distributing<br />
the Program (<strong>or</strong> any w<strong>or</strong>k based on the Program), you indicate your<br />
acceptance of this License to do so, and all its terms and conditions <strong>f<strong>or</strong></strong><br />
copying, distributing <strong>or</strong> modifying the Program <strong>or</strong> w<strong>or</strong>ks based on it.<br />
6. Each time you redistribute the Program (<strong>or</strong> any w<strong>or</strong>k based on the<br />
Program), the recipient automatically receives a license from the <strong>or</strong>iginal<br />
licens<strong>or</strong> to copy, distribute <strong>or</strong> modify the Program subject to these terms<br />
and conditions. You may <strong>no</strong>t impose any further restrictions on the<br />
recipients' exercise of the rights granted herein. You are <strong>no</strong>t responsible<br />
<strong>f<strong>or</strong></strong> en<strong>f<strong>or</strong></strong>cing compliance by third parties to this License.<br />
7. If, as a consequence of a court judgment <strong>or</strong> allegation of patent<br />
infringement <strong>or</strong> <strong>f<strong>or</strong></strong> any other reason (<strong>no</strong>t limited to patent issues),<br />
conditions are imposed on you (whether by court <strong>or</strong>der, agreement <strong>or</strong><br />
otherwise) that contradict the conditions of this License, they do <strong>no</strong>t<br />
excuse you from the conditions of this License. If you can<strong>no</strong>t distribute<br />
so as to satisfy simultaneously your obligations under this License and<br />
any other pertinent obligations, then as a consequence you may <strong>no</strong>t<br />
distribute the Program at all. F<strong>or</strong> example, if a patent license would <strong>no</strong>t<br />
permit royalty-free redistribution of the Program by all those who receive<br />
copies directly <strong>or</strong> indirectly through you, then the <strong>only</strong> way you could<br />
satisfy both it and this License would be to refrain entirely from<br />
distribution of the Program.<br />
If any p<strong>or</strong>tion of this section is held invalid <strong>or</strong> unen<strong>f<strong>or</strong></strong>ceable under any<br />
particular circumstance, the balance of the section is intended to apply<br />
and the section as a whole is intended to apply in other circumstances.<br />
It is <strong>no</strong>t the purpose of this section to induce you to infringe any patents <strong>or</strong><br />
other property right claims <strong>or</strong> to contest validity of any such claims; this<br />
section has the sole purpose of protecting the integrity of the free software
distribution system, which is implemented by public license practices.<br />
Many people have made generous contributions to the wide range of<br />
software distributed through that system in reliance on consistent<br />
application of that system; it is up to the auth<strong>or</strong>/don<strong>or</strong> to decide if he <strong>or</strong><br />
she is willing to distribute software through any other system and a<br />
licensee can<strong>no</strong>t impose that choice.<br />
This section is intended to make th<strong>or</strong>oughly clear what is believed to be a<br />
consequence of the rest of this License.<br />
8. If the distribution and/<strong>or</strong> use of the Program is restricted in certain<br />
countries either by patents <strong>or</strong> by copyrighted interfaces, the <strong>or</strong>iginal<br />
copyright holder who places the Program under this License may add an<br />
explicit geographical distribution limitation excluding those countries, so<br />
that distribution is permitted <strong>only</strong> in <strong>or</strong> among countries <strong>no</strong>t thus<br />
excluded. In such case, this License inc<strong>or</strong>p<strong>or</strong>ates the limitation as if<br />
written in the body of this License.<br />
9. The Free Software Foundation may publish revised and/<strong>or</strong> new<br />
versions of the General Public License from time to time. Such new<br />
versions will be similar in spirit to the present version, but may differ in<br />
detail to address new problems <strong>or</strong> concerns.<br />
Each version is given a distinguishing version number. If the Program<br />
specifies a version number of this License which applies to it and "any<br />
later version", you have the option of following the terms and conditions<br />
either of that version <strong>or</strong> of any later version published by the<br />
FreeSoftware Foundation. If the Program does <strong>no</strong>t specify a version<br />
number of this License, you may choose any version ever published by<br />
the Free Software Foundation.<br />
10. If you wish to inc<strong>or</strong>p<strong>or</strong>ate parts of the Program into other free<br />
programs whose distribution conditions are different, write to the auth<strong>or</strong><br />
to ask <strong>f<strong>or</strong></strong> permission. F<strong>or</strong> software which is copyrighted by the Free<br />
Software Foundation, write to the Free Software Foundation; we<br />
sometimes make exceptions <strong>f<strong>or</strong></strong> this. Our decision will be guided by the<br />
GNU General Public License<br />
two goals of preserving the free status of all derivatives of our free<br />
software and of promoting the sharing and reuse of software generally.<br />
NO WARRANTY<br />
11. Because the program is licensed free of charge, there is <strong>no</strong> warranty<br />
<strong>f<strong>or</strong></strong> the program, to the extent permitted by appli<strong>cable</strong> law. except when<br />
otherwise stated in writing the copyright holders and/<strong>or</strong> other parties<br />
provide the program "as is" without warranty of any kind, either<br />
expressed <strong>or</strong> implied, including, but <strong>no</strong>t limited to, the implied warranties<br />
of merchantability and fitness <strong>f<strong>or</strong></strong> a particular purpose. The entire risk as<br />
to the quality and per<strong>f<strong>or</strong></strong>mance of the program is with you. Should the<br />
program prove defective, you assume the cost of all necessary servicing,<br />
repair <strong>or</strong> c<strong>or</strong>rection.<br />
12. In <strong>no</strong> event unless required by appli<strong>cable</strong> law <strong>or</strong> agreed to in writing<br />
will any copyright holder, <strong>or</strong> any other party who may modify and/<strong>or</strong><br />
redistribute the program as permitted above, be liable to you <strong>f<strong>or</strong></strong><br />
damages, including any general, special, incidental <strong>or</strong> consequential<br />
damages arising out of the use <strong>or</strong> inability to use the program (including<br />
but <strong>no</strong>t limited to loss of data <strong>or</strong> data being rendered inaccurate <strong>or</strong> losses<br />
sustained by you <strong>or</strong> third parties <strong>or</strong> a failure of the program to operate<br />
with any other programs), even if such holder <strong>or</strong> other party has been<br />
advised of the possibility of such damages.<br />
End of terms and conditions.<br />
HOW TO APPLY THESE TERMS TO YOUR NEW PROGRAMS<br />
If you develop a new program, and you want it to be of the greatest<br />
possible use to the public, the best way to achieve this is to make it free<br />
software which everyone can redistribute and change under these terms.<br />
To do so, attach the following <strong>no</strong>tices to the program. It is safest to<br />
attach them to the start of each source file to most effectively convey the<br />
exclusion of warranty; and each file should have at least the "copyright"<br />
line and a pointer to where the full <strong>no</strong>tice is found.<br />
167<br />
9
168<br />
Chapter 9<br />
Linux and Other Imp<strong>or</strong>tant In<strong>f<strong>or</strong></strong>mation<br />
LINUX SOURCE NOTICE<br />
TiVo Digital Video Rec<strong>or</strong>ders (DVRs) are powered by the Linux<br />
operating system. The machine-readable copy of the c<strong>or</strong>responding<br />
source code is available <strong>f<strong>or</strong></strong> the cost of distribution. Please visit<br />
www.tivo.com/linux <strong>f<strong>or</strong></strong> m<strong>or</strong>e in<strong>f<strong>or</strong></strong>mation.<br />
MACROVISION COPYRIGHT PROTECTION<br />
The TiVo Digital Video Rec<strong>or</strong>der inc<strong>or</strong>p<strong>or</strong>ates copyright protection<br />
tech<strong>no</strong>logy that is protected by U.S. patents and other intellectual<br />
property rights. <strong>Use</strong> of this copyright protection tech<strong>no</strong>logy must be<br />
auth<strong>or</strong>ized by Macrovision, and is intended <strong>f<strong>or</strong></strong> home and other limited<br />
pay-per-view uses <strong>only</strong> unless otherwise auth<strong>or</strong>ized by Macrovision.<br />
Reverse engineering <strong>or</strong> disassembly is prohibited. U.S. patent Nos.<br />
4,631,603, 4,577,216, 4,819,098 and 4,907,093 licensed <strong>f<strong>or</strong></strong> limited payper-view<br />
uses <strong>only</strong>.<br />
TELEPHONE LINE INTERRUPTION<br />
Periodically, the TiVo Digital Video Rec<strong>or</strong>der dials in to the TiVo<br />
service via your telephone line. If you pick up your telephone during the<br />
time in<strong>f<strong>or</strong></strong>mation is being transferred, you will hear static <strong>no</strong>ise. If you<br />
would like to use your telephone while the in<strong>f<strong>or</strong></strong>mation is being<br />
transferred, you can hang up, wait about 45 seconds, and pick up your<br />
telephone again. The DVR will disconnect, and allow you to place your<br />
call. You can also interrupt the transfer at any time by temp<strong>or</strong>arily<br />
unplugging the phone line from the DVR. If the transfer is interrupted, it<br />
will resume at a later time.<br />
Linux and Other Imp<strong>or</strong>tant In<strong>f<strong>or</strong></strong>mation<br />
INTERACTIVE PROGRAM GUIDE<br />
The interactive program guide (“IPG”) features of this device are covered<br />
by the following United States patents: 4,706,121.<br />
MPEG LA<br />
Any use of this product other than consumer personal use in any manner<br />
that complies with the MPEG-2 standard <strong>f<strong>or</strong></strong> encoding video in<strong>f<strong>or</strong></strong>mation<br />
<strong>f<strong>or</strong></strong> packaged media is expressly prohibited without a license under<br />
appli<strong>cable</strong> patents in the MPEG-2 patent p<strong>or</strong>tfolio, which license is<br />
available from MPEG LA, L.L.C., 250 Steele Street, Suite 300, Denver,<br />
Col<strong>or</strong>ado 80206.<br />
DOLBY LABORATORIES<br />
This product contains one <strong>or</strong> m<strong>or</strong>e programs protected under<br />
international and U.S. copyright laws as unpublished w<strong>or</strong>ks. They are<br />
confidential and proprietary to Dolby Lab<strong>or</strong>at<strong>or</strong>ies. Their reproduction <strong>or</strong><br />
disclosure, in whole <strong>or</strong> in part, <strong>or</strong> the production of derivative w<strong>or</strong>ks<br />
therefrom without the express permission of Dolby Lab<strong>or</strong>at<strong>or</strong>ies is<br />
prohibited. Copyright 1992-1997 by Dolby Lab<strong>or</strong>at<strong>or</strong>ies, Inc. All rights<br />
reserved.<br />
169<br />
9
170<br />
Chapter 9<br />
Privacy, Service, Warranty, and Licenses
APPENDIX<br />
A<br />
Back Panel Reference and<br />
Specifications
172<br />
Appendix<br />
1<br />
TCD230040<br />
BQLDT02BTCD2X0<br />
120 V~60Hz<br />
0.75A<br />
3<br />
Back Panel Reference<br />
2<br />
3<br />
4<br />
5<br />
7<br />
Back Panel Reference<br />
6 10 13<br />
1 - AC ~ In. (Connects to A/C power.) The DVR does <strong>no</strong>t use a separate on and off switch;<br />
plugging it into the wall socket switches it on.<br />
2 - Phone Jack. (Connects to phone c<strong>or</strong>d.) The DVR uses the phone line to get program<br />
in<strong>f<strong>or</strong></strong>mation and other data from the TiVo service. If you already have a phone line<br />
connected to your <strong>cable</strong> <strong>box</strong>, use the provided splitter.<br />
3 - Control Out/IR. (Connects to <strong>cable</strong> <strong>or</strong> satellite <strong>box</strong>; IR stands <strong>f<strong>or</strong></strong> infrared.) This<br />
connection allows the DVR to change channels on your <strong>cable</strong> <strong>or</strong> satellite <strong>box</strong>. The purple<br />
end of the IR Control <strong>cable</strong> plugs into the DVR. The two emitters on the other end of the<br />
<strong>cable</strong> are placed in front of the IR sens<strong>or</strong> on the <strong>cable</strong> and/<strong>or</strong> satellite <strong>box</strong>.<br />
IN<br />
8 9 11 12 14
4 - Control Out/Serial. (Connects to <strong>cable</strong> <strong>or</strong> satellite <strong>box</strong>; <strong>no</strong>t available on all <strong>cable</strong> <strong>or</strong><br />
satellite <strong>box</strong>es.) This allows the DVR to change channels on a <strong>cable</strong> <strong>or</strong> satellite <strong>box</strong>.<br />
5- USB. (Universal Serial Bus.) F<strong>or</strong> connecting a USB netw<strong>or</strong>k adapter. See page 101.<br />
6 - Left/Right Audio Outputs. (Connects to TV.) Connect the Left/Right Audio <strong>cable</strong>s<br />
(the white and red ones) to these jacks.<br />
7 - Composite Video Outputs. (Connects to TV.) Composite Video provides very good<br />
picture quality. It is used with the Left/Right Audio <strong>cable</strong>s (the white and red ones).<br />
8 - S-Video Output. (Connects to TV.) S-Video provides the highest quality picture. F<strong>or</strong><br />
audio with S-Video, use the Left/Right Audio <strong>cable</strong>s (the white and red plugs on the<br />
Composite A/V <strong>cable</strong>s) and just ign<strong>or</strong>e the yellow end of the Composite A/V <strong>cable</strong>.<br />
9 - Composite Video Input. (Connects to <strong>cable</strong> <strong>or</strong> satellite <strong>box</strong>.) Composite Video<br />
provides very good picture quality. It is used with the Left/Right Audio <strong>cable</strong>s.<br />
10 - Left/Right Audio Input. (Connects to <strong>cable</strong> <strong>or</strong> satellite <strong>box</strong>.) Connect the Left/Right<br />
Audio <strong>cable</strong>s (the white and red ones) to these jacks.<br />
11- S-Video Input. (Connects to <strong>cable</strong> <strong>or</strong> satellite <strong>box</strong>.) F<strong>or</strong> audio with S-Video, use the<br />
Left/Right Audio <strong>cable</strong>s (the white and red plugs on the Composite A/V <strong>cable</strong>s) and just<br />
ign<strong>or</strong>e the yellow end of the Composite A/V <strong>cable</strong>.<br />
12 - Channel 3/4 Switch. If you use a Coaxial RF <strong>cable</strong> to connect the DVR to your TV,<br />
you need to set this switch. Check which channel the TV is set to when it receives <strong>cable</strong><br />
TV. Then set this switch to the same channel (either 3 <strong>or</strong> 4).<br />
13 - RF In. (Connects to <strong>cable</strong> <strong>box</strong>, <strong>cable</strong> from wall, <strong>or</strong> antenna.) Connect a Coaxial RF<br />
<strong>cable</strong> from your antenna, <strong>cable</strong> <strong>box</strong>, <strong>or</strong> <strong>cable</strong> from the wall, to this jack.<br />
14 - RF Out. (Connects to TV.) <strong>Use</strong> this jack if you are using a Coaxial RF <strong>cable</strong> to<br />
connect the DVR to the TV.<br />
Back Panel Reference<br />
173<br />
A
174<br />
Appendix<br />
®<br />
CAUTION: TO PREVENT ELECTRICAL<br />
SHOCK, MATCH WIDE BLADE OF<br />
PLUG TO WIDE SLOT, AND FULLY INSERT.<br />
®<br />
Actual rec<strong>or</strong>ding capacity depends<br />
on signal quality and the type of<br />
programming being rec<strong>or</strong>ded.<br />
Specifications<br />
Video In: S-Video 4-pin mini DIN<br />
Composite Video RCA<br />
Video Out: S-Video 4-pin mini DIN<br />
Composite Video RCA (2)<br />
Audio Line In: Stereo L/R RCA (1 pair)<br />
Audio Line Out: Stereo L/R RCA (2 pairs)<br />
RF In: F-Connect<strong>or</strong> Female<br />
RF Out: F-Connect<strong>or</strong> Female<br />
Channel 3 <strong>or</strong> 4 switchable<br />
Expansion P<strong>or</strong>t: USB (2)<br />
Telephone: RJ-11 female, 2-wire<br />
Control Out: 3.5mm mini jack sockets (2)<br />
Power: 120VAC, 60Hz, 40W<br />
Ambient (external)<br />
Operating Temperature: 15C to 35C<br />
Operating Humidity: 5% to 80%<br />
Dimensions: 15" w X 12" d X 3.375" h<br />
Remote Control: 34 Buttons<br />
St<strong>or</strong>age: ATA/IDE Hard Drive<br />
Back Panel Reference
Index
176<br />
A<br />
A/V components, stacking on DVR 9<br />
A/V receiver<br />
programming remote to control 85<br />
AC In jack 172<br />
access<strong>or</strong>ies<br />
carton contents 3<br />
<strong>no</strong>t included 3<br />
adapters<br />
USB netw<strong>or</strong>k 106<br />
wired (Ethernet) 106<br />
wireless 106<br />
ADVANCE button 66<br />
audio<br />
secondary audio program (SAP) 77<br />
troubleshooting 137<br />
audio jack, TV has <strong>only</strong> one (white) 4<br />
Audio Settings screen 77<br />
auto-rec<strong>or</strong>ding WishList<br />
repeating rec<strong>or</strong>ding features and 46<br />
auto-rec<strong>or</strong>ding WishList search 63<br />
B<br />
BACK button 66<br />
back panel reference 172<br />
Browse by Channel 55<br />
Browse by Time 54<br />
C<br />
<strong>cable</strong> <strong>box</strong><br />
including in setup 5<br />
why to connect 5<br />
<strong>cable</strong> lineup<br />
Guided <strong>Setup</strong> and 27<br />
setting 78<br />
<strong>cable</strong>s<br />
carton contents 3<br />
choosing a video <strong>cable</strong> 4<br />
<strong>no</strong>t included 3<br />
<strong>cable</strong>s and jacks, the basics 2<br />
call waiting prefix 95<br />
changing channels<br />
watching one program while<br />
rec<strong>or</strong>ding a<strong>no</strong>ther 19<br />
Channel 3/4 Switch 173<br />
channel banner 77<br />
icons and 68<br />
viewing 68<br />
Channel Change/IR jack 172<br />
Channel Change/Serial jack 173<br />
channel changing settings 77<br />
channel lists<br />
setting up 78<br />
Channel Settings screen 77<br />
channels<br />
Guide Options and 51<br />
locking channels with<br />
Parental Controls 81<br />
troubleshooting 128<strong>–</strong>131<br />
Channels You Receive<br />
Guided <strong>Setup</strong> and 28<br />
setting up a list of 78<br />
code search, per<strong>f<strong>or</strong></strong>ming 87, 91<br />
Index<br />
Composite A/V <strong>cable</strong>s, when to choose 4<br />
Composite Video Input jacks 173<br />
Composite Video Output jacks 173<br />
conflicts<br />
pri<strong>or</strong>ities and 49<br />
questions about 135<br />
connection to DVR<br />
setting 84<br />
connection to the TiVo service<br />
troubleshooting 126<strong>–</strong>128<br />
control buttons<br />
using the 66<br />
Customer Supp<strong>or</strong>t 124<br />
D<br />
DHCP Client ID 118<br />
dial prefix<br />
setting 95<br />
dial tone detection<br />
setting 96<br />
dial-in number<br />
changing 94<br />
Guided <strong>Setup</strong> and 26<br />
Digital Video Rec<strong>or</strong>der (DVR)<br />
back panel reference 172<br />
controlling m<strong>or</strong>e than one 89<br />
specifications 174<br />
stacking things on top 9<br />
warranty 159<br />
DNS address 120<br />
Dolby ® Pro Logic 21<br />
Dolby ® Surround Sound 21
duplicates<br />
repeating rec<strong>or</strong>dings and 46<br />
DVD player<br />
tips <strong>f<strong>or</strong></strong> adding 21<br />
DVD rec<strong>or</strong>der<br />
tips <strong>f<strong>or</strong></strong> adding 20, 21<br />
DVR SWITCH<br />
programming 89<br />
resetting 90<br />
F<br />
Fav<strong>or</strong>ite Channels<br />
See also Guide Options.<br />
setting up a list of 78<br />
<strong>f<strong>or</strong></strong>ward<br />
fast <strong>f<strong>or</strong></strong>ward 66<br />
FORWARD button 66<br />
frame <strong>f<strong>or</strong></strong>ward 66<br />
front panel lights<br />
turning on and off 91<br />
G<br />
game console<br />
tips <strong>f<strong>or</strong></strong> adding 21<br />
gateway address 120<br />
GNU General Public License 164<br />
GPL (General Public License) 164<br />
guide<br />
customizing 51<br />
displaying 51<br />
Guide Options and 51<br />
rec<strong>or</strong>ding from 51, 52<br />
using to find programs 51<br />
Guide Options 51<br />
channels 51<br />
Channels You Receive and 51<br />
day and time 51<br />
Fav<strong>or</strong>ite Channels and 51<br />
filtering 51<br />
guide style 51<br />
Guided <strong>Setup</strong><br />
<strong>cable</strong> lineup and 27<br />
<strong>cable</strong> providers and 27<br />
Channels You Receive and 28<br />
choosing IR code and 6<br />
dial-in number and 26<br />
dialing <strong>f<strong>or</strong></strong>mat and 27<br />
introduction to 25<br />
IR Test screen and 6<br />
phone dialing option. See dialing<br />
options.<br />
repeating 99<br />
satellite providers and 27<br />
setup call and 26<br />
tips and troubleshooting 26<br />
H<br />
home netw<strong>or</strong>k<br />
connecting 107<br />
settings 112<br />
troubleshooting 141<strong>–</strong>144<br />
I<br />
icons<br />
See inside back cover.<br />
INSTANT REPLAY button 66<br />
IP address 119<br />
IR code<br />
what it does 6<br />
IR tent<br />
building an IR tent 7<br />
optimizing IR control 6<br />
K<br />
Keep Until... 73<br />
L<br />
Left/Right Audio Input jacks 173<br />
Left/Right Audio Output jack 173<br />
lights<br />
on the DVR’s front panel 91<br />
Linux 169<br />
live TV<br />
definition of vi<br />
rec<strong>or</strong>ding from 52<br />
rec<strong>or</strong>ding the saved p<strong>or</strong>tion 52<br />
troubleshooting 131<br />
M<br />
Macrovision 169<br />
manual repeating rec<strong>or</strong>ding<br />
repeating rec<strong>or</strong>ding features and 46<br />
setting up 56<br />
177
178<br />
Manual Season Pass. See manual<br />
repeating rec<strong>or</strong>ding.<br />
Manually Rec<strong>or</strong>d Time/Channel 56<br />
Messages<br />
reading messages from TiVo 76<br />
Multi-Room Viewing 103<br />
music<br />
file types 104<br />
playing 105<br />
Music & Photos 104<br />
MUTE button, programming 86<br />
N<br />
netw<strong>or</strong>king<br />
troubleshooting 141<strong>–</strong>144<br />
Now Playing<br />
tour 42<br />
troubleshooting 135<strong>–</strong>136<br />
watching programs from 72<br />
O<br />
Online Scheduling 57<br />
open source 164<br />
operating temperature 174<br />
Overtime Scheduler TM . See Rec<strong>or</strong>ding<br />
Options.<br />
P<br />
Parental Controls<br />
auto-relock 80<br />
channel lock 81<br />
movies and TV shows with<br />
<strong>no</strong> rating 81<br />
repeating rec<strong>or</strong>dings and 46<br />
troubleshooting 137<br />
turning on and off 79<br />
Parental Controls screen 79<br />
PAUSE button 66<br />
per<strong>f<strong>or</strong></strong>ming a code search 87, 91<br />
Phone & Netw<strong>or</strong>k <strong>Setup</strong> 92<br />
phone avail. detection<br />
setting 95<br />
phone dialing options 94<strong>–</strong>96<br />
phone jack<br />
what if it’s <strong>no</strong>t close by 8<br />
phone line 8<br />
photos<br />
file types 104<br />
viewing 105<br />
Pick Programs to Rec<strong>or</strong>d<br />
See also Rec<strong>or</strong>d by Time <strong>or</strong> Channel.<br />
See also Season Pass Manager.<br />
See also To Do List.<br />
troubleshooting 132<strong>–</strong>134<br />
PLAY button 66<br />
Privacy Policy 146<br />
Program In<strong>f<strong>or</strong></strong>mation screen 72<br />
Program In<strong>f<strong>or</strong></strong>mation screen,<br />
definition of vi<br />
programmable buttons<br />
resetting 91<br />
programs<br />
transferring between DVRs 103<br />
Index<br />
R<br />
Rating Settings<br />
MMPA definitions 82<br />
Movies and 80<br />
TV Content and 80<br />
TV Movies and 80<br />
TV ratings definitions 82<br />
RECORD button 66<br />
Rec<strong>or</strong>d by Time <strong>or</strong> Channel 54<br />
rec<strong>or</strong>ding capacity, actual 174<br />
Rec<strong>or</strong>ding Hist<strong>or</strong>y 50<br />
Rec<strong>or</strong>ding Options 47<br />
Keep At Least 48<br />
Keep At Most 48<br />
Keep Until 48<br />
list of 48<br />
Overtime Scheduler 48<br />
setting 47<br />
Show Type 48<br />
Start Rec<strong>or</strong>ding 48<br />
Stop Rec<strong>or</strong>ding 48<br />
rec<strong>or</strong>ding quality<br />
setting the default 83<br />
remote control<br />
incompatibility with some<br />
makes and models 88<br />
<strong>no</strong>t w<strong>or</strong>king with TV 125<br />
per<strong>f<strong>or</strong></strong>ming a code search 87, 91<br />
programming 85<br />
resetting the programmable<br />
buttons 91
using with your TV and<br />
A/V receiver 85<br />
repeating rec<strong>or</strong>dings 46<br />
Restart <strong>or</strong> Reset System 99<br />
restarting the DVR 99<br />
RF Coaxial <strong>cable</strong>, when to choose 4<br />
RF In jack 173<br />
RF Out jack 173<br />
RF splitter 18<br />
RF Video 84<br />
router address 120<br />
S<br />
SAP (secondary audio program) 77<br />
Save to VCR 74<br />
Search By Title 53<br />
Season Pass TM 53<br />
cancelling a Season Pass 49<br />
repeating rec<strong>or</strong>ding features and 46<br />
using the Season Pass Manager 49<br />
Serial Control <strong>cable</strong>, when to connect 5<br />
Service Agreement 153<br />
service number<br />
activating TiVo service and 24<br />
where to find 97<br />
service updates, where to find in<strong>f<strong>or</strong></strong>mation<br />
about vi<br />
Settings<br />
audio 77<br />
<strong>cable</strong> lineup 78<br />
channel banner 77<br />
channel changing 77<br />
channels 77<br />
Channels You Receive 78<br />
connection to DVR 84<br />
Fav<strong>or</strong>ite Channels 78<br />
Parental Controls 79<br />
rec<strong>or</strong>ding quality 83<br />
RF Video 84<br />
sound effects volume and 77<br />
television audio 77<br />
TiVo Suggestions 84<br />
video 84<br />
Settings screen 77<br />
setup example<br />
choosing 9<br />
Showcases 41<br />
SLOW button 66<br />
sound effects volume 77<br />
specifications 174<br />
splitting the signal 18<br />
stacking objects on DVR 9<br />
Standby 100<br />
Start Rec<strong>or</strong>ding. See Rec<strong>or</strong>ding Options.<br />
status bar 67<br />
Stop Rec<strong>or</strong>ding. See Rec<strong>or</strong>ding Options.<br />
stopping a rec<strong>or</strong>ding 52<br />
st<strong>or</strong>age 174<br />
subnet mask 120<br />
S-Video <strong>cable</strong>, when to choose 4<br />
S-Video Input jack 173<br />
S-Video Output jack 173<br />
System In<strong>f<strong>or</strong></strong>mation screen 97<br />
T<br />
TCP/IP settings116<br />
television audio 77<br />
time<br />
how the DVR’s clock is set 133<br />
TiVo Central ® Online 57<br />
TiVo Desktop application 104<br />
TiVo Privacy Policy 146<br />
TiVo ® Service<br />
activating 24<br />
questions about 140<br />
TiVo Service Agreement 153<br />
TiVo Suggestions<br />
automatic rec<strong>or</strong>ding of 84<br />
auto-rec<strong>or</strong>ding of 41<br />
using Thumbs buttons and 40<br />
TiVolution ® Magazine 41<br />
To Do List 50<br />
tone/pulse setting 95<br />
troubleshooting screens 98<br />
TV INPUT button, programming 86<br />
TV POWER button, programming 86<br />
U<br />
USB 173<br />
V<br />
VCR, saving programs to 74<br />
video<br />
See also Video Rec<strong>or</strong>ding Quality<br />
troubleshooting 137<br />
179
180<br />
Video Rec<strong>or</strong>ding Quality<br />
Rec<strong>or</strong>ding Options and 48<br />
Video Settings screen 84<br />
View Rec<strong>or</strong>ding Hist<strong>or</strong>y 50<br />
VOLUME button, programming 86<br />
volume, sound effects and 77<br />
W<br />
warranty 159<br />
weight, supp<strong>or</strong>ting of on DVR 9<br />
WEP 113<br />
wireless passw<strong>or</strong>ds 115<br />
WishList TM searches 58<strong>–</strong>63<br />
keyw<strong>or</strong>d tips 62<br />
Index
Glossary of Icons<br />
TM<br />
TM<br />
These appear when you press THUMBS UP <strong>or</strong> THUMBS<br />
DOWN . You can give a program up to three THUMBS UP<br />
<strong>or</strong> three THUMBS DOWN.<br />
Ipreview icons appear when an option—such as<br />
automatically scheduling an upcoming program <strong>or</strong><br />
watching an additional program segment—is<br />
available. Press SELECT <strong>or</strong> THUMBS UP to choose<br />
the option.<br />
TiVo Central, Showcases, <strong>or</strong> TiVolution Magazine<br />
Save to VCR<br />
Indicates a selection that has some special video content.<br />
Select to watch a special preview <strong>or</strong> visit a Showcase.<br />
Indicates news <strong>or</strong> a special promotional offer from TiVo.<br />
Appears as a warning if a remote button is pressed during<br />
“Save to VCR.”<br />
To Do List and View Upcoming Episodes<br />
(These icons appear beside programs scheduled to be rec<strong>or</strong>ded.)<br />
Program is an individual rec<strong>or</strong>ding (<strong>no</strong>t part of a Season Pass <strong>or</strong> WishList ). In other places, it means an item has been<br />
selected.<br />
Program will be rec<strong>or</strong>ded as part of a Season Pass.<br />
Program will be rec<strong>or</strong>ded as part of a WishList.<br />
Channel Banner<br />
(These icons appear in the large channel banner.)<br />
(Red with black b<strong>or</strong>der) Select to start <strong>or</strong> stop a rec<strong>or</strong>ding.<br />
Select to display <strong>or</strong> turn on Parental Controls.<br />
Select to read new messages.
Now Playing<br />
(Green) This program will be saved until you delete it.<br />
(Yellow) In less than one day, this program may be deleted to<br />
make room <strong>f<strong>or</strong></strong> other rec<strong>or</strong>dings you have requested, but <strong>only</strong> if<br />
space is needed.<br />
(Yellow with exclamation mark) At any time, this program may be<br />
deleted to make room <strong>f<strong>or</strong></strong> other programs you have requested.<br />
(Red with black b<strong>or</strong>der) This program is currently being rec<strong>or</strong>ded<br />
<strong>or</strong> transferred.<br />
This program is a TiVo ® Suggestion. TiVo Suggestions are<br />
rec<strong>or</strong>ded <strong>only</strong> if space is available, and are the first to be deleted<br />
“Plain” folder <strong>–</strong> contains m<strong>or</strong>e than one episode of the same<br />
series.<br />
Folder with red dot <strong>–</strong> <strong>f<strong>or</strong></strong> any group that includes a program that<br />
is currently rec<strong>or</strong>ding <strong>or</strong> transferring.<br />
Folder with blue star <strong>–</strong> contains one <strong>or</strong> m<strong>or</strong>e programs rec<strong>or</strong>ded<br />
by a WishList TM search.<br />
Folder with Thumbs Up TM <strong>–</strong> contains all programs rec<strong>or</strong>ded as<br />
TiVo Suggestions.<br />
DVR <strong>–</strong> <strong>f<strong>or</strong></strong> a DVR on your netw<strong>or</strong>k.
TiVo and HUMAX are dedicated to providing you with quality supp<strong>or</strong>t and customer<br />
service. If you have questions <strong>or</strong> difficulties, we would like to hear from you.<br />
Troubleshooting<br />
Check the Troubleshooting chapter of this guide. It has detailed answers to the most common questions,<br />
and solutions <strong>f<strong>or</strong></strong> typical troubleshooting issues.<br />
Contact Customer Supp<strong>or</strong>t<br />
You can find complete Customer Supp<strong>or</strong>t contact in<strong>f<strong>or</strong></strong>mation in the Troubleshooting chapter of this guide.<br />
Online Customer Supp<strong>or</strong>t<br />
Check the HUMAX supp<strong>or</strong>t site <strong>or</strong> the TiVo supp<strong>or</strong>t site:<br />
HUMAX Customer Supp<strong>or</strong>t<br />
• Connecting your DVR to your TV & other equipment<br />
• Phone calls and connecting to the TiVo service<br />
• Channel changing and the remote control<br />
• Audio and video<br />
www.humaxusa.com/supp<strong>or</strong>t<br />
TiVo Customer Supp<strong>or</strong>t<br />
• Using TiVo service features (finding & rec<strong>or</strong>ding programs)<br />
• Your channel lineup and channel lists<br />
• Your TiVo service account and billing issues<br />
• Online scheduling and home media features<br />
www.tivo.com/supp<strong>or</strong>t<br />
20005-2200