Free SubScriPtioN - 2Ride Motorcycle Magazine
Free SubScriPtioN - 2Ride Motorcycle Magazine
Free SubScriPtioN - 2Ride Motorcycle Magazine

Create successful ePaper yourself
Turn your PDF publications into a flip-book with our unique Google optimized e-Paper software.
teCH<br />
Corner<br />
How your bike feels when riding over<br />
bumps or tracking through corners<br />
is directly related to how well your<br />
suspension is maintained and adjusted.<br />
Suspension maintenance and set-up are often<br />
thought to be important to track day riders or<br />
racers only. While riders that spend time on<br />
the track are more likely to spend time working<br />
on their suspension than those committed to<br />
the street, any rider will benefit from having<br />
their suspension properly tuned. Street riders<br />
will benefit with better control, comfort and<br />
improved tire wear.<br />
I’m going to dispel some of the ‘black<br />
magic’ around suspension components and<br />
proper adjustment. Understanding how the<br />
different components work together and basic<br />
adjustments required to improve your bikes<br />
handling will help you when it comes time to<br />
SToRY BY SIMon BakeR<br />
adjust your suspension yourself or discuss any<br />
changes with your mechanic.<br />
Other than some unique designs from BMW<br />
and a few other manufacturers the, majority<br />
of motorcycles are and have been equipped<br />
with telescopic forks. This article will focus<br />
on telescopic forks, what the different parts<br />
are, what they do and how to adjust them for<br />
proper performance and safety.<br />
Telescopic forks are connected to the<br />
motorcycle frame though a triple tree.<br />
The forks connect the frame to the front<br />
wheel, to allow turning of the front wheel<br />
and importantly, to keep the front wheel in<br />
constant contact with the ground (except with<br />
wheelies!).<br />
Telescopic forks come in two configurations:<br />
Standard Configuration - With the standard<br />
configuration the polished tube is attached to<br />
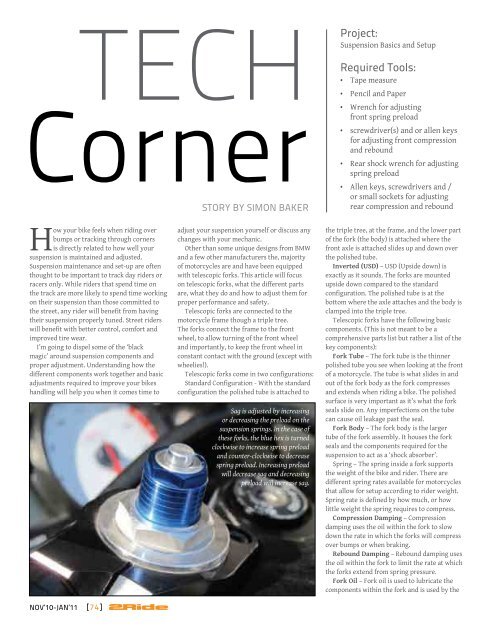
Sag is adjusted by increasing<br />
or decreasing the preload on the<br />
suspension springs. In the case of<br />
these forks, the blue hex is turned<br />
clockwise to increase spring preload<br />
and counter-clockwise to decrease<br />
spring preload. Increasing preload<br />
will decrease sag and decreasing<br />
preload will increase sag.<br />
Project:<br />
Suspension Basics and Setup<br />
Required Tools:<br />
• Tape measure<br />
• Pencil and Paper<br />
• Wrench for adjusting<br />
front spring preload<br />
• screwdriver(s) and or allen keys<br />
for adjusting front compression<br />
and rebound<br />
• Rear shock wrench for adjusting<br />
spring preload<br />
• Allen keys, screwdrivers and /<br />
or small sockets for adjusting<br />
rear compression and rebound<br />
the triple tree, at the frame, and the lower part<br />
of the fork (the body) is attached where the<br />
front axle is attached slides up and down over<br />
the polished tube.<br />
Inverted (USD) – USD (Upside down) is<br />
exactly as it sounds. The forks are mounted<br />
upside down compared to the standard<br />
configuration. The polished tube is at the<br />
bottom where the axle attaches and the body is<br />
clamped into the triple tree.<br />
Telescopic forks have the following basic<br />
components. (This is not meant to be a<br />
comprehensive parts list but rather a list of the<br />
key components):<br />
Fork Tube – The fork tube is the thinner<br />
polished tube you see when looking at the front<br />
of a motorcycle. The tube is what slides in and<br />
out of the fork body as the fork compresses<br />
and extends when riding a bike. The polished<br />
surface is very important as it’s what the fork<br />
seals slide on. Any imperfections on the tube<br />
can cause oil leakage past the seal.<br />
Fork Body – The fork body is the larger<br />
tube of the fork assembly. It houses the fork<br />
seals and the components required for the<br />
suspension to act as a ‘shock absorber’.<br />
Spring – The spring inside a fork supports<br />
the weight of the bike and rider. There are<br />
different spring rates available for motorcycles<br />
that allow for setup according to rider weight.<br />
Spring rate is defined by how much, or how<br />
little weight the spring requires to compress.<br />
Compression Damping – Compression<br />
damping uses the oil within the fork to slow<br />
down the rate in which the forks will compress<br />
over bumps or when braking.<br />
Rebound Damping – Rebound damping uses<br />
the oil within the fork to limit the rate at which<br />
the forks extend from spring pressure.<br />
Fork Oil – Fork oil is used to lubricate the<br />
components within the fork and is used by the<br />
compression and rebound valves to achieve<br />
damping.<br />
Fork Seal – The fork seal is located at the<br />
end of the fork body and seals against the fork<br />
tube. It prevents fork oil from leaking out and<br />
contaminants from getting in.<br />
So what do all these parts do? They work<br />
together to keep your tires in constant contact<br />
with the ground, absorb bumps and manage<br />
braking and cornering forces.<br />
The spring’s role is to support the weight<br />
of the motorcycle and rider, allowing the<br />
suspension to compress under heavier forces.<br />
The spring does this by compressing over<br />
bumps, when braking and cornering. It also<br />
extends the forks when the wheel ‘falls’ into a<br />
bump. Springs without any sort of control will<br />
continue to oscillate, without any damping<br />
effect, the spring will continue to extend and<br />
compress over and over again many times. This<br />
would make for a very unpleasant ride if the<br />
bike continued to bounce long after going over<br />
a bump. When the bike makes contact with a<br />
bump with the spring still oscillating then the<br />
result would be a jarring impact.<br />
Compression and rebound damping<br />
are what provide the necessary control<br />
around the spring’s oscillations.<br />
Compression damping controls the<br />
fork through the compression stroke.<br />
Rebound damping controls the rate<br />
at which the fork extends. These two<br />
damping controls prevent unwanted<br />
spring oscillations and when set<br />
correctly, keeps the tire planted on the<br />
pavement.<br />
Suspension Adjustments<br />
On a sport bike there are three<br />
basic suspension settings that can be<br />
adjusted on the front forks and rear<br />
shock. The most important of these is<br />
sag, or preload. Sag is the amount the<br />
suspension compresses with the rider<br />
on the bike. Sag is important because when set<br />
correctly is ensures the suspension is operating<br />
in the correct operating range for the damping<br />
and the springs.<br />
There are two sag measurements you need to<br />
be concerned with; static and rider.<br />
Static Sag is the amount the suspension<br />
compresses under the weight of the bike alone.<br />
Rider Sag is the amount the suspension<br />
compresses under the weight of the bike and<br />
rider wearing gear.<br />
As a general rule of thumb, static sag<br />
should be 5-10 mm and rider sag, on a street<br />
bike, should be 30-35 mm and 25-30mm on a<br />
track bike.<br />
Sag is set by first measuring the front and<br />
rear suspension independently without any<br />
weight on the bike and the suspension fully<br />
extended. You should have a second person<br />
assist with this by lifting the front and rear<br />
of the bike to find out your fully extended<br />
measurement, or alternatively for the front you<br />
can use a triple tree pin stand to lift the bike,<br />
while you measure.<br />
The measurements should be taken from a<br />
solid point on the bike, such as the fairing or<br />
subframe to another, such as the lower fork<br />
tube or swingarm. Regardless of where you<br />
choose you need to make sure you measure<br />
exactly the same place each time during<br />
sag adjustment. Take note of this initial<br />
measurement.<br />
The next measurement is to obtain static<br />
sag. This is best done without the use of any<br />
stands and someone balancing the bike for you.<br />
Bounce the suspension a couple of times and let<br />
it settle. Use your reference points used for the<br />
extended measurement and measure again.<br />
These two measurements give you your<br />
static sag.<br />
Extended measurement - bike weight<br />
measurement = static sag<br />
The final measurement is with the weight<br />
of the rider, in standard riding gear, on the<br />
bike. Again with someone balancing the bike,<br />
This is the compression adjuster<br />
on a typical telescopic fork<br />
you need to be seated on the bike with your<br />
gear. Bounce the suspension again and allow<br />
to settle. Using the same reference points as<br />
in the first two steps measure how much the<br />
suspension has compressed.<br />
Extended measurement – rider weight<br />
measurement = rider sag<br />
Now that you have your sag measurements<br />
for the front and rear of the bike you may need<br />
to adjust your suspension to obtain the correct<br />
settings. You will need to consult the technical<br />
documentation for your bike for the proper<br />
adjustment locations for the front forks and<br />
rear shock.<br />
Once you have your rider sag within the<br />
desired range you will need to check your<br />
static sag setting again. With the rider sag set<br />
correctly, if your static sag is above 10 mm then<br />
you need stiffer front springs. If your static sag<br />
is less than 5 mm after setting rider sag then<br />
you will need softer springs.<br />
The next setting to adjust is rebound<br />
damping. Rebound damping is best set with<br />
the suspension warm; you will need to ride the<br />
bike for a few miles to warm up the suspension.<br />
Rebound damping on front forks is typically<br />
set using the adjuster on the front forks in<br />
the center of the preload adjuster (see pic of<br />
preload adjustment).<br />
To set rebound you need to bounce the<br />
suspension and watch how it settles. If the<br />
suspension comes up very slowly when you<br />
bounce it you have too much preload. If<br />
the suspension comes back up quickly and<br />
continues to bounce, you don’t have enough<br />
damping. The ideal setting is when the<br />
suspension comes back up from the bounce<br />
and settles back on the spring near the static<br />
sag setting. This means the suspension has<br />
absorbed the bump properly and is ready for<br />
the next bump.<br />
Compression damping is the final adjustment<br />
you’ll be doing. Compression damping controls<br />
how quickly the suspension compresses<br />
over bumps and when braking. Too much<br />
compression damping and the bike will<br />
feel harsh or chatter over bumps and,<br />
in the case of front compression, will<br />
feel difficult to turn into corners when<br />
braking. Conversely, if compression<br />
damping is too soft the bike will<br />
feel vague and soft. Compression<br />
damping is best set by starting with<br />
the manufacturer’s settings (or a good<br />
mechanic’s recommendation) and<br />
adjusting to feel.<br />
Another good idea is to install a zip<br />
tie both on one of your fork tubes as<br />
well as on the rear shock. The zip tie<br />
will tell you, at a glance, how much<br />
of your suspension you are using and<br />
how close you are to bottoming out. If<br />
your sag is set correctly and the zip tie<br />
shows you are bottoming out your suspension<br />
this is a great indicator that you don’t have<br />
enough compression damping.<br />
Whenever making adjustments to any part<br />
of your motorcycle, especially the suspension,<br />
where you may make changes over and over<br />
again to make it right, take notes. Notes are<br />
important so you know what you’ve adjusted<br />
and by how much in case you need to revert<br />
back to previous settings.<br />
I hope this article has increased your<br />
knowledge as it relates to motorcycle<br />
suspension and gives you the confidence to try<br />
these adjustments yourself or, at least, puts<br />
you in a better position to discuss making these<br />
changes with your mechanic.<br />
By setting up your suspension correctly,<br />
your bike will corner, brake and ride smoother<br />
putting you in better control of your bike.<br />
nov’10-jan‘11 [74] nov’10-jan‘11 [75]