How to Use Storycard Theater™
How to Use Storycard Theater™
How to Use Storycard Theater™

You also want an ePaper? Increase the reach of your titles
YUMPU automatically turns print PDFs into web optimized ePapers that Google loves.
The Joy of Kamishibai<br />
Kamishibai Performance Tips<br />
By David Battino and Hazuki Kataoka<br />
Authors and Publishers, S<strong>to</strong>rycard Theater<br />
Kamishibai s<strong>to</strong>rycard dramas are easy <strong>to</strong> read and fun <strong>to</strong> watch. Here are some techniques we’ve found<br />
will make your performances even more enjoyable.<br />
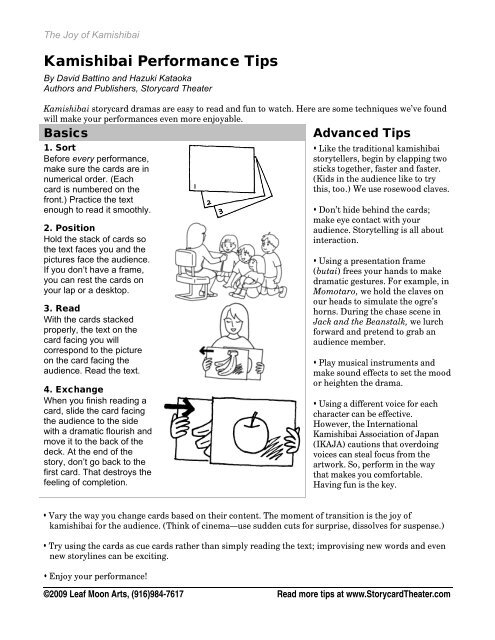
Basics<br />
1. Sort<br />
Before every performance,<br />
make sure the cards are in<br />
numerical order. (Each<br />
card is numbered on the<br />
front.) Practice the text<br />
enough <strong>to</strong> read it smoothly.<br />
2. Position<br />
Hold the stack of cards so<br />
the text faces you and the<br />
pictures face the audience.<br />
If you don’t have a frame,<br />
you can rest the cards on<br />
your lap or a desk<strong>to</strong>p.<br />
3. Read<br />
With the cards stacked<br />
properly, the text on the<br />
card facing you will<br />
correspond <strong>to</strong> the picture<br />
on the card facing the<br />
audience. Read the text.<br />
4. Exchange<br />
When you finish reading a<br />
card, slide the card facing<br />
the audience <strong>to</strong> the side<br />
with a dramatic flourish and<br />
move it <strong>to</strong> the back of the<br />
deck. At the end of the<br />
s<strong>to</strong>ry, don’t go back <strong>to</strong> the<br />
first card. That destroys the<br />
feeling of completion.<br />
Advanced Tips<br />
• Like the traditional kamishibai<br />
s<strong>to</strong>rytellers, begin by clapping two<br />
sticks <strong>to</strong>gether, faster and faster.<br />
(Kids in the audience like <strong>to</strong> try<br />
this, <strong>to</strong>o.) We use rosewood claves.<br />
• Don’t hide behind the cards;<br />
make eye contact with your<br />
audience. S<strong>to</strong>rytelling is all about<br />
interaction.<br />
• Using a presentation frame<br />
(butai) frees your hands <strong>to</strong> make<br />
dramatic gestures. For example, in<br />
Momotaro, we hold the claves on<br />
our heads <strong>to</strong> simulate the ogre’s<br />
horns. During the chase scene in<br />
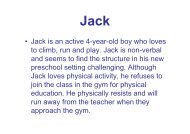
Jack and the Beanstalk, we lurch<br />
forward and pretend <strong>to</strong> grab an<br />
audience member.<br />
• Play musical instruments and<br />
make sound effects <strong>to</strong> set the mood<br />
or heighten the drama.<br />
• Using a different voice for each<br />
character can be effective.<br />
<strong>How</strong>ever, the International<br />
Kamishibai Association of Japan<br />
(IKAJA) cautions that overdoing<br />
voices can steal focus from the<br />
artwork. So, perform in the way<br />
that makes you comfortable.<br />
Having fun is the key.<br />
• Vary the way you change cards based on their content. The moment of transition is the joy of<br />
kamishibai for the audience. (Think of cinema—use sudden cuts for surprise, dissolves for suspense.)<br />
• Try using the cards as cue cards rather than simply reading the text; improvising new words and even<br />
new s<strong>to</strong>rylines can be exciting.<br />
• Enjoy your performance!<br />
©2009 Leaf Moon Arts, (916)984-7617 Read more tips at www.S<strong>to</strong>rycardTheater.com
The Joy of Kamishibai<br />
<strong>How</strong> To Make Your Own Kamishibai<br />
Making kamishibai s<strong>to</strong>rycards is a rewarding project for students<br />
because it teaches so many creative skills: writing, editing, illustration,<br />
presentation, and collaboration. Here are some insights we’ve developed<br />
while producing and performing our own kamishibai.<br />
Materials Needed<br />
Construction paper or posterboard; white paper; markers, paints, or<br />
pho<strong>to</strong>s; gluesticks or rubber cement <strong>to</strong> attach artwork; transparent tape <strong>to</strong> attach text.<br />
Writing Tips<br />
1. Emphasize dialog.<br />
2. Write for the ear; write colloquially.<br />
3. Divide the s<strong>to</strong>ry in<strong>to</strong> scenes, with each scene ending on<br />
a cliffhanger or at least leading in<strong>to</strong> the next.<br />
4. Don’t duplicate the picture with the text. Because the<br />
picture is always in view, you don’t have <strong>to</strong> describe<br />
what’s going on.<br />
5. Know your target audience; use shorter sentences and<br />
simpler words for younger audiences.<br />
6. <strong>Use</strong> sensory words. (“The ogre fell <strong>to</strong> the ground like a<br />
stinky wet sock.”)<br />
7. Test and refine on your target audience. This is one of<br />
the best educational benefits of having students make<br />
their own kamishibai: They can practice iterative editing<br />
and get immediate feedback on its effectiveness: Which<br />
phrases were hard <strong>to</strong> read aloud? Which parts were<br />
confusing for the audience? Where did they lose<br />
interest? Which parts did they like?<br />
Kamishibai Benefits<br />
• Easier <strong>to</strong> read (and watch) than<br />
conventional picture books.<br />
• Facilitates interactive<br />
s<strong>to</strong>rytelling.<br />
• More immersive than simply<br />
hearing a s<strong>to</strong>ry, which is helpful<br />
for English language learners<br />
and special-needs students.<br />
• Facilitates picture-reading, an<br />
important step in learning <strong>to</strong><br />
read text.<br />
• A fun way <strong>to</strong> experience foreign<br />
cultures, his<strong>to</strong>ry, and<br />
languages.<br />
• Develops presentation skills.<br />
• An engaging, visual way <strong>to</strong><br />
teach math concepts.<br />
• Helps demonstrate and develop<br />
social skills.<br />
Illustration Tips<br />
1. Pick a moment in the scene that’s dramatic but doesn’t give away what’s going <strong>to</strong> happen.<br />
2. <strong>Use</strong> bright colors and clear pictures without excessive detail; they need <strong>to</strong> make sense from<br />
across a room. Students can download pho<strong>to</strong>s or cut them out of magazines; collages work well.<br />
3. Create the artwork on a separate sheet and then paste that <strong>to</strong> the construction paper or<br />
posterboard when you’re happy with the appearance. Using backing material that’s larger than<br />
the artwork creates a frame effect that enhances the drama.<br />
4. Follow this layout chart <strong>to</strong> match the art with the text. <strong>Use</strong> removable tape <strong>to</strong> attach the text <strong>to</strong><br />
the cards at first; that allows you <strong>to</strong> modify the words (see Writing Tip 7 above) and placement.<br />
ART 1 2 3 4 5 6 7 8<br />
TEXT 2 3 4 5 6 7 8 1<br />
Reference:<br />
Kamishibai Man (Author: Allen Say)<br />
Kamishibai S<strong>to</strong>ry Theater: The Art of Picture Telling (Paperback) (Author Dianne de Las Casas)<br />
<strong>How</strong> <strong>to</strong> Perform Kamishibai Q & A (Author: Noriko Matsui)<br />
©2009 Leaf Moon Arts, (916)984-7617 Read more tips at www.S<strong>to</strong>rycardTheater.com