K-6 Activities - Dudley Observatory
K-6 Activities - Dudley Observatory
K-6 Activities - Dudley Observatory

Create successful ePaper yourself
Turn your PDF publications into a flip-book with our unique Google optimized e-Paper software.
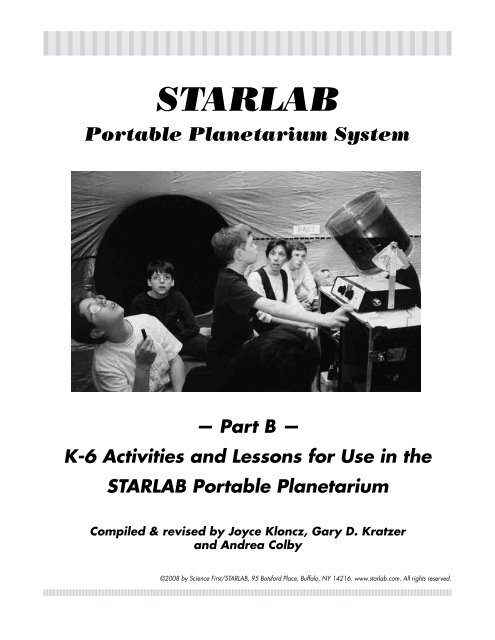
STARLAB<br />
Portable Planetarium System<br />
— Part B —<br />
K-6 <strong>Activities</strong> and Lessons for Use in the<br />
STARLAB Portable Planetarium<br />
Compiled & revised by Joyce Kloncz, Gary D. Kratzer<br />
and Andrea Colby<br />
©2008 by Science First/STARLAB, 95 Botsford Place, Buffalo, NY 14216. www.starlab.com. All rights reserved.
Table of Contents<br />
Part B — K-6 <strong>Activities</strong> and Lessons<br />
Tips On Using STARLAB by Joyce Kloncz.........B-5<br />
Pre- and Post-STARLAB <strong>Activities</strong><br />
Overview ........................................................... B-6<br />
Lessons for Grades K-3 ......................................... B-6<br />
Lessons for Grades 4-6 ......................................... B-6<br />
Sample Scope and Sequence<br />
Kindergarten ....................................................... B-7<br />
Grade One ......................................................... B-7<br />
Grade Two ......................................................... B-8<br />
Grade Three ....................................................... B-8<br />
Grade Four ......................................................... B-9<br />
Grade Five ......................................................... B-9<br />
<strong>Activities</strong><br />
Horizon Lesson for Primary Grades ...................... B-10<br />
How to Make a Star Clock ................................. B-12<br />
How to Make a Moon Phaser ............................. B-13<br />
Constructing a Moon Calendar ........................... B-14<br />
Solar System Mobile .......................................... B-20<br />
How to Make Constellation Pictures ..................... B-21<br />
How to Remember Orion’s Stars .......................... B-22<br />
How to Use a Star Finder ................................... B-23<br />
How to Make a Do it Yourself Star Finder ............. B-25<br />
How to Use a Dipper Finder ............................... B-27<br />
Dipper Finder Pattern and Instructions ................. B-29<br />
Stars and Constellations .................................... B-30<br />
The Motion of Stars and Constellations ................. B-32<br />
Tell Me What You Know About Stars! ................... B-33<br />
A Comparison of Star and Planet Attributes .......... B-35<br />
People Search Activity ........................................ B-37<br />
People Search Worksheet ................................... B-38<br />
Our Universal Address ....................................... B-39<br />
A Summary of Planetarium <strong>Activities</strong> for<br />
Student Success (PASS)<br />
Vol 1: Planetarium Educator’s Workshop Guide ..... B-40<br />
Vol 2: Planetarium <strong>Activities</strong> for Schools ............... B-40<br />
Vol 3: Resources for Teaching Astronomy and<br />
Space Science................................................... B-40<br />
Vol 4: A Manual for Using Portable Planetariums ... B-40<br />
Vol 5: Constellations Tonight ............................... B-40<br />
Vol 6: Red Planet Mars ....................................... B-40<br />
Vol 7: Moons of the Solar System ........................ B-40<br />
Vol 8: Colors from Space .................................... B-40<br />
Vol 9: How Big Is the Universe? ........................... B-41<br />
Vol 10: Who “Discovered” America? ................... B-41<br />
Vol 11: Astronomy of the Americas ...................... B-41<br />
Vol 12: Stonehenge ........................................... B-41<br />
Vol 13: Northern Lights ...................................... B-41<br />
Evening Star Maps<br />
Evening Star Map for January - February .............. B-42<br />
Evening Star Map for March - April ..................... B-43<br />
Evening Star Map for May - June ......................... B-44<br />
Evening Star Map for July - August ....................... B-45<br />
Evening Star Map for September - October ........... B-46<br />
Evening Star Map for November - December ........ B-47<br />
K-6 Resources<br />
Free and/or Inexpensive Materials to Teach<br />
Astronomy in the Classroom ................................ B-49<br />
Astronomy for Elementary Teachers Bibliography ... B-51<br />
Stars & Skies, STARLAB <strong>Activities</strong> for Grades 4-6<br />
Elementary Grades 4-6 Objectives ...................... B-54<br />
Cardinal Directions, Activity 4-1 ......................... B-56<br />
Celestial Movement, Activity 4-2 .......................... B-57<br />
Apparent Motion, Activity 4-3 ............................. B-58<br />
Stars and Light Pollution, Activity 4-4 .................... B-59<br />
East-West Constellation Movement, Activity 4-5 ..... B-60<br />
Star Groupings, Activity 4-6 ................................ B-61<br />
Circumpolar Constellations, Activity 4-7 ............... B-62<br />
Early Astronomers, Activity 5-1 ............................ B-63<br />
Phases of the Moon, Activity 5-2.......................... B-64<br />
Constellation Location, Activity 5-3 ...................... B-65<br />
• B–3 • K–6 <strong>Activities</strong>
Table of Contents (continued)<br />
Part B — K-6 <strong>Activities</strong> and Lessons<br />
Nightly Position of Constellations, Activity 5-4 ....... B-66<br />
Seasonal Position of Constellations, Activity 5-5 .... B-67<br />
Position of the North Star, Activity 5 -6 .................. B-68<br />
The Ecliptic, Activity 5-7 ..................................... B-69<br />
Studying Early Astronomers, Activity 6-1............... B-70<br />
Sunrise and Sunset Position, Activity 6-2 ............... B-71<br />
Apparent Motion, Activity 6-3 ............................. B-72<br />
Seasonal Changes, Activity 6-4 ........................... B-73<br />
Stellar Position — Poles vs. Equator, Activity 6-5 .... B-74<br />
Stellar Reference Points, Activity 6-6 ..................... B-75<br />
Greek Mythological Constellations, Activity 6 -7 ..... B-76<br />
Native American and Greek Myths, Activity 6-8 .... B-77<br />
Using a Star Finder, Activity 6-9 .......................... B-78<br />
K–6 <strong>Activities</strong> • B–4 •<br />
Stars & Skies, Supplemental Activites for<br />
Grades 4-6<br />
Comparing the Size of the Planets ....................... B-80<br />
Drawing Words ................................................. B-81<br />
Jumbled Words ................................................. B-81<br />
Word Search .................................................... B-82<br />
Making Constellation Slides ................................ B-83<br />
Lost in Space ..................................................... B-83<br />
Lost on the Moon Worksheet ............................... B-84<br />
Lost on the Moon Answer Key ............................. B-85<br />
Fun Pictures for Your Classroom ........................... B-86
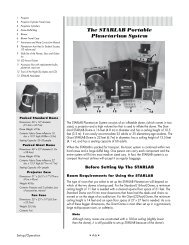
Tips On Using STARLAB<br />
by Joyce Kloncz<br />
The first time you use STARLAB is an exciting event! If you are using it as a classroom<br />
teacher or as a planetarium director, you’ll want to make sure you are prepared before<br />
you begin. Here are some ideas that have been used in the past for a successful<br />
STARLAB program.<br />
1. Try to set up STARLAB a day ahead of time so you are ready and comfortable<br />
before the students come. After following the set-up directions in the first section<br />
of the book, take some time in STARLAB preparing for your first visitors.<br />
2. Find some interesting planetarium music to play when your students arrive. (A<br />
favorite of mine is “Celestial Soda Pop” by Fresh Aire VI – Orpheus).<br />
3. Plan some classroom management techniques for students. It is important that<br />
they know your expectations in advance. In a dark classroom like STARLAB, it’s<br />
important to be consistent, but caring! Here are some tried and true techniques:<br />
• Make sure there are two adults to maintain safety.<br />
• When entering STARLAB, have two children hold the door flaps open.<br />
• Set a small fluorescent lantern in the doorway (available from Radio Shack).<br />
• The teacher should go in first, turn on the projector side lights, and have the<br />
children follow in single file.<br />
• Have the students sit completely around the inside edge of the STARLAB<br />
floor, but not up against the STARLAB wall. This is their seat for the duration<br />
(I suggest that teachers don’t allow seat-changing in STARLAB).<br />
• Make sure the students don’t block the inflation/ventilation tube.<br />
• Have a red flashlight available that will help to spot any problems.<br />
• When leaving, the teacher should be the last one out.<br />
4. Look through the cylinder information and decide in advance what you will do.<br />
If you are going to be taking children into STARLAB only once, plan a lesson that<br />
will be easy to do. For instance, show the Greek Mythology Cylinder and tell the<br />
stories about four easy-to-find constellations, such as Orion, Big Bear and Little<br />
Bear, and Cassiopeia. (See the Greek Mythology Cylinder section).Then show<br />
the Constellation Cylinder and with an arrow pointer, show the students where<br />
those four constellations are on that cylinder. Next, show the Starfield Cylinder<br />
and point out the same four constellations. Have children look carefully at the<br />
night sky, then close their eyes and imagine what the constellations look like.<br />
When they open their eyes, see if they can still find the constellations. With older<br />
students, have them use the star maps and arrow pointers with teams of students<br />
to find the constellations. If you can accomplish all of this, the students will have<br />
had a wonderful introduction to STARLAB.<br />
5. When you take students in again, add some constellation stories to the ones<br />
you told the first time. If time allows, show the Earth Cylinder or other cylinders.<br />
Try some activities from your Planetarium <strong>Activities</strong> for Student Success (PASS)<br />
volumes. (Did you send in your Product Registration form? See Note.)<br />
6. It’s important that the students realize that you are learning along with them. If<br />
they ask you questions that you can’t answer, simply tell them that you’ll find<br />
the answer together. You don't have to know all of the answers the first time in<br />
STARLAB. Your confidence will grow each time.<br />
Note<br />
One set of the 13-volume PASS<br />
series (referred to throughout<br />
this section) is sent to you free<br />
when you return your Product<br />
Registration form. If you<br />
haven’t already received a set<br />
with your system, make sure to<br />
send in your form!<br />
Additional sets can be ordered<br />
through Science First/STARLAB,<br />
by calling 800-537-8703 or<br />
716-874-0133 or by visiting<br />
our Web site at: www.starlab.<br />
com.<br />
• B–5 • K–6 <strong>Activities</strong>
Note<br />
One set of the 13-volume PASS<br />
series (referred to throughout<br />
this section) is sent to you free<br />
when you return your Product<br />
Registration form. If you<br />
haven’t already received a set<br />
with your system, make sure to<br />
send in your form!<br />
Additional sets can be ordered<br />
through Science First/STARLAB,<br />
by calling 800-537-8703 or<br />
716-874-0133 or by visiting<br />
our Web site at: www.starlab.<br />
com.<br />
K–6 <strong>Activities</strong> • B–6 •<br />
Pre- and Post-STARLAB <strong>Activities</strong><br />
Overview<br />
Listed below are some activities that can be done by the classroom teacher either<br />
prior to or after being in STARLAB. Complete lessons follow in this K-6 section.<br />
Lessons for Grades K-3<br />
1. Do the “Horizon Lesson for Primary Grades” on page 10 to show young students<br />
how the horizon goes all the way to the ground.<br />
• Make your own constellations from bleach-spotted tissue paper.<br />
2. Do the “How to Make Constellations Pictures” lesson on page 21.<br />
• Punch the holes of one constellation through aluminum foil and a star map,<br />
then put foil on an overhead projector and have kids guess which constellation<br />
it is.<br />
• Punch holes through a star map in the bottom of a film can. Look at the<br />
constellation through light. (Film cans are free at film processing firms.)<br />
3. Use the seasonal Star Maps to learn constellations on pages 42-47.<br />
4. Do the “Circle Puzzle,” “Dots Puzzle,” and “Create a Constellation” lessons<br />
(from PASS Volume 5, Constellations Tonight*) to show students how ancient<br />
Greeks and Romans came up with the constellations.<br />
Lessons for Grades 4-6<br />
1. Do the “Meteoroids & Craters” experiments from PASS Volume 7, Moons of the<br />
Solar System.<br />
2. Do the Oobleck experiment (from Oobleck: What Do Scientists Do? in the GEMS<br />
series — see resource list on page 45 for purchasing information).<br />
3. Make a Star Clock using the template on page 12 of this section (from Earth,<br />
Moon and Stars — GEMS).<br />
4. Send seasonal Star Maps home with your students so that they can practice finding<br />
constellations and planets with their parents. See templates on pages 42-47.<br />
5. Do the “What Are Your Ideas About the Earth?” worksheet to find out about students’<br />
misconceptions about our earth (from Earth, Moon and Stars — GEMS).<br />
6. Make polystyrene “moon balls” to show the moon’s phases. (See PASS Volume<br />
7, Moons of the Solar System).<br />
7. Encourage students to track the moon’s phases and locations for a month.<br />
8. Make a Moon Phaser (see page 13).
Sample Scope and Sequence<br />
The following scope and sequence for elementary grades has been used successfully<br />
for many years by classroom teachers. It allows a natural growth of concept-building<br />
from year to year, spiraling on skills learned in previous years.<br />
Kindergarten<br />
1. In the classroom, discuss how the early Greeks and Romans saw constellations<br />
in the sky. Do “Making Shapes” (PASS Volume 2) and “Create a Constellation”<br />
worksheets (PASS Volume 5). Tell the story of Cassiopeia, Cepheus, and Andromeda.<br />
Show a large black tag board constellation picture of the Big Dipper,<br />
Little Dipper, the “Lazy W,” Orion and Canis Major. Explain how their interpretation<br />
of the “Lazy W” is just as effective as the Greek mythology story.<br />
2. In STARLAB, ease the students’ excitement about being in STARLAB for the first<br />
time. Discuss proper seating procedures and behavior expectations. Using the<br />
Greek Mythology Cylinder, tell the story of Ursa Major and Minor, Orion, Cassiopeia,<br />
Cepheus and Andromeda. Find the above constellations on the Constellation<br />
Cylinder. Put on the Starfield Cylinder and look for those constellations.<br />
3. In STARLAB, review the above winter constellations. Use the Greek Mythology<br />
Cylinder, Constellation Cylinder and Starfield Cylinder. Show the Earth Cylinder<br />
and the Celestial Coordinates Cylinder.<br />
Grade One<br />
1. In STARLAB, use the Greek Mythology Cylinder to find and tell the stories of<br />
Ursa Major and Minor, Orion, Cassiopeia, Cepheus, Andromeda, Canis Major<br />
and Minor, Gemini and Taurus. Put on the Constellation Cylinder and locate<br />
the above constellations. Tell the story of Orion’s four main stars: Betelgeuse,<br />
Bellatrix, Rigel, and Saiph. Try to locate the above constellations on the Starfield<br />
Cylinder. After leaving STARLAB, hand out winter star maps and give directions<br />
on how to use them by discussing the cardinal directions (north, south, east and<br />
west). Show the picture of Orion’s four main stars.<br />
2. In the classroom, follow the Horizon Lesson (page 10 of this section) by making<br />
“bleach” constellations. Discuss day and night, the rising and setting of the sun<br />
and moon, and identify the cardinal directions of each. Using Post-it notes and<br />
fluorescent markers, make a picture of something you could see on the horizon.<br />
Collect for next week. Do the “Make a Daytime and Nighttime Sky” worksheet<br />
and the “Day and Night” puzzle sheet (PASS Volume 2). Find or make up constellations<br />
on bleach sheets. Hang familiar constellations in classroom.<br />
3. In STARLAB, place Post-it pictures of the horizon where students think the<br />
horizon will be in STARLAB. Use black lights to show ultraviolet light on Post-its.<br />
Discuss ultraviolet light in the spectrum. Show the Native American Mythology<br />
Cylinder and tell the legends of Long Sash, the possum, buzzard and spider, and<br />
Big Bear and the Three Indian Braves. Put the Starfield Cylinder on and show<br />
how constellations would look from various points on the earth. Demonstrate day<br />
and night. If time allows, show the Ancient Chinese Legends or Ancient Chinese<br />
Seasons Cylinders.<br />
Kindergarten<br />
Grade One<br />
• B–7 • K–6 <strong>Activities</strong>
Grade Two<br />
Grade Three<br />
K–6 <strong>Activities</strong> • B–8 •<br />
Grade Two<br />
1. In STARLAB, using the Greek Mythology Cylinder, review the constellations<br />
introduced in Grade One section but add the stories of Leo the Lion, Auriga the<br />
Charioteer, Lepus the Hare, Draco, and the Pleiades. Look at these constellations<br />
using the Constellation Cylinder. Hand out arrow pointers and show their<br />
locations. Look at the Starfield Cylinder and try to locate the same constellations.<br />
After leaving STARLAB, hand out star maps, and show the proper way to use<br />
them discussing the cardinal directions.<br />
2. In STARLAB, use the Earth Cylinder to discuss the global continents. Introduce the<br />
concept of longitude by tying it in with time zones (each is 15° of longitude wide<br />
on average). Introduce latitude and determine your location’s latitude. Use the<br />
Celestial Coordinates Cylinder and tie in latitude and longitude with declination<br />
and right ascension. Introduce the celestial equator. Show the moon phases on<br />
the Starfield Cylinder.<br />
3. In STARLAB, show the Aurora Borealis slides. Using colored chalk and a piece of<br />
black construction paper, have students draw what they think the Northern Lights<br />
look like. If time allows, show the Native American Mythology Cylinder and<br />
review and introduce new stories.<br />
4. In the classroom, make aluminum foil constellations using current star maps. Do<br />
the “Circle Puzzle” (PASS Volume 5, Constellations Tonight) to recognize that the<br />
constellations which they invent can be just as useful as the ancient Greek and<br />
Roman constellations. Do the “Dots Puzzle” (also PASS Volume 5).<br />
Grade Three<br />
1. In STARLAB, review all of the above winter constellations using the Greek Mythology<br />
Cylinder. Introduce the spring constellations of Bootes, Virgo, and Hydra.<br />
Run back to back winter and spring star maps. Using star maps, work in groups<br />
of four to identify the constellations on the Constellation Cylinder. Put the Starfield<br />
Cylinder on and try to locate the winter and spring constellations in the night sky.<br />
2. Do the “Red Planet Mars” lesson (PASS Volume 6) in STARLAB in which children<br />
find a “star” much like Mars. See slides of Lowell’s study of Mars, and using<br />
Exobiology, create a creature that could live on Mars with its conditions of thin<br />
atmosphere, cold temperatures, and low gravity.<br />
3. In STARLAB, review the Native American Mythology Cylinder and legends about<br />
Native American constellations. Add the legend of the lizard, snake and butterfly.<br />
Show the Earth Cylinder. Find the continents and continue the discussion<br />
of latitude and longitude and how they relate to the celestial equator. View the<br />
African Mythology Cylinder and tell stories from various groups from Africa.<br />
4. In the classroom, make constellation viewers using film containers (page 21).<br />
Make “Star Clocks” (page 12).
Grade Four<br />
1. In STARLAB, review winter and spring constellations using the Greek Mythology<br />
Cylinder. Introduce summer constellations of Aquila, Lyra, Cygnus, Scorpius,<br />
Sagittarius, Ophiuchus, Hercules, and the Corona Borealis. With the Constellation<br />
Cylinder, work in groups of four to locate winter, spring, and summer<br />
constellations. Run star maps back to back with winter and summer constellations.<br />
Try to locate the above constellations using the Starfield Cylinder.<br />
2. In STARLAB, do “Moons of the Solar System,” program (PASS Volume 7) which<br />
simulates the process Galileo used to track the four objects near Jupiter. Show<br />
slides of other moons in the solar system. Use moon balls to demonstrate phases<br />
and eclipses of the moon.<br />
3. In STARLAB, review the Starfield Cylinder by finding winter, spring, and summer<br />
constellations. Help students to begin to understand the celestial equator, the<br />
zenith and the meridian. To show how stars would appear from the North Pole,<br />
set the projector for 90º north latitude. To show how stars would appear from<br />
the equator, set the projector for 0º latitude. Discuss the apparent magnitude of<br />
stars and do the “Brightness of Stars” worksheet 1 and 2. Follow Activity 6 in<br />
Volume 2 of the PASS series — “How Do the Stars Appear to Move?” Introduce<br />
the Ancient Chinese Seasons and Ancient Chinese Legends Cylinders and tell<br />
stories about their people.<br />
4. In the classroom, make “Moon Phasers” (page 13).<br />
5. In the classroom, do the “Oobleck” lesson (Oobleck: What Do Scientists Do?<br />
from the GEMS series).<br />
6. In the classroom or outdoors, do “Meteors, Meteorites, and Meteoroids” lesson<br />
(PASS Volume 7, Moons of the Solar System).<br />
Grade Five<br />
1. In STARLAB, review the winter, spring, and summer constellations using the<br />
Greek Mythology Cylinder. Introduce the fall constellations of Aries, Pegasus,<br />
Andromeda, Aquarius, Pisces, and Capricorn. Using the Constellation Cylinder,<br />
work in groups of four to find these constellations, plus winter, spring, and summer<br />
constellations, using star maps and the arrow pointer. Try to locate as many<br />
constellations as possible.<br />
2. In STARLAB, do the “Colors in Space” (PASS Volume 8) lesson, showing how<br />
reflection and absorption of colors is used by scientists to determine the composition<br />
of stars. Use the “magic cloth” and “color analyzers” to model concepts<br />
used by astronomers. Using a prism and diffraction grating, study the spectrum.<br />
3. In STARLAB, show the Aurora Borealis slides, and sketch how they see the<br />
Northern Lights over their school. Show the Earth Cylinder to review time zones.<br />
Show the Celestial Coordinates Cylinder to discuss right ascension and declination.<br />
Review the African Mythology and Ancient Chinese Cylinders.<br />
4. In the classroom, do “What Are Your Ideas about the Earth?” (Earth, Moon and<br />
Stars — GEMS) to clear up students’ misconceptions about astronomy. Make a<br />
Star Finder (page 25).<br />
Grade Four<br />
Grade Five<br />
• B–9 • K–6 <strong>Activities</strong>
Materials<br />
• 1 large 9-foot diameter white circle<br />
cut from butcher paper<br />
• 12” x 18” light blue construction<br />
paper (one per child)<br />
• 12” x 18” dark blue tissue paper<br />
(one per child)<br />
• spray bottle with diluted bleach<br />
• newspapers to cover desk, floor,<br />
and/or outside area<br />
• glue sticks<br />
• Post-its<br />
• pencils<br />
• tag board cut-out of a crescent<br />
moon and a sun<br />
Sky<br />
?<br />
Ground<br />
K–6 <strong>Activities</strong> • B–10 •<br />
Horizon Lesson for Primary Grades<br />
Purpose of Lesson<br />
The purpose of this activity is to clear up misconceptions young children have about<br />
the horizon and the sky. They will often draw pictures like the one shown. This activity<br />
is designed for classroom teachers who have limited access to STARLAB and/or for<br />
planetarium directors to give to classroom teachers in preparation for a planetarium<br />
visit.<br />
Objectives<br />
1. Students will demonstrate by modeling that the sky around us comes all the way<br />
down to the ground.<br />
2. Students will be able to describe the horizon — that place very far away where<br />
we see the sky and ground touch.<br />
3. Students will demonstrate by modeling that the sun, moon and stars seem to go<br />
above the horizon and sink below the horizon.<br />
4. Using a pointer, students will identify the horizon and cardinal directions in<br />
STARLAB and on the paper circle.<br />
Note<br />
Weather permitting, this activity could be done outdoors.<br />
Procedure<br />
Students will make sky cards out of 2 layers of paper. Spray diluted bleach onto navy<br />
blue tissue paper. (The bleach will make spots that look like stars, so use a spray, not<br />
a stream type spray bottle.) Glue tissue paper onto blue construction paper with glue<br />
sticks. (Glue only edges of paper.)<br />
Ask: “Where should this large circle be to represent the ground?” After deciding<br />
it goes on the floor, ask, “Where does your light blue sky card go?”<br />
Most will hold it up in the air.<br />
Ask: “What is in between?” (Air) Discuss possibilities, but come to the conclusion<br />
that the sky is air and the air comes all the way to the ground. Have<br />
the students place their sky card so that it touches the edge of the ground<br />
paper. Discuss that this point is called the horizon.<br />
Ask: “What do we do about all the gaps?” (Because the children are not yet<br />
sitting close together.) Tighten the circle so that the sky cards are touching<br />
with ground underneath. Redefine horizon.<br />
Ask: “How do we know where to put the sun? Where does it rise and set?”<br />
Identify north, south, east and west and label the ground paper with magic<br />
marker. Talk about where the sun comes up in the morning and where it sets.<br />
Have a child lift and carry the sun to show it rising in the east and setting in<br />
the west.<br />
Turn the sky papers around and talk about the night sky. Repeat the process with the<br />
moon and identify the horizon.<br />
Ask: “Does the moon only appear at night? Can we ever see it in the daytime?”<br />
Of course!
• Hand out Post-its, and have the children draw an object that they would see on<br />
the horizon, such as buildings, trees, people, etc. Save these notes until the next<br />
time they go into STARLAB. Then distribute the notes and have the students place<br />
their Post-it on the STARLAB wall where they think the horizon is in STARLAB.<br />
Put on the Starfield Cylinder to check their answers. If incorrect, reposition their<br />
Post-it.<br />
• After leaving STARLAB, come back to the ground circle and draw their object on<br />
the horizon around the edge. Use the “Do It Yourself Star Finder” (see pages 25,<br />
26) as a guide.<br />
• On the blue tissue paper sky card, have students find familiar constellations with<br />
black fine line markers. Label the constellation name, again using the Star Finder<br />
as a guide.<br />
• On the light blue sky card, have students draw what they would see in the daytime<br />
sky: birds, planes, the sun, the moon, etc.<br />
Extension <strong>Activities</strong><br />
Write a story about what you imagine the sun does at night for fun. How does it<br />
hide? What does the moon do at night? Teach perspective in art and identify the<br />
horizon. Draw landscapes. Start with an horizon line and add sky, ground, etc. Take<br />
photos of the horizon.<br />
• B–11 • K–6 <strong>Activities</strong>
CASSIOPEIA'S<br />
CHAIR<br />
THE TIME IS<br />
North Star<br />
LITTLE DIPPER<br />
K–6 <strong>Activities</strong> • B–12 •<br />
How to Make a Star Clock<br />
Indoors — Making the Star Clock<br />
1. Cut out the two circles with a pair of scissors.<br />
2. Cut out the notch on the small circle.<br />
3. Use a paper punch to make a hole in the center of the small circle.<br />
4. Place the small circle on top of the large circle. Push a large paper fastener<br />
down through the center of both circles, and spread open the fastener on the<br />
back side of the Star Clock.<br />
Outdoors — Using the Star Clock<br />
1. Find the Big Dipper and the North Star, as shown on the face of your Star Clock.<br />
2. Face the North Star, as shown on the front of the clock.<br />
3. Find the current month around the outside circle of the Star Clock. Put your thumb<br />
over the current month. Hold your Star Clock so the current month, marked by<br />
your thumb, is AT THE TOP.<br />
4. Holding the large disk firmly with the current date at the top, turn the smaller disk<br />
until its stars line up with those in the sky.<br />
5. Read the time in the window.<br />
6. If you are on Daylight Savings Time, add one hour.<br />
BIG DIPPER<br />
JAN<br />
DEC<br />
FEB<br />
NOV<br />
PM<br />
PM<br />
midnight<br />
AM<br />
AM<br />
AM<br />
MAR<br />
PM<br />
AM<br />
OCT<br />
APR<br />
PM PM PM PM PM PM<br />
MAY<br />
From the GEMS Teacher’s Guide, Earth, Moon, and Stars. Reproduced with permission from Lawrence<br />
Hall of Science. Copyright © 1986 by The Regents of the University of California.<br />
PM<br />
PM<br />
AM<br />
AM<br />
AM<br />
6 5 4 3 2 1 12 11 10 9 8 7 6 5 4 3 2 1 12 11 10 9 8 7<br />
AM<br />
SEP<br />
AM<br />
AM<br />
AM<br />
noon<br />
AUG<br />
JUN<br />
JUL
How to Make a Moon Phaser<br />
1. Cut out both parts and<br />
connect with a brass<br />
fastener through the black<br />
dots.<br />
2. Hold the clock so the halfcircle<br />
part has the word<br />
“Horizon” right side up.<br />
3. To find the time that the<br />
moon rises, find the<br />
desired phase. Try “New”<br />
first. Place it at “E” for<br />
east. The “To the Meridian”<br />
arrow will point toward<br />
6 a.m. That is about<br />
the time it rises.<br />
4. Rotate the phase part until<br />
“New” is lined up with the<br />
“To the Meridian” arrow.<br />
Then the moon is highest<br />
in the south. The arrow<br />
points to “Noon.” Rotate<br />
the phase part until it is at<br />
the “W” for west, therefore<br />
setting. The arrow will<br />
point toward 6 p.m.<br />
• B–13 • K–6 <strong>Activities</strong>
Materials<br />
• 30 4” x 5” pieces of tagboard<br />
• lunar images (see next 5 pages)<br />
• 2 looseleaf rings or pieces of yarn to<br />
bind the booklet<br />
• glue sticks<br />
• hole punch<br />
This abbreviated version of the<br />
Constructing a Moon Calendar<br />
activity is printed with<br />
permission from Science Kit &<br />
Boreal Laboratories. The complete<br />
laboratory kit, catalog<br />
#46590-00, is available for<br />
sale from:<br />
Science Kit & Boreal Laboratories<br />
777 East Park Drive<br />
Tonawanda, NY 14150-6784<br />
Phone: 800-828-7777<br />
Grade Level<br />
K–6 <strong>Activities</strong> • B–14 •<br />
Constructing a Moon Calendar<br />
Elementary through middle school.<br />
Procedure<br />
The following activity can be done as a class activity with each student making one<br />
page or each student making an entire calendar. The images are a photo-realistic<br />
simulation of the moon as it might be seen through a small telescope or binoculars.<br />
Each image has a number for the age of that moon in days.<br />
1. Cut out the moon images from the attached pages along the dotted lines.<br />
2. Paste each moon image to a separate piece of 4 x 5 inch tag board.<br />
3. Punch two holes at the top of each tag board page.<br />
4. Assemble all 30 tag board pages in numerical order and bind them together<br />
with the looseleaf rings or yarn. This is now the Moon Calendar.<br />
Note<br />
Because the moon goes around the earth in 291/2 days and there are 30<br />
moon phases, this Moon Phase Calendar needs to be reset to the actual new<br />
moon or full moon about every six to eight weeks.<br />
Contributed by Stephen Berr.
1 2<br />
3 4<br />
5 6<br />
• B–15 • K–6 <strong>Activities</strong>
7 8<br />
9 10<br />
11 12<br />
K–6 <strong>Activities</strong> • B–16 •
13 14<br />
Full<br />
17<br />
16<br />
18<br />
• B–17 • K–6 <strong>Activities</strong>
19 20<br />
21<br />
K–6 <strong>Activities</strong> • B–18 •<br />
22<br />
23 24
25 26<br />
27 28<br />
29 New<br />
• B–19 • K–6 <strong>Activities</strong>
P<br />
J M E V M<br />
Neptune<br />
N<br />
6" long #50 Black threads<br />
S U<br />
E V<br />
Pluto<br />
M<br />
M<br />
P<br />
J Sun<br />
N<br />
U<br />
S<br />
K–6 <strong>Activities</strong> • B–20 •<br />
Jupiter Sun<br />
Earth<br />
Fold down (slightly) on dashed line. Color both sides light blue.<br />
Uranus<br />
Venus<br />
Saturn<br />
Mercury<br />
Uranus<br />
Pluto<br />
Mercury<br />
Pin hole<br />
for hanging<br />
Mars<br />
Venus<br />
Hanging thread<br />
#50 Black — 18" long<br />
Neptune<br />
Saturn<br />
Sun<br />
Cut out along heavy line. Cut<br />
very carefully with scissors or an<br />
exacto knife. Measure accurately<br />
and your mobile will balance.<br />
Earth<br />
Jupiter<br />
Solar System Mobile<br />
Cut 1/4" long — one for each planet<br />
Mars<br />
Published with permission of W. Russell Blake, copyright owner. Copyright ©1969 by W. Russell Blake.
How to Make Constellation Pictures<br />
Aluminum Foil and Film Can Planetariums<br />
Here are two lessons that can be done before or after STARLAB use — one uses<br />
aluminum foil, the other uses film can holders. The foil constellations can be used with<br />
all grade levels, but the film can constellations should be used with older elementary<br />
ages, such as grades 3, 4, or 5, due to the fact that push pins are used.<br />
Objectives<br />
Children, by making constellation pictures, will be able to distinguish eight seasonal<br />
constellations, learn the constellations by their Greek name, identify their classmates’<br />
constellation pictures when viewed on an overhead projector, and take the constellation<br />
pictures home to review.<br />
Process Skills<br />
Describing • observing • interpreting • communicating • working cooperatively<br />
Procedure<br />
• Have students fold their foil in half, in half again, and in half again. Unfold the<br />
foil and cut on the fold lines. They will now have 8 small rectangles. (If the foil<br />
is all wrinkled, roll a pencil over it to smooth it out). Choose one constellation to<br />
work on first.<br />
• Place the star map over the piece of foil and using a stick pin, poke through the<br />
stars on the star map. (Use newspaper, styrofoam or cardboard pieces to protect<br />
the table top). They may have to practice this a bit so that the pin hole is a hole,<br />
rather than a tear. Use a permanent marker to write the name of the Greek constellation<br />
on the foil. Complete all 8 pictures.<br />
• When done, take one at a time up to the overhead projector, and have students<br />
guess which constellation they see. They can also take these pictures home and<br />
hang them in either their north, south, east or west window where they would see<br />
the constellations in the night sky. This is a good way to review the constellations<br />
they have learned in STARLAB.<br />
• This lesson can be varied by having children use film can holders. (They are<br />
available through film processing stores, which will give them away to teachers,<br />
if they know you are using them for a school project.) Have children carefully cut<br />
out the constellation shape plus its name. Tape that small piece of paper UPSIDE<br />
DOWN on the bottom of the film can so when they look through the film can,<br />
the constellation will be right side up. Push carefully through the stars with a push<br />
pin. When done, tape the picture with its name on the side, so students don’t<br />
forget its name. They can be removed later when they have learned the names.<br />
Hold the film cans to their eyes and identify which constellation they have made.<br />
Do as many film can planetariums as you can.<br />
Evaluation<br />
Have students identify which constellations they have made by showing them and<br />
identifying them to the teacher. Take the pictures or film cans into STARLAB to identify<br />
them while viewing the Starfield Cylinder.<br />
Materials<br />
• 9” x 12” sheets of aluminum foil<br />
• scissors<br />
• Scotch Tape<br />
• newspaper<br />
• Styrofoam or cardboard pieces<br />
• stick pins or push pins<br />
• discarded film can holders<br />
• seasonal star maps<br />
• permanent markers<br />
• B–21 • K–6 <strong>Activities</strong>
How to Remember Orion’s Stars<br />
Betelgeuse, Bellatrix, Rigel and Saiph<br />
Tell a story about beetles drinking juice, then doing “belly tricks,” then taking medicine for their bellyache (“Di-Gel” sounds<br />
like Rigel), then playing baseball and the umpire calling the beetle “Saiph.”<br />
Betelgeuse Bellatrix<br />
Saiph<br />
K–6 <strong>Activities</strong> • B–22 •<br />
Rigel
How to Use a Star Finder<br />
If a student is to become truly interested in the stars, he must be able to identify them<br />
as he looks up at the myriad of lights in the night sky. By learning to use a Star Finder<br />
in the planetarium — a controlled model of the real sky — students can develop skills<br />
to use Star Finders out of doors and competence in identifying stars and constellations.<br />
Objectives<br />
Students will be able to:<br />
1. Use a Star Finder with some degree of proficiency in locating stars both in the<br />
planetarium and in the real sky.<br />
2. Identify specific constellations in the night sky for any specific date with the aid of<br />
a Star Finder.<br />
Process Skills<br />
Describing • observing • interpreting • communicating • inferring • working cooperatively<br />
Background Information<br />
Share the following information with students: A representation of the real sky is<br />
provided by a Star Finder. Thus a Star Finder may be used as a tool for locating stars<br />
in the sky.<br />
Procedure<br />
In the classroom:<br />
1. The teacher should duplicate or have printed enough patterns for Star Finders for<br />
each student to assemble one. The instructions for assembling and using the Star<br />
Finder are provided with the pattern.<br />
2. Using an overhead projector with a transparency of the Star Finder students are<br />
using, point out and/or demonstrate the following:<br />
A. Time and date<br />
B. Proper orientation<br />
C. Position of observer<br />
D. Cardinal or compass points<br />
Help children get well acquainted with four or more major constellations to<br />
be visible in the night sky on date of planetarium visits.<br />
In the planetarium:<br />
1. Set planetarium for evening of visit.<br />
2. Distribute Star Finders to the pupils who made them and one red flashlight to<br />
every two students. Explain the necessity of working together with one student<br />
holding the red flashlight and the other working with the Star Finder.<br />
3. Let the planetarium sun set and help students orient themselves and the Star<br />
Finder with respect to planetarium compass points (N, E, S, W). Bring the stars<br />
up so that the brightest ones are visible.<br />
4. Students should set their Star Finders by turning the star disk until the date printed<br />
Materials<br />
• STARLAB Portable Planetarium<br />
• Do It Yourself Star Finder pattern<br />
(see pp. 25, 26)<br />
• Starfield Cylinder<br />
• glue sticks<br />
• arrow pointers<br />
• scissors<br />
• red flashlights (for reading)<br />
• B–23 • K–6 <strong>Activities</strong>
K–6 <strong>Activities</strong> • B–24 •<br />
on the disk is set to correspond with the time of observing. Face south and hold<br />
the Star Finder in such a manner that the stars can be read and the south on the<br />
finder points towards the South Pole. Continue holding the finder in position and<br />
use the flashlight to locate the stars which match those in the sky. The Finder is<br />
designed for latitudes 30° N through 50° N but is useful at any northern midlatitude.<br />
5. After dimming the side lights enough for more stars to be seen, ask the students<br />
to use their Star Finders as above to identify a constellation and/or star as you<br />
point it out on the dome.<br />
6. After the above step is accomplished to your satisfaction, turn the side lights<br />
down completely and let students observe the “real sky.” Let students use the arrow<br />
pointer to outline constellations on the dome.<br />
7. Sum up the planetarium experience of the value of a Star Finder.<br />
Follow-up <strong>Activities</strong><br />
1. Each student should take his/her Star Finder home and use it to locate the same<br />
asterisms and constellations in the nighttime sky that he/she observed in the<br />
planetarium.<br />
2. Plan a night observation session with students and use the Star Finder to locate<br />
objects in the real sky. (For a star party, incorporate activities for parents.)<br />
3. Ask several students to make a comparative study of other types of star finders<br />
and to use one or more of them. They should report results to the class.<br />
4. Assign charts of various types to other students, with the request that they locate<br />
five stars in the sky at night and later report on their stargazing experiences.<br />
Evaluation<br />
Point to a constellation or asterism (one or several) and ask students to locate it on<br />
their Star Finders, marking it with a circle. Evaluate each student on his performance<br />
in the post activities. List several stars and constellations by name and ask students to<br />
use their Star Finders to determine the month each star and constellation would be visible<br />
at 10:00 p.m. and to name the general area of the sky in which the star would<br />
appear.<br />
Note<br />
For Do It Yourself Star Finder pattern used in the activity, see the next two<br />
pages. These Star Finders are also available from Learning Technologies on<br />
a heavy-duty cardboard. Call toll-free 1-800-537-8703 or visit www.starlab.<br />
com for more information.
How to Make a Do it Yourself Star Finder<br />
• B–25 • K–6 <strong>Activities</strong>
K–6 <strong>Activities</strong> • B–26 •
How to Use a Dipper Finder<br />
Children will start feeling at home with the stars and will become interested in observing<br />
them further when they realize that they can easily find the Big Dipper on a clear<br />
night. The Big Dipper, in turn, will help them locate a very important star for finding<br />
their way, Polaris. The Dipper Finder to be made in this activity will tell them in what<br />
general region of the north sky to look for the Big Dipper at any hour of the night<br />
throughout the year. As they use it, they will see how the Dipper appears to move<br />
around the Pole Star.<br />
Objectives<br />
Students will be able to:<br />
1. Use the Dipper Finder to locate the position of the Big Dipper at selected hours<br />
and months of the year.<br />
2. Locate the North Star (Polaris).<br />
Process Skills<br />
Describing • observing • interpreting • communicating • inferring • working cooperatively<br />
Background Information<br />
Share the following information with students.<br />
The Big Dipper appears to move in the sky from hour to hour.<br />
The Big Dipper appears to change its position from month to month.<br />
The pointer stars in the Big Dipper point toward the North Star (Polaris).<br />
Procedure<br />
In the classroom:<br />
1. Review rotation of the earth, shape of the Big Dipper, and the usefulness of this<br />
star configuration in finding the North Star and cardinal points.<br />
2. Ask students to construct the Dipper Finder using the materials given them.<br />
3. Let students practice setting and orienting the Dipper Finder for various dates and<br />
hours of night until they become familiar with its operation.<br />
In the planetarium:<br />
1. Preset the planetarium for the date of the visit and for one hour after sunset.<br />
2. With side lights up, ask students to set their Dipper Finders for the date and time<br />
of the STARLAB setting and determine the approximate region of the north sky<br />
where the Big Dipper will be found.<br />
3. With the students, identify cardinal points, horizon, meridian, and zenith.<br />
4. Activate the stars, lowering the side lights until the Big and Little Dippers are<br />
visible (but maintain as much room illumination as possible). Each student should<br />
verify his predicted orientation of the Big Dipper with its position in the planetarium<br />
sky. Ask students to observe the position of the North Star (ask them this<br />
again in connection with all later observations).<br />
5. Using diurnal motion, advance the sky two or three hours at a time through a<br />
Materials<br />
• STARLAB Portable Planetarium<br />
• Dipper Finder pattern and instructions<br />
(see p. 29)<br />
• Starfield Cylinder<br />
• paper fastener<br />
• arrow pointers<br />
• glue sticks<br />
• red flashlights (for reading)<br />
• scissors<br />
• B–27 • K–6 <strong>Activities</strong>
K–6 <strong>Activities</strong> • B–28 •<br />
24-hour period. Before each advancement, students should reset their Dipper<br />
Finders for the correct time and make a prediction on the Dipper’s location.<br />
Following each advancement they should observe the position of the Dipper in<br />
relation to their prediction as well as the horizon, zenith, and other stars.<br />
6. Using annual motion and the ecliptic, and the same inquiry procedures as<br />
above, show the position of the sun by season and the position of the Dipper in<br />
the evening sky on the same date.<br />
Follow-Up <strong>Activities</strong><br />
1. Each student should take his Dipper Finder home and use it to locate the Dipper<br />
and North Star in the night sky.<br />
2. The Dipper Finder is large enough to include more stars. Ask students to plot<br />
the Little Dipper, Cassiopeia, and Draco on their Dipper Finders from the sky at<br />
night. On the next school day, they should check their success with a star chart.<br />
3. At upper elementary levels, guide students in using their Dipper Finders and the<br />
Big Dipper to tell the time of night (see Engelbriktson, Greenleaf, Let’s Explore<br />
Outer Space, pp. 24-36 for directions for using the Big Dipper as a clock in the<br />
sky).<br />
Evaluation<br />
Show the Big Dipper in four different positions at 9 p.m. on the planetarium dome<br />
and ask students to use their Dipper Finders to discover the month in which each position<br />
would occur.<br />
Note<br />
For the Dipper Finder pattern used in the activity, see the next page.
May<br />
April<br />
9pm 8 7 6<br />
10<br />
11<br />
June<br />
12<br />
Dipper Finder Pattern<br />
and Instructions<br />
July<br />
March<br />
August<br />
Feb<br />
Polaris<br />
Sept<br />
Jan<br />
Oct<br />
Dec<br />
Nov<br />
Horizon Horizon<br />
Construction<br />
1. Cut out the circle and<br />
rectangle and glue-stick<br />
both onto tag board. Trim<br />
tag board to exact size of<br />
circle and square.<br />
2. Fasten circle to rectangle<br />
by putting paper fastener<br />
through Polaris.<br />
Use<br />
1. Line up the date of observation<br />
with the time of<br />
observation. For example,<br />
if it is 10 p.m. on April 11,<br />
turn the month wheel until<br />
a point about a third of the<br />
way into the space marked<br />
“April” is aligned with 10<br />
p.m. on the square card.<br />
2. Hold the card up so that<br />
the north horizon on the<br />
card corresponds with<br />
the north horizon in the<br />
planetarium or real sky.<br />
North<br />
Dipper Finder<br />
• B–29 • K–6 <strong>Activities</strong>
Materials<br />
• STARLAB Portable Planetarium<br />
• arrow pointers<br />
• Starfield Cylinder<br />
• red flashlights (for reading)<br />
Objectives<br />
K–6 <strong>Activities</strong> • B–30 •<br />
Stars and Constellations<br />
Students will be able to:<br />
1. Determine star colors.<br />
2. Match hot and cool stars with proper color.<br />
3. Explain that the sun is the closest star; other stars are very far away.<br />
4. Determine the magnitude of various stars in the winter sky.<br />
5. Identify Rigel, Betelgeuse, Sirius, Procyon, Aldebaran, Pollux and Castor as<br />
bright stars and identify the constellations in which those stars are located in the<br />
winter sky.<br />
6. Find the winter and summer triangle.<br />
Process Skills<br />
Describing • observing • interpreting • communicating • inferring • working cooperatively<br />
Background information<br />
Share the following information with students.<br />
1. Stars vary in color.<br />
a. The color of a star is determined by its temperature.<br />
b. Red stars are the coolest stars.<br />
c. Blue-white stars are the hottest stars.<br />
2. Stars vary greatly in size.<br />
a. Our sun is a medium-sized star.<br />
b. The red giants are the largest stars.<br />
c. The white dwarfs are the smallest stars.<br />
Procedure<br />
Point out red stars (Betelgeuse in Orion, Antares in Scorpius) and blue-white stars (Rigel<br />
in Orion and Spica in Virgo). With a dimmer switch and a clear glass bulb, show<br />
how the cooler filament is red, just before the bulb goes out, and the hottest filament<br />
turned all the way up is white or bluish. Have students compare the hottest part of a<br />
bonfire (blue flame), the coolest part, (red flame), or the most efficient color on a gas<br />
stove (blue).<br />
3. The magnitude of a star refers to its observed brightness.<br />
a. The lower the magnitude, the brighter the star.<br />
b. Stars fainter than the sixth magnitude cannot be seen with unaided eyes.<br />
4. Stars vary greatly in distance from the earth.<br />
a. The sun is our closest star.<br />
b. The stars are so far away that we cannot easily measure the distance in<br />
miles.<br />
c. If you travel 1000 miles an hour, it would take you 3 million years to reach<br />
the nearest star excluding the sun.
d. The distance to stars is measured in “light years.”<br />
Use a star map and have students determine the magnitude of stars by putting five<br />
rays around the brightest, four rays around the next brightest, three, two, and one<br />
ray around those least bright, in order. Use the following constellations: Orion, Canis<br />
Major and Minor, Gemini, and Taurus. Show them the accepted magnitude chart of<br />
stars as found in the PASS series (Volume 2, Lesson 6) or by using a star chart.<br />
5. The sky is divided into areas by groups of stars known as constellations.<br />
a. There are 88 constellations in the entire sky.<br />
b. These can be used to locate position in the sky.<br />
c. Constellations are star patterns.<br />
• The most familiar are the circumpolar constellations which can be seen<br />
at all times (depending on your latitude).<br />
• Other common constellations can be seen only during certain times of<br />
the year.<br />
d. Some large, bright stars are easily seen.<br />
• Betelgeuse and Rigel are part of the constellation Orion.<br />
• Sirius is a part of Canis Major.<br />
• Spica is a part of Virgo.<br />
• Vega, Deneb and Altair form the summer triangle.<br />
• Betelgeuse, Procyon and Sirius form the winter triangle.<br />
Locate the above familiar constellations using a star map. Have students work in<br />
teams, and assign each team two constellations to find. When done, use arrow pointers<br />
to locate the constellations in the dome.<br />
• B–31 • K–6 <strong>Activities</strong>
Materials<br />
• STARLAB Portable Planetarium<br />
• arrow pointers<br />
• Starfield Cylinder<br />
• red flashlights (for reading)<br />
Objectives<br />
K–6 <strong>Activities</strong> • B–32 •<br />
The Motion of Stars<br />
and Constellations<br />
Students will be able to:<br />
1. Observe that during rotation, Polaris stands still.<br />
2. Explain why seasonal stars rise and set and circumpolar stars do not.<br />
3. Tell which direction circumpolar stars appear to move around Polaris.<br />
Process Skills<br />
Describing • observing • interpreting • communicating • inferring • working cooperatively<br />
Background Information<br />
Share the following information with students.<br />
1. Northern circumpolar stars are located in the northern sky.<br />
a. The North Star is always above the North Pole.<br />
• The North Star does not appear to move in the sky.<br />
• It can be found by using the guardian stars of the Big Dipper.<br />
b. The circumpolar stars do not rise and set, but are always visible and revolve<br />
around the North Star.<br />
2. Stars appear to move rapidly in the night sky due to the rotation of the earth.<br />
a. Circumpolar stars revolve counterclockwise around Polaris.<br />
• The position of the stars changes about 15º each hour.<br />
• They make a complete revolution in a little less than 24 hours.<br />
b. In the southern sky, the stars move from east to west.<br />
• The stars that rise in the eastern part of the sky, set in the western part of<br />
the sky.<br />
• This movement in the sky is similar to that of the sun.<br />
3. The reason the stars do not come back to exactly the same place each night is<br />
due to the earth’s orbit of the sun.<br />
a. This motion is very slow.<br />
• The earth revolves around the sun in 365 and 1/4 days.<br />
• The star’s apparent motion to the west is about 1 degree each day.<br />
b. Constellations move to the west when observed at the same time each night.<br />
• Orion is seen in the southeast sky at 8 p.m. on January 1.<br />
• Orion is in the southern sky at 8 p.m. in the middle of February.<br />
• Late in March, Orion is in the western part of the sky at 8 p.m.<br />
Procedure<br />
Turn on diurnal motion to see how the stars appear to rise and set. Use the information<br />
above to provide astronomy concepts to students. Watch the circumpolar stars to<br />
see how they revolve around the North Star. Use the two “guardian stars” of the Big<br />
Dipper to go to the North Star, Polaris. Watch the stars in the southern sky move from<br />
east to west. Demonstrate night sky with daily motion.
Tell Me What You Know About Stars!<br />
Note<br />
This activity was contributed by Sue Reynolds Button of the Onondaga-<br />
Cortland-Madison BOCES, Syracuse, NY. For background information on<br />
the Milky Way Galaxy and the solar system, refer to theSTARLAB Solar<br />
System & Galaxy Cylinder section of this book.<br />
Grade Level<br />
3-6<br />
Procedure<br />
• On the Attribute Web below, have the students record some facts that they know<br />
about stars. Encourage them to think about all stars (not just one) and why they<br />
are called stars. They may use the lines out from the center of the Web to record<br />
their thoughts. Have them write one fact on each line. If they think of more than<br />
four facts, they can add more lines to write on.<br />
• Have the students repeat the above procedure on the appropriate Attribute Web<br />
for planets and moons (see next page).<br />
Stars<br />
• B–33 • K–6 <strong>Activities</strong>
Planets<br />
Moons<br />
K–6 <strong>Activities</strong> • B–34 •
Note<br />
A Comparison of Star<br />
and Planet Attributes<br />
This activity was contributed by Sue Reynolds Button of the Onondaga-<br />
Cortland-Madison BOCES, Syracuse, NY. For background information on<br />
the Milky Way Galaxy and the solar system, refer to the STARLAB Solar<br />
System & Galaxy Cylinder section of this book.<br />
Grade Level<br />
3-6<br />
Procedure<br />
Have the students use one of the two following<br />
Venn Diagrams to compare and contrast attributes<br />
— Venn Diagram 1: stars and planets<br />
(below) or Venn Diagram 2: stars, planets and<br />
moons (next page).<br />
Venn Diagram 1<br />
STARS<br />
planets<br />
• B–35 • K–6 <strong>Activities</strong>
Venn Diagram 2<br />
stars Planets<br />
moons<br />
K–6 <strong>Activities</strong> • B–36 •
Objective<br />
Content review<br />
Grade Level<br />
5-6<br />
Procedure<br />
People Search Activity<br />
Explain the activity to your students. Using the People Search sheet (on the next<br />
page), each person is asked to move around the room until they find a person<br />
who can help them fill in the answer for one of the items in the boxes. The person<br />
who helped must sign their name once in the one box. The search continues as the<br />
student writes answers received from other students and gets their signatures in the<br />
other boxes. As a culiminating activity, the teacher asks for volunteers to restate<br />
answers they collected.<br />
Note<br />
This activity was contributed by Sue Reynolds Button of the Onondaga-<br />
Cortland-Madison BOCES, Syracuse, NY. For background information on<br />
the Milky Way Galaxy and the solar system, refer to the STARLAB Solar<br />
System & Galaxy Cylinder section of this book.<br />
• B–37 • K–6 <strong>Activities</strong>
Name_________________________________________________________ Date_________________________<br />
Find someone who . . .<br />
People Search Worksheet<br />
1. Can tell the name of our Solar System’s sun. 6. Knows his/her "universal address." (Ask, "Where do<br />
you live in the universe?")<br />
2. Can compare and contrast the terms "star" and<br />
"planet."<br />
K-6 <strong>Activities</strong> • B–38 •<br />
7. Can define the term "ecliptic."<br />
3. Can tell the number of stars in our Solar System. 8. Can explain why our Solar System’s planets can never<br />
be seen in the north sky at our latitude.<br />
4. Can name the planets in our Solar System in order<br />
(from the closest to the furthest from the sun).<br />
9. Knows all thirteen constellations of the zodiac.<br />
5. Can tell you the name of our home galaxy. 10. Can tell you their "sun sign" and can explain how they<br />
determined it.
Note<br />
Our Universal Address<br />
This activity was contributed by Sue Reynolds Button of the Onondaga-<br />
Cortland-Madison BOCES, Syracuse, NY. For background information on<br />
the Milky Way Galaxy and the solar system, refer to the STARLAB Solar<br />
System & Galaxy Cylinder section of this book.<br />
Grade Level<br />
4-6<br />
Procedure<br />
Explain the activity to your students:<br />
“On the top rung of this ladder, write the name of something that represents the<br />
largest thing you can think of in space that can contain, inside of it, all the other<br />
categories on the ladder. It is the larges thing we<br />
can name in space and that we live in. Fill<br />
in the rest of the ladder rungs with names<br />
of objects, groups of objects that tell where<br />
we live in space. The smalles object or part<br />
will be written on the bottom rung of the<br />
ladder. We are ranking items according<br />
to size and what the item contains. Each<br />
item must contain the items that are on the<br />
rungs below it.”<br />
• B–39 • K–6 <strong>Activities</strong>
Series Editors: Cary Sneider,<br />
Alan Friedman, and Alan<br />
Gould<br />
Series Introduction<br />
If you have access to a planetarium<br />
for teaching about<br />
astronomy, space science, and<br />
other subjects, this series of<br />
books is for you. Designed for<br />
both experienced planetarium<br />
professionals and teachers who<br />
will be using a planetarium<br />
for the first time, these volumes<br />
provide a wealth of field-tested<br />
strategies and practical suggestions<br />
for presenting entertaining<br />
and educationally effective<br />
programs for students.<br />
The first four books provide a<br />
general orientation to astronomy<br />
and space science<br />
education with applications<br />
for both the planetarium and<br />
classroom settings. Each of the<br />
remaining volumes presents a<br />
complete planetarium program<br />
and related classroom activities.<br />
We hope you will find the<br />
materials useful in your work<br />
with students and teachers, as<br />
well as springboards for your<br />
imagination and creativity.<br />
K–6 <strong>Activities</strong> • B–40 •<br />
A Summary of Planetarium <strong>Activities</strong><br />
for Student Success (PASS)<br />
Vol 1: Planetarium Educator’s Workshop Guide<br />
Participatory planetarium programs involve students actively in the planetarium<br />
environment. The most effective programs are both entertaining and educational. This<br />
guide introduces the theory and practice of developing effective planetarium programs<br />
through a series of thought-provoking activities and discussions.<br />
Vol 2: Planetarium <strong>Activities</strong> for Schools<br />
This volume provides a wealth of effective planetarium activities for elementary and<br />
middle school students, as well as ideas for developing new activities for students of<br />
any age.<br />
Vol 3: Resources for Teaching Astronomy and Space Science<br />
There is a wide spectrum of resources for teaching astronomy and space science in<br />
elementary and middle schools. This annotated resource guide has the best resources<br />
that we have found, including school curricula, books, periodicals, films, videos,<br />
slides, professional organizations, planetariums, and telescopes.<br />
Vol 4: A Manual for Using Portable Planetariums<br />
Primarily a “how-to” manual for setting up and using a portable planetarium, this<br />
guide has many suggestions useful for teaching school programs in any planetarium.<br />
Vol 5: Constellations Tonight<br />
In this participatory version of a classic night sky planetarium program, students<br />
receive star maps and have an opportunity to use them to find constellations in the<br />
planetarium sky. Classroom activities include creating constellations and using star<br />
maps.<br />
Vol 6: Red Planet Mars<br />
Students discover Mars three different ways during this planetarium program. They<br />
find the red planet by observing it over a period of several nights as it moves against<br />
the background stars. Then they view it through a telescope and try to map its surface.<br />
Finally they see Mars via space probes. Classroom activities involve students in<br />
modeling the solar system, and creating creatures that could survive under different<br />
planetary conditions.<br />
Vol 7: Moons of the Solar System<br />
This program begins with observations of the earth’s moon and a modeling activity<br />
that shows why the moon goes through phases and eclipses. Then the students look<br />
at Jupiter’s four major moons on a series of nights and figure out how long it takes<br />
one to circle Jupiter. Finally, the students journey through the solar system to see many<br />
moons through the “eyes” of modern spacecraft. Classroom activities involve students<br />
in performing experiments in crater formation, using moon maps, and designing<br />
lunar settlements.<br />
Vol 8: Colors from Space<br />
What can we learn about the stars and planets from their colors? Answering this<br />
question requires a fundamental understanding of why we see color. During this program,<br />
students deepen their understanding through a series of activities in which they<br />
“travel” to an imaginary planet circling a red sun, and experiment with color filters
and diffraction gratings. Related classroom activities include making secret messages<br />
that can only be decoded with color filters, and then using the same filters to view<br />
nebulae and planets.<br />
Vol 9: How Big Is the Universe?<br />
Based partly on ideas from the short film Powers of Ten, this program surveys<br />
distances and sizes of things in the universe. Starting with ordinary things on earth<br />
that students are familiar with, they move to progressively more distant astronomical<br />
objects: the moon, the sun, the solar system, nearby stars, the Milky Way galaxy, and<br />
clusters of galaxies. Students use various methods to determine distance: parallax,<br />
“radar,” and comparing brightness of objects. Classroom activities include students<br />
writing their complete galactic address, making a parallax distance finder, finding the<br />
distance to the moon, and activities about the expanding universe.<br />
Vol 10: Who “Discovered” America?<br />
Students ponder the meaning of the word discover in this program. Can one “discover”<br />
a land where people are already living? Students learn the reasons and methods<br />
by which Columbus navigated to the “New World,” and some of the impacts of his<br />
voyages on Native Americans. They also find that certain myths about Columbus are<br />
untrue. He was not, for example, alone in believing that the earth is round. Students<br />
also learn about other explorers who “discovered” America long before Columbus’s<br />
time. Classroom activities include determining the shape and size of the earth, using<br />
quadrants to determine latitude, and modeling lunar eclipses.<br />
Vol 11: Astronomy of the Americas<br />
There are hundreds of Native American cultures, each with distinctive views of the<br />
heavens. There are also common threads in many of those cultures. In this program<br />
students visit five cultures: the Hupa people of Northern California, plains and mountain<br />
tribes that have used Medicine Wheel in Northern Wyoming, the Anasazi of<br />
Chaco Canyon in New Mexico, the Mayan people in Mexico and Central America,<br />
and the Incan people in Peru. Students observe moon cycles and changes in the sunrise<br />
and sunset positions on the horizon and learn how solar observations help Native<br />
Americans stay in tune with the harmonies of nature. Classroom activities include<br />
the Mayan and Aztec number systems, observing changes in real sunset positions,<br />
and learning how Venus can appear as either the “Morning Star” or “Evening Star.”<br />
Vol 12: Stonehenge<br />
In this program, students learn what Stonehenge is and how it could have been used<br />
by its builders as a gigantic astronomical calendar. They also learn how astronomer<br />
Gerald Hawkins discovered one of Stonehenge’s probable functions, by actively<br />
formulating and testing their own hypotheses in the planetarium. Along the way, they<br />
learn a lot about apparent solar motion, and the creation of the research field of<br />
“archaeoastronomy.” Classroom activities include constructing a special Solar Motion<br />
Demonstrator to represent the entire yearly cycle of the solar motion.<br />
Vol 13: Northern Lights<br />
Aurora borealis and aurora australis (northern and southern lights) are beautiful<br />
displays of moving luminous colored patterns in the night sky. Students identify what<br />
areas of Earth are best suited for aurora viewing. They model the different seasonal<br />
patterns of the Sun's apparent daily motion in various latitudes, including places<br />
where there is the phenomenon of "midnight Sun." They observe and sketch aurorae,<br />
learn about the causes of aurorae, and find out about NASA missions that are studying<br />
aurorae. Classroom activities include selecting ideal locales on Earth for aurora<br />
watching, determining the altitudes of simulated aurora, predicting aurora on other<br />
planets, spectrum studies, and aurora mythology.<br />
Note<br />
One set of this 13-volume<br />
series is sent to you free when<br />
you return your Product Registration<br />
form. If you haven’t already<br />
received a set with your<br />
system, make sure to send in<br />
your form! Additional sets can<br />
be ordered through Science<br />
First/STARLAB, by calling 800-<br />
537-8703 or 716-874-0133<br />
• B–41 • K–6 <strong>Activities</strong>
WESTERN HORIZON<br />
To use map:<br />
Evening Star Map for January - February<br />
SOUTHERN HORIZON<br />
NORTHERN HORIZON<br />
K–6 <strong>Activities</strong> • B–42 •<br />
between 9:00<br />
and 10:00 p.m.<br />
Turn the map so the direction you are facing is on the bottom. The constellations in the sky will match the constellations<br />
on the map.<br />
From Planetarium <strong>Activities</strong> for Student Success (PASS), Volume 5: Constellations Tonight. Reproduced with permission from Lawrence Hall of<br />
Science. Copyright © 1993 by The Regents of the University of California.<br />
EASTERN HORIZON
WESTERN HORIZON<br />
Evening Star Map for March - April<br />
SOUTHERN HORIZON<br />
NORTHERN HORIZON<br />
between 9:00<br />
and 10:00 p.m.<br />
To use map:<br />
Turn the map so the direction you are facing is on the bottom. The constellations in the sky will match the constellations<br />
on the map.<br />
From Planetarium <strong>Activities</strong> for Student Success (PASS), Volume 5: Constellations Tonight. Reproduced with permission from Lawrence Hall of<br />
Science. Copyright © 1993 by The Regents of the University of California.<br />
• B–43 • K–6 <strong>Activities</strong><br />
EASTERN HORIZON
WESTERN HORIZON<br />
To use map:<br />
Evening Star Map for May - June<br />
SOUTHERN HORIZON<br />
NORTHERN HORIZON<br />
Turn the map so the direction you are facing is on the bottom. The constellations in the sky will match the constellations<br />
on the map.<br />
K–6 <strong>Activities</strong> • B–44 •<br />
between 9:00<br />
and 10:00 p.m.<br />
From Planetarium <strong>Activities</strong> for Student Success (PASS), Volume 5: Constellations Tonight. Reproduced with permission from Lawrence Hall of<br />
Science. Copyright © 1993 by The Regents of the University of California.<br />
EASTERN HORIZON
WESTERN HORIZON<br />
To use map:<br />
Evening Star Map for July - August<br />
SOUTHERN HORIZON<br />
NORTHERN HORIZON<br />
between 9:00<br />
and 10:00 p.m.<br />
Turn the map so the direction you are facing is on the bottom. The constellations in the sky will match the constellations<br />
on the map.<br />
From Planetarium <strong>Activities</strong> for Student Success (PASS), Volume 5: Constellations Tonight. Reproduced with permission from Lawrence Hall of<br />
Science. Copyright © 1993 by The Regents of the University of California.<br />
• B–45 • K–6 <strong>Activities</strong><br />
EASTERN HORIZON
WESTERN HORIZON<br />
To use map:<br />
Evening Star Map for September - October<br />
SOUTHERN HORIZON<br />
NORTHERN HORIZON<br />
K–6 <strong>Activities</strong> • B–46 •<br />
between 9:00<br />
and 10:00 p.m.<br />
Turn the map so the direction you are facing is on the bottom.The constellations in the sky will match the constellations<br />
on the map.<br />
From Planetarium <strong>Activities</strong> for Student Success (PASS), Volume 5: Constellations Tonight. Reproduced with permission from Lawrence Hall of<br />
Science. Copyright © 1993 by The Regents of the University of California.<br />
EASTERN HORIZON
WESTERN HORIZON<br />
To use map:<br />
Evening Star Map for November - December<br />
SOUTHERN HORIZON<br />
NORTHERN HORIZON<br />
between 9:00<br />
and 10:00 p.m.<br />
Turn the map so the direction you are facing is on the bottom. The constellations in the sky will match the constellations<br />
on the map.<br />
From Planetarium <strong>Activities</strong> for Student Success (PASS), Volume 5: Constellations Tonight. Reproduced with permission from Lawrence Hall of<br />
Science. Copyright © 1993 by The Regents of the University of California.<br />
• B–47 • K–6 <strong>Activities</strong><br />
EASTERN HORIZON
K-6<br />
Resources<br />
K–6 <strong>Activities</strong> • B–48 •
Free and/or Inexpensive Materials to<br />
Teach Astronomy in the Classroom<br />
The Universe in the Classroom: A Newsletter on Teaching<br />
Astronomy<br />
To be put on the mailing list for future issues, teachers should write on school stationery<br />
and identify the grade level they teach. This is a free, excellent classroom<br />
resource for grades 3-12.<br />
Astronomical Society of the Pacific, Teachers’ Newsletter, Dept. N, 390<br />
Ashton Ave., San Francisco, CA 94112, Telephone: 1-800-335-2624<br />
Also order their catalog. It is a plethora of astronomy materials.<br />
Abrams Planetarium Sky Calendars<br />
For about $7.50 a year, a sky calendar will be mailed quarterly, three issues per<br />
mailing. This single sheet contains a wealth of easily observed astronomical events,<br />
presented in a clear, understandable format with daily information given on a<br />
monthly calendar with a star map on the back. Contact Abrams Planetarium at the<br />
address below for current pricing.<br />
Abrams Planetarium, Michigan State University, East Lansing, MI 48823<br />
Science Education News<br />
This newsletter is free of charge and covers science education news, opportunities for<br />
fellowships, institutes, forums, and meetings, and reviews resources and reports on<br />
science education. Use school stationery.<br />
Office of Science and Technology Education, American Assoc. for the Advancement<br />
of Science, 1333 H St. NW, Washington, DC 2000<br />
NASA photographs, updates, and information sheets<br />
A wonderful wealth of up-to-date NASA information, including the Voyager 2 flybys.<br />
This material is free. Use school stationery.<br />
NASA Jet Propulsion Laboratory, Attn: Teacher Resource Center, JPL Educational<br />
Outreach, 4800 Oak Grove Dr., Mail Stop CS-530, Pasadena, CA<br />
91109<br />
Free astronomy catalogs<br />
(Make requests on school stationery.)<br />
Project STAR Hands-on Science Materials, Science First/STARLAB,<br />
95 Botsfors Place, Buffalo, NY 14216. Phone: 1-800-537-8703.<br />
www.starlab.com<br />
Edmund Scientific, 101 E. Glouster Pike, Barrington, NJ 08007-1380<br />
Sargent-Welch, 7300 N. Linder Ave., PO Box 1026, Skokie, IL 60077<br />
Frey Scientific Co., 905 Hickory Lane, Mansfield, OH 44095<br />
Optica, 4100 MacArthur Blvd., Oakland, CA 94619<br />
• B–49 • K–6 <strong>Activities</strong>
K–6 <strong>Activities</strong> • B–50 •<br />
Additional Materials<br />
Great Explorations in Math and Science (GEMS) Series<br />
Created by the Lawrence Hall of Science, University of California, Berkeley. Including:<br />
1. Color Analyzers, Grades 5-8.<br />
2. Earth, Moon and Stars, Grades 5-9.<br />
3. Moons of Jupiter, Grades 4-9.<br />
4. Oobleck: What Do Scientists Do?, Grades 4-8.<br />
Available from Learning Technologies, 40 Cameron Avenue, Somerville,<br />
MA 02144. Phone: 1-800-537-8703 or 1-617-628-1459. Fax 1-617-628-<br />
8606. www.starlab.com<br />
Planetarium <strong>Activities</strong> for Student Success (PASS)<br />
A 13-volume set created by the Lawrence Hall of Science, University of California,<br />
Berkeley.<br />
Available from Science First/STARLAB, 95 Botsford Place, Buffalo, NY<br />
14216. Phone: 1-800-537-8703 or 1-716-874-0133. Fax 1-716-874-<br />
9853. www.starlab.com
Astronomy for Elementary Teachers<br />
Bibliography<br />
Books<br />
Allison, Linda, The Reasons for Seasons, a Brown Paper Book Series, Little,<br />
Brown, and Co., Boston/Toronto/London.<br />
Beyer, S. L., The Star Guide — A Unique System for Identifying the Brightest<br />
Stars in the Night Sky, Little, Brown. & Co.<br />
Blum, James K., The Stargazer’s Companion, Mallard Press, 666 5th Ave.,<br />
NY, NY 10103.<br />
DeBruin, Jerry, and Murad, Don, Look to the Sky, Good Apple, Cartage, IL.<br />
Dickinson, Terence, Exploring the Night Sky, Camden House.<br />
Jobb, Jamie, The Night Sky Book, a Brown Paper Book series, Little, Brown<br />
and Co., Boston/Toronto/London.<br />
Krupp, E.C., The Big Dipper and You, Morrow Junior Books.<br />
Krupp, E.C., The Moon and You, Morrow Junior Books.<br />
Levy, David H., The Sky — A User’s Guide, Cambridge University Press.<br />
Mayer, Ben, Starwatch, Perigee Books, Putnam Publishing Group.<br />
Menzel, D. H. and Pasachoff, J. M., A Field Guide to the Stars and Planets,<br />
National Audubon Society and National Wildlife Federation.<br />
Moeschl, Richard, Exploring the Sky, Chicago Review Press.<br />
Moore, Patrick, Astronomers’ Stars, W. W. Norton & Co., NY/London.<br />
Moore, Patrick, The Pocket Guide to Astronomy, Simon & Schuster, NY.<br />
Porcellino, Michael, Young Astronomer’s Guide to the Night Sky, TAB Books,<br />
Blue Ridge Summit, PA.<br />
Raymo, Chet, 365 Starry Nights, Prentice Hall Press.<br />
Rey, H. A., The Stars — A New Way to See Them, Houghton Mifflin, Boston.<br />
Rey, H. A., Find the Constellations, Houghton Mifflin Company, Boston.<br />
Schaaf, Fred, Seeing the Sky, 100 Projects <strong>Activities</strong> & Explorations in<br />
Astronomy, John Wiley & Sons, NY.<br />
Whitney, Charles A., Whitney’s Star Finder, Alfred A. Knopf, NY.<br />
• B–51 • K–6 <strong>Activities</strong>
Tapes — Video and Cassette<br />
K–6 <strong>Activities</strong> • B–52 •<br />
Tours of the Night Sky, Astronomical Society of the Pacific. Available from<br />
Learning Technologies, 40 Cameron Ave., Somerville, MA 02144. 19 minutes,<br />
1-800-537-8703 or 1-617-628-1459. www.starlab.com<br />
Voyager — the Grand Tour, (video) 19 min., Young Astronauts.<br />
Magazines/Booklets<br />
Astronomy magazine, Kalmbach Publishing Co., 1027 N. 7th St., Milwaukee,<br />
WI 53233<br />
“Backyard Astronomy,” by Alan MacRobert, Sky and Telescope magazine.<br />
Sky Publishing Corp., PO Box 9111, Belmont, MA 02178<br />
Daytime Astronomy, Teachers’ Guide for ESS, Webster/McGraw Hill, Co.<br />
Earth, Moon, and Stars: An Astronomy Activity Guide, GEMS Guides, by<br />
Cary Sneider, Lawrence Hall of Science, Berkeley, CA, 94720.<br />
The Edmund Sky Guide, T. Dickinson and S. Brown, Edmund Scientific, Barrington,<br />
NJ 08007.<br />
A Look at the Planets, NASA, Supt. of Documents, US Gov. Printing Office,<br />
Washington, DC 20402.<br />
Odyssey Magazine, a magazine for children, 21027 Crossroads Circle,<br />
PO Box 1612, Waukesha, WI 53187-1612.<br />
Science and Children, (contains sky chart and calendar), comes with membership<br />
in the National Science Teachers Assoc., 1742 Connecticut Ave.<br />
NW, Washington DC 20009-1171 (202-328-5800) $52 per year for 8<br />
issues.
Stars & Skies<br />
An E.S.E.A. Title IV Project, 1979.<br />
The Stars & Skies project was originally developed in 1979. The activities in this section<br />
have been culled from the original document and updated by Gary D. Kratzer.<br />
These activities should be especially useful to the beginning STARLAB user. The<br />
elementary section is divided according to grade level. Each section contains suggested<br />
student objectives, background information, and planetarium activities. This<br />
section also contains supplemental activities to be used as pre- or post-planetarium<br />
visits. Refer to the Appendix (located at the end of the Grades 7-9 section) includes<br />
scripts and directions for construction of support equipment.<br />
Revised by Gary D. Kratzer, 1997<br />
STARLAB<br />
Planetarium<br />
Learning Technologies Inc., Somerville, MA<br />
©2008 by Science First/STARLAB, 95 Botsford Place, Buffalo, NY 14216.<br />
All rights reserved.<br />
STARLAB<br />
<strong>Activities</strong><br />
for Grades<br />
4 to 6<br />
• B–53 • K–6 <strong>Activities</strong>
K–6 <strong>Activities</strong> • B–54 •<br />
Elementary Grades 4-6 Objectives<br />
Objectives — Grade 4<br />
The student should be able to:<br />
1. Identify the cardinal directions and locate the North Star in the planetarium.<br />
2. Describe the general east to west movement of the sun, stars, and moon.<br />
3. Observe and describe the apparent motion of the Big Dipper in relation to the<br />
North Star over a period of several hours.<br />
4. Observe and discuss the concept that stars continually shine but may not be seen<br />
by the naked eye due to other stronger light sources.<br />
5. Observe and describe the movement of constellations.<br />
6. Demonstrate that constellations are merely imaginary star groupings that are not<br />
connected in any physical way.<br />
7. Identify the circumpolar constellations, using the Constellation Cylinder in<br />
STARLAB.<br />
Objectives — Grade 5<br />
The student should be able to:<br />
1. Compare and discuss the work of early astronomers Copernicus, Galileo, Ptolemy.<br />
2. Describe the phases of the moon in 5 stages (new to full).<br />
3. Observe and discuss the major constellations not covered at previous levels, using<br />
the Constellation Cylinder within the STARLAB.<br />
4. Describe the comparative positions of the circumpolar stars in a given 24-hour<br />
period.<br />
5. Describe the relative positions of the circumpolar stars during different seasons.<br />
6. Demonstrate why the North Star does not appear to change its relative position<br />
in the sky.<br />
7. Demonstrate an understanding that celestial bodies appear to move in a regular<br />
path through the universe “dome.”<br />
Objectives — Grade 6<br />
The student should be able to:<br />
1. Compare and discuss the work of some early astronomers. Review 5th level<br />
astronomers and add Tycho Brahe, Kepler, and Eratosthenes.<br />
2. Describe the relative changes in the sunrise and sunset times over one year.<br />
3. Demonstrate an understanding of the reasons for the apparent motion of the<br />
stars.<br />
4. Demonstrate an understanding of the seasonal changes in stellar locations due to<br />
the revolution of the earth around the sun.<br />
5. Demonstrate an understanding of the differences in stellar motion as observed<br />
from the equator versus the polar regions.<br />
6. Identify four major stellar reference points used in locating and describing positions<br />
of other stellar bodies.
7. Identify the location and explain the Greek mythological origin of the zodiacal<br />
constellations.<br />
8. Discuss and compare legends of the Native American with those of the Greek<br />
legends of Ursa Major, Ursa Minor, Cassiopeia, and Orion.<br />
9. Demonstrate the use of a star finder map by locating constellations in the<br />
STARLAB sky.<br />
• B–55 • K–6 <strong>Activities</strong>
Materials<br />
• STARLAB Portable Planetarium<br />
• Projector<br />
• Starfield Cylinder<br />
Objective<br />
K–6 <strong>Activities</strong> • B–56 •<br />
Cardinal Directions, Activity 4-1<br />
The student should be able to identify the North Star and cardinal directions within<br />
the planetarium.<br />
Procedure<br />
• Set the projector for a particular date, time and latitude.<br />
• Have the student locate the Big Dipper (Ursa Major). Locate the two stars at the<br />
end of the cup. These are the pointer stars. (See diagram.)<br />
Note<br />
If you are observing from a latitude near 30°, the Big Dipper will actually<br />
appear to dip below the northern horizon within a 24-hour period as it<br />
revolves around Polaris.<br />
• Follow an imaginary line connecting these two stars approximately 5 times the<br />
length between the two pointer stars. Polaris (North Star) will be the moderately<br />
bright star nearest to that line.<br />
• Have the students establish that quadrant as north. Have the students face north.<br />
Now explain that south will be behind them, east to the right and west to the left.
Objective<br />
Celestial Movement, Activity 4-2<br />
The student should be able to describe the general east to west movement of the sun,<br />
the moon and other stars.<br />
Procedure 1<br />
• Set the Starfield Cylinder for 12:00 a.m. in the month of December at your home<br />
latitude. Have the students observe the constellation, Orion.<br />
• Advance the cylinder one hour, observing the same constellation.<br />
• Rotate the cylinder platform until Orion disappears below the western horizon<br />
and continue until it reappears on the eastern horizon. Have the students discuss<br />
the observed directional movement of the constellation. Point out that the movement<br />
is an east to west movement.<br />
• Demonstrate the east to west movement of the sun and moon.<br />
Procedure 2<br />
• Use the same procedure as above, substituting months for the hourly settings.<br />
Specify that the monthly observation needs to be made at the same time of night<br />
each month.<br />
• Discuss the similarity in east-west movement.<br />
Extension Activity<br />
Set up a slide projector on the ecliptic slide projector mount. Set the mount at the 30°<br />
setting. Use the moon slide set and demonstrate the motion of the moon by turning the<br />
swivel base from east to west. Discuss east to west movement of the moon.<br />
Materials<br />
• STARLAB Portable Planetarium<br />
• Projector<br />
• Starfield Cylinder<br />
• ecliptic slide projector mount<br />
• moon slide set<br />
• 35 mm slide projector<br />
• B–57 • K–6 <strong>Activities</strong>
Materials<br />
• STARLAB Portable Planetarium<br />
• Projector<br />
• Constellation Cylinder<br />
Objective<br />
K–6 <strong>Activities</strong> • B–58 •<br />
Apparent Motion, Activity 4-3<br />
The student should be able to observe and describe the apparent motion of the Big<br />
Dipper (Ursa Major) in relation to the North Star over a period of several hours.<br />
Procedure<br />
• Have the students identify the position of the Big Dipper at a particular time. Using<br />
the pointer stars, locate and identify the North Star.<br />
• Set the projector for 8:00 p.m. Observe the location of the Big Dipper.<br />
• Turn the projector to the 9:00 p.m. setting. Discuss the change in position of the<br />
Dipper, especially noting the “handle.”<br />
• Make several other one-hour changes. Discuss the movement.<br />
Extension Activity<br />
For an additional activity, select times at random and have students predict the time.<br />
Also discuss the similarities of the movement to a clock, noting that the Dipper will<br />
make one complete rotation in 24 hours.
Objective<br />
Stars and Light Pollution,<br />
Activity 4-4<br />
The student should be able to observe and discuss the concept that stars continually<br />
shine but may not be seen with the naked eye due to a phenomenon known as light<br />
pollution.<br />
Procedure<br />
• Turn down the side lamps on the projector. Adjust the projector to its lowest setting.<br />
No star should be seen. Ask the students to describe what they see.<br />
• Slowly increase the brightness of the projector (with the Starfield Cylinder in<br />
place). Ask students to tell you when they see the first star. Continue to turn knob<br />
until the entire starfield is lighted. Discuss the concept that stars are of different<br />
brightness (called magnitude).<br />
• Turn the dimmer knob on projector down from full brightness about 1/2 turn.<br />
Slowly turn on the variable light source. Discuss the comparison of this light to<br />
the rising sun with the children.<br />
• As the Variable Light Source reaches full strength, ask the students the difference<br />
they see in the starfield in the planetarium sky. Emphasize the concept that stars<br />
make their own light and are constantly emitting light, but our eyes will only register<br />
that light if there is no other stronger light source interfering. In this case, the<br />
Variable Light Source (sun simulator) is stronger than many of the stars of lower<br />
magnitude, thereby rendering them invisible to our eye.<br />
• Discuss real life situations where this same thing happens.<br />
Extension Activity<br />
Have students observe the sky from various locations such as: urban, rural, and<br />
isolated places away from lights.<br />
Materials<br />
• STARLAB Portable Planetarium<br />
• Projector<br />
• Starfield Cylinder<br />
• Variable Light Source (see Appendix<br />
in 7-9 section)<br />
• B–59 • K–6 <strong>Activities</strong>
Materials<br />
• STARLAB Portable Planetarium<br />
• Projector<br />
• Constellation Cylinder<br />
K–6 <strong>Activities</strong> • B–60 •<br />
East-West Constellation Movement,<br />
Activity 4-5<br />
Objective<br />
The student should be able to observe and discuss the general east to west movement<br />
of constellations.<br />
Background<br />
Constellation configurations do not actually move above us, but only appear to move<br />
due to the rotation of the earth and the gradual revolution of our planet around the<br />
sun.<br />
Procedure<br />
• Set the projector for 7 p.m. on a specified date and latitude. Identify any one of<br />
the constellations visible on that date. With the students, make note of the location<br />
of the constellation.<br />
• Now move the projector to the 8 p.m. setting and observe the changes. Continue<br />
the process for each hour (ex. 9:00 p.m., 10 p.m., etc.). Students should note<br />
the general east to west movement.<br />
• Select a specific time to observe. Set the projector for the first day of the month<br />
you are observing. Note the location of a selected constellation.<br />
• Next move the projector to the first of the following month, same time of night.<br />
Note location of the constellation. Continue this date movement for each of the<br />
12 months. Discuss the yearly motion and compare it to the nightly motion.
Objective<br />
Star Groupings, Activity 4-6<br />
The student should be able to demonstrate the concept that constellations are merely<br />
imaginary star groupings that are not connected in any physical way.<br />
Procedure 1<br />
• As the students sit in the planetarium ask them to observe the starfield and see if<br />
they can connect the stars to make any shapes. Have them work in pairs. Share<br />
their findings. Pass around arrow pointers, if available.<br />
• Put on the Constellation Cylinder and introduce the word “constellation.” Point<br />
out a couple of the common constellations (Big Dipper, Cepheus). Ask students to<br />
suggest ways they think these constellations got their names.<br />
• Turn up the planetarium side lights. Divide the students into 4 or 5 groups. Ask<br />
each group to put a series of dots on their sheet of white paper which has been<br />
provided (do not connect yet), using the felt tip markers. Give each group a<br />
number. That number should be put on their sheet. The group should make up a<br />
name for their constellation. The number will serve to identify the group’s work.<br />
• Have each group display their constellation. Have each student or group decide<br />
what each constellation might be. Share the ideas. Discuss the variety of answers<br />
and emphasize the concept that constellations are arbitrary configurations made<br />
up by man.<br />
Procedure 2<br />
• Have the students connect the stars in any pattern to form a figure of some type.<br />
This will be their “self-discovered” constellation.<br />
• Have the students name their constellations. You may want them to compose a<br />
mythical story to go with the figure.<br />
• As a class you may want to develop an entire sky map, putting each student’s<br />
constellation in the sky, and use a bulletin board as your universe.<br />
Materials<br />
• STARLAB Portable Planetarium<br />
• Projector<br />
• Constellation Cylinder<br />
• Starfield Cylinder<br />
• white paper<br />
• markers<br />
• arrow pointers<br />
• clipboards (optional)<br />
• B–61 • K–6 <strong>Activities</strong>
Materials<br />
• STARLAB Portable Planetarium<br />
• Projector<br />
• Constellation Cylinder<br />
• Do it Yourself Star Finder (see pp<br />
25, 26)<br />
• Constellation Locator Script (see<br />
Appendix)<br />
Objective<br />
K–6 <strong>Activities</strong> • B–62 •<br />
Circumpolar Constellations,<br />
Activity 4-7<br />
The student should be able to identify the circumpolar constellations on the constellation<br />
starfield in the portable planetarium.<br />
Procedure<br />
• Using the Do it Yourself Star Finder, familiarize yourself with the following constellations:<br />
Ursa Major (Big Dipper), Ursa Minor (Little Dipper), Draco, Cepheus,<br />
Cassiopeia.<br />
• In STARLAB, ask students to identify the Big Dipper. Discuss the idea that the Big<br />
Dipper is part of the constellation Ursa Major, the Big Bear. It can be seen all<br />
year in the northern sky.<br />
• Use the pointer stars at the edge of the Big Dipper cup to locate Polaris. Since<br />
Polaris (North Star) is at the tip of the handle of the Little Dipper, the constellation<br />
Ursa Minor, the Little Bear, is found. It can also be seen all year in the northern<br />
sky.<br />
• Cassiopeia is located on the opposite side of the North Star from the Big Dipper.<br />
Draw a line through the pointer stars to the North Star and continue that line<br />
twice that distance to find the constellation. Nicknamed the Lazy W, Cassiopeia<br />
is found high in the autumn evening sky. In summer it is found in the northeastern<br />
sky and in winter in the northwestern sky.<br />
• Next, move to Cepheus, who is located near his queen, Cassiopeia. The top<br />
side of the Lazy W will point to Cepheus. Cepheus is made up of rather dim (low<br />
magnitude) stars. Its shape is basically a triangle on top of a box. Cepheus is<br />
upside down in the northeastern summer evening sky. He can be found high in<br />
the autumn evening sky and low in the spring sky.<br />
• Finally, Draco, the Dragon, appears next to Cepheus. He wraps his tail around<br />
Ursa Minor (Little Dipper). The stars between the Big and Little Dippers are the<br />
end of the dragon’s tail. The main body of the dragon begins and stretches to the<br />
diamond-shaped head. The legs are very low magnitude stars, so look closely.<br />
Draco is high in the summer evening sky and low in the winter northern sky.<br />
Extension Activity<br />
Go outside at night with your students and use the Do it Yourself Star Finder to locate<br />
these same constellations in the real night sky.
Objective<br />
Early Astronomers, Activity 5-1<br />
The student should be able to compare and discuss the work of early astronomers:<br />
Ptolemy, Copernicus, and Galileo.<br />
Background<br />
Ptolemy, in his book, The Alamagest, explained the geocentric (earth-centered) theory<br />
of the planetary motions. The planets were thought to rotate in circles (epicycles), the<br />
centers of which described orbits around the earth. The sun and moon, also considered<br />
planets, were believed to orbit the earth without epicyclical rotation.<br />
Not until the year 1543 did anyone seriously challenge the idea that Earth was the<br />
center of the universe. A Polish astronomer, Nicolaus Copernicus, argued that the<br />
earth and the moon, along with the other five planets then known, all moved around<br />
the sun in circles. He also said that the earth rotates and this makes the sun and stars<br />
appear to move across the sky. Like most ideas that upset comfortable old beliefs, the<br />
idea that earth was in motion was hard to accept. It was up to other scientists later<br />
on, to prove that Copernicus was right.<br />
Galileo advanced the idea that before explaining what happens, you must carefully<br />
observe how it happens. He used a set of lenses, developed by a Dutch spectacle<br />
maker, Hans Lippershey, to invent a telescope that made objects appear about 36<br />
times larger. Observations with his telescope, especially the discovery of the phases<br />
of Venus, supported the ideas of Copernicus.<br />
Procedure<br />
• Class discussion in the planetarium or classroom setting should center around<br />
each of the men.<br />
• Student reports can be assigned. Have students write news articles, in the present<br />
tense, about the findings of these men.<br />
Extension <strong>Activities</strong><br />
Students could role play and dress according to the times.<br />
• B–63 • K–6 <strong>Activities</strong>
Materials<br />
• STARLAB Portable Planetarium<br />
• Projector<br />
• Starfield Cylinder<br />
• moon phases<br />
Optional<br />
• ecliptic slide projector mount (see<br />
Appendix for plans)<br />
• 35mm projector<br />
• moon phase slides<br />
Objective<br />
K–6 <strong>Activities</strong> • B–64 •<br />
Phases of the Moon, Activity 5-2<br />
The student should be able to describe the phases of the moon in five stages (new to<br />
full).<br />
Background<br />
1. New moon<br />
2. Waxing crescent<br />
3. First quarter<br />
4. Waxing gibbous<br />
5. Full moon<br />
1 2 3 4 5<br />
During the revolution of the moon about the earth, the relative positions of the sun,<br />
earth, and moon change. This causes sunlight to be reflected toward the earth by<br />
different portions of the side of the moon facing us. The changing positional relationships<br />
of the sun, earth, and moon caused by the moon’s orbit about the earth are<br />
responsible for the apparent changes in its shape as viewed from Earth.<br />
Procedure for the Classroom<br />
For several weeks prior to obtaining the STARLAB, students should observe the moon<br />
outdoors each night and report on its appearance and position in the sky.<br />
Procedure for the Planetarium<br />
• Using a star chart, set the projector for the appropriate date, time, and latitude.<br />
• (Optional) Set up the slide projector on its stand just to side of the entrance tube.<br />
• Using the STARLAB moon phases (or slide projector with moon phase slides),<br />
give students practice in identifying the different phases of the moon.<br />
• Demonstrate the general path the moon takes across the sky (east to westerly<br />
movement).
Constellation Location, Activity 5-3<br />
Objective<br />
The student should be able to locate the following constellations using the Constellation<br />
Cylinder: Ursa Major, Ursa Minor, Cassiopeia, Cepheus, Draco, Orion, Canis<br />
Major, Leo and Pegasus.<br />
Procedure<br />
Review the concept of what a constellation is. Read the Constellation Locator Script<br />
while displaying the Constellation Cylinder giving ample time for students to locate<br />
the stars in the dome as you read. Use the arrow pointer to review each of the<br />
constellations. If you feel that the students are capable, you may project the entire<br />
starfield using the Starfield Cylinder and review those constellations covered.<br />
Materials<br />
• STARLAB Portable Planetarium<br />
• Projector<br />
• Constellation Cylinder<br />
• Constellation Locator Script (see<br />
Appendix)<br />
• arrow pointer<br />
• B–65 • K–6 <strong>Activities</strong>
Materials<br />
• STARLAB Portable Planetarium<br />
• Projector<br />
• Starfield Cylinder<br />
• Constellation Cylinder<br />
• worksheet of circles<br />
K–6 <strong>Activities</strong> • B–66 •<br />
Nightly Position of Constellations,<br />
Activity 5-4<br />
Objective<br />
The student should be able to describe the comparative positions of the circumpolar<br />
constellations in a given 24-hour period.<br />
Background<br />
The constellations, Ursa Major, Ursa Minor, Draco, Cassiopeia, and Cepheus, can<br />
easily be seen circling Polaris in a 24-hour period.<br />
Procedure<br />
• Using standard setup procedure with the Constellation Cylinder, locate the Big<br />
Dipper (Ursa Major) and Polaris. Show students how the Big Dipper appears<br />
to rotate around Polaris. You may do this by turning the projection cylinder one<br />
complete rotation.<br />
• Locate the other major circumpolar constellations and note the motion by turning<br />
the cylinder one complete rotation again.<br />
• Place the Starfield Cylinder on the projector and locate the Big Dipper and<br />
Polaris.<br />
• Give the students the worksheet of circles. Have them draw the position of the<br />
Big Dipper in the appropriate section of Circle #1.<br />
• Move the projection cylinder through 4 hours of the night time sky. You may or<br />
may not wish to identify the particular time. Have the students again draw the<br />
position of the Big Dipper in the appropriate section of Circle #2.<br />
• Continue this same procedure of 4 hour movements and drawing the Big Dipper<br />
in the rest of the sections of each circle. This will show the position of the Big Dipper<br />
through a 24-hour period. You may follow the same procedure for the other<br />
circumpolar constellations.<br />
Note<br />
It should be emphasized that in the real sky all of the positions would not be<br />
seen due to daylight hours.
Seasonal Position of Constellations,<br />
Activity 5-5<br />
Objective<br />
The student should be able to describe the relative positions of the circumpolar stars<br />
in different seasons of the year.<br />
Background<br />
If the circumpolar constellations are observed at the same time each night throughout<br />
the year, they will appear to make a complete rotation around Polaris (North Star).<br />
Procedure<br />
• Use the Do it Yourself Starfinder to become familiar with the position of the<br />
circumpolar constellations in various months of the year.<br />
• Have the Starfield Cylinder set for one of the fall months. Make your observation<br />
time about 9:00 p.m. for your latitude.<br />
• To show students the different positions of the circumpolar constellations throughout<br />
the year, simply rotate the projector month-by-month past the<br />
9:00 p.m. observing time as indicated on the hour and date scale.<br />
Materials<br />
• STARLAB Portable Planetarium<br />
• Projector<br />
• Starfield Cylinder<br />
• Do it Yourself Starfinder<br />
• B–67 • K–6 <strong>Activities</strong>
Materials<br />
• STARLAB Portable Planetarium<br />
• Projector<br />
• Starfield Cylinder<br />
• Constellation Cylinder<br />
Objective<br />
K–6 <strong>Activities</strong> • B–68 •<br />
Position of the North Star,<br />
Activity 5 -6<br />
The student should be able to demonstrate why the North Star does not appear to<br />
change relative position in the sky.<br />
Procedure<br />
• Using the Constellation Cylinder, have the students use the “pointer” stars of the<br />
Big Dipper to locate Polaris (North Star). Point out the rest of Ursa Minor (Little<br />
Dipper).<br />
• Have the students follow the movement of Ursa Minor while the projector platform<br />
is turned slowly by hand one complete rotation. The students should observe<br />
Polaris as the pivot point for the movement of Ursa Minor.<br />
• Have some students follow the motion of other circumpolar constellations while<br />
observing the North Star.<br />
• The same activities may be repeated using the Starfield Cylinder.
Objective<br />
The Ecliptic, Activity 5-7<br />
The students should be able to demonstrate an understanding that celestial bodies<br />
appear to move in a regular path against the background of space.<br />
Background<br />
The ecliptic is the path which the sun and planets seem to follow in the night sky or<br />
celestial sphere. It is the midpoint of a band 16° wide between which the twelve<br />
constellations of the zodiac are found, as well as the sun, moon and planets.<br />
Procedure<br />
• Using the Constellation Cylinder, point out the location of the ecliptic.<br />
• While moving the cylinder in a slow circle, have the students observe and follow<br />
certain constellations located close to the ecliptic.<br />
• Using a planet slide in the projector mounted on the ecliptic slide projector<br />
mount, move the planet along the ecliptic. Discuss the movement. Point out that<br />
the ecliptic path will not always be in the same place in the sky. Relate this path<br />
to the changing daily path of the sun across the sky during the seasons.<br />
Materials<br />
• STARLAB Portable Planetarium<br />
• Projector<br />
• Constellation Cylinder<br />
Optional<br />
• 35 mm slide projector<br />
• ecliptic slide projector mount (see<br />
Appendix)<br />
• planet slides<br />
• B–69 • K–6 <strong>Activities</strong>
Objective<br />
K–6 <strong>Activities</strong> • B–70 •<br />
Studying Early Astronomers,<br />
Activity 6-1<br />
The student should be able to compare and discuss the work of Ptolemy, Copernicus,<br />
Galileo, Brahe, and Kepler.<br />
Background<br />
Refer to background information from Activity 5-1.<br />
Tycho Brahe made careful observations of the sky for twenty-seven years. He kept<br />
accurate nightly records of the positions of the planets that could be seen with the<br />
naked eye — Mercury, Venus, Mars, Jupiter, and Saturn. Brahe mapped the positions<br />
of about a thousand stars. Even though he believed that the sun revolves around<br />
the earth and that the other planets revolve around the sun, the accurate data he<br />
obtained was later useful to many astronomers. It was especially useful to Brahe’s<br />
assistant, Johannes Kepler.<br />
Johannes Kepler became an assistant to Brahe only a year and a half before Brahe<br />
died. Through study of the thousands of pages of notes Brahe left, Kepler discovered<br />
patterns and relationships. His discoveries are called Kepler’s laws. They give the<br />
mathematical explanation for calculating:<br />
1. The shape of a planet’s orbit.<br />
2. The speed of a planet at each part of its orbit.<br />
3. The period of revolution of each planet.<br />
Procedure<br />
• Conduct a class discussion in the planetarium or classroom covering each of the<br />
astronomers covered.<br />
• Assign written reports. Have students write news articles, in the present tense,<br />
about the findings of these astronomers.<br />
Extension Activity<br />
Students could role play and dress according to the times.
Objective<br />
Sunrise and Sunset Position,<br />
Activity 6-2<br />
The student should be able to describe the relative changes in the sunrise and sunset<br />
positions and times over a one year period.<br />
Background<br />
If you got up early enough to watch the sunrise one morning each week for a<br />
whole year, you would notice an interesting pattern. On September 22 (autumnal<br />
equinox) the sun would rise due east; on December 21 (winter solstice) the sun<br />
rises from its southern-most position; on March 20 (vernal equinox) the sun again<br />
rises due east; and on June 21 (summer solstice) the sun rises from its northernmost<br />
position. If you made accurate observations from the time the sun rose due<br />
east, then moved southward, then northward, then back due east, you would find<br />
that 365 days had passed.<br />
The yearly changes in the stars which are visible are sometimes difficult for children<br />
to understand. Remember that it is night when we are on the side of earth away from<br />
the sun, and we can only see those stars which are above us at night. Consider two<br />
times of the year; six months apart — for example, December 21 and June 21. The<br />
earth is on opposite sides of its orbit on these two dates. When you look into the sky<br />
on these two nights you are looking in opposite directions and see a different part of<br />
the sky. Therefore, the stars seen in the southern sky will change throughout the year.<br />
For the same reason, the stars which are near the North Star will appear to make a<br />
complete circle around it each year.<br />
Procedure<br />
• Using the Starfield Cylinder and optional ecliptic slide projector mount, set up<br />
for approximately September 22 by removing the plug covering the September<br />
sun position on the Starfield Cylinder. Repeat the procedure when observing<br />
in December, March and June. Project the sun due east just above the horizon.<br />
Rotate the cylinder to about December 22 and show the sun rising from its southern-most<br />
position along the ecliptic. Again rotate the cylinder to about March<br />
20 and show the sun rising due east. Rotate the cylinder to about June 21 and<br />
show the sun rising at its most northern position. Finish the activity by moving the<br />
cylinder once more to September 22 and show the sun rising due east.<br />
• Review the procedure for locating the North Star (Polaris) and have the students<br />
follow the apparent motion of the circumpolar constellations as they move<br />
around Polaris. Be sure to relate the movement to the rotation of the earth (one<br />
complete turn of the cylinder equals 24 hours).<br />
• Have the students face the eastern horizon and locate a star or constellation. Use<br />
a star and planet finder to help. For example: if you observe the night sky on November<br />
15 at 9:00 p.m., the constellation, Orion, will be in the eastern sky. The<br />
students should follow the constellation as it rises and sets. This motion should be<br />
related to the rotation of the earth.<br />
Extension <strong>Activities</strong><br />
Have the students plot the path of the sun rising throughout a year’s time on a worksheet<br />
that has the horizon drawn on it. Use the sunrise-sunset time schedule to relate<br />
the days getting shorter and shorter and then longer and longer to the above activity<br />
showing the different positions of the sun rising at different times of the year.<br />
Materials<br />
• STARLAB Portable Planetarium<br />
• Projector<br />
• Starfield Cylinder<br />
• horizon worksheet (paper with<br />
horizon drawn on it)<br />
Optional<br />
• ecliptic slide projector mount<br />
• B–71 • K–6 <strong>Activities</strong>
Materials<br />
• STARLAB Portable Planetarium<br />
• Projector<br />
• Starfield Cylinder<br />
Objective<br />
K–6 <strong>Activities</strong> • B–72 •<br />
Apparent Motion, Activity 6-3<br />
The student should be able to demonstrate an understanding of the reasons for the<br />
apparent motion of the stars.<br />
Procedure<br />
Demonstrate these concepts as you explain this in STARLAB.<br />
The earth has two principal motions. Rotation is the turning of the earth on its axis.<br />
Revolution is the motion of the earth in its orbit around the sun. (Care should be taken<br />
not to confuse these terms when working with children). The earth rotates on its axis<br />
once in 24 hours (rounded off). When viewed from above the North Pole, the earth<br />
turns in a counterclockwise direction. It might be less confusing to children if the earth<br />
is thought of as turning from west to east. The sun appears to rise in the east. We<br />
know that the earth is moving and the sun is “standing still.” Therefore, we must be<br />
moving toward the sun at sunrise or toward the east. It is important to see that sun<br />
time varies from east to west because of the earth’s rotation. For example, sunrise<br />
occurs in New York long before it does in California.<br />
When the earth is observed from above the North Pole, it appears as a circle. All<br />
circles contain 360°; therefore it is 360° around the earth. We know that the earth<br />
turns once in 24 hours. By dividing the distance around the earth (360°) by the time<br />
it takes for the earth to rotate once on its axis (24 hours) we find that the earth turns<br />
15° per hour. It is extremely important for children to realize that the apparent night<br />
motion of the stars is due to the earth’s rotation, and not movement of the stars! Think<br />
of the stars as being stationary in space. What will a star on the eastern horizon appear<br />
to do as the earth turns toward the east? Obviously it will appear to rise. Following<br />
the same logic, it is apparent that the North Star will not appear to move since it<br />
is over the axis of the earth. The stars which are near the North Star will appear to<br />
circle the earth. The stars which are near the North Star will appear to circle it since<br />
they are seen too far above the horizon to rise and set.<br />
The movement of the earth around the sun is called revolution. The earth revolves<br />
about the sun in approximately 365 and 1/4 days or one calendar year. While the<br />
earth is revolving around the sun, its axis points toward the North Star (Polaris).<br />
Since the axis angle never changes, the angle between the earth’s axis and the sun<br />
is constantly changing; giving us our seasons and causing changes in the stars which<br />
are visible.
Objective<br />
Seasonal Changes, Activity 6-4<br />
The student should be able to demonstrate an understanding of the seasonal changes<br />
in stellar locations due to the revolution of the earth around the sun.<br />
Background<br />
Many constellations appear to change positions in the sky as the seasons change.<br />
If you know your constellations well, you can use them as a calendar to help tell the<br />
month of the year.<br />
Procedure<br />
• Locate the Big Dipper and Cassiopeia in the northern sky. Which one seems<br />
to be on top? (Cassiopeia will be on top if the projector is set for observing in<br />
May). Turn the projection cylinder month-by-month and have the students observe<br />
or chart the location of these two constellations throughout the different seasons.<br />
• Have the projector (with either cylinder) set for observing in August at 9:00 p.m.<br />
Locate the constellations Sagittarius, Scorpius, and Libra in the southern and<br />
western sky close to the horizon or the ecliptic. Turn the cylinder so the students<br />
will see these constellations pass from view in the west. In early November at<br />
9:00 p.m. the constellations Capricornus, Aquarius, and Pisces will appear in the<br />
south and west along the ecliptic. Again, turn the cylinder stopping on another<br />
month and locating the constellations seen in the southern sky. In this manner, the<br />
students will observe a general east to west movement of constellations throughout<br />
different seasons of the year.<br />
Materials<br />
• STARLAB Portable Planetarium<br />
• Projector<br />
• Constellation Cylinder<br />
• Starfield Cylinder<br />
• B–73 • K–6 <strong>Activities</strong>
Materials<br />
• STARLAB Portable Planetarium<br />
• Projector<br />
• Starfield Cylinder<br />
K–6 <strong>Activities</strong> • B–74 •<br />
Stellar Position — Poles vs. Equator,<br />
Activity 6-5<br />
Objective<br />
The student should be able to demonstrate an understanding of the differences in stellar<br />
position at the equator versus the polar region.<br />
Procedure<br />
• Demonstrate the sky as seen from the North Pole. Tilt the projector to a latitude<br />
of 90° North. Locate the Big Dipper and Polaris. Turn on the daily motion switch<br />
and slowly rotate the cylinder in a complete circle. Show the students what stellar<br />
motion is like as viewed from the North Pole.<br />
• Show the sky as seen from the equator. Change the latitude of the cylinder to 0°<br />
or the equator. If the change is made slowly, the students will see familiar stars<br />
disappear to the north while new stars appear to the south. Turn on the daily motion<br />
to move the cylinder slowly in a complete circle. This will demonstrate stellar<br />
motion as seen from the equator. The North Star is due north on the horizon. The<br />
South Pole of the sky is due south on the horizon. The South Pole is hard to locate<br />
because no conspicuous stars mark it. Both points (the North and South Poles of<br />
the sky) will not appear to move.
Objective<br />
Stellar Reference Points,<br />
Activity 6-6<br />
The student should be able to identify four major stellar reference points used in locating<br />
and describing positions of other stellar bodies.<br />
Background<br />
Stellar observers generally use well-known and easily identifiable astronomical<br />
features as reference points in locating other stellar features. Four common reference<br />
points are:<br />
1. Polaris<br />
2. Cassiopeia<br />
3. Pointer stars of the Big Dipper (Ursa Major)<br />
4. Orion’s belt<br />
Procedure<br />
• Have students identify the Big Dipper (Ursa Major). Locate the 2 stars which<br />
make up the end of the cup. These two stars, called the pointer stars, are most<br />
important. Using the arrow pointer, have each student point to these stars and<br />
draw a line through them and approximately five times the distance between<br />
them to locate Polaris, the North Star.<br />
• To reinforce the idea that all bodies seem to rotate around Polaris, slowly turn the<br />
cylinder and notice the phenomenon.<br />
• Have students find the star which joins the handle of the Big Dipper to the bowl.<br />
Follow an imaginary line from this star through Polaris (North Star) and continue<br />
in this direction until you find the “W” or “M” shaped constellation of Cassiopeia.<br />
Again, have each student follow the location procedure. If time permits, turn<br />
the projector off, turn the cylinder a 1/4 turn, turn projector back on, and relocate<br />
Cassiopeia.<br />
• To locate Orion (Orion the Hunter can be found in the southern sky throughout<br />
the winter), look for Betelgeuse (Beetle Juice)<br />
and Rigel (Ri-gel), the two brightest stars with<br />
Cassiopeia<br />
the three dimmer stars of the belt halfway<br />
between the two. From the three stars<br />
forming Orion’s belt, follow the line<br />
suggested by these three stars to<br />
Polaris<br />
the southeast. They lead to the<br />
very bright star, Sirius, the<br />
most apparently bright<br />
star of the night skies.<br />
Sirius is the bright<br />
star in the constellation,<br />
Canis Major<br />
or Big Dog. Canis<br />
Major is one of the<br />
Ursa Major<br />
two hunting dogs of<br />
Orion.<br />
(Illustration not to scale).<br />
Materials<br />
• STARLAB Portable Planetarium<br />
• Projector<br />
• Starfield Cylinder<br />
• arrow pointer<br />
• B–75 • K–6 <strong>Activities</strong>
Materials<br />
• STARLAB Portable Planetarium<br />
• Projector<br />
• Starfield Cylinder<br />
• Constellations Cylinder<br />
• Greek Mythology Cylinder<br />
• Do it Yourself Star Finder<br />
K–6 <strong>Activities</strong> • B–76 •<br />
Greek Mythological Constellations,<br />
Activity 6 -7<br />
Objective<br />
The student should be able to observe the location and discuss the Greek mythological<br />
origin of the zodiacal constellation.<br />
Background<br />
The twelve zodiacal constellations are:<br />
• Aries, the Ram<br />
• Taurus, the Bull<br />
• Gemini, the Twins<br />
• Cancer, the Crab<br />
• Leo, the Lion<br />
• Virgo, the Virgin<br />
• Libra, the Scales<br />
• Scorpius, the Scorpion<br />
• Sagittarius, the Archer<br />
• Capricornus, the Sea Goat<br />
• Aquarius, the Water Bearer<br />
• Pisces, the Fishes<br />
Procedure<br />
• Locate the 12 zodiacal constellations using the Constellation Cylinder or Greek<br />
Mythology Cylinder. (The Do it Yourself Star Finder will also help).<br />
• Then locate the 12 zodiacal constellations on the Starfield Cylinder.<br />
• Optional: refer to the Constellation Locator Script.
Native American and Greek Myths,<br />
Activity 6-8<br />
Objective<br />
The student should be able to discuss and compare/contrast the legends of the Native<br />
American and the Greek legends of Ursa Major, Ursa Minor, Cassiopeia, and<br />
Orion.<br />
Procedure<br />
• Discuss and compare Native American Mythology with Greek mythological<br />
origins of selected constellations.<br />
• Students may be divided into groups for research and presentation of constellation<br />
origin: Native American and Greek. Presentations can be given in the<br />
STARLAB.<br />
Materials<br />
• STARLAB Portable Planetarium<br />
• Projector<br />
• Starfield Cylinder<br />
Optional<br />
• Native American Mythology Cylinder<br />
• Greek Mythology Cylinder<br />
• B–77 • K–6 <strong>Activities</strong>
Materials<br />
• STARLAB Portable Planetarium<br />
• Projector<br />
• Starfield Cylinder<br />
• Do it Yourself Star Finder<br />
Objective<br />
K–6 <strong>Activities</strong> • B–78 •<br />
Using a Star Finder, Activity 6-9<br />
The student should be able to demonstrate the use of a Do it Yourself Star Finder by<br />
locating a given constellation within the portable planetarium.<br />
Background<br />
Follow the specific directions for the Do it Yourself Star Finder.<br />
Procedure<br />
With the Starfield Cylinder in place and latitude set, hand out the Do it Yourself Star<br />
Finders. Beginning with easy-to-find constellations, have students locate them for a<br />
particular day and time of the year.
Stars & Skies Supplemental<br />
<strong>Activities</strong><br />
for Grades<br />
4-6<br />
• B–79 • K–6 <strong>Activities</strong>
• paper<br />
• pencils<br />
• scissors<br />
Materials<br />
K–6 <strong>Activities</strong> • B–80 •<br />
Comparing the Size of the Planets<br />
Note<br />
To scale down the size of the planets, you can use any unit of measurement.<br />
The smallest unit can be the smallest planet. For example, you might use 1<br />
centimeter as 1 unit.<br />
Procedure<br />
• Mark off 1 unit on a piece of paper. This represents the diameter of Mercury.<br />
Make a circle from this diameter as shown.<br />
• Use the table below to measure the diameter of each planet.<br />
• Cut out and label each planet.<br />
• Discuss: Which planet is the largest? Which planet is the second largest? Which<br />
planets are about the same size as the earth? How might you compare the size<br />
of the sun with the size of each of the planets?<br />
• Suggestion: You might make a mobile out of your planets. Make the planets<br />
out of heavy paper or back them with cardboard and hang them on a clothes<br />
hanger.<br />
Units of Diameter<br />
Venus — 2 1 / 2 Jupiter — 29 Neptune — 9<br />
Earth — 2 3 / 5 Saturn — 25 Pluto — 1<br />
Mars — 2 2 / 5 Uranus — 10 Sun — 287
Drawing Words<br />
Some words can be written so they show their meaning (see drawings at right).<br />
Procedure<br />
• Ask the students to think about how they might draw other words about the solar<br />
system.<br />
• Have them try their luck using words such as the following.<br />
Constellations Satellite<br />
Reflecting Orbit<br />
Meteors Solar System<br />
Comet Eclipse<br />
Galaxy Winter<br />
Rotation Summer<br />
Mercury Autumn<br />
Revolution Spring<br />
Jumbled Words<br />
At the conclusion or beginning of a group of activities or a unit on a certain subject,<br />
duplicate the following scrambled words and/or use other special vocabulary from<br />
the unit. See how many words the students can unscramble in a specified time.<br />
nselcolatiosnt (constellations)<br />
sptlean (planets)<br />
nortsaomy (astronomy)<br />
etpeolces (telescope)<br />
treeom (meteor)<br />
mcote (comet)<br />
smra (Mars)<br />
srats (stars)<br />
czodia (zodiac)<br />
• B–81 • K–6 <strong>Activities</strong>
Word List<br />
K–6 <strong>Activities</strong> • B–82 •<br />
Word Search<br />
Find the following words in the puzzle below.<br />
Moon Rocket Orbit<br />
Rotate Gravity Phase<br />
Sun Month Wax<br />
Apollo Astronaut Wane<br />
Telescope Lunar Seas<br />
Rays Tide Crescent<br />
Cold Meteorite Hot<br />
Volcanoes Eclipse Crater<br />
Satellite Gibbous<br />
S A T E L L I T E A W A X P G<br />
G K M O N T H S C D A N R M I<br />
R P R O C K E T L P N H O T B<br />
A H M E T E O R I T E S T D S<br />
V A X C O L D Q P D L R A F O<br />
I S Y W Z C R E S C E N T R U<br />
T E L E S C O P E L G S E A S<br />
Y B A S T R O N A U T S R Y T<br />
L O R B I T M O O N G D R S I<br />
K S U N S V O L C A N O E S D<br />
A P O L L O S R C R A T E R E
Making Constellation Slides<br />
Procedure<br />
• Use processed black 35mm slides (or slides you took when you thought there<br />
was enough light) to make constellation slides. Place the black slides on a soft<br />
surface such as a magazine. Using a needle, poke small holes in the slide at<br />
locations corresponding to star positions in the constellations.<br />
• A shoe box makes a good projector for constellation slides made out of black<br />
construction paper. If each student made a projector and a slide you would have<br />
some good material for a quiz. Cut the end out of a shoe box and two slots on<br />
each side to allow a piece of black construction paper, with pin holes in the form<br />
of a constellation, to slide through. Place a flashlight on the inside of the box or<br />
cut out the other end of the box to allow light to pass through the pin holes.<br />
• Clear transparencies with the constellations drawn on them is a simple way to<br />
project the stars.<br />
• Have several students draw stars (small dots for small circles) hit or miss on the<br />
chalkboard so that the board is quite full of “stars” in the “sky.” The students<br />
may use a piece of plain white paper and fill their “sky” full of “stars” and then<br />
exchange their paper with another student. Ask the children to see if they could<br />
join some together with a line and tell what this picture reminds them of.<br />
Lost in Space<br />
Note<br />
The purpose of this activity is to become familiar with the facts about the<br />
universe.<br />
Procedure<br />
• The class is to be divided into two teams of equal ability.<br />
• Each team elects a captain who will be responsible for giving the team answer.<br />
The first player on Team A gives a one-sentence description of where he is; for<br />
example: “I am on a planet that has four moons.” The players on Team B have<br />
up to three team guesses to guess where player on Team A is. If they guess correctly,<br />
the player from Team A is captured and becomes a member of Team B.<br />
If they do not guess correctly, the first player from Team B describes where he is<br />
and the players from Team A do the guessing. The team with the most players at<br />
the end of the allotted time is declared the winner.<br />
• It would be helpful to the students to give them a little time to do some research<br />
on their own location. To avoid errors, the pupil who gives the description<br />
might be requested to write the correct answer to where he is lost and allow the<br />
teacher to check it, to insure that his clue description is correct.<br />
• B–83 • K–6 <strong>Activities</strong>
Name_________________________________________________________ Date_________________________<br />
Lost on the Moon Worksheet<br />
You are in a space crew originally scheduled to rendezvous with a mother ship on the lighted surface of the moon.<br />
Mechanical difficulties, however, have forced your ship to crash-land at a spot some 200 miles from the rendezvous<br />
point. The rough landing has damaged much of the equipment on board. Since survival depends on reaching the<br />
mother ship, the most critical items available must be chosen for the 200 mile trip. Below are listed the 15 items<br />
left intact after landing. Your task is to rate them in terms of their importance to your crew in its attempt to reach the<br />
rendezvous point. Place number 1 by the most important item, 2 by the second most important, and so on through<br />
number 15 for the least important.<br />
___ Box of matches<br />
___ Food concentrate (4 packages)<br />
___ 50 feet of nylon rope<br />
___ Parachute silk (1 large piece)<br />
___ Portable heating unit<br />
___ Two .45 caliber pistols (with shells)<br />
___ One case dehydrated milk<br />
___ Two 100 lb. tanks of oxygen<br />
___ Stellar map (of the moon’s constellations)<br />
___ Flashlight<br />
___ Magnetic compass<br />
___ Gallons of water (5)<br />
___ Signal flares (3)<br />
___ First aid kit with injection needles<br />
___ Solar-powered FM receiver transmitter<br />
Compare your ranking with the astronauts’ list supplied by your teacher, then do the following:<br />
• Beside each item on your list, place the number that represents the difference between your ranking and the<br />
astronauts’ ranking. For example, if you listed oxygen first, you would write 0 in front of oxygen on your list. If<br />
you had ranked it third you would write 2, and so on.<br />
• After placing a score beside each item on your list, add up the individual scores to set a total score.<br />
• The lower your score, the closer you came to surviving the return trip to the base ship.<br />
• What is your survival score?<br />
• Compare your score with others in your class.<br />
Refer to the above list to answer the following questions.<br />
1. Oxygen, water, and food concentrate are very important items. Why?<br />
2. How would the star chart and solar-powered receiver-transmitter be useful?<br />
3. For each one of the following items, briefly explain why it would be almost useless for your survival: box of<br />
matches, magnetic compass, flashlight, portable heating unit.<br />
4. If you were stranded on the dark side of the moon would your ranking of items be different?<br />
5. Which two items named in Question 3 would become important on the dark side of the moon? Why?<br />
K-6 <strong>Activities</strong> • B–84 •
Lost on the Moon Answer Key<br />
Here’s how astronauts would rank the importance of the<br />
following:<br />
15 Box of matches (little or no use on moon)<br />
4 Food concentrate (4 packages) (daily food requirements)<br />
6 50 feet of nylon rope (help in climbing, securing packs)<br />
8 Parachute silk (1 large piece) (shelter against sun)<br />
12 Portable heating unit (useful only for dark side of moon)<br />
10 Two .45 caliber pistols (with shells) (Useful as self-propulsion devices)<br />
11 One case dehydrated milk (nutrition source when mixed with water)<br />
l Two 100 lb. tanks of oxygen (necessary for breathing)<br />
3 Stellar map (of the moon’s constellations) (Principal means of finding direction)<br />
13 Flashlight (useful only for dark side of moon)<br />
14 Magnetic compass (useless; moon probably has no magnetic poles)<br />
2 Gallons of water (5) (to replenish body loss)<br />
9 Signal flares (3) (location marker when within sight of base ship)<br />
7 First aid kit with injection needles (for injury or sickness)<br />
5 Solar-powered FM receiver transmitter(distress signaling)<br />
Answer to questions on Lost on the Moon Worksheet<br />
1. These meet critical body requirements and they are not found on the moon.<br />
2. Important for determining position; means of communication with base ship.<br />
3. Matches — will not burn on the moon.<br />
Magnetic compass — no known magnetic poles on the moon.<br />
Flashlight — sun is so bright it would be difficult to tell whether it was on or off.<br />
Heating unit — too much heat already.<br />
4. Yes.<br />
5. Flashlight for signaling and for lighting the way, and the portable heating unit<br />
because of extreme cold on dark side.<br />
• B–85 • K–6 <strong>Activities</strong>
Fun Pictures for Your Classroom<br />
K–6 <strong>Activities</strong> • B–86 •
• B–87 • K–6 <strong>Activities</strong>
K–6 <strong>Activities</strong> • B–88 •