UltraNova Editor & Librarian User Guide.pdf - Novation
UltraNova Editor & Librarian User Guide.pdf - Novation
UltraNova Editor & Librarian User Guide.pdf - Novation

You also want an ePaper? Increase the reach of your titles
YUMPU automatically turns print PDFs into web optimized ePapers that Google loves.
NOTE: Undo and Redo buttons are available in the toolbar. Inadvertently deleted or reset<br />
patches in the <strong>Librarian</strong> can be restored using these buttons. The usual keyboard shortcuts<br />
should also be available. It is important to remember that all Undo history will be lost as<br />
soon as the <strong>Librarian</strong> is shut down. Care should be taken so that you do not unintentionally<br />
lose any sounds when using the Delete/Reset command.<br />
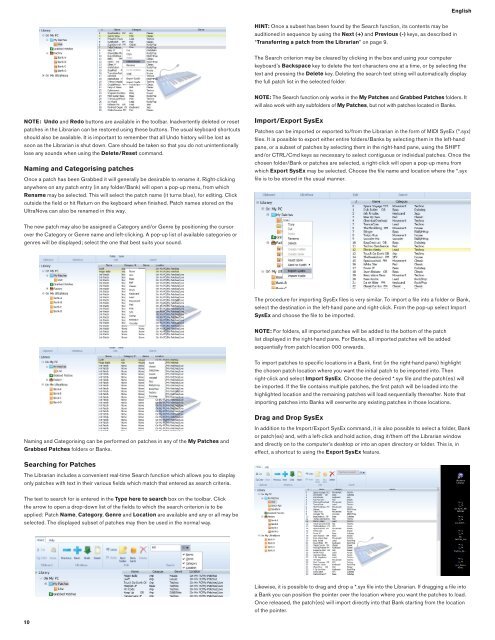
Naming and Categorising patches<br />
Once a patch has been Grabbed it will generally be desirable to rename it. Right-clicking<br />
anywhere on any patch entry (in any folder/Bank) will open a pop-up menu, from which<br />
Rename may be selected. This will select the patch name (it turns blue), for editing. Click<br />
outside the fi eld or hit Return on the keyboard when fi nished. Patch names stored on the<br />
<strong>UltraNova</strong> can also be renamed in this way.<br />
The new patch may also be assigned a Category and/or Genre by positioning the cursor<br />
over the Category or Genre name and left-clicking. A pop-up list of available categories or<br />
genres will be displayed; select the one that best suits your sound.<br />
Naming and Categorising can be performed on patches in any of the My Patches and<br />
Grabbed Patches folders or Banks.<br />
Searching for Patches<br />
The <strong>Librarian</strong> includes a convenient real-time Search function which allows you to display<br />
only patches with text in their various fi elds which match that entered as search criteria.<br />
The text to search for is entered in the Type here to search box on the toolbar. Click<br />
the arrow to open a drop-down list of the fi elds to which the search criterion is to be<br />
applied: Patch Name, Category, Genre and Location are available and any or all may be<br />
selected. The displayed subset of patches may then be used in the normal way.<br />
10<br />
HINT: Once a subset has been found by the Search function, its contents may be<br />
auditioned in sequence by using the Next (+) and Previous (-) keys, as described in<br />
“Transferring a patch from the <strong>Librarian</strong>” on page 9.<br />
English<br />
The Search criterion may be cleared by clicking in the box and using your computer<br />
keyboard’s Backspace key to delete the text characters one at a time, or by selecting the<br />
text and pressing the Delete key. Deleting the search text string will automatically display<br />
the full patch list in the selected folder.<br />
NOTE: The Search function only works in the My Patches and Grabbed Patches folders. It<br />
will also work with any subfolders of My Patches, but not with patches located in Banks.<br />
Import/Export SysEx<br />
Patches can be imported or exported to/from the <strong>Librarian</strong> in the form of MIDI SysEx (*.syx)<br />
fi les. It is possible to export either entire folders/Banks by selecting them in the left-hand<br />
pane, or a subset of patches by selecting them in the right-hand pane, using the SHIFT<br />
and/or CTRL/Cmd keys as necessary to select contiguous or individual patches. Once the<br />
chosen folder/Bank or patches are selected, a right-click will open a pop-up menu from<br />
which Export SysEx may be selected. Choose the fi le name and location where the *.syx<br />
fi le is to be stored in the usual manner.<br />
The procedure for importing SysEx fi les is very similar. To import a fi le into a folder or Bank,<br />
select the destination in the left-hand pane and right-click. From the pop-up select Import<br />
SysEx and choose the fi le to be imported.<br />
NOTE: For folders, all imported patches will be added to the bottom of the patch<br />
list displayed in the right-hand pane. For Banks, all imported patches will be added<br />
sequentially from patch location 000 onwards.<br />
To import patches to specifi c locations in a Bank, fi rst (in the right-hand pane) highlight<br />
the chosen patch location where you want the initial patch to be imported into. Then<br />
right-click and select Import SysEx. Choose the desired *.syx fi le and the patch(es) will<br />
be imported. If the fi le contains multiple patches, the fi rst patch will be loaded into the<br />
highlighted location and the remaining patches will load sequentially thereafter. Note that<br />
importing patches into Banks will overwrite any existing patches in those locations.<br />
Drag and Drop SysEx<br />
In addition to the Import/Export SysEx command, it is also possible to select a folder, Bank<br />
or patch(es) and, with a left-click and hold action, drag it/them off the <strong>Librarian</strong> window<br />
and directly on to the computer’s desktop or into an open directory or folder. This is, in<br />
effect, a shortcut to using the Export SysEx feature.<br />
Likewise, it is possible to drag and drop a *.syx fi le into the <strong>Librarian</strong>. If dragging a fi le into<br />
a Bank you can position the pointer over the location where you want the patches to load.<br />
Once released, the patch(es) will import directly into that Bank starting from the location<br />
of the pointer.