www.irai.com AUTOMSIM manual - Automgen
www.irai.com AUTOMSIM manual - Automgen
www.irai.com AUTOMSIM manual - Automgen

You also want an ePaper? Increase the reach of your titles
YUMPU automatically turns print PDFs into web optimized ePapers that Google loves.
M1<br />
F1<br />
U1<br />
L1<br />
V1<br />
L2<br />
M3~<br />
W1<br />
L3<br />
KM2<br />
EVC1<br />
<strong>AUTOMSIM</strong> <strong>manual</strong><br />
24V<br />
C1MINI<br />
0V<br />
C1MAXI<br />
0 1 2 3 4 5 6 7 8 9 10 11 12 13 14<br />
0 1<br />
EVC1<br />
1MAXI<br />
2<br />
BP Dcy<br />
1MINI<br />
API<br />
<strong>www</strong>.<strong>irai</strong>.<strong>com</strong>
<strong>AUTOMSIM</strong> <strong>manual</strong><br />
INTRODUCTION................................................................................................................................................. 5<br />
INSTALLATION.................................................................................................................................................. 6<br />
PRACTICAL EXPERIENCE.............................................................................................................................. 6<br />
USING <strong>AUTOMSIM</strong> .......................................................................................................................................... 10<br />
ORGANIZING APPLICATIONS............................................................................................................................. 10<br />
CREATING AN <strong>AUTOMSIM</strong> SHEET.................................................................................................................. 10<br />
ADDING AN OBJECT ONTO AN <strong>AUTOMSIM</strong> SHEET.......................................................................................... 11<br />
USING THE COLOR LOOKUP TABLE ................................................................................................................... 13<br />
SELECTING ONE OR MORE OBJECTS. ................................................................................................................. 14<br />
SELECTING ONE OR MORE OBJECTS. ................................................................................................................. 15<br />
DELETING ONE OR MORE OBJECTS.................................................................................................................... 15<br />
CHANGING THE ORIENTATION OF ONE OR MORE OBJECTS................................................................................. 15<br />
COPYING/CUTTING ONE OR MORE OBJECTS TO THE CLIPBOARD........................................................................ 15<br />
PASTING ONE OR MORE OBJECTS FROM THE CLIPBOARD................................................................................... 15<br />
MODIFYING OBJECT PROPERTIES. ..................................................................................................................... 16<br />
EXPORTING ONE OR MORE OBJECTS.................................................................................................................. 16<br />
FUNCTIONS....................................................................................................................................................... 17<br />
INTERCHANGING OBJECTS ................................................................................................................................17<br />
CREATING SENSORS ASSOCIATED WITH A CYLINDER ........................................................................................ 17<br />
INTERCHANGING <strong>AUTOMSIM</strong> OBJECTS WITH THE AUTOMATISM PROGRAM................................................... 19<br />
INTERCHANGING <strong>AUTOMSIM</strong> OBJECTS WITH THE IRIS 3D OPERATING SIMULATOR...................................... 20<br />
INTERCHANGING <strong>AUTOMSIM</strong> OBJECTS WITH THE IRIS2D SUPERVISION OBJECTS......................................... 21<br />
How can a link be made between an IRIS2D pushbutton or switch and an <strong>AUTOMSIM</strong> pushbutton or<br />
switch? ....................................................................................................................................................... 21<br />
How can a link be made between an <strong>AUTOMSIM</strong> object and an IRIS2D indicator light? ....................... 22<br />
<strong>AUTOMSIM</strong> 3 (C)opyright 2003 IRAI
Introduction<br />
<strong>AUTOMSIM</strong> <strong>manual</strong><br />
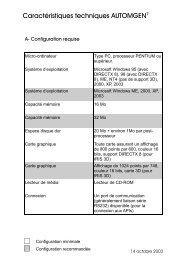
<strong>AUTOMSIM</strong> is a pneumatic / electrical / hydraulic simulation module.<br />
It can be used alone or as an addition to AUTOMGEN 7 functions:<br />
SCADA and 3D<br />
process<br />
simulation<br />
AUTOMATION<br />
application<br />
Electrical,<br />
pneumatic and<br />
hydraulic<br />
simualtion<br />
<strong>AUTOMSIM</strong> 5 (C)opyright 2003 IRAI
<strong>AUTOMSIM</strong> <strong>manual</strong><br />
Installation<br />
To install <strong>AUTOMSIM</strong>, install AUTOMGEN 7 . In options, be sure that<br />
« <strong>AUTOMSIM</strong> » is checked.<br />
Practical experience<br />
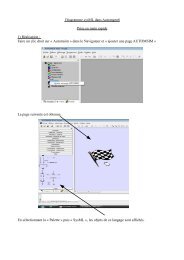
Let us do a simple example: cylinder + distributor<br />
Click with the right side of the mouse on « <strong>AUTOMSIM</strong> »<br />
Select “Add an <strong>AUTOMSIM</strong> page”<br />
<strong>AUTOMSIM</strong> 6 (C)opyright 2003 IRAI
<strong>AUTOMSIM</strong> <strong>manual</strong><br />
Click with the right side of the mouse on the <strong>AUTOMSIM</strong> sheet (right<br />
part) then select “Add an object”<br />
Select “double acting cylinder”, and then click on “Open the object”.<br />
Repeat the steps above then add a 4/2 directional valve with monostable<br />
hand control, a pressure source and a pneumatic exhaust.<br />
<strong>AUTOMSIM</strong> 7 (C)opyright 2003 IRAI
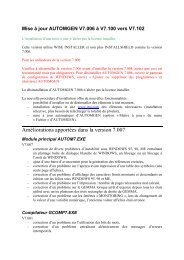
You should obtain the following:<br />
<strong>AUTOMSIM</strong> <strong>manual</strong><br />
Create connections between the different <strong>com</strong>ponents: Move the cursor<br />
over the connections (light blue circles), press the left button of the<br />
mouse then release it, move the cursor of the mouse to the connection<br />
where the link must be connected, press the left button of the mouse<br />
then release it.<br />
Repeat the above step for each connection until the following result is<br />
achieved:<br />
Click on the “GO” button on the toolbar.<br />
<strong>AUTOMSIM</strong> 8 (C)opyright 2003 IRAI
<strong>AUTOMSIM</strong> <strong>manual</strong><br />
The cylinder shaft will <strong>com</strong>e out. To make it go back in, click on the<br />
<strong>manual</strong> control of the distributor.<br />
While it is running, you can make changes, add objects, move them,<br />
etc…<br />
With <strong>AUTOMSIM</strong>, it is not necessary to stop simulation!<br />
To end the simulation, click again on “GO”.<br />
<strong>AUTOMSIM</strong> 9 (C)opyright 2003 IRAI
Using <strong>AUTOMSIM</strong><br />
Organizing applications<br />
<strong>AUTOMSIM</strong> <strong>manual</strong><br />
<strong>AUTOMSIM</strong> applications are written on one or more sheets that appear<br />
in the tree structure of AUTOMGEN 7 . The objects are then placed on the<br />
sheet(s): an object = a <strong>com</strong>ponent such as a cylinder or an electrical<br />
contact.<br />
Opening an existing application<br />
The subdirectory « Examples / automsim » of the installation directory of<br />
AUTOMGEN 7 contains examples done with <strong>AUTOMSIM</strong>.<br />
Creating an <strong>AUTOMSIM</strong> sheet<br />
To add an AUTOSIM sheet in the tree structure of a project, click with<br />
the right button of the mouse on the “<strong>AUTOMSIM</strong>” <strong>com</strong>ponent in the tree<br />
structure, then select “Add an <strong>AUTOMSIM</strong> page”.<br />
An <strong>AUTOMSIM</strong> sheet is then created.<br />
<strong>AUTOMSIM</strong> 10 (C)opyright 2003 IRAI
Adding an object onto an <strong>AUTOMSIM</strong> sheet<br />
<strong>AUTOMSIM</strong> <strong>manual</strong><br />
Click with the right button of the mouse on the <strong>AUTOMSIM</strong> sheet (<br />
shown below on the right) and select “Add an object”.<br />
The selection assistant for an object then appears:<br />
The assistant shows a preview of the object in the bottom of the window.<br />
To add the object onto the <strong>AUTOMSIM</strong> sheet, click on “Open the object”.<br />
Then move the mouse to place the object on the <strong>AUTOMSIM</strong> sheet,<br />
press the left button of the mouse and release it to leave the object.<br />
<strong>AUTOMSIM</strong> 11 (C)opyright 2003 IRAI
You will obtain the following result:<br />
<strong>AUTOMSIM</strong> <strong>manual</strong><br />
<strong>AUTOMSIM</strong> 12 (C)opyright 2003 IRAI
Using the palette<br />
<strong>AUTOMSIM</strong> <strong>manual</strong><br />
1- Click on the object(s) in the palette (they appear as selected):<br />
framed by black squares).<br />
<strong>AUTOMSIM</strong> 13 (C)opyright 2003 IRAI
<strong>AUTOMSIM</strong> <strong>manual</strong><br />
2- Click on the selected object(s), keep the button pressed and drag<br />
the object onto the sheet.<br />
Selecting one or more objects.<br />
To select an object, move the cursor of the mouse over the object, press<br />
the left button of the mouse and release it. Black squares appear around<br />
the objects when they are selected:<br />
To deselect an object, repeat the same step.<br />
To select several objects: keep the SHIFT key of the keyboard pressed<br />
and select several objects following the method described above.<br />
To select several objects that are in the same area: press the left button<br />
of the mouse, move the cursor of the mouse – a selection rectangle<br />
<strong>AUTOMSIM</strong> 14 (C)opyright 2003 IRAI
<strong>AUTOMSIM</strong> <strong>manual</strong><br />
emerges – release the left button of the mouse when the selection<br />
rectangle is of the desired size.<br />
To select an object that is under another object (several objects can be<br />
superimposed), click several times with the left button of the mouse on<br />
the objects covering each other: at each click, the selection moves from<br />
one object to the other.<br />
Selecting one or more objects.<br />
Move the cursor over one or more selected objects – the cursor of the<br />
mouse takes on the appearance of four direction arrows – press the left<br />
button of the mouse, move the objects by moving the mouse, release the<br />
left button of the mouse when the desired position for the objects is<br />
reached.<br />
Deleting one or more objects.<br />
Move the cursor over one or several selected objects, press then release<br />
the right button of the mouse and select “Delete”.<br />
Changing the orientation of one or more objects<br />
Move the cursor over one or more selected objects, press then release<br />
the right button of the mouse and select the desired setting in the<br />
“Rotation” menu.<br />
Copying/cutting one or more objects to the clipboard<br />
Move the cursor over one or more selected objects, press then release<br />
the right button of the mouse and select “Copy” or “Paste”.<br />
Pasting one or more objects from the clipboard<br />
Press then release the right button of the mouse over an empty area of<br />
the <strong>AUTOMSIM</strong> sheet and select “Paste” in the menu.<br />
<strong>AUTOMSIM</strong> 15 (C)opyright 2003 IRAI
Modifying object properties.<br />
<strong>AUTOMSIM</strong> <strong>manual</strong><br />
Move the cursor over one or more selected objects, press then release<br />
the right button of the mouse and select “Properties”.<br />
Example of the properties of a directional valve:<br />
Exporting one or more objects<br />
Move the cursor over one or more selected objects, press then release<br />
the right button of the mouse and select “Export”.<br />
The objects are exported to files with the extension .ASO.<br />
By exporting to the subdirectory “automsim/lib” of the installation<br />
directory of AUTOMGEN7, the new objects created appear in the<br />
<strong>AUTOMSIM</strong> assistant. The name of the file is the name shown in the<br />
assistant. If the name must contain the character ‘/’, substitute this<br />
character with ‘@’ in the file name.<br />
<strong>AUTOMSIM</strong> 16 (C)opyright 2003 IRAI
Functions<br />
<strong>AUTOMSIM</strong> <strong>manual</strong><br />
Interchanging objects<br />
Interchanging <strong>AUTOMSIM</strong> objects is done either by visual links defined<br />
in the sheets (a pneumatic or electrical pipe connecting two objects for<br />
example) or by a symbol. A symbol is a generic name “mini sensor” for<br />
example. A symbol can be any name except for the key words reserved<br />
for the AUTOMGEN variable names (see the AUTOMGEN language<br />
reference <strong>manual</strong>) and the symbols used in the AUTOMGEN table of<br />
symbols.<br />
Creating sensors associated with a cylinder<br />
The mini and maxi end stops of a cylinder can be configured in the<br />
properties of the cylinder. Example:<br />
References for the symbols used can be found in the electrical contacts<br />
<strong>AUTOMSIM</strong> 17 (C)opyright 2003 IRAI
For example:<br />
<strong>AUTOMSIM</strong> <strong>manual</strong><br />
The sensors can also be positioned directly on the <strong>AUTOMSIM</strong> sheet.<br />
For example:<br />
The gray circle associated with the sensor objects must coincide with the<br />
gray dot located on the piston or the cylinder shaft so that the sensor is<br />
activated.<br />
<strong>AUTOMSIM</strong> 18 (C)opyright 2003 IRAI
<strong>AUTOMSIM</strong> <strong>manual</strong><br />
Interchanging <strong>AUTOMSIM</strong> objects with the automatism program<br />
As seen above, the symbols used in the <strong>AUTOMSIM</strong> objects permit the<br />
exchange of information between objects. These symbols must not be<br />
either names of AUTOMGEN variables or names of AUTOMGEN<br />
symbols, as we only want to interact between <strong>AUTOMSIM</strong> objects. If we<br />
use an AUTOMGEN variable name or an AUTOMGEN symbol, then<br />
<strong>AUTOMSIM</strong> objects refer to AUTOMGEN variables and can therefore,<br />
depending on the situation, read or write automatism application<br />
variables.<br />
Example:<br />
0 exit the rod<br />
exited rod<br />
1 return the rod<br />
returned rod<br />
<strong>AUTOMSIM</strong> 19 (C)opyright 2003 IRAI<br />
.
<strong>AUTOMSIM</strong> <strong>manual</strong><br />
Interchanging <strong>AUTOMSIM</strong> objects with the IRIS 3D operating<br />
simulator<br />
In the “Translations” and “Rotations” IRIS 3D performances, the<br />
<strong>AUTOMSIM</strong> type permits reference to be made to the position of an<br />
<strong>AUTOMSIM</strong> cylinder object (see the example <strong>com</strong>plet2.agn).<br />
<strong>AUTOMSIM</strong> 20 (C)opyright 2003 IRAI
<strong>AUTOMSIM</strong> <strong>manual</strong><br />
Interchanging <strong>AUTOMSIM</strong> objects with the IRIS2D supervision<br />
objects<br />
How can a link be made between an IRIS2D pushbutton or switch and<br />
an <strong>AUTOMSIM</strong> pushbutton or switch?<br />
<strong>AUTOMSIM</strong> 21 (C)opyright 2003 IRAI
<strong>AUTOMSIM</strong> <strong>manual</strong><br />
How can a link be made between an <strong>AUTOMSIM</strong> object and an IRIS2D<br />
indicator light?<br />
Comments: note that the <strong>AUTOMSIM</strong> variables are considered as<br />
numerical variables. It is therefore necessary to write “su=1”<br />
<strong>AUTOMSIM</strong> 22 (C)opyright 2003 IRAI