Micron Plus P.I.R - Eclats antivols
Micron Plus P.I.R - Eclats antivols
Micron Plus P.I.R - Eclats antivols

You also want an ePaper? Increase the reach of your titles
YUMPU automatically turns print PDFs into web optimized ePapers that Google loves.
<strong>Micron</strong> <strong>Plus</strong> P.I.R<br />
Using surface mount components (SMD) and a proven design, the <strong>Micron</strong> <strong>Plus</strong> has a<br />
very high level of performance and reliability.<br />
Features:<br />
Dual Pyro-electric Sensor<br />
Coverage 10-12 Meters<br />
Pulse Count Setting 1 or Auto<br />
SMD Technology<br />
Temperature Compensation<br />
High Immunity To RFI<br />
Interchangeable Lens Library<br />
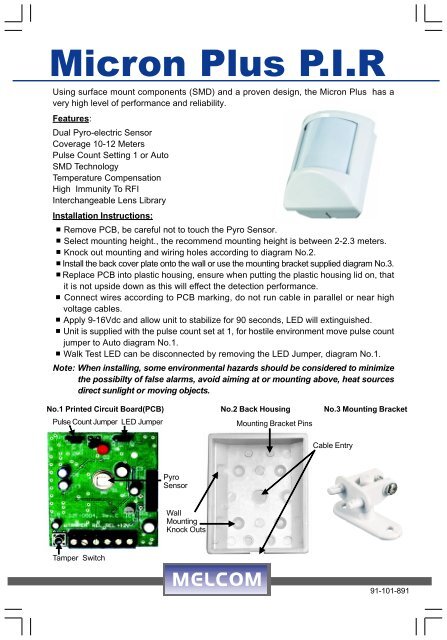
Installation Instructions:<br />
.Remove PCB, be careful not to touch the Pyro Sensor.<br />
.Select mounting height., the recommend mounting height is between 2-2.3 meters.<br />
.Knock out mounting and wiring holes according to diagram No.2.<br />
.Install the back cover plate onto the wall or use the mounting bracket supplied diagram No.3.<br />
.Replace PCB into plastic housing, ensure when putting the plastic housing lid on, that<br />
it is not upside down as this will effect the detection performance.<br />
.Connect wires according to PCB marking, do not run cable in parallel or near high<br />
voltage cables.<br />
.Apply 9-16Vdc and allow unit to stabilize for 90 seconds, LED will extinguished.<br />
.Unit is supplied with the pulse count set at 1, for hostile environment move pulse count<br />
jumper to Auto diagram No.1.<br />
.Walk Test LED can be disconnected by removing the LED Jumper, diagram No.1.<br />
Note: When installing, some environmental hazards should be considered to minimize<br />
the possibilty of false alarms, avoid aiming at or mounting above, heat sources<br />
direct sunlight or moving objects.<br />
No.1 Printed Circuit Board(PCB) No.2 Back Housing No.3 Mounting Bracket<br />
Pulse Count Jumper LED Jumper<br />
Mounting Bracket Pins<br />
Tamper Switch<br />
Pyro<br />
Sensor<br />
Wall<br />
Mounting<br />
Knock Outs<br />
Cable Entry<br />
91-101-891
Lens Coverage:<br />
Specifications:<br />
Sensor: Pyro-electric dual element<br />
Coverage: 10-12 meters<br />
Detection Zones: 24 multi level area<br />
Mounting Height: 2 meters<br />
Pulse Count: 1 or Auto<br />
Detectabel Speed: 0.15-2 meters per second<br />
Walk Test: Light emitting diode (LED)<br />
Operating Voltage: 9-16 Volts DC<br />
Current: 17mA<br />
Warm Up Period: 60-90 seconds<br />
Alarm Period: 3 seconds<br />
Alarm Contacts: Normally opened (N/O)<br />
Tamper Switch: Normally closed (N/C)<br />
Operating Temperature: 0.C to + 45.C<br />
Dimensions: (H x W x D): 98mm x 68mm x 43mm<br />
Weight: 92 grams (Approx)<br />
Case Material High inpact ABS<br />
Problems:<br />
Problem Probable Cause Solution<br />
No range Mounted too high Adjust mounted height 2-2.3 meters<br />
Mounted upside down Mount right way up<br />
Lens mounted upside down Remove lens and refit right way up<br />
No LED light No power or broken wires Connect power supply or replace wires<br />
Wire not fitted correctly Check wiring to sensor & control panel<br />
Sensor activates, Moving object within the detection Relocate sensor direction<br />
when no person area, rapid temperature change<br />
within the detection within the detection area. (Heater,<br />
area Sunlight, Air Conditioner)<br />
91-101-891