GAIA SH-01 Sound Creating Guidebook - Roland
GAIA SH-01 Sound Creating Guidebook - Roland
GAIA SH-01 Sound Creating Guidebook - Roland

You also want an ePaper? Increase the reach of your titles
YUMPU automatically turns print PDFs into web optimized ePapers that Google loves.
ACHIEVE<br />
MASTERY!<br />
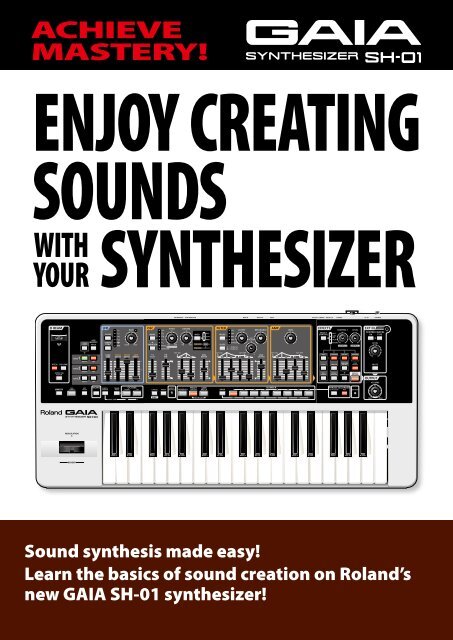
ENJOY CREATING<br />
SOUNDS<br />
WITH SYNTHESIZER<br />
YOUR<br />
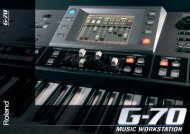
<strong>Sound</strong> synthesis made easy!<br />
Learn the basics of sound creation on <strong>Roland</strong>’s<br />
new <strong>GAIA</strong> <strong>SH</strong>-<strong>01</strong> synthesizer!
INTRO<br />
D Beam<br />
By moving your<br />
hand above the D<br />
Beam controller<br />
you can change<br />
the sound’s pitch,<br />
volume, or bright-<br />
Introducing the Controls<br />
ness. EXT IN<br />
You can connect<br />
a portable audio<br />
player here.<br />
USB Memory<br />
You can save your<br />
patches to USB<br />
memory.<br />
Tone<br />
You can layer three<br />
tones to be played<br />
simultaneously.<br />
Here’s where you<br />
select the tone you<br />
want to edit.<br />
Lever<br />
Move this to left or<br />
right to change the<br />
sound’s pitch.<br />
Move this away<br />
from yourself to<br />
apply modulation.<br />
A NOTE OF<br />
ADVICE<br />
LFO<br />
This modulates the<br />
sound.<br />
What are the Three Elements of <strong>Sound</strong>?<br />
The three elements of sounds are pitch, brightness, and volume. On a synthesizer,<br />
these elements are controlled by the following three sections.<br />
1. Pitch = Oscillator (OSC)<br />
2. Brightness = Filter (FILTER)<br />
3. Volume = Amplifier (AMP)<br />
Oscillator (OSC)<br />
This determines the sound’s pitch. The oscillator<br />
is the heart of a synthesizer, and is where<br />
you select the waveform that forms the basis<br />
of the sound.<br />
Filter<br />
This determines the<br />
sound’s brightness.<br />
Amp<br />
This determines the sound’s<br />
volume. This is also where the<br />
sound’s attack and decay are<br />
adjusted.<br />
<strong>Roland</strong>’s <strong>GAIA</strong> <strong>SH</strong>-<strong>01</strong> synthesizer is designed so that these three elements of sound are arranged on the<br />
panel in an intuitive layout, making the sound-creating process easy.<br />
2 3<br />
Pitch<br />
OSC<br />
Brightness<br />
FILTER<br />
Effects<br />
Here you can apply reverb to give<br />
the sound more depth, or add other<br />
effects.<br />
Volume<br />
AMP<br />
Volume<br />
This adjusts the<br />
overall volume.<br />
Patch<br />
Here you can call up<br />
patches.
STEP<br />
1<br />
Play a <strong>Sound</strong>!<br />
The <strong>GAIA</strong> <strong>SH</strong>-<strong>01</strong> lets you start playing as soon as you turn on the power.<br />
1. Turn on the power.<br />
2. Press the NUMBER [1] button.<br />
In this example we’ve selected sound (patch) number 1. On the following page we’ll explain more about how to<br />
select “patches.”<br />
3. Use the [VOLUME] knob to adjust the volume.<br />
4. Play the keyboard.<br />
Did you hear sound? Now read the next page, and select and play other sounds (patches).<br />
What is a “Patch”?<br />
The <strong>GAIA</strong> <strong>SH</strong>-<strong>01</strong> lets you save the sounds you create.<br />
Each sound you save is called a “patch.”<br />
You can think of the locations that store the patches as being like shelves.<br />
You’ll select the desired patch by GROUP, BANK, and NUMBER.<br />
Internal Memory USB Memory (sold separately)<br />
PRESET GROUP<br />
Non-rewritable 64 patches<br />
USER GROUP<br />
Rewritable 64 patches<br />
You can use these patches to store the original sounds you’ve created.<br />
Select Other Patches!<br />
A sound you’ve saved can be easily recalled simply by pressing a button.<br />
Go ahead and try out each patch to get an idea of what kind of sounds the <strong>GAIA</strong> <strong>SH</strong>-<strong>01</strong> can produce.<br />
Select a GROUP<br />
PRESET PATCH<br />
USER PATCH<br />
USB MEMORY PATCH<br />
A NOTE OF<br />
ADVICE<br />
Select a BANK<br />
Press the [BANK]<br />
and then press one<br />
of the [1]–[8] buttons<br />
USB MEMORY<br />
Rewritable 64 patches<br />
Select a NUMBER<br />
Press one of the [1]–[8] buttons<br />
How to Think About <strong>Sound</strong> Programming<br />
As you take a closer look at the factory-set patches (preset patches),<br />
you’ll notice all sorts of clever tricks that were used to create the sounds.<br />
Remember these tricks, and use them to create new sounds from scratch.<br />
As you create your own sounds by modifying the preset patches, you’ll<br />
learn various ways in which the sound can be changed.<br />
4 5
STEP<br />
2<br />
Create a <strong>Sound</strong>!<br />
Create a Bass <strong>Sound</strong><br />
1. Call up the “PRESET B-1” patch.<br />
Press the [PRESET<br />
PATCH] button<br />
Press the [BANK] button and<br />
then press the [2] (B) button<br />
2. Press the [KEY HOLD] button so it’s blinking.<br />
3. Press the second C key from the bottom.<br />
You’ll hear an arpeggiated techno bass.<br />
4. Turn the FILTER [RESONANCE] knob to the<br />
maximum position.<br />
5. Slowly turn the FILTER [CUTOFF] knob from<br />
the maximum position down to the minimum.<br />
It’s effective to make this change in sync with the tempo.<br />
6. Set the [RESONANCE] knob at 10 o’clock, and<br />
the [CUTOFF] knob at 12 o’clock.<br />
7. In sync with the tempo, raise the LFO [FILTER DEPTH]<br />
slider, and then bring it back to the center.<br />
For the LFO DEPTH, the center is 0.<br />
A NOTE OF<br />
ADVICE<br />
Press the [1] button<br />
Use the [CUTOFF] Knob to Fatten the <strong>Sound</strong>!<br />
Moving the [CUTOFF] knob will make the sound fatter or brighter. Once you’ve<br />
familiarized yourself with its function, try moving the [CUTOFF] knob between<br />
10 o’clock and one o’clock while you raise and lower the LFO [FILTER DEPTH]<br />
slider. It’s effective to do this in sync with the tempo.<br />
Let’s try playing an arpeggiated synth bass sound.<br />
Turn the filter knob to make the sound change.<br />
How Do I Stop the <strong>Sound</strong>?<br />
Press the [KEY HOLD] button to stop the sound.<br />
Add More Low End!<br />
Turn on the [TONE 3] button, and play the keyboard.<br />
Layering three tones produces an even fatter sound.<br />
Save The Patch You’ve Created<br />
The <strong>GAIA</strong> <strong>SH</strong>-<strong>01</strong> has internal memory in which you can store 64 patches<br />
that you’ve created.<br />
By using USB memory (sold separately), you’ll be able to store 64 more<br />
patches.<br />
To save your patch, press the [WRITE] button and then select the save-destination patch number; finally press<br />
the [WRITE] button once again.<br />
Select the GROUP<br />
USER PATCH<br />
USB MEMORY PATCH<br />
A NOTE OF<br />
ADVICE<br />
Press the [WRITE] button<br />
Select a BANK<br />
Press the [BANK]<br />
and then press one<br />
of the [1]–[8] buttons<br />
Layer Tones to Create Fat <strong>Sound</strong>s!<br />
The <strong>GAIA</strong> <strong>SH</strong>-<strong>01</strong> lets you layer three tones together,<br />
allowing you to create incredibly fat sounds. Use the<br />
TONE buttons to turn each tone on/off.<br />
Select a NUMBER<br />
Press one of the [1]–[8]<br />
buttons<br />
6 7
STEP<br />
3<br />
Create a Pad <strong>Sound</strong><br />
1. Call up the “PRESET A-3” patch.<br />
Press the [PRESET<br />
PATCH] button<br />
Press the [BANK] button and<br />
then press the [1] (A) button<br />
2. Press the [KEY HOLD] button so it’s blinking.<br />
3. Simultaneously press the TONE 1 and TONE 2<br />
[SELECT] buttons so they’re lit.<br />
You can use the [SELECT] buttons to select the tone that you want<br />
to edit.<br />
4. Play a chord.<br />
5. While playing a chord, set the AMP [ATTACK]<br />
slider in the range of about 2–5.<br />
The attack sound will become more gentle.<br />
While you play, adjust the slider to get the desired attack.<br />
6. Next, try pressing the TONE 3 [SELECT] button<br />
and adjusting the sound of TONE 3.<br />
7. Raise the FILTER [ENV DEPTH] slider from<br />
the center position to 2. The soft sound will<br />
become brighter.<br />
8. Set the FILTER [ATTACK] slider to 6. Now the<br />
sound of TONE 3 will slowly become brighter<br />
after you play the key.<br />
Press the [3] button<br />
Here we’ll try playing a polyphonic pad sound. This is a synth pad that combines an<br />
attack sound with a softer sound.<br />
9. Lower the FILTER [ENV DEPTH] slider<br />
downward from the center. The sound of TONE<br />
3 will disappear.<br />
For additional expressive possibilities, you can move the FILTER<br />
[ENV DEPTH] slider while you play.<br />
Turn off the [KEY HOLD] button, and raise<br />
the TONE 3 AMP [R] (RELEASE) slider to the<br />
maximum position.<br />
The time over which the sound of TONE 3 disappears will<br />
lengthen.<br />
You can change how the sound varies over time by adjusting the<br />
ADSR, so you may want to adjust these settings until you get the<br />
sound you like.<br />
Save the Patch You’ve Created<br />
To save your patch, press the [WRITE] button, then select the save-destination patch number, and finally press<br />
the [WRITE] button once again.<br />
A NOTE OF<br />
ADVICE<br />
Press the [WRITE] button<br />
Adjust the Envelope!<br />
For example, if you want to create a gradual attack, such as for strings, try<br />
raising the [A] slider. If you want the sound to linger for a while after you take<br />
your hand off the keyboard, raise the [R] slider.<br />
The sound’s attack and decay are created in the ENV (envelope generator) section.<br />
Raise or lower the [A] [D] [S] [R] sliders, and notice how they affect the sound.<br />
Release the key<br />
8 9<br />
Volume<br />
Play a key A D<br />
S<br />
R<br />
Time<br />
Symbol Name Volume change<br />
A Attack time Duration of the attack<br />
D Decay time Duration of the decay<br />
S Sustain level Level while sustained<br />
R Release time Duration of the release
STEP STEP<br />
Create A Distorted Guitar<br />
4 Create a Wind <strong>Sound</strong> 5 <strong>Sound</strong><br />
Let’s try playing a wind sound that was created using noise. Noise allows you to produce this type of sound.<br />
We’ll try controlling the character of the wind while listening to it.<br />
1. Turn the FILTER [CUTOFF] knob all the way to<br />
the left.<br />
2. Call up the “PRESET A-8” patch.<br />
Press the [PRESET<br />
PATCH] button<br />
Press the [BANK] button and<br />
then press the [1] (A) button<br />
3. Press the [KEY HOLD] button so it’s blinking.<br />
4. Press and hold any key. The wind will start<br />
blowing.<br />
The sound of trickling water will also begin.<br />
5. While holding down the key to make the wind<br />
continue blowing, turn the FILTER [CUTOFF]<br />
knob toward the right, and move it between<br />
the 10 o’clock and 1 o’clock positions.<br />
This lets you control the character of the wind.<br />
A NOTE OF<br />
ADVICE<br />
Use Cutoff to Control the Character of the Wind<br />
As you turn the [CUTOFF] knob<br />
toward the left, the sound will<br />
become more muffled. When the<br />
knob is turned all the way toward<br />
the left, the sound will be nearly<br />
inaudible. This is because most of the<br />
frequency range is not being allowed<br />
to pass.<br />
Press the [8] button<br />
Level<br />
Overtones<br />
being cut<br />
Frequency<br />
The <strong>GAIA</strong> <strong>SH</strong>-<strong>01</strong> contains a powerful effects section that lets you use five effects simultaneously.<br />
Let’s try creating the sound of a distorted guitar.<br />
1. Call up the “PRESET A-6” patch.<br />
Press the [PRESET<br />
PATCH] button<br />
Press the [BANK] button and<br />
then press the [1] (A) button<br />
2. Press the [KEY HOLD] button to turn off its<br />
illumination.<br />
3. First, let’s listen to the undistorted sound.<br />
Press the EFFECTS [DIST] button so its light is off, and play the<br />
keyboard.<br />
You’ll hear the undistorted sound.<br />
4. Press the EFFECTS [DIST] button so it’s lit, and<br />
play the keyboard again.<br />
Play two-fingered chords to simulate the performance of a rock<br />
guitarist.<br />
If you hold a note for a while, you’ll hear the feedback that’s<br />
typical of a guitar amp played at high volume.<br />
A NOTE OF<br />
ADVICE<br />
<strong>GAIA</strong>’s Amazing Effects!<br />
Press the [6] button<br />
Press the [DIST] button<br />
so its light goes out<br />
The <strong>GAIA</strong> <strong>SH</strong>-<strong>01</strong> contains five effects processors: distortion (DIST), modulation<br />
(FLANGER), delay (DELAY), reverb (REVERB), and low boost (LOW<br />
BOOST). Using the DIST or FUZZ effects located in the leftmost column will<br />
distort the sound, making it more aggressive. DELAY and REVERB let you<br />
create lush, spacious sounds. Go ahead and try out various effects to hear<br />
what they do.<br />
10 11
APPENDIX<br />
Examples of <strong>Creating</strong> <strong>Sound</strong>s<br />
Synth Bass (PRESET PATCH: H-1)<br />
2 3 7<br />
6 1 5 4 4 9<br />
1 Press the [CANCEL/<strong>SH</strong>IFT] button and [WRITE] button to recall the initialized sound.<br />
The sawtooth wave is selected. Press the [VARIATION] button to light the [WAVE] button into red.<br />
2 Since the bass usually sounds in the lower registers, turn the [PITCH] knob to the left so the sound is<br />
lowered by an octave.<br />
3 Set the FILTER [CUTOFF] knob between 8 and 9 o’clock.<br />
The sound will diminish.<br />
4 Next, you need to specify the character of the sound’s sustained portion. Set the FILTER ENV [ENV<br />
DEPTH] slider to the 60% position. Set the FILTER ENV [S] slider to the 65% position. The sound will<br />
be somewhat muted.<br />
5 Now you’re ready to create the attack. Set the FILTER ENV [D] slider to the 35% position. The attack<br />
will be softened.<br />
6 To simulate the effect of keeping a finger on the string and sliding to a different fret,<br />
press the [MONO] button so it’s lit.<br />
7 Set the [RESONANCE] knob to the 11 o’clock position, giving the sound a distinctive character.<br />
8 Set the AMP ENV [S] slider to the maximum position, and set the [A] [D] [R] sliders to the minimum<br />
position.<br />
9 Make fine adjustments to the FILTER ENV [ENV DEPTH] slider to determine the overall tonal<br />
character.<br />
This synth bass is similar to the sound in chapter 2 “Recall and Edit Presets”, chapter 5 “How to Make<br />
a <strong>Sound</strong>” of the DVD.<br />
8<br />
Synth Lead (PRESET PATCH: H-7)<br />
12 13<br />
9<br />
2<br />
1<br />
7 3<br />
5<br />
4 8 11<br />
1 Press the [CANCEL/<strong>SH</strong>IFT] button and [WRITE] button to recall the initialized sound.<br />
The sawtooth wave is selected. Press the [VARIATION] button to light the [WAVE] button into<br />
red.<br />
2 Turn the [PITCH] knob to the right so the sound is raised by an octave.<br />
3 Set the FILTER [CUTOFF] knob to the 2 o’clock position.<br />
4 Set the FILTER [RESONANCE] knob to the 8 o’clock position.<br />
5 Now you’re ready to create the attack.<br />
Set the FILTER ENV [A] [D] [S] [R] sliders all to the lowest position.<br />
6 Next, you need to determine the overall tonal character.<br />
Slightly raise the FILTER ENV [ENV DEPTH] slider.<br />
7 Press the FILTER [SLOPE] button to select -24 dB.<br />
The sound will become a bit softer.<br />
8 Set the AMP ENV [S] slider to the maximum position, and set the [A] [D] [R] sliders<br />
to the minimum position.<br />
9 To get a more appropriate lead feeling, press the [MONO] button so it’s lit.<br />
With this setting, the patch will play only single notes, and if you press a key while still holding<br />
the previous key, the sound will change smoothly to the new pitch.<br />
10 Press the [REVERB] button so it’s lit.<br />
11 Turn the [CONTROL 1] knob to add reverberation to the lead sound.<br />
This synth lead is similar to the sound in chapter 2 “Recall and Edit Presets” of the DVD.<br />
6<br />
10
APPENDIX<br />
Examples of <strong>Creating</strong> <strong>Sound</strong>s<br />
Synth Pad (PRESET PATCH: H-2)<br />
2 3<br />
1<br />
4<br />
5<br />
6<br />
7 8 9 11<br />
10 12<br />
1 Press the [CANCEL/<strong>SH</strong>IFT] button and [WRITE] button to recall the initialized sound.<br />
The sawtooth wave is selected.<br />
2 Press the OSC [WAVE] button to select SUPER SAW. Press the [VARIATION] button to light the [WAVE]<br />
button into red.<br />
3 Set the FILTER [CUTOFF] knob to the 1 o’clock position.<br />
The sound will become a bit darker.<br />
4 Now you’re ready to specify the overall character of the sound. Set the FILTER ENV [A] slider to 55%,<br />
the [D] slider to 70%, the [S] slider to 25%, and the [R] slider to 10%.<br />
5 Raise the FILTER ENV [ENV DEPTH] slider from 0 to the second mark to specify the overall character.<br />
6 Turn the AMP [LEVEL] knob all the way to the right (MAX).<br />
7 Set the AMP ENV [A] slider to the 20% position.<br />
The attack will become slower.<br />
8 Raise the AMP ENV [R] slider to about the middle position.<br />
Now the sound will linger for a while even after you take your finger off the key.<br />
9 Press the [PANNING DELAY] button so it’s lit.<br />
10 Set the EFFECTS [CONTROL 1] knob to the 10 o’clock position to add a sense of spaciousness.<br />
11 Press the [REVERB] button so it’s lit.<br />
12 Set the EFFECTS [CONTROL 1] knob to the 1 o’clock position to add reverberation.<br />
This synth pad is similar to the sound in chapter 5 “How to Make a <strong>Sound</strong>” of the DVD.<br />
<strong>Sound</strong> Effect (PRESET PATCH: H-5)<br />
2 3<br />
14 15<br />
1<br />
4<br />
5 6 7<br />
8 10<br />
Here’s how to create a sound effect that might be appropriate<br />
for a spaceship taking off.<br />
9 11<br />
* These settings may produce a sudden, loud sound. Turn the knobs slowly to avoid damaging your hearing<br />
or your speakers.<br />
1 Press the [CANCEL/<strong>SH</strong>IFT] button and [WRITE] button to recall the initialized sound.<br />
The sawtooth wave is selected.<br />
2 Press the OSC [WAVE] button to select NOISE.<br />
3 Turn the FILTER [CUTOFF] knob all the way to the left (MIN).<br />
You will no longer hear sound.<br />
4 Set the FILTER [RESONANCE] knob to the 9 o’clock position.<br />
5 Set the FILTER ENV [A] slider to 50%, the [D] slider to 65%, and the [R] slider to 60%.<br />
Lower the [S] slider all the way to the bottom.<br />
6 Slowly raise the FILTER ENV [ENV DEPTH] slider to the maximum position.<br />
7 Set the AMP ENV [A] slider to 55%, the [D] slider to 65%, and the [R] slider to 70%.<br />
Lower the [S] slider all the way to the bottom.<br />
8 Press the [PANNING DELAY] button so it’s lit.<br />
9 Set the EFFECTS [CONTROL 1] knob to the 11 o’clock position to add some spaciousness.<br />
10 Press the [REVERB] button so it’s lit.<br />
11 Set the EFFECTS [CONTROL 1] knob to the 12 o’clock position to add reverb.<br />
This sound effect is similar to the sound in chapter 5 “How to Make a <strong>Sound</strong>” of the DVD.
Experience the magic of creating your own sounds.<br />
For more than a quarter century, <strong>Roland</strong> has defined and redefined the state of the art in<br />
synthesizers.<br />
Today, the fundamentals for sound creation remain the same for most synthesizers.<br />
By understanding the fundamentals, anyone can enjoy creating sound for virtually any<br />
type of synthesizer.<br />
<strong>Roland</strong> Synthesizer History<br />
1973<br />
<strong>SH</strong>-1000<br />
1978<br />
1979<br />
<strong>SH</strong>-1<br />
<strong>SH</strong>-2<br />
1981<br />
1982<br />
JUPITER-8<br />
JUNO-60<br />
1987<br />
D-50<br />
1996<br />
1991<br />
JP-8000<br />
JD-800<br />
2003<br />
V-Synth<br />
V-Synth GT<br />
1982 <strong>SH</strong>-1<strong>01</strong><br />
2006 <strong>SH</strong>-2<strong>01</strong><br />
Copyright © 2<strong>01</strong>0 ROLAND CORPORATION<br />
All rights reserved. No part of this publication may be reproduced in any<br />
form without the written permission of ROLAND CORPORATION.<br />
<strong>Roland</strong> and <strong>GAIA</strong> are either registered trademarks or trademarks of <strong>Roland</strong><br />
Corporation in the United States and/or other countries.<br />
2007<br />
2008<br />
Fantom-G<br />
* 5 1 0 0 0 1 1 7 3 0 - 0 3 *<br />
RAM-4520