Tux the Linux Penguin - Codigo-Linux
Tux the Linux Penguin - Codigo-Linux
Tux the Linux Penguin - Codigo-Linux

You also want an ePaper? Increase the reach of your titles
YUMPU automatically turns print PDFs into web optimized ePapers that Google loves.
30<br />
31<br />
32<br />
36<br />
37<br />
38<br />
39<br />
33<br />
34<br />
35<br />
40<br />
41<br />
42<br />
43<br />
44<br />
46<br />
47<br />
48<br />
49<br />
50<br />
56<br />
45<br />
51<br />
52<br />
53<br />
54<br />
55<br />
57<br />
1<br />
2<br />
4<br />
5<br />
6<br />
7<br />
8<br />
9<br />
10<br />
11<br />
13<br />
14<br />
3<br />
58<br />
59<br />
60<br />
61<br />
62<br />
63<br />
64<br />
12<br />
21<br />
22<br />
23<br />
24<br />
25<br />
26<br />
27<br />
28<br />
29<br />
68<br />
65<br />
67<br />
66<br />
69<br />
70<br />
71<br />
16<br />
15<br />
17<br />
18<br />
19<br />
20
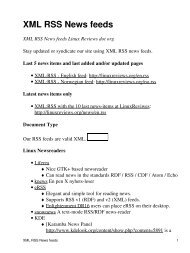
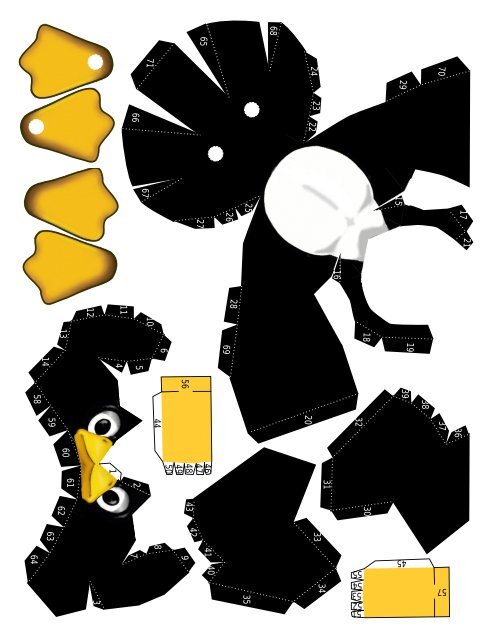
Assemble <strong>the</strong> head (tabs 1-13), bending <strong>the</strong> paper so <strong>the</strong><br />
tabs line up with <strong>the</strong> corresponding tab-less region.<br />
Glue all tabs in <strong>the</strong> number <strong>the</strong>y are ordered. Some<br />
tabs may be glued at <strong>the</strong> same time.<br />
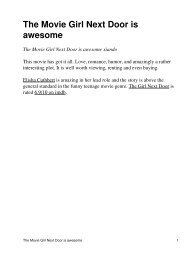
4<br />
Flatten <strong>the</strong> joint tabs against <strong>the</strong> inside of <strong>the</strong> body<br />
to secure <strong>the</strong> wings.<br />
Seal up <strong>the</strong><br />
body by gluing<br />
<strong>the</strong> remaining<br />
tabs (65-71).<br />
1<br />
Apply glue to <strong>the</strong> wings' joint<br />
tabs and squeeze <strong>the</strong>m<br />
through <strong>the</strong> wing<br />
holes at <strong>the</strong><br />
same time.<br />
Apply glue to <strong>the</strong> leg joint tabs (56 &<br />
57) and insert <strong>the</strong>m into <strong>the</strong><br />
body's leg holes.<br />
Flatten <strong>the</strong> tabs<br />
against <strong>the</strong> inside of<br />
<strong>the</strong> body, making<br />
sure <strong>the</strong> feet will point in a nice direction.<br />
9<br />
Assemble <strong>the</strong> body (tabs<br />
15-29), following <strong>the</strong><br />
numbers.<br />
7<br />
A toothpick can be used to<br />
apply pressure to <strong>the</strong> last few<br />
tabs until <strong>the</strong> glue holds.<br />
2<br />
Make sure your assembly leaves holes<br />
for <strong>the</strong> wings.<br />
5<br />
Build <strong>the</strong> legs by rolling<br />
<strong>the</strong>m into cylinders and<br />
gluing <strong>the</strong>ir tab.<br />
Asslembe<br />
<strong>the</strong> wings (tabs<br />
30-35), following <strong>the</strong><br />
numbered tabs.<br />
Insert <strong>the</strong> leg tabs (46-55) through <strong>the</strong><br />
foot holes. Fold <strong>the</strong> tabs flat against <strong>the</strong><br />
undersides of <strong>the</strong> feet.<br />
Apply glue to <strong>the</strong> undersides of <strong>the</strong> feet<br />
and attach <strong>the</strong> foot bottoms.<br />
Apply glue to <strong>the</strong> head joint tabs<br />
(58-64) and insert <strong>the</strong>m into <strong>the</strong><br />
neck hole.<br />
Flatten <strong>the</strong> tabs agains <strong>the</strong><br />
inside of <strong>the</strong> body.<br />
10<br />
8<br />
3<br />
Keep your penguin out<br />
of direct sunlight as<br />
<strong>the</strong>y're used to <strong>the</strong> cold<br />
Antarctic days.<br />
6