You also want an ePaper? Increase the reach of your titles
YUMPU automatically turns print PDFs into web optimized ePapers that Google loves.
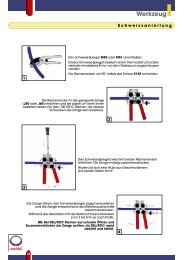
1<br />
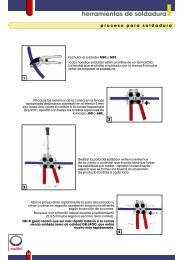
Insert the ends of the belt into the appropriate clamp<br />
(J50 or J60), allowing 5 mm of each end to protrude<br />
into the inside (If the belt to weld is a DEL/ROC, strongly<br />
tighten the top screws of the clamp).<br />
3<br />
36<br />
<strong>welding</strong> <strong>tools</strong><br />
w e l d i n g p r o c e s s<br />
Plug the M50 or M51 <strong>welding</strong> iron in.<br />
As our <strong>welding</strong> iron includes a thermostat, you should plug<br />
the iron in at least 8 minutes before <strong>welding</strong>.<br />
Cut both ends of the belt, in a sharp 90° angle, with S135<br />
graduated cutter.<br />
Open the clamp,quickly remove the <strong>welding</strong> iron and re-close<br />
at once, tightening accordingly to the cross section of the belt<br />
(the bigger the belt, the more tightened the clamp).<br />
Maintain the clamp close using the side screw and let the belt<br />
cool (which should take between 2 and 5 minutes, depending<br />
on the size of the belt).<br />
If you do weld a DEL/ROC belt, this step will have to be<br />
handled even faster.<br />
2<br />
Slide the blade in between both ends of the belt and<br />
make sure that the blade bears on the whole surface<br />
to weld.<br />
Tighten slightly and leave the ends melt.<br />
Wait until you get a good bead of melted material<br />
on each side.<br />
4
a n d V b e l t s<br />
5<br />
37<br />
<strong>welding</strong> <strong>tools</strong><br />
Clean the <strong>welding</strong> point.<br />
Check the alignment of the <strong>welding</strong> point out, as well as its<br />
homogeneity (no bubble of air) and solidity (by bending it).<br />
Fit the belt on the machine.<br />
NB: Always use a clean and very hot <strong>welding</strong> iron.<br />
Both ends of the belt to weld should be perfectly clean as well.<br />
CLEAN THE BLADE OF THE WELDING IRON IMMEDIATELY.<br />
M51 <strong>welding</strong> iron :<br />
Wipe the blade with a clean 100% cotton cloth.<br />
Fer M50 :<br />
Remove most of the melted material with the blade of a knife (without scraping the iron),<br />
and wipe the rest out with a clean 100% cotton cloth.<br />
Do not use any cloth that may contain synthetic materials, which would melt in<br />
contact with the blade of the <strong>welding</strong> iron, and then contaminate the <strong>welding</strong> iron.<br />
For V belts only :<br />
If you use a J25 <strong>welding</strong> clamp, cut both ends of the belt with a 45° angle,<br />
using our S135 cutter.<br />
Insert the ends of the belt into the J25 clamp, allowing 5 mm of each end<br />
to protrude into the inside .<br />
The two dies of our J25 <strong>welding</strong> are not in the same horizontal line<br />
(1 mm difference for small belts, 2 mm for bigger belts), to compensate<br />
for the slippage of the belts' ends due to melting when brought together<br />
for <strong>welding</strong>. The exerted pressure on the handles during the melting will<br />
bring both ends back in the same alignment.