

SPLIT-TYPE AIR CONDITIONERS - Air Tech
SPLIT-TYPE AIR CONDITIONERS - Air Tech
SPLIT-TYPE AIR CONDITIONERS - Air Tech

You also want an ePaper? Increase the reach of your titles
YUMPU automatically turns print PDFs into web optimized ePapers that Google loves.
● OPERATING INSTRUCTIONS ●<br />
<strong>Air</strong> outlet<br />
Before operation: Insert the power supply plug into the power outlet and/or turn the breaker on.<br />
• Make sure the polarity of the batteries is correct.<br />
• Do not use manganese batteries. The remote controller could malfunction.<br />
• Do not use rechargeable batteries.<br />
• Replace all batteries with new ones of the same type.<br />
• Batteries can be used for approximately 1 year. However, batteries with<br />
expired shelf lives last shorter.<br />
• Press RESET gently using a thin instrument.<br />
If the RESET button is not pressed, the remote controller may not operate<br />
correctly.<br />
En-3<br />
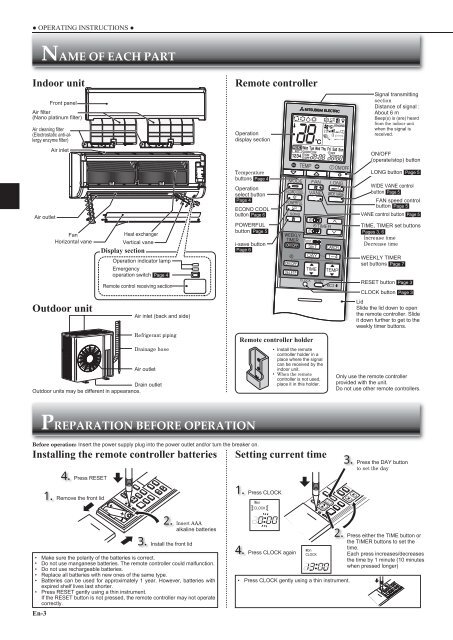
NAME OF EACH PART<br />
Indoor unit Remote controller<br />
Front panel<br />
<strong>Air</strong> fi lter<br />
(Nano platinum fi lter)<br />
<strong>Air</strong> cleaning fi lter<br />
(Electrostatic anti-allergy<br />
enzyme fi lter)<br />
<strong>Air</strong> inlet<br />
Fan<br />
Heat exchanger<br />
Horizontal vane Vertical vane<br />
Display section<br />
Outdoor unit<br />
Operation indicator lamp<br />
Emergency<br />
operation switch Page 4<br />
Remote control receiving section<br />
<strong>Air</strong> inlet (back and side)<br />
Refrigerant piping<br />
Drainage hose<br />
<strong>Air</strong> outlet<br />
Drain outlet<br />
Outdoor units may be different in appearance.<br />
PREPARATION BEFORE OPERATION<br />
Installing the remote controller batteries Setting current time<br />
4. Press RESET<br />
1. Remove the front lid<br />
2. Insert AAA<br />
alkaline batteries<br />
3. Install the front lid<br />
Operation<br />
display section<br />
Temperature<br />
buttons Page 4<br />
Operation<br />
select button<br />
Page 4<br />
ECONO COOL<br />
button Page 6<br />
POWERFUL<br />
button Page 5<br />
i-save button<br />
Page 6<br />
Remote controller holder<br />
1. Press CLOCK<br />
4. Press CLOCK again<br />
• Install the remote<br />
controller holder in a<br />
place where the signal<br />
can be received by the<br />
indoor unit.<br />
• When the remote<br />
controller is not used,<br />
place it in this holder.<br />
• Press CLOCK gently using a thin instrument.<br />
Signal transmitting<br />
section<br />
Distance of signal :<br />
About 6 m<br />
Beep(s) is (are) heard<br />
from the indoor unit<br />
when the signal is<br />
received.<br />
ON/OFF<br />
(operate/stop) button<br />
LONG button Page 5<br />
WIDE VANE control<br />
button Page 5<br />
FAN speed control<br />
button Page 5<br />
VANE control button Page 5<br />
TIME, TIMER set buttons<br />
Pages 3, 6<br />
Increase time<br />
Decrease time<br />
WEEKLY TIMER<br />
set buttons Page 7<br />
RESET button Page 3<br />
CLOCK button Page 3<br />
Lid<br />
Slide the lid down to open<br />
the remote controller. Slide<br />
it down further to get to the<br />
weekly timer buttons.<br />
Only use the remote controller<br />
provided with the unit.<br />
Do not use other remote controllers.<br />
3. Press the DAY button<br />
to set the day<br />
2. Press either the TIME button or<br />
the TIMER buttons to set the<br />
time.<br />
Each press increases/decreases<br />
the time by 1 minute (10 minutes<br />
when pressed longer)


