SPEEDBEAD Installation Instructions - OpticsPlanet.com
SPEEDBEAD Installation Instructions - OpticsPlanet.com
SPEEDBEAD Installation Instructions - OpticsPlanet.com

Create successful ePaper yourself
Turn your PDF publications into a flip-book with our unique Google optimized e-Paper software.
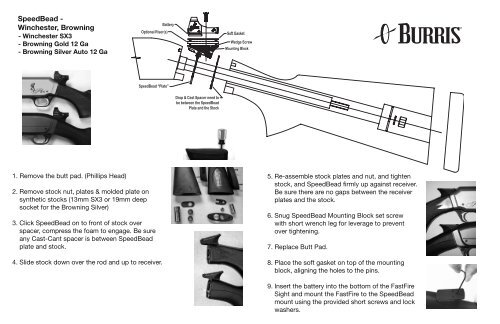
SpeedBead -<br />
Winchester, Browning<br />
- Winchester SX3<br />
- Browning Gold 12 Ga<br />
- Browning Silver Auto 12 Ga<br />
1. Remove the butt pad. (Phillips Head)<br />
2. Remove stock nut, plates & molded plate on<br />
synthetic stocks (13mm SX3 or 19mm deep<br />
socket for the Browning Silver)<br />
3. Click SpeedBead on to front of stock over<br />
spacer, <strong>com</strong>press the foam to engage. Be sure<br />
any Cast-Cant spacer is between SpeedBead<br />
plate and stock.<br />
4. Slide stock down over the rod and up to receiver.<br />
5. Re-assemble stock plates and nut, and tighten<br />
stock, and SpeedBead firmly up against receiver.<br />
Be sure there are no gaps between the receiver<br />
plates and the stock.<br />
6. Snug SpeedBead Mounting Block set screw<br />
with short wrench leg for leverage to prevent<br />
over tightening.<br />
7. Replace Butt Pad.<br />
8. Place the soft gasket on top of the mounting<br />
block, aligning the holes to the pins.<br />
9. Insert the battery into the bottom of the FastFire<br />
Sight and mount the FastFire to the SpeedBead<br />
mount using the provided short screws and lock<br />
washers.