GF7050V-M7 SE BIOS Manual - TigerDirect.com
GF7050V-M7 SE BIOS Manual - TigerDirect.com
GF7050V-M7 SE BIOS Manual - TigerDirect.com

Create successful ePaper yourself
Turn your PDF publications into a flip-book with our unique Google optimized e-Paper software.
<strong>GF7050V</strong>-<strong>M7</strong> <strong>SE</strong> <strong>BIOS</strong> <strong>Manual</strong><br />
<strong>BIOS</strong> Setup.................................................................................................1<br />
1 Main Menu...............................................................................................3<br />
2 Advanced Menu.......................................................................................7<br />
3 PCIPnP Menu........................................................................................19<br />
4 Boot Menu..............................................................................................23<br />
5 Chipset Menu.........................................................................................26<br />
6 Performance Menu...............................................................................30<br />
7 Exit Menu...............................................................................................33<br />
i
<strong>GF7050V</strong>-<strong>M7</strong> <strong>SE</strong> <strong>BIOS</strong> <strong>Manual</strong><br />
<strong>BIOS</strong> Setup<br />
Introduction<br />
The purpose of this manual is to describe the settings in the AMI <strong>BIOS</strong> Setup<br />
program on this motherboard. The Setup program allows users to modify the basic<br />
system configuration and save these settings to CMOS RAM. The power of CMOS<br />
RAM is supplied by a battery so that it retains the Setup information when the power<br />
is turned off.<br />
Basic Input-Output System (<strong>BIOS</strong>) determines what a <strong>com</strong>puter can do without<br />
accessing programs from a disk. This system controls most of the input and output<br />
devices such as keyboard, mouse, serial ports and disk drives. <strong>BIOS</strong> activates at the<br />
first stage of the booting process, loading and executing the operating system. Some<br />
additional features, such as virus and password protection or chipset fine-tuning<br />
options are also included in <strong>BIOS</strong>.<br />
The rest of this manual will to guide you through the options and settings in <strong>BIOS</strong><br />
Setup.<br />
Plug and Pla y Support<br />
This AMI <strong>BIOS</strong> supports the Plug and Play Version 1.0A specification.<br />
EPA Green PC Support<br />
This AMI <strong>BIOS</strong> supports Version 1.03 of the EPA Green PC specification.<br />
APM Support<br />
This AMI <strong>BIOS</strong> supports Version 1.1&1.2 of the Advanced Power Management<br />
(APM) speci fication. Power management features are implemented via the System<br />
Management Interrupt (SMI). Sleep and Suspend power management modes are<br />
supported. Power to the hard disk drives and video monitors can also be managed by<br />
this AMI <strong>BIOS</strong>.<br />
ACPI Support<br />
AMI ACPI <strong>BIOS</strong> support Version 1.0b of Advanced Configuration and Power<br />
interface specification (ACPI). It provides ASL code for power management and<br />
device configuration capabilities as defined in the ACPI specification, developed by<br />
Microsoft, Intel and Toshiba.<br />
1
<strong>GF7050V</strong>-<strong>M7</strong> <strong>SE</strong> <strong>BIOS</strong> <strong>Manual</strong><br />
PCI Bus Support<br />
This AMI <strong>BIOS</strong> also supports Version 2.3 of the Intel PCI (Peripheral Component<br />
Interconn ect) local bus speci fication.<br />
DRAM Support<br />
DDR2 SDRAM (Double Data Rate II Synchronous DRAM) is supported.<br />
Supported CPUs<br />
This AMI <strong>BIOS</strong> supports the Intel CPU.<br />
Using Setup<br />
When starting up the <strong>com</strong>puter, press<br />
during the Power-On Self-Test<br />
(POST) to enter the <strong>BIOS</strong> setup utility.<br />
In the <strong>BIOS</strong> setup utility, you will see<br />
General Help description at the top right<br />
corner, and this is providing a brief<br />
description of the selected item.<br />
Navigation Keys for that particular menu<br />
are at the bottom right corner, and you can<br />
use these keys to select item and ch ange<br />
the settings.<br />
Notice<br />
The default <strong>BIOS</strong> settings apply for most conditions to ensure optimum performance<br />
of the motherboard. If the system be<strong>com</strong>es unstable after changing any settings,<br />
please load the default settings to ensure system’s <strong>com</strong>patibility and stability. Use<br />
Load Setup Default under the Exit Menu.<br />
For better system perform ance, the <strong>BIOS</strong> firmware is being continuously updated.<br />
The <strong>BIOS</strong> information described in this manual is for your reference only. The actual<br />
<strong>BIOS</strong> information and settings on board may be slightly different from this manual.<br />
The content of this manual is subject to be changed without notice. We will not be<br />
responsible for any mistakes found in this user’s manual and any system damage that<br />
may be caused by wrong-settings.<br />
2<br />
General Help<br />
Navigation Keys
<strong>GF7050V</strong>-<strong>M7</strong> <strong>SE</strong> <strong>BIOS</strong> <strong>Manual</strong><br />
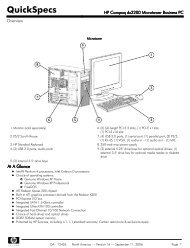
1 Main Menu<br />
Once you enter AMI <strong>BIOS</strong> Setup Utility, the Main Menu will appear on the screen<br />
providing an overview of the basic system inform ation.<br />
<strong>BIOS</strong> <strong>SE</strong>TU P U TILITY<br />
Main Advan ced PCIPnP Boot Chipset Performance<br />
System Overvie w<br />
AMI <strong>BIOS</strong><br />
Version :01. 01.01<br />
Build Date:01/ 01/08<br />
System Memory<br />
Size :<br />
System Time [ 00:<br />
00:00]<br />
System Date [Tue 01/01/2008]<br />
Floppy A<br />
> IDE Configur ation<br />
AMI <strong>BIOS</strong><br />
vxx .xx (C)Copyright 1985-200x, American Me gatrends, Inc.<br />
3<br />
Use [ENTER], [TAB]<br />
or [SHIFT-TAB] to<br />
select a field.<br />
Use [+] or [-] to<br />
configure system Time.<br />
+-<br />
Tab<br />
F1<br />
F10<br />
ESC<br />
Shows system information including <strong>BIOS</strong> version, built date, etc.<br />
System Memory<br />
Shows system memory size, VGA shard memory will be excluded..<br />
System Time<br />
Set the system internal clock.<br />
System Date<br />
Exit<br />
S elect Screen<br />
S elect Item<br />
C hange Field<br />
S elect Field<br />
G eneral Help<br />
S ave and Exit<br />
Exit<br />
Set the system date. Note that the ‘Day’ automatically changes when you set the<br />
date.<br />
Floppy A<br />
Select the type of floppy disk drive installed in your system.<br />
Options: 360K, 5.25 in / 1.2M, 5.25 in / 720K, 3.5 in / 1.44M, 3.5 in /<br />
2.88M, 3.5 in / None
<strong>GF7050V</strong>-<strong>M7</strong> <strong>SE</strong> <strong>BIOS</strong> <strong>Manual</strong><br />
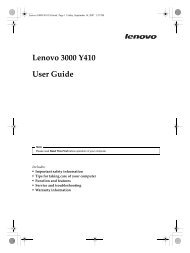
IDE Configuration<br />
T he <strong>BIOS</strong> will automatically detect the presence of IDE/SAT A devices. There is a<br />
sub-menu fo r each IDE/SAT A device. Select a device and press to enter<br />
the sub-menu of detailed options.<br />
Main<br />
IDE Confugurat ion<br />
<strong>BIOS</strong> <strong>SE</strong>TU P U TILITY<br />
OnChip P-ATA C ontroller [Ena bled]<br />
OnChip S-ATA C ontroller [Ena bled]<br />
SATA Mode Sele ct [SAT A Mode]<br />
Change the AHC I DID for Linux[Dis abled]<br />
> nVidia RAID Setup<br />
> Primary IDE Master<br />
> Primary IDE Slave<br />
> Serial-ATA P ri Master Channel<br />
> Serial-ATA P ri Slave Channel<br />
> Serial-ATA S ec Master Channel<br />
> Serial-ATA S ec Slave Channel<br />
Hard Disk Writ e Protect [Dis abled]<br />
IDE Detect Tim e Out (Sec) [35]<br />
ATA(PI) 80Pin Cable Detection[Hos t & Device]<br />
vxx .xx (C)Copyright 1985-200x, American Me gatrends, Inc.<br />
OnChip P-ATA Controller<br />
This item allows you to control the onboard IDE controller.<br />
Options: Enabled (Default) / Disabled<br />
OnChip S-ATA Controller<br />
This item allows you to control the onboard SATA controller.<br />
Options: Enabled (Default) / Disabled<br />
SATA Mode Select<br />
This item allows you to choose the SATA operation mode.<br />
Options: SATA Mode (Default) / RAID / AHCI / Linux AHCI<br />
Change the AHCI DID for Linux<br />
This item appears only when SATA mode is set to Linux AHCI.<br />
Options: Disabled (Default) / Enabled<br />
4<br />
DISABLED: disables the<br />
integrated IDE<br />
Controller.<br />
ENABLED: enables the<br />
integrated IDE<br />
Controller.<br />
S elect Screen<br />
S elect Item<br />
EnterG<br />
o to Sub Screen<br />
F1 G eneral Help<br />
F10 S ave and Exit<br />
ESC Exit
<strong>GF7050V</strong>-<strong>M7</strong> <strong>SE</strong> <strong>BIOS</strong> <strong>Manual</strong><br />
nVidia RAID Setup<br />
Main<br />
<strong>BIOS</strong> <strong>SE</strong>TU P U TILITY<br />
RAID Setup<br />
SATA Primary M aster Channel [Dis abled]<br />
SATA Primary S lave Channel [Dis abled]<br />
SATA Secondary Master Channel[Dis abled]<br />
SATA Secondary Slave Channel [Dis abled]<br />
vxx .xx (C)Copyright 1985-200x, American Me gatrends, Inc.<br />
SATA Primary/Secondary Master/Slave Channel<br />
These item allows you to set the NV RAID function.<br />
Options: Disabled (Default) / Enabled<br />
5<br />
Options<br />
Disabled<br />
Enabled<br />
+-<br />
F1<br />
F10<br />
ESC<br />
S elect Screen<br />
S elect Item<br />
C hange Option<br />
G eneral Help<br />
S ave and Exit<br />
Exit<br />
Primary IDE Master/Slave ; Serial-ATA Pri/Sec Master/Slave Channel<br />
Main<br />
Primary IDE Master<br />
Device :<br />
<strong>BIOS</strong> <strong>SE</strong>TUP UTILITY<br />
Type [Auto]<br />
LBA/Large Mode [Auto]<br />
Block (Multi-Sector Transfer)[Auto]<br />
PIO Mode [Auto]<br />
DMA Mode [Auto]<br />
S.M.A.R.T [Auto]<br />
32Bit Data Transfer [Enabled]<br />
Select the type<br />
of device connected<br />
to the system.<br />
+-<br />
F1<br />
F10<br />
ESC<br />
vxx.xx (C)Copyright 1985-200x, American Megatrends, Inc.<br />
Select Screen<br />
Select Item<br />
Change Option<br />
General Help<br />
Save and Exit<br />
Exit<br />
T he <strong>BIOS</strong> detects the information and values of resp ective devices, and these<br />
information and values are shown below to the name of the sub-menu.
<strong>GF7050V</strong>-<strong>M7</strong> <strong>SE</strong> <strong>BIOS</strong> <strong>Manual</strong><br />
Type<br />
Select the type of the IDE/SATA drive.<br />
Options: Auto (Default) / CDROM / ARMD / Not Installed<br />
LBA/Large Mode<br />
Enable or disable the LBA mode.<br />
Options: Auto (Default) / Disabled<br />
Block (Multi-Sector Transfer)<br />
Enable or disable multi-sector trans fer.<br />
Options: Auto (Default) / Disabled<br />
PIO Mode<br />
Select the PIO mode.<br />
Options: Auto (Default) / 0 / 1 / 2 / 3 / 4<br />
DMA Mode<br />
Select the DMA mode.<br />
Options: Auto (Default) / Disabled<br />
S.M.A.R.T<br />
Set the Smart Monitoring, Analysis, and Reporting Technology.<br />
Options: Auto (Default) / Disabled / Enabled<br />
32Bit Data Transfer<br />
Enable or disable 32-bit data transfer.<br />
Options: Enabled (Default) / Disabled<br />
Hard Disk Write Protect<br />
Disable or enable device write protection. This will be effective only if the device<br />
is accessed through <strong>BIOS</strong>.<br />
Options: Disabled (Default) / Enabled<br />
IDE Detect Time Out (Sec)<br />
Select the time out value for detecting IDE/SATA devices.<br />
Options: 35 (Default) / 30 / 25 / 20 / 15 / 10 / 5 / 0<br />
ATA(PI) 80Pin Cable Detection<br />
Options: Host & Device (Default)<br />
6
<strong>GF7050V</strong>-<strong>M7</strong> <strong>SE</strong> <strong>BIOS</strong> <strong>Manual</strong><br />
2 Advanced Menu<br />
The Advanced Menu allows you to configure the settings of CPU, Super I/O, Power<br />
Management, and other system devices.<br />
Notice<br />
Beware of that setting inappropriate values in items of this menu may cause<br />
system to malfunction.<br />
<strong>BIOS</strong> <strong>SE</strong>TU P U TILITY<br />
Main Advan ced PCIPnP Boot Chipset Performance<br />
Advanced Setti ngs<br />
WARNING: Setti ng wrong values in below sections<br />
may c ause system to malf unction.<br />
> CPU Configur ation<br />
> SuperIO Conf iguration<br />
> Hardware Hea lth Configuration<br />
> Smart Fan Co nfiguration<br />
> Power Config uration<br />
> USB Configur ation<br />
CPU Configuration<br />
vxx .xx (C)Copyright 1985-200x, American Me gatrends, Inc.<br />
7<br />
Exit<br />
Configure CPU.<br />
S elect Screen<br />
S elect Item<br />
EnterG<br />
o to Sub Screen<br />
F1 G eneral Help<br />
F10 S ave and Exit<br />
ESC Exit<br />
This item shows the CPU information that the <strong>BIOS</strong> automatically detects.<br />
<strong>BIOS</strong> <strong>SE</strong>TU P U TILITY<br />
Advan ced<br />
Configure adva nced CPU settings<br />
Module Version :3F.08<br />
Manufacturer:I ntel<br />
Frequency :<br />
FSB Speed :<br />
Cache L1 :<br />
Cache L2 :<br />
Ratio Actual V alue:<br />
Hardware Prefe tcher [En abled]<br />
Adjacent Cache Line Prefetch [En abled]<br />
Max CPUID Valu e Limit [Di sabled]<br />
Intel(R) Virtu alization Tech [En abled]<br />
Execute-Disabl e Bit Capability[En abled]<br />
Core Multi-Pro cessing [En abled]<br />
Intel(R) Speed Step(tm) tech [En abled]<br />
This should be enabled<br />
in order to enable or<br />
disable the Hardware<br />
Prefetcher Disable<br />
Feature.<br />
+-<br />
F1<br />
F10<br />
ESC<br />
vxx .xx (C)Copyright 1985-200x, American Me gatrends, Inc.<br />
S elect Screen<br />
S elect Item<br />
C hange Option<br />
G eneral Help<br />
S ave and Exit<br />
Exit
<strong>GF7050V</strong>-<strong>M7</strong> <strong>SE</strong> <strong>BIOS</strong> <strong>Manual</strong><br />
Hardware Prefetcher<br />
T he processor has a hardware prefetch er that automatically analy zes its requirements<br />
and prefetches dat a and instructions from the memory into the Level 2 cache that are<br />
likely to be required in the near future. This reduces the latency associated with<br />
memory reads.<br />
Options: Enabled (Default) / Disabled<br />
Adjacent Cache Line Prefetch<br />
T he processor has a h ardware adjacent cache line prefet ch mech anism that<br />
automatically fetches an extra 64-byte cache line whenev er the processo r requests for<br />
a 64-byte cache line. This reduces cache latency by making the next cache line<br />
immediately available if the processor requires it as well.<br />
Options: Enabled (Default) / Disabled<br />
Max CPUID Value Limit<br />
When the <strong>com</strong>puter is booted up, the operating system executes the CPUID<br />
instruction to identify the processor and its capabilities. Before it can do so, it must<br />
first query the processor to find out the highest input value CPUID recognizes. This<br />
determines the kind of basic information CPUID can provide the operating system.<br />
Options: Disabled (Default) / Enabled<br />
Intel(R) Virtualization Tech<br />
Virtualization Technology can virtually separate your system resource into several<br />
parts, thus enhance the performance when running virtual machines or multi<br />
interface systems.<br />
Options: Enabled (Default) / Disabled<br />
Execute-Disable Bit Capability<br />
This item allows you to configure the Execute Disabled Bit function, which protects<br />
your system from buffer overflow attacks.<br />
Options: Enabled (Default) / Disabled<br />
Core Multi-Processing<br />
This item allows multi-processing function for multi-core processors.<br />
Options: Enabled (Default) / Disabled<br />
8
<strong>GF7050V</strong>-<strong>M7</strong> <strong>SE</strong> <strong>BIOS</strong> <strong>Manual</strong><br />
Intel(R) SpeedStep(tm) Tech<br />
This item allows you to enable SpeedStep technology for better power saving.<br />
SpeedStep is a technology built into some Intel processors that allows the clock<br />
speed o f the processor to be dynamically changed by software.<br />
Options: Enabled (Default) / Disabled<br />
SuperIO Conf iguration<br />
Advan ced<br />
<strong>BIOS</strong> <strong>SE</strong>TU P U TILITY<br />
Configure ITE8 718 Super IO Chipse t<br />
Onboard Floppy Controller [Ena bled]<br />
Serial Port1 A ddress [3F8 /IRQ4]<br />
Parallel Port Address [378 ]<br />
Parallel Por t Mode [Nor mal]<br />
Parallel Por t IRQ [IRQ 7]<br />
Keyboard Power On [Dis abled]<br />
Mouse PowerOn [Dis abled]<br />
Restore on AC Power Loss [Pow er Off]<br />
vxx .xx (C)Copyright 1985-200x, American Me gatrends, Inc.<br />
Onboard Floppy Controller<br />
9<br />
Allows <strong>BIOS</strong> to Enable<br />
or Disable Floppy<br />
Controller<br />
+-<br />
F1<br />
F10<br />
ESC<br />
S elect Screen<br />
S elect Item<br />
C hange Option<br />
G eneral Help<br />
S ave and Exit<br />
Exit<br />
Select enabled if your system has a floppy disk controller (FDC) installed on the<br />
system board and you wish to use it. If you installed another FDC or the system uses<br />
no floppy drive, select disabled in this field.<br />
Options: Enabled (Default) / Disabled<br />
Serial Port1 Address<br />
Select an address and corresponding interrupt for the first and second serial ports.<br />
Options: 3F8/IRQ4 (Default) / 2F8/IRQ3 / 3E8/IRQ4 / 2E8/IRQ3 / Auto / Disabled<br />
Parallel Port Address<br />
T his item allows you to determine access onboard parallel port controller with which<br />
I/O Address.<br />
Options: 378 (Default) / 278 / 3BC / Disabled
<strong>GF7050V</strong>-<strong>M7</strong> <strong>SE</strong> <strong>BIOS</strong> <strong>Manual</strong><br />
Parallel Port Mode<br />
This item allows you to determine how the parallel port should function.<br />
Options: Normal (Default) Using Parallel port as Standard Printer Port.<br />
EPP Using Parallel Port as Enhanced Parallel Port.<br />
ECP Using Parallel port as Extended Capabilities Port.<br />
ECP+EPP Using Parallel port as ECP & EPP mode.<br />
Parallel Port IRQ<br />
This item allows you to select the IRQ for the onboard parallel port.<br />
Options: IRQ7 (Default) / IRQ5 / Disabled<br />
Keyboard Pow erOn<br />
This item allows you to control the keyboard power on function.<br />
Options: Disabled (Default) / Enabled<br />
Mouse PowerOn<br />
This item allows you to control the mouse power on function.<br />
Options: Disabled (Default) / Enabled<br />
Restore on AC Power Loss<br />
This setting specifies how your system should behave after a power fail or interrupts<br />
occurs. By choosing Disabled will leave the <strong>com</strong>puter in the power off state.<br />
Choosing Enabled will restore the system to the status before power failure or<br />
interrupt occurs.<br />
Options: Power Off (Default) / Power ON / Last State<br />
10
<strong>GF7050V</strong>-<strong>M7</strong> <strong>SE</strong> <strong>BIOS</strong> <strong>Manual</strong><br />
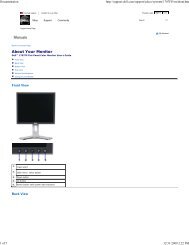
Hardware Health Configuration<br />
This item shows the system temperature, fan speed, and voltage information.<br />
<strong>BIOS</strong> <strong>SE</strong>TU P U TILITY<br />
Advan ced<br />
Hardware Healt h Configuration<br />
H/W Health Fun ction [Ena bled]<br />
Shutdown Tempe rature [Dis abled]<br />
CPU Temperatur e<br />
CPU Fan Speed<br />
SYSTEM Fan Spe ed<br />
CPU Core<br />
Memory Voltage<br />
+3.30V<br />
+5.00V<br />
+12.0V<br />
Vtt Voltage<br />
Chipset Voltag e<br />
+5.00V<br />
vxx .xx (C)Copyright 1985-200x, American Me gatrends, Inc.<br />
11<br />
Enables Hardware<br />
Health Monitoring<br />
Device.<br />
+-<br />
F1<br />
F10<br />
ESC<br />
S elect Screen<br />
S elect Item<br />
C hange Option<br />
G eneral Help<br />
S ave and Exit<br />
Exit<br />
H/W Health Function<br />
If you <strong>com</strong>puter contains a monitoring system, it will show PC health status during<br />
POST stage.<br />
Options: Enabled (Default) / Disabled<br />
Shutdow n Temperature<br />
This item allows you to set up the CPU shutdown Temperature. This item is only<br />
effective under Windows 98 ACPI mode.<br />
Options: Disabled (Default) / 60℃/140℉ / 65℃/149℉ / 70℃/158℉ / 75℃/167℉<br />
/ 80℃/176℉ / 85℃/185℉ / 90℃/194℉
<strong>GF7050V</strong>-<strong>M7</strong> <strong>SE</strong> <strong>BIOS</strong> <strong>Manual</strong><br />
Smart Fan Configuration<br />
Advan ced<br />
<strong>BIOS</strong> <strong>SE</strong>TU P U TILITY<br />
Smart Fan Conf iguration<br />
CPU Smart Fan [Dis abled]<br />
Smart Fan Cali bration<br />
Control Mode<br />
o<br />
Fan Ctrl OFF( C)<br />
o<br />
Fan Ctrl On( C )<br />
Fan Ctrl Start value<br />
Fan Ctrl Sensi tive<br />
CPU Smart Fan<br />
vxx .xx (C)Copyright 1985-200x, American Me gatrends, Inc.<br />
This item allows you to control the CPU Smart Fan function.<br />
Options: Disabled (default) / Auto / 4-pin / 3-pin<br />
12<br />
When you choice [Auto]<br />
,[3Pin] or [4Pin],<br />
please run the<br />
calibration to define<br />
the Fan parameters for<br />
Smart Fan control<br />
+-<br />
F1<br />
F10<br />
ESC<br />
S elect Screen<br />
S elect Item<br />
C hange Option<br />
G eneral Help<br />
S ave and Exit<br />
Exit<br />
Smart Fan Calibration<br />
Choose this item and then the <strong>BIOS</strong> will auto test and detect the CPU/System fan<br />
functions and show CPU/System fan speed.<br />
Control Mode<br />
This item provides several operation modes of the fan.<br />
Options: Quiet / Performance / <strong>Manual</strong><br />
Fan Ctrl OFF(℃ )<br />
If the CPU/System Temperature is lower than the set value, FAN will turn off.<br />
Options: 0~127 (℃)<br />
Fan Ctrl On(℃ )<br />
CPU/System fan starts to work under smart fan function when arrive this set value.<br />
Options: 0~127 (℃)
<strong>GF7050V</strong>-<strong>M7</strong> <strong>SE</strong> <strong>BIOS</strong> <strong>Manual</strong><br />
Fan Ctrl Start Value<br />
When CPU/System temperature arrives to the set value, the CPU/System fan will<br />
work under Smart Fan Function mode.<br />
Options: 0~127 (℃)<br />
Fan Ctrl Sensitive<br />
Increasing the value will raise the speed of CPU/System fan.<br />
Options: 1~127<br />
Power Configuration<br />
Advan ced<br />
ACPI Settings<br />
<strong>BIOS</strong> <strong>SE</strong>TU P U TILITY<br />
> Chipset ACPI Configuration<br />
Suspend mode [S1( POS)]<br />
Repost Video o n S3 Resume [NO]<br />
ACPI Version F eatures [ACP I v1.0]<br />
ACPI APIC supp ort [Ena bled]<br />
AMI OEMB table [Ena bled]<br />
Headless mode [Dis abled]<br />
Resume On PME# [Dis abled]<br />
Resume On PCIE Wake# [Dis abled]<br />
Resume On LAN( MAC) [Dis abled]<br />
Resume On Ring [Dis abled]<br />
Resume By RTC Alarm [Dis abled]<br />
RTC Alarm Date (Days)<br />
System Time<br />
vxx .xx (C)Copyright 1985-200x, American Me gatrends, Inc.<br />
13<br />
Chipset ACPI related<br />
Configuration settings<br />
S elect Screen<br />
S elect Item<br />
EnterG<br />
o to Sub Screen<br />
F1 G eneral Help<br />
F10 S ave and Exit<br />
ESC Exit
<strong>GF7050V</strong>-<strong>M7</strong> <strong>SE</strong> <strong>BIOS</strong> <strong>Manual</strong><br />
Chipset ACPI Configuration<br />
Advan ced<br />
<strong>BIOS</strong> <strong>SE</strong>TU P U TILITY<br />
Chipset ACPI C onfiguration<br />
SouthBridge AC PI HPET TABLE [Ena bled]<br />
ACPI PM Timer Width [32- bits]<br />
APIC Destinati on Mode [Log ical]<br />
vxx .xx (C)Copyright 1985-200x, American Me gatrends, Inc.<br />
SouthBridge ACPI HPET TABLE<br />
Options: Enabled (Default) / Disabled<br />
ACPI PM Timer Width<br />
Options: 32-bits (Default) / 24-bits<br />
APIC Destination Mode<br />
Options: Logical (Default)<br />
14<br />
Options<br />
Disabled<br />
Enabled<br />
+-<br />
F1<br />
F10<br />
ESC<br />
S elect Screen<br />
S elect Item<br />
C hange Option<br />
G eneral Help<br />
S ave and Exit<br />
Exit<br />
Suspend mode<br />
The item allows you to select the suspend type under the ACPI operating system.<br />
Options: S1 (POS) (Default) Power on Suspend<br />
S3 (STR) Suspend to RAM<br />
Auto POS+STR<br />
Repost Video on S3 Resume<br />
Options: NO (Default) / YES<br />
ACPI Version Features<br />
T he item allows you to select the version of ACPI.<br />
Options: ACPI v1.0 (Default) / ACPI v2.0 / ACPI v3.0
<strong>GF7050V</strong>-<strong>M7</strong> <strong>SE</strong> <strong>BIOS</strong> <strong>Manual</strong><br />
ACPI APIC support<br />
T his item is used to enable or disable the motherboard's APIC (Advan ced<br />
Programmable Interrupt Controller). The APIC provides multiprocessor support,<br />
more IRQs and faster interrupt handling.<br />
Options: Enabled (Default) / Disabled<br />
AMI OEMB table<br />
Set this value to allow the ACPI <strong>BIOS</strong> to add a pointer to an OEMB table in the Root<br />
System Description Table (RSDT) table.<br />
Options: Enabled (Default) / Disabled<br />
Headless mode<br />
This is a server-specific feature. A headless server is one that operates without a<br />
keyboard, monitor or mouse. To run in headless mode, both <strong>BIOS</strong> and operating<br />
system (e.g. Windows Server 2003) must support headless operation.<br />
Options: Disabled (Default) / Enabled<br />
Resume On PME#<br />
When you select Enabled, a PME signal from PCI card returns the system to Full ON<br />
state.<br />
For this function to work, you may need a LAN add-on card which supports the<br />
Wake on LAN function. Set the Wake on LAN (WOL) jumper on motherboard to<br />
enable i f applicable.<br />
Options: Disabled (Default) / Enabled<br />
Resume On PCIE Wake#<br />
When you select Enabled, a signal from PCI-E card returns the system to Full ON<br />
state.<br />
For this function to work, you may need a LAN add-on card which supports the<br />
Wake on LAN function. Set the Wake on LAN (WOL) jumper on motherboard to<br />
enable i f applicable.<br />
Options: Disabled (Default) / Enabled<br />
Resume On LAN(MAC)<br />
This item allows you to enable or disable Wake On LAN from Soft-Off function.<br />
Options: Disabled (Default) / Enabled<br />
15
<strong>GF7050V</strong>-<strong>M7</strong> <strong>SE</strong> <strong>BIOS</strong> <strong>Manual</strong><br />
Resume On Ring<br />
This item allows you control the wake on ring function.<br />
Options: Disabled (Default) / Enabled<br />
Resume By RTC Alarm<br />
When “ Enabled”, you can set the date and time at which the RTC (real-time clock)<br />
alarm awak ens the system from Suspend mode.<br />
Options: Disabled (Default) / Enabled<br />
RTC Alarm Date (Days)<br />
You can choose which date the system will boot up.<br />
System Time<br />
You can choose the system boot up time, input hour, minute and second to specify.<br />
Note: If you have change the setting, you must let the system boot up until it<br />
goes to the operating system, before this function will work.<br />
16
<strong>GF7050V</strong>-<strong>M7</strong> <strong>SE</strong> <strong>BIOS</strong> <strong>Manual</strong><br />
USB Configuration<br />
This item shows the USB controller and using USB device information.<br />
<strong>BIOS</strong> <strong>SE</strong>TU P U TILITY<br />
Advan ced<br />
USB Configurat ion<br />
Module Version - 2.24.2-13.4<br />
USB Devices En abled:<br />
Legacy USB Sup port [Ena bled]<br />
USB 2.0 Contro ller Mode [HiS peed]<br />
<strong>BIOS</strong> EHCI Hand -Off [Ena bled]<br />
> USB Mass Sto rage Device Configu ration<br />
vxx .xx (C)Copyright 1985-200x, American Me gatrends, Inc.<br />
17<br />
Enables support for<br />
legacy USB. AUTO<br />
option disables<br />
legacy support if<br />
no USB devices are<br />
connected.<br />
+-<br />
F1<br />
F10<br />
ESC<br />
S elect Screen<br />
S elect Item<br />
C hange Option<br />
G eneral Help<br />
S ave and Exit<br />
Exit<br />
Legacy USB Support<br />
This item determines if the <strong>BIOS</strong> should provide legacy support for USB devices<br />
like the keyboard, mouse, and USB drive. T his is a useful feature when using such<br />
USB devices with operating systems that do not natively support USB (e.g.<br />
Microsoft DOS or Windows NT).<br />
Options: Enabled (Default) / Disabled<br />
USB 2.0 Controller Mode<br />
This item allows you to select the operation mode of the USB 2.0 controller.<br />
Options: HiSpeed (Default) USB 2.0-480Mbps<br />
FullSpeed USB 1.1-12Mbps<br />
<strong>BIOS</strong> EHCI Hand-Off<br />
This item allows you to enable support for operating systems without an EHCI<br />
hand-off feature.<br />
Options: Enabled (Default) / Disabled
<strong>GF7050V</strong>-<strong>M7</strong> <strong>SE</strong> <strong>BIOS</strong> <strong>Manual</strong><br />
USB Mass Storage Device Configuration<br />
Advanced<br />
USB Mass Storage Device Configuration<br />
USB Mass Storage Reset Delay [20 Sec]<br />
Device #<br />
Emulation Type [Auto]<br />
<strong>BIOS</strong> <strong>SE</strong>TUP UTILITY<br />
vxx.xx (C)Copyright 1985-200x, American Megatrends, Inc.<br />
18<br />
Number of seconds<br />
POST waits for the<br />
USB mass storage<br />
device after start<br />
unit <strong>com</strong>mand.<br />
+-<br />
F1<br />
F10<br />
ESC<br />
Select Screen<br />
Select Item<br />
Change Option<br />
General Help<br />
Save and Exit<br />
Exit<br />
USB Mass Storage Reset Delay<br />
This item allows you to set the reset delay for USB mass storage device.<br />
Options: 20 Sec (Default) / 10 Sec / 30 Sec / 40 Sec<br />
Emulation Type<br />
This item allows you to select the emulation type of the USB mass storage device.<br />
Options: Auto (Default) / Floppy / Forced FDD / Hard Disk / CDROM
<strong>GF7050V</strong>-<strong>M7</strong> <strong>SE</strong> <strong>BIOS</strong> <strong>Manual</strong><br />
3 PCIPnP Menu<br />
This section describes configuring the PCI bus system. PCI, or Personal Computer<br />
Interconnect, is a system which allows I/O devices to operate at speeds nearing the<br />
speed of the CPU itself uses when <strong>com</strong>municating with its own special <strong>com</strong>ponents.<br />
Notice<br />
Beware of that setting inappropriate values in items of this menu may cause<br />
system to malfunction.<br />
<strong>BIOS</strong> <strong>SE</strong>TU P U TILITY<br />
Main Advan ced PCIPnP Boot Chipset Performance<br />
Advanced PCI/P nP Settings<br />
WARNING: Setti ng wrong values in below sections<br />
may c ause system to malf unction.<br />
Clear NVRAM [No]<br />
Plug & Play O/ S [No]<br />
PCI Latency Ti mer [32]<br />
Allocate IRQ t o PCI VGA [Yes ]<br />
Palette Snoopi ng [Dis abled]<br />
PCI IDE BusMas ter [Ena bled]<br />
OffBoard PCI/I SA IDE Card [Aut o]<br />
> PCI Resource<br />
> PCI Express Configuration<br />
Clear NVRAM<br />
vxx .xx (C)Copyright 1985-200x, American Me gatrends, Inc.<br />
19<br />
Clear NVRAM during<br />
System Boot.<br />
+-<br />
F1<br />
F10<br />
ESC<br />
Exit<br />
S elect Screen<br />
S elect Item<br />
C hange Option<br />
G eneral Help<br />
S ave and Exit<br />
Exit<br />
This item allows you to clear the data in the NVRAM (CMOS) by selecting “Yes”.<br />
Options: No (Default) / Yes<br />
Plug & P lay OS<br />
When set to YES, <strong>BIOS</strong> will only initialize the PnP cards used for the boot sequence<br />
(VGA, IDE, SCSI). The rest of the cards will be initialized by the PnP operating<br />
system like Window 95. When set to NO, <strong>BIOS</strong> will initialize all the PnP cards.<br />
For non-PnP operating systems (DOS, Netware), this option must set to NO.<br />
Options: No (Default) / Yes
<strong>GF7050V</strong>-<strong>M7</strong> <strong>SE</strong> <strong>BIOS</strong> <strong>Manual</strong><br />
PCI Latency Timer<br />
This item controls how long a PCI device can hold the PCI bus before another takes<br />
over. The longer the latency, the longer the PCI device can retain control of the bus<br />
before handing it over to another PCI device.<br />
Options: 32 (Default) / 64 / 96 / 128 / 160 / 192 / 224 / 248<br />
Allocate IRQ to PCI VGA<br />
This item allows <strong>BIOS</strong> to choose a IRQ to assign for the PCI VGA card.<br />
Options: Yes (Default) / No<br />
Palette Snooping<br />
Some old graphic controllers need to “ snoop” on the VGA palette and then map it to<br />
their display as a way to provide boot information and VGA <strong>com</strong>patibility. This item<br />
allows such snooping to take place.<br />
Options: Disabled (Default) / Enabled<br />
PCI IDE BusMaster<br />
This item is a toggle for the built-in driver that allows the onboard IDE controller to<br />
perform DMA (Direct Memory Access) trans fers.<br />
Options: Enabled (Default) / Disabled<br />
OffBoard PCI/ISA IDE Card<br />
This item is for any other non-onboard PCI/ISA IDE controller adapter.<br />
Options: Auto (Default) / Disabled<br />
20
<strong>GF7050V</strong>-<strong>M7</strong> <strong>SE</strong> <strong>BIOS</strong> <strong>Manual</strong><br />
PCI Resource<br />
PCIPnP<br />
<strong>BIOS</strong> <strong>SE</strong>TUP UTILITY<br />
PCI Resource<br />
IRQ3 [Available]<br />
IRQ4 [Available]<br />
IRQ5 [Available]<br />
IRQ7 [Available]<br />
IRQ9 [Available]<br />
IRQ10 [Available]<br />
IRQ11 [Available]<br />
IRQ14 [Available]<br />
IRQ15 [Available]<br />
DMA Channel 0 [Available]<br />
DMA Channel 1 [Available]<br />
DMA Channel 3 [Available]<br />
DMA Channel 5 [Available]<br />
DMA Channel 6 [Available]<br />
DMA Channel 7 [Available]<br />
Reserved Memory Size [Disabled]<br />
vxx.xx (C)Copyright 1985-200x, American Megatrends, Inc.<br />
21<br />
Available: Specified<br />
IRQ is available to be<br />
used by PCI/PnP<br />
devices.<br />
Reserved: Specified<br />
IRQ is reserved for<br />
use by Legacy ISA<br />
devices.<br />
+-<br />
F1<br />
F10<br />
ESC<br />
Select Screen<br />
Select Item<br />
Change Option<br />
General Help<br />
Save and Exit<br />
Exit<br />
IRQ3/4/5/7/9/10/11/14/15<br />
These items will allow you to assign each system interrupt a type, depending on the<br />
type of device using the interrupt. The option “Available” means the IRQ is going<br />
to assign automatically.<br />
Options: Available (Default) / Reserved<br />
DMA Channel 0/1/3/5/6/7<br />
These items will allow you to assign each DMA channel a type, depending on the<br />
type of device using the channel. T he option “ Available” means the channel is<br />
going to assign automatically.<br />
Options: Available (Default) / Reserved<br />
Reserved Memory Size<br />
This item allows <strong>BIOS</strong> to reserve certain memory size for specific PCI device.<br />
Options: Disabled (Default) / 16K / 32K / 64K
<strong>GF7050V</strong>-<strong>M7</strong> <strong>SE</strong> <strong>BIOS</strong> <strong>Manual</strong><br />
PCI Express Configuration<br />
PCIPnP<br />
<strong>BIOS</strong> <strong>SE</strong>TUP UTILITY<br />
PCI Express Configuration<br />
Active State Power-Management[Disabled]<br />
vxx.xx (C)Copyright 1985-200x, American Megatrends, Inc.<br />
Active State Power-Management<br />
22<br />
Enable/Disable<br />
PCI Express L0s and<br />
L1 link power<br />
states.<br />
+-<br />
F1<br />
F10<br />
ESC<br />
Select Screen<br />
Select Item<br />
Change Option<br />
General Help<br />
Save and Exit<br />
Exit<br />
This item sets the ASPM configuration for the PCI Express devices before the<br />
operating system boots. This function is for OS which does not support ASPM.<br />
Options: Disabled (Default) / Enabled
<strong>GF7050V</strong>-<strong>M7</strong> <strong>SE</strong> <strong>BIOS</strong> <strong>Manual</strong><br />
4 Boot Menu<br />
This menu allows you to setup the system boot options.<br />
<strong>BIOS</strong> <strong>SE</strong>TU P U TILITY<br />
Main Advan ced PCIPnP Boot Chipset Performance<br />
Boot Settings Configuration<br />
> Boot Device Priority<br />
> Hard Disk Dr ives<br />
> Removable Dr ives<br />
> CD/DVD Drive s<br />
Quick Boot [Ena bled]<br />
Quiet Boot [Dis abled]<br />
Full Screen LO GO Show [Ena bled]<br />
AddOn ROM Disp lay Mode [For ce <strong>BIOS</strong>]<br />
Bootup Num-Loc k [ON]<br />
PS/2 Mouse Sup port [Aut o]<br />
Wait for F1 If Error [Ena bled]<br />
Hit DEL Messag e Display [Ena bled]<br />
Interrupt 19 C apture [Dis abled]<br />
vxx .xx (C)Copyright 1985-200x, American Me gatrends, Inc.<br />
Boot De vice Priority<br />
23<br />
Exit<br />
Specifies the<br />
Boot Device<br />
Priority sequence.<br />
S elect Screen<br />
S elect Item<br />
EnterG<br />
o to Sub Screen<br />
F1 G eneral Help<br />
F10 S ave and Exit<br />
ESC Exit<br />
Items in this sub-menu specify the boot device priority sequence from the available<br />
devices. The number of device items that appears on the screen depends on the<br />
number of devices installed in the system.<br />
Hard Disk Drives<br />
T he <strong>BIOS</strong> will attempt to arrange the hard disk boot sequence automatically. You<br />
can also ch ange the booting sequence. T he number of device items that appears on<br />
the screen depends on the number of devices installed in the system.<br />
Removable Drives<br />
T he <strong>BIOS</strong> will attempt to arrange the removable drive boot sequence automatically.<br />
You can also change the booting sequence. The number of device items that<br />
appears on the screen depends on the number of devices installed in the system.
<strong>GF7050V</strong>-<strong>M7</strong> <strong>SE</strong> <strong>BIOS</strong> <strong>Manual</strong><br />
CD/DVD Drives<br />
The <strong>BIOS</strong> will attempt to arrange the CD/DVD drive boot sequence automatically.<br />
You can also change the booting sequence. The number of device items that<br />
appears on the screen depends on the number of devices installed in the system.<br />
Quick Boot<br />
Enabling this option will cause an abridged version of the Power On Self-Test<br />
(POST) to execute after you power up the <strong>com</strong>puter.<br />
Options: Enabled (Default) / Disabled<br />
Quiet Boot<br />
This <strong>BIOS</strong> feature determines if the <strong>BIOS</strong> should hide the normal POST messages<br />
with the motherboard or system manufacturer's full-screen logo.<br />
Options: Disabled (Default) / Enabled<br />
Full Screen LOGO Show<br />
This item allows you to enable/disable Full Screen LOGO Show function.<br />
Options: Enabled (Default) / Disabled<br />
AddOn ROM Display Mode<br />
This item sets the display mode for option ROM.<br />
Options: Force <strong>BIOS</strong> (Default) / Keep Current<br />
Bootup Num-Lock<br />
Selects the NumLock State after the system switched on.<br />
Options: ON (Default) / OFF<br />
PS/2 Mouse Support<br />
This <strong>BIOS</strong> feature determines if the <strong>BIOS</strong> should reserve IRQ12 for the PS/2 mouse<br />
or allow other devices to make use of this IRQ.<br />
Options: Auto (Default) / Enabled<br />
24
<strong>GF7050V</strong>-<strong>M7</strong> <strong>SE</strong> <strong>BIOS</strong> <strong>Manual</strong><br />
Wait for ‘F1 ’ If Error<br />
This <strong>BIOS</strong> feature controls the system's response when an error is detected during<br />
the boot sequence.<br />
Options: Enabled (Default) / Disabled<br />
Hit ‘DEL’ Message Display<br />
This <strong>BIOS</strong> feature allows you to control the display of the Hit “ DEL” to enter Setup<br />
message during memory initialization.<br />
Options: Enabled (Default) / Disabled<br />
Interrupt 19 Capture<br />
Interrupt 19 is the software interrupt that handles the boot disk function. When set<br />
to Enabled, this item allows the option ROMs to trap interrupt 19.<br />
Options: Disabled (Default) / Enabled<br />
25
<strong>GF7050V</strong>-<strong>M7</strong> <strong>SE</strong> <strong>BIOS</strong> <strong>Manual</strong><br />
5 Chipset Menu<br />
T his submenu allows you to configure the speci fic features of the chipset installed on<br />
your system. This chipset manage bus speeds and access to system memory<br />
resources, such as DRAM. It also coordinates <strong>com</strong>munications with the PCI bus.<br />
Notice<br />
Beware of that setting inappropriate values in items of this menu may cause<br />
system to malfunction.<br />
<strong>BIOS</strong> <strong>SE</strong>TU P U TILITY<br />
Main Advan ced PCIPnP Boot Chipset Performance<br />
Advanced Chips et Settings<br />
WARNING: Setti ng wrong values in below sections<br />
may c ause system to malf unction.<br />
> Spread Spect rum Control<br />
Top of Memory under 4GB [3 GB]<br />
Memory Remap F eature [En abled]<br />
LPC P2P P2P [+ +/- +/-]<br />
Primary Graphi cs Adapter [PC IE->PCI->IGPU]<br />
iGPU and Ext-V GA Selection [Bo th Exist and iGP]<br />
iGPU Frame Buf fer Detect [Au to]<br />
iGPU Frame Buf fer Size [12 8MB]<br />
USB 1.1 Contro ller [En abled]<br />
USB 2.0 Contro ller [En abled]<br />
AZALIA AUDIO [In ternal codec + E]<br />
MAC ID Informa tion :<br />
Onboard LAN [Au to]<br />
Onboard LAN Bo ot ROM [Di sabled]<br />
vxx .xx (C)Copyright 1985-200x, American Me gatrends, Inc.<br />
26<br />
Exit<br />
S elect Screen<br />
S elect Item<br />
EnterG<br />
o to Sub Screen<br />
F1 G eneral Help<br />
F10 S ave and Exit<br />
ESC Exit
<strong>GF7050V</strong>-<strong>M7</strong> <strong>SE</strong> <strong>BIOS</strong> <strong>Manual</strong><br />
Spread Spectrum Control<br />
<strong>BIOS</strong> <strong>SE</strong>TU P U TILITY<br />
Chipset<br />
Spread Spectru m Setup<br />
CPU Spread Spe ctrum [Di sabled]<br />
PCIE Spread Sp ectrum [Di sabled]<br />
SATA Spread Sp ectrum [Di sabled]<br />
CPU Spread Spectrum<br />
vxx .xx (C)Copyright 1985-200x, American Me gatrends, Inc.<br />
This item allows you to control the CPU spread spectrum.<br />
Options: Disabled (Default) / Enabled<br />
27<br />
Options<br />
Disabled<br />
Enabled<br />
+-<br />
F1<br />
F10<br />
ESC<br />
PCIE Spread Spectrum<br />
This item allows you to control the PCI-Express spread spectrum.<br />
Options: Disabled (Default) / Enabled<br />
SATA Spread Spectrum<br />
This item allows you to control the SATA spread spectrum.<br />
Options: Disabled (Default) / Enabled<br />
Top of Memory under 4GB<br />
Options: 3 GB (Default)<br />
Memory Remap Feature<br />
S elect Screen<br />
S elect Item<br />
C hange Option<br />
G eneral Help<br />
S ave and Exit<br />
Exit<br />
This item allows you to enable or disable the remapping of the overlapped PCI<br />
memory above the total physical memory. Only 64-bit OS supports this function.<br />
Options: Enabled (Default) / Disabled
<strong>GF7050V</strong>-<strong>M7</strong> <strong>SE</strong> <strong>BIOS</strong> <strong>Manual</strong><br />
LPC P2P↑ P2P↓<br />
Options: + +/- +/- (Default) / - + + / + - +/- / + - +<br />
Primary Graphics Adapter<br />
This item allows you to choose the primary graphics device.<br />
Options: PCIE->PCI->IGPU (Default)<br />
iGPU and Ext-VGA Selection<br />
T his item determines the working VGA device when there are two VGA devices<br />
installed at the same time.<br />
Options: Disable iGPU if Ext-VGA exist / Both Exist and iGPU by Frame Buffer<br />
Detect (Default)<br />
iGPU Frame Buffer Detect<br />
This item allows you to control the iGPU frame buffer.<br />
Options: Auto (Default) / Disabled<br />
iGPU Frame Buffer Size<br />
This item allows you to choose the frame buffer size of on-chip VGA.<br />
Options: 128MB (Default) / 16MB / 32MB / 64MB / 256MB / Disabled<br />
USB 1.1 Controller<br />
This item allows you to control the USB 1.1 controller.<br />
Options: Enabled (Default) / Disabled<br />
USB 2.0 Controller<br />
This item allows you to control the USB 2.0 controller.<br />
Options: Enabled (Default) / Disabled<br />
AZALIA AUDIO<br />
This item allows you to control the onboard codec and on-chip codec.<br />
Options: Internal codec+E (Default) / Internal codec / External codec / Disabled<br />
28
<strong>GF7050V</strong>-<strong>M7</strong> <strong>SE</strong> <strong>BIOS</strong> <strong>Manual</strong><br />
MAC ID Information<br />
This item shows the onboard LAN MAC ID.<br />
Onboard LAN<br />
This option allows you to control the onboard LAN.<br />
Options: Auto (Default) / Disabled<br />
Onboard LAN Boot ROM<br />
This item allows you to enable or disable the Onboard LAN Boot ROM.<br />
Options: Disabled (Default) / Enabled<br />
29
<strong>GF7050V</strong>-<strong>M7</strong> <strong>SE</strong> <strong>BIOS</strong> <strong>Manual</strong><br />
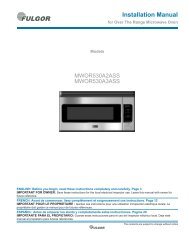
6 Performance Menu<br />
This submenu allows you to change voltage and clock of various devices.<br />
(However, we suggest you to use the default setting. Changing the voltage and clock<br />
improperly may damage the device.)<br />
Notice<br />
Beware of that setting inappropriate values in items of this menu may cause<br />
system to malfunction.<br />
<strong>BIOS</strong> <strong>SE</strong>TU P U TILITY<br />
Main Advan ced PCIPnP Boot Chipset Performance<br />
Performance se tting<br />
Current FSB Speed<br />
Current Memo ry Speed<br />
Target Memor y Speed<br />
CPU B<strong>SE</strong>L Selec t [A uto]<br />
System Clock M ode [A uto]<br />
PCIE Frequency (Mhz) [1 00]<br />
Over voltage s etting<br />
CPU Overvoltag e [1 00%]<br />
Memory Overvol tage [1 .95V]<br />
Chipset Overvo ltage [1 00%]<br />
Vtt Overvoltag e [1 00%]<br />
Memory Timing setting<br />
Memory Timings [A uto]<br />
tCL (CAS Lat ency) [A uto]<br />
vxx .xx (C)Copyright 1985-200x, American Me gatrends, Inc.<br />
Current FSB Speed<br />
This item shows current FSB clock.<br />
Current Memory Speed<br />
This item shows current memory clock.<br />
Target Memory Speed<br />
This item shows target memory clock.<br />
CPU B<strong>SE</strong>L Select<br />
30<br />
Exit<br />
Options<br />
Auto<br />
FSB-1066<br />
FSB-533<br />
FSB-800<br />
FSB-1333<br />
S elect Screen<br />
S elect Item<br />
EnterG<br />
o to Sub Screen<br />
F1 G eneral Help<br />
F10 S ave and Exit<br />
ESC Exit<br />
This item allows you to select the CPU Frequency.<br />
Options: Auto (Default) / FSB-1066 / FSB-533 / FSB-800 / FSB-1333
<strong>GF7050V</strong>-<strong>M7</strong> <strong>SE</strong> <strong>BIOS</strong> <strong>Manual</strong><br />
System Clock Mode<br />
This item determines the relationship between FSB clock and memory clock.<br />
Options: Auto (Default) / Linked / Unlinked<br />
PCIE Frequency (MHz)<br />
Raising this improves texture loading times across the board<br />
Options: 100 (MHz) (Default) / 100 ~ 200<br />
CPU Overvoltage<br />
This item allows you to select CPU Voltage Control.<br />
Options: 100% (Default) / 103.3% / 106.6% / 110.0%<br />
Memory Overvoltage<br />
This item allows you to select DDR Voltage Control.<br />
Options: 1.95V (Default) / 2.05V / 2.15V / 2.20V / 2.25V / 2.30V / 2.40V / 2.50V<br />
Chipset Overvoltage<br />
This item allows you to select NB/SB Voltage Control.<br />
Options: 100% (Default)<br />
VTT Overvoltage<br />
This item allows you to select VTT Voltage Control.<br />
Options: 100% (Default)<br />
Memory Timings<br />
This item allows you to control the memory timings.<br />
Options: Auto (Default) / <strong>Manual</strong><br />
tCL (CAS Latency)<br />
Options: Auto (Default) / 3 CLK ~ 6 CLK<br />
tRCD<br />
Options: Auto (Default) / 3 CLK ~ 6 CLK<br />
31
tRP<br />
<strong>GF7050V</strong>-<strong>M7</strong> <strong>SE</strong> <strong>BIOS</strong> <strong>Manual</strong><br />
Options: Auto (Default) / 3 CLK ~ 6 CLK<br />
tRAS<br />
Options: Auto (Default) / 5 CLK ~ 18 CLK<br />
Command Per Clock (CMD)<br />
Options: Auto (Default) / 1T / 2T<br />
tRRD<br />
Options: Auto (Default) / 2 CLK ~ 5 CLK<br />
tRC<br />
Options: Auto (Default) / 11 CLK ~ 26 CLK<br />
tWR<br />
Options: Auto (Default) / 3 CLK ~ 6 CLK<br />
tWTR<br />
Options: Auto (Default) / 1 CLK ~ 3 CLK<br />
tREF<br />
Options: Auto (Default) / 7.8 us / 3.9 us<br />
Burst Length<br />
Options: Auto (Default)<br />
32
<strong>GF7050V</strong>-<strong>M7</strong> <strong>SE</strong> <strong>BIOS</strong> <strong>Manual</strong><br />
7 Exit Menu<br />
This menu allows you to load the optimal default settings, and save or discard the<br />
changes to the <strong>BIOS</strong> items.<br />
<strong>BIOS</strong> <strong>SE</strong>TU P U TILITY<br />
Main Advan ced PCIPnP Boot Chipset Performance<br />
Exit Options<br />
Save Changes a nd Exit<br />
Discard Change s and Exit<br />
Discard Change s<br />
Load Optimal D efaults<br />
Security Setti ngs<br />
> Security<br />
vxx .xx (C)Copyright 1985-200x, American Me gatrends, Inc.<br />
Save Changes and Exit<br />
Save all configuration changes to CMOS RAM and exit setup.<br />
Discard Changes and Exit<br />
33<br />
Exit<br />
Exit system setup<br />
after saving the<br />
changes.<br />
F10 key can be used<br />
for this operation.<br />
Abandon all changes made during the current session and exit setup.<br />
Discard Changes<br />
S elect Screen<br />
S elect Item<br />
EnterG<br />
o to Sub Screen<br />
F1 G eneral Help<br />
F10 S ave and Exit<br />
ESC Exit<br />
Abandon all changes made during the current session and restore the previously<br />
saved values.<br />
Load Optimal Defaults<br />
This selection allows you to reload the <strong>BIOS</strong> when problem occurs during system<br />
booting sequence. These configurations are factory settings optimized for this<br />
system.
<strong>GF7050V</strong>-<strong>M7</strong> <strong>SE</strong> <strong>BIOS</strong> <strong>Manual</strong><br />
Security<br />
This sub-menu allows you to provide/revise supervisor and user password.<br />
Security Setti ngs<br />
Supervisor Pas sword :Not Installe d<br />
User Password :Not Installe d<br />
<strong>BIOS</strong> <strong>SE</strong>TU P U TILITY<br />
Change Supervi sor Password<br />
User Access Le vel [Ful l Access]<br />
Change User Pa ssword<br />
Clear User Pas sword<br />
Password Check [Set up]<br />
Boot Sector Vi rus Protection [Dis abled]<br />
vxx .xx (C)Copyright 1985-200x, American Me gatrends, Inc.<br />
34<br />
Exit<br />
Install or Change the<br />
password.<br />
S elect Screen<br />
S elect Item<br />
EnterC<br />
hange<br />
F1 G eneral Help<br />
F10 S ave and Exit<br />
ESC Exit<br />
Change Supervisor Passw ord<br />
Setting the supervisor password will prohibit everyone except the supervisor from<br />
making changes using the CMOS Setup Utility. You will be prompted with to enter a<br />
password.<br />
User Acess Level<br />
This item allows supervisor to set the user level.<br />
Options: Full Access (Default) / No Access / View Only / Limited<br />
Change User Password<br />
If the Supervisor Password is not set, then the User Password will function in the<br />
same way as the Supervisor Password. If the Supervisor Password is set and the User<br />
Password is set, the “User” will only be able to view configurations but will not be<br />
able to change them.<br />
Clear User Passw ord<br />
This item is for clearing user password.
<strong>GF7050V</strong>-<strong>M7</strong> <strong>SE</strong> <strong>BIOS</strong> <strong>Manual</strong><br />
Passw ord Check<br />
This item is for setting the timing that checking password.<br />
Options: Setup (Default) / Always<br />
Boot Sector Virus Protection<br />
This option allows you to choose the VIRUS Warning feature that is used to protect<br />
the IDE Hard Disk boot sector. If this function is enabled and an attempt is made to<br />
write to the boot sector, <strong>BIOS</strong> will display a warning message on the screen and<br />
sound an alarm beep.<br />
Options: Disabled (Default) / Enabled<br />
35