About Your Monitor - TigerDirect.com
About Your Monitor - TigerDirect.com
About Your Monitor - TigerDirect.com

Create successful ePaper yourself
Turn your PDF publications into a flip-book with our unique Google optimized e-Paper software.
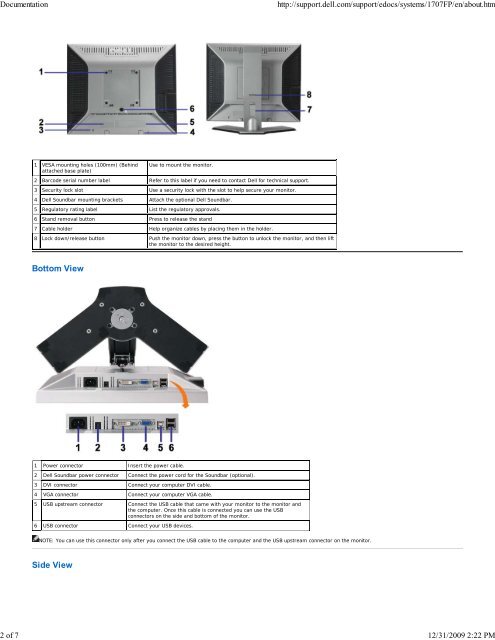
Documentation http://support.dell.<strong>com</strong>/support/edocs/systems/1707FP/en/about.htm<br />
1 VESA mounting holes (100mm) (Behind<br />
attached base plate)<br />
Use to mount the monitor.<br />
2 Barcode serial number label Refer to this label if you need to contact Dell for technical support.<br />
3 Security lock slot Use a security lock with the slot to help secure your monitor.<br />
4 Dell Soundbar mounting brackets Attach the optional Dell Soundbar.<br />
5 Regulatory rating label List the regulatory approvals.<br />
6 Stand removal button Press to release the stand<br />
7 Cable holder Help organize cables by placing them in the holder.<br />
8 Lock down/release button Push the monitor down, press the button to unlock the monitor, and then lift<br />
the monitor to the desired height.<br />
Bottom View<br />
1 Power connector Insert the power cable.<br />
2 Dell Soundbar power connector Connect the power cord for the Soundbar (optional).<br />
3 DVI connector Connect your <strong>com</strong>puter DVI cable.<br />
4 VGA connector Connect your <strong>com</strong>puter VGA cable.<br />
5 USB upstream connector Connect the USB cable that came with your monitor to the monitor and<br />
the <strong>com</strong>puter. Once this cable is connected you can use the USB<br />
connectors on the side and bottom of the monitor.<br />
6 USB connector Connect your USB devices.<br />
NOTE: You can use this connector only after you connect the USB cable to the <strong>com</strong>puter and the USB upstream connector on the monitor.<br />
Side View<br />
2 of 7 12/31/2009 2:22 PM