Bra-Making - It's Sew Easy
Bra-Making - It's Sew Easy
Bra-Making - It's Sew Easy

You also want an ePaper? Increase the reach of your titles
YUMPU automatically turns print PDFs into web optimized ePapers that Google loves.
<strong>Bra</strong>-<strong>Making</strong><br />
Basics<br />
It’s easier<br />
than you think<br />
to sew bras<br />
that fit<br />
By St e p h a n i L . M i L L e r<br />
At first glance, making your own bras<br />
might seem far too troublesome to<br />
bother. But it really is surprisingly<br />
easy, and the results can be satisfying and<br />
well worth mastering a few lingerie sewing<br />
techniques.<br />
There are many reasons to sew your own<br />
bras. Perhaps your size is difficult to find in<br />
retail shops or you’re underwhelmed by the limited<br />
styles available in your size. Maybe you have<br />
specific fitting challenges that ready-to-wear bras<br />
can’t accommodate, or you need a special configuration<br />
for a special garment. Or maybe you just want to<br />
get creative with styles and fabrications.<br />
This article will help you understand bra sizing,<br />
fitting, and materials and will set you on the path to<br />
sewing your own well-fitting, attractive bras.<br />
Stephani L. Miller is a Threads associate editor.<br />
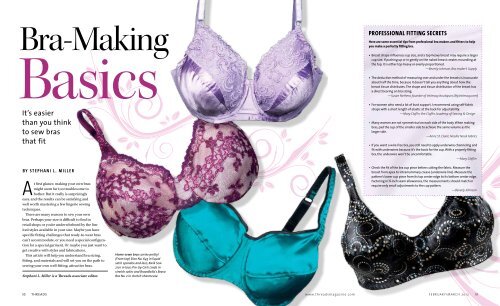
Home-sewn bras can be pretty!<br />
(From top) Elan No. 645 in liquid<br />
satin spandex and lace; Kwik <strong>Sew</strong><br />
2101 in lace; Pin-Up Girls Linda in<br />
stretch satin; and <strong>Bra</strong>voBella’s <strong>Bra</strong>vo<br />
<strong>Bra</strong> No. 2 in stretch charmeuse.<br />
Professional fitting secrets<br />
Here are some essential tips from professional bra makers and fitters to help<br />
you make a perfectly fitting bra.<br />
• Breast shape influences cup size, and a top-heavy breast may require a larger<br />
cup size. If pushing up or in gently on the naked breast creates mounding at<br />
the top, it is either top-heavy or evenly proportioned.<br />
—Beverly Johnson, <strong>Bra</strong>-maker’s Supply<br />
• The deductive method of measuring over and under the breasts is inaccurate<br />
about half the time, because it doesn’t tell you anything about how the<br />
breast tissue distributes. The shape and tissue distribution of the breast has<br />
a direct bearing on bra sizing.<br />
—Susan Nethero, founder of Intimacy boutiques (MyIntimacy.com)<br />
• For women who need a lot of bust support, I recommend using self-fabric<br />
straps with a short length of elastic at the back for adjustability.<br />
—Mary Claflin, the Claflin Academy of <strong>Sew</strong>ing & Design<br />
• Many women are not symmetrical on each side of the body. When making<br />
bras, pad the cup of the smaller side to achieve the same volume as the<br />
larger side.<br />
—Anne St. Claire, Needle Nook Fabrics<br />
• If you want a wire-free bra, you still need to apply underwire channeling and<br />
fit with underwires because it’s the basis for the cup. With a properly fitting<br />
bra, the underwire won’t be uncomfortable.<br />
—Mary Claflin<br />
• Check the fit of the bra cup piece before cutting the fabric. Measure the<br />
breast from apex to intramammary crease (underwire line). Measure the<br />
pattern’s lower cup piece from its top center edge to its bottom center edge.<br />
Factoring in 1 ⁄4-inch seam allowances, the measurements should match or<br />
require only small adjustments to the cup pattern.<br />
—Beverly Johnson<br />
50 TH R EADS w w w.threadsmagazine.com F e b r ua ry/Ma rc h 2 0 1 2<br />
51
Measure up<br />
Sizing a bra is the biggest challenge in bra making. <strong>Bra</strong> patternmakers each base their<br />
sizing on different calculations, so your size may vary from pattern to pattern. Also, not<br />
every pattern will provide the right combination of band and cup size to meet your<br />
unique proportions and distributions. It’s important to find out which bra-sizing method<br />
your chosen pattern uses before purchasing it to ensure you get the correct size combination.<br />
Many bra patterns include this information, but some omit it.<br />
Here are two methods commonly used to calculate bra size. Each may deliver a different<br />
size, and your pattern may use another method. For each, put on your best-fitting<br />
bra; this lifts your breasts into the correct position, even if the fit is imperfect. Keep the<br />
measuring tape snug, but don’t compress the flesh; keep your arms down.<br />
Method 1—Band Size: Measure around the rib cage (under bust); round to a whole<br />
number. Add 4 or 5 to get an even number. Cup Size: Measure around the full bust, then<br />
around the high bust; keep the tape high under the arms. Subtract the high bust from<br />
the full bust. Every inch of difference is a cup size (1=A, 2=B, 3=C, 4=D, etc.).<br />
Method 2—Band Size: Measure the high bust. Round to the nearest whole, even<br />
number. Cup Size: Measure as described in Method 1.<br />
Choose the right materials<br />
The best bra materials aren’t widely available, and it may be<br />
necessary to purchase from different sources. Purchasing<br />
a packaged kit of materials can save time and effort. (See<br />
“Resources,” page 54, for materials and kit sellers.)<br />
FaBricS<br />
Firm stretch fabrics are best for bras; a stretchier cup gives<br />
less support. Simplex, low-stretch satins, 50-denier nylon tricot,<br />
and lace are good cup fabrics. Bands should be made from<br />
powernet (or substitute a firm shaper net). Powernet has<br />
ample stretch, but it’s strong enough to make a supportive<br />
band. Cover it with the cup fabric, or use it alone.<br />
eLaSticS<br />
You’ll need two types of elastic: plush-back elastic,<br />
which has one soft, fuzzy side, for the bra band; and<br />
satin-finished strap elastic for straps. Some bras combine<br />
self-fabric straps with elastic straps; some use<br />
only elastic. Both elastic types come in multiple widths.<br />
Smaller sizes may find narrower widths sufficient, while<br />
larger sizes may prefer the extra support of wider strap or<br />
band elastics.<br />
UnderwireS and channeLing<br />
Underwire options are coated or uncoated flexible steel or<br />
plastic. Coated steel underwires are thinner and very flexible,<br />
while the uncoated variety are slightly thicker and a bit less<br />
flexible. Both come in multiple lengths for different styles<br />
of bra cup. Plastic underwires are lighter in weight, flexible,<br />
and can be trimmed to fit any cup style. Larger cup sizes may<br />
find either of the steel underwire types give better support.<br />
Underwires are inserted into channeling, a soft casing that<br />
cushions them.<br />
Elastic<br />
lace trim<br />
Plush-back<br />
band elastics<br />
(above and<br />
below)<br />
Simplex<br />
(cup fabric)<br />
Strap<br />
elastic<br />
Powernet<br />
(band fabric)<br />
Hook-and-eye<br />
fastener<br />
Strap sliders<br />
Underwires:<br />
plastic and steel<br />
Underwire<br />
channeling<br />
Photos: Sloan Howard. Illustrations: Gloria Melfi<br />
Fashion a beautiful bra<br />
Specific bra construction steps depend on the pattern you choose, but the techniques are similar in most patterns. Below and on the following<br />
pages is a general guide to the basics of bra construction. If possible, cut the fabric with a rotary cutter—fitted with a fresh blade—on a mat,<br />
and use pattern weights, not pins, to eliminate fabric distortion and ensure accuracy. A bra’s narrow seam allowances (typically 1 ⁄4 inch) allow<br />
low tolerance for variation, so start right by cutting accurately.<br />
1<br />
Lay out the pattern<br />
on the fabric. The<br />
grainline markings on<br />
bra patterns indicate the<br />
fabric’s direction of stretch<br />
(or greatest stretch, if<br />
it is a two-way stretch).<br />
Cutting the pieces in the<br />
correct direction of stretch<br />
ensures the best support.<br />
Cut the bra pieces.<br />
52 TH R EADS w w w.threadsmagazine.com<br />
High<br />
bust<br />
Full<br />
bust<br />
Under<br />
bust<br />
Strap rings<br />
2<br />
Follow your pattern’s cup assembly directions. The construction order<br />
will depend on the style of the cup, the number of pieces, and whether<br />
there is a lace overlay, a lining, or an interfacing. Your first set should be test cups<br />
to evaluate fit. Make them in the same fabric as your final bra, and mark the<br />
seam allowances.<br />
Tip<br />
STRAP<br />
LOWER CUP<br />
Pattern used: PinUp Girls Linda <strong>Bra</strong><br />
Stretch teSt. Check your fabric’s direction and degree of<br />
greatest stretch (DOGS). Stretch a 10-inch length of the fabric<br />
alongside a ruler until it resists. Expanding from 10 to 13 inches<br />
indicates 30 percent stretch, 14 inches equals 40 percent, etc. Any<br />
fabric with more than 40 percent stretch isn’t suitable for bra cups.<br />
—Beverly Johnson, <strong>Bra</strong>-maker’s Supply<br />
UPPER<br />
CUP<br />
3<br />
BAND<br />
BRIDGE<br />
Evaluate the fit of the test cups. They should<br />
cover the breasts completely from side to side<br />
without wrinkling or gaping. Seam allowances<br />
should extend beyond the breast’s edges. <strong>Sew</strong> the<br />
cups for the final bra.<br />
c o n t i n u e d ▸ ▸ ▸<br />
F e b r ua ry/Ma rc h 2 0 1 2<br />
53
4<br />
Prepare the band. For a full-band bra with a separately cut bridge, sew<br />
the band pieces to the bridge to create a single unit (shown). Some<br />
patterns may have a one-piece band with an integrated bridge.<br />
6<br />
Bridge<br />
resources<br />
BAND (RS) BAND (WS)<br />
If your bra is a full-band style, as shown by Elan’s no. 645 bra<br />
pattern, the bridge and bands are sewn together before attaching<br />
the cups.<br />
<strong>Sew</strong> cups to band. For a partial-band bra, band pieces<br />
and bridge attach to the cups separately (shown). A fullband<br />
bra’s cups attach to a band/bridge unit (see step 4).<br />
Band attachment<br />
Cup<br />
Bridge<br />
For even more information on bra making, look to these references to guide you through<br />
the minutiae of sizing, fitting, and finishing. See materials sources at right.<br />
• Intimately Yours: <strong>Bra</strong>s That Fit by Anne St. Claire—ideal for the home sewer intent on<br />
perfectly fitting bras. NdlNookFab.blogspot.com.<br />
• The <strong>Bra</strong>-maker’s Manual by Beverly Johnson, <strong>Bra</strong>-maker’s Supply—written for custom<br />
bra makers, it also offers home sewers a master’s education in bra fit and construction.<br />
<strong>Bra</strong>MakersManual.com.<br />
• “Basic <strong>Bra</strong> <strong>Making</strong>” class, taught by Mary Claflin, the Claflin Academy of <strong>Sew</strong>ing & Design.<br />
ClaflinAcademy.com.<br />
• “<strong>Bra</strong>s 102—Basic Construction, two-disc set” by Monica O’Rourke <strong>Bra</strong>vo, <strong>Bra</strong>voBella <strong>Bra</strong>s.<br />
<strong>Bra</strong>voBella<strong>Bra</strong>s.com.<br />
7<br />
5<br />
Attach the<br />
elastics.<br />
This sample is a<br />
partial-band bra.<br />
Construction order<br />
for attaching band<br />
elastics varies. Lap<br />
the plush-back<br />
elastic, fuzzy side<br />
up, on the band’s<br />
right side with the<br />
picot edge facing<br />
the band. Zigzag<br />
the picot edge<br />
first, then turn<br />
the elastic to the<br />
band’s wrong side<br />
and zigzag the<br />
opposite edge.<br />
Picot<br />
edge<br />
BAND (RS)<br />
Bottom band elastic<br />
BAND (WS)<br />
Picot edge<br />
Add underwires. Pin and stitch one underwire channeling edge to the right<br />
side of each cup’s bottom seam allowance, turn to the wrong side and finish.<br />
(Method varies.) Insert the underwires and satin-stitch the channel ends closed.<br />
Pin underwire<br />
channeling<br />
to each cup’s<br />
lower edge.<br />
POWERNET<br />
BAND LINING<br />
Underwire<br />
channel<br />
stitched in<br />
place<br />
<strong>Bra</strong>MakersSupply.com<br />
NdlNookFab.blogspot.com<br />
FabricDepotCo.com<br />
<strong>Sew</strong>Sassy.com<br />
ELingeriA.de<br />
<strong>Bra</strong><strong>Making</strong>Supplies.com<br />
<strong>Bra</strong>Components.com<br />
Etsy.com<br />
Fabric.com<br />
8<br />
Prepare the<br />
strap assembly<br />
and attach the<br />
straps. Zigzag<br />
stitch the strap<br />
elastic to the bra<br />
band’s back upper<br />
raw edge (shown).<br />
Different patterns<br />
use different strap<br />
styles: Straps<br />
may be entirely<br />
bra fabric or<br />
strap elastic, or a<br />
combination of<br />
both. Some patterns<br />
omit strap rings and<br />
sliders, but most<br />
use them.<br />
evaluate your bra’s fit<br />
A perfect fit enables each part of a bra to perform<br />
its intended function—to firmly but comfortably<br />
support the bust. To determine whether your bra<br />
fits correctly, compare it to the ideal fit guidelines<br />
listed below.<br />
Bottom band elastic<br />
• The Band sits level all the way around the body,<br />
but may also sit slightly lower in back. It fits snugly<br />
on the last eye setting without rolling or squeezing<br />
the rib cage. The band provides 90 percent of the<br />
bra’s support and can be tightened as it stretches.<br />
• The Cups contain the breasts without compressing<br />
the flesh. The cup material does not wrinkle<br />
or pucker, and the breast fills the cup without<br />
overflowing. The center cup seam—whether<br />
vertical, horizontal, or diagonal—aligns with the<br />
breast apex.<br />
• The Underwires sit comfortably around the<br />
perimeter of the breasts against the chest wall<br />
without pinching or squeezing.<br />
• The Bridge sits flush against the chest wall, or<br />
within a pinkie’s-width. It does not tip forward or<br />
pull away from the body.<br />
• The Straps fit snugly on the shoulder without<br />
digging into the flesh or slipping.<br />
Slider<br />
Top band elastic<br />
Ring<br />
Bridge<br />
CUP<br />
This full-band, three-part-cup bra style<br />
shows the parts of a bra. Proper fit is<br />
the same from style to style.<br />
9<br />
Apply the back fastener. Fold the hook tape over<br />
the band’s right end, as worn, with the hooks<br />
face down. Place the eye tape on the band’s left end,<br />
eyes face up. <strong>Sew</strong> each with a straight stitch, then<br />
overcast and finish the hook-and-eye tape edges<br />
using a short, wide zigzag stitch.<br />
54 TH R EADS w w w.threadsmagazine.com<br />
F e b r ua ry/Ma rc h 2 0 1 2 55<br />
Strap<br />
Center cup<br />
seam<br />
Eye tape<br />
Underwire<br />
BAND<br />
Hook tape