Couture Inspired Dress Pattern - Victoria and Albert Museum
Couture Inspired Dress Pattern - Victoria and Albert Museum
Couture Inspired Dress Pattern - Victoria and Albert Museum

Create successful ePaper yourself
Turn your PDF publications into a flip-book with our unique Google optimized e-Paper software.
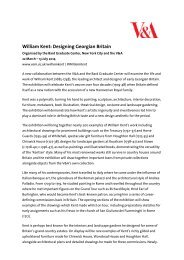
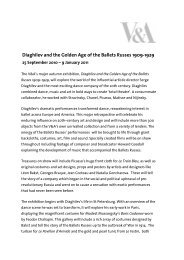
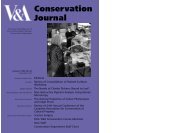
<strong>Couture</strong> <strong>Inspired</strong> <strong>Dress</strong> <strong>Pattern</strong><br />
This is an original pattern, created for the V&A Golden Age of <strong>Couture</strong><br />
exhibition website.<br />
It is based on a 1950’s ready to wear dress from the V&A collection <strong>and</strong> has<br />
been sized for modern day UK sizes 10, 12 <strong>and</strong> 14.<br />
The dress is close fitting with a waist seam, flared skirt <strong>and</strong> pockets. It is fitted<br />
above the waist with b<strong>and</strong> detail <strong>and</strong> lined top body.<br />
Day dress by Horrockses Fashion. Grey cotton printed with pink roses <strong>and</strong> white<br />
daisies, Britain, 1953. <strong>Museum</strong> no. T.640-1996<br />
1
You will need<br />
• A 20in (51cm) zipper (the original dress used a 19in zipper, but these<br />
are now difficult to find).<br />
• One large press stud.<br />
Fabrics:<br />
The original dress was made from floral cotton, with white cotton lining<br />
on upper body.<br />
You may want to be creative when you make your dress <strong>and</strong> choose a<br />
fabric that suits your own taste.<br />
Fabric cutting lengths:<br />
Main dress fabric:<br />
For fabrics that are…<br />
• 115cm (45in) wide 400cm length of fabric is required<br />
• 150cm (60in) wide 350cm length of fabric is required<br />
If you are using fabric with a pattern, you may need more fabric than<br />
the amounts given above.<br />
Lining fabric:<br />
For fabrics that are…<br />
• 115cm (45in) wide 60cm length of fabric is required<br />
Body Measurements (in cm)<br />
The pattern has been made for modern day UK sizes 10, 12 (sizes are given<br />
in cm):<br />
Size 10 12 14<br />
Bust<br />
84 88 92<br />
Waist<br />
Hips<br />
64 68 72<br />
89 93 97<br />
Shoulder 12 12.25 12.5<br />
Nape to waist 39.5 40 40.5<br />
Waist to knee 58 58.5 59<br />
2
About the pattern<br />
The<br />
pattern is available to download from the V&A Golden Age of <strong>Couture</strong><br />
website: www.vam.ac.uk/couture/<br />
There are two versions of the pattern<br />
available for you to download:<br />
1.<br />
A4/Print at Home<br />
This version of the pattern has been arranged onto A4 sized<br />
pages, for you to print <strong>and</strong> assemble at home.<br />
2. Large paper size<br />
This version<br />
of the pattern appears in this pdf as a single, large<br />
page.<br />
Each<br />
version<br />
of the pattern comprises of 2 documents, one for the pieces that<br />
form the body of the dress, the<br />
other for the skirt pieces.<br />
Ho w to assembling the A4/print at home pattern<br />
1. Download the following files:<br />
2.<br />
• 1_top_va_dress_pattern_A4.doc<br />
• 2_skirt_va_dress_pattern_A4.doc<br />
Open the files in Adobe Acrobat (or Acrobat Reader).<br />
3. Print the files.<br />
• Do not select ‘scale to fit’ or ‘crop’.<br />
• Do ensure that ‘None’ is selected<br />
the ‘Page Scaling’ option.<br />
• Print each pattern piece single sided; do not use duplex/double<br />
sided printing.<br />
4. Each page of the pattern is numbered to help you assemble the<br />
pattern.<br />
• The number appears on the bottom right<br />
of each pattern page.<br />
• Page<br />
1 appears is at<br />
the top left of the<br />
pattern, the numbering then<br />
proceeds<br />
across the<br />
top row,<br />
then down<br />
to the start of the next row<br />
(on the left side) <strong>and</strong> so on until the last piece,<br />
at the bottom right.<br />
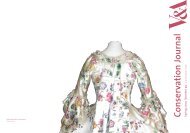
5. Use the<br />
pattern diagram on page 4 of this document to help you<br />
assemble<br />
the pattern.<br />
6. Each patte rn piece has a small margin around it. You may wish to cut<br />
off the margin on<br />
one side of each join<br />
between two pieces to prevent<br />
overlap.<br />
7. Use the dots <strong>and</strong> cross es on the pattern to help line up the pieces.<br />
3
Notes for printing the large file<br />
If you decide to print the large file at a printer’s, please ensure that they do<br />
not ‘scale to fit’, that they use the least expensive paper available for printing<br />
the<br />
pattern <strong>and</strong> they use paper of a suitable width for the pattern.<br />
<strong>Pattern</strong><br />
Pieces:<br />
1. Front body (cut 1 main fabric & 1 lining)<br />
2. Front shoulder piece (cut 2 main fabric & 2 lining)<br />
3. Back body<br />
(cut 2 main fabric & 2 lining)<br />
4. Back shoulder piece (cut 2 main fabric & 2 lining)<br />
5. B<strong>and</strong> (cut 1)<br />
6. Front lower body (cut 1)<br />
7. Back lower body (cut 1)<br />
8. Back bow piece<br />
(cut 1)<br />
9. Folded bow piece (cut 1)<br />
10. Central bow piece<br />
(cut 1)<br />
11. Centre front skirt panel (cut 1)<br />
12. Side front skirt panel<br />
(cut 2)<br />
13. Centre back skirt panel (cut 1)<br />
14. Side back skirt panel<br />
(cut 2)<br />
15. Centre back zip fastening<br />
(cut 1)<br />
16. Lower side skirt (cut 2)<br />
17. Pocket bag<br />
(cut 2)<br />
18. Upper side skirt panel (cut 2)<br />
4
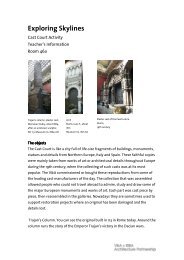
<strong>Pattern</strong> Diagram<br />
5
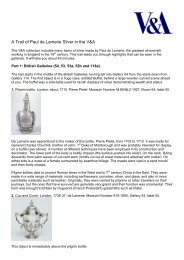
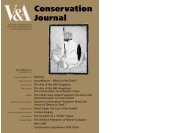
Underst<strong>and</strong>ing the pattern<br />
Diagrams:<br />
These<br />
diagrams show the names used for each part of the dress in the<br />
pattern:<br />
6
Notes<br />
• 1.5cm seam allowances included (this is shown on the pattern pieces<br />
for size 12 only, for all other sizes you will need to measure the correct<br />
allowance)<br />
• A 4cm hem allowance included<br />
• 2cm ease is given in the waist fit<br />
• All sizes are shown on the same pattern. You will need to ensure you<br />
cut the right size. To help you do this, the pattern lines are colour<br />
coded:<br />
o Size 10 Red<br />
o Size 12 Black<br />
o Size 14 Blue<br />
7
<strong>Pattern</strong> Instructions<br />
Body part:<br />
1. Stitch darts on front body piece (1)<br />
2. Stitch the two front shoulder pieces (2) to the front body piece (1)<br />
matching the notches.<br />
3. Stitch the two back shoulder pieces (4) to the two back body pieces (3)<br />
matching notches.<br />
4. Stitch the front side seams to the back side seams<br />
5. Stitch the front shoulder seams to the back shoulder seams<br />
6. Press all seams open <strong>and</strong> trim corners<br />
7. Repeat stages 1-6 with the lining pieces<br />
8. Place the two body pieces right sides together <strong>and</strong> sew around the<br />
neck edges <strong>and</strong> down the centre backs<br />
9. Trim back the seams of the lining <strong>and</strong> snip the corners (to aid turning<br />
body through to the right side)<br />
10. Turn body through, so that the right sides of the fabric are on the<br />
outside.<br />
11. Stitch around arm holes (on body to lining). From inside, with right<br />
sides together, pin <strong>and</strong> stitch from side seam to shoulder point, then<br />
stitch one side of arm hole at a time.<br />
12. Snip into curved armhole seams (to aid turning armholes through to<br />
right side).<br />
13. Stitch both ends of b<strong>and</strong> (5), turn through to right side <strong>and</strong> press on fold<br />
line.<br />
14. Stitch to body at under bust line.<br />
15. Stitch side seams of the front lower body piece (6) to the two back<br />
lower body pieces (7).<br />
16. Press side seams open <strong>and</strong> stitch lower<br />
body to top body (with b<strong>and</strong> in-<br />
between)<br />
17. Press all seams up: inside top body lining.<br />
18. H<strong>and</strong> sew lining to b<strong>and</strong><br />
Skirt part:<br />
19. Make up central front panels: Stitch centre front panel (11) to the two<br />
side front panels (12).<br />
20. Press seams to outside.<br />
21. Place zip facing (15) right sides<br />
together with centre back panel (13)<br />
matching the notches.<br />
8
22. Pin <strong>and</strong> stitch (0.5cm) either side of the zip opening, then cut down zip<br />
opening (<strong>and</strong> turn facing through to right side).<br />
23. Press into place<br />
24. Make up central back panels: stitch centre back panel (13) to the two<br />
side back panels (14), (catching the zip facing into seams).<br />
25. Press seams to outside.<br />
26. Make up side pocket panels: Stitch under pocket bag (17) to side panel<br />
(16) at pocket opening matching the notches.<br />
27. Press pocket seam open <strong>and</strong> fold back on its-self.<br />
28. Stitch pocket bag (17) to upper side panel (18) around the pocket<br />
seam, matching the notches.<br />
29. Repeat stages 26, 27, 28 with other ‘side<br />
pocket panel’.<br />
30. Stitch both ‘side pocket panels’ to front (12)<br />
<strong>and</strong> back (14) ‘central<br />
panels’. When doing so, catch top of pocket into seams, matching<br />
notches.<br />
31. Press seams to outside<br />
32. Press skirt hem up, <strong>and</strong> sew.<br />
Completing dress:<br />
33. Stitch body to skirt at waistline, matching notches.<br />
34. Sew zipper in by h<strong>and</strong> (as original dress).<br />
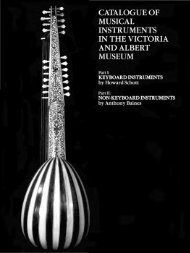
35. Make up bow: (see photos below). Stitch both sides of ‘back bow piece’<br />
(8) together to make a tube. Trim seam inside, turn through to right<br />
side.<br />
36. Press with seam running along centre back of tube.<br />
37. Tuck in ends to enclose <strong>and</strong> h<strong>and</strong>-sew<br />
into place.<br />
38. Stitch both sides of folded bow piece (9) together to make a tube. Trim<br />
seam inside, turn through<br />
to right side.<br />
39. Press with seam running along centre back of the tube.<br />
40. Sew ends together with seam to make a loop (<strong>and</strong> trim seam).<br />
41. Place ‘folded bow piece’ (9) on top<br />
of ‘back bow piece’ (8) <strong>and</strong> stitch<br />
down centre of bow to hold<br />
in place.<br />
42. Stitch both sides of central bow piece (10) together to make a tube.<br />
Trim seam inside, turn through to right side.<br />
43. Press with seam running along centre back of tube.<br />
44. Sew ends together with seam to make a loop (<strong>and</strong> trim seam).<br />
45. Place central bow piece ( 10) loop around the layers of bow.<br />
46. H<strong>and</strong> sew bow to left side of b<strong>and</strong> on dress.<br />
9
47. H<strong>and</strong> sew press stud to bow <strong>and</strong> right side of b<strong>and</strong> on dress.<br />
10