Instructions for Installing Toilevator(R) - Rehabmart.com
Instructions for Installing Toilevator(R) - Rehabmart.com
Instructions for Installing Toilevator(R) - Rehabmart.com

You also want an ePaper? Increase the reach of your titles
YUMPU automatically turns print PDFs into web optimized ePapers that Google loves.
<strong>Instructions</strong> <strong>for</strong> <strong>Installing</strong> <strong>Toilevator</strong>(R)<br />
Parts:<br />
1 super base<br />
2 foam ring seals<br />
1 soil pipe extension<br />
2 closet bolts<br />
2 round washers<br />
2 plastic washers<br />
4 flat washers<br />
2 trim caps<br />
4 Hexagon nuts<br />
1 Extended flexible water hose<br />
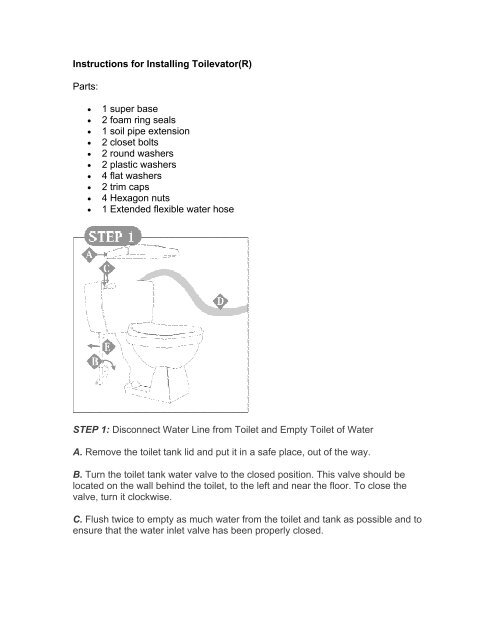
STEP 1: Disconnect Water Line from Toilet and Empty Toilet of Water<br />
A. Remove the toilet tank lid and put it in a safe place, out of the way.<br />
B. Turn the toilet tank water valve to the closed position. This valve should be<br />
located on the wall behind the toilet, to the left and near the floor. To close the<br />
valve, turn it clockwise.<br />
C. Flush twice to empty as much water from the toilet and tank as possible and to<br />
ensure that the water inlet valve has been properly closed.
D. Remove any remaining water in the tank and toilet bowl with a sponge, bailer<br />
or a wet/dry vacuum.<br />
E. Disconnect the water hose from the toilet tank and wall valve. Use a wrench if<br />
needed.<br />
STEP 2: Disassemble Toilet from Floor<br />
A. Remove the trim caps that cover the closet bolts. Use a screwdriver if needed.<br />
Closet bolts secure the toilet to the floor and are located on the base of the toilet<br />
near the floor. Remove the nuts from the closet bolts.<br />
B. Lay newspaper and perhaps some plastic on the floor, to place the toilet and<br />
tank on.<br />
C. Remove the toilet from its mount and place it on the newspaper. To make<br />
handling of the toilet easier, you may wish to remove the toilet tank. Disassemble<br />
the tank from the toilet base by removing the fasteners located in the bottom of<br />
the toilet tank. Or, you may wish to get help from another person. With one<br />
person on each side of the toilet, remove the entire toilet tank and toilet assembly<br />
from the closet flange and place the assembly on the newspaper.<br />
NOTE: If you have difficulty removing the toilet, you may need to break the seal<br />
to the closet flange by rocking the toilet from side to side.<br />
D. Remove any remaining old wax or foam seal from the closet flange and toilet<br />
underside.<br />
NOTE: Be careful not to drop anything down the open soil pipe. It is a good idea<br />
to temporarily block the open pipe.
STEP 3: Locate the Correct Spacer Adjustment Holes<br />
A. Place the spacer flat on the floor so the lettering is showing. Note that there<br />
are 6 pairs of numbered holes. One end is labeled A and the other end is labeled<br />
B.<br />
B. Find the adjustment position by placing the toilet on top of the spacer. To<br />
correctly find the adjustment position, the closet bolt holes of the toilet (those<br />
holes on either side of the soil pipe opening if the toilet has more than one set of<br />
bolt holes) should line up with one of the six sets of numbered holes on the<br />
spacer.<br />
C. Choose a set of holes that allow the front edge of the toilet base to <strong>com</strong>e up<br />
as close as possible to the end of the spacer without overhanging while<br />
<strong>com</strong>pletely covering up the spacer top surface detail.<br />
NOTE: The spacer is reversible. Either end can go <strong>for</strong>ward.<br />
D. Record the number of the correct spacer hole and whether the A end or the B<br />
end is closest to the wall. (Example: 3A - toward the wall)
STEP 4: Install the Spacer and Soil Pipe Extension<br />
A. Remove the old closet bolts by sliding them out of the slots of the floor flange.<br />
B. Replace the new longer closet bolts that were supplied with the kit in the<br />
closet flange bolt receptacles.<br />
C. Place the spacer on the floor, over the closet flange, with the closet bolts<br />
through the correct spacer holes and the spacer in the correct orientation.<br />
Unwrap one foam seal (supplied with the kit) and push it into place over the<br />
bottom end of the pipe fitting.<br />
D. Place the pipe fitting with the foam ring seal into position in the closet flange<br />
by placing the pipe fitting over the closet bolts. The word "UP" on the pipe should<br />
face up. Push down until the foam* seal is seated firmly in the closet flange and<br />
the pipe is resting on top of the spacer.<br />
*Foam ring seals are a new improved technology to replace wax seals. Foam seals allow a<br />
margin of error in the placement and removal of the toilet should a misalignment occur. If you<br />
prefer to use wax seals, you can obtain two from your local hardware store.<br />
E. Place on round washer supplied with the kit over each closet bolt and screw<br />
on one nut over each closet bolt. Tighten nut down to hold the spacer in position.<br />
Do not over tighten. Check alignment.
STEP 5:Re-install the Toilet onto the Spacer<br />
A. Unwrap the second foam ring, supplied with the kit, and assemble onto the<br />
underside of the toilet. Push the foam ring around the soil pipe opening until it<br />
rests on the porcelain.<br />
B. Lower the toilet onto the spacer with the closet bolts <strong>com</strong>ing through the bolt<br />
holes. It is easiest to lift the toilet onto the spacer with two people. Push the toilet<br />
down firmly to set the foam seal. Make sure that the toilet and spacer are<br />
reasonably perpendicular to the wall. Adjust the rotation as necessary.<br />
C. Place a plastic washer, supplied with the kit, over each closet bolt. Place the<br />
other flat washers, supplied with the kit, over the closet bolts and on top of the<br />
plastic washers. Fasten the second set of nuts over the closet bolts until tight.<br />
NOTE: Be careful not to over tighten the fasteners since over tightening may<br />
cause the porcelain to break.<br />
D. Install the trim caps supplied with the kit over the nut assembly and snap into<br />
place over the plastic washer.<br />
E. Re-assemble the toilet tank to the back of the toilet at this time, if you took it<br />
off.
STEP 6: Reconnect the Water Supply to the Toilet Tank<br />
A. If your original cold water line is still long enough to reach your toilet tank, you<br />
may reuse it. Otherwise, use the longer water hose supplied with the kit. If you<br />
cannot reuse your previous water inlet connection or the supplied water hose,<br />
check at your hardware store <strong>for</strong> the correct water line fixture.<br />
NOTE: The supplied water connection hose is <strong>for</strong> use on <strong>com</strong>pression outlet<br />
valves only. Do not use the supplied water line on iron pipe stub outs, slip joint<br />
valves or flare outlet valves. The supplied water connection hose is intended <strong>for</strong><br />
normal household water pressure up to 100 psi. If your system uses more than<br />
100 psi., attach a higher pressure hose.<br />
B. Turn the water inlet valve to the open position, counter clockwise. With the<br />
water valve open, the toilet tank should fill with water and the toilet should be<br />
ready to flush. Try flushing once or twice be<strong>for</strong>e use.<br />
NOTE: If the water hose connections are leaking, tighten the connections with a<br />
wrench until it stops.<br />
C. Replace the toilet tank lid.<br />
D. If desired, a bead of silicone sealant can be applied between the spacer and<br />
the toilet as well as between the spacer and the floor.