Tipto Twelve Beschreibung - H. Lohmann Schiffs
Tipto Twelve Beschreibung - H. Lohmann Schiffs
Tipto Twelve Beschreibung - H. Lohmann Schiffs

Create successful ePaper yourself
Turn your PDF publications into a flip-book with our unique Google optimized e-Paper software.
<strong>Tipto</strong> <strong>Twelve</strong> ® <strong>Beschreibung</strong>:<br />
Das <strong>Tipto</strong> <strong>Twelve</strong>® ist ein Hochleistungstau. Die 12-fach geflochtene Bauweise<br />
macht das Tau runder, stabiler, mehr kompakt und regelmäßiger auf der<br />
Oberfläche. Seine Kraft, der geringe Abrieb und die Energieabsorbierung<br />
sichern einen langen Lebenslauf, Wirtschaftlichkeit und Sicherheit. Der kleine<br />
Durchmesser, das weiche Material und das niedrige Gewicht erleichtern die<br />
Handhabung an Bord. <strong>Tipto</strong> <strong>Twelve</strong> ist 100% schwimmfähig! Somit ist die<br />
Gefahr, dass das Tau in die <strong>Schiffs</strong>-Propeller kommt, minimiert. Kostspielige<br />
Ausfallzeiten können so vermieden werden. <strong>Tipto</strong> <strong>Twelve</strong> ist verfügbar in den<br />
Durchmessern von 16 bis zu 48 mm. <strong>Tipto</strong> <strong>Twelve</strong> wird als Festmacher bei<br />
Pollern und/oder Winden verwendend. Das <strong>Tipto</strong> <strong>Twelve</strong> hat eine sehr gute UV-<br />
Beständigkeit. Seine gelbe Farbe ist auch ein Sicherheitsfaktor. Das Tau ist gut<br />
zu erkennen und verringert Unfälle durch Stolpern. Ein spezielles Lago Coating<br />
(gelbe Farbe) verstärkt zusätzlich die Abrieb - und Bruchfestigkeit! Zusätzlich<br />
erhöht sich die Haltbarkeit der Spleiße. Alle Taue werden mit Zertifikat<br />
geliefert. Ausgiebige TCLL Tests haben ergeben, das <strong>Tipto</strong> <strong>Twelve</strong> im<br />
Vergleich zu normalen PP Tauen wesentlich länger die Bruchfestigkeit hält.<br />
Dies trägt wieder zur Arbeitssicherheit an Bord bei. Lieferbare Standartlängen<br />
mit zwei Augen und Preise finden Sie unter: www.lohmann-webshop.de! Auf<br />
Wunsch können auch individuelle Tauwerklängen angefertigt werden. Weitere<br />
technische Informationen und die Spleißanleitung sehen Sie unter:<br />
www.lankhorstropes.com!<br />
H. <strong>Lohmann</strong> <strong>Schiffs</strong> – und Industriebedarf e. K.<br />
Zeppelinstraße 3 – 6 49733 Haren (Ems)<br />
Tel. 05932-73470 Fax 05932-734730<br />
info@lohmann-haren.de
FIBRE ROPES<br />
High performance ropes TIPTO-TWELVE®<br />
<strong>Tipto</strong> <strong>Twelve</strong>®, available in the<br />
diameter range of 16 mm till<br />
48 mm, is the successor of the<br />
well-known <strong>Tipto</strong> Eight®. The<br />
construction is different, the<br />
material remains<br />
the same. The 12-strand<br />
braided construction makes<br />
the rope rounder, more<br />
stable, more compact and<br />
more regular on the surface.<br />
This increases the abrasion<br />
resistance and the life-time<br />
of the rope even more.<br />
<strong>Tipto</strong> <strong>Twelve</strong>® can be used<br />
for mooring, using either<br />
bollards and/or winches. All<br />
<strong>Tipto</strong> <strong>Twelve</strong>® coils will be<br />
fitted with a quality label,<br />
stating “Original product<br />
of Lankhorst Ropes”. <strong>Tipto</strong><br />
<strong>Twelve</strong>® ropes in the range<br />
from 32 mm up to 48 mm<br />
have been upgraded with an<br />
extra marker yarn. The rope<br />
size can now easily (and<br />
above all) without mistake<br />
be identified.<br />
Green = 32 mm<br />
Brown = 36 mm<br />
Black = 40 mm<br />
Blue = 44 mm<br />
White = 48 mm<br />
The master of innovation in ropes<br />
TIPTO TWELVE®<br />
SPECIFIC GRAVITY • 0,93 CONSTRUCTION • 12-strand<br />
UV-RESISTANCE • very good plaited<br />
ABRASION RESISTANCE • very good TCLL VALUE • 70,7%<br />
CHEMICAL RESISTANCE • good COLOUR • yellow<br />
ELONGATION • see graph MARKER YARN • orange<br />
MELTING POINT • approx. 140 o C WATERABSORPTION • 0%<br />
Art.number<br />
111.516<br />
111.520<br />
111.524<br />
111.528<br />
111.532<br />
111.536<br />
111.540<br />
111.544<br />
111.548<br />
Circ.<br />
(inches)<br />
2<br />
2 1/2<br />
3<br />
3 1/2<br />
4<br />
4 1/2<br />
5<br />
5 1/2<br />
6<br />
Diameter<br />
(mm)<br />
16<br />
20<br />
24<br />
28<br />
32<br />
36<br />
40<br />
44<br />
48<br />
Weight<br />
(kg/100m)<br />
12,1<br />
18,9<br />
27,3<br />
37,3<br />
53<br />
66<br />
75,6<br />
92,4<br />
109<br />
MBF<br />
(kN)<br />
48<br />
72,8<br />
103<br />
137<br />
177<br />
222<br />
269<br />
321<br />
378<br />
Weight<br />
(lbs/100 ft)<br />
8<br />
13<br />
18<br />
25<br />
36<br />
44<br />
51<br />
62<br />
73<br />
MBF<br />
(lbs)<br />
10.791<br />
16.366<br />
23.155<br />
30.799<br />
39.791<br />
49.908<br />
60.474<br />
72.164<br />
84.978<br />
Diameter, weight and MBF (as well as other mechanical and physical properties) are determined<br />
according ISO 2307:2005. The MBF refers to the breaking strength in the rope/wire itself, without<br />
splices or any other form of termination that can be formed with or without the use of accessories/<br />
fi ttings.<br />
Min.breaking force (%)<br />
100<br />
90<br />
80<br />
70<br />
60<br />
50<br />
40<br />
30<br />
20<br />
10<br />
0<br />
0 10 20 30 40<br />
Elongation (%)<br />
R-2<br />
010610
INFORMATION<br />
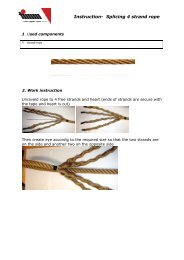
THE TOOLS YOU WILL NEED: Sharp knife, tape and a spike<br />
This splice is suitable for 12 strand ropes, braided one over one.<br />
SPLICE INSTRUCTIONS TIPTO TWELVE®<br />
START<br />
a. Start with measuring the length of the tail. It should at least be 12 full braiding<br />
pitches long. Wrap a tape around rope at the start point of the splice (photo 1);<br />
b. Tape the individual ends to keep yarns together. Then unlay the tail for the full 12<br />
braiding pitches;<br />
c. Bend the rope to form the eye and add eye protection if required. A seizing or<br />
whipping may be used to keep two rope parts together at the start point of the<br />
splice;<br />
d. Divide the 12 strands into 6 pairs. 3 pairs of left hand lay and 3 pairs of right hand lay<br />
strands (photo 2).<br />
SPLICING<br />
Note: always tuck right hand lay strands under right hand lay strands and left under left.<br />
A. Tuck from the fi rst pair (1R right red), the 1 st strand under 6 strands (2 right, 2 left, 2<br />
right) of the body (photo 3);<br />
B. Tuck the 2 nd right hand strand from this pair under 5 strands (photo 4);<br />
C. Continue tucking these strands under resp. the same 5 th and 6 th right hand strand of<br />
the body. (over one, under one, over one) (photo 5);<br />
D. Both strands are tucked in the same way 3 times in total. Only with the second strand<br />
a fourth tuck is made over one, under two (photo 6);<br />
E. The second pair of strands (2L, left, grey), are tucked under the 4 th and 3 rd strand of<br />
the body (photo 7). Continue here as well with tucking these strands over and under<br />
the same 4 th and 3 rd strand of the body. Again, only the second strand is tucked for a<br />
fourth time over one, under 2 (photo 8);<br />
www.lankhorstropes.com<br />
The master of innovation in ropes<br />
8<br />
1<br />
2<br />
3<br />
4<br />
5<br />
6<br />
7<br />
I-9<br />
010709
010709<br />
INFORMATION<br />
9<br />
10<br />
11<br />
12<br />
13<br />
14<br />
15<br />
16<br />
17<br />
www.lankhorstropes.com<br />
The master of innovation in ropes<br />
F. The third pair (3R, right, yellow), are tucked under resp. the 2 nd and 1 st strand of the<br />
body. Then follow the same procedure as described before (photo 9 + 10);<br />
G. The fourth pair (4L, left, black), go under resp. the 1 st and 2 nd strands of the body<br />
(calculated from the tucks made at F) Then follow same procedure (photo 11 + 12);<br />
H. The fi fth set (5R, right, white), are both tucked under one strand, then follow same<br />
procedure (photo 13+14);<br />
I. The last pair (6L, left, blue) are tucked under resp. 2 and 3 strands, then follow the<br />
same procedure (photo 15+16);<br />
J. The splice is now fi nished. Tape the two most close laying ends together (if the<br />
procedure has been followed correctly then such a pair will consists out of a left<br />
and right hand laid strand) and cut off the over length (photo 17).<br />
THE SPLICE IS NOW COMPLETE.<br />
I-10