Single Pole and 3-Way Switch
Single Pole and 3-Way Switch
Single Pole and 3-Way Switch

Create successful ePaper yourself
Turn your PDF publications into a flip-book with our unique Google optimized e-Paper software.
PK-93604-10-00-0A<br />
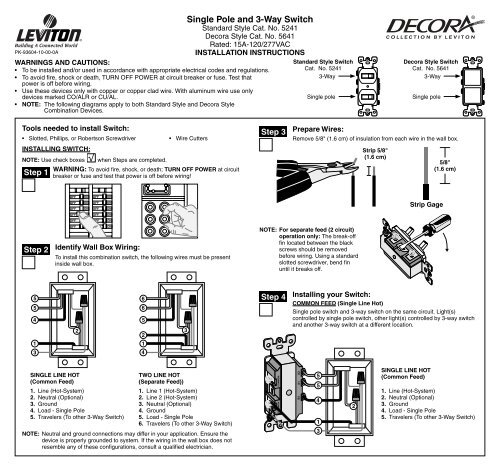
<strong>Single</strong> <strong>Pole</strong> <strong>and</strong> 3-<strong>Way</strong> <strong>Switch</strong><br />
St<strong>and</strong>ard Style Cat. No. 5241<br />
Decora Style Cat. No. 5641<br />
Rated: 15A-120/277VAC<br />
INSTALLATION INSTRUCTIONS<br />
WARNINGS AND CAUTIONS:<br />
To be installed <strong>and</strong>/or used in accordance with appropriate electrical codes <strong>and</strong> regulations.<br />
To avoid fi re, shock or death, TURN OFF POWER at circuit breaker or fuse. Test that<br />
power is off before wiring.<br />
Use these devices only with copper or copper clad wire. With aluminum wire use only<br />
devices marked CO/ALR or CU/AL.<br />
NOTE: The following diagrams apply to both St<strong>and</strong>ard Style <strong>and</strong> Decora Style<br />
Combination Devices.<br />
Tools needed to install <strong>Switch</strong>:<br />
Slotted, Phillips, or Robertson Screwdriver Wire Cutters<br />
INSTALLING SWITCH:<br />
NOTE: Use check boxes when Steps are completed.<br />
Step 1<br />
Step 2<br />
<br />
<br />
<br />
<br />
<br />
WARNING: To avoid fi re, shock, or death; TURN OFF POWER at circuit<br />
breaker or fuse <strong>and</strong> test that power is off before wiring!<br />
<br />
<br />
<br />
<br />
<br />
<br />
<br />
<br />
<br />
<br />
<br />
<br />
<br />
<br />
<br />
<br />
<br />
<br />
<br />
Identify Wall Box Wiring:<br />
To install this combination switch, the following wires must be present<br />
inside wall box.<br />
<br />
SINGLE LINE HOT<br />
(Common Feed)<br />
1. Line (Hot-System)<br />
2. Neutral (Optional)<br />
3. Ground<br />
4. Load - <strong>Single</strong> <strong>Pole</strong><br />
5. Travelers (To other 3-<strong>Way</strong> <strong>Switch</strong>)<br />
NOTE: Neutral <strong>and</strong> ground connections may differ in your application. Ensure the<br />
device is properly grounded to system. If the wiring in the wall box does not<br />
resemble any of these confi gurations, consult a qualifi ed electrician.<br />
<br />
<br />
<br />
<br />
<br />
<br />
TWO LINE HOT<br />
(Separate Feed))<br />
<br />
1. Line 1 (Hot-System)<br />
2. Line 2 (Hot-System)<br />
3. Neutral (Optional)<br />
4. Ground<br />
5. Load - <strong>Single</strong> <strong>Pole</strong><br />
6. Travelers (To other 3-<strong>Way</strong> <strong>Switch</strong>)<br />
Step 3<br />
St<strong>and</strong>ard Style <strong>Switch</strong><br />
Cat. No. 5241<br />
3-<strong>Way</strong><br />
<strong>Single</strong> pole<br />
NOTE: For separate feed (2 circuit)<br />
operation only: The break-off<br />
fi n located between the black<br />
screws should be removed<br />
before wiring. Using a st<strong>and</strong>ard<br />
slotted screwdriver, bend fi n<br />
until it breaks off.<br />
Step 4<br />
Decora Style <strong>Switch</strong><br />
Cat. No. 5641<br />
3-<strong>Way</strong><br />
<strong>Single</strong> pole<br />
Prepare Wires:<br />
Remove 5/8" (1.6 cm) of insulation from each wire in the wall box.<br />
Strip 5/8"<br />
(1.6 cm)<br />
Strip Gage<br />
5/8"<br />
(1.6 cm)<br />
Installing your <strong>Switch</strong>:<br />
COMMON FEED (<strong>Single</strong> Line Hot)<br />
<strong>Single</strong> pole switch <strong>and</strong> 3-way switch on the same circuit. Light(s)<br />
controlled by single pole switch, other light(s) controlled by 3-way switch<br />
<strong>and</strong> another 3-way switch at a different location.<br />
<br />
<br />
<br />
<br />
<br />
<br />
<br />
SINGLE LINE HOT<br />
(Common Feed)<br />
1. Line (Hot-System)<br />
2. Neutral (Optional)<br />
3. Ground<br />
4. Load - <strong>Single</strong> <strong>Pole</strong><br />
5. Travelers (To other 3-<strong>Way</strong> <strong>Switch</strong>)
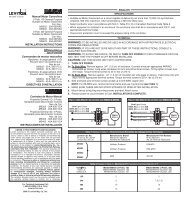
Step 4<br />
cont.<br />
Connect wires per WIRING DIAGRAM as follows.<br />
NOTE: For separate feed installations (TWO LINE HOT) proceed to Step 4a.<br />
Loop wires clockwise 3/4 turn around terminal screws.<br />
Green or bare copper wall box wire (Ground) to Green screw.<br />
Black wall box wire (LINE HOT) to any Black screw (Common).<br />
Remaining black wall box wire (Load) to Brass screw (B1).<br />
Traveler wires to Brass screws (A1 <strong>and</strong> A2).<br />
Tighten screws over wire loops with a force of 12-14 in-lbs. of torque.<br />
Terminal screws accept up to #12 AWG copper or copper clad wire.<br />
Step 4a<br />
COMMON FEED (<strong>Single</strong> Line Hot)<br />
SEPARATE FEED (Two Line Hot)<br />
<strong>Single</strong> pole switch <strong>and</strong> 3-way switch on two separate circuits. Light(s)<br />
controlled by single pole switch, other light(s) controlled by 3-way switch<br />
<strong>and</strong> another 3-way switch at a different location. Break-off fi n removed.<br />
Break-off fi n<br />
removed<br />
<br />
<br />
TWO LINE HOT<br />
(Separate Feed)<br />
1. Line 1 (Hot-System)<br />
2. Line 2 (Hot-System)<br />
<br />
3. Neutral (Optional)<br />
4. Ground<br />
<br />
5. Load - <strong>Single</strong> <strong>Pole</strong><br />
<br />
<br />
6. Travelers<br />
(To other 3-<strong>Way</strong> <strong>Switch</strong>)<br />
<br />
For technical assistance contact us at 1-800-824-3005<br />
Visit our website at www.leviton.com<br />
Step 4a<br />
cont.<br />
Connect wires per WIRING DIAGRAM as follows.<br />
Loop wires clockwise 3/4 turn around terminal screws.<br />
Green or bare copper wall box wire (Ground) to Green screw.<br />
Black wall box wire (LINE 1 - HOT) to Black screw (Common).<br />
Black wall box wire (LINE 2 - HOT) to remaining Black screw (Common).<br />
Remaining black wall box wire (Load) to Brass screw (B1).<br />
Traveler wires to Brass screws (A1 <strong>and</strong> A2).<br />
Tighten screws over wire loops with a force of 12-14 in.-lbs. of torque.<br />
Terminal screws accept up to #12 AWG copper or copper clad wire.<br />
Step 5<br />
Step 6<br />
Product Information<br />
SEPARATE FEED (Two Line Hot)<br />
Complete Installation:<br />
Carefully position all wires to provide room in wall box for switch<br />
Mount switch into wall box with mounting screws supplied.<br />
Attach wallplate (sold separately) <strong>and</strong> restore power.<br />
INSTALLATION IS COMPLETE.<br />
Test Installation:<br />
RESTORE POWER AT CIRCUIT BREAKER OR FUSE.<br />
FOR 3-WAY SWITCH<br />
Operate top toggle (rocker) several times: Light(s) should turn<br />
on <strong>and</strong> off.<br />
Go to other 3-way switch location <strong>and</strong> operate toggle (rocker) several<br />
times: Light(s) should turn on <strong>and</strong> off.<br />
FOR SINGLE POLE SWITCH<br />
Operate bottom toggle (rocker) several times: Light(s) should turn on<br />
<strong>and</strong> off.<br />
NOTE: If light(s) do not work properly, TURN OFF POWER <strong>and</strong><br />
re-check wiring connections. If light(s) still do not work, consult a<br />
qualifi ed electrician.<br />
LIMITED 2 YEAR WARRANTY AND EXCLUSIONS<br />
Leviton warrants to the original consumer purchaser <strong>and</strong> not for the benefi t of anyone else that this product at the time of its sale by Leviton is free of defects in materials <strong>and</strong> workmanship under normal <strong>and</strong> proper<br />
use for two years from the purchase date. Leviton’s only obligation is to correct such defects by repair or replacement, at its option, if within such two year period the product is returned prepaid, with proof of<br />
purchase date, <strong>and</strong> a description of the problem to Leviton Manufacturing Co., Inc., Att: Quality Assurance Department, 59-25 Little Neck Parkway, Little Neck, New York 11362-2591. This warranty excludes<br />
<strong>and</strong> there is disclaimed liability for labor for removal of this product or reinstallation. This warranty is void if this product is installed improperly or in an improper environment, overloaded, misused, opened, abused,<br />
or altered in any manner, or is not used under normal operating conditions or not in accordance with any labels or instructions. There are no other or implied warranties of any kind, including merchantability <strong>and</strong><br />
fi tness for a particular purpose, but if any implied warranty is required by the applicable jurisdiction, the duration of any such implied warranty, including merchantability <strong>and</strong> fi tness for a particular purpose, is limited<br />
to two years. Leviton is not liable for incidental, indirect, special, or consequential damages, including without limitation, damage to, or loss of use of, any equipment, lost sales or profi ts or delay or failure to perform<br />
this warranty obligation. The remedies provided herein are the exclusive remedies under this warranty, whether based on contract, tort or otherwise.<br />
PK-93604-10-00-0A