SINGLE BRAID EYE SPLICE (TUCK)
SINGLE BRAID EYE SPLICE (TUCK)
SINGLE BRAID EYE SPLICE (TUCK)

Create successful ePaper yourself
Turn your PDF publications into a flip-book with our unique Google optimized e-Paper software.
FIGURE 1<br />
FIGURE 2<br />
FIGURE 3<br />
6<br />
A<br />
B<br />
<strong>SINGLE</strong> <strong>BRAID</strong> <strong>EYE</strong> <strong>SPLICE</strong><br />
(<strong>TUCK</strong>)<br />
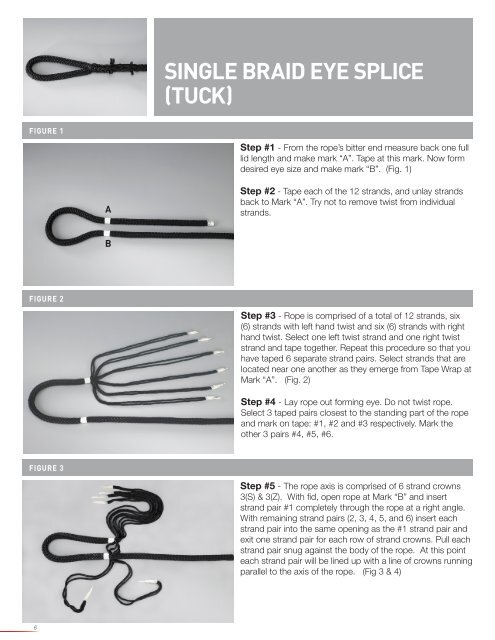
Step #1 - From the rope’s bitter end measure back one full<br />
lid length and make mark “A”. Tape at this mark. Now form<br />
desired eye size and make mark “B”. (Fig. 1)<br />
Step #2 - Tape each of the 12 strands, and unlay strands<br />
back to Mark “A”. Try not to remove twist from individual<br />
strands.<br />
Step #3 - Rope is comprised of a total of 12 strands, six<br />
(6) strands with left hand twist and six (6) strands with right<br />
hand twist. Select one left twist strand and one right twist<br />
strand and tape together. Repeat this procedure so that you<br />
have taped 6 separate strand pairs. Select strands that are<br />
located near one another as they emerge from Tape Wrap at<br />
Mark “A”. (Fig. 2)<br />
Step #4 - Lay rope out forming eye. Do not twist rope.<br />
Select 3 taped pairs closest to the standing part of the rope<br />
and mark on tape: #1, #2 and #3 respectively. Mark the<br />
other 3 pairs #4, #5, #6.<br />
Step #5 - The rope axis is comprised of 6 strand crowns<br />
3(S) & 3(Z). With fid, open rope at Mark “B” and insert<br />
strand pair #1 completely through the rope at a right angle.<br />
With remaining strand pairs (2, 3, 4, 5, and 6) insert each<br />
strand pair into the same opening as the #1 strand pair and<br />
exit one strand pair for each row of strand crowns. Pull each<br />
strand pair snug against the body of the rope. At this point<br />
each strand pair will be lined up with a line of crowns running<br />
parallel to the axis of the rope. (Fig 3 & 4)
FIGURE 4<br />
FIGURE 5<br />
FIGURE 6<br />
<strong>SINGLE</strong> <strong>BRAID</strong> <strong>EYE</strong> <strong>SPLICE</strong><br />
(<strong>TUCK</strong>)<br />
Step #6 - Starting with strand pair #1, select a row of<br />
crowns down the axis of the rope and tuck the pair #1 over<br />
one strand and under two strands. Once tucked, pull out<br />
slack in strand pair #1. Make only one tuck. Now tuck pair<br />
strands #2 through #6 in the same way – with each pair<br />
select crown row and tuck the individual pair over one strand<br />
and under two strands. Pull out slack in each strand.<br />
Remove tape wrap at Mark “A” and gently but firmly pull on<br />
each of the strand pairs so Mark “A” is now snug up to the<br />
base of the eye. (Mark B) Now complete two (2) more sets<br />
of tucks with each tapered strand pair. Be sure to tuck each<br />
strand pair down the same crown strand line - try to keep<br />
twist in each pair, and continually remove slack from each<br />
strand pair after tucking. (Fig. 5 & 6)<br />
Step #7 – Cut off strand pairs #1, #3 and #5.<br />
Tuck strand pairs #2, #4 and #6 for additional 3 tucks – retain<br />
twist and remove excess slack.<br />
Step #8 - Split each strand pair (#2, #4, #6) into 2 individual<br />
strands and tape each strand. Cut off one strand in each<br />
pair leaving a short tail projecting from last tuck. Tuck the<br />
remaining 3 single taped strands for 3 tucks (over one under<br />
two) removing slack and keeping twist. Now cut off the<br />
taped strands leaving a short tail projecting as shown above.<br />
Note: After cutting off the last strand, melt the ends of all<br />
the cut strands and remove tape.<br />
7