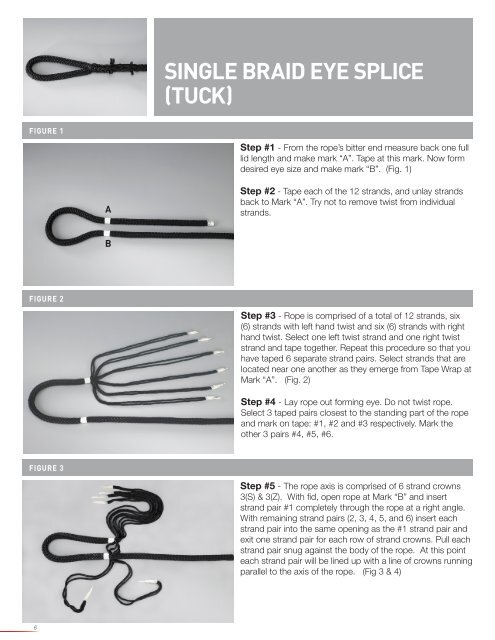
SINGLE BRAID EYE SPLICE (TUCK)
SINGLE BRAID EYE SPLICE (TUCK)
SINGLE BRAID EYE SPLICE (TUCK)

You also want an ePaper? Increase the reach of your titles
YUMPU automatically turns print PDFs into web optimized ePapers that Google loves.
FIGURE 1<br />
FIGURE 2<br />
FIGURE 3<br />
6<br />
A<br />
B<br />
<strong>SINGLE</strong> <strong>BRAID</strong> <strong>EYE</strong> <strong>SPLICE</strong><br />
(<strong>TUCK</strong>)<br />
Step #1 - From the rope’s bitter end measure back one full<br />
lid length and make mark “A”. Tape at this mark. Now form<br />
desired eye size and make mark “B”. (Fig. 1)<br />
Step #2 - Tape each of the 12 strands, and unlay strands<br />
back to Mark “A”. Try not to remove twist from individual<br />
strands.<br />
Step #3 - Rope is comprised of a total of 12 strands, six<br />
(6) strands with left hand twist and six (6) strands with right<br />
hand twist. Select one left twist strand and one right twist<br />
strand and tape together. Repeat this procedure so that you<br />
have taped 6 separate strand pairs. Select strands that are<br />
located near one another as they emerge from Tape Wrap at<br />
Mark “A”. (Fig. 2)<br />
Step #4 - Lay rope out forming eye. Do not twist rope.<br />
Select 3 taped pairs closest to the standing part of the rope<br />
and mark on tape: #1, #2 and #3 respectively. Mark the<br />
other 3 pairs #4, #5, #6.<br />
Step #5 - The rope axis is comprised of 6 strand crowns<br />
3(S) & 3(Z). With fid, open rope at Mark “B” and insert<br />
strand pair #1 completely through the rope at a right angle.<br />
With remaining strand pairs (2, 3, 4, 5, and 6) insert each<br />
strand pair into the same opening as the #1 strand pair and<br />
exit one strand pair for each row of strand crowns. Pull each<br />
strand pair snug against the body of the rope. At this point<br />
each strand pair will be lined up with a line of crowns running<br />
parallel to the axis of the rope. (Fig 3 & 4)
FIGURE 4<br />
FIGURE 5<br />
FIGURE 6<br />
<strong>SINGLE</strong> <strong>BRAID</strong> <strong>EYE</strong> <strong>SPLICE</strong><br />
(<strong>TUCK</strong>)<br />
Step #6 - Starting with strand pair #1, select a row of<br />
crowns down the axis of the rope and tuck the pair #1 over<br />
one strand and under two strands. Once tucked, pull out<br />
slack in strand pair #1. Make only one tuck. Now tuck pair<br />
strands #2 through #6 in the same way – with each pair<br />
select crown row and tuck the individual pair over one strand<br />
and under two strands. Pull out slack in each strand.<br />
Remove tape wrap at Mark “A” and gently but firmly pull on<br />
each of the strand pairs so Mark “A” is now snug up to the<br />
base of the eye. (Mark B) Now complete two (2) more sets<br />
of tucks with each tapered strand pair. Be sure to tuck each<br />
strand pair down the same crown strand line - try to keep<br />
twist in each pair, and continually remove slack from each<br />
strand pair after tucking. (Fig. 5 & 6)<br />
Step #7 – Cut off strand pairs #1, #3 and #5.<br />
Tuck strand pairs #2, #4 and #6 for additional 3 tucks – retain<br />
twist and remove excess slack.<br />
Step #8 - Split each strand pair (#2, #4, #6) into 2 individual<br />
strands and tape each strand. Cut off one strand in each<br />
pair leaving a short tail projecting from last tuck. Tuck the<br />
remaining 3 single taped strands for 3 tucks (over one under<br />
two) removing slack and keeping twist. Now cut off the<br />
taped strands leaving a short tail projecting as shown above.<br />
Note: After cutting off the last strand, melt the ends of all<br />
the cut strands and remove tape.<br />
7