Replace a Ceiling Fan - Walmart
Replace a Ceiling Fan - Walmart
Replace a Ceiling Fan - Walmart

You also want an ePaper? Increase the reach of your titles
YUMPU automatically turns print PDFs into web optimized ePapers that Google loves.
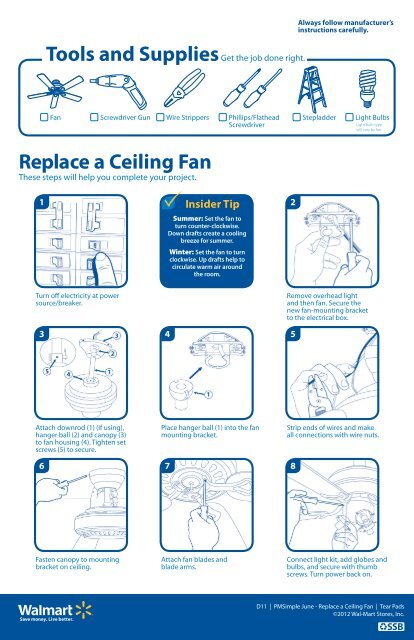
<strong>Replace</strong> a <strong>Ceiling</strong> <strong>Fan</strong><br />
These steps will help you complete your project.<br />
1<br />
3<br />
Attach downrod (1) (if using),<br />
hanger ball (2) and canopy (3)<br />
to fan housing (4). Tighten set<br />
screws (5) to secure.<br />
6<br />
Tools and Supplies Get the job done right.<br />
<strong>Fan</strong> Screwdriver Gun Wire Strippers Phillips/Flathead<br />
Screwdriver<br />
Turn off electricity at power<br />
source/breaker.<br />
Fasten canopy to mounting<br />
bracket on ceiling.<br />
4<br />
Place hanger ball (1) into the fan<br />
mounting bracket.<br />
7<br />
Insider Tip<br />
Summer: Set the fan to<br />
turn counter-clockwise.<br />
Down drafts create a cooling<br />
breeze for summer.<br />
Winter: Set the fan to turn<br />
clockwise. Up drafts help to<br />
circulate warm air around<br />
the room.<br />
Attach fan blades and<br />
blade arms.<br />
Remove overhead light<br />
and then fan. Secure the<br />
new fan-mounting bracket<br />
to the electrical box.<br />
Strip ends of wires and make<br />
all connections with wire nuts.<br />
D11 | Projects Made Smple | Tear Pads | ©2012 Wal-Mart Stores, Inc. | 0000000<br />
2<br />
5<br />
8<br />
Always follow manufacturer’s<br />
instructions carefully.<br />
Stepladder Light Bulbs<br />
Light bulb type<br />
will vary by fan.<br />
Connect light kit, add globes and<br />
bulbs, and secure with thumb<br />
screws. Turn power back on.<br />
D11 | PMSimple June - <strong>Replace</strong> a <strong>Ceiling</strong> <strong>Fan</strong> | Tear Pads<br />
©2012 Wal-Mart Stores, Inc.