

SuperFlo Owner's Manual - Pentair
SuperFlo Owner's Manual - Pentair
SuperFlo Owner's Manual - Pentair

Create successful ePaper yourself
Turn your PDF publications into a flip-book with our unique Google optimized e-Paper software.
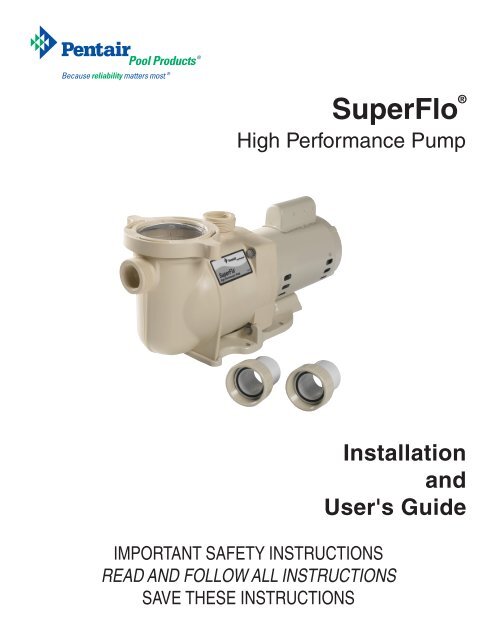
<strong>SuperFlo</strong> ®<br />
High Performance Pump<br />
Installation<br />
and<br />
User's Guide<br />
IMPORTANT SAFETY INSTRUCTIONS<br />
READ AND FOLLOW ALL INSTRUCTIONS<br />
SAVE THESE INSTRUCTIONS
Customer Service<br />
If you have questions about ordering <strong>Pentair</strong> Water Pool and Spa ("<strong>Pentair</strong>") replacement parts,<br />
and pool products, please use the following contact information:<br />
Customer Service (8 A.M. to 5 P.M. — Eastern and Pacific Times)<br />
Phone: (800) 831-7133<br />
Fax: (800) 284-4151<br />
Technical Support<br />
Sanford, North Carolina (8 A.M. to 5 P.M. — Eastern Time)<br />
Phone: (919) 566-8000<br />
Fax: (919) 566-8920<br />
Moorpark, California (8 A.M. to 5 P.M. — Pacific Time)<br />
Phone: (805) 553-5000 (Ext. 5591)<br />
Fax: (805) 553-5515<br />
Web site<br />
visit www.pentairpool.com and staritepool.com to find information about <strong>Pentair</strong> products<br />
© 2012 <strong>Pentair</strong> Water Pool and Spa, Inc. All rights reserved.<br />
This document is subject to change without notice.<br />
1620 Hawkins Ave., Sanford, NC 27330 • (919) 566-8000<br />
10951 West Los Angeles Ave., Moorpark, CA 93021 • (805) 553-5000<br />
Trademarks and Disclaimers: <strong>SuperFlo</strong> ® , <strong>Pentair</strong> Pool Products ® , Because reliability matters most ® , Sta-Rite ® , and <strong>Pentair</strong> Water Pool and<br />
Spa ® , are registered trademarks of <strong>Pentair</strong> Water Pool and Spa, Inc. and/or its affiliated companies in the United States or other countries.<br />
Century ® is a registered trademark of Regal Beloit EPC, Inc., Franklin Electric ® is a registered trademark of Franklin Electric Co., Inc., and<br />
AO Smith ® is a registered trademark of A.O. Smith, Corp. Unless noted, names and brands of others that may be used in this document are<br />
not used to indicate an affiliation or endorsement between the proprietors of these names and brands and <strong>Pentair</strong> Water Pool and Spa, Inc.<br />
Those names and brands may be the trademarks or registered trademarks of those parties or others.<br />
P/N 350096 Rev. E 2/22/12
Table of Contents<br />
Important Warning and Safety Instructions ..........................................................................ii<br />
Section 1: Introduction ......................................................................................................1<br />
<strong>SuperFlo</strong> ® Pump Overview.......................................................................................1<br />
General Features .....................................................................................................2<br />
Section 2: Electrical Requirements ..................................................................................3<br />
Wiring Installation .....................................................................................................3<br />
Section 3: Maintenance .....................................................................................................5<br />
Pump Strainer Basket ..............................................................................................5<br />
Cleaning the Pump Strainer Basket .........................................................................5<br />
Winterizing ...............................................................................................................7<br />
Electric Motor Care ..................................................................................................7<br />
Section 4: Servicing ..........................................................................................................8<br />
Pump Disassembly ..................................................................................................8<br />
Pump Reassembly/Seal Replacement ....................................................................9<br />
Shaft Seal ................................................................................................................9<br />
Section 5: Restart Instructions .........................................................................................10<br />
Priming the Pump ....................................................................................................10<br />
Section 6: Troubleshooting ...............................................................................................11<br />
Section 7: Technical Data ..................................................................................................12<br />
Illustrated Parts List .................................................................................................12<br />
Pump Curves ...........................................................................................................13<br />
<strong>SuperFlo</strong> ® Pump Installation and User’s Guide<br />
i
ii<br />
<strong>Pentair</strong> Water Pool and Spa ®<br />
PUMP WARNING AND SAFETY INSTRUCTIONS<br />
For Pool and Spa Pumps (Non SVRS Pumps)<br />
(<strong>Pentair</strong> Water Pool and Spa ® , Sta-Rite ® , and <strong>Pentair</strong> Pool Products ® )<br />
<strong>SuperFlo</strong> ® Pump Installation and User’s Guide<br />
IMPORTANT SAFETY INSTRUCTIONS<br />
When installing and using this electrical equipment, basic safety precautions should always be<br />
followed, include the following:<br />
General Warnings<br />
READ AND FOLLOW ALL INSTRUCTIONS<br />
To reduce the risk of injury, do not permit children to use this product.<br />
Risk of Electrical Shock. Connect only to a branch circuit protected by a ground-fault<br />
circuit-interrupter (GFCI). Contact a qualifi ed electrician if you cannot verify that the<br />
circuit is protected by a GFCI.<br />
This unit must be connected only to a supply circuit that is protected by a ground-fault<br />
circuit-interrupter (GFCI). Such a GFCI should be provided by the installer and should be<br />
tested on a routine basis. To test the GFCI, push the test button. The GFCI should interrupt<br />
power. Push the reset button. Power should be restored. If the GFCI fails to operate in this<br />
manner, the GFCI is defective. If the GFCI interrupts power to the pump without the test<br />
button being pushed, a ground current is fl owing, indicating the possibility of an electric<br />
shock. Do not use this pump. Disconnect the pump and have the problem corrected by a<br />
qualifi ed service representative before using.<br />
This pump is for use with permanent swimming pools and may also be used with hot tubs<br />
and spas if so marked. Do not use with storable pools. A permanently-installed pool is<br />
constructed in or on the ground or in a building such that it cannot be readily disassembled<br />
for storage. A storable pool is constructed so that it is capable of being readily disassembled<br />
for storage and reassembled to its original integrity.<br />
Never open the inside of the drive motor enclosure. There is a capacitor bank that holds a 230<br />
VAC charge even when there is no power to the unit.<br />
The pump is not submersible.<br />
The pump is capable of high fl ow rates; use caution when installing and programming to limit<br />
pumps performance potential with old or questionable equipment.<br />
Code requirements for the electrical connection differ from state to state. Install equipment in<br />
accordance with the National Electrical Code and all applicable local codes and ordinances.<br />
Before servicing the pump; press the Stop button and disconnect the communication cable,<br />
then switch OFF power to the pump by disconnecting the main circuit to the pump.<br />
This appliance is not intended for use by persons (including children) of reduced physical,<br />
sensory or mental capabilities, or lack of experience and knowledge, unless they have been<br />
given supervision or instruction concerning the use of the appliance by a person responsible<br />
for their safety.<br />
To reduce the risk of injury, do not permit children to use this product.<br />
SAVE THESE INSTRUCTIONS
<strong>Pentair</strong> Water Pool and Spa ®<br />
PUMP WARNING AND SAFETY INSTRUCTIONS<br />
For Pool and Spa Pumps (Non SVRS Pumps)<br />
(<strong>Pentair</strong> Water Pool and Spa ® , Sta-Rite ® , and <strong>Pentair</strong> Pool Products ® )<br />
Warnings and safety instructions for <strong>Pentair</strong> Water Pool and Spa ® pumps and other related products are available at:<br />
http://www.pentairpool.com/pool-owner/safety-warnings/ or call (800) 831-7133 for additional free copies of these<br />
instructions.<br />
Please refer to http://www.pentairpool.com/pool-owner/safety-warnings/ for warning and safety instructions<br />
related to the <strong>SuperFlo</strong> ® High Performance Pump.<br />
READ AND FOLLOW ALL WARNING AND SAFETY INSTRUCTIONS<br />
This is the safety alert symbol. When you see this symbol on your system or in this manual, look<br />
for one of the following signal words and be alert to the potential for personal injury.<br />
Warns about hazards that can cause death, serious personal injury, or major property damage<br />
if ignored.<br />
Warns about hazards that may cause death, serious personal injury, or major property damage<br />
if ignored.<br />
Warns about hazards that may or can cause minor personal injury or property damage if ignored.<br />
NOTE indicates special instructions not related to hazards.<br />
Carefully read and follow all safety instructions in this manual and on equipment. Keep safety labels in good<br />
condition; replace if missing or damaged.<br />
FAILURE TO FOLLOW ALL INSTRUCTIONS AND WARNINGS CAN RESULT IN SERIOUS BODILY<br />
INJURY OR DEATH. THIS PUMP SHOULD BE INSTALLED AND SERVICED ONLY BY A<br />
QUALIFIED POOL SERVICE PROFESSIONAL. INSTALLERS, POOL OPERATORS AND<br />
OWNERS MUST READ THESE WARNINGS AND ALL INSTRUCTIONS IN THE OWNER’S<br />
MANUAL BEFORE USING THIS PUMP. THESE WARNINGS AND THE OWNER’S MANUAL<br />
MUST BE LEFT WITH THE POOL OWNER.<br />
SUCTION ENTRAPMENT HAZARD: STAY OFF THE MAIN DRAIN AND AWAY FROM ALL<br />
SUCTION OUTLETS!<br />
THIS PUMP PRODUCES HIGH LEVELS OF SUCTION AND CREATES A STRONG VACUUM<br />
AT THE MAIN DRAIN AT THE BOTTOM OF YOUR POOL AND SPA. THIS SUCTION IS SO<br />
STRONG THAT IT CAN TRAP ADULTS OR CHILDREN UNDER WATER IF THEY COME IN<br />
CLOSE PROXIMITY TO A POOL OR SPA DRAIN OR A LOOSE OR BROKEN DRAIN COVER<br />
OR GRATE.<br />
READ AND KEEP THESE INSTRUCTIONS FOR FUTURE REFERENCE<br />
<strong>SuperFlo</strong> ® Pump Installation and User’s Guide<br />
F<br />
iii
iv<br />
<strong>Pentair</strong> Water Pool and Spa ®<br />
PUMP WARNING AND SAFETY INSTRUCTIONS<br />
For Pool and Spa Pumps (Non SVRS Pumps)<br />
(<strong>Pentair</strong> Water Pool and Spa ® , Sta-Rite ® , and <strong>Pentair</strong> Pool Products ® )<br />
THE USE OF UNAPPROVED COVERS OR ALLOWING USE OF THE POOL OR SPA WHEN COVERS ARE<br />
MISSING, CRACKED OR BROKEN CAN RESULT IN BODY OR LIMB ENTRAPMENT, HAIR ENTANGLEMENT,<br />
BODY ENTRAPMENT, EVISCERATION AND/OR DEATH.<br />
The suction at a pool or spa drain or outlet can cause:<br />
Limb Entrapment: When a limb is sucked or inserted into an opening resulting in a mechanical bind or swelling.<br />
This hazard is present when a drain cover is missing, broken, loose, cracked or not properly secured.<br />
Hair Entanglement: When the hair tangles or knots in the drain cover, trapping the swimmer underwater. This<br />
hazard is present when the fl ow rating of the cover is too small for the pump or pumps.<br />
Body Entrapment: When a portion of the body is held against the drain cover trapping the swimmer underwater.<br />
This hazard is present when the drain cover is missing, broken or the cover fl ow rating is not high enough for the<br />
pump or pumps.<br />
Evisceration/Disembowelment: When a person sits on an open pool<br />
(particularly a child wading pool) or spa outlet and suction is applied directly to the intestines, causing severe<br />
intestinal damage. This hazard is present when the drain cover is missing, loose, cracked, or not properly secured.<br />
Mechanical Entrapment: When jewelry, swimsuit, hair decorations, fi nger, toe or knuckle is caught in an opening<br />
of an outlet or drain cover. This hazard is present when the drain cover is missing, broken, loose, cracked, or not<br />
properly secured.<br />
NOTE: ALL SUCTION PLUMBING MUST BE INSTALLED IN ACCORDANCE WITH THE LATEST NATIONAL<br />
AND LOCAL CODES FOR SWIMMING POOLS, SPAS AND HOT TUBS, INCLUDING NSPI STANDARDS AND<br />
CPSC GUIDELINES.<br />
TO MINIMIZE THE RISK OF INJURY DUE TO SUCTION ENTRAPMENT HAZARD:<br />
Pools and spas should utilize a minimum of two drains per pump.<br />
A properly installed and secured ANSI/ASME A112.19.8 approved anti-entrapment<br />
suction cover must be used for each drain.<br />
Each suction cover must be installed at least three (3’) feet apart, as measured from the<br />
nearest point to nearest point.<br />
Regularly inspect all covers for cracks, damage and advanced weathering.<br />
If a cover becomes loose, cracked, damaged, broken or is missing, close the pool or<br />
spa immediately, shut off the pump, post a notice and keep the pool or spa closed until<br />
an appropriate certifi ed cover is properly installed.<br />
Replace drain covers as necessary. Drain covers deteriorate over time due to exposure<br />
to sunlight, pool chemicals and weather.<br />
Avoid getting hair, limbs or body in close proximity to any suction cover, pool drain or<br />
outlet.<br />
Disable suction outlets or reconfi gure into return inlets.<br />
A clearly labeled emergency shut-off switch for the pool pump and spa jet pump must be in an<br />
easily accessible, obvious place near the pool or spa. Make sure bathers know where it is and<br />
how to use it in case of emergency.<br />
<strong>SuperFlo</strong> ® Pump Installation and User’s Guide
<strong>Pentair</strong> Water Pool and Spa ®<br />
PUMP WARNING AND SAFETY INSTRUCTIONS<br />
For Pool and Spa Pumps (Non SVRS Pumps)<br />
(<strong>Pentair</strong> Water Pool and Spa ® , Sta-Rite ® , and <strong>Pentair</strong> Pool Products ® )<br />
The Virginia Graeme Baker (VGB) Pool and Spa Safety Act creates new requirements for owners and<br />
operators of commercial swimming pools and spas.<br />
Commercial pools or spas constructed on or after December 19, 2008, shall utilize:<br />
(A) A multiple main drain system without isolation capability with suction outlet covers that meet ASME/ANSI<br />
A112.19.8a Suction Fittings for Use in Swimming Pools, Wading Pools, Spas, and Hot Tubs and either:<br />
(i) A safety vacuum release system (SVRS) meeting ASME/ANSI A112.19.17 Manufactured Safety Vacuum<br />
Release systems (SVRS) for Residential and Commercial Swimming Pool, Spa, Hot Tub, and Wading<br />
Pool Suction Systems and/or ASTM F2387 Standard Specifi cation for Manufactured Safety Vacuum<br />
Release Systems (SVRS) for Swimming pools, Spas and Hot Tubs or<br />
(ii) A properly designed and tested suction-limiting vent system or<br />
(iii) An automatic pump shut-off system.<br />
Commercial pools and spas constructed prior to December 19, 2008, with a single submerged suction outlet<br />
shall use a suction outlet cover that meets ASME/ANSI A112.19.8a and either:<br />
(A) A SVRS meeting ASME/ANSI A112.19.17 and/or ASTM F2387, or<br />
(B) A properly designed and tested suction-limiting vent system, or<br />
(C) An automatic pump shut-off system, or<br />
(D) Disabled submerged outlets, or<br />
(E) Suction outlets shall be reconfi gured into return inlets.<br />
servicing of the system f<br />
For Installation of Electrical Controls at Equipment Pad<br />
(ON/OFF Switches, Timers and Automation Load Center)<br />
Install all electrical controls at equipment pad, such as on/off switches, timers, and control systems,<br />
etc. to allow the operation (startup, shut-down, or servicing) of any pump or fi lter so the user does<br />
not place any portion of his/her body over or near the pump strainer lid, fi lter lid or valve closures.<br />
This installation should allow the user enough space to stand clear of the fi lter and pump during<br />
system start-up, shut down or servicing of the system fi lter.<br />
HAZARDOUS PRESSURE: STAND CLEAR OF PUMP AND FILTER DURING START-UP<br />
Pool and spa circulation systems operate under high pressure. When any part of the circulating<br />
system (i.e. locking ring, pump, fi lter, valves, etc.) is serviced, air can enter the system and become<br />
pressurized. Pressurized air can cause the pump housing cover fi lter lid and valves to violently<br />
separate which can result in severe personal injury or death. Filter tank lid and strainer cover must<br />
be properly secured to prevent violent separation. Stand clear of all circulation system equipment<br />
when turning on or starting up pump.<br />
Before servicing pool and spa equipment, make note of the fi lter pressure. Be sure that all controls are set to<br />
ensure the system cannot inadvertently start during service. Turn off all power to the pump.<br />
IMPORTANT: Place fi lter manual air relief valve in the open position and wait for all pressure in the<br />
system to be relieved.<br />
Before starting the system, fully open the manual air relief valve and place all system valves in the “open”<br />
position to allow water to fl ow freely from the pool and spa back to the pool or spa. Stand clear of all pool and<br />
spa equipment and start the pump.<br />
IMPORTANT: Do not close fi lter manual air relief valve until all pressure has been discharged from the<br />
valve and a steady stream of water appears. Observe fi lter pressure gauge and be sure it is not higher than<br />
the pre-service condition.<br />
<strong>SuperFlo</strong> ® Pump Installation and User’s Guide<br />
v
vi<br />
<strong>Pentair</strong> Water Pool and Spa ®<br />
PUMP WARNING AND SAFETY INSTRUCTIONS<br />
For Pool and Spa Pumps (Non SVRS Pumps)<br />
(<strong>Pentair</strong> Water Pool and Spa ® , Sta-Rite ® , and <strong>Pentair</strong> Pool Products ® )<br />
General Installation Information<br />
All work must be performed by a qualifi ed pool professional, and must conform to all national,<br />
state, and local codes.<br />
Install to provide drainage of compartment for electrical components.<br />
These instructions contain information for a variety of pump models and therefore some<br />
instructions may not apply to a specifi c model. All models are intended for use in swimming<br />
pool applications. The pump will function correctly only if it is properly sized to the specifi c<br />
application and properly installed.<br />
Pumps improperly sized or installed or used in applications other than for which the pump<br />
was intended can result in severe personal injury or death. These risks may include but not<br />
be limited to electric shock, fi re, fl ooding, suction entrapment or severe injury or property<br />
damage caused by a structural failure of the pump or other system component.<br />
The pump can produce high levels of suction within the suction side of the plumbing system.<br />
These high levels of suction can pose a risk if a person comes within the close proximity of<br />
the suction openings. A person can be seriously injured by this high level of vacuum or may<br />
become trapped and drown. It is absolutely critical that the suction plumbing be installed<br />
in accordance with the latest national and local codes for swimming pools.<br />
<strong>SuperFlo</strong> ® Pump Installation and User’s Guide<br />
SAVE THESE INSTRUCTIONS
<strong>SuperFlo</strong> ® High Performance Pump Overview<br />
1<br />
Section 1<br />
Introduction<br />
The perfect choice for all types of pools, the <strong>SuperFlo</strong> ® was specifically designed to be your best<br />
choice for a variety of inground pools. Thick walled body parts, a heavy duty 56 square flange motor,<br />
and highly engineered hydraulics make this rugged and tested design perfect for any pool, spa, water<br />
feature, or fountain. And <strong>SuperFlo</strong>’s silent running capability and small footprint allow it to easily drop<br />
into a compact equipment pad.<br />
Efficient, Quiet, Rugged, and Versatile<br />
All pumps from <strong>Pentair</strong> Water Pool and Spa incorporate innovative hydraulic engineering that has been<br />
refined for over 40 years. <strong>SuperFlo</strong> ® reflects the latest and best <strong>Pentair</strong> technology, to move water more<br />
efficiently for lower operational costs. Compact, rugged, and easy to maintain, <strong>SuperFlo</strong> ® will deliver<br />
years of reliable service.<br />
<strong>SuperFlo</strong> ® Pump<br />
<strong>SuperFlo</strong> ® Pump Installation and User’s Guide
2<br />
General Features<br />
• Extremely quiet operation<br />
• Unionized fittings (1.5” and 2”) for simple replacement<br />
• Cam and Ramp lid for easy cleaning and maintenance<br />
• Heavy-duty, high service factor 56 square flange motor for long life<br />
• Integral volute and pot reduce hydraulic noise<br />
• See-through lid permits easy inspection of strainer basket<br />
Additional Features:<br />
• 115 volt or 230 volt models available<br />
• 1/2 Hp to 2 1/2 Hp configurations to accommodate a wide range of applications<br />
• Self-priming for quick, easy start-up<br />
• Every <strong>SuperFlo</strong> pump is performance and pressure tested prior to shipment to ensure superior quality<br />
• UL/CUL/NSF<br />
<strong>SuperFlo</strong> ® Pump Installation and User’s Guide
This section describes how to wire the <strong>SuperFlo</strong> ® pump.<br />
Section 2<br />
Electrical Requirements<br />
Note: Before installing this product, read and follow all warning notices and instructions on<br />
pages ii-vi.<br />
Electrical Requirements and Wiring<br />
WARNING — Risk of electrical shock or electrocution.<br />
Wiring Installation<br />
This pool pump must be installed by a licensed or certified electrician or a qualified pool serviceman in<br />
accordance with the National Electrical Code and all applicable local codes and ordinances. Improper<br />
installation will create an electrical hazard which could result in death or serious injury to pool users,<br />
installers, or others due to electrical shock, and may also cause damage to property.<br />
Always disconnect power to the pool pump at the circuit breaker before servicing the pump.<br />
Failure to do so could result in death or serious injury to serviceman, pool users or others due to<br />
electric shock.<br />
1. Be sure all electrical breakers and switches are turned off before wiring motor.<br />
2. Be sure that the wiring voltage matches the motor voltage (230 VAC or 115 VAC). If they do not match, the<br />
motor can overheat.<br />
3. Choose a wire size from the Chart 1. When in doubt use a heavier gauge (larger diameter) wire. Heavier<br />
gauge will allow the motor to run cooler and more efficient.<br />
4. Be sure all electrical connections are clean and tight.<br />
5. Cut wires to the appropriate length so they do not overlap or touch when connected to the terminal board.<br />
Chart 1.<br />
SUPPLY WIRE SIZES (AWG)<br />
(Size and Length by Horsepower)<br />
Hp 115 volts 230 volts<br />
50 ft. 100 ft. 150 ft. 50 ft. 100 ft. 150 ft.<br />
1/3 14 14 12 14 14 14<br />
1/2 14 12 10 14 14 14<br />
3/4 12 12 10 147 14 14<br />
1 12 10 8 14 14 14<br />
1½ 10 10 8 14 14 12<br />
2 10 8 8 14 12 12<br />
2½ - - - 12 12 10<br />
3 - - - 12 12 10<br />
<strong>SuperFlo</strong> ® Pump Installation and User’s Guide<br />
3
4<br />
Wiring Installation, (Continued).<br />
6. Permanently ground the motor using the green ground terminal located on the inside of the motor canopy or<br />
access plate, see Figure 1. Use the correct wire size and type specified by National Electrical Code. Make<br />
sure the ground wire is connected to an electrical service ground.<br />
7. Bond the motor to the pool structure in accordance with the National Electrical Code. UL requires use of a<br />
solid copper bonding conductor not smaller than 8 AWG.<br />
8. Connect the wire from the accessible wire connector on the motor to all metal parts of the swimming pool,<br />
spa, or hot tub structure and to all electrical equipment, metal conduit, and metal piping within 5 feet of the<br />
inside walls of the swimming pool, spa, or hot tub. For Canada, a 6 AWG or larger solid copper bonding<br />
conductor is required.<br />
9. The pump should be permanently connected to either a circuit breaker, 2-pole timer or 2-pole relay. If AC<br />
power is supplied by a GFCI circuit breaker, use a dedicated circuit breaker that has no other electrical loads.<br />
10. Connect the pump permanently to a circuit. Make sure no other lights or appliances are on the same circuit.<br />
<strong>SuperFlo</strong> ® Pump Installation and User’s Guide<br />
Ground Screw<br />
Figure 1.
This section describes how to maintain the <strong>SuperFlo</strong> ® pump.<br />
The Pump Strainer Basket<br />
5<br />
Section 3<br />
Maintenance<br />
This unit, sometimes referred to as the ‘Hair and Lint Pot’, is the unit in front of the volute. Inside the chamber<br />
is the basket which must be kept clean of leaves and debris at all times. View basket through the ‘See Through<br />
Lid’ to inspect for leaves and debris.<br />
Regardless of the length of time between filter cleaning, it is most important to visually inspect the hair and lint<br />
pot basket at least once a week. A clogged basket reduces the efficiency of the filter and heater and puts added<br />
stress on the pump motor.<br />
Cleaning the Pump Strainer Basket<br />
WARNING — DO NOT open the strainer pot if pump fails to prime or if pump has been operating without water in<br />
the strainer pot. Pumps operated in these circumstances may experience a build up of vapor pressure<br />
and may contain scalding hot water. Opening the pump may cause serious personal injury. In order<br />
to avoid the possibility of personal injury, make sure the suction and discharge valves are open and<br />
strainer pot temperature is cool to touch, then open with extreme caution.<br />
CAUTION — To prevent damage to the pump and filter and for proper operation of the system, clean pump strainer<br />
and skimmer baskets regularly.<br />
1. Turn off motor.<br />
2. Relieve pressure in the system.<br />
3. Turn the clamp and lid in a counter-clockwise direction until it stops.<br />
4. Turn the clamp and lid set to remove the clamp and lid.<br />
5. Put the debris from the basket into the trash and rinse the basket. Replace the basket if cracked.<br />
6. Replace the basket. Be sure to align the slot in the basket with the rib in the volute, see Figure 2.<br />
7. Fill the pump pot and volute up to the inlet port with water.<br />
8. Clean the cover, cover O-ring, and sealing surface of the pump pot. Grease the O-ring with a silicone<br />
based lubricant.<br />
WHEN INSTALLING<br />
BASKET, MAKE<br />
SURE TO ALIGN SLOT<br />
IN BASKET WITH<br />
RIB IN VOLUTE.<br />
WHEN PROPERLY<br />
INSTALLED, BASKET<br />
WILL DROP INTO PLACE.<br />
Figure 2.<br />
<strong>SuperFlo</strong> ® Pump Installation and User’s Guide
6<br />
Cleaning the Pump Strainer Basket, (Continued).<br />
9. Reinstall the lid by placing the clamp and the lid on the pot; see Figure 3.<br />
10. Be sure the lid O-ring is properly placed. Seat the clamp and lid then turn clockwise until the handles are<br />
horizontal; see Figure 4.<br />
WARNING — This FilTer OperaTes uNDer high pressure.<br />
When any part of the circulating system (e.g., Lock Ring, Pump, Filter, Valves, etc.) is serviced, air<br />
can enter the system and become pressurized. Pressurized air can cause the lid to separate which<br />
can result in severe injury, death, or property damage. To avoid this potential hazard, follow these<br />
instructions.<br />
11. Turn the power “ON” at the house circuit breaker. Reset the pool time clock to the correct time<br />
12. Open the manual air relief valve on top of the filter.<br />
13. Stand clear of the filter. Start the pump.<br />
14. Bleed air from the filter until a steady stream of water comes out. Close the manual air relief valve.<br />
Figure 3.<br />
CLAMP<br />
LID<br />
O-RING<br />
BASKET<br />
VOLUTE<br />
<strong>SuperFlo</strong> ® Pump Installation and User’s Guide<br />
VOLUTE<br />
Figure 4.<br />
LID<br />
CLAMP
Winterizing<br />
1. If the air temperature drops below 35° F., the water in the pump can freeze and cause damage. Freeze damage<br />
is not warrantable.<br />
2. To prevent freeze damage follow the procedures listed below:<br />
• Shut off electrical power for the pump at the house circuit breaker.<br />
• Drain the water out of the pump case by removing the two thumb-twist drain plugs from the case.<br />
Store the plugs in the pump basket.<br />
• Cover the motor to protect it from severe rain, snow and ice.<br />
• Do not wrap the motor in plastic. It will cause condensation and rust on the inside of the motor.<br />
CAUTION — In mild climate area, when temporary freezing conditions may occur, run your filtering equipment all<br />
night to prevent freezing.<br />
Care of Electric Motor<br />
1. Protect from heat.<br />
• Shade the motor from the sun.<br />
• Any enclosure must be well ventilated to prevent overheating.<br />
• Provide ample cross ventilation.<br />
2. Protect against dirt.<br />
• Protect from any foreign matter or splashing water.<br />
• Do not store (or spill) pool chemicals near the motor.<br />
• Avoid sweeping or stirring up dust near the motor while in operation.<br />
• If a motor has been damaged by dirt it voids the motor warranty.<br />
3. Protect against moisture.<br />
• Protect from splashing pool water and lawn sprinklers.<br />
• Protect from the weather.<br />
• If a motor has become wet - let it dry before operating. Do not allow the pump to operate if it has<br />
been flooded.<br />
• If a motor has been damaged by water it voids the motor warranty.<br />
NOTE<br />
• DO NOT wrap motor with plastic or other air tight materials. The motor may be covered during a storm, for winter storage,<br />
etc., but never when operating, or expecting operation.<br />
• When replacing the motor, be certain that the motor support is correctly positioned to support the size of motor being installed.<br />
<strong>SuperFlo</strong> ® Pump Installation and User’s Guide<br />
7
8<br />
Section 4<br />
Servicing<br />
This section describes how to service the <strong>SuperFlo</strong> ® pump.<br />
WARNING — Risk of electrical shock or electrocution.<br />
This pool pump must be installed by a licensed or certified electrician or a qualified pool serviceman in<br />
accordance with the National Electrical Code and all applicable local codes and ordinances. Improper<br />
installation will create an electrical hazard which could result in death or serious injury to pool users,<br />
installers, or others due to electrical shock, and may also cause damage to property.<br />
Always disconnect power to the pool pump at the circuit breaker before servicing the pump. Failure to<br />
do so could result in death or serious injury to serviceman, pool users or others due to electric shock.<br />
Read all servicing instructions before working on the pump.<br />
WARNING — DO NOT open the strainer pot if pump fails to prime or if pump has been operating without water in<br />
the strainer pot. Pumps operated in these circumstances may experience a build up of vapor pressure<br />
and may contain scalding hot water. Opening the pump may cause serious personal injury. In order<br />
to avoid the possibility of personal injury, make sure the suction and discharge valves are open and<br />
strainer pot temperature is cool to touch, then open with extreme caution.<br />
CAUTION — Be sure not to scratch or mar the polished shaft seal faces; seal will leak if faces are damaged.<br />
Pump Disassembly<br />
1. All moving parts are located in the rear sub-assembly of this pump.<br />
Required Tools:<br />
• 1/4 inch socket or open end wrench.<br />
• 3/8 inch socket or open end wrench.<br />
• 9/16 inch open end wrench.<br />
• Flat blade screwdriver.<br />
2. To remove and repair the motor sub-assembly perform the following procedures:<br />
a. Turn off the pump circuit breaker at the main panel.<br />
b. Drain the pump by removing the drain plugs.<br />
c. Remove the 4 bolts that hold the main pump body (strainer pot/volute) to the rear sub-assembly.<br />
d. GENTLY pull the two pump halves apart, removing the rear sub-assembly.<br />
e. Remove the three hex head screws holding the diffuser in position.<br />
f. Hold the impeller securely in place and remove the impeller lock screw by using a flat blade screwdriver<br />
or wrench. The screw is a left-handed thread and loosens in a clockwise direction.<br />
g. Remove the shaft cap located at the back of the motor and hold the shaft secure with a ½ inch (Century ®<br />
motors) or 7/16 inch (Franklin Electric ® Motors) open-end wrench. On AO Smith ® motors, remove the<br />
motor canopy, move the capacitor to one side and hold the shaft with a 7/16 inch open-end wrench.<br />
h. To unscrew the impeller from the shaft, twist the impeller counter-clockwise.<br />
i. Remove the four bolts from the seal plate to the motor using a 3/8 inch wrench.<br />
j. Place the seal plate face down on a flat surface and tap out the ceramic seal.<br />
k. Clean the seal plate, seal housing, and the motor shaft.<br />
<strong>SuperFlo</strong> ® Pump Installation and User’s Guide
Pump Reassembly/Seal Replacement<br />
1. When installing the replacement seal into the seal plate, use soapy water to wet the rubber boot before<br />
pressing it into the seal plate.<br />
2. Remount the seal plate to the motor.<br />
3. Before installing the rotating portion of the seal on the motor shaft, wet the motor shaft with soapy water and<br />
slide the seal onto the motor shaft. Ensure that the carbon face contacts the ceramic face of the stationary<br />
seat. Press the seal into the seal plate with your thumbs and wipe off the ceramic with a clean cloth.<br />
4. Grease the motor shaft thread and screw impeller onto the motor shaft.<br />
5. Screw in the impeller lock screw (counter-clockwise to tighten).<br />
6. Remount the diffuser onto the seal plate. Make sure the plastic pins and holding screw inserts are aligned.<br />
7. Grease the diffuser quad ring and seal plate O-ring prior to reassembly.<br />
8. Grease the bolt threads, assemble the motor sub-assembly to the strainer pot-pump body by using the two<br />
through bolts for proper alignment. Do not tighten the through bolts until all 4 bolts are in place and finger<br />
tightened.<br />
9. Fill the pump with water.<br />
10. Reinstall the pump lid and plastic clamp; see SECTION 3, Maintenance.<br />
11. Reprime the system.<br />
The Shaft Seal<br />
1. The Shaft Seal consists primarily of two parts, a rotating member and a ceramic seal.<br />
2. The pump requires little or no service other than reasonable care, however, a Shaft Seal may occasionally<br />
become damaged and must be replaced.<br />
QUAD<br />
RING<br />
DIFFUSER<br />
SCREW<br />
IMPELLER<br />
LOCKING<br />
SCREW<br />
SEAL PLATE<br />
BOLT<br />
MOTOR SLINGER<br />
MOTOR SHAFT<br />
SEAL PLATE O-RING<br />
IMPELLER<br />
Figure 5.<br />
<strong>SuperFlo</strong> ® Pump Installation and User’s Guide<br />
9
10<br />
Section 5<br />
Restart Instructions<br />
If the <strong>SuperFlo</strong> ® pump is installed below the water level of the pool, close return and suction lines prior to opening<br />
hair and lint pot on pump. Make sure to reopen valves prior to operating.<br />
CAUTION — DO NOT run the pump dry. If the pump is run dry, the mechanical seal will be damaged and the pump<br />
will start leaking. If this occurs, the damaged seal must be replaced. ALWAYS maintain proper water<br />
level in your pool (half way up skimmer opening). If the water level falls below the skimmer opening,<br />
the pump will draw air through the skimmer, losing the prime and causing the pump to run dry, resulting<br />
in a damaged seal. Continued operation in this manner could cause a loss of pressure, resulting in<br />
damage to the pump case, impeller and seal, and may cause property damage and personal injury.<br />
Priming the Pump<br />
1. The pump strainer pot must be filled with water before the pump is initially started. Follow these steps to<br />
prime the pump.<br />
a. Remove the pump lid plastic clamp. Remove the pump lid.<br />
b. Fill the pump strainer pot with water.<br />
c. Reassemble the pump cover and plastic clamp onto the strainer pot. The pump is now ready to prime.<br />
d. Open the air release valve on the filter, and stand clear of the filter.<br />
e. Turn on the switch or time clock.<br />
f. When water comes out of the air release valve, close the valve. The system should now be free of air<br />
and recirculating water to and from the pool.<br />
2. For 2-speed pumps:<br />
a. Pump should run on high-speed for priming.<br />
b. The pump should not run longer than 8 minutes before priming is achieved.<br />
<strong>SuperFlo</strong> ® Pump Installation and User’s Guide
Failure TO pump<br />
pump Will Not prime — to much air Check suction piping and valve glands on any suction gate valves.<br />
Secure lid on pump strainer pot and make sure lid gasket is in place.<br />
Check water level to make sure skimmer is not drawing air.<br />
pump Will Not prime — not enough water Make sure suction lines, pump strainer, and pump volute are full of water.<br />
pump strainer clogged Clean pump strainer pot.<br />
pump strainer gasket defective Replace gasket.<br />
reDuceD capaciTy and/or heaD<br />
Make sure valve on suction line is working and open, (some systems do not have valves).<br />
Check water level to make sure water is available through skimmer.<br />
air pockets or leaks in suction line Check suction piping and valve glands on any suction gate valves.<br />
pump Will Not prime — to much air Secure lid on pump strainer pot and make sure lid gasket is in place.<br />
Check water level to make sure skimmer is not drawing air.<br />
clogged impeller Turn off electrical power to the pump.<br />
Remove the clamp that holds the volute to the seal plate.<br />
Slide the motor and seal plate away from the volute.<br />
Clean debris from impeller.<br />
If debris cannot be removed, complete the following steps.<br />
(1) Remove left hand thread anti-spin bolt and O-ring.<br />
(2) Remove, clean and reinstall impeller.<br />
(3) Reinstall anti-spin bolt.<br />
Reinstall diffuser and quad ring.<br />
pump strainer clogged Clean suction trap.<br />
Reinstall motor and seal plate into volute.<br />
Section 6<br />
Troubleshooting<br />
Use the following troubleshooting information to resolve possible problems with your <strong>SuperFlo</strong> ® pump.<br />
WARNING — risk OF elecTrical shOck Or elecTrOcuTiON.<br />
Improperly installation will create an electrical hazard which could result in death or serious injury to<br />
pool users, installers, or others due to electrical shock, and may also cause damage to property.<br />
1. If you are not familiar with your pool filtering system and/or heater:<br />
a. Do NOT attempt to adjust or service without consulting your dealer, or a qualified pool<br />
technician.<br />
b. Read the entire Installation & User’s Guide before attempting to use, service or adjust the<br />
pool filtering system or heater.<br />
Note: Turn off power to unit prior to attempting service or repair.<br />
Problems and Corrective Actions<br />
Problem Corrective Action<br />
Reinstall clamp around seal plate and volute and tighten securely.<br />
11<br />
<strong>SuperFlo</strong> ® Pump Installation and User’s Guide
12<br />
Section 7<br />
Technical Data<br />
Illustrated Parts List<br />
Item Part Description<br />
No. No.<br />
SINGLE SPEED SUPERFLO MOTORS<br />
1 355018S ½, ¾ HP — (Almond)<br />
1 355020S 1 HP — (Almond)<br />
1 355022S 1½ HP — (Almond)<br />
1 355024S 2 HP — (Almond)<br />
1 355026S 2½ HP — (Almond)<br />
DUAL SPEED SUPERFLO MOTORS<br />
1 350088S ¾ HP 115 VOLTAGE — (Almond)<br />
1 355003S 1 HP — (Almond)<br />
1 356630S 1½ HP — (Almond)<br />
1 071320S 2 HP — (Almond)<br />
ENERGY EFFICIENT SUPERFLO MOTORS<br />
1 071313S ½, ¾, 1 HP — (Almond)<br />
1 071314S 1½ HP — (Almond)<br />
1 071315S 2 HP — (Almond)<br />
1 071316S 2½ HP — (Almond)<br />
2 356012 SEAL PLATE<br />
3 350094 BASE<br />
4 350090 CLAMP, RAMP & CAM<br />
5 350091 LID<br />
6 357255 O-RING, LID #2-357<br />
7 350089 VOLUTE<br />
8 350093 ADAPTER, 2 req.<br />
9 350092 NUT, 2 req.<br />
10 192115 O-RING DRAIN PLUG, 2 req.<br />
11 071131 DRAIN PLUG, 2 req.<br />
<strong>SuperFlo</strong> ® Pump Installation and User’s Guide<br />
19<br />
1<br />
14<br />
3<br />
2<br />
22<br />
20<br />
21<br />
13 12<br />
18<br />
17<br />
16<br />
11 10<br />
Item Part Description<br />
No. No.<br />
12 355621 SCREW ¾-16 X 2¼ HEX HD, 4 req.<br />
13 072184 WASHER 3/8 in. S/S, 4 req.<br />
14 355619 O-RING SEAL BRACKET<br />
15 350099 O-RING ADAPTER #2-226, 2 req.<br />
16 355030 SEAL DIFFUSER<br />
17 355334 SCREW #8-32 HEX WASHER HD, 3 req.<br />
18 355617 DIFFUSER - ½ HP<br />
18 355617 DIFFUSER - ¾ HP<br />
18 355617 DIFFUSER - 1 HP<br />
18 355618 DIFFUSER - 1½ HP<br />
18 355618 DIFFUSER - 2 HP<br />
18 350170 DIFFUSER - 2½ HP<br />
19 354290 HEX HEAD SCREW 3/8 - 16, 4 req.<br />
20 355043 IMPELLER ½ HP<br />
20 355043 IMPELLER ¾ HP<br />
20 355067 IMPELLER 1 HP<br />
20 355074 IMPELLER 1½ HP<br />
20 355086 IMPELLER 2 HP<br />
20 355093 IMPELLER 2½ HP<br />
20 355067 IMPELLER 1 HP, 2-SPD<br />
20 355074 IMPELLER 1½ HP, 2-SPD<br />
20 355086 IMPELLER 2 HP, 2-SPD<br />
21 355389 SCREW, IMPELLER LOCKING<br />
22 354545 SEAL SET<br />
23 355667 BASKET, LARGE<br />
24 350157 KIT UNION SUPERFLO ® (Items No. 8, 9, 15)<br />
4<br />
6<br />
23<br />
7<br />
15<br />
5<br />
8<br />
9
Pump Curve<br />
Total Dynamic Head In Feet Of Water<br />
100<br />
90<br />
80<br />
70<br />
60<br />
50<br />
40<br />
30<br />
20<br />
10<br />
0<br />
1750 RPM<br />
<strong>Pentair</strong> Water Water Pool Pool and and Spa, Inc. Spa, Inc.<br />
Pump Performance Curve Curve<br />
<strong>SuperFlo</strong> ®<br />
<strong>SuperFlo</strong> ®Series Series<br />
3450 RPM<br />
2HP<br />
½, ¾ HP<br />
½, ¾ HP<br />
1 HP 1 ½ HP<br />
0 10 20 30 40 50 60 70 80 90 100 110 120 130<br />
Flow Rate in U.S. GPM<br />
1 HP<br />
2 HP<br />
1 ½HP<br />
2 ½ HP<br />
13<br />
<strong>SuperFlo</strong> ® Pump Installation and User’s Guide
14<br />
<strong>SuperFlo</strong> ® Pump Installation and User’s Guide<br />
NOTES
SAVE THESE INSTRUCTIONS
*350096*<br />
P/N 350096 Rev. E 2/22/12<br />
*354707*<br />
LIT PKG. P/N 354707


