PART NO: 63607063 - Walmart
PART NO: 63607063 - Walmart
PART NO: 63607063 - Walmart

You also want an ePaper? Increase the reach of your titles
YUMPU automatically turns print PDFs into web optimized ePapers that Google loves.
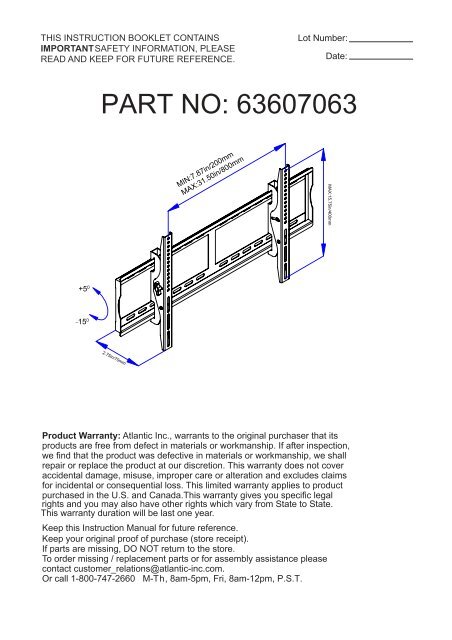
THIS INSTRUCTION BOOKLET CONTAINS<br />
IMPORTANT SAFETY INFORMATION, PLEASE<br />
READ AND KEEP FOR FUTURE REFERENCE.<br />
+5 0<br />
_ 15 0<br />
Lot Number:<br />
Date:<br />
<strong>PART</strong> <strong>NO</strong>: <strong>63607063</strong><br />
2.75in/70mm<br />
MIN:7.87in/200mm<br />
MAX:31.50in/800mm<br />
Product Warranty: Atlantic Inc., warrants to the original purchaser that its<br />
products are free from defect in materials or workmanship. If after inspection,<br />
we find that the product was defective in materials or workmanship, we shall<br />
repair or replace the product at our discretion. This warranty does not cover<br />
accidental damage, misuse, improper care or alteration and excludes claims<br />
for incidental or consequential loss. This limited warranty applies to product<br />
purchased in the U.S. and Canada.This warranty gives you specific legal<br />
rights and you may also have other rights which vary from State to State.<br />
This warranty duration will be last one year.<br />
Keep this Instruction Manual for future reference.<br />
Keep your original proof of purchase (store receipt).<br />
If parts are missing, DO <strong>NO</strong>T return to the store.<br />
To order missing / replacement parts or for assembly assistance please<br />
contact customer_relations@atlantic-inc.com.<br />
Or call 1-800-747-2660 M-Th, 8am-5pm, Fri, 8am-12pm, P.S.T.<br />
MAX:15.75in/400mm
Assembly Tips:<br />
Become familiar with the instructions and all parts.<br />
Make sure that all parts are in the box and in good condition.<br />
Assemble the product on the open flat carton or a rug to protect the product and<br />
your floor.<br />
Some heavy products need a second person to assist in the assembly.<br />
Do not install on the sloping surface.<br />
With each step, first insert and hand-tighten all bolts and screws by hand. After ALL<br />
BOLTS are slightly screwed in, fully tighten bolts with Phillips screwdriver in sequential<br />
pattern (clockwise or counter clockwise).<br />
!<br />
Caution:<br />
Never let children climb on product or play with product.<br />
Do not sit or stand on product.<br />
Do not fasten a TV that is heavier than the recommended load rating to the<br />
mount.<br />
Improper installation may cause property damage and/or personal injury,so the<br />
installation must be done by two qualified contractors.The manufacture is not<br />
liable for damage or injury caused by incorrect mounting,assembly or use.<br />
The unit will hold 37-70in(93.98-177.80cm) Plasma and LCD TV and the weight<br />
of TV must not exceed 132lbs(60kgs). The wall must be capable of supporting<br />
five times weight of TV plus the mount.<br />
Improper handling can result in cuts and lacerations.<br />
Pictures for reference only,subject to our available products.<br />
Care Instructions:<br />
Use electrostatic dust cloths to clean product.<br />
1
Parts List<br />
Item Components Parts List Q’<br />
ty<br />
Item Components Parts List Q’<br />
ty<br />
A 1<br />
B 1<br />
C 1<br />
D 4<br />
Tools Needed(Not Included)<br />
5/16” or 8mm<br />
Diameter Drill Bit<br />
2<br />
E 4<br />
F<br />
G<br />
2<br />
2
16”/406mm<br />
D<br />
A<br />
1 2<br />
1.Hold wall plate(A) against wall at desired 2. Attach TV mounts(B&C) to the back panel of TV.<br />
position, then using a pencil mark 4 hole Make sure you choose the same height of<br />
locations. Then drill holes according pencil screw holes in TV mounts.<br />
marks using 5/16” or 8mm size drill bit to a<br />
depth of 2.5”/<br />
64mm.<br />
Insert wall anchor(D) to the holes,then fix wall<br />
plate(A) to the wall with screws(E).<br />
3 4<br />
G<br />
E<br />
3.Attach the handles(F) to the mounts through<br />
washers(G).<br />
F<br />
3<br />
C<br />
safety screws<br />
4. Hang up the TV to wall plate,then fix the<br />
safety screws tightly.<br />
B
PAY EXTRA CARE AND ATTENTION WHEN YOU FASTEN TWO TV MOUNTS TO THE BACK PANEL<br />
OF TV IN STEP 3. MAKE SURE THE APPROPRIATE MOUNT HARDWARE IS BEING USED<br />
PROPERLY.<br />
1.Select correct Mounting Hardware according to the screw hole size of your TV,discard any remaining<br />
screws or spacers.<br />
2.Carefully lay your TV on its face on a non-abrasivesurface,making sure to lay padding underneath it<br />
so as not to damage the screen.<br />
3.Place left TV mount and right mount in the approriate position,making sure CENTERED on the back<br />
of the TV and LEVEL with on another.<br />
Mounting Hardware List Q’ty Mounting Hardware List Q’ty<br />
H<br />
I<br />
J<br />
K<br />
L<br />
M<br />
N<br />
O<br />
M8X16<br />
M6X12<br />
M5X12<br />
M4X12<br />
M8X40<br />
M6X35<br />
M5X30<br />
M4X30<br />
4<br />
4<br />
4<br />
4<br />
4<br />
4<br />
4<br />
4<br />
P<br />
Q<br />
R<br />
S<br />
M4/M5 washer<br />
M6/M8 washer<br />
M8/M6 spacer<br />
M4/M5 spacer<br />
4<br />
4<br />
4<br />
4<br />
4