
You also want an ePaper? Increase the reach of your titles
YUMPU automatically turns print PDFs into web optimized ePapers that Google loves.
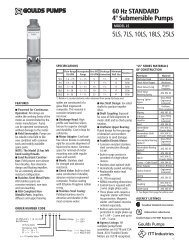
WIRING and GROUNDING<br />
4<br />
WARNING<br />
Hazardous voltage<br />
can shock, burn or<br />
cause death.<br />
Install, ground and wire according<br />
to local and National Electrical Code<br />
requirements.<br />
Install an all leg disconnect switch near<br />
the pump.<br />
Disconnect and lockout electrical power before<br />
installing or servicing pump.<br />
Electrical supply MUST match pumps name plate<br />
specifi cations. Incorrect voltage can cause fi re,<br />
damage to the motor and voids warranty.<br />
Motors not protected MUST be provided with<br />
contactors and thermal overloads for single phase<br />
motors, or starters with heaters for three phase<br />
motors. See motor nameplate.<br />
Use only stranded copper wire to motor and ground.<br />
The ground wire MUST be at a least as large as the wire<br />
to the motor. Wires should be color coded for ease of<br />
maintenance.<br />
Follow motor manufacturer's wiring diagram on the<br />
motor nameplate or terminal cover carefully.<br />
WARNING<br />
Hazardous<br />
voltage<br />
BURNS OR DEATH.<br />
ROTATION<br />
FAILURE TO PERMANENTLY GROUND<br />
THE PUMP, MOTOR AND CONTROLS<br />
BEFORE CONNECTING TO ELECTRI-<br />
CAL POWER CAN CAUSE SHOCK,<br />
NOTICE: INCORRECT ROTATION MAY CAUSE<br />
DAMAGE TO THE PUMP AND VOIDS THE<br />
WARRANTY.<br />
Correct rotation is right-hand, CLOCKWISE when<br />
viewed from the motor end. On tank mounted units,<br />
remove motor end plug or cover, turn power on and off<br />
quickly to observe rotation.<br />
To reverse three phase motor rotation, interchange any<br />
two power supply leads.<br />
OPERATION<br />
WARNING<br />
Hazardous<br />
voltage<br />
SPLASHING OR IMMERSING OPEN<br />
DRIP PROOF MOTORS IN FLUIDS<br />
CAN CAUSE FIRE,SHOCK, BURNS OR<br />
DEATH.<br />
NOTICE: PUMP MUST BE FULLY PRIMED BEFORE<br />
OPERATION. DO NOT RUN PUMP DRY OR PUMP<br />
BEARING DAMAGE WILL RESULT.<br />
After stabilizing the system at normal operating<br />
conditions, check the piping. If necessary, adjust the pipe<br />
supports.<br />
MAINTENANCE<br />
WARNING<br />
Hazardous<br />
voltage<br />
BURNS OR DEATH.<br />
FAILURE TO DISCONNECT AND<br />
LOCKOUT ELECTRICAL POWER<br />
BEFORE ATTEMPTING ANY<br />
MAINTENANCE CAN CAUSE SHOCK,<br />
Motors have permanently lubricated bearings. No lubrication<br />
is possible or necessary. Follow the motor manufacturer's<br />
recommendations for maintenance.<br />
If pump performance degrades due to excessive leakage,<br />
inspect pump bearing, bushing and shaft for excessive<br />
wear. Replace as necessary.<br />
SEASONAL SERVICE:<br />
To REMOVE pump from service, drain all pumpage<br />
from pump and piping.<br />
To RETURN pump to service, replace all plugs and<br />
piping using Tefl on tape or equivalent on male threads<br />
for the <strong>NPV</strong> Series.<br />
Refer to "OPERATION" section of manual.<br />
<strong>NPV</strong> SERIES DISASSEMBLY<br />
Follow ALL warnings and instructions in the<br />
"MAINTENANCE" section of this manual.<br />
While complete disassembly of the unit will be described,<br />
it is recommended that you proceed only as far as required<br />
to perform the maintenance needed.<br />
Remove the mounting plate, or clamp, from pump.<br />
LIQUID END:<br />
1. Remove casing bolts (5).<br />
2. Remove casing (1, 2) and casing O-ring (4) from<br />
pump mounting plate (7).<br />
3. Remove guidevane (3) and O-ring (21) on model SL<br />
only.<br />
4. Restrain shaft (12) from rotation by applying a 9 ⁄16"<br />
wrench to shaft fl ats through holes in the support<br />
tube (11).<br />
5. Remove impeller nut (20) by turning COUNTER-<br />
CLOCKWISE. Nut may need to be heated with a<br />
torch to remove.<br />
NOTICE: EXERCISE CAUTION IN HANDLING<br />
HOT IMPELLER NUT.<br />
6. Remove impeller (16, 17) by turning COUNTER-<br />
CLOCKWISE when looking at the front of the<br />
pump. Protect hand with a rag or glove.<br />
NOTICE: SUPPORT TUBE HAS LEFT HAND<br />
THREADS.<br />
7. Remove pump plate from support tube by turning<br />
plate CLOCKWISE when viewing from the front of<br />
the pump.<br />
8. Remove snap ring (13) from pump plate and pull out<br />
restricting bushing (14).<br />
9. Press out pump bearing (15A, 15B) with a bearing or<br />
arbor press.<br />
10. Remove support tube from motor plate (9) by<br />
turning tube CLOCKWISE when viewing from the<br />
front of the pump.<br />
11. Remove motor end plug, or cover, to expose<br />
screwdriver slot, or fl ats, on end of the motor shaft.<br />
12. Restrain motor shaft with appropriate tool and<br />
remove shaft extension (12) from motor shaft, by<br />
turning it COUNTERCLOCKWISE. Shaft extension<br />
may need to be heated with a torch to remove. Apply<br />
heat to the shaft extension, not to motor shaft.