
You also want an ePaper? Increase the reach of your titles
YUMPU automatically turns print PDFs into web optimized ePapers that Google loves.
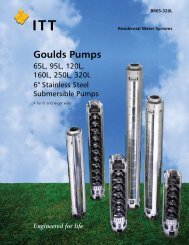
ITT<br />
Goulds Pumps<br />
G&L SERIES<br />
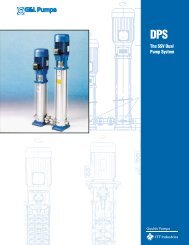
MODELS <strong>SHV</strong> and <strong>NPV</strong><br />
Installation, <strong>Operation</strong> and<br />
Maintenance Instructions<br />
Goulds Pumps is a brand of ITT Corporation.<br />
www.goulds.com<br />
Engineered for life<br />
<strong>NPV</strong><br />
<strong>SHV</strong><br />
General Industry
SUBJECT PAGE<br />
Safety Instructions ........................................................................................................................................................ 3<br />
Description and Specifi cations ...................................................................................................................................... 3<br />
Engineering Data .......................................................................................................................................................... 3<br />
Installation ................................................................................................................................................................... 3<br />
Suction Piping .............................................................................................................................................................. 3<br />
Discharge Piping........................................................................................................................................................... 3<br />
Wiring and Grounding ................................................................................................................................................. 4<br />
Rotation ....................................................................................................................................................................... 4<br />
<strong>Operation</strong> ..................................................................................................................................................................... 4<br />
Maintenance................................................................................................................................................................. 4<br />
<strong>NPV</strong> Disassembly ......................................................................................................................................................... 4<br />
<strong>NPV</strong> Reassembly .......................................................................................................................................................... 5<br />
<strong>SHV</strong> Disassembly ......................................................................................................................................................... 5<br />
<strong>SHV</strong> Reassembly .......................................................................................................................................................... 5<br />
Repair Parts .................................................................................................................................................................. 7<br />
<strong>NPV</strong> Pump – Dimensions, Weights and Specifi cations ................................................................................................... 9<br />
<strong>NPV</strong> Optional Mounting Accessories ............................................................................................................................ 9<br />
<strong>SHV</strong> Pump – Dimensions, Weights and Specifi cations ................................................................................................. 10<br />
<strong>SHV</strong> Optional Mounting Accessories .......................................................................................................................... 11<br />
Troubleshooting ......................................................................................................................................................... 12<br />
Limited Warranty ....................................................................................................................................................... 12<br />
Declaration of Conformity ......................................................................................................................................... 31<br />
Pump Model Number:<br />
Pump Serial Number:<br />
Dealer:<br />
Dealer Phone No.:<br />
Date of Purchase:<br />
Date of Installation:<br />
Current Readings at Startup:<br />
1 Ø 3 Ø L1-2 L2-3 L3-1<br />
Amps: Amps:<br />
Volts: Volts:<br />
2
SAFETY INSTRUCTIONS<br />
TO AVOID SERIOUS OR FATAL PERSONAL INJURY<br />
OR MAJOR PROPERTY DAMAGE, READ AND<br />
FOLLOW ALL SAFETY INSTRUCTIONS IN MANUAL<br />
AND ON PUMP.<br />
THIS MANUAL IS INTENDED TO ASSIST IN THE<br />
INSTALLATION AND OPERATION OF THIS UNIT<br />
AND MUST BE KEPT WITH THE PUMP.<br />
This is a SAFETY ALERT SYMBOL.<br />
When you see this symbol on the pump<br />
or in the manual, look for one of the<br />
following signal words and be alert<br />
to the potential for personal injury or<br />
property damage.<br />
DANGER Warns of hazards that WILL cause<br />
serious personal injury, death or major<br />
property damage.<br />
WARNING Warns of hazards that CAN cause<br />
serious personal injury, death or major<br />
property damage.<br />
CAUTION Warns of hazards that CAN cause personal<br />
injury or property damage.<br />
NOTICE: INDICATES SPECIAL INSTRUCTIONS<br />
WHICH ARE VERY IMPORTANT AND<br />
MUST BE FOLLOWED.<br />
THOROUGHLY REVIEW ALL INSTRUCTIONS<br />
AND WARNINGS PRIOR TO PERFORMING ANY<br />
WORK ON THIS PUMP.<br />
MAINTAIN ALL SAFETY DECALS.<br />
WARNING<br />
Hazardous fluids<br />
can cause fire,<br />
burns or death.<br />
UNIT NOT DESIGNED FOR USE<br />
WITH HAZARDOUS LIQUIDS OR<br />
FLAMMABLE GASES. THESE<br />
FLUIDS MAY BE PRESENT IN<br />
CONTAINMENT AREAS.<br />
NOTICE: INSPECT UNIT FOR DAMAGE AND<br />
REPORT ALL DAMAGE TO THE CARRIER OR<br />
DEALER IMMEDIATELY.<br />
DESCRIPTION and SPECIFICATIONS:<br />
The <strong>NPV</strong> and <strong>SHV</strong> Series pumps are vertically immersed,<br />
end-suction designed pumps for general liquid transfer<br />
service, machine tool coolant, parts washer, fi ltration,<br />
waste treatment and OEM applications. Liquid-end construction<br />
is all AISI 300 series stainless steel.<br />
These pumps are not designed for applications requiring<br />
ANSI, FDA or NSF ratings and are not recommended for<br />
use in highly abrasive services such as grinding.<br />
Impellers are available in enclosed and open confi gurations<br />
depending on the model. Enclosed impeller versions<br />
of the <strong>NPV</strong> are fi tted with a diffuser for high effi ciency<br />
and for negligible radial shaft loading.<br />
<strong>NPV</strong> units have NEMA 56J motors with C-face mounting<br />
and threaded shaft extensions. <strong>SHV</strong> units have<br />
NEMA standard JM frame motors.<br />
ENGINEERING DATA<br />
Maximum Liquid Temperature: 250° F (120° C)<br />
Maximum Working Pressure: <strong>NPV</strong> 125 psi (9 bars)<br />
<strong>SHV</strong> 230 psi (15 bars)<br />
Starts per hour: 20 - Evenly distributed<br />
INSTALLATION<br />
NOTICE: UNIT CAN BE INSTALLED IN VERTICAL<br />
ORIENTATION ONLY. DO NOT INSTALL WITH<br />
MOTOR BELOW PUMP.<br />
Unit may be mounted directly to a tank top or the<br />
optional Goulds Pumps mounting plate may be utilized.<br />
Minimum and maximum liquid levels must be maintained<br />
for proper pump operation. Refer to Dimensions<br />
page for details.<br />
Allow adequate space for servicing and ventilation.<br />
Protect from freezing or fl ooding.<br />
PIPING<br />
Piping should be no smaller than the pump discharge and<br />
suction connections and kept as short as possible, avoiding<br />
unnecessary fi ttings to minimize friction losses.<br />
All piping MUST be independently supported and<br />
MUST NOT place any piping loads on the pump.<br />
NOTICE: DO NOT FORCE PIPING INTO PLACE<br />
AT PUMP SUCTION AND DISCHARGE<br />
CONNECTIONS.<br />
All joints MUST be air tight. Use 3-4 wraps of Tefl on<br />
tape to seal threaded connections on <strong>NPV</strong> Series.<br />
<strong>SHV</strong> Series pumps use standard ANSI 150# raised face<br />
fl anges.<br />
PIPING - SUCTION<br />
Suction piping is not required for typical installation of<br />
unit.<br />
Suction intake should be above the minimum distance<br />
from tank bottom: <strong>NPV</strong> = 2", <strong>SHV</strong> = 4". Tank must be<br />
kept free of debris.<br />
Use a foot valve only when necessary to hold prime<br />
during intermittent service where tank liquid level does<br />
not return to minimum depth before pump is re-started.<br />
Refer to dimensions page for details.<br />
NOTICE: IN ALL CASES, THE BEARING MUST BE<br />
SUBMERGED IN LIQUID AT START-UP.<br />
To avoid air pockets, no part of suction piping should be<br />
higher than pump suction connections.<br />
PIPING - DISCHARGE<br />
Install a check valve suitable to handle the fl ow, liquids<br />
and to prevent backfl ow. After the check valve, install an<br />
appropriately sized gate valve to be used to regulate the<br />
pump capacity, pump inspection and for maintenance.<br />
3
WIRING and GROUNDING<br />
4<br />
WARNING<br />
Hazardous voltage<br />
can shock, burn or<br />
cause death.<br />
Install, ground and wire according<br />
to local and National Electrical Code<br />
requirements.<br />
Install an all leg disconnect switch near<br />
the pump.<br />
Disconnect and lockout electrical power before<br />
installing or servicing pump.<br />
Electrical supply MUST match pumps name plate<br />
specifi cations. Incorrect voltage can cause fi re,<br />
damage to the motor and voids warranty.<br />
Motors not protected MUST be provided with<br />
contactors and thermal overloads for single phase<br />
motors, or starters with heaters for three phase<br />
motors. See motor nameplate.<br />
Use only stranded copper wire to motor and ground.<br />
The ground wire MUST be at a least as large as the wire<br />
to the motor. Wires should be color coded for ease of<br />
maintenance.<br />
Follow motor manufacturer's wiring diagram on the<br />
motor nameplate or terminal cover carefully.<br />
WARNING<br />
Hazardous<br />
voltage<br />
BURNS OR DEATH.<br />
ROTATION<br />
FAILURE TO PERMANENTLY GROUND<br />
THE PUMP, MOTOR AND CONTROLS<br />
BEFORE CONNECTING TO ELECTRI-<br />
CAL POWER CAN CAUSE SHOCK,<br />
NOTICE: INCORRECT ROTATION MAY CAUSE<br />
DAMAGE TO THE PUMP AND VOIDS THE<br />
WARRANTY.<br />
Correct rotation is right-hand, CLOCKWISE when<br />
viewed from the motor end. On tank mounted units,<br />
remove motor end plug or cover, turn power on and off<br />
quickly to observe rotation.<br />
To reverse three phase motor rotation, interchange any<br />
two power supply leads.<br />
OPERATION<br />
WARNING<br />
Hazardous<br />
voltage<br />
SPLASHING OR IMMERSING OPEN<br />
DRIP PROOF MOTORS IN FLUIDS<br />
CAN CAUSE FIRE,SHOCK, BURNS OR<br />
DEATH.<br />
NOTICE: PUMP MUST BE FULLY PRIMED BEFORE<br />
OPERATION. DO NOT RUN PUMP DRY OR PUMP<br />
BEARING DAMAGE WILL RESULT.<br />
After stabilizing the system at normal operating<br />
conditions, check the piping. If necessary, adjust the pipe<br />
supports.<br />
MAINTENANCE<br />
WARNING<br />
Hazardous<br />
voltage<br />
BURNS OR DEATH.<br />
FAILURE TO DISCONNECT AND<br />
LOCKOUT ELECTRICAL POWER<br />
BEFORE ATTEMPTING ANY<br />
MAINTENANCE CAN CAUSE SHOCK,<br />
Motors have permanently lubricated bearings. No lubrication<br />
is possible or necessary. Follow the motor manufacturer's<br />
recommendations for maintenance.<br />
If pump performance degrades due to excessive leakage,<br />
inspect pump bearing, bushing and shaft for excessive<br />
wear. Replace as necessary.<br />
SEASONAL SERVICE:<br />
To REMOVE pump from service, drain all pumpage<br />
from pump and piping.<br />
To RETURN pump to service, replace all plugs and<br />
piping using Tefl on tape or equivalent on male threads<br />
for the <strong>NPV</strong> Series.<br />
Refer to "OPERATION" section of manual.<br />
<strong>NPV</strong> SERIES DISASSEMBLY<br />
Follow ALL warnings and instructions in the<br />
"MAINTENANCE" section of this manual.<br />
While complete disassembly of the unit will be described,<br />
it is recommended that you proceed only as far as required<br />
to perform the maintenance needed.<br />
Remove the mounting plate, or clamp, from pump.<br />
LIQUID END:<br />
1. Remove casing bolts (5).<br />
2. Remove casing (1, 2) and casing O-ring (4) from<br />
pump mounting plate (7).<br />
3. Remove guidevane (3) and O-ring (21) on model SL<br />
only.<br />
4. Restrain shaft (12) from rotation by applying a 9 ⁄16"<br />
wrench to shaft fl ats through holes in the support<br />
tube (11).<br />
5. Remove impeller nut (20) by turning COUNTER-<br />
CLOCKWISE. Nut may need to be heated with a<br />
torch to remove.<br />
NOTICE: EXERCISE CAUTION IN HANDLING<br />
HOT IMPELLER NUT.<br />
6. Remove impeller (16, 17) by turning COUNTER-<br />
CLOCKWISE when looking at the front of the<br />
pump. Protect hand with a rag or glove.<br />
NOTICE: SUPPORT TUBE HAS LEFT HAND<br />
THREADS.<br />
7. Remove pump plate from support tube by turning<br />
plate CLOCKWISE when viewing from the front of<br />
the pump.<br />
8. Remove snap ring (13) from pump plate and pull out<br />
restricting bushing (14).<br />
9. Press out pump bearing (15A, 15B) with a bearing or<br />
arbor press.<br />
10. Remove support tube from motor plate (9) by<br />
turning tube CLOCKWISE when viewing from the<br />
front of the pump.<br />
11. Remove motor end plug, or cover, to expose<br />
screwdriver slot, or fl ats, on end of the motor shaft.<br />
12. Restrain motor shaft with appropriate tool and<br />
remove shaft extension (12) from motor shaft, by<br />
turning it COUNTERCLOCKWISE. Shaft extension<br />
may need to be heated with a torch to remove. Apply<br />
heat to the shaft extension, not to motor shaft.
NOTICE: EXERCISE CAUTION IN HANDLING<br />
HOT SHAFT EXTENSION.<br />
NOTICE: INSPECT BUSHING, PUMP BEARING<br />
AND SHAFT EXTENSION FOR EXCESSIVE<br />
WEAR. REPLACE AS NECESSARY.<br />
13. Remove motor bolts (8) and remove motor plate<br />
from motor.<br />
14. Remove U-cup seal (23) from motor plate and<br />
discard.<br />
<strong>NPV</strong> SERIES REASSEMBLY<br />
All parts should be cleaned before assembly.<br />
NOTICE: ALL O-RINGS SHOULD BE REPLACED<br />
AFTER ANY DISASSEMBLY OF UNIT.<br />
1. Check motor shaft for run out. Maximum<br />
permissible is .002" TIR.<br />
2. Install new U-cup seal in motor plate and install<br />
motor plate on motor, torquing bolts to 15 lbs. ft.<br />
3. Restrain motor shaft with appropriate tool. Apply<br />
Loctite 7649 to shaft threads and allow to dry. Apply<br />
LOCTITE ® #243 to motor shaft threads and install<br />
shaft extension by turning CLOCKWISE.<br />
4. Apply LOCTITE ® #243 to support tube threads.<br />
Attach support tube to motor plate turning<br />
COUNTER-CLOCKWISE.<br />
5. Replace pump bearing, bushing and snap ring in<br />
pump plate. Use LOCTITE ® #243 when installing<br />
bushing in pump plate.<br />
6. Install pump plate to support tube turning<br />
COUNTER-CLOCKWISE.<br />
7. While holding shaft from rotation with a 9 ⁄16" wrench,<br />
install impeller by turning it CLOCKWISE, insuring<br />
that the impeller seats securely against the shaft.<br />
8. Apply LOCTITE ® #243 to end of shaft and install<br />
impeller nut, turning CLOCKWISE.<br />
9. Install guidevane and guidevane O-ring on SL models<br />
only.<br />
NOTICE: DO NOT LUBRICATE GUIDEVANE<br />
O-RING. ENSURE IT IS NOT PINCHED BY THE<br />
IMPELLER ON REASSEMBLY.<br />
10. Install new casing O-ring and casing, torquing casing<br />
bolts to 50 lbs. in.<br />
11. Check reassembled unit for binding. If binding occurs,<br />
realign casing over impeller eye.<br />
12. Assembly is complete.<br />
<strong>SHV</strong> SERIES DISASSEMBLY<br />
Follow ALL warnings and instructions in the<br />
"MAINTENANCE" section of this manual.<br />
While complete disassembly of the unit will be described,<br />
it is recommended that you proceed only as far as<br />
required to perform the maintenance needed.<br />
Remove mounting plate bolts from tank top.<br />
Lift pump out of the tank with an adequately sized nylon<br />
lifting strap or chain attached to the motor.<br />
Remove the mounting plate and motor leg from pump<br />
and motor.<br />
LIQUID END:<br />
NOTE: PRIOR TO DISASSEMBLY PLEASE NOTE RE-<br />
LATIONSHIP OF PUMP CASING, PUMP PLATE,<br />
MOTOR PLATE AND SUPPORT TUBE. WHEN<br />
PUMP IS REASSEMBLED THE BOLT CIRCLES<br />
WILL HAVE TO BE LINED UP IN THE SAME<br />
WAY TO INSURE THE CASING DISCHARGE<br />
IS DIRECTLY OPPOSITE THE MOTOR FEET.<br />
IT MAY BE HELPFUL TO MARK A LINE ON<br />
THESE PARTS PRIOR TO DISASSEMBLY.<br />
1. Remove casing (22) and casing O-ring (21) from<br />
pump mounting plate (12).<br />
2. While restraining impeller from rotating remove impeller<br />
bolt (20) and impeller washer (19) by turning<br />
C.C.W.<br />
3. Remove impeller (18) and key (17) from shaft.<br />
4. Remove the three bolts which connect the tube<br />
support (10) to the pump mounting plate (12).<br />
5. Grasp the pump mounting plate and carefully slide it<br />
out from the tube support and set it aside.<br />
6. Remove snap ring (15) from pump mounting plate<br />
and pull out bushing (14).<br />
7. Carefully press out pump bearing (13A, 13B) with a<br />
bearing or arbor press.<br />
8. Remove shaft sleeve (16) from shaft extension (9).<br />
9. Remove the three bolts (11) that connect the tube<br />
support to the motor plate and then remove the tube<br />
support from the motor plate.<br />
10. Using (2) 1½ inch open end wrenches on the fl ats of<br />
the shaft extension and the coupling (6), remove the<br />
shaft by turning it C.C.W.<br />
11. Remove coupling bolt (8) and coupling washer from<br />
the motor shaft with a socket and extension.<br />
12. Remove coupling and key (5) from the motor shaft.<br />
13. Remove motor bolts (11) from motor mounting plate<br />
(3).<br />
14. Remove motor mounting plate from motor.<br />
15. Remove U-cup seal (2) from motor mounting plate.<br />
NOTICE: INSPECT BUSHING, PUMP BEARING<br />
AND SHAFT SLEEVE FOR EXCESSIVE WEAR.<br />
REPLACE AS NECESSARY.<br />
<strong>SHV</strong> SERIES REASSEMBLY<br />
All parts should be cleaned before assembly.<br />
NOTICE: ALL O-RINGS SHOULD BE REPLACED<br />
AFTER ANY DISASSEMBLY OF UNIT.<br />
1. Check motor shaft to the following dimensions.<br />
Reference NEMA standards for proper measurement<br />
methods.<br />
2. Maximum shaft runout - .002 inches.<br />
3. Maximum eccentricity of mounting rabbet - .004<br />
inches.<br />
4. Maximum face runout - .004 inches.<br />
5. Install new U-cup seal in motor mounting plate and<br />
then install motor plate on motor with 4 bolts.<br />
6. Place key in motor shaft and slide coupling on motor<br />
shaft. Install bolt with washer and torque to 17 ft. lbs.<br />
5
NOTE: INSURE U-CUP SEAL REMAINS IN ITS<br />
PROPER POSITION DURING COUPLING IN-<br />
STALLATION.<br />
7. Place 2 or 3 drops of LOCTITE ® #271 on shaft<br />
extension threads. Screw shaft extension into coupling<br />
and tighten securely with open end wrenches.<br />
8. Place tube support over motor mounting plate, insert<br />
3 bolts and tighten to 17 ft. lbs. Apply 1 drop of<br />
LOCTITE ® #243 to each bolt prior to tightening.<br />
9. Press bearing into pump mounting plate.<br />
10. Install restricting bushing with snap ring to pump<br />
mounting plate.<br />
11. Carefully position pump mounting plate assembly<br />
and slide into open end of pump support.<br />
6<br />
12. Insert 3 bolts and tighten to 17 ft. lbs. Apply 1 drop<br />
of LOCTITE ® #243 to each bolt prior to tightening.<br />
13. Apply 1 drop of LOCTITE ® #271 to inside of shaft<br />
sleeve and then slide sleeve over shaft extension.<br />
14. Place key in shaft extension keyseat and slide<br />
impeller over shaft extension. Install impeller bolt<br />
with washer and torque to 17 ft. lbs.<br />
15. Install new O-ring and casing on the pump mounting<br />
plate. Install casing bolts using alternating method<br />
and torque to 17 ft. lbs. Insure casing plug is<br />
installed.<br />
16. Check unit for free turning of impeller prior to pump<br />
startup.<br />
17. Assembly is complete.
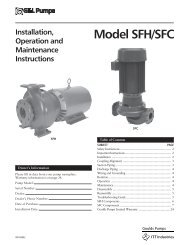
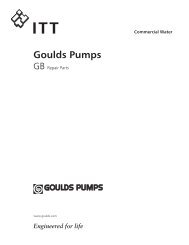
Repair Parts Model <strong>NPV</strong><br />
Item # Quantity Description Material<br />
1 1 Casing (Model SL)<br />
2 1 Casing (Model SR)<br />
3 1 Guidevane<br />
AISI 316<br />
Stainless Steel<br />
4 1 O-ring - Casing Viton/EPR<br />
5 8 Socket Head Cap Screw AISI 304<br />
6 8 Hex Nut Stainless Steel<br />
7 1 Pump Mounting Plate AISI 303 SS<br />
8 4 Hex Head Bolt Plated Steel<br />
9 1 Motor Plate Cast Iron<br />
10 1 Motor Electrical<br />
11 1 Support Tube AISI 304 SS<br />
12 1 Shaft Extension AISI 304 SS<br />
12A 1 Shaft, Ceramic Coated AISI 304 SS<br />
16<br />
2 22<br />
(1SR ONLY)<br />
6<br />
5<br />
4<br />
12/12A<br />
7<br />
3 1 21 20<br />
Model SR — Open Impeller Model SL — Closed Impeller<br />
23<br />
10<br />
9<br />
8<br />
11<br />
14<br />
15A/15B/15C<br />
18<br />
19<br />
Item # Quantity Description Material<br />
13 1 Internal Snap Ring Stainless Steel<br />
14 1 Bushing Nitronic 60 SS<br />
15A 1 Bearing Viton<br />
15B 1 Bearing Carbon<br />
15C 1 Bearing EPR<br />
16 1 Impeller (Model SR) AISI 316 SS<br />
17 1 Impeller (Model SL) AISI 316 SS<br />
18 1 Plug, Drain and Vent AISI 316 SS<br />
19 2 O-ring (Drain and Vent Plug) Viton/EPR<br />
20 1 Impeller Nut AISI 300 SS<br />
21 1 O-ring (Impeller) Viton/EPR<br />
22 1 O-ring - Casing Viton/EPR<br />
23 1 U-cup Seal Tefl on<br />
17<br />
13<br />
7
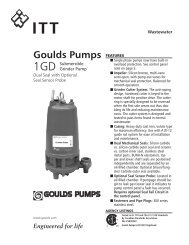
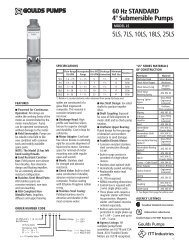
Repair Parts Model <strong>SHV</strong><br />
8<br />
Suction<br />
20<br />
22<br />
19<br />
17<br />
19<br />
Discharge<br />
16/16A<br />
25<br />
24<br />
21<br />
23<br />
12<br />
13A/13B/13C<br />
15<br />
14<br />
9<br />
List of Material<br />
Item # Quantity Description Material<br />
1 1 Motor Electrical<br />
2 1 Seal, U-cup Tefl on<br />
3 1 Motor Mounting Plate Painted Cast Iron<br />
4 4 Bolt, Motor Plated Steel<br />
5 1 Key, Motor Steel<br />
6 1 Coupling 300 Series SS<br />
7 1 Washer, Coupling 300 Series SS<br />
8 1 Bolt, Coupling 300 Series SS<br />
9 1 Shaft Extension 300 Series SS<br />
10 1 Tube 300 Series SS<br />
11 6 Bolt, Tube 300 Series SS<br />
12 1 Pump Mounting Plate 300 Series SS<br />
13A 1 Bearing Viton<br />
13B 1 Bearing Carbon<br />
13C 1 Bearing EPR<br />
14 1 Bushing 300 Series SS<br />
15 1 Snap Ring 300 Series SS<br />
16 1 Shaft Sleeve 300 Series SS<br />
16A 1 Shaft Sleeve, Ceramic Coated 300 Series SS<br />
17 1 Key, Impeller 300 Series SS<br />
18 1 Impeller 316SS<br />
19 1 Washer, Impeller 300 Series SS<br />
20 1 Bolt, Impeller 300 Series SS<br />
21 1 O-ring Viton<br />
22 1 Casing 316SS<br />
23 8 Bolt, Casing 300 Series SS<br />
24 1 Plug, Pipe 300 Series SS<br />
25 1 Thrust Plate 300 Series SS<br />
8<br />
7<br />
6<br />
5<br />
10<br />
2<br />
11<br />
4<br />
3<br />
1
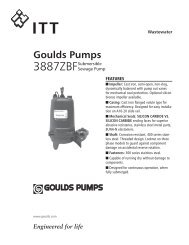
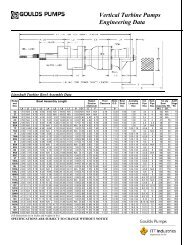
<strong>NPV</strong> Pump – Dimensions, Weights and Specifi cations<br />
Bomba <strong>NPV</strong> – Dimensiones, Pesos y Especifi caciones<br />
Série <strong>NPV</strong> — dimensions, poids et caractéristiques<br />
A<br />
C MAX.<br />
C MÁX.<br />
R<br />
.50<br />
0,50<br />
M<br />
DISCHARGE<br />
DESCARGA<br />
REFOULEMENT<br />
7,00 DIÁM. • 6,50 DIÁM. MÁX.<br />
7,00 (DIAM.) • 6,50 (DIAM. MAX.)<br />
7.00 DIA.<br />
6.50 DIA. MAX.<br />
B B<br />
Y<br />
X<br />
8.68<br />
8,68<br />
Dimensions – Determined by Pump,<br />
Dimensiones – Determinadas por la Bomba<br />
Dimensions — pompe<br />
SUCTION<br />
SUCCIÓN<br />
ASPIRATION<br />
Optional Mounting Accessories<br />
Accesorios de Montaje Opcionales<br />
Série <strong>NPV</strong> — accessoires de fi xation optionnels<br />
1.50 REF.<br />
1,50 (RÉF.)<br />
A<br />
N<br />
6.0" MINIMUM<br />
LIQUID LEVEL<br />
6,0" MÍNIMO NIVEL<br />
DEL LÍQUIDO<br />
6,0 (NIVEAU DE<br />
LIQUIDE MIN.)<br />
.56 DIA.<br />
TYPICAL<br />
,56 DIÁM.,<br />
TÍPICO<br />
0,56 (DIAM.<br />
TYPE)<br />
15.50<br />
15,50<br />
CLEARANCE HOLE<br />
AGUJERO DE PASO<br />
TROU DE PASSAGE<br />
.56 DIA. TYPICAL<br />
,56 DIÁM., TÍPICO<br />
0,56 (DIAM. TYPE)<br />
14.0 REF.<br />
14,0 REF.<br />
14,0 (RÉF.)<br />
5.97<br />
5,97<br />
MP1<br />
11.00<br />
11,00<br />
9.5 REF.<br />
9,5 REF.<br />
9,5 (RÉF.)<br />
VIEW “A-A”<br />
MOUNTING PLATE<br />
VISTA A-A<br />
PLACA DE MONTAJE<br />
VUE A-A<br />
(PLAQUE DE FIXATION)<br />
MC1<br />
5.97<br />
5,97<br />
VIEW “B-B”<br />
MOUNTING CLAMP<br />
VISTA B-B<br />
ABRAZADERA DE MONTAJE<br />
VUE B-B<br />
(DOUBLE ÉTRIER DE FIXATION)<br />
6.25<br />
6,25<br />
5⁄8" DIA.<br />
5.25<br />
5,25<br />
5 ⁄8" DIÁM.<br />
5 ⁄8 (DIAM.)<br />
.75<br />
TYPICAL<br />
,75 TÍPICO<br />
0,75 (TYPE)<br />
Pump,<br />
Bomba<br />
Pompe<br />
Suction NPT, Discharge NPT,<br />
Succión NPT Descarga NPT<br />
Aspiration (NPT) Refoulement (NPT)<br />
M N R<br />
14 24 14 24 14 24<br />
1SL, 1SR 1¼ 1 4<br />
9<br />
3 ⁄8 2 7.78 17.78 13.20 23.20 14.68 24.68 65<br />
2SL, 2SR 1½ 1¼ 4½ 21 ⁄8 7.78 17.78 13.20 23.20 14.68 24.68 70<br />
3SL, 3SR 2 1½ 45 ⁄8 21 X Y<br />
⁄8 7.78 17.78 13.20 23.20 14.68 24.68 70<br />
NOTES:<br />
NOTAS:<br />
1. Motor dimensions may vary 1. Las dimensiones del motor puede<br />
with motor manufacturers. que varíen con los fabricantes.<br />
2. Dimensions in inches, weights<br />
in pounds.<br />
3. For explosion proof motor<br />
dimensions consult factory for<br />
2. Dimensiones en pulgadas, pesos<br />
en libras.<br />
3. Para las dimensiones de los motores<br />
a prueba de explosión consultar<br />
information.<br />
con la fábrica para información.<br />
½ 16 21 47 19 18 27 9<br />
4. Not to be used for construc- 4. No usar para propósitos de<br />
tion purposes unless certifi ed. construcción sin certifi car.<br />
15 ⁄16<br />
¾ 19 24 41 21 21 30 10¼<br />
1 22 26 49 23 21 30 11<br />
1½ 28 35 56 27 27 37 115 ⁄16<br />
2 33 39 60 32 33 44 121 ⁄16<br />
3 40 43 — 41 37 — 127 Dimensions Determined by Shaft,<br />
Dimensiones Determinadas por el Eje, Dimensions — selon l’arbre<br />
Max. Wt.<br />
Pump only,<br />
Peso máx.,<br />
Bomba sola.<br />
Poids max.,<br />
pompe seule<br />
Available Motor Weights and Dimensions,<br />
Pesos y Dimensiones de Motores que se ofrecen<br />
Dimensions et poids — moteur<br />
HP<br />
hp<br />
Motor Weights, Pesos del Motor, Poids<br />
1 Phase,<br />
3 Phase,<br />
Monofásicos, 1Ø<br />
Trifásicos, 3Ø<br />
ODP TEFC EXP ODP TEFC EXP<br />
C Max.<br />
Length,<br />
Longitud,<br />
C max.<br />
NOTA :<br />
1. Les dimensions du moteur peuvent varier selon le fabricant.<br />
2. Les dimensions sont en pouces, et le poids, en livres.<br />
⁄16<br />
3. S’adresser au personnel de l’usine pour les dimensions des moteurs<br />
5 50 — — 50 — — 13<br />
antidéfl agrants.<br />
7½ — — — 49 — — 14<br />
4. Ne pas utiliser les dimensions pour la construction si elles ne sont pas Dimensions in inches, weights in pounds., Dimensiones en pulgadas, pesos en libras., ODP =<br />
certifi ées à cette fi n.<br />
abrité (à ouvertures de ventilation protégées) ; TEFC = fermé autoventilé ; EXP = antidéfl agrant.
<strong>SHV</strong> Pump – Dimensions, Weights and Specifi cations;<br />
Dimensiones, Pesos y Especifi caciones de la Bomba <strong>SHV</strong>;<br />
Série <strong>SHV</strong> — dimensions, poids et caractéristiques<br />
Dimensions – Determined by Pump; Dimensiones – Determinadas por la Bomba; Dimensions — pompe<br />
150 lb. Flange; Brida de<br />
"DC" Max.; Dimensions Determined by Shaft; Dimensiones Pump Size; 2<br />
150 libras; Bride, 150 lb/po<br />
X Y<br />
Max. Wt. Pump only;<br />
Determinadas por el Eje; Dimensions — selon l’arbre Peso máx., Bomba sola;<br />
"DC" Máx.; Tamaño de la Bomba; Suction; Succión; Discharge; Descarga;<br />
DC max. N "R" Ref.; "R" Ref.; R (réf.) Pompe<br />
Aspiration Refoulement<br />
Poids max., pompe seule<br />
14 24 14 24 14 24<br />
10<strong>SHV</strong> — 1 x 2 - 8<br />
2 1 71 ⁄8<br />
31 ⁄8<br />
55 ⁄8<br />
149 ⁄16 249 9<strong>SHV</strong> — 1 x 2 - 6<br />
6<br />
⁄16<br />
83 93<br />
3 4<strong>SHV</strong> — 1½ x 2½ - 6<br />
1½<br />
⁄8<br />
3¼<br />
5<br />
7<br />
75 85<br />
5 ⁄16 175 ⁄16 145 ⁄8 245 7<strong>SHV</strong> — 1½ x 2½ - 8 2½<br />
7<br />
⁄8 75 85<br />
1 ⁄8 4 55 ⁄8 1511 ⁄32 2511 5<strong>SHV</strong> — 2 x 2½ - 6 2 5 15<br />
⁄32 83 93<br />
7 ⁄16 257 ⁄16 76 86<br />
10<br />
DISCHARGE<br />
DESCARGA<br />
REFOULEMENT<br />
“C” MAX.<br />
“C” MÁX.<br />
C MAX.<br />
"N" Min. Liquid Level<br />
Nivel mínimo de líquido *N*<br />
N (niveau de liquide min.)<br />
Y<br />
X<br />
“P” DIA. MAX.<br />
“P” DIÁM. MÁX.<br />
P (DIAM. MAX.)<br />
D<br />
3.00 Max. Liquid Level<br />
Nivel máximo de líquido 3.00<br />
3,00 (niveau de liquide max.)<br />
4½ DIA. REF.<br />
4½ DIÁM. REF.<br />
4½ (DIAM. DE RÉF.)<br />
“DC” MAX.<br />
“DC” MÁX.<br />
DC MAX.<br />
SUCTION<br />
SUCCIÓN<br />
ASPIRATION<br />
MOTOR LEG<br />
PATA DEL MOTOR<br />
PLAQUE-PATTE DU MOTEUR<br />
“R” REF.<br />
“R” REF.<br />
R (RÉF.)<br />
Dimensions in inches;<br />
Dimensiones en pulgadas;<br />
Les dimensions sont en pouces,<br />
et le poids, en livres.<br />
For motor information and related dimensions, see page 9.<br />
Para información acerca del motor y las dimensiones relacionadas, vea la página 9.<br />
Voir autres dimensions et détails relatifs aux moteurs, en page 9.<br />
L F F<br />
B<br />
3 ⁄8 MOUNTING PLATE<br />
3 ⁄8 PLACA DE MONTAJE<br />
3 ⁄8 (PLAQUE DE FIXATION)
<strong>SHV</strong> Pump – Dimensions, Weights and Specifi cations;<br />
Dimensiones, Pesos y Especifi caciones de la Bomba <strong>SHV</strong>;<br />
Série <strong>SHV</strong> — dimensions, poids et caractéristiques (suite)<br />
Dimensions – Determined by Motor;<br />
Dimensiones – Determinadas por el motor; Dimensions — moteur<br />
Motor<br />
Frame;<br />
Bastidor<br />
del motor;<br />
Carcasse<br />
de moteur<br />
L F B D<br />
“C”<br />
Max.;<br />
“C”<br />
Máx.;<br />
C max.<br />
“P” Dia. Max. Wt.<br />
Max.; Motor;<br />
Diám. P Peso Máx.<br />
Máx.; del motor;<br />
P (diam. Poids<br />
max.) max.<br />
143JM<br />
315 ⁄32<br />
2<br />
6 3½ 117 ⁄8 65 ⁄8 41<br />
145JM 2½ 57<br />
182JM<br />
43 ⁄32<br />
2¼<br />
6½ 4½ 143 ⁄8<br />
77 ⁄8<br />
77<br />
184JM<br />
213JM<br />
5<br />
2¾<br />
16 97<br />
3 ⁄32<br />
8 5¼ 18¼<br />
95 ⁄8<br />
122<br />
215JM 3½ 17¼ 155<br />
254TCZ<br />
55 ⁄8 41 ⁄8 9½<br />
6¼ 21½ 11½ 265<br />
256TCZ 5 11¾ 320<br />
Motor Horsepower; Potencia del motor;<br />
Puissance du moteur (hp)<br />
Motor<br />
Frame;<br />
Bastidor<br />
3500 RPM; 3 500 r/min<br />
1 Phase; 1 Ø; 3 Phase; 3 Ø;<br />
1750 RPM; 1 750 r/min<br />
1 Phase; 1 Ø; 3 Phase; 3 Ø;<br />
del motor; Monofásicos Trifásicos Monofásicos Trifásicos<br />
Carcasse<br />
de moteur ODP TEFC ODP TEFC EXP ODP TEFC ODP TEFC EXP<br />
143JM – – – – – – – 1 1 1<br />
145JM 2 2 2-3 2 – 1-1½ 1-1½ 1½-2 1½-2 1½-2<br />
182JM 3 3 5 3 3 2 2-3 3 3 3<br />
184JM 5 5 7½ 5 5 3 – 5 5 5<br />
213JM 7½ – 10 7½ 7½ 5 – 7½ 7½ 7½<br />
215JM 10 – 15 10-15 10 – – 10 10 10<br />
254TCZ – – 20 – – – – – – –<br />
256TCZ – – 25 20-25 – – – – – –<br />
Les dimensions sont en pouces, et le poids, en livres. ODP = abrité (à ouvertures de<br />
ventilation protégées) ; TEFC = fermé autoventilé ; EXP = antidéfl agrant.<br />
Optional Mounting Accessories;<br />
Accesorios de Montaje Opcionales; Série <strong>SHV</strong> — accessoires de fi xation optionnels<br />
MOTOR LEG ¼" PLATE STEEL;<br />
PATA DEL MOTOR, PLACA DE<br />
ACERO DE ¼";<br />
PLAQUE-PATTE EN<br />
ACIER (¼)<br />
5.00;<br />
5,00<br />
17.00;<br />
17,00<br />
2.75; 2,75<br />
1.00;<br />
1,00<br />
ML2<br />
8.50;<br />
8,50<br />
12.00;<br />
12,00<br />
30.50;<br />
30,50<br />
4.62;<br />
4,62<br />
28.00 REF.<br />
28,00 REF.<br />
28,00 (RÉF.)<br />
CLEARANCE HOLE;<br />
AGUJERO DE PASO;<br />
TROU DE PASSAGE<br />
SIX .62 DIA. HOLES FOR<br />
254JM & 256JM FRAME<br />
MOTORS;<br />
6 AGUJEROS DE 0,62"<br />
DIÁM. PARA MOTORES<br />
DE BASTIDOR 254JM Y<br />
256JM;<br />
SIX TROUS DE 0,62 po<br />
DE DIAM. POUR LES<br />
CARCASSES DE MOTEUR<br />
254JM ET 256JM<br />
.62 DIA.;<br />
,62 DIÁM;<br />
0,62 (DIAM.)<br />
1.75;<br />
1,75<br />
3.62 R<br />
16.50;<br />
16,50<br />
3,62 (r)<br />
MP2<br />
2,94 (r)<br />
2.94 R<br />
14.25 REF.;<br />
14,25 REF.;<br />
14,25 (RÉF.)<br />
2.62 R<br />
2,62 (r)<br />
MOUNTING PLATE 3 ⁄8" PLATE STEEL;<br />
PLACA DE MONTAJE, PLACA DE ACERO DE 3 ⁄8";<br />
PLAQUE DE FIXATION EN ACIER ( 3 ⁄8)<br />
MOTOR LEG ¼" PLATE STEEL;<br />
PATA DEL MOTOR, PLACA DE ACERO<br />
DE ¼";<br />
PLAQUE-PATTE<br />
EN ACIER (¼)<br />
5.00;<br />
5,00<br />
18.25;<br />
18,25<br />
.62 DIA. TYPICAL;<br />
.62 DIÁM., TÍPICO;<br />
0,62 (DIAM. TYPE)<br />
MOTOR LEG SLOTS, TWO .62" SLOTS 5.75" LONG 8.50"<br />
APART; RANURAS DE LA PATA DEL MOTOR, 2 RANURAS<br />
DE ,62" X 5,75" DE LARGO, ESPACIADAS 8,50" ;<br />
FENTES POUR LA PLAQUE-PATTE DU MOTEUR : DEUX DE<br />
0,62 po x 5,75 po, DISTANTES DE 8,50 po<br />
.62 DIA. THRU HOLE LOCATED 90° APART;<br />
0,62" DIÁMETRO DE AGUJEROS, ESPACIADOS A 90°;<br />
TROUS DE 0,62 po DE DIAM., À 90° L’UN DE L’AUTRE<br />
.25" RADIUS SLOT, LOCATED 90° APART;<br />
0,25" RADIO DE RANURAS PASANTES, ESPACIADAS A 90°;<br />
FENTES DE 0,25 po, À 90° L’UNE DE L’AUTRE<br />
13.00;<br />
13,00<br />
2.75; 2,75<br />
1.00;<br />
1,00<br />
ML1<br />
8.50;<br />
8,50<br />
10.00;<br />
10,00<br />
SIX .50 DIA. HOLES FOR 213JM & 215JM<br />
FRAME MOTORS; 6 AGUJEROS DE 0,50"<br />
DIÁM. PARA MOTORES DE BASTIDOR<br />
213JM Y 215JM; SIX TROUS DE 0,50 po<br />
DE DIAM. POUR LES CARCASSES DE<br />
MOTEUR 213JM ET 215JM<br />
SIX .50 DIA. HOLES FOR 184JM & 186JM<br />
FRAME MOTORS; 6 AGUJEROS DE 0,50"<br />
DIÁM. PARA MOTORES DE BASTIDOR<br />
184JM Y 186JM; SIX TROUS DE 0,50 po<br />
DE DIAM. POUR LES CARCASSES DE<br />
MOTEUR 184JM ET 186JM<br />
SIX .44 DIA. HOLES FOR 143JM & 145JM<br />
FRAME MOTORS; 6 AGUJEROS DE 0,.44"<br />
DIÁM. PARA MOTORES DE BASTIDOR<br />
143JM Y 145JM; SIX TROUS DE 0,44 po<br />
DE DIAM. POUR LES CARCASSES DE<br />
MOTEUR 143JM ET 145JM<br />
.62 DIA.; ,62 DIÁM; 0,62 (DIAM.)<br />
0.75; 0,75<br />
11
ITT<br />
TROUBLESHOOTING<br />
WARNING FAILURE TO DISCONNECT AND LOCKOUT ELECTRICAL POWER BEFORE<br />
ATTEMPTING ANY MAINTENANCE CAN CAUSE SHOCK, BURNS OR DEATH.<br />
Hazardous voltage<br />
can shock, burn or<br />
cause death.<br />
SYMPTOM:<br />
Motor Not Running<br />
See Probable Causes 1 through 5<br />
Little or No Liquid Delivered<br />
See Probable Causes 6 through 12<br />
Excessive Power Consumption<br />
See Probable Causes 3, 12, 13, 14<br />
Excessive noise and Vibration<br />
See Probable Causes 3, 6, 7, 10, 13, 15 and 16<br />
PROBABLE CAUSES:<br />
1. Motor thermal protector tripped<br />
2. Open circuit breaker or blown fuse<br />
3. Impeller binding<br />
4. Motor improperly wired<br />
5. Defective motor<br />
6. Pump is not primed, air or gases in pumpage<br />
7. Discharge, suction plugged or valve closed<br />
8. Incorrect rotation (3 phase only)<br />
9. Low voltage or phase loss<br />
10. Impeller worn or plugged with debris<br />
11. System head too high<br />
12. Incorrect impeller diameter<br />
13. Discharge head too low - excessive fl ow rate<br />
14. Fluid viscosity and/or specifi c gravity too high<br />
15. Worn bearing<br />
16. Pump, motor or piping loose<br />
GOULDS PUMPS LIMITED WARRANTY<br />
This warranty applies to all water systems pumps manufactured by Goulds Pumps.<br />
Any part or parts found to be defective within the warranty period shall be replaced at no charge to the dealer during the warranty period. The<br />
warranty period shall exist for a period of twelve (12) months from date of installation or eighteen (18) months from date of manufacture, whichever<br />
period is shorter.<br />
A dealer who believes that a warranty claim exists must contact the authorized Goulds Pumps distributor from whom the pump was purchased<br />
and furnish complete details regarding the claim. The distributor is authorized to adjust any warranty claims utilizing the Goulds Pumps Customer<br />
Service Department.<br />
The warranty excludes:<br />
(a) Labor, transportation and related costs incurred by the dealer;<br />
(b) Reinstallation costs of repaired equipment;<br />
(c) Reinstallation costs of replacement equipment;<br />
(d) Consequential damages of any kind; and,<br />
(e) Reimbursement for loss caused by interruption of service.<br />
For purposes of this warranty, the following terms have these defi nitions:<br />
(1) “Distributor” means any individual, partnership, corporation, association, or other legal relationship that stands between Goulds Pumps and<br />
the dealer in purchases, consignments or contracts for sale of the subject pumps.<br />
(2) “Dealer” means any individual, partnership, corporation, association, or other legal relationship which engages in the business of selling or<br />
leasing pumps to customers.<br />
(3) “Customer” means any entity who buys or leases the subject pumps from a dealer. The “customer” may mean an individual, partnership,<br />
corporation, limited liability company, association or other legal entity which may engage in any type of business.<br />
THIS WARRANTY EXTENDS TO THE DEALER ONLY.<br />
Goulds Pumps, G&L and the ITT Engineered Blocks Symbol are<br />
registered trademarks and tradenames of ITT Corporaton.<br />
Loctite is a registered trademark of Loctite Corporation.<br />
Tefl on is a registered trademark of Dupont.<br />
SPECIFICATIONS ARE SUBJECT TO CHANGE WITHOUT NOTICE.<br />
IM101R03 March, 2007<br />
© 2007 ITT Corporation<br />
Engineered for life<br />
General Industry