
Create successful ePaper yourself
Turn your PDF publications into a flip-book with our unique Google optimized e-Paper software.
DTSI Graphics HRW—Holt Physics 2002 Page 351 CMYK<br />
PROCEDURE<br />
CBL AND SENSORS<br />
Pressure and volume of a gas<br />
2. Prepare a data table in your lab notebook <strong>with</strong> four<br />
columns and nine rows. In the first row, label the first<br />
four columns Volume (cm 3 ), Trial 1 Pressure (atm),<br />
Trial 2 Pressure (atm), and Trial 3 Pressure (atm).<br />
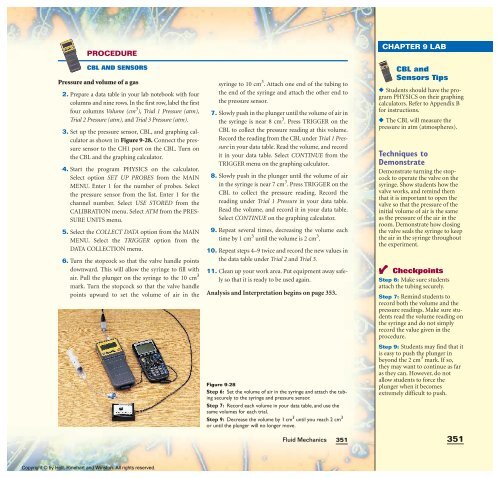
3. Set up the pressure sensor, CBL, and graphing calculator<br />
as shown in Figure 9-28. Connect the pressure<br />
sensor to the CH1 port on the CBL. Turn on<br />
the CBL and the graphing calculator.<br />
4. Start the program PHYSICS on the calculator.<br />
Select option SET UP PROBES from the MAIN<br />
MENU. Enter 1 for the number of probes. Select<br />
the pressure sensor from the list. Enter 1 for the<br />
channel number. Select USE STORED from the<br />
CALIBRATION menu. Select ATM from the PRES-<br />
SURE UNITS menu.<br />
5. Select the COLLECT DATA option from the MAIN<br />
MENU. Select the TRIGGER option from the<br />
DATA COLLECTION menu.<br />
6. Turn the stopcock so that the valve handle points<br />
downward. This will allow the syringe to fill <strong>with</strong><br />
air. Pull the plunger on the syringe to the 10 cm 3<br />
mark. Turn the stopcock so that the valve handle<br />
points upward to set the volume of air in the<br />
Copyright © by Holt, Rinehart and Winston. All rights reserved.<br />
syringe to 10 cm 3 . Attach one end of the tubing to<br />
the end of the syringe and attach the other end to<br />
the pressure sensor.<br />
7. Slowly push in the plunger until the volume of air in<br />
the syringe is near 8 cm 3 . Press TRIGGER on the<br />
CBL to collect the pressure reading at this volume.<br />
Record the reading from the CBL under Trial 1 Pressure<br />
in your data table. Read the volume, and record<br />
it in your data table. Select CONTINUE from the<br />
TRIGGER menu on the graphing calculator.<br />
8. Slowly push in the plunger until the volume of air<br />
in the syringe is near 7 cm 3 . Press TRIGGER on the<br />
CBL to collect the pressure reading. Record the<br />
reading under Trial 1 Pressure in your data table.<br />
Read the volume, and record it in your data table.<br />
Select CONTINUE on the graphing calculator.<br />
9. Repeat several times, decreasing the volume each<br />
time by 1 cm 3 until the volume is 2 cm 3 .<br />
10. Repeat steps 4–9 twice and record the new values in<br />
the data table under Trial 2 and Trial 3.<br />
11. Clean up your work area. Put equipment away safely<br />
so that it is ready to be used again.<br />
Analysis and Interpretation begins on page 353.<br />
Figure 9-28<br />
Step 6: Set the volume of air in the syringe and attach the tubing<br />
securely to the syringe and pressure sensor.<br />
Step 7: Record each volume in your data table, and use the<br />
same volumes for each trial.<br />
Step 9: Decrease the volume by 1 cm 3 until you reach 2 cm 3<br />
or until the plunger will no longer move.<br />
<strong>Fluid</strong> <strong>Mechanics</strong><br />
351<br />
CHAPTER XX 9 LAB LAB<br />
CBL and<br />
Sensors Tips<br />
◆ Students should have the program<br />
PHYSICS on their graphing<br />
calculators. Refer to Appendix B<br />
for instructions.<br />
◆ The CBL will measure the<br />
pressure in atm (atmospheres).<br />
Techniques to<br />
Demonstrate<br />
Demonstrate turning the stopcock<br />
to operate the valve on the<br />
syringe. Show students how the<br />
valve works, and remind them<br />
that it is important to open the<br />
valve so that the pressure of the<br />
initial volume of air is the same<br />
as the pressure of the air in the<br />
room. Demonstrate how closing<br />
the valve seals the syringe to keep<br />
the air in the syringe throughout<br />
the experiment.<br />
Checkpoints<br />
Step 6: Make sure students<br />
attach the tubing securely.<br />
Step 7: Remind students to<br />
record both the volume and the<br />
pressure readings. Make sure students<br />
read the volume reading on<br />
the syringe and do not simply<br />
record the value given in the<br />
procedure.<br />
Step 9: Students may find that it<br />
is easy to push the plunger in<br />
beyond the 2 cm 3 mark. If so,<br />
they may want to continue as far<br />
as they can. However, do not<br />
allow students to force the<br />
plunger when it becomes<br />
extremely difficult to push.<br />
351