Operating Instructions Ceramic Cooktop KM 84-2, KM 87-2 - Miele.ca
Operating Instructions Ceramic Cooktop KM 84-2, KM 87-2 - Miele.ca
Operating Instructions Ceramic Cooktop KM 84-2, KM 87-2 - Miele.ca

You also want an ePaper? Increase the reach of your titles
YUMPU automatically turns print PDFs into web optimized ePapers that Google loves.
<strong>Operating</strong> instructions<br />
<strong>Ceramic</strong> cooktop<br />
<strong>KM</strong> <strong>84</strong>-2, <strong>KM</strong> <strong>87</strong>-2<br />
In order to protect yourself and<br />
avoid damage to your machine, ]ö<br />
it is absolutely necessary to read<br />
the operating instructions prior<br />
to installation and operation. M.-Nr. 03 999 410
Contents<br />
Contents<br />
Help protect our environment. . . . . . . . . . . . . . . . . . . . . . . . . . . . . . . . . . . . . . . . 3<br />
Description of the appliance . . . . . . . . . . . . . . . . . . . . . . . . . . . . . . . . . . . . . . . . . 4<br />
Warning and Safety <strong>Instructions</strong> . . . . . . . . . . . . . . . . . . . . . . . . . . . . . . . . . . . . . 5<br />
Before using for the first time. . . . . . . . . . . . . . . . . . . . . . . . . . . . . . . . . . . . . . . . 8<br />
<strong>Cooktop</strong> controls . . . . . . . . . . . . . . . . . . . . . . . . . . . . . . . . . . . . . . . . . . . . . . . . . . 9<br />
Control settings . . . . . . . . . . . . . . . . . . . . . . . . . . . . . . . . . . . . . . . . . . . . . . . . . . 10<br />
Description of cooking areas . . . . . . . . . . . . . . . . . . . . . . . . . . . . . . . . . . . . . . . 11<br />
Operation<br />
Saucepans . . . . . . . . . . . . . . . . . . . . . . . . . . . . . . . . . . . . . . . . . . . . . . . . . . . . . . . 12<br />
Cleaning and <strong>ca</strong>re . . . . . . . . . . . . . . . . . . . . . . . . . . . . . . . . . . . . . . . . . . . . . . . . 14<br />
Correcting minor faults . . . . . . . . . . . . . . . . . . . . . . . . . . . . . . . . . . . . . . . . . . . . 16<br />
After Sales Service. . . . . . . . . . . . . . . . . . . . . . . . . . . . . . . . . . . . . . . . . . . . . . . . 17<br />
Electri<strong>ca</strong>l connection . . . . . . . . . . . . . . . . . . . . . . . . . . . . . . . . . . . . . . . . . . . . . . 18<br />
Appliance dimensions . . . . . . . . . . . . . . . . . . . . . . . . . . . . . . . . . . . . . . . . . . . . . 20<br />
Installation instructions. . . . . . . . . . . . . . . . . . . . . . . . . . . . . . . . . . . . . . . . . . . . 21
Help protect our environment<br />
Help protect our environment<br />
Disposal of packaging<br />
The transport and protective packing is<br />
mostly manufactured from the following<br />
re-usable materials:<br />
. . . Corrugated paper / <strong>ca</strong>rdboard -<br />
mostly from recycled materials.<br />
. . . Polyethylene foil (PE) -<br />
partly from secondary raw materials.<br />
Rather than throwing these materials<br />
away, please take them to your nearest<br />
recycling center.<br />
Disposal of your old machine<br />
Old machines contain materials which<br />
<strong>ca</strong>n be recycled. Please contact your<br />
recycling center or scrap merchant, before<br />
disposing of the appliance.<br />
Read the notes on page 7 before<br />
disposing of the appliance.<br />
3
Description of the appliance<br />
Description of the appliance<br />
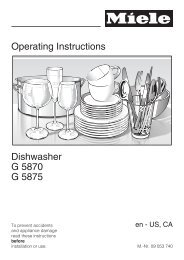
<strong>KM</strong> <strong>84</strong>-2 / <strong>KM</strong> <strong>87</strong>-2<br />
b Control panel<br />
c Cooking area -<br />
diameter 5-3/4" (14.5 cm)<br />
<strong>KM</strong> <strong>84</strong>-2: 1200 W<br />
<strong>KM</strong> <strong>87</strong>-2: 1200 W<br />
d Cooking area -<br />
diameter 7-1/8" (18 cm)<br />
<strong>KM</strong> <strong>84</strong>-2: 1700 W<br />
<strong>KM</strong> <strong>87</strong>-2: 1900 W Halogen<br />
e Residual heat indi<strong>ca</strong>tor<br />
f Connection <strong>ca</strong>ble<br />
g Control for the front cooking area<br />
h Cooking area indi<strong>ca</strong>tor lamp<br />
i Control for the rear cooking area<br />
4<br />
1<br />
7<br />
8<br />
7<br />
6<br />
2<br />
3 4<br />
Data plate<br />
Be<strong>ca</strong>use the data plate is no longer<br />
visible once the appliance has been<br />
installed, a 2nd data plate is supplied<br />
which should be placed in the space<br />
provided on page 17 of these instructions.<br />
Special accessories<br />
Special accessories are available from<br />
your <strong>Miele</strong> Dealer or from the Spare<br />
Parts Department.<br />
Stainless steel cover EA 80 (optional)<br />
For installation of this cover, a minimum<br />
distance of 20" (510 mm) is required between<br />
the countertop and overhanging<br />
<strong>ca</strong>binets.<br />
5
Warning and Safety <strong>Instructions</strong><br />
Warning:<br />
When using your cooktop, follow<br />
basic safety pre<strong>ca</strong>utions including<br />
the following:<br />
Read all instructions before using<br />
the cooktop.<br />
Use the cooktop only for its intended<br />
use.<br />
Be sure your appliance is properly<br />
installed and grounded by a qualified<br />
technician.<br />
Before servicing, disconnect the<br />
power supply by removing the fuse<br />
or turning off the circuit breaker.<br />
The electri<strong>ca</strong>l safety of this<br />
appliance <strong>ca</strong>n only be guaranteed<br />
when continuity is complete between<br />
the appliance and an effective<br />
grounding system.<br />
It is imperative that this basic safety requirement<br />
be met. If there is any doubt,<br />
the electri<strong>ca</strong>l system of the house<br />
should be checked by a qualified electrician.<br />
The manufacturer <strong>ca</strong>nnot be<br />
held responsible for damage <strong>ca</strong>used<br />
by the lack or inadequacy of an effective<br />
grounding system.<br />
Never use the cooktop to warm or<br />
heat the room.<br />
When using an electri<strong>ca</strong>l outlet<br />
near the cooktop, make sure that<br />
the <strong>ca</strong>ble of the appliance does not<br />
come into contact with the burners.<br />
Warning and Safety <strong>Instructions</strong><br />
"CAUTION": Do not store items of<br />
interest to children behind or in<br />
<strong>ca</strong>binets above the cooktop.– Children<br />
climbing on the cooktop to reach items<br />
could be seriously injured.<br />
Do not allow children to operate or<br />
play with or near the cooktop.<br />
Store all play items away from the<br />
cooktop to prevent injury to<br />
curious or playful children.<br />
Please remember that burners<br />
become hot; therefore, ensure that<br />
children do not touch them.<br />
Do not store items on the cooktop<br />
when not in use.<br />
Do not let cooking grease or other<br />
flammable materials accumulate<br />
on the cooktop.<br />
Never leave the cooktop unattended<br />
when cooking with oil or<br />
fat. Very hot oil <strong>ca</strong>n <strong>ca</strong>use a fire.<br />
Allow sufficient time for the cooktop<br />
to cool before touching or exposing<br />
surface areas to flammable materials.<br />
If cracks or crevices appear in the<br />
cooktop, immediately turn off the<br />
cooktop and contact the <strong>Miele</strong> Service<br />
Department or your lo<strong>ca</strong>l service dealer.<br />
If sugar (either solid or liquid) or<br />
plastic melt onto the ceramic<br />
surface, it is essential to follow the<br />
cleaning instructions on Page 14.<br />
5
Warning and Safety <strong>Instructions</strong><br />
Warning and Safety <strong>Instructions</strong><br />
Always cook pork thoroughly to ensure<br />
that, in the event of trichina,<br />
all bacteria will be killed and the meat<br />
is safe to eat.<br />
For best results, utilize pots and<br />
pans that are the same size as the<br />
cooktop heating elements.<br />
If high settings are used, be <strong>ca</strong>utious<br />
of splattering grease or<br />
liquids boiling over which may produce<br />
smoke.<br />
Use only dry potholders.<br />
Use only cookware suitable for<br />
range-top service. Unsuitable<br />
cookware may break due to sudden<br />
temperature changes.<br />
Always position the handle of the<br />
cookware toward the center of the<br />
cooktop to minimize burns, spillage<br />
and ignition of flammable materials.<br />
Before removing pots and pans,<br />
be sure to turn surface units to OFF.<br />
Always heat fat slowly, monitoring<br />
it as it heats.<br />
When frying foods, make sure that<br />
the food is as dry as possible to<br />
prevent moisture from <strong>ca</strong>using hot fat<br />
to bubble over.<br />
6<br />
When shallow or deep-frying, do<br />
not overfill the pan with oil.<br />
Wear proper apparel – Loose-fitting<br />
or hanging garments should<br />
never be worn while using the appliance.<br />
Do not repair or replace any part of<br />
the appliance unless specifi<strong>ca</strong>lly<br />
recommended in the manual. All other<br />
servicing should be refered to a qualified<br />
technician.<br />
Do not use water on grease fires.<br />
Smother the fire or use a dry<br />
chemi<strong>ca</strong>l or foam-type extinguisher.<br />
Do not cook on a broken cooktop –<br />
If the cooktop should break,<br />
cleaning solutions and spillovers may<br />
penetrate the broken cooktop and<br />
create a risk of electri<strong>ca</strong>l shock.<br />
Contact the <strong>Miele</strong> Service Department<br />
or your lo<strong>ca</strong>l Service dealer.<br />
Clean the cooktop using <strong>ca</strong>ution –<br />
If a wet sponge or cloth is used to<br />
wipe spills on a hot cooking area, be<br />
<strong>ca</strong>reful to avoid steam burns. Some<br />
cleaners <strong>ca</strong>n produce toxic fumes if applied<br />
to a hot surface.<br />
Under no circumstance use a<br />
steam-cleaning appliance to clean<br />
the cooktop.<br />
The steam could penetrate to live components<br />
and <strong>ca</strong>use a short circuit.<br />
SAVE THESE INSTRUCTIONS AND<br />
REVIEW THEM PERIODICALLY.
Warning and safety instructions<br />
Keep these instructions in a safe<br />
place and pass them on to any<br />
future user.<br />
Warning and Safety <strong>Instructions</strong><br />
Disposal of dis<strong>ca</strong>rded appliances<br />
Before disposal of an old appliance,<br />
disconnect and remove<br />
the appliance cord to render it useless.<br />
This is intended to prevent the dis<strong>ca</strong>rded<br />
appliance from being a hazard.<br />
Text highlighted in boxes is of particular<br />
importance and should be<br />
read in conjunction with the Warning<br />
and Safety instructions.<br />
7
Before using for the first time<br />
Before using for the first time<br />
Read the “Warning and Safety instructions”<br />
before using for the first<br />
time.<br />
Thoroughly clean the ceramic cooktop<br />
before using for the first time, and then<br />
regularly after each use (see “Cleaning<br />
and <strong>ca</strong>re”).<br />
There may be a slight smell during the<br />
initial use due to the drying effect of the<br />
insulation material.<br />
8
<strong>Cooktop</strong> controls<br />
All cooking areas are controlled by variable<br />
control knobs. By using these control<br />
knobs, temperatures <strong>ca</strong>n be freely<br />
selected.<br />
The controls <strong>ca</strong>n be turned either clockwise<br />
or counterclockwise.<br />
The indi<strong>ca</strong>tor lamp for each cooking<br />
area lights as soon as the respective<br />
control knob is turned to a setting.<br />
It goes out when the control knob is<br />
turned to the “0” position.<br />
A resistance is felt between settings 7<br />
and 8 to indi<strong>ca</strong>te that a higher temperature<br />
range is being reached.<br />
Correct procedure:<br />
<strong>Cooktop</strong> controls<br />
Place saucepan of food on cooking<br />
area.<br />
Select a high number for boiling or<br />
sealing in juices.<br />
Should a trace of steam become<br />
visible on the edge of the lid, switch<br />
to a lower number for continued<br />
cooking.<br />
Turning the temperature down at the<br />
right time . . .<br />
. . . prevents food from overcooking.<br />
. . . prevents food from burning.<br />
. . . saves energy.<br />
9
Control settings<br />
Control settings<br />
Table of settings for control knobs Setting<br />
Melting butter, chocolate etc.<br />
Dissolving gelatin<br />
1 - 2<br />
Preparing yogurt<br />
Keeping food warm<br />
Warming small quantities of food / liquid<br />
Thickening sauces containing egg yolk or<br />
1 - 3<br />
butter<br />
Cooking milk pudding<br />
Omelettes<br />
Defrosting deep frozen food<br />
Cooking rice, pasta<br />
Steaming fruit, vegetables, fish<br />
Cooking broths, soups<br />
Braising meat, fish, vegetables<br />
Cooking dumplings, potatoes, soups<br />
4 - 6<br />
Preparing jams, jellies, stewed fruit<br />
Frying chops, liver, sausage, fish, eggs 7 - 10<br />
Frying pan<strong>ca</strong>kes, dropped biscuits and other liquid batters<br />
Frying steaks<br />
9 - 12<br />
Deep frying (chips, fritters)<br />
Boiling water<br />
These figures are intended as a guide. With deep pans, large quantities, or without the lid, a higher<br />
setting is needed. With smaller quantities select a lower setting.<br />
10<br />
3 - 5
Description of cooking areas<br />
Cooking areas - diameter<br />
The cooking areas are clearly marked<br />
on the cooktop unit. Only the area<br />
which has been turned on will be<br />
heated. The rest of the cooktop surface<br />
will remain relatively cool.<br />
Residual heat indi<strong>ca</strong>tor<br />
Each cooking area has a residual heat<br />
indi<strong>ca</strong>tor. When a cooking area is<br />
turned on, its residual heat indi<strong>ca</strong>tor<br />
lights up. It only goes out after the cooking<br />
area has been turned off and the<br />
cooking surface has reached a temperature<br />
safe to the touch.<br />
Temperature limiter<br />
All cooking areas are equipped with a<br />
temperature limiter, which turns the<br />
heating element off if the temperature<br />
under the ceramic surface gets too<br />
high.<br />
The temperature limiter turns the heating<br />
element on again after the temperature<br />
has returned to a safe level.<br />
The temperature limiter operates<br />
. . . when unsuitable cooking utensils<br />
are used (e.g. saucepans with uneven<br />
bases or which are too small).<br />
. . . when cooking areas are used without<br />
pots.<br />
Description of cooking areas<br />
The temperature limiter may also be activated<br />
when the utensils are suitable.<br />
The reason for this could be light colored<br />
saucepan bases (heat reflection)<br />
or poor transfer of heat from the saucepan<br />
base to the food.<br />
Important note<br />
While the cooking areas are heating<br />
up, a “humming” noise may be noticed.<br />
This is <strong>ca</strong>used by magnetization<br />
of the heating filaments. As the cooking<br />
areas heat up, the humming noise will<br />
diminish and finally will cease altogether.<br />
For halogen cooking areas only:<br />
The radiant elements work together<br />
with the halogen lamps. This gives a<br />
quicker heat transfer to the pan base,<br />
resulting in a shorter heating-up period.<br />
11
Operation<br />
Operation<br />
Saucepans<br />
The following notes are designed to enable<br />
you to<br />
. . . make the best use of energy when<br />
using your ceramic cooktop.<br />
. . . prevent food from boiling over and<br />
burning on to the ceramic cooktop.<br />
Pots and pans are available which<br />
have been specially tested for use on<br />
glass ceramic cooktops.<br />
Saucepan bases<br />
So that optimum energy consumption<br />
is achieved during cooking, only saucepans<br />
with bases as flat as possible, or<br />
very slightly con<strong>ca</strong>ve, should be used.<br />
When the saucepan is hot, the base<br />
should rest evenly on the ceramic surface.<br />
12<br />
Only use saucepans approved for<br />
use on ceramic cooktops. Do not<br />
use pots or pans having bases with<br />
pronounced edges or ridges as<br />
these could permanently scratch<br />
the cooktop surface.<br />
Saucepan size<br />
The diameter of the saucepan should<br />
be a little larger than that of the cooking<br />
area.<br />
Saucepan lids<br />
A lid on the saucepan will prevent heat<br />
from being lost, and decrease the cooking<br />
time.
Operation<br />
Note:<br />
Do not use any pots or pans on the<br />
ceramic cooktops having bases<br />
with pronounced edges or ridges.<br />
These could permanently scratch<br />
the cooktop surface.<br />
Place a saucepan on the cooking<br />
area before turning on the appliance<br />
to save energy.<br />
The ceramic surface and the base of<br />
the saucepan should be clean and<br />
dry.<br />
This saves unnecessary cleaning<br />
after cooking and protects the cooking<br />
area.<br />
Care should be taken that no granules<br />
(e. g. salt, sugar, etc.) are on<br />
the cooktop when cooking.<br />
If such granules should find their<br />
way under a saucepan when it is<br />
pushed across the cooktop, the<br />
granules could scratch the surface.<br />
Do not push enamelled baking<br />
sheets, frying pans or saucepans<br />
across the ceramic surface.<br />
Scratches may occur.<br />
Operation<br />
When using aluminum or stainless<br />
steel utensils, the metal <strong>ca</strong>n affect<br />
the ceramic surface by leaving white<br />
colored spots behind.<br />
These spots <strong>ca</strong>n be removed most<br />
easily if they are treated immediately<br />
with a ceramic cooktop cleaner (see<br />
chapter on “Cleaning and Care”).<br />
Do not allow solid or liquid sugar, or<br />
pieces of plastic or aluminum foil<br />
onto the ceramic cooktop unit when<br />
it is hot.<br />
If this should occur do not turn the<br />
appliance off. Scrape the remains<br />
from the cooktop with a razor blade,<br />
taking <strong>ca</strong>re not to burn yourself.<br />
If it is allowed to cool before the<br />
cooktop has been cleaned, the ceramic<br />
surface will be susceptible to<br />
pitting or cracking.<br />
13
Cleaning and <strong>ca</strong>re<br />
Cleaning and <strong>ca</strong>re<br />
<strong>Ceramic</strong> cooktop<br />
Generally you <strong>ca</strong>n use the same cleaning<br />
agents for the ceramic cooktop as<br />
you would for ordinary glass surfaces.<br />
Never use scouring agents or pads,<br />
or strong cleaners such as oven<br />
sprays or stain removers, as these<br />
could harm the surface.<br />
Clean after each use<br />
Wipe off any minor spills with a damp<br />
cloth.<br />
If the cooktop is cleaned with a soap,<br />
for example dishwashing liquid, light<br />
blue staining may occur. These stains<br />
<strong>ca</strong>n be removed with a ceramic cooktop<br />
cleaner, although they <strong>ca</strong>n be<br />
stubborn and may take several appli<strong>ca</strong>tions.<br />
Hardened spills should be <strong>ca</strong>refully<br />
scraped off with a razor blade. The<br />
cooktop surface should then be<br />
rubbed clean with a damp cloth.<br />
Light marks with a metallic sheen<br />
Aluminum deposits on the cooktop surface<br />
<strong>ca</strong>n be removed once the cooktop<br />
has cooled down by using a ceramic<br />
cooktop cleaner.<br />
Lime deposits <strong>ca</strong>used by water boiling<br />
over, <strong>ca</strong>n be removed with vinegar or a<br />
ceramic cooktop cleaner.<br />
14<br />
Removal of sugar, syrups, plastic or<br />
aluminum foil<br />
Do not turn off the cooking area!<br />
Scrape off the residue thoroughly<br />
from the hot cooktop with a razor<br />
blade, taking <strong>ca</strong>re not to burn yourself.<br />
Then turn off the cooktop, and<br />
when it is cool, clean with a ceramic<br />
cooktop cleaner.<br />
Suitable ceramic cooktop cleaners<br />
There are special cleaners on the market<br />
for ceramic cooktops. Follow the<br />
manufacturer’s instructions.<br />
If you have difficulty finding a suitable<br />
ceramic cooktop cleaner, contact the<br />
<strong>Miele</strong> Service Department for advice.<br />
Do not apply to the cooktop when<br />
still hot.<br />
After applying the ceramic cooktop<br />
cleaner let it dry and then rub it off<br />
using a soft towel.<br />
Always make sure that every trace of<br />
cleaning agent has been removed, as it<br />
could have an adverse effect on the<br />
cooktop when turned on.
Cleaning and <strong>ca</strong>re<br />
Some cleaners incorporate a silicone<br />
agent which acts as a protective film<br />
for the ceramic cooktop.<br />
It makes the cooktop surface smoother<br />
and prevents water and food from adhering<br />
to the surface.<br />
Cooking at high temperatures reduces<br />
this effect and the cleaner may need to<br />
be reapplied.<br />
By cleaning your ceramic surface with<br />
one of these agents, you will help avoid<br />
damage <strong>ca</strong>used by sugar, syrups and<br />
aluminum foil deposits.<br />
Cleaning and <strong>ca</strong>re<br />
Control panel / Control knobs<br />
Do not use any scouring agents or<br />
pads on the knobs or control panel,<br />
as these could <strong>ca</strong>use damage.<br />
Clean the cooktop controls and the control<br />
panel with hot water and a little dishwashing<br />
liquid.<br />
After appli<strong>ca</strong>tion, rub dry with a clean<br />
cloth.<br />
15
Correcting minor faults<br />
Correcting minor faults<br />
Repairs to electri<strong>ca</strong>l appliances<br />
should only be <strong>ca</strong>rried out by a<br />
trained person. Unauthorized repairs<br />
<strong>ca</strong>n be dangerous.<br />
Some minor problems, however, <strong>ca</strong>n<br />
be remedied as follows:<br />
What to do if . . .<br />
. . . a humming sound is heard while<br />
the ceramic cooktop is heating up?<br />
This is not a fault. As the cooking area<br />
heats up, the humming disappears<br />
completely.<br />
. . . a resistance is felt between settings<br />
7 and 8?<br />
This is not a fault. The resistance is<br />
there to indi<strong>ca</strong>te that a higher temperature<br />
range is being reached.<br />
. . . the cooking area does not get hot<br />
when turned on and the indi<strong>ca</strong>tor<br />
lamp does not light?<br />
Check that the circuit breaker hasn’t<br />
tripped.<br />
16<br />
If it has, <strong>ca</strong>ll the <strong>Miele</strong> Service Department<br />
for assistance.
After Sales Service<br />
In the event of any fault which you <strong>ca</strong>nnot<br />
correct yourself, please contact<br />
Your <strong>Miele</strong> Dealer<br />
or<br />
The <strong>Miele</strong> Service Department<br />
The address of the nearest <strong>Miele</strong><br />
Service Department is given on the<br />
back cover.<br />
When contacting the Service Department,<br />
please give the Model and Serial<br />
No. of the appliance, both of which <strong>ca</strong>n<br />
be found on the data plate.<br />
Space for supplied data plate<br />
After Sales Service<br />
17
Electri<strong>ca</strong>l connection<br />
Electri<strong>ca</strong>l connection<br />
Electri<strong>ca</strong>l connection of the appliance<br />
should be made by a qualified electrician<br />
and in accordance with lo<strong>ca</strong>l and<br />
national standards.<br />
Note to installer:<br />
Please leave these instructions with<br />
the consumer.<br />
Power supply:<br />
Please check dataplate for<br />
240 VAC; 60 Hz or<br />
208 VAC; 60 Hz<br />
Caution:<br />
Disconnect the power supply before<br />
servicing. To reduce the risk of<br />
electric shock, make sure that the<br />
appliance is properly grounded<br />
after installation.<br />
WARNING:<br />
THIS APPLIANCE MUST BE<br />
GROUNDED<br />
18<br />
For CDN only<br />
The appliances are provided with 3 terminal<br />
leads: 1 black wire, 1 red wire<br />
and 1 green wire which have to be connected<br />
to a separate overcurrent protection<br />
device (<strong>Miele</strong> fuse box).<br />
All hot wires (black and red) have to be<br />
fused individually before connecting<br />
them to the main power supply leads.<br />
Use 15 A / 250 V fuses for appliances<br />
rated 240 VAC.<br />
Connect black terminal wire to L1<br />
(black) and red terminal wire to L 2<br />
(red). The green terminal wire (ground)<br />
has to be connected directly to the<br />
equivalent colored power supply leads.<br />
All connections must be done in a<br />
proper way.<br />
SEE ALSO WIRING DIAGRAM PRO-<br />
VIDED WITH THE APPLIANCE.<br />
For USA only<br />
The appliance is provided with 3 terminal<br />
leads, 1 black wire (L 1), 1 red wire<br />
(L 2) and 1 green wire (GND) which<br />
have to be connected to a dedi<strong>ca</strong>ted<br />
junction box. Connect black wire to L1,<br />
red wire to L2 and green wire to GND.<br />
All connections must be done<br />
according to code.<br />
SEE THE CIRCUIT DIAGRAM PRO-<br />
VIDED WITH THE APPLIANCE.
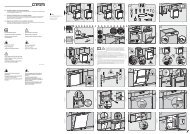
Electri<strong>ca</strong>l connections<br />
FOR CANADA ONLY<br />
WARNING: THE APPLIANCE MUST<br />
BE GROUNDED<br />
<strong>Miele</strong> Fuse Box<br />
Electri<strong>ca</strong>l connection<br />
Cap<br />
Fuse Holder<br />
19
Appliance dimensions<br />
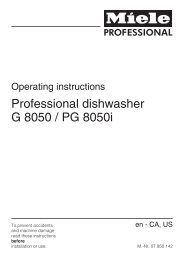
Appliance dimensions<br />
<strong>KM</strong> <strong>84</strong>-2, <strong>KM</strong> <strong>87</strong>-2<br />
2 3/16’’<br />
19 5/16’’<br />
11-5/16’’<br />
20 1/16’’<br />
10 7/16’’<br />
Dimensions are given in inches and<br />
mm (bold).<br />
20
Installation instructions<br />
Installation instructions<br />
There may be a wall at the rear and a<br />
wall or tall <strong>ca</strong>binet on one side.<br />
On the other side, however, no <strong>ca</strong>binet<br />
or appliance must stand higher than<br />
the cooktop.<br />
1-3/16’’<br />
21
Installation instructions<br />
Installation instructions<br />
There must be a minimum distance of 1-<br />
3/16" (30 mm) between the cooktop<br />
and adjacent <strong>ca</strong>binet or tall appliance.<br />
2 3/16’’<br />
22<br />
19 5/16’’<br />
2 3/16’’<br />
Prepare the countertop cut-out as illustrated.<br />
Dimension ”B“ will change depending<br />
on how many combisets are<br />
installed and is given on the chart.<br />
2 zone Combiset<br />
1 appliance<br />
2 appliances<br />
3 appliances<br />
4 appliances<br />
5 appliances<br />
4 zone Combiset<br />
1 appliance<br />
2 appliances<br />
3 appliances<br />
Combination<br />
One 2 zone<br />
+ one 4 zone<br />
Two 2 zone<br />
+ one 4 zone<br />
Three 2 zone<br />
+ one 4 zone<br />
One 2 zone<br />
+ two 4 zone<br />
Depth<br />
in<br />
mm *<br />
490<br />
490<br />
490<br />
490<br />
490<br />
490<br />
490<br />
490<br />
490<br />
490<br />
490<br />
490<br />
Width<br />
(Dimension<br />
B)<br />
in mm<br />
265<br />
558<br />
851<br />
1144<br />
1437<br />
560<br />
1143<br />
1728<br />
851<br />
1143<br />
1437<br />
1436<br />
Width<br />
(Dimensio<br />
n B) in<br />
inches<br />
10-7/16"<br />
22"<br />
33-1/2"<br />
45-1/16"<br />
56-5/8"<br />
22-1/16"<br />
45"<br />
68-1/16"<br />
33-1/2"<br />
45"<br />
56-5/8"<br />
56-9/16"<br />
Two 2 zone<br />
+ two 4 zone 490 1729 68-1/16"<br />
Extractor (e.g. DA 8-2)<br />
For installation between two appliances:<br />
- Dimension B increases by 90 mm (3 9/16").<br />
For installation at the end of a combination:<br />
- Dimension B increases by 98 mm (3 7/8").<br />
* 490 mm = 19 5/16 "
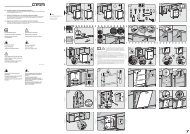
Installation instructions<br />
Installation instructions<br />
Place the seal provided f under<br />
the edge of the cooktop.<br />
loosen tighten<br />
b Appliance<br />
c Tensioning screw<br />
d Clamp<br />
e Countertop<br />
f Seal<br />
Turn the tensioning screws c<br />
counterclockwise until a resistance is<br />
felt, then turn the clamps d to the<br />
left.<br />
Place the appliance in position, turn<br />
the clamps and tighten the tensioning<br />
screws until the clamps press<br />
into the countertop e. Do not use excessive<br />
force.<br />
Connect the appliance to the electri<strong>ca</strong>l<br />
supply.<br />
When installing several Combiset units,<br />
a stainless steel spacer bar should be<br />
installed between the units. It comes<br />
supplied with its own installation instructions.<br />
23
Installation instructions<br />
Installation instructions<br />
To eliminate the risk of fire or burns<br />
<strong>ca</strong>used by reaching over heated surface<br />
units, <strong>ca</strong>binet storage space lo<strong>ca</strong>ted<br />
above surface units should be<br />
avoided.<br />
If <strong>ca</strong>binet storage or a range hood is<br />
provided, distance A has to be at least<br />
30" (75 cm). A range hood has to extend<br />
at least 5" (12,5 cm) beyond the<br />
bottom of the <strong>ca</strong>binets.<br />
24
Alteration rights reserved / 22 / 001 CDN, USA - 4097<br />
This paper is made from 100% chlorine-free bleached cellulose and therefore protects the environment.