They're tricky to use and often only - Popular Photography
They're tricky to use and often only - Popular Photography
They're tricky to use and often only - Popular Photography

Create successful ePaper yourself
Turn your PDF publications into a flip-book with our unique Google optimized e-Paper software.
They’re <strong>tricky</strong> <strong>to</strong> <strong>use</strong> <strong>and</strong> <strong>often</strong> <strong>only</strong> work in<br />
certain circumstances. But when they do,<br />
WOW!<br />
© HERBERT KEPPLER (2)<br />
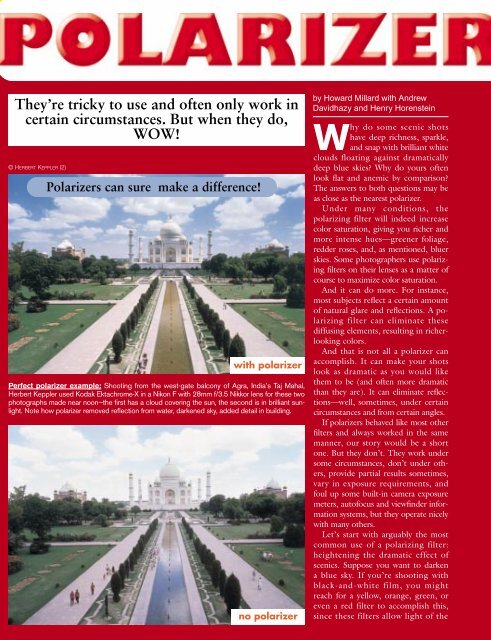
Polarizers can sure make a difference!<br />
with polarizer<br />
Perfect polarizer example: Shooting from the west-gate balcony of Agra, India’s Taj Mahal,<br />
Herbert Keppler <strong>use</strong>d Kodak Ektachrome-X in a Nikon F with 28mm f/3.5 Nikkor lens for these two<br />
pho<strong>to</strong>graphs made near noon—the first has a cloud covering the sun, the second is in brilliant sunlight.<br />
Note how polarizer removed reflection from water, darkened sky, added detail in building.<br />
no polarizer<br />
by Howard Millard with Andrew<br />
Davidhazy <strong>and</strong> Henry Horenstein<br />
Why do some scenic shots<br />
have deep richness, sparkle,<br />
<strong>and</strong> snap with brilliant white<br />
clouds floating against dramatically<br />
deep blue skies? Why do yours <strong>often</strong><br />
look flat <strong>and</strong> anemic by comparison?<br />
The answers <strong>to</strong> both questions may be<br />
as close as the nearest polarizer.<br />
Under many conditions, the<br />
polarizing filter will indeed increase<br />
color saturation, giving you richer <strong>and</strong><br />
more intense hues—greener foliage,<br />
redder roses, <strong>and</strong>, as mentioned, bluer<br />
skies. Some pho<strong>to</strong>graphers <strong>use</strong> polarizing<br />
filters on their lenses as a matter of<br />
course <strong>to</strong> maximize color saturation.<br />
And it can do more. For instance,<br />
most subjects reflect a certain amount<br />
of natural glare <strong>and</strong> reflections. A polarizing<br />
filter can eliminate these<br />
diffusing elements, resulting in richerlooking<br />
colors.<br />
And that is not all a polarizer can<br />
accomplish. It can make your shots<br />
look as dramatic as you would like<br />
them <strong>to</strong> be (<strong>and</strong> <strong>often</strong> more dramatic<br />
than they are). It can eliminate reflections—well,<br />
sometimes, under certain<br />
circumstances <strong>and</strong> from certain angles.<br />
If polarizers behaved like most other<br />
filters <strong>and</strong> always worked in the same<br />
manner, our s<strong>to</strong>ry would be a short<br />
one. But they don’t. They work under<br />
some circumstances, don’t under others,<br />
provide partial results sometimes,<br />
vary in exposure requirements, <strong>and</strong><br />
foul up some built-in camera exposure<br />
meters, au<strong>to</strong>focus <strong>and</strong> viewfinder information<br />
systems, but they operate nicely<br />
with many others.<br />
Let’s start with arguably the most<br />
common <strong>use</strong> of a polarizing filter:<br />
heightening the dramatic effect of<br />
scenics. Suppose you want <strong>to</strong> darken<br />
a blue sky. If you’re shooting with<br />
black-<strong>and</strong>-white film, you might<br />
reach for a yellow, orange, green, or<br />
even a red filter <strong>to</strong> accomplish this,<br />
since these filters allow light of the
the one filter you can’t do without<br />
same color <strong>to</strong> pass through, but block light of a complementary<br />
color. Therefore, almost any color filter will work <strong>to</strong><br />
darken a blue sky, except, of course, a blue filter. But these<br />
filters may affect other colors in the scene. For example, a<br />
red filter darkens a blue sky, but<br />
lightens a red barn in the same<br />
l<strong>and</strong>scape. More important for<br />
most of us: Colored filters cannot<br />
be <strong>use</strong>d with color films without<br />
tinting the entire picture area.<br />
Under the right conditions, a<br />
polarizing filter will darken a blue<br />
sky without appreciably affecting<br />
any other part of the pho<strong>to</strong>graph,<br />
whether <strong>use</strong>d with black-<strong>and</strong>-white<br />
or color film. It can do this beca<strong>use</strong><br />
some of the light reflected from the<br />
sky is naturally polarized by particles<br />
in the atmosphere. By rotating<br />
a polarizing filter, you can block<br />
the polarized light, causing the sky<br />
<strong>to</strong> darken (see drawing, above).<br />
The effect can be varied by rotating<br />
the filter, allowing you <strong>to</strong> control<br />
just how dark you want the sky.<br />
How much a polarizing filter<br />
will darken the sky depends on the<br />
state of the sky <strong>and</strong> your shooting<br />
angle in relation <strong>to</strong> it. A clear blue<br />
UNPOLARIZED<br />
LIGHT POLARIZER<br />
POLARIZED<br />
LIGHT<br />
sky has a lot of polarized light <strong>and</strong> will darken appreciably at<br />
right angles <strong>to</strong> the direction from which the sun is shining.<br />
A gray, overcast sky polarizes virtually no light, so it will<br />
hardly be affected by a polarizer.<br />
Here’s a simple way <strong>to</strong> determine which areas of the sky<br />
will be darkened most—point your thumb upward at<br />
the sun. Then extend your index finger at 90<br />
degrees <strong>to</strong> your thumb, like a child’s imitation play pis<strong>to</strong>l. By<br />
twisting your wrist while still pointing your thumb at the<br />
sun, your finger will travel along a b<strong>and</strong> across the sky. This<br />
b<strong>and</strong> is the area of maximum darkening for any given elevation<br />
of the sun (see diagrams on next page). As you can see,<br />
about noontime (with the sun overhead), maximum polarization<br />
(<strong>and</strong> consequently, picture darkening) takes place<br />
near the horizon in all areas. Near sunset, the polarized b<strong>and</strong><br />
is at its strongest directly overhead. In short, always <strong>use</strong> your<br />
thumb <strong>and</strong> forefinger. They will never let you down—but<br />
don’t forget <strong>to</strong> twist your wrist (see drawings, next page).<br />
We’ve now darkened the blue sky, thus accenting the<br />
clouds. What about enriching color saturation <strong>and</strong> eliminat-<br />
POLARIZED<br />
LIGHT<br />
ALL PHOTOS © MITCHELL FUNK EXCEPT AS NOTED.<br />
ALL ILLUSTRATIONS © FRANCISCO SALAZAR<br />
Polarizers: How they do what they do<br />
Vertical order out of chaos: Lined up minute<br />
crystals in polarizer <strong>only</strong> allow unpolarized light<br />
rays vibrating in one plane through the filter.<br />
(Most light, unless reflected from a shiny surface<br />
or in the sky on a sunny day, is unpolarized).<br />
Turning the polarizer: The lined-up direction of<br />
the filter crystals always determines the plane of<br />
light ray vibration allowed through. Here we’ve<br />
turned the filter 90 degrees so <strong>only</strong> the horizontal<br />
vibrations of light rays enter.<br />
Getting the polarization effect: If light is already<br />
polarized by being reflected from the right<br />
kind of shiny surface or coming from the correct<br />
type of sunlit sky, it is vibrating <strong>only</strong> in one plane <strong>to</strong><br />
begin with (here horizontal). Therefore, you can cut<br />
it down or eliminate the light completely by turning<br />
your polarizer so its crystals don’t line up in the<br />
same direction as the light ray vibrations coming<br />
in. The polarized sky becomes underexposed <strong>and</strong><br />
so appears dark; reflections are eliminated.<br />
ing or minimizing reflection—such as in a window or still<br />
water? Actually, both effects are closely allied. Polarizers have<br />
rotating mount rings, so you can turn the polarizer <strong>to</strong> either<br />
cut down or completely eliminate the polarized light reflected<br />
from the window or the water <strong>to</strong> see what’s below or<br />
behind the surface. Color saturation (<strong>and</strong> richness) of reflective<br />
objects—from berries <strong>to</strong> bathing beauties—is also increased,<br />
since the polarizer removes the shiny highlights that<br />
dilute or mask the true color of the subject (see pho<strong>to</strong>s, page<br />
79). With an SLR or a view camera, you can see the striking<br />
results in your subject’s appearance as you turn the polarizer.<br />
Unfortunately, your best efforts <strong>to</strong> reduce or minimize<br />
reflections <strong>and</strong>/or flare won’t always bear fruit. Polished<br />
bare metal won’t be affected by a polarizer <strong>and</strong> neither will<br />
a body of rough-surfaced water. Even when the surfaces are<br />
good for polarization, the camera <strong>and</strong> polarizer must be at<br />
Edi<strong>to</strong>r’s Note: In 1985, Modern Pho<strong>to</strong>graphy magazine published a 15-page l<strong>and</strong>mark magnum opus on polarizers <strong>and</strong> how <strong>to</strong> <strong>use</strong> them.<br />
This cornucopia of essential polarizing information was among many treasures acquired by POPULAR PHOTOGRAPHY when it purchased<br />
Modern Pho<strong>to</strong>graphy in 1989. Unfortunately, the article’s pho<strong>to</strong>graphs were poor, <strong>and</strong> it was <strong>to</strong>o long. Since the polarizer is far <strong>and</strong> away<br />
the most essential filter for amateurs <strong>and</strong> pros—albeit a <strong>tricky</strong> <strong>and</strong> idiosyncratic one—we decided <strong>to</strong> polish, shorten, tighten <strong>and</strong> update our<br />
polarizer prize, gracing it with completely new pho<strong>to</strong>graphs. Let us know how you like it. —H.K.
To find b<strong>and</strong> of maximum scenic sky effect, look 90 degrees from the sun<br />
POLARIZED AREA<br />
POLARIZED AREA<br />
90<br />
90<br />
SUN<br />
OVERHEAD<br />
LATE<br />
AFTERNOON<br />
SUN<br />
an optimal angle <strong>to</strong> the surface, usually 30 <strong>to</strong> 40 degrees.<br />
Smooth reflecting surfaces, like glass in a s<strong>to</strong>re window or<br />
the surface of a pond, react most dramatically with polarizing<br />
filters since they polarize light naturally. Most of the polarized<br />
light waves that reach the camera can be blocked by<br />
rotating your polarizer until you see just what you want.<br />
However, some surfaces polarize light more than others, so<br />
it’s sometimes impossible <strong>to</strong> eliminate all reflections. Also,<br />
the angles of the camera, light <strong>and</strong> reflection are critical.<br />
You can’t eliminate reflections from light-diffusing surfaces—s<strong>and</strong>,<br />
powdery snow, rough rocks, or clouds—with a<br />
polarizing filter. These surfaces act <strong>to</strong> unpolarize light, scattering<br />
it in all directions; a polarizing filter barely affects them.<br />
A mirror also does not polarize light; it merely<br />
reflects the light—polarized or not—that strikes it. Unless<br />
the light is already polarized when it reaches the mirror,<br />
your polarizing filter will do little or no good. An exception:<br />
Richer colors with polarizer<br />
Slide film, no polarizer<br />
Noontime: Horizon’s polarized. You<br />
need a bright, clear day for maximum<br />
polarization effect of the sky, but <strong>only</strong><br />
part of the sky is polarized, namely a<br />
b<strong>and</strong> 90 degrees from the sun. Polarization<br />
effect falls off gradually above<br />
<strong>and</strong> below b<strong>and</strong>.<br />
Low sun: Overhead’s polarized. During<br />
the morning or afternoon, sun is<br />
closer <strong>to</strong> horizon. The polarization<br />
b<strong>and</strong> tilts accordingly, giving you the<br />
possibility of using polarizer <strong>to</strong> maximize<br />
darkened sky overhead.<br />
Slide film with polarizer<br />
Polarizer always enriches color: Polarizer darkens sky, <strong>and</strong> increases color saturation<br />
with both slide <strong>and</strong> printfilm. However printfilm saturation also depends on pho<strong>to</strong>finisher<br />
who made the print.<br />
Print film, no polarizer<br />
Print film with polarizer<br />
SKY AREA MOST<br />
DARKENED WITH<br />
POLARIZING FILTER<br />
Use your finger: Point thumb at the sun.<br />
Your forefinger, when bent, will trace the<br />
b<strong>and</strong> of maximum polarization effect.<br />
A blue sky, for example, reflected in a mirror can be controlled<br />
with a polarizer; the reflected surface here merely<br />
acts <strong>to</strong> relay the light. Reflections from some metallic subjects<br />
(<strong>and</strong> even mirrors) can be controlled with the <strong>use</strong> of<br />
two polarizers—one over the light source <strong>and</strong> the other<br />
over the camera lens. We’ll discuss this technique later.<br />
Using a polarizing filter with a rangefinder or twin-lens reflex<br />
camera (or any other camera without through-the-picture-taking-lens<br />
viewing) is a little less precise since you can’t<br />
view the scene through the polarizer <strong>and</strong> lens as the film will<br />
see it. Here’s a way around the problem. First, set up the<br />
camera at approximately a 35-degree angle <strong>to</strong> an easily polarized<br />
subject, such as a window with a reflection. A tripod is<br />
<strong>use</strong>ful. Then, hold the filter at the camera position <strong>and</strong> look<br />
through it. Rotate the filter until you see the glare or reflection<br />
diminish. Again, a change of angle might help. Once<br />
you have the filter in position for the result you want, put<br />
the filter on the camera lens, maintaining<br />
the same angle <strong>and</strong> degree of rotation. A<br />
dot or mark on the rim of the polarizer (indicating<br />
the axis of polarization of the filter)<br />
will help you maintain proper orientation. If<br />
this mark is pointed <strong>to</strong>ward the sun when<br />
the camera is in shooting position, you will<br />
get the maximum amount of polarization<br />
for sky darkening (but not necessarily for<br />
eliminating reflections <strong>and</strong> glare). Even with<br />
SLR cameras, this is a fast way <strong>to</strong> shoot.<br />
Occasionally, you will find a situation<br />
where two different surfaces are reflecting<br />
light in different planes in the same pho<strong>to</strong>graph,<br />
perhaps two s<strong>to</strong>re windows at an<br />
angle <strong>to</strong> each other. When this happens, you<br />
generally have <strong>to</strong> settle for minimizing the<br />
reflection in one surface—the one positioned<br />
at the correct polarizing angle <strong>to</strong> the<br />
filter. Depending on the various angles <strong>and</strong><br />
surfaces involved, you may be able <strong>to</strong> partially<br />
reduce the reflection in both surfaces.<br />
Try different camera angles <strong>and</strong> degrees of<br />
polarizer rotation, carefully viewing the
Wiping out reflections: Interior of s<strong>to</strong>re window is<br />
obscured by external reflections.<br />
Will polarizer work with print film as well as slide film?<br />
Here are the same reflections shot on print film without<br />
a polarizer.<br />
POLARIZER<br />
POLARIZED<br />
LIGHT<br />
UNPOLARIZED<br />
LIGHT<br />
30<br />
LIGHT<br />
SOURCE<br />
WINDOW<br />
effects of each on the subjects’ surfaces.<br />
How can you get proper exposure when using a polarizing<br />
filter? Use your SLR’s TTL metering system. If you <strong>use</strong><br />
a h<strong>and</strong>held meter, take a reading as you normally would,<br />
calculate the required change as described below, <strong>and</strong> make<br />
the adjustment manually.<br />
Although they vary slightly, most br<strong>and</strong>s of polarizers<br />
have a filter fac<strong>to</strong>r of 2X <strong>to</strong> 4X. Check the instructions for<br />
the type you’re using <strong>to</strong> be sure. When using filter fac<strong>to</strong>rs,<br />
remember that 2X means that the filter is reducing the light<br />
that reaches the film <strong>to</strong> half the original amount. To compensate<br />
for a fac<strong>to</strong>r of 2X, add the equivalent of a one-s<strong>to</strong>p<br />
of exposure (open the lens one f-s<strong>to</strong>p or <strong>use</strong> the next slow-<br />
You can eliminate reflections<br />
30<br />
By using polarizer, external reflection is virtually wiped<br />
out. Why? Camera <strong>and</strong> light were at almost ideally<br />
efficient 30 degrees <strong>to</strong> s<strong>to</strong>re window (see drawing)<br />
The polarizer eliminates reflections equally well if<br />
you’re using print film.<br />
The magic angle is 30 degrees: When light hits a reflecting surface at a<br />
30-degree angle <strong>and</strong> camera is at same angle, maximum reflections are removed.<br />
Glass, water, <strong>and</strong> glossy paper polarize light well, allow reflections <strong>to</strong><br />
be removed or minimized. Skin, clouds, s<strong>and</strong>, <strong>and</strong> most metal surfaces don’t<br />
polarize, so highlights <strong>and</strong> reflections can’t be removed from them.<br />
est shutter speed). A 3X fac<strong>to</strong>r polarizing filter, requires 1 2 ⁄3<br />
more s<strong>to</strong>ps of exposure. A 4X fac<strong>to</strong>r requires two more<br />
s<strong>to</strong>ps of exposure or a 4X increase in exposure time. If<br />
you’re not sure what your polarizer’s filter fac<strong>to</strong> is, try 1 1 ⁄2<br />
or 2 s<strong>to</strong>ps as a starting point, <strong>and</strong> test.<br />
Is it really that simple? No. The filter fac<strong>to</strong>r given for a<br />
polarizer indicates the amount of light lost when the filter is<br />
<strong>use</strong>d <strong>to</strong> pho<strong>to</strong>graph a subject consisting uniquely of unpolarized<br />
light (or one from which glare needs <strong>to</strong> be<br />
removed). It is the least possible amount of necessary exposure<br />
compensation. Depending on such fac<strong>to</strong>rs as subject<br />
<strong>and</strong> light conditions—in other words, how much light is<br />
being polarized—you may need additional compensation.
Usually, the extra exposure will be minimal,<br />
perhaps a fraction of an f-s<strong>to</strong>p, but<br />
occasionally, if the subject contains a lot<br />
of polarized light, you’ll need significantly<br />
more exposure.<br />
Large areas in the subject that polarize<br />
light, like expanses of blue sky or<br />
still water, tend <strong>to</strong> affect the determination<br />
of proper exposure. Meters looking<br />
at the scene through a polarizing<br />
filter may indicate overexposure for the<br />
average areas of the scene.<br />
While a through-the-lens meter reading<br />
with most cameras is usually accurate<br />
<strong>and</strong> a h<strong>and</strong>held meter may require<br />
some calculations, bracket polarized exposures<br />
if possible. Make an exposure<br />
according <strong>to</strong> your meter reading, then<br />
make an exposure of at least one-s<strong>to</strong>p<br />
more (one-half s<strong>to</strong>p for color slide film)<br />
<strong>and</strong>, for a full bracket, an additional exposure<br />
of at least one-s<strong>to</strong>p less (again,<br />
one-half s<strong>to</strong>p for color slide film).<br />
Bracketing increases the chances that<br />
one of the exposures will be what you need.<br />
If you want <strong>to</strong> copy artwork, such as drawings, paintings,<br />
or pho<strong>to</strong>graphs, polarizers can help enormously by controlling<br />
reflections <strong>and</strong> glare while increasing color saturation.<br />
Set up your camera on a tripod or a vertical copy st<strong>and</strong> with<br />
a polarizer on the lens, <strong>and</strong> place the subject so it is parallel<br />
<strong>to</strong> the camera back. Often, the best lighting consists of two<br />
lights, (flood, quartz, or strobe—preferably with modeling<br />
lights <strong>to</strong> preview the effect) each positioned at the same<br />
angle on either side of the artwork.<br />
To start, try a 45-degree angle, with light evenly covering<br />
the entire piece of art. Place your light carefully <strong>to</strong> eliminate<br />
or minimize any glare or reflection. If you can’t eliminate<br />
glare by moving the lights, “cross-polarize” by putting a<br />
polarizing filter on your camera lens plus sheets of polarizing<br />
material, one each, over the two light sources. A single polarizing<br />
filter over the camera lens will have a slight effect, but<br />
since the camera will be aimed directly at the surface <strong>and</strong> not<br />
at an angle <strong>to</strong>ward it, the effect will be minimal if the surface<br />
of your art is very smooth. If the surface is irregular, as in a<br />
painting, even a single polarizer on the camera can improve<br />
results significantly.<br />
To get the most benefit from the polarization effect, <strong>use</strong><br />
polarizers over lights <strong>and</strong> camera lens. Place polarizers on<br />
the lights so that their axes are pointing in the same direction.<br />
If there are no markings <strong>to</strong> indicate the axes, hold the<br />
two sheets (<strong>to</strong>gether) up <strong>to</strong> any light <strong>and</strong> rotate one sheet<br />
until the maximum amount of light shines through. At this<br />
point, the axes of the two polarizers will be facing in the<br />
same direction. Mark them with tape. Fasten them in front,<br />
of but at a safe distance, from the heat. (Use “barndoors”<br />
<strong>to</strong> avoid spillover of unpolarized light.) Aim the polarized<br />
lights at a 45-degree angle <strong>to</strong> the artwork on either side (see<br />
45<br />
For best copying, <strong>use</strong> cross-polarization<br />
45<br />
POLARIZER<br />
SHEET<br />
1’<br />
PHOTOFLOOD<br />
POLARIZER<br />
Why cross-polarize: When you try<br />
<strong>to</strong> copy art without a polarizer, you<br />
generally lose color, richness <strong>and</strong> contrast—while<br />
you may pick up various<br />
reflections from the room, surface of<br />
the painting, glass cover, or frame<br />
beca<strong>use</strong> of the lights. With crosspolarization<br />
(polarizer on camera plus<br />
polarizers over light sources) a vast<br />
improvement can be seen.<br />
How <strong>to</strong> cross polarize: Place two<br />
lights at 45-degree angles from the<br />
art <strong>to</strong> be copied. Attach a polarizer<br />
over your lens. Place polarizing sheets<br />
(see text for source) in front of lights<br />
with polarizing axes vertical as shown<br />
in lines on polarizing material in drawing.<br />
Most sheets have axes marked.<br />
Turn polarizer on camera <strong>to</strong> create<br />
best possible effect through<br />
viewfinder or on ground glass.<br />
drawing on opposite page).<br />
After you’ve put the polarizers in front of the lights,<br />
rotate the polarizer on the lens until the glare from the artwork<br />
diminishes or disappears. The polarization effect will<br />
be at its maximum when the axis of the filter on the lens is<br />
perpendicular <strong>to</strong> the axis of the filters on the light.<br />
“Cross-polarization,” as the setup is generally called, has<br />
some drawbacks. It is likely <strong>to</strong> add contrast, so you may<br />
need <strong>to</strong> overexpose <strong>and</strong> underdevelop the film <strong>to</strong> compensate.<br />
This is fine if you are shooting black-<strong>and</strong>-white film,<br />
but such adjustments may ca<strong>use</strong> color shifts with color<br />
emulsions. Many professionals control the contrast of crosspolarized<br />
copies by “flashing.” This technique consists of<br />
exposing the film (with whatever lighting equipment you’re<br />
using—not just flash) <strong>to</strong> a white or gray card. Making a second<br />
exposure with this blank card lowers contrast <strong>and</strong> opens<br />
up shadows by effectively “fogging” the film.<br />
After the basic exposure is complete, cover the painting<br />
being copied with a sheet of white paper or a card, <strong>and</strong> give<br />
an exposure that’s two percent of the normal exposure. An<br />
easy way <strong>to</strong> determine this is by using neutral-density filters.<br />
There is no neutral density filter that gives two percent, but<br />
an ND filter of 0.7 passes 20 percent of the light, <strong>and</strong> an ND<br />
filter of 1.0 passes 10 percent of the light, so putting them<br />
<strong>to</strong>gether gives a density of 1.7, which transmits just two percent.<br />
The added “flash” exposure will cut down the contrast<br />
<strong>and</strong> put a little image in dead-black areas.<br />
Furthermore, the specular highlights on the artwork,<br />
such as cracks on the surface of a painting, may pick up a<br />
blue or magenta cast if the polarizers aren’t completely neutral.<br />
To avoid this, don’t cross-polarize completely; s<strong>to</strong>p rotating<br />
the filter just before it reaches the maximum extinction<br />
position.
Cross-polarization can reduce glare from artwork under<br />
glass also. First, cover the camera <strong>and</strong> st<strong>and</strong> with black fabric<br />
or paper that doesn’t reflect light, such as construction<br />
paper with a hole cut out for the lens, so the light from the<br />
camera <strong>and</strong> st<strong>and</strong> (or other objects located behind the camera)<br />
does not reflect on the glass. Be careful <strong>to</strong> <strong>use</strong> a lens (or<br />
a filter on the lens) with a black rim facing the artwork <strong>to</strong><br />
further reduce the chance of reflection. Use black tape <strong>to</strong><br />
cover any lettering on the front of the lens.<br />
Helpful hints <strong>and</strong> tips<br />
Here are a few suggestions which can help you with<br />
your polarizer:<br />
Using your polarizer as an ND filter: Your polarizer<br />
can act as a neu-<br />
tral-density filter.<br />
Since it doesn’t<br />
affect color renditionappreciably<br />
(except <strong>to</strong><br />
make it more<br />
saturated) but<br />
does cut down<br />
the amount of<br />
light reaching<br />
the lens, it may<br />
allow you, for<br />
example, <strong>to</strong> <strong>use</strong><br />
fast film on a<br />
bright day—a<br />
A bowl of cherries sparkles with surface reflection<br />
highlights without a polarizer.<br />
situation that would ordinarily dem<strong>and</strong> a faster shutter<br />
speed than you want <strong>to</strong> <strong>use</strong>. Furthermore, it can make it<br />
possible for you <strong>to</strong> create a blurred image.<br />
Turn day in<strong>to</strong> night: You can produce an exaggerated<br />
“day as night” effect by using both a polarizer <strong>and</strong> a deep red<br />
filter on your lens for black-<strong>and</strong>-white, or a polarizer <strong>and</strong> a<br />
deep blue filter for color film. You’ll get extremely dark skies,<br />
simulating a night scene.<br />
Be careful of rotating lenses: Many lenses have front<br />
elements that do not rotate when you focus; others, particularly<br />
zoom lenses, do rotate. With rotating front elements,<br />
focus first, then adjust the polarizer, <strong>and</strong> take your exposure<br />
reading. If you “polarize” first <strong>and</strong> focus later, you may not<br />
get the results you want.<br />
Don’t let sunglasses cross you up: Be sure not <strong>to</strong> wear<br />
polarizing sunglasses when pho<strong>to</strong>graphing with polarizers!<br />
Watch out for vignetting: When using polarizers alone<br />
or stacked with filters, you run the risk of vignetting at the<br />
edges of the picture frame. The rim of the outermost filter<br />
may block light from reaching the film, particularly with<br />
wide-angle lenses. Although the problem can occur when<br />
combining any filters, extra attention should be paid <strong>to</strong> polarizers,<br />
since their mounts tend <strong>to</strong> be thicker than others <strong>to</strong><br />
accommodate the rotating mount. In fact, even without<br />
combining filters, some polarizers might block light from<br />
the edges of the film with a wide-angle lens beca<strong>use</strong> they are<br />
thicker than other filters. Some manufacturers sell specially<br />
designed polarizers in thin mounts <strong>to</strong> combat this problem.<br />
When in doubt, test at all apertures <strong>and</strong> examine the corners<br />
of the negatives or the unmounted slides for corner cu<strong>to</strong>ff.<br />
If cu<strong>to</strong>ff is slight or <strong>only</strong> at certain apertures, you may wish<br />
<strong>to</strong> <strong>use</strong> the filters anyway. Professional pho<strong>to</strong>graphers tend <strong>to</strong><br />
<strong>use</strong> oversized filters on wide-angle lenses (the filters screw<br />
on<strong>to</strong> the lens via a step-up ring). By using a filter large<br />
enough <strong>to</strong> cover the whole lensmount, the filter edge isn’t<br />
in the way <strong>to</strong> vignette. In the last few years some filter makers<br />
have combined polarizers with a warming filter. Not<br />
<strong>only</strong> is this a combination <strong>often</strong> <strong>use</strong>d by pros, but it also<br />
keeps the resulting filter ring thinner than a stacked pair <strong>to</strong><br />
minimize the chances of vignetting.<br />
Beware of overlong exposures: When using a polarizer,<br />
your exposure will, of course, increase. You must either <strong>use</strong><br />
a larger aperture,<br />
decrease your<br />
shutter speed,<br />
or both <strong>to</strong><br />
compensate for<br />
your polarizing<br />
filter. You can<br />
do this many<br />
times without<br />
difficulty, but<br />
sometimes you<br />
can’t. Subjects<br />
With camera <strong>and</strong> light about 30 degrees from each in low light re-<br />
other, the polarizer removes highlights. Cherries are quire a tripod<br />
richer, but is the picture better?<br />
(a good idea<br />
with or without<br />
a polarizing filter). A subject in motion may be blurred<br />
if the exposure time is <strong>to</strong>o long.<br />
Caring for your polarizer: A polarizing filter should be<br />
cleaned <strong>and</strong> h<strong>and</strong>led like any other filter. Use a soft cloth or<br />
lens tissue <strong>and</strong> lens cleaner <strong>to</strong> wipe the filter gently when<br />
cleaning. Avoid using <strong>to</strong>o much lens cleaner <strong>and</strong> don’t let<br />
any run over the edge of the filter. Polarizing filters are light<br />
stable <strong>and</strong> should last indefinitely with normal <strong>use</strong>. Under<br />
high temperatures, or if exposed <strong>to</strong> strong light for long<br />
periods, however, they may delaminate <strong>and</strong> acquire a color<br />
cast. Sheet-type polarizers can be deformed if placed <strong>to</strong><br />
close <strong>to</strong> hot lights. Even the light from an electronic flash<br />
may affect these polarizers adversely if they are taped tightly<br />
on<strong>to</strong> the flash, especially if the flash is <strong>use</strong>d <strong>often</strong>.<br />
Getting richer color © HERBERT KEPPLER (2)<br />
What polarizer do you need?<br />
So much for using polarizers. What kind of polarizer should<br />
you get? You thought there was just one type of polarizer<br />
available in different br<strong>and</strong>s? No, there are two: linear <strong>and</strong> circular.<br />
Knowing which is which <strong>and</strong> what polarizer you <strong>and</strong><br />
your camera need can make the difference between polarizing<br />
success or failure, particularly as far as exposure is concerned.<br />
Linear polarizers are relatively inexpensive <strong>and</strong> work with<br />
all cameras that do not have through-lens metering <strong>and</strong>/or<br />
au<strong>to</strong>focusing. However, if you own an SLR with throughlens<br />
metering <strong>and</strong>/or au<strong>to</strong>focusing, you’ll probably need a<br />
circular polarizer which, alas, costs about three times as<br />
much as a linear polarizer. Linear polarizers can give the
wrong exposure or focus when <strong>use</strong>d with through-lens metering<br />
<strong>and</strong> focusing systems that <strong>use</strong> beam splitters or split<br />
prisms in their metering or au<strong>to</strong>focusing systems.<br />
The terms linear <strong>and</strong> circular refer <strong>to</strong> how each transmits<br />
light. Physically, the two types look very much the same.<br />
Their <strong>use</strong> <strong>and</strong> results are also the same.<br />
(Check out the two illustrations below <strong>to</strong> see just what a linear<br />
polarizer doesn’t do, but a circular polarizer does.)<br />
You can, however, <strong>use</strong> linear polarization even with the<br />
cameras <strong>and</strong> h<strong>and</strong>-held meters mentioned above, as long as<br />
you don’t try <strong>to</strong> <strong>use</strong> the lightmeter normally. To determine exposure,<br />
take a lightmeter reading without the polarizer. Then<br />
put the filter over the metering cell <strong>and</strong> manually adjust the<br />
reading by the equivalent of one <strong>to</strong> two s<strong>to</strong>ps, according <strong>to</strong><br />
the filter fac<strong>to</strong>r. Or, keep the polarizing filter on the lens, but<br />
rotate it <strong>to</strong> its least effective position—the<br />
least change in exposure from that required<br />
with no filter. Take a meter reading<br />
<strong>and</strong> set the f-s<strong>to</strong>p <strong>and</strong> shutter speed<br />
at that reading. Then rotate the filter <strong>to</strong><br />
the position where it provides the pic<strong>to</strong>rial<br />
results you want, <strong>and</strong> make the exposure.<br />
Again, you may need a little extra<br />
exposure, depending on the subject <strong>and</strong><br />
the degree <strong>to</strong> which polarized light is diminished<br />
from the scene. Bracket wherever<br />
possible.<br />
It should be obvious by now that it’s<br />
advantageous <strong>to</strong> buy a circular polarizer,<br />
despite its high price. But if you already<br />
own a polarizer, how can you tell<br />
whether it’s linear or circular? Usually<br />
it’s marked “circular” or “circ” on the<br />
rim. No marking? Probably linear. Still<br />
not certain? Make a little test as suggested<br />
in the two pho<strong>to</strong>s above.<br />
Checking out polarizers<br />
When selecting a polarizer, make sure it has no definite<br />
color; it should be a neutral gray. To check, look through<br />
the filter at a piece of white paper. If the paper appears <strong>to</strong><br />
have color—brown, green, purple, yellow, or whatever—try<br />
another polarizer or a different br<strong>and</strong>. Theoretically, a polarizing<br />
filter should not allow any blue or purple light<br />
through when eliminating strongly polarized light, or when<br />
Can you tell it’s a circular polarizer by looking at it? Sure!<br />
Clear both ways? It’s a linear polarizer: Hold polarizer close <strong>to</strong> mirror so<br />
polarizer <strong>and</strong> reflection overlap slightly. If the overlap is clear, as here, <strong>and</strong><br />
also when you reverse the polarizer, it’s linear.<br />
UNPOLARIZED<br />
LIGHT<br />
One side shows black overlap? It’s a circular polarizer. If there is black<br />
overlap when you look through one side or reversed? It’s circular.<br />
two polarizers are crossed. In reality, though, most polarizers<br />
do allow small amounts of these colors <strong>to</strong> pass through.<br />
This happens beca<strong>use</strong> pho<strong>to</strong>graphic polarizers are most efficient<br />
in green <strong>and</strong> red regions, but tend <strong>to</strong> “leak” blue<br />
light—i.e., they’re less efficient at polarizing blue light.<br />
How does this affect your pictures? Although a slight<br />
blue color may be visible <strong>to</strong> your eye when two polarizers<br />
How <strong>and</strong> why circular polarizers work<br />
CIRCULAR POLARIZER<br />
LINEAR QUARTER WAVE<br />
+<br />
POLARIZER RETARDER<br />
LINEARLY<br />
POLARIZED<br />
LIGHT<br />
CIRCULARILY<br />
POLARIZED LIGHT<br />
TO CAMERA<br />
METERING<br />
SYSTEM<br />
Scrambling Light: Circular polarizer consists of st<strong>and</strong>ard linear polarizer plus quarter<br />
wave retarder which scrambles the polarized light so it moves in a spiral or circular<br />
direction. To most already polarized camera metering systems, this light appears<br />
as “depolarized” so the systems operate manually.
Bicolor polarizer<br />
will give you two<br />
variable colors.<br />
No polarizer<br />
First polarizer:<br />
Converts r<strong>and</strong>om<br />
white light in<strong>to</strong> polarized(Unidirectional)<br />
waves.<br />
Red-blue bicolor polarizer–many<br />
hues with a twist of the wrist: These intriguing<br />
filters produce a variety of colors<br />
with a single lens attachment. By<br />
turning the front element, you can vary<br />
the color cast of your picture from<br />
one color <strong>to</strong> another with a range<br />
from deep <strong>to</strong> pale for each color, <strong>and</strong><br />
you can obtain a mix of several colors in<br />
between. Here’s a simplified explanation.<br />
As you can see in the diagram above, r<strong>and</strong>om white light<br />
waves passing through the first polarizer emerge as unidirectional<br />
(polarized) white light. This enables the dichroic plastic <strong>to</strong><br />
break up the light in<strong>to</strong> primary colors <strong>and</strong> rotate their planes of<br />
polarization selectively according <strong>to</strong> those colors (wavelengths).<br />
In the red-blue filter <strong>use</strong>d for the shots above, a magenta filter<br />
placed behind the dichroic disk removes the green light waves<br />
are crossed, is usually not visible in your pho<strong>to</strong>graph. It may<br />
appear as a slight coloration in strong specular highlights.<br />
Testing polarizers by crossing them is highly subjective<br />
beca<strong>use</strong> your eye has such great sensitivity <strong>and</strong> ability <strong>to</strong> pick<br />
up slight color “leaks.” The best test is <strong>to</strong> <strong>use</strong> the polarizer<br />
o shoot color slide pictures. If no color casts appear in areas<br />
rom which strong glare is being removed by the filter, then<br />
he filter is OK.<br />
Polarizers are available as screw-in filters <strong>and</strong> in drop-in<br />
eries sizes. They also come in thin plastic sheets <strong>and</strong> can be<br />
aminated <strong>to</strong> thicker glass or plastic square sheets for <strong>use</strong><br />
ith various filter-holder systems.<br />
Polarizing material in sheets is available at prices ranging<br />
rom $15 for an unmounted 5x8 1 ⁄2-inch model up <strong>to</strong> $111<br />
for a 17x30-inch size unmounted from Edmund Industrial<br />
Optics, 101 E. Gloucester Pike, Barring<strong>to</strong>n, NJ 08007;<br />
phone: 800-363-1992.<br />
Dichroic plastic:<br />
Twists polarized<br />
white in<strong>to</strong> red, blue<br />
or green light at<br />
different angles.<br />
Magenta filter:<br />
Removes most green<br />
light, leaving red <strong>and</strong> blue<br />
waves at different angles.<br />
Second polarizer:<br />
Allows different amounts<br />
of red <strong>and</strong> blue waves<br />
through, depending on<br />
their relative angles <strong>to</strong><br />
its grid.<br />
<strong>and</strong> the second polarizer analyzes or “reads out” the remaining<br />
red <strong>and</strong> blue components of the light waves differentially, depending<br />
on their respective angles <strong>to</strong> the second polarizing grid.<br />
So, as you turn the front polarizer, varying the angle at which the<br />
red <strong>and</strong> blue are transmitted, you can get all red <strong>and</strong> no blue<br />
(when the blue waves are at 90 degrees <strong>to</strong> the second polarizer),<br />
all blue <strong>and</strong> no red, or anything in between.<br />
Besides linear, circular, <strong>and</strong> polarizer-warming filter combos,<br />
there’s one more special-effects filter you should know<br />
about—the bicolor. A bicolor allows you <strong>to</strong> vary the overall<br />
color cast from one color <strong>to</strong> another, or anywhere in between.<br />
Once very popular <strong>and</strong> made by many manufacturers,<br />
we could find <strong>only</strong> one source <strong>to</strong>day. Called Variocolor,<br />
Cokin makes them in red-green, red-blue, blue-yellow <strong>and</strong><br />
pink- orange. How they work, plus examples of their <strong>use</strong>,<br />
appear above.<br />
By this point, we hope most of your questions have been<br />
answered about polarization—why it works, when <strong>and</strong> how<br />
you can <strong>use</strong> it. Your best bet? Get yourself a polarizer <strong>and</strong><br />
practice with it. You don’t even have <strong>to</strong> put it on a camera.<br />
Just hold it <strong>to</strong> your eye, look at a likely subject, <strong>and</strong> start<br />
turning. Then, when you have a real need for a polarizer,<br />
you’ll have a better chance at making it work. p