How to make a bootable flash disk and to flash BIOS - MSi
How to make a bootable flash disk and to flash BIOS - MSi
How to make a bootable flash disk and to flash BIOS - MSi

Create successful ePaper yourself
Turn your PDF publications into a flip-book with our unique Google optimized e-Paper software.
<strong>How</strong> <strong>to</strong> <strong>make</strong> a <strong>bootable</strong> <strong>flash</strong> <strong>disk</strong> <strong>and</strong> <strong>to</strong> <strong>flash</strong> <strong>BIOS</strong><br />
Tools <strong>to</strong> prepare:<br />
1. Flash Disk (It is strongly recommended <strong>to</strong> use usb <strong>flash</strong> drive less than 512M for better<br />
compatibility)<br />
2. NB or PC which can connect <strong>to</strong> the Internet<br />
Procedures:<br />
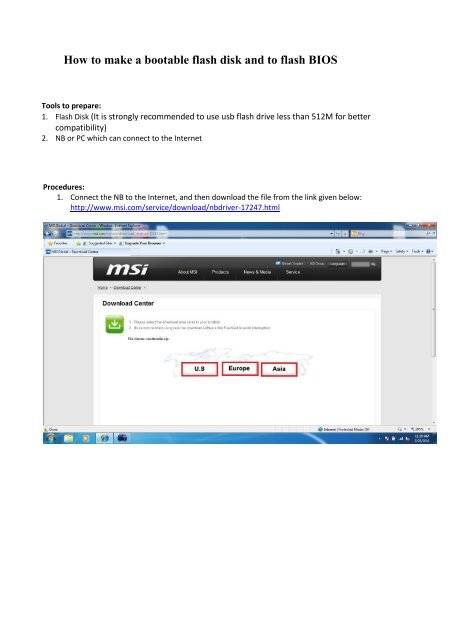
1. Connect the NB <strong>to</strong> the Internet, <strong>and</strong> then download the file from the link given below:<br />
http://www.msi.com/service/download/nbdriver-17247.html
2. Press “Save”.<br />
3. After pressing “Save”, save the file on the desk<strong>to</strong>p <strong>and</strong> then extract the zip file.
4. Extract the exe file <strong>and</strong> then select “Diskimage” <strong>and</strong> “Floppy” <strong>and</strong> browser.<br />
5. Select “fdboot” <strong>and</strong> press” open”.
6. Confirm whether the drive corresponds <strong>to</strong> the USB <strong>flash</strong> <strong>disk</strong>. If correct, press ”OK” directly.<br />
7. Press “Exit” <strong>to</strong> exit system. Now, have you <strong>bootable</strong> <strong>flash</strong>drive.<br />
8. Open web browser, connect <strong>to</strong> MSI official website <strong>and</strong> download the corresponding <strong>BIOS</strong>.
<strong>How</strong> <strong>to</strong> <strong>flash</strong> MSI Notebook <strong>BIOS</strong> under DOS mode<br />
Special Note:<br />
The <strong>BIOS</strong> files provided here are exclusively for MSI products. MSI takes no responsibility for any<br />
damage caused by improper use or lack of technical expertise.<br />
Attention:<br />
Users who download <strong>BIOS</strong> from here should use the <strong>flash</strong> utility included in the downloaded<br />
compressed file when doing the <strong>BIOS</strong> update. To avoid <strong>BIOS</strong> update failure, please do not use older<br />
versions of the update utility or utilities not provided by MSI.
Update <strong>BIOS</strong> with a <strong>bootable</strong> USB <strong>flash</strong> drive (Pen drive):<br />
1. Extract the zip file containing the <strong>BIOS</strong> files <strong>and</strong> <strong>flash</strong> utility <strong>to</strong> a <strong>bootable</strong> USB <strong>flash</strong> drive (Pen drive).<br />
2. Insert the USB <strong>flash</strong> drive (Pen drive) in the USB port.<br />
3. Boot up the notebook <strong>and</strong> press F11 key <strong>to</strong> run Boot menu <strong>and</strong> then <strong>to</strong> select USB <strong>flash</strong> <strong>disk</strong> drive.<br />
Note1: For some models, you need <strong>to</strong> go in<strong>to</strong> the bios <strong>and</strong> change boot priority.<br />
Note 2: Make sure the AC adapter is firmly connected <strong>to</strong> your notebook before you run this utility.<br />
Make sure the AC adapter is firmly connected <strong>to</strong> your notebook before you run this<br />
utility.<br />
4. Press Enter key <strong>and</strong> then <strong>to</strong> select “FreeDOS Safe Mode (don’t load any drivers)”.
5. Please access the correct drive. Here is an example. Type b: at DOS prompt A:\>, you should be able <strong>to</strong><br />
see the files that you saved. Execute the batch file FLASH.BAT.<br />
6. Wait for a couple of seconds <strong>to</strong> complete the <strong>BIOS</strong> update procedure.<br />
DO NOT power off the notebook during this <strong>BIOS</strong> update process.<br />
7. Power off the notebook after the <strong>BIOS</strong> update procedure is completed.<br />
8. Remove battery pack <strong>and</strong> AC adapter.<br />
9. Plug in battery pack or AC adapter.
9. Power on notebook <strong>and</strong> press key <strong>to</strong> enter the <strong>BIOS</strong> setup menu.<br />
Note: This is only applicable for some models. For others, You will not be prompted with the<br />
message below, you can directly press “DEL” <strong>and</strong> load Set-up Default (see Step 10)<br />
11. Select [Load Setup Defaults] <strong>and</strong> press key <strong>to</strong> load <strong>BIOS</strong> default settings.<br />
12. Select [Exit &Save Changes] <strong>and</strong> press key <strong>to</strong> save changes <strong>and</strong> exit.