1 Welcome to Corel PHOTO-PAINT® 10, a powerful tool for editing ...
1 Welcome to Corel PHOTO-PAINT® 10, a powerful tool for editing ...
1 Welcome to Corel PHOTO-PAINT® 10, a powerful tool for editing ...

Create successful ePaper yourself
Turn your PDF publications into a flip-book with our unique Google optimized e-Paper software.
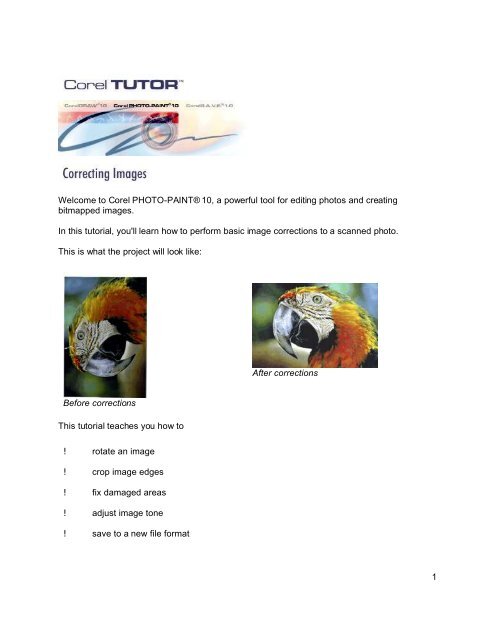
<strong>Welcome</strong> <strong>to</strong> <strong>Corel</strong> <strong>PHOTO</strong>-<strong>PAINT®</strong> <strong>10</strong>, a <strong>powerful</strong> <strong>to</strong>ol <strong>for</strong> <strong>editing</strong> pho<strong>to</strong>s and creating<br />
bitmapped images.<br />
In this tu<strong>to</strong>rial, you'll learn how <strong>to</strong> per<strong>for</strong>m basic image corrections <strong>to</strong> a scanned pho<strong>to</strong>.<br />
This is what the project will look like:<br />
Be<strong>for</strong>e corrections<br />
This tu<strong>to</strong>rial teaches you how <strong>to</strong><br />
! rotate an image<br />
! crop image edges<br />
! fix damaged areas<br />
! adjust image <strong>to</strong>ne<br />
! save <strong>to</strong> a new file <strong>for</strong>mat<br />
After corrections<br />
1
Be<strong>for</strong>e you start<br />
You will need <strong>to</strong> download the sample file found on first page of the online tu<strong>to</strong>rial, or substitute<br />
your own file.<br />
Open an image<br />
You'll start by opening the sample file or your own file.<br />
1. Click File menu Open.<br />
2. From the Look in list box, choose the drive and folder where you saved the file.<br />
3. Double-click the filename.<br />
Rotate an image<br />
You can rotate an image by a preset amount or a cus<strong>to</strong>m amount.<br />
You'll use a preset amount <strong>to</strong> rotate the sample image.<br />
1. On the Standard <strong>to</strong>olbar, choose 1 <strong>to</strong> 1 from the Zoom level list box .<br />
You can now see the actual size of the sample image.<br />
2. Click Image menu Rotate 90º clockwise.<br />
Crop image edges<br />
You can remove unwanted areas of an image by cropping.<br />
You'll crop the white border that displays around the edges of the sample image.<br />
1. Click the Maximize but<strong>to</strong>n in the <strong>to</strong>p-right corner of the image window <strong>to</strong> view the<br />
white space around the sample image.<br />
2. In the <strong>to</strong>olbox, click the Deskew crop <strong>to</strong>ol .<br />
2
3. Drag the Deskew crop <strong>to</strong>ol across the image <strong>to</strong> create<br />
a rectangle. Enclose as much of the image in the<br />
rectangle as possible without including any white space.<br />
You can adjust the rectangle by dragging a sizing<br />
handle or reset the Deskew crop <strong>to</strong>ol by double-clicking<br />
outside the rectangle.<br />
4. Double-click inside the rectangle <strong>to</strong> remove the area<br />
outside.<br />
Fix damaged areas<br />
Handles - definition<br />
A set of eight black<br />
squares that appear at the<br />
corners and sides of a<br />
rectangle which encloses<br />
an image area. You can<br />
drag the handles <strong>to</strong> resize<br />
the rectangle.<br />
The Clone <strong>to</strong>ol lets you copy pixels from one image area <strong>to</strong> another. When you use the Clone<br />
<strong>to</strong>ol, two brushes display in the image window: a source point brush and a brush that applies<br />
the copied pixels from the source point.<br />
You'll fix a tear at the <strong>to</strong>p of the sample image by using the Clone <strong>to</strong>ol.<br />
1. In the <strong>to</strong>olbox, open the Zoom <strong>to</strong>ols flyout ,<br />
and click the Zoom <strong>to</strong>ol .<br />
2. Drag across the tear mark at the <strong>to</strong>p of the image <strong>to</strong><br />
enclose the area around the tear in the zooming<br />
rectangle.<br />
3. In the <strong>to</strong>olbox, open the Brush <strong>to</strong>ols flyout<br />
, and click the Clone <strong>to</strong>ol .<br />
4. On the property bar, open the Clone <strong>to</strong>ol picker ,<br />
and click Clone <strong>to</strong>ol .<br />
5. From the Brush type list box on the property bar,<br />
choose Normal clone <strong>to</strong> reset the clone settings.<br />
6. Move the Nib size slider on the property bar <strong>to</strong> set the<br />
value at 12.<br />
7. Click beside the tear mark <strong>to</strong> set the source point.<br />
8. Click on the tear mark <strong>to</strong> copy the pixels from the<br />
source point. Continue <strong>to</strong> click and drag along the tear<br />
mark.<br />
Pixel - definition<br />
A colored dot that is the<br />
smallest part of a<br />
bitmapped image<br />
You can reset the source<br />
point by right-clicking <strong>to</strong><br />
set the second brush as<br />
the source point.<br />
You can also undo actions<br />
by clicking the Undo<br />
but<strong>to</strong>n on the<br />
Standard <strong>to</strong>olbar.<br />
3
9. On the Standard <strong>to</strong>olbar, choose 1 <strong>to</strong> 1 from the Zoom level list box <strong>to</strong> evaluate the<br />
results.<br />
Adjust image <strong>to</strong>ne<br />
<strong>Corel</strong> <strong>PHOTO</strong>-PAINT <strong>10</strong> has many filters and <strong>to</strong>ols that let you adjust the color and <strong>to</strong>ne of an<br />
image.<br />
The sample image is slightly dark. You'll correct this problem using the<br />
Brightness-Contrast-Intensity adjustment filter. This filter lets you darken an image by<br />
decreasing values or lighten an image by increasing values. As you increase the brightness,<br />
you'll need <strong>to</strong> increase the contrast and intensity settings <strong>to</strong> retain image detail. You can<br />
experiment with different settings until you achieve the results you want.<br />
1. Click Image Adjust Brightness-Contrast-Intensity.<br />
2. Click the Single preview window but<strong>to</strong>n and ensure the Preview but<strong>to</strong>n<br />
appears pressed, <strong>to</strong> compare the adjusted image with the original image.<br />
3. Drag the following sliders <strong>to</strong> increase the values and lighten the image:<br />
! Brightness–lightens or darkens all pixels equally<br />
! Contrast–adjusts the difference between light and dark colors<br />
! Intensity–brightens light areas or darkens dark areas<br />
4. Click OK.<br />
4
The sample image was corrected using the following settings:<br />
! Brightness=20<br />
! Contrast=<strong>10</strong><br />
! Intensity=<strong>10</strong><br />
Save <strong>to</strong> a new file <strong>for</strong>mat<br />
<strong>Corel</strong> <strong>PHOTO</strong>-PAINT <strong>10</strong> offers a wide variety of file <strong>for</strong>mats. The sample image is a scanned<br />
pho<strong>to</strong> saved as a .tif file. If you want <strong>to</strong> email an image, you probably want <strong>to</strong> change the file<br />
<strong>for</strong>mat in order <strong>to</strong> reduce the file size.<br />
You'll save the sample image in the JPEG <strong>for</strong>mat.<br />
1. Click File menu Export Export.<br />
2. From the Files of type list box, choose JPG-JPEG bitmaps.<br />
3. Click Save.<br />
4. In the JPEG export dialog box, enable the Preview but<strong>to</strong>n <strong>to</strong> preview the change in<br />
image quality.<br />
You can drag inside the preview window <strong>to</strong> view other parts of the image.<br />
5. Drag the Compression slider <strong>to</strong> change the file size, which is displayed in the<br />
bot<strong>to</strong>m-right corner. A higher compression number results in a smaller file size but<br />
decreases image quality.<br />
6. Click OK.<br />
From here ...<br />
In this tu<strong>to</strong>rial, you have learned some basic image-<strong>editing</strong> techniques that you can use <strong>to</strong><br />
correct images. For more in<strong>for</strong>mation about the <strong>to</strong>pics and <strong>to</strong>ols discussed in this tu<strong>to</strong>rial, refer<br />
<strong>to</strong> the online Help.<br />
To access the online Help click Help Help <strong>to</strong>pics, click the Index tab, and type the following:<br />
For more in<strong>for</strong>mation about ... Type<br />
Rotating images rotating, images<br />
Cropping images cropping, images<br />
Cloning images Clone <strong>to</strong>ol<br />
Color and <strong>to</strong>ne adjustment filters correcting, color<br />
File <strong>for</strong>mats file <strong>for</strong>mat<br />
5