Washing Machine Перална машина - Blomberg
Washing Machine Перална машина - Blomberg
Washing Machine Перална машина - Blomberg

Create successful ePaper yourself
Turn your PDF publications into a flip-book with our unique Google optimized e-Paper software.
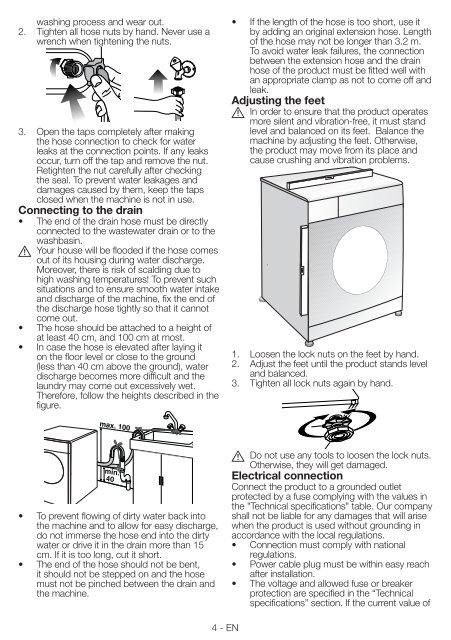
washing process and wear out.<br />
2. Tighten all hose nuts by hand. Never use a<br />
wrench when tightening the nuts.<br />
3. Open the taps completely after making<br />
the hose connection to check for water<br />
leaks at the connection points. If any leaks<br />
occur, turn off the tap and remove the nut.<br />
Retighten the nut carefully after checking<br />
the seal. To prevent water leakages and<br />
damages caused by them, keep the taps<br />
closed when the machine is not in use.<br />
Connecting to the drain<br />
• The end of the drain hose must be directly<br />
connected to the wastewater drain or to the<br />
A<br />
washbasin.<br />
Your house will be flooded if the hose comes<br />
out of its housing during water discharge.<br />
Moreover, there is risk of scalding due to<br />
high washing temperatures! To prevent such<br />
situations and to ensure smooth water intake<br />
and discharge of the machine, fix the end of<br />
the discharge hose tightly so that it cannot<br />
come out.<br />
• The hose should be attached to a height of<br />
at least 40 cm, and 100 cm at most.<br />
• In case the hose is elevated after laying it<br />
on the floor level or close to the ground<br />
(less than 40 cm above the ground), water<br />
discharge becomes more difficult and the<br />
laundry may come out excessively wet.<br />
Therefore, follow the heights described in the<br />
figure.<br />
• To prevent flowing of dirty water back into<br />
the machine and to allow for easy discharge,<br />
do not immerse the hose end into the dirty<br />
water or drive it in the drain more than 15<br />
cm. If it is too long, cut it short.<br />
• The end of the hose should not be bent,<br />
it should not be stepped on and the hose<br />
must not be pinched between the drain and<br />
the machine.<br />
4 - EN<br />
• If the length of the hose is too short, use it<br />
by adding an original extension hose. Length<br />
of the hose may not be longer than 3.2 m.<br />
To avoid water leak failures, the connection<br />
between the extension hose and the drain<br />
hose of the product must be fitted well with<br />
an appropriate clamp as not to come off and<br />
leak.<br />
Adjusting the feet<br />
A<br />
In order to ensure that the product operates<br />
more silent and vibration-free, it must stand<br />
level and balanced on its feet. Balance the<br />
machine by adjusting the feet. Otherwise,<br />
the product may move from its place and<br />
cause crushing and vibration problems.<br />
1. Loosen the lock nuts on the feet by hand.<br />
2. Adjust the feet until the product stands level<br />
and balanced.<br />
3. Tighten all lock nuts again by hand.<br />
A<br />
Do not use any tools to loosen the lock nuts.<br />
Otherwise, they will get damaged.<br />
Electrical connection<br />
Connect the product to a grounded outlet<br />
protected by a fuse complying with the values in<br />
the "Technical specifications" table. Our company<br />
shall not be liable for any damages that will arise<br />
when the product is used without grounding in<br />
accordance with the local regulations.<br />
• Connection must comply with national<br />
regulations.<br />
• Power cable plug must be within easy reach<br />
after installation.<br />
• The voltage and allowed fuse or breaker<br />
protection are specified in the “Technical<br />
specifications” section. If the current value of