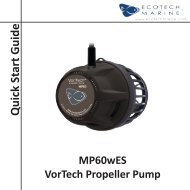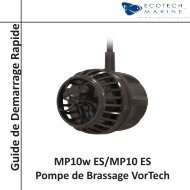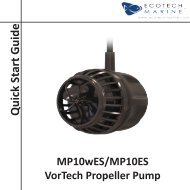
Your VorTech propeller pump Before you start ... - EcoTech Marine
Your VorTech propeller pump Before you start ... - EcoTech Marine
Your VorTech propeller pump Before you start ... - EcoTech Marine

You also want an ePaper? Increase the reach of your titles
YUMPU automatically turns print PDFs into web optimized ePapers that Google loves.
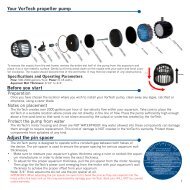
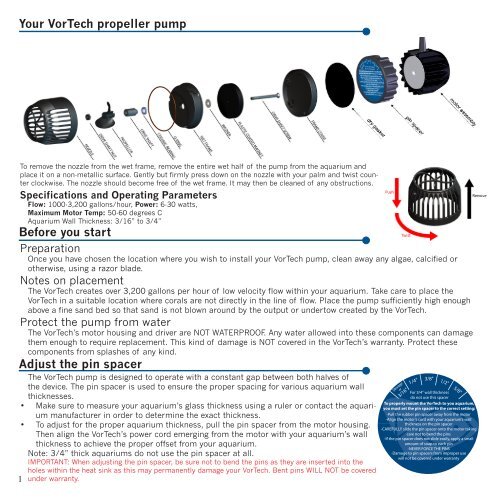
<strong>Your</strong> <strong>VorTech</strong> <strong>propeller</strong> <strong>pump</strong><br />
To remove the nozzle from the wet frame, remove the entire wet half of the <strong>pump</strong> from the aquarium and<br />
place it on a non-metallic surface. Gently but firmly press down on the nozzle with <strong>you</strong>r palm and twist counter<br />
clockwise. The nozzle should become free of the wet frame. It may then be cleaned of any obstructions.<br />
Specifications and Operating Parameters<br />
Flow: 1000-3,200 gallons/hour, Power: 6-30 watts,<br />
Maximum Motor Temp: 50-60 degrees C<br />
Aquarium Wall Thickness: 3/16” to 3/4”<br />
<strong>Before</strong> <strong>you</strong> <strong>start</strong><br />
Preparation<br />
Once <strong>you</strong> have chosen the location where <strong>you</strong> wish to install <strong>you</strong>r <strong>VorTech</strong> <strong>pump</strong>, clean away any algae, calcified or<br />
otherwise, using a razor blade.<br />
Notes on placement<br />
The <strong>VorTech</strong> creates over 3,200 gallons per hour of low velocity flow within <strong>you</strong>r aquarium. Take care to place the<br />
<strong>VorTech</strong> in a suitable location where corals are not directly in the line of flow. Place the <strong>pump</strong> sufficiently high enough<br />
above a fine sand bed so that sand is not blown around by the output or undertow created by the <strong>VorTech</strong>.<br />
Protect the <strong>pump</strong> from water<br />
The <strong>VorTech</strong>’s motor housing and driver are NOT WATERPROOF. Any water allowed into these components can damage<br />
them enough to require replacement. This kind of damage is NOT covered in the <strong>VorTech</strong>’s warranty. Protect these<br />
components from splashes of any kind.<br />
Adjust the pin spacer<br />
The <strong>VorTech</strong> <strong>pump</strong> is designed to operate with a constant gap between both halves of<br />
the device. The pin spacer is used to ensure the proper spacing for various aquarium wall<br />
thicknesses.<br />
• Make sure to measure <strong>you</strong>r aquarium’s glass thickness using a ruler or contact the aquarium<br />
manufacturer in order to determine the exact thickness.<br />
•<br />
1<br />
To adjust for the proper aquarium thickness, pull the pin spacer from the motor housing.<br />
Then align the <strong>VorTech</strong>’s power cord emerging from the motor with <strong>you</strong>r aquarium’s wall<br />
thickness to achieve the proper offset from <strong>you</strong>r aquarium.<br />
Note: 3/4” thick aquariums do not use the pin spacer at all.<br />
IMPORTANT: When adjusting the pin spacer, be sure not to bend the pins as they are inserted into the<br />
holes within the heat sink as this may permanently damage <strong>you</strong>r <strong>VorTech</strong>. Bent pins WILL NOT be covered<br />
under warranty.
Warnings<br />
•<br />
•<br />
•<br />
•<br />
•<br />
The <strong>VorTech</strong> utilizes very powerful magnets and can cause severe personal injury.<br />
NEVER connect the two halves of this device without a proper spacer in-between.<br />
NEVER place either half of this device near magnetically attractive surfaces or sensitive electronics.<br />
The motor and driver can become HOT. Be cautious around these surfaces.<br />
Never run the <strong>pump</strong> dry as the heat buildup may cause damage to its components.<br />
Attach the <strong>VorTech</strong><br />
Align the <strong>VorTech</strong><br />
•<br />
•<br />
•<br />
Attach the motor assembly<br />
•<br />
Apply the rubber gasket at the chosen location for the <strong>VorTech</strong> <strong>pump</strong>, on the outside of<br />
<strong>you</strong>r aquarium.<br />
• Apply the cord mounting tab approximately 2” above this location. Make sure the glass is<br />
clean and free of any grease or dirt prior to applying this tab.<br />
• Place the <strong>VorTech</strong> motor, with or without the pin spacer attached, upon the black gasket,<br />
and secure the cord to the mounting tab using one of the provided wire-ties.<br />
• The cord must be positioned pointing upwards so that if the <strong>VorTech</strong> were to fall off the<br />
aquarium, it does not swing and damage <strong>you</strong>r aquarium. When operating, make sure the<br />
gasket is properly recessed within the pin spacer.<br />
Attach the wetside assembly<br />
•<br />
•<br />
Place the wet side into the aquarium, making sure to allow ALL air to escape from the<br />
<strong>propeller</strong> housing.<br />
Carefully connect both halves of the <strong>pump</strong> together and visually align both halves of the<br />
<strong>pump</strong>.<br />
Protect the Pump From falling<br />
Due to the nature of the magnetically coupled design, it is possible for the <strong>VorTech</strong> to become dislodged from the<br />
aquarium glass and fall to the ground. The cord should be positioned vertically above the <strong>pump</strong> with the mounting tab<br />
•<br />
directly above the motor to ensure that the motor does not move in the event of a decoupling of the magnets.<br />
The provided cord-mounting tab MUST be used to prevent damage to the motor or the surrounding environment.<br />
Turn the speed up to the maximum speed by using the speed control knob on the<br />
driver.<br />
Plug the power supply into the driver. If vibration or noise is detected, carefully<br />
adjust the <strong>propeller</strong> housing by moving it VERY slightly left, right, up or down, until<br />
the noise/vibration is eliminated or minimized as much as possible.<br />
After alignment has been ensured, turn the speed control knob to achieve the desired<br />
flow rate within <strong>you</strong>r aquarium.<br />
IMPORTANT: If the <strong>VorTech</strong> is not properly aligned, a strong vibration will be heard. If the alignment is not corrected, this<br />
can cause increased electrical consumption, excessive wear on the components, excessive heat and excessive noise.<br />
2
<strong>Your</strong> <strong>VorTech</strong> Wireless Wave Driver<br />
Wireless Wave Drivers are capable of controlling a <strong>VorTech</strong><br />
<strong>pump</strong> in a variety of different ways. Out of the box, any<br />
MP40w model <strong>pump</strong> is capable of operating as a master<br />
<strong>pump</strong>, a slave <strong>pump</strong>, or in autonomous mode. A master <strong>pump</strong><br />
broadcasts wireless signals and a slave <strong>pump</strong> receives these<br />
wireless signals. On any aquarium, the aquarist can have<br />
up to seven different master <strong>pump</strong>s broadcasting on unique<br />
frequencies. Each master <strong>pump</strong> can be synced with an infinite<br />
number of slave <strong>pump</strong>s.<br />
Master <strong>pump</strong>s broadcast signals in one of five modes:<br />
Constant Speed Mode (green), Lagoon Random Mode (purple),<br />
Master Pump in:<br />
- Pulse Mode (blinking ( g blue) )<br />
Slave Pumps in:<br />
-Sync Mode (white)<br />
-Anti Sync Mode<br />
(orange) ( g )<br />
Reef-Crest Random Mode (yellow), Short Pulse (blue) and Long Pulse Mode (salmon). Slave <strong>pump</strong>s will receive this<br />
broadcasted signal and process it in either Sync Mode (white) or Anti-Sync Mode (orange). In sync mode a slave <strong>pump</strong><br />
will behave exactly the same as the master <strong>pump</strong>. In anti-sync mode the slave <strong>pump</strong> will behave inversely to the master;<br />
so when the master <strong>pump</strong> is at high speed, the slave will be at low speed and vice-versa. Any combination of these<br />
modes can be used to create reef-like currents and waves within <strong>you</strong>r aquarium.<br />
This <strong>pump</strong> configuration could be<br />
used to create a standing wave<br />
within <strong>you</strong>r aquarium.<br />
Wave Motion Warning<br />
The generation of waves within <strong>you</strong>r aquarium places additional stress on the aquarium glass and joints. Not all<br />
aquarium tanks are designed to withstand this stress, and failure of the glass and/or joints could result.<br />
You are encouraged, before generating waves, to consult with <strong>you</strong>r aquarium tank manufacturer to determine if the tank<br />
construction is adequate to withstand the additional stress generated by the wave motion.<br />
You are also encouraged to assure that <strong>you</strong>r aquarium stand or furniture is adequately stable to withstand the additional<br />
stress resulting from wave generation.<br />
<strong>EcoTech</strong> <strong>Marine</strong> DISCLAIMS AND WILL NOT BE LIABLE FOR, damage to aquarium tanks or their surroundings, water<br />
damage, or any other consequential damages resulting from wave generation. MAKE WAVES AT YOUR OWN RISK.<br />
3
Advanced Features<br />
Night Mode<br />
Enter the following button sequence to set Night Mode at the precise time when <strong>you</strong> desire <strong>you</strong>r <strong>pump</strong> to enter into Night Mode. The<br />
<strong>pump</strong>’s internal timer will then enter Night Mode for 10 hours and return back to <strong>you</strong>r previous mode for 14 hours.<br />
Step 1) Wait until the exact time that <strong>you</strong> wish night mode<br />
to begin.<br />
hold<br />
Step 2) Press and hold Mode and Set to enter Setup. The<br />
LED will blink red/white/blue<br />
Step 3) Press and hold Mode and Set again to set Night<br />
Mode. The LED will now switch to breathing white.<br />
Night mode will operate at a constant speed of 50% of the day mode speed.<br />
Day Mode Night Mode Day Mode Day Mode<br />
Reef Crest<br />
Random g<br />
Constant<br />
Speed Mode<br />
Short Pulse<br />
Mode g<br />
Constant<br />
Speed Mode<br />
80% of<br />
40% of<br />
100% of<br />
50% of<br />
max speed<br />
max speed<br />
max speed<br />
max speed<br />
After programming Night Mode, the <strong>pump</strong> will enter Night Mode at the same time every day until the driver loses power. If the driver loses<br />
power, Night Mode setting must be re-enabled. You can force a <strong>pump</strong> out of Night Mode by holding both Mode and Set. The <strong>pump</strong> will<br />
automatically resume Night Mode at the original set time. Once <strong>you</strong> have forced a <strong>pump</strong> out of Night Mode, it can not be re-entered manually<br />
and <strong>you</strong> must wait until the original set time.<br />
Pump Disconnect Calibration<br />
<strong>Your</strong> <strong>VorTech</strong> can automatically shut down in the event of a <strong>pump</strong> disconnect. To set-up this mode, <strong>you</strong> must calibrate<br />
<strong>you</strong>r motor using the following sequence of operations:<br />
Step 1) Go into Feed Mode<br />
hold<br />
Enter Feed Mode by holding the Mode button for 3 seconds. Feed Mode is indicated<br />
by a blinking white light.<br />
Step 2) Remove <strong>pump</strong> from <strong>you</strong>r tank<br />
Remove the motor and wet side assembly and set aside separately. Motor will still<br />
Remove<br />
be running so set it in a safe place with pin spacer facing upwards. (Do not con-<br />
Pump<br />
nect both halves of the <strong>pump</strong>!)<br />
Step 3) Hold Mode and Set<br />
hold<br />
Holding both buttons while in feed mode will change the light from a blinking<br />
+<br />
white to a cycling white and yellow, this indicates that <strong>you</strong> have entered Calibration<br />
Mode.<br />
Step 4) Let the program run<br />
The white and yellow cycling light will continue for about sixty seconds and then<br />
Wait<br />
60sec<br />
the <strong>pump</strong> will re<strong>start</strong>.<br />
Step 5) Re-attach the <strong>pump</strong> to tank<br />
You have completed the Pump Disconnect Calibration and now have error codes<br />
Re-attach<br />
enabled<br />
+<br />
hold<br />
Example 1 Example 2<br />
+<br />
4
General Operational Modes<br />
Constant Speed Mode<br />
When a <strong>pump</strong> is in Constant Speed Mode, the dial is used to set the operational speed. If this <strong>pump</strong> is a master, the associated slave<br />
<strong>pump</strong>s will replicate the master weather in sync or anti-sync mode.<br />
Lagoon Random Mode<br />
When a <strong>pump</strong> is in Lagoon Random Mode, the dial is used to set the maximum operational speed, and the driver will automatically<br />
randomize the <strong>pump</strong>s output to simulate a low energy lagoon reef environment. If this <strong>pump</strong> is a master, the associated slave <strong>pump</strong>s will<br />
replicate the master in sync or anti-sync modes.<br />
Reef-Crest Random Mode<br />
When a <strong>pump</strong> is in Reef-Crest Random Mode, the dial is used to set the maximum operational speed, and the driver will automatically<br />
randomize the <strong>pump</strong>s output to simulate a high energy reef-crest environment. If this <strong>pump</strong> is a master <strong>pump</strong>, the associated slave<br />
<strong>pump</strong>s will replicate the master in sync or anti-sync modes.<br />
0<br />
15 30 45<br />
60<br />
Time (min)<br />
Lagoonal Random Mode Reef Crest Random Mode<br />
Short Pulse Mode<br />
When a <strong>pump</strong> is first entered into Pulse Mode, <strong>you</strong> must set the maximum <strong>pump</strong> speed by adjusting the dial. When the desired speed<br />
is achieved, press the Set button to lock this speed. The LED will now begin to blink. This blinking LED represents the pulsing frequency.<br />
Now adjust the dial to make the <strong>pump</strong> pulse faster or slower. To save this wave, press and hold Set until the LED flashes green/white<br />
indicating that the wave is saved.<br />
Long Pulse Mode<br />
When the <strong>pump</strong> is entered into swell mode, the maximum speed of the <strong>pump</strong> is set by adjusting the dial. When the desired speed is<br />
achieved, press the Set button to lock this speed. The LED will now begin to blink, the blinking LED represents the swelling frequency.<br />
Now adjust the dial to make the frequency increase or decrease. To save this wave, press and hold the Set button until the LED flashes<br />
green/white indicating that the wave is saved.<br />
Feed Mode<br />
To enter Feed Mode, press and hold the mode button for three seconds. The LED will now blink white indicating that the <strong>pump</strong>s are in<br />
feed mode. Regardless of <strong>you</strong>r system’s master/slave <strong>pump</strong> configuration, all <strong>pump</strong>s will enter feed mode when that mode is selected on<br />
any one <strong>pump</strong>. The <strong>pump</strong>s will spin very slowly for ten minutes and then resume their prior operating conditions.<br />
Battery Backup Mode<br />
When a battery backup accessory is added to the <strong>VorTech</strong> <strong>pump</strong>, the <strong>pump</strong> will automatically switch to Battery Backup mode during a<br />
5<br />
% of<br />
max<br />
speed<br />
% of<br />
max<br />
speed<br />
% of<br />
max<br />
speed<br />
power outage. The <strong>pump</strong>s will run at the minimum speed to maximize their run time during this critical period.<br />
Time<br />
Time
Firmware Upgrade<br />
During the firmware upgrade process, turn off all Wireless Wave Drivers within 20 feet of the two that<br />
<strong>you</strong> will be performing the upgrade process with. Also, move the two drivers that <strong>you</strong> will be using to<br />
upgrade within 3 feet of each other.<br />
On the <strong>VorTech</strong> Gen2 <strong>pump</strong><br />
Step 1: Prior to powering the unit<br />
on, press and hold the Mode button<br />
and continue to hold mode as <strong>you</strong><br />
power on the unit.<br />
Step 2: Continue to hold the Mode<br />
button down while the LED is Red<br />
for approximatley 10 seconds<br />
Step 3: When the LED toggles<br />
between Red and Yellow, the driver<br />
is set as the Upgrade Master driver.<br />
Release the Mode button<br />
Once the upgrade process is<br />
<strong>start</strong>ed through the Slave Driver,<br />
the Master will flash its LED<br />
quickly in the following colors:<br />
Red, Green, Red, Blue.<br />
Powered<br />
Off<br />
Upgrade<br />
Master<br />
Sending<br />
New Firmware<br />
On the <strong>VorTech</strong> Gen1 <strong>pump</strong><br />
Step 1: Prior to powering the unit<br />
on, press and hold the Mode and<br />
Set buttons and continue to hold<br />
them as <strong>you</strong> power the unit on.<br />
Step 2: Continue to hold the Mode<br />
and Set buttons down while the<br />
LED is Red for approximatley 10<br />
seconds.<br />
Step 3: When the LED toggles<br />
between Red and White, the driver<br />
is set as the Upgrade Slave driver.<br />
Release both the Mode and Set<br />
buttons.<br />
Step 4: Press and hold the Set<br />
button for approximatley 10 seonds<br />
to <strong>start</strong> the Firmware Upgrade<br />
process.<br />
Step 5: The process is <strong>start</strong>ed<br />
when the LED flashes White and<br />
Blue very quickly. Release the Set<br />
button.<br />
Powered<br />
Off<br />
Upgrade<br />
Slave<br />
Reciving<br />
New Firmware<br />
The entire upgrade process takes approximately three minutes. The upgrade is still in progress while the Master driver flashes red, green, red, blue<br />
quickly and the slave driver flashes blue and white quickly. The process is complete when both drivers flash a LED code with half second flashes.<br />
Note: If both WWD’s already have the same firmware revision, the upgrade process will not occur, and the Master will show the Upgrade Completed<br />
Successfully LED code.<br />
The final status of <strong>you</strong>r upgrade can be determined from the LED code on the Master Driver:<br />
Upgrade Completed Successfully: Both Drivers now have the same Firmware.<br />
Upgrade Failed: Communication Error.<br />
Upgrade Failed: The Master Driver’s Firmware is older than the Slave Driver’s Firmware.<br />
The current version of Firmware on <strong>you</strong>r Wireless Wave Driver can be determined when <strong>you</strong> power it<br />
up by reading the following color combinations:<br />
Bootloader<br />
indicator<br />
Major revision<br />
number: Count<br />
each green blink<br />
Mode Mode<br />
Minor revision number: Count each blue blink Startup complete<br />
blink<br />
Set<br />
Set<br />
6
Programming Multiple Pumps<br />
7<br />
A <strong>pump</strong> group consists of one master <strong>pump</strong> and at least one slave <strong>pump</strong>. There can only be one master <strong>pump</strong> per group which can<br />
include an unlimited number of slave <strong>pump</strong>s.<br />
In order to set a <strong>pump</strong> as a master or a slave, the aquarist must first enter the MP40w’s configuration mode. Within configuration<br />
mode one can do one of three different things:<br />
•<br />
•<br />
•<br />
reset the <strong>pump</strong>’s memory<br />
set the <strong>pump</strong> as a master<br />
set the <strong>pump</strong> as a slave<br />
Masters and slaves must be set as groups and each group must be programed separately. It is imperative that the following steps are<br />
preformed in order and exactly as described. It is possible to have up to seven groups in one area each with a unique master <strong>pump</strong>.<br />
Step 1: Clear Driver Memory<br />
The internal memory of each unit must be cleared before setting<br />
up a group.<br />
Step 2: Enter Configuration Mode<br />
All <strong>pump</strong>s in a group must then be set into configuration mode before<br />
the assignment of slave or master status. This configuration must<br />
be performed with the drivers in close proximity to ensure proper<br />
assignment. The drivers will blink red, white and blue in this mode.<br />
Step 3: Assign the Master<br />
Set the master <strong>pump</strong> by pressing the mode button. The LED will<br />
then blink blue and green.<br />
Step 4: Assign the Slaves<br />
Set all the slave <strong>pump</strong>s by pressing the set button on each driver. The<br />
LED will then blink blue and yellow.<br />
NOTE: If any slave blinks blue and red, it was too far away from the<br />
master driver and could not communicate properly.<br />
Step 5: Reset the Master<br />
Hold the mode button on the master <strong>pump</strong> after completing ALL<br />
the master/slave assignments.<br />
hold hold hold<br />
Step 6: Begin Normal Operation<br />
Use the controls on the Master Pump to operate all <strong>pump</strong>s in the group. Slave <strong>pump</strong>s can only be set to sync or anti-sync modes.<br />
Step 7: Program Subsequent Groups<br />
Now that the first group is programmed, repeat steps 1-5 on the next group of <strong>pump</strong>s, if so desired.<br />
NOTE: The subsequent <strong>pump</strong> groups must be programmed near the original group. For example, if running two different groups in<br />
separate areas of <strong>you</strong>r house, the second group must be programmed within 5 feet the first group to ensure proper communication.<br />
+<br />
hold<br />
+<br />
tap<br />
tap<br />
hold<br />
Pump<br />
Resets<br />
Pump<br />
Resets
Maintenance<br />
Wear of the drive shaft<br />
The <strong>VorTech</strong> <strong>pump</strong> features a wear component in the form of the drive shaft. This part is designed with a special<br />
engineering grade plastic which extends the part’s lifetime. The plastic drive shaft can be expected to last for years,<br />
depending on the speed, frequency, and alignment of the <strong>pump</strong>.<br />
Cleaning <strong>you</strong>r <strong>VorTech</strong><br />
The <strong>VorTech</strong> may need thorough cleaning of the components periodically to keep it running optimally. This can be<br />
accomplished by disassembling the wet half of the <strong>pump</strong> and gently brushing the components with a soft brush under<br />
running water. Soaking these parts in a mild acid solution such as vinegar may be necessary if there is an extreme<br />
amount of calcium buildup. Do not use strong acids as this may damage the components.<br />
Troubleshooting<br />
Break-in<br />
The <strong>VorTech</strong> <strong>pump</strong> is engineered to adapt to its aqueous environment. During the first week of use, <strong>you</strong>r <strong>pump</strong> may run<br />
noisier or stall. The noise should quiet dramatically over night and any stall conditions can safely be reset by manually<br />
cycling the power to <strong>you</strong>r <strong>pump</strong>.<br />
Operational Range<br />
The wireless signal range is roughly 10 feet when drivers are within a direct line of site. Masters and slaves must all<br />
be set and operating near one another to avoid signals being missed. If a <strong>pump</strong> generates a red/blue error message,<br />
this means that the master and slave <strong>pump</strong>s were not close enough to one another when they were setup. Depending<br />
on other electromagnetic interference or other variables, wireless range can vary between 2 and 10 feet. The wireless<br />
signal will not pass through water.<br />
Error Codes<br />
Over Temperature Condition<br />
In the event of a motor overheating, the <strong>pump</strong> will automatically shut down<br />
for a period to allow for cooling. Once the motor has cooled, the driver will<br />
automatically re<strong>start</strong> and resume normal operation. You may experience an<br />
overheating error from a misalignment.<br />
ErrorCodes:<br />
Over OverTemp Temp Stall Stall<br />
Condition Condition<br />
MiscError<br />
Stall Condition<br />
In the event of a motor stall, the <strong>pump</strong> may have stopped for a few possible reasons. You should first check that there<br />
is not something blocking the <strong>propeller</strong> from spinning. Next, check to make sure the magnets are not rubbing on either<br />
the pin spacer or the frame cover.<br />
Miscellaneous Error<br />
This error could be attributed to a communication error between <strong>pump</strong>s or an unidentified error in the wave driver. Move<br />
the drivers closer together and minimize any physical obstructions in between the drivers.<br />
8
9<br />
Warranty<br />
<strong>EcoTech</strong> <strong>Marine</strong> warrants to the original purchaser only that the <strong>VorTech</strong> <strong>propeller</strong> <strong>pump</strong> will be free from defects in material and workmanship under normal use for<br />
a period of (1) year from the date of original purchase if the product is installed and used properly and consistent with the User Manual. The <strong>VorTech</strong> <strong>propeller</strong> <strong>pump</strong><br />
consists of a wet side operating unit that will be fully submerged in the aquarium and a motor and driver that must not be exposed to water at any time. <strong>EcoTech</strong><br />
<strong>Marine</strong>’s warranty shall not apply: (i) to any damaged <strong>VorTech</strong> <strong>propeller</strong> <strong>pump</strong> that has been subjected to accident, misuse, neglect, alteration, acts of God, improper<br />
handling, improper transport, improper storage, improper use or application, improper installation, improper testing or unauthorized repair, (ii) to any <strong>VorTech</strong> <strong>propeller</strong><br />
<strong>pump</strong> where the motor and/or driver have been exposed to water or (iii) to cosmetic problems or defects that result from normal wear and tear under ordinary<br />
use, and do not affect the performance or use of the product. <strong>EcoTech</strong> <strong>Marine</strong>’s warranty applies only to a product that is manufactured by or for <strong>EcoTech</strong> <strong>Marine</strong><br />
and identified by the <strong>EcoTech</strong> <strong>Marine</strong> trademark, trade name or product identification logo affixed to the product. If <strong>you</strong> notice a problem with <strong>you</strong>r <strong>VorTech</strong> <strong>propeller</strong><br />
<strong>pump</strong>, do not attempt to repair it <strong>you</strong>rself. Any attempts at self repair shall void this limited warranty. <strong>EcoTech</strong> <strong>Marine</strong> shall not be held liable for damage to<br />
any aquarium, aquarium life forms, or other personal objects due to improper use of the device. If the product develops a covered defect within the one-year period,<br />
<strong>EcoTech</strong> <strong>Marine</strong> will, at its option, either repair or replace the <strong>VorTech</strong> <strong>propeller</strong> <strong>pump</strong> without charge, provided that the <strong>VorTech</strong> <strong>propeller</strong> <strong>pump</strong> is returned during<br />
the warranty period.<br />
The <strong>VorTech</strong> <strong>pump</strong> operates at high temperatures and produces forces within the aquarium that can cause extreme loading and fatigue. Due to this, caution must be<br />
used when installing this device on any aquarium. Because the construction of aquariums varies from each manufacturer and the operating conditions of each individual<br />
aquarist is different, there is a possibility that the <strong>VorTech</strong> <strong>propeller</strong> <strong>pump</strong> may cause damage to <strong>you</strong>r aquarium. Please contact <strong>you</strong>r aquarium manufacturer to<br />
determine if <strong>you</strong>r aquarium is properly built and recommended for <strong>VorTech</strong> <strong>pump</strong>s. If <strong>you</strong> notice any damage to <strong>you</strong>r aquarium, including but not limited to crazing,<br />
cracking, bending, scratching, etc, immediately discontinue the use of the <strong>VorTech</strong> <strong>propeller</strong> <strong>pump</strong>. <strong>EcoTech</strong> <strong>Marine</strong> will not be liable for any damage caused to<br />
<strong>you</strong>r aquarium resulting from the use of the <strong>VorTech</strong> <strong>propeller</strong> <strong>pump</strong>.<br />
To obtain warranty service or technical support, please contact <strong>EcoTech</strong> <strong>Marine</strong>’s customer service department at (610) 954-8480. You will receive instructions on<br />
how to return the product for repair or replacement. To take advantage of this Limited Warranty <strong>you</strong> will be required to supply an original point of purchase receipt.<br />
ECOTECH MARINE DISCLAIMS ALL OTHER WARRANTIES WHETHER ORAL OR WRITTEN, EXPRESS OR IMPLIED, TO THE FULLEST EXTENT<br />
ALLOWED BY APPLICABLE LAW. NO IMPLIED WARRANTY OF FITNESS FOR A PARTICULAR PURPOSE OR MERCHANTABILITY SHALL APPLY<br />
EXCEPT AS REQUIRED BY APPLICABLE LAW. ECOTECH MARINE DOES NOT AUTHORIZE ANY PERSON OR BUSINESS ENTITY, INCLUDING ITS<br />
AUTHORIZED DEALERS, TO CREATE FOR IT ANY OBLIGATIONS, LIABILITIES, OR OTHER WARRANTIES IN CONNECTION WITH THIS PROD-<br />
UCT.<br />
ALL WARRANTIES ARE VOID IF THERE IS DAMAGE TO THE VORECH PROPELLER PUMP THAT IS NOT A RESULT OF A DEFECT IN THE MATERI-<br />
ALS OR WORKMANSHIP. THE SOLE AND EXCLUSIVE REMEDY FOR ALL CLAIMS THAT YOU MAY HAVE ARISING OUT OF OR IN CONNECTION<br />
WITH YOUR USE OF THIS PRODUCT, WHETHER MADE OR SUFFERED BY YOU OR ANOTHER PERSON AND WHETHER BASED IN CONTRACT<br />
OR TORT, SHALL BE REPAIR OR REPLACEMENT OF THE PRODUCT. IN NO EVENT WILL ECOTECH MARINE BE LIABLE TO YOU OR ANY OTHER<br />
PARTY FOR ANY DIRECT, INDIRECT, GENERAL, SPECIAL, INCIDENTAL, CONSEQUENTIAL, EXEMPLARY OR OTHER DAMAGES ARISING OUT<br />
OF THE USE OR INABILITY OF TO USE THE PRODUCT (INCLUDING, WITHOUT LIMITATION, DAMAGES FOR LOSS OF BUSINESS PROFITS,<br />
BUSINESS INTERRUPTION, LOSS OF INFORMATION OR ANY OTHER PECUNIARY LOSS, DAMAGE TO YOUR AQUARIUM OR ANY AQUARIUM<br />
INHABITANTS), OR FROM ANY BREACH OF WARRANTY, EVEN IF ECOTECH MARINE HAS BEEN ADVISED OF THE POSSIBILITY OF SUCH<br />
DAMAGES. IN NO CASE SHALL ECOTECH MARINE’S LIABILITY EXCEED THE AMOUNT YOU PAID FOR THE PRODUCT. IF YOU DISAGREE<br />
WITH THESE TERMS AND CONDITIONS DO NOT USE THE VORTECH PROPELLER PUMP.<br />
Some states do not allow the exclusion or limitation of incidental or consequential damages, so the above exclusions may not apply to <strong>you</strong>. <strong>EcoTech</strong> <strong>Marine</strong>’s warranty<br />
is governed by the laws of the Commonwealth of Pennsylvania, excluding its conflict of laws principles and excluding the provisions of the United Nations<br />
Convention on Contracts for the International Sale of Goods. This warranty gives <strong>you</strong> specific legal rights, and <strong>you</strong> may also have other rights, which vary from state<br />
to state.<br />
Customer Support<br />
service@ecotechmarine.com<br />
(610) 954-8480<br />
Sales inquiries please contact:<br />
sales@ecotechmarine.com<br />
(800) 785-0338
FCC and CE Warnings:<br />
Operation is subject to the following two conditions: (1) this device may not cause interference, and (2) this device must<br />
accept any interference including interference that may cause undesired operation of the device.<br />
Changes or modifications not expressly approved by <strong>EcoTech</strong> <strong>Marine</strong> could void the user’s authority to operate the <strong>VorTech</strong><br />
Wireless Wave Driver.<br />
This product carries an ingress protection rating of IPX0 and must not be immersed in water.<br />
Danger: To avoid possible electrical shock, special care should be taken since water is employed in the use of aquarium<br />
equipment. For each of the following situations, do not attempt repairs <strong>you</strong>rself; return the appliance to the manufacturer<br />
for service or discard the appliance.<br />
DO NOT immerse in water. If the appliance falls into the water, DON’T reach for it! First unplug it and then retrieve it. If<br />
electrical components of the appliance get wet, unplug the appliance immediately. (Non-immersible equipment only)<br />
Carefully examine the appliance after installation. It should not be plugged in if there is water on parts not intended to be<br />
wet.<br />
Do not operate any appliance if it has a damaged cord or plug, or if it is malfunctioning or if it is dropped or damaged<br />
in any manner. The power cord of this appliance cannot be replaced: If the cord is damaged, the appliance should be<br />
discarded. Never cut the cord.<br />
To avoid the possibility of the appliance plug or receptacle getting wet, position aquarium stand and tank to one side of a<br />
wall mounted receptacle to prevent water from dripping onto the receptacle or plug. The “drip-loop” should be arranged<br />
by the user for each cord connecting an aquarium appliance to a receptacle. A “drip-loop” is the1 q1 part of the cord<br />
below the level of the receptacle, or the connector if an extension cord is used, to prevent water traveling along the cord<br />
and coming in contact with the receptacle. If the plug or receptacle does get wet, DON’T unplug the cord. Disconnect<br />
the fuse or circuit breaker that supplies power to the appliance, then unplug and examine for presence of water in the<br />
receptacle.<br />
Close supervision is necessary when an appliance is used by or near children.<br />
To avoid injury, do not contact moving parts or hot parts such as heaters, reflectors, lamp bulbs, and the like.<br />
Always unplug an appliance from an outlet and battery backup when not in use, before putting on or taking off parts, and<br />
before cleaning.<br />
Never yank cord to pull plug from outlet. Grasp the plug and pull to disconnect.<br />
Do not use an appliance for other than intended use. The use of attachments not recommended or sold by the appliance<br />
manufacturer may cause an unsafe condition.<br />
Do not install or store the appliance where it will be exposed to weather or to temperatures below freezing.<br />
Make sure an appliance mounted on a tank is securely installed before operating it. Read and observe all the important<br />
notices on the appliance.<br />
If an extension cord is necessary, a cord with a proper rating should be used. A cord rated for less amperes or watts than<br />
the appliance rating may overheat. Care should be taken to arrange the cord so that it will not be tripped over or pulled.<br />
Prior to servicing ensure the appliance is unplugged from the mains as well as the battery backup.<br />
10