Epson RX 700 instruction Manual.pdf
Epson RX 700 instruction Manual.pdf
Epson RX 700 instruction Manual.pdf

You also want an ePaper? Increase the reach of your titles
YUMPU automatically turns print PDFs into web optimized ePapers that Google loves.
Continuous Ink Supply System<br />
<strong>Epson</strong> Stylus Photo <strong>RX</strong><strong>700</strong><br />
With Auto Reset Chips<br />
EPSON Stylus Photo <strong>RX</strong><strong>700</strong> Instructions<br />
Thank you for purchasing Continuous Ink Supply System (CISS).<br />
We appreciate your support and will try our best to make your experience with<br />
our products a happy one! Printing will be different experience after you install<br />
your Continuous Ink Supply system Just imagine being able to print without<br />
worrying about running out of ink and having to buy expensive cartridges.<br />
Please take your time installing your CISS. Do not remove your old cartridges<br />
until you have the CISS system primed and ready to install (to prevent the<br />
drying of heads). In addition, make sure you are getting perfect nozzle checks<br />
before installing the CISS system. The CISS system won’t be able to work<br />
properly if the nozzles are previously clogged.<br />
Most people get a perfect nozzle check the first time after installing the CISS,<br />
others may need to run two or three cleaning cycles or let the printer sit for a<br />
while before they get the perfect results.
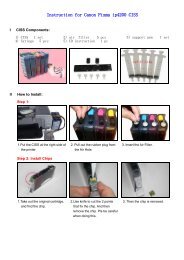
1) General Guide:<br />
Components<br />
a. Continuous ink supply system 1set<br />
b. Instruction manual 1pc<br />
c. Refill kits 6pcs<br />
2) Opening box inspection<br />
a.Check whether all the accessories are in place<br />
3) Installation Procedures:<br />
a.<br />
b、 Check whether there's leakage of CIS System, whether some tubes have been<br />
separated from CISS. If there is, please kindly to contact the local dealer.<br />
c、<br />
Check whether there is air space in the tube. If the length of air space is more than 20cm,<br />
please clean the printer head for 2 or 3 times before printing.<br />
<strong>RX</strong><strong>700</strong> printer Please put the two parts Open the cartridge’s cover<br />
at the printer’s sides.<br />
The black one at the left side.<br />
Pay attention to the colour .
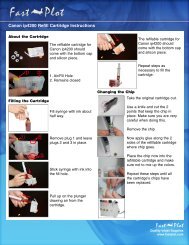
. Take the original cartridge out of the printer<br />
Press the cartridge, then Remove the original cartridge Take off the orange rubber off your<br />
Cartridge will come out cartridge<br />
4) Install CISS<br />
Put cartridge into your printer Press the cartridges make sure<br />
They contact well with printer<br />
Install the other sides cartridges
5 ) Turn on the power<br />
Use paper to make a taper Insert the plug Turn on the power switch<br />
Insert the taper into the hole<br />
This allows the cover to remain<br />
open by over-riding the cut off<br />
switch,<br />
6) Nozzle check<br />
7) Check print<br />
Usual<br />
Broken line<br />
If like this,pls clean the printer head<br />
Nozzle check ok Colour page check ok Pictures check ok
8 ) Reset Procedure:<br />
If when you print, the control board It tells you to change cartridge Please turn off printer for 1min,<br />
appears with this information and then turn on printer again.<br />
This time levels will be full<br />
You can now print.<br />
9 ) Refill Ink:<br />
Please pay attention to the ink level in the reservoirs; if the ink level is below 1cm as in the<br />
above picture shown, please use PRO refill kits to fill ink into Reservoir bottles immediately.<br />
Carefully pull out the rubber plugs from the refill holes.(there is possibility of ink spattering.<br />
Be careful! !) Then put the stopper rubber back. (Please keep the printer and the reservoir<br />
at the same horizontal level during the process of refilling ink.)
IMPORTANT:<br />
1. Please don't take the cartridges out at random after installing your<br />
Continuous Ink unit. Keep the reservoir bottles the same level as the<br />
printer.<br />
2. Try to keep at least 2cm of ink in the reservoir bottles. It is important not<br />
to run out of ink and draw air into the cartridge.<br />
3. Don't place the reservoir bottles higher or lower than the printer.<br />
4. Use in a dry place between 15 and 25 degrees centigrade. Avoid<br />
exposure to direct sunlight.<br />
5. Don't sway the reservoirs - it may cause leakage.<br />
6. Don't pull out the cartridge connector or tear off the adhesive tape at<br />
the bottom of the cartridge.<br />
7. Always refill the reservoirs with Continuous Ink PRO-inks to ensure the<br />
best quality print and the long life of your Continuous Ink unit<br />
WARNING:<br />
Not drinkable, keep out of reach of young children<br />
Avoid exposure to direct sunlight and don't keep in high or freezing<br />
temperatures<br />
Avoid dropping!<br />
Continuousink.com, PO BOX 4193, CARDIFF, CF14 8BA<br />
Free Phone: 0800 043 6620 Email: sales@ continuousink.com