Configuring Audio Input and Output Configuring 2/4/5.1/7.1-Channel ...
Configuring Audio Input and Output Configuring 2/4/5.1/7.1-Channel ...
Configuring Audio Input and Output Configuring 2/4/5.1/7.1-Channel ...

Create successful ePaper yourself
Turn your PDF publications into a flip-book with our unique Google optimized e-Paper software.
<strong>Configuring</strong> <strong>Audio</strong> <strong>Input</strong> <strong>and</strong> <strong>Output</strong><br />
<strong>Configuring</strong> 2/4/<strong>5.1</strong>/<strong>7.1</strong>-<strong>Channel</strong> <strong>Audio</strong><br />
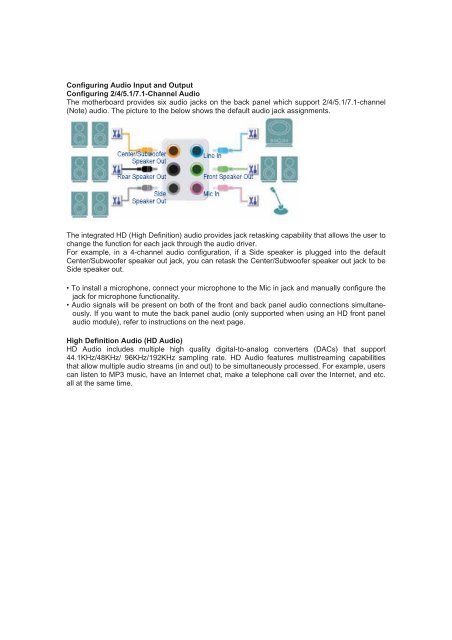
The motherboard provides six audio jacks on the back panel which support 2/4/<strong>5.1</strong>/<strong>7.1</strong>-channel<br />
(Note) audio. The picture to the below shows the default audio jack assignments.<br />
The integrated HD (High Definition) audio provides jack retasking capability that allows the user to<br />
change the function for each jack through the audio driver.<br />
For example, in a 4-channel audio configuration, if a Side speaker is plugged into the default<br />
Center/Subwoofer speaker out jack, you can retask the Center/Subwoofer speaker out jack to be<br />
Side speaker out.<br />
• To install a microphone, connect your microphone to the Mic in jack <strong>and</strong> manually configure the<br />
jack for microphone functionality.<br />
• <strong>Audio</strong> signals will be present on both of the front <strong>and</strong> back panel audio connections simultaneously.<br />
If you want to mute the back panel audio (only supported when using an HD front panel<br />
audio module), refer to instructions on the next page.<br />
High Definition <strong>Audio</strong> (HD <strong>Audio</strong>)<br />
HD <strong>Audio</strong> includes multiple high quality digital-to-analog converters (DACs) that support<br />
44.1KHz/48KHz/ 96KHz/192KHz sampling rate. HD <strong>Audio</strong> features multistreaming capabilities<br />
that allow multiple audio streams (in <strong>and</strong> out) to be simultaneously processed. For example, users<br />
can listen to MP3 music, have an Internet chat, make a telephone call over the Internet, <strong>and</strong> etc.<br />
all at the same time.
A. <strong>Configuring</strong> Speakers(The following instructions use Windows Vista as the example operating<br />
system.)<br />
Step 1:<br />
After installing the audio driver, the HD <strong>Audio</strong> Manager icon will appear in the notification area.<br />
Double-click the icon to access the HD <strong>Audio</strong> Manager.<br />
(Note) 2/4/<strong>5.1</strong>/<strong>7.1</strong>-<strong>Channel</strong> <strong>Audio</strong> Configurations:Refer to the following for multi-channel speaker<br />
configurations. • 2-channel audio: Headphone or Line out.• 4-channel audio: Front speaker out<br />
<strong>and</strong> Sidej/Rearkl speaker out.• <strong>5.1</strong>-channel audio: Front speaker out, Sidej/Rearkl speaker out,<br />
<strong>and</strong> Center/Subwoofer speaker out.• <strong>7.1</strong>-channel audio: Front speaker out, Rear speaker out,<br />
Center/Subwoofer speaker out, <strong>and</strong> Side speaker out.<br />
Step 2:<br />
Connect an audio device to an audio jack. The The current connected device is dialog box<br />
appears. Select the device according to the type of device you connect. Then click OK.<br />
Step 3:<br />
On the Speakers screen, click the Speaker Configuration tab. In the Speaker Configuration list,<br />
select Stereo, Quadraphonic, <strong>5.1</strong> Speaker, or <strong>7.1</strong> Speaker according to the type of speaker<br />
configuration you wish to set up. Then the speaker setup is completed.
B. <strong>Configuring</strong> Sound Effect<br />
You may configure an audio environment on the Sound Effects tab.<br />
C. Activating an AC'97 Front Panel <strong>Audio</strong> Module<br />
If your chassis provides an AC'97 front panel audio module, to activate the AC'97 functionality,<br />
click the tool icon on the Speaker Configuration tab. On the Connector Settings dialog box,<br />
select the Disable front panel jack detection check box. Click OK to complete.
D. Muting the Back Panel <strong>Audio</strong> (For HD <strong>Audio</strong> Only)<br />
Click Device advanced settings on the top right corner on the Speaker Configuration tab to<br />
open the Device advanced settings dialog box. Select the Mute the rear output device, when a<br />
front headphone plugged in check box. Click OK to complete.


![CP900-B [RoHS] - Dfi](https://img.yumpu.com/18888557/1/184x260/cp900-b-rohs-dfi.jpg?quality=85)
![CP900-B [RoHS] - Dfi](https://img.yumpu.com/18888555/1/184x260/cp900-b-rohs-dfi.jpg?quality=85)
![CP900-B [RoHS] - Dfi](https://img.yumpu.com/18888549/1/184x260/cp900-b-rohs-dfi.jpg?quality=85)
![CP900-B [RoHS] - Dfi](https://img.yumpu.com/18888536/1/184x260/cp900-b-rohs-dfi.jpg?quality=85)