
Create successful ePaper yourself
Turn your PDF publications into a flip-book with our unique Google optimized e-Paper software.
-<br />
CH<br />
CL<br />
CG<br />
+<br />
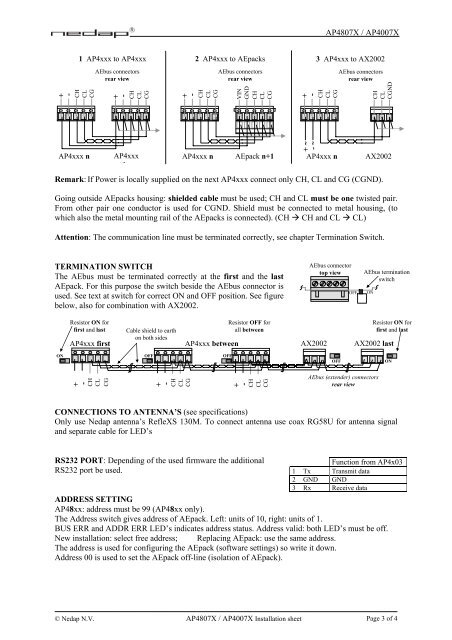
1 AP4xxx to AP4xxx<br />
AEbus connectors<br />
rear view<br />
AP4xxx n AP4xxx<br />
+1<br />
<strong>AP4807</strong>X / <strong>AP4007</strong>X<br />
Remark: If Power is locally supplied on the next AP4xxx connect only CH, CL and CG (CGND).<br />
Going outside AEpacks housing: shielded cable must be used; CH and CL must be one twisted pair.<br />
From other pair one conductor is used for CGND. Shield must be connected to metal housing, (to<br />
which also the metal mounting rail of the AEpacks is connected). (CH CH and CL CL)<br />
Attention: The communication line must be terminated correctly, see chapter Termination Switch.<br />
TERMINATION SWITCH<br />
The AEbus must be terminated correctly at the first and the last<br />
AEpack. For this purpose the switch beside the AEbus connector is<br />
used. See text at switch for correct ON and OFF position. See figure<br />
below, also for combination with AX2002.<br />
Resistor ON for<br />
first and last<br />
AP4xxx first<br />
-<br />
CH<br />
CL<br />
CG<br />
+<br />
-<br />
CH<br />
CL<br />
CG<br />
+<br />
2 AP4xxx to AEpacks<br />
-<br />
CH<br />
CL<br />
CG<br />
+<br />
AEbus connectors<br />
rear view<br />
AP4xxx n AEpack n+1<br />
AP4xxx between<br />
ON OFF<br />
OFF<br />
+<br />
-<br />
CH<br />
CL<br />
CG<br />
Cable shield to earth<br />
on both sides<br />
VIN<br />
GND<br />
CH<br />
CONNECTIONS TO ANTENNA’S (see specifications)<br />
Only use Nedap antenna’s RefleXS 130M. To connect antenna use coax RG58U for antenna signal<br />
and separate cable for LED’s<br />
RS232 PORT: Depending of the used firmware the additional<br />
RS232 port be used.<br />
3 AP4xxx to AX2002<br />
+<br />
-<br />
CH<br />
CL<br />
CG<br />
+ ~<br />
- ~<br />
AEbus connector<br />
top view<br />
AEbus connectors<br />
rear view<br />
AP4xxx n AX2002<br />
Function from AP4x03<br />
1 Tx Transmit data<br />
2 GND GND<br />
3 Rx Receive data<br />
ADDRESS SETTING<br />
AP48xx: address must be 99 (AP48xx only).<br />
The Address switch gives address of AEpack. Left: units of 10, right: units of 1.<br />
BUS ERR and ADDR ERR LED’s indicates address status. Address valid: both LED’s must be off.<br />
New installation: select free address; Replacing AEpack: use the same address.<br />
The address is used for configuring the AEpack (software settings) so write it down.<br />
Address 00 is used to set the AEpack off-line (isolation of AEpack).<br />
© Nedap N.V. <strong>AP4807</strong>X / <strong>AP4007</strong>X Installation sheet Page 3 of 4<br />
CL<br />
CG<br />
Resistor OFF for<br />
all between<br />
+<br />
-<br />
CH<br />
CL<br />
CG<br />
OFF<br />
CH<br />
CL<br />
CGND<br />
AEbus termination<br />
switch<br />
ON<br />
Resistor ON for<br />
first and last<br />
AX2002 AX2002 last<br />
OFF ON<br />
AEbus (extender) connectors<br />
rear view