
You also want an ePaper? Increase the reach of your titles
YUMPU automatically turns print PDFs into web optimized ePapers that Google loves.
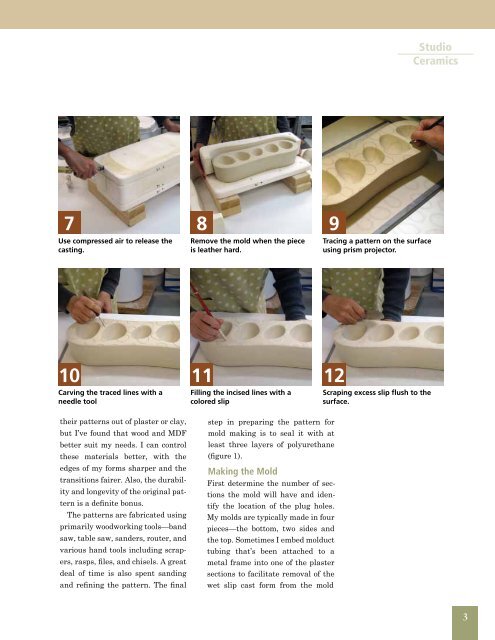
7<br />
Use compressed air to release the<br />
casting.<br />
10<br />
Carving the traced lines with a<br />
needle tool<br />
their patterns out of plaster or clay,<br />
but I’ve found that wood and MDF<br />
better suit my needs. I can control<br />
these materials better, with the<br />
edges of my forms sharper and the<br />
transitions fairer. Also, the durability<br />
and longevity of the original pattern<br />
is a definite bonus.<br />
The patterns are fabricated using<br />
primarily woodworking tools—band<br />
saw, table saw, sanders, router, and<br />
various hand tools including scrapers,<br />
rasps, files, and chisels. A great<br />
deal of time is also spent sanding<br />
and refining the pattern. The final<br />
8<br />
Remove the mold when the piece<br />
is leather hard.<br />
11<br />
Filling the incised lines with a<br />
colored slip<br />
9<br />
step in preparing the pattern for<br />
mold making is to seal it with at<br />
least three layers of polyurethane<br />
(figure 1).<br />
Making the Mold<br />
First determine the number of sections<br />
the mold will have and identify<br />
the location of the plug holes.<br />
My molds are typically made in four<br />
pieces—the bottom, two sides and<br />
the top. Sometimes I embed molduct<br />
tubing that’s been attached to a<br />
metal frame into one of the plaster<br />
sections to facilitate removal of the<br />
wet slip cast form from the mold<br />
Tracing a pattern on the surface<br />
using prism projector.<br />
12<br />
Scraping excess slip flush to the<br />
surface.<br />
<strong>Studio</strong><br />
<strong><strong>Ceramic</strong>s</strong><br />
3