Techniques - Ceramic Arts Daily
Techniques - Ceramic Arts Daily
Techniques - Ceramic Arts Daily

You also want an ePaper? Increase the reach of your titles
YUMPU automatically turns print PDFs into web optimized ePapers that Google loves.
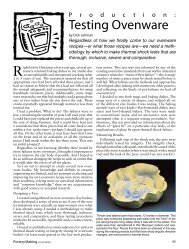
1<br />
Apply terra sigillata to the<br />
lid of the bone dry piece.<br />
5<br />
Outline the floral foreground<br />
with black stain.<br />
2<br />
Dip the exterior. Smooth<br />
out any overlaps with a<br />
finger.<br />
6<br />
Use a stylus for creating<br />
sgraffito decoration.<br />
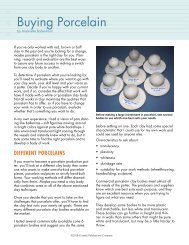
Glaze the bisqued pot with the PB<br />
Matte Majolica Glaze. Mix the glaze<br />
to a consistency slightly thicker than<br />
‘normal’ glaze thickness. Smaller forms<br />
can be dipped using glazing tongs while<br />
for larger forms such as the one in this<br />
demonstration, the glaze needs to be<br />
poured and dipped. Pour the glaze into<br />
the pot’s interior and dip it onto the<br />
exterior (figure 2). Take care to keep the<br />
glaze from overlapping too excessively.<br />
Heavily overlapped majolica glaze shows<br />
the discrepancies of thickness after firing<br />
and could crawl or pinhole if too thick.<br />
With a sponge, wipe the foot of the<br />
pot thoroughly clean. If making a lidded<br />
vessel, remove the glaze on the rim of<br />
the pot and the underside of the lid with<br />
a sponge to avoid the lid sticking to the<br />
pot in the kiln (figure 3). After the glaze<br />
dries, smooth out any air bubbles, drips,<br />
or pinholes by gently rubbing the surface<br />
and dusting off the loosened material.<br />
Use a mask or respirator when rubbing<br />
or blowing the glaze dust.<br />
Clean the lip, lid, and foot<br />
with a sponge.<br />
Coat the foreground with<br />
wax resist.<br />
Draw on the design over<br />
the glaze with a pencil<br />
first.<br />
Designing a ‘blossom’<br />
with a finger.<br />
www.ceramicartsdaily.org | Copyright © 2010, <strong>Ceramic</strong> Publications Company | Three Great <strong>Ceramic</strong> Glazing <strong>Techniques</strong> | 3<br />
3<br />
7<br />
4<br />
8<br />
Inglaze Decoration<br />
Once the piece has ‘cured’ for a day, it is<br />
time to decorate! Begin by using a soft #2<br />
pencil to lightly draw out the decoration<br />
(figure 4). Using the pencil first allows you<br />
to run through ideas before committing<br />
fully with the brush and stains. Decoration<br />
can be as minimal as a few dots of color or<br />
as elaborate as an overall pattern covering<br />
the piece. The choice is up to you. If you<br />
make a mistake, it can be gently ‘erased’<br />
with a finger.<br />
Unlike painting, where the background<br />
is usually painted on first, the majolica<br />
technique begins with painting the foreground<br />
using a stain paste and working<br />
backward toward the background so<br />
that colors are always painted onto a<br />
white ground. For her decoration, Posey<br />
often chooses floral motifs. However, the<br />
motifs that adorn her work are patterns,<br />
rather than actual representations of nature,<br />
that she uses to divide and define the<br />
space of the pottery in interesting ways.