Volume8. Issue4 - Ceramic Arts Daily
Volume8. Issue4 - Ceramic Arts Daily
Volume8. Issue4 - Ceramic Arts Daily

Create successful ePaper yourself
Turn your PDF publications into a flip-book with our unique Google optimized e-Paper software.
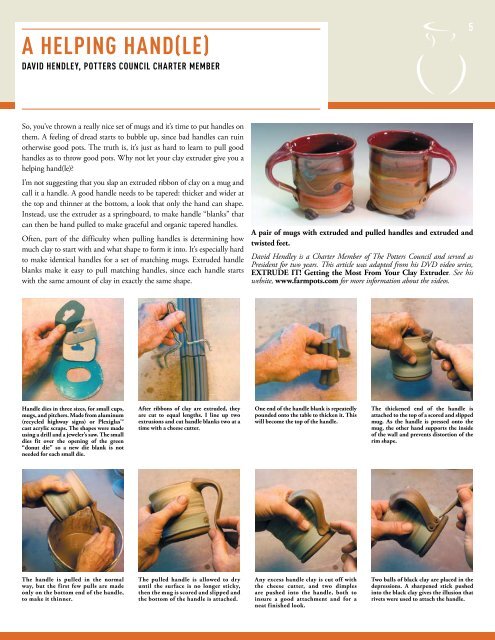
A hElPInG hAnd(lE)<br />
dAVId hEndlEy, POTTERS COunCIl ChARTER MEMBER<br />
So, you’ve thrown a really nice set of mugs and it’s time to put handles on<br />
them. A feeling of dread starts to bubble up, since bad handles can ruin<br />
otherwise good pots. The truth is, it’s just as hard to learn to pull good<br />
handles as to throw good pots. Why not let your clay extruder give you a<br />
helping hand(le)?<br />
I’m not suggesting that you slap an extruded ribbon of clay on a mug and<br />
call it a handle. A good handle needs to be tapered: thicker and wider at<br />
the top and thinner at the bottom, a look that only the hand can shape.<br />
Instead, use the extruder as a springboard, to make handle “blanks” that<br />
can then be hand pulled to make graceful and organic tapered handles.<br />
Often, part of the difficulty when pulling handles is determining how<br />
much clay to start with and what shape to form it into. It’s especially hard<br />
to make identical handles for a set of matching mugs. Extruded handle<br />
blanks make it easy to pull matching handles, since each handle starts<br />
with the same amount of clay in exactly the same shape.<br />
Handle dies in three sizes, for small cups,<br />
mugs, and pitchers. Made from aluminum<br />
(recycled highway signs) or Plexiglas<br />
cast acrylic scraps. The shapes were made<br />
using a drill and a jeweler’s saw. The small<br />
dies fit over the opening of the green<br />
“donut die” so a new die blank is not<br />
needed for each small die.<br />
The handle is pulled in the normal<br />
way, but the first few pulls are made<br />
only on the bottom end of the handle,<br />
to make it thinner.<br />
After ribbons of clay are extruded, they<br />
are cut to equal lengths. I line up two<br />
extrusions and cut handle blanks two at a<br />
time with a cheese cutter.<br />
The pulled handle is allowed to dry<br />
until the surface is no longer sticky,<br />
then the mug is scored and slipped and<br />
the bottom of the handle is attached.<br />
A pair of mugs with extruded and pulled handles and extruded and<br />
twisted feet.<br />
David Hendley is a Charter Member of The Potters Council and served as<br />
President for two years. This article was adapted from his DVD video series,<br />
EXTRUDE IT! Getting the Most From Your Clay Extruder. See his<br />
website, www.farmpots.com for more information about the videos.<br />
One end of the handle blank is repeatedly<br />
pounded onto the table to thicken it. This<br />
will become the top of the handle.<br />
Any excess handle clay is cut off with<br />
the cheese cutter, and two dimples<br />
are pushed into the handle, both to<br />
insure a good attachment and for a<br />
neat finished look.<br />
5<br />
The thickened end of the handle is<br />
attached to the top of a scored and slipped<br />
mug. As the handle is pressed onto the<br />
mug, the other hand supports the inside<br />
of the wall and prevents distortion of the<br />
rim shape.<br />
Two balls of black clay are placed in the<br />
depressions. A sharpened stick pushed<br />
into the black clay gives the illusion that<br />
rivets were used to attach the handle.