Knuckle Hinge Joint - The Guild of New Hampshire Woodworkers
Knuckle Hinge Joint - The Guild of New Hampshire Woodworkers
Knuckle Hinge Joint - The Guild of New Hampshire Woodworkers

Create successful ePaper yourself
Turn your PDF publications into a flip-book with our unique Google optimized e-Paper software.
•NEW HAMPSHIRE<br />
Nov 2008<br />
Volume 20 No. 2<br />
THE G U I L D OF<br />
WOODWOR K E R S •<br />
Founded 1990<br />
www.gnhw.org<br />
Nov 8 Period Furniture<br />
Nov 15 <strong>Guild</strong> Meeting<br />
Nov 16 Luthiers<br />
Nov 22 GSWT<br />
Dec 6 BIG<br />
Dec 13 Hand Tools<br />
Jan 10 Period Furniture<br />
Jan 18 Luthiers<br />
Jan 24 GSWT<br />
Feb 7 BIG<br />
Feb 14 Hand Tools<br />
Feb 21 <strong>Guild</strong> Meeting<br />
Mar 14 Period Furniture<br />
Mar 15 Luthiers<br />
Mar 21 <strong>Guild</strong> Small Meetings<br />
Mar 28 GSWT<br />
Apr 4 BIG<br />
Apr 11 Hand Tools<br />
Apr 18 <strong>Guild</strong> Meeting<br />
May 9 Period Furniture<br />
May 17 Luthiers<br />
May 23 Turning Symposium<br />
May 30 GSWT<br />
Jun 6 BIG<br />
Jun 13 Hand Tools<br />
Jun 20 Summer Trip<br />
Jul 25 GSWT<br />
<strong>The</strong><br />
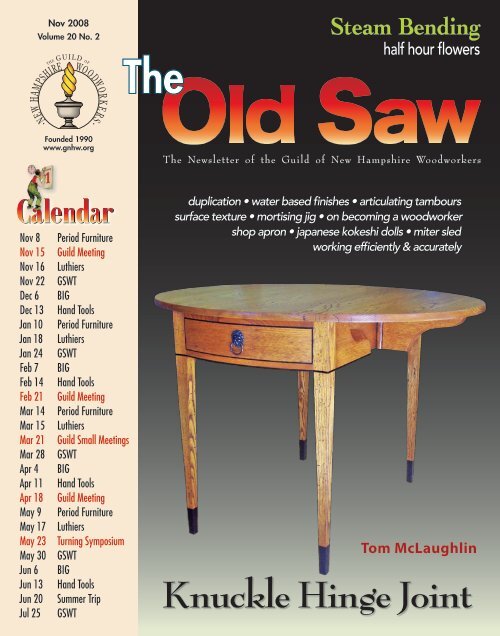
Steam Bending<br />
half hour flowers<br />
<strong>The</strong> <strong>New</strong>sletter <strong>of</strong> the <strong>Guild</strong> <strong>of</strong> <strong>New</strong> <strong>Hampshire</strong> <strong>Woodworkers</strong><br />
duplication • water based finishes • articulating tambours<br />
surface texture • mortising jig • on becoming a woodworker<br />
shop apron • japanese kokeshi dolls • miter sled<br />
working efficiently & accurately<br />
Tom McLaughlin<br />
<strong>Knuckle</strong> <strong>Hinge</strong> <strong>Joint</strong>
president’s message by Dave Frechette<br />
Scholarships and a Safety Lesson<br />
It is a great thrill to be the new President<br />
<strong>of</strong> the <strong>Guild</strong> <strong>of</strong> <strong>New</strong> <strong>Hampshire</strong><br />
<strong>Woodworkers</strong>. I would like to start by<br />
again thanking Dave Anderson for a<br />
great job over the last two years.<br />
Annual Meeting – For those <strong>of</strong> you<br />
who were not at the annual meeting, we<br />
missed you and you missed a fun auction<br />
and an excellent educational session<br />
by Garrett Hack. <strong>The</strong> main business<br />
covered was a vote to raise the dues to<br />
forty dollars annually. As many <strong>of</strong> you<br />
realize, we were getting to the point<br />
where we were actually losing money on<br />
each member. <strong>The</strong> increase should hold<br />
us for a number <strong>of</strong> years.<br />
Scholarships – It is my hope that<br />
over the next two years the <strong>Guild</strong> will<br />
continue to expand it’s educational<br />
activities particularly into the schools<br />
near our membership. I know that my<br />
first experiences where in a junior high<br />
shop class, which was mandatory and<br />
all male back then. I think things have<br />
changed a little over the years. <strong>The</strong><br />
fact that the scholarship requests have<br />
overtaken the income to the scholarship<br />
Steering Committee<br />
President David Frechette 802-633-2561 dfrech@together.net<br />
At Large Mike Noel 603-744-3821 mnlwoods@netzero.net<br />
Secretary Caleb Dietrich 603-556-1629 calebd356@yahoo.com<br />
Treasurer Peter James 603-435-8133 cpjvkj@metrocast.net<br />
At Large Peter Breu 603-647-2327 peterbreu@comcast.net<br />
At Large Jon Siegel 603-768-5882 big@proctornet.com<br />
At Large Bob LaCivita 603-942-1240 rlacivita@comcast.net<br />
At Large John Whiteside 603-679-5443 johninfremont@comcast.net<br />
At Large Ed Orecchio 603-542-0322 ejorecchio@verizon.net<br />
At Large John Faro 603-968-9800 jff960@metrocast.net<br />
At Large Roger Myers 603-773-9634 strathamwood@comcast.net<br />
Old Saw Editor Jim Seroskie 603-673-2123 jseroskie@verizon.net<br />
Past President Dave Anderson 603-887-6267 dsachester@gsinet.net<br />
Programs Alan Saffron 603-424-2023 sasaffron@verizon.net<br />
Scholarship Committee<br />
Chairman Peter Breu 603-647-2327 peterbreu@comcast.net<br />
Member David Frechette 802-633-2561 dfrech@together.net<br />
Member Ed Bartlett 603-364-5242 erbart@metrocast.net<br />
— Please send all applications to Peter Breu, Selection Committee Chair<br />
In addition, Peter Bloch and Bob Jarrett are non-voting members<br />
<strong>The</strong> <strong>Guild</strong> <strong>of</strong> <strong>New</strong> <strong>Hampshire</strong> <strong>Woodworkers</strong> – Bringing together the diverse interests <strong>of</strong> the <strong>New</strong> <strong>Hampshire</strong> woodworking community.<br />
“<strong>The</strong> Old Saw” is published five times per year. To join the <strong>Guild</strong>, go to www.gnhw.org and click on “Membership “ to download an application form.<br />
2 <strong>The</strong> <strong>Guild</strong> <strong>of</strong> <strong>New</strong> <strong>Hampshire</strong> <strong>Woodworkers</strong><br />
fund is a positive change. While there<br />
is still plenty <strong>of</strong> money available, both<br />
members and nonmembers are taking<br />
advantage <strong>of</strong> the funds and we are<br />
beginning to reach out to area schools.<br />
Just as a reminder, scholarships<br />
are not need based, are given for any<br />
woodworking related educational<br />
activity and the applications are available<br />
online from Peter Breu, chairman <strong>of</strong> the<br />
committee. We do ask that recipients<br />
pay the <strong>Guild</strong> back in some form.<br />
This may be writing an article on the<br />
experience for <strong>The</strong> Old Saw, making an<br />
item for the Sunapee Craft Fair Raffle<br />
or volunteering to work at the Fair or<br />
some other event is up to the individual<br />
and the committee.<br />
Shop Safety Lesson – On another<br />
note, I recently had a reminder <strong>of</strong> the<br />
importance <strong>of</strong> shop safety. My lathe is<br />
a large One Way and the extension was<br />
on to turn a spindle from a 31/2 foot 4x4.<br />
This was a sizable piece <strong>of</strong> wood and I<br />
started at a low speed. Everything went<br />
well until the lathe turned itself <strong>of</strong>f. It<br />
turned right back on when I pushed the<br />
button but kept<br />
turning itself <strong>of</strong>f.<br />
I decided it must have a loose wire<br />
or something so I shut the whole thing<br />
<strong>of</strong>f and dismantled the control panel.<br />
Everything seemed intact so I called<br />
One Way and told them my trouble.<br />
Tech support had me check a magnetic<br />
switch inside the lathe but it appeared<br />
to be OK. Tech support then said to<br />
turn on the lathe. I said the front <strong>of</strong> the<br />
control box was <strong>of</strong>f and hanging from<br />
the wires but was told it did not matter.<br />
So I did what I was told. Unfortunately<br />
the speed control dial on the One Way<br />
is on the control box. Part <strong>of</strong> my usual<br />
routine is to check it before turning on<br />
the lathe but in this case it was upside<br />
down and out <strong>of</strong> sight and I did not<br />
follow my usual routine. Even more<br />
unfortunate for me was the fact that it<br />
had shifted when I took <strong>of</strong>f the panel.<br />
When I turned on the lathe, it<br />
was near full speed. I immediately<br />
recognized my dilemma but could not<br />
hit the emergency shut <strong>of</strong>f because it too<br />
continued on Page 3<br />
SubGroups<br />
BIG Bob LaCivita 603-942-1240 rlacivita@metrocast.net<br />
Granite State Woodturners Jon Siegel 603-768-5882 big@proctornet.com<br />
Granite State Woodturners DJ Delorie 603-463-5996 dj@delorie.com<br />
Granite State Woodturners Marcel Durette 603-669-2995 marceldurette@aol.com<br />
Luthier John Whiteside 603-679-5443 johninfremont@comcast.net<br />
Period Furniture Mike Noel 603-744-3821 mnlwoods@netzero.net<br />
Period Furniture John Faro 603-968-9800 jff960@metrocast.net<br />
Hand Tools Dave Anderson 603-887-6267 dsachester@gsinet.net<br />
Volunteer Positions<br />
Books Tony Immorlica 603-673-9629 aaijr@comcast.net<br />
Membership DJ Delorie 603-463-5996 dj@delorie.com<br />
Old Saw Mailing Syd Lorandeau 603-542-5295 slorandeau@verizon. net<br />
Shirts/Hats Peter James 603-435-8133 cpjvkj@metrocast.net<br />
Small Meetings Ed Orecchio 603-542-0322 ejorecchio@verizon.net<br />
Sunapee Co-Coordinator Mike Noel 603-744-3821 mnlwoods@netzero.net<br />
Sunapee Co-Coordinator John Faro 603-968-9800 jff960@metrocast.net<br />
Video Librarian John Pitrone 603-894-5893 jpitrone@verizon.net<br />
Video Recording Peter Bloch 603-526-6152 peterbloch@adelphia.net<br />
Web Master DJ Delorie 603-463-5996 dj@delorie.com
announcements<br />
Nov 15 th , 2008<br />
November Meeting<br />
Homestead hosts November <strong>Guild</strong> meeting in <strong>New</strong>market, NH<br />
An Introduction to Bench Planes – <strong>The</strong> common bench planes should be a part <strong>of</strong> every<br />
woodworking assortment <strong>of</strong> tools even if you do most <strong>of</strong> your work with power tools.<br />
<strong>The</strong>re are just some operations that can be done better, faster and with less effort. For<br />
our November meeting at the Homestead School, Dave Anderson will provide you<br />
with an introduction to these tools, their selection, setup and uses.<br />
For the morning session between 10:00 and 11:00,<br />
members are invited to bring in problem planes which<br />
don’t work properly or those which need setup, and we<br />
will hold a mini-clinic on problem solving for planes.<br />
Please bring chairs and don’t forget your lunch.<br />
Please consider bringing a project to the meeting, either<br />
one you are working on or one you have completed. It<br />
is a great way to see what others are doing and to give<br />
us some inspiration.<br />
<strong>The</strong> main afternoon session will explore how to<br />
get into these planes with your choice <strong>of</strong> new or used,<br />
inexpensive or pricey, and bevel up versus bevel down<br />
styles. Special emphasis will be directed toward picking<br />
a basic kit <strong>of</strong> three to four planes which you will never<br />
outgrow and which will meet most <strong>of</strong> your needs. While<br />
Pr e s i d e n t ’s Me s s a g e – continued<br />
was in the wrong place. <strong>The</strong> 4x4 took <strong>of</strong>f<br />
and hit me in the face scraping me up,<br />
squishing my glasses and cutting my<br />
nose. Some bending, a few stitches and<br />
the passage <strong>of</strong> time have returned me to<br />
my normal self.<br />
<strong>The</strong> take home message is that it is<br />
great to have safe routines for operating<br />
Ta b l e Sa w S …<br />
1.5 hp HP 10 inch General Cabinet Saw - extra<br />
blades etc, 220 volt. Accessories available. Direct<br />
wired. This is David Lambs saw.<br />
Also included is 1.5 hp 10 inch Delta Contractors<br />
Table Saw 30 inch – With Mobility kit installed<br />
– $625 obo.<br />
Richard Brennan: 603-783 9493 or<br />
David Lamb: 603-783-9912<br />
Ch i S e l Mo r T i S e r…<br />
Multico PM 20 Hollow Chisel Mortiser. Good<br />
condition – $750.<br />
Dennis Capodestria: 603-968 3145 or<br />
jhighland@innevi.com<br />
your machinery but when you get out <strong>of</strong><br />
the routine, recognize it and take greater<br />
care. If you are going to do something<br />
and have a gut feeling that it is not a<br />
great idea, do not do it until you figure<br />
out why.<br />
My mistake was listening to someone<br />
on the phone tell me to do something I<br />
was not comfortable doing and going<br />
ra d i a l ar M Sa w & Pl a n e r…<br />
Delta 10-inch Radial Arm Saw, excellent<br />
condition, one owner, light use. Includes 8-foot<br />
extension table. List price $1200. For sale, $350<br />
or BRO.<br />
DeWalt 121/2 inch thickness planer, benchtop<br />
model. Includes extra set <strong>of</strong> new knives.<br />
Excellent condition, one owner, very little use.<br />
List price $450. For sale, $150 or BRO.<br />
Matthew Siranian: 603-526-8029 or<br />
matthewsiranian@tds.net<br />
Mu l T i C o Mo r T i S e r & ST a n l e y<br />
Pl a n e S…<br />
Multico PM16 mortiser with AEG German motor<br />
Directions to<br />
Homestead<br />
Woodworking School<br />
• From Rt 125 north, turn right onto Rt<br />
87 in Epping. After 3 miles turn left<br />
onto Bald Hill Road. <strong>The</strong> school is 1.1<br />
miles on the left.<br />
• From Rt 108 south, turn right onto Rt<br />
152 in <strong>New</strong>market. Go past the high<br />
school and turn left onto Grant Road.<br />
After 3.5 miles turn left onto Bald Hill<br />
Road. <strong>The</strong> school is 0.5 miles on the<br />
right.<br />
a well set up and equipped woodworkers<br />
bench is always desirable, many <strong>of</strong> us<br />
have only a basic bench. Part <strong>of</strong> the<br />
demonstration will give you strategies<br />
and show you ways to work effectively<br />
with only the most basic bench plus a<br />
few inexpensive shop made fixtures<br />
which take up little space can be put<br />
away after every use.<br />
ahead and doing it anyway. If I had<br />
stepped back for a moment I could have<br />
unloaded the lathe and/or checked the<br />
speed control. <strong>The</strong> worst thing was that<br />
it later became clear that there was no<br />
information to be gained from turning<br />
on the lathe and three new switches later,<br />
the problem is still unsolved.<br />
in great shape with<br />
instruction and parts<br />
manual. This is the<br />
machine that all the<br />
others have copied –<br />
$160 firm.<br />
Buy<br />
Neat<br />
Stuff<br />
Plus several clean Stanley user planes.<br />
Bill <strong>New</strong>bold 603-673-1261 before 9 pm<br />
Sh a r P e n i n g Sy S T e M …<br />
Woodcraft Mark ll Sharpening System – $400<br />
plus shipping. I can email photo to anyone who<br />
might be interested.<br />
John McAlevey: 207-273-2535 or<br />
johnmcalevey@gmail.com<br />
<strong>The</strong> <strong>Guild</strong> <strong>of</strong> <strong>New</strong> <strong>Hampshire</strong> <strong>Woodworkers</strong><br />
3
Q<br />
Write to jseroskie@verizon.net with your questions 4<br />
Sizing Par T S – When sizing<br />
the parts for a furniture<br />
project from rough sawn planks, how<br />
do you deal with the movement that<br />
can occur shortly after the plank is<br />
divided? Do you allow the plank to sit<br />
for a period after being planed? Do<br />
you size them slightly over sized and<br />
allow them to find balance before a<br />
final shape is given? Caleb Dietrich<br />
Bob LaCivita replies: To minimize<br />
wood movement when milling rough<br />
lumber into parts for a project, I first cut<br />
the pieces to length leaving them long<br />
by and 1˝ up to 6˝. This way I can cut<br />
away any snipe left by the planer. I then<br />
cut all my parts to width using a band<br />
saw with a fairly wide course blade. I<br />
leave the parts 1/4˝ - 3/8˝ wider than the<br />
finished dimension. If the rough board<br />
has a very bad bow to it, I will remove<br />
the bow by jointing or hand planing.<br />
By sizing to a rough dimension, you<br />
are relieving the tension in the wood<br />
caused by the natural way it has grown<br />
or in the drying process. Most <strong>of</strong> us<br />
have experienced a wide board closing<br />
in around table saw blade. This will<br />
eliminate this for the most part and make<br />
cutting much safer. Once the parts are<br />
cut to rough size, I joint a reference face<br />
and edge and then plan the remaining<br />
face and saw the last edge.<br />
Bill Thomas replies: <strong>The</strong> rule <strong>of</strong><br />
thumb I learned in school for sizing<br />
rough stock was to cut all the parts<br />
1˝ longer than finished dimension, 1/2˝<br />
wider, and round up the thickness to the<br />
next standard quarter, ie. 4/4, 5/4, 6/4,<br />
8/4, etc.<br />
<strong>The</strong> next step is rough milling to an<br />
oversize dimension. It is very important<br />
to allow the wood to equalize to its new<br />
dimensions. Wood can be thought <strong>of</strong> as<br />
a sponge. <strong>The</strong> outside may be dry, but<br />
the inside contains moisture roughly<br />
equidistant from the outside. When the<br />
4 <strong>The</strong> <strong>Guild</strong> <strong>of</strong> <strong>New</strong> <strong>Hampshire</strong> <strong>Woodworkers</strong><br />
wood is cut and milled, some <strong>of</strong> that<br />
moisture is now closer to the surfaces,<br />
especially the ends, which creates an<br />
imbalance <strong>of</strong> stresses. That imbalance<br />
can cause the wood to go out <strong>of</strong> flat,<br />
sometimes dramatically.<br />
It is critical to allow the stock to<br />
settle down to equilibrium before going<br />
further with it. How much extra to leave<br />
is a judgement call. If the pieces are<br />
milled close to their final dimensions,<br />
they will be also close to final equilibrium,<br />
but run the risk <strong>of</strong> moving beyond their<br />
final tolerance.<br />
Conversely, if too much extra is<br />
left, the final milling may need further<br />
equalizing. How long the process takes<br />
depends on the species <strong>of</strong> wood, the<br />
thickness <strong>of</strong> the stock and the moisture<br />
content <strong>of</strong> the wood before cutting.<br />
<strong>The</strong>re is no magic answer, but as much<br />
time as possible should be allowed.<br />
Q<br />
wo o d v S Me T a l SP o k e S h a v e<br />
– What is the benefit <strong>of</strong> the<br />
blade angle in wooden spokeshaves<br />
compared to metal spokeshaves? Joe<br />
Barry<br />
Bill Thomas replies: Without going<br />
too far into cutting geometry, a metal<br />
bodied spokeshave is designed to work<br />
like a miniature bench plane. <strong>The</strong> iron<br />
is held at a 45° angle and the bevel is on<br />
the bottom to give the clearance angle.<br />
<strong>The</strong> typical wood bodied spokeshave,<br />
however, is quite different. <strong>The</strong> iron is<br />
flat on the underside with the bevel up,<br />
like a chisel. When the iron is lowered,<br />
the nose <strong>of</strong> the spokeshave rests on the<br />
work and the cutting edge becomes<br />
angled downwards. This allows it to dig<br />
in and take a cut.<br />
Since the clearance angle changes<br />
depending on how far the iron is lowered,<br />
a wood bodied spokeshave can be set<br />
to take very fine cuts, or if necessary,<br />
lowered more so that heavier cuts can<br />
be made.<br />
Q<br />
wa x in She l l a C – What type<br />
<strong>of</strong> shellac does not have wax<br />
in it? If the shellac has wax, how do<br />
you remove it? What if any problems<br />
does the wax cause? John Watson<br />
Ted Blachley replies: If you have<br />
Bullseye shellac from the hardware store<br />
and want to de-wax it, pour some in a<br />
jar, put the cover on and let it sit on a<br />
window sill for a few days. You will see<br />
the wax settle to the bottom. Without<br />
disturbing the jar, suck the clear liquid<br />
<strong>of</strong>f the top with a turkey baster and<br />
dispense into another jar. You can let<br />
the shellac in the first jar settle again<br />
and repeat the process.<br />
Traditional shellac in flake form is<br />
available in the woodworking catalogs<br />
– follow directions on the package. I’ve<br />
found it to be a harder finish. <strong>The</strong> wax in<br />
Bullseye may cause adhesion problems<br />
if you are using it as a sealer under<br />
varnish.<br />
Q<br />
JoinTing a TableT o P –<br />
Are there any particular<br />
techniques to ensure a flat surface<br />
when jointing boards for a table top?<br />
David Frechette<br />
Ted Blachley replies: When making<br />
a top, use lumber that has been<br />
acclimated to the shop for as long as<br />
possible. Flattening a single board is a<br />
basic woodworking skill but requires<br />
sharp eyes and sharp hand planes. Use<br />
straight edges and winding sticks to<br />
check for twist.<br />
Once a side is flat you can proceed to<br />
the planer to mill the other side parallel.<br />
Re-check for twist as you approach<br />
desired thickness. <strong>Joint</strong> one edge square<br />
to the face and run it against the fence<br />
<strong>of</strong> the table saw to rip the other edge<br />
square. If you can do that, you are<br />
halfway there.<br />
I have a set <strong>of</strong> perfectly straight long<br />
continued on Page 10
About thirty years ago, a small ad in<br />
a trade magazine caught my eye. It<br />
<strong>of</strong>fered ‘Water Based Lacquer’ as a safer<br />
alternative to the common nitrocellulose<br />
lacquers that many <strong>of</strong> us were spraying.<br />
After receiving a sample can that had a<br />
very plain industrial label, I first noticed<br />
that it said, ‘Combustible’. <strong>The</strong> sniff test<br />
confirmed that it had plenty <strong>of</strong> solvent,<br />
maybe alcohol, and I took their word<br />
that it would burn or at least smolder<br />
over a flame. <strong>The</strong> critical test came from<br />
brush and spray application, as I looked<br />
for leveling, hardness, and most <strong>of</strong> all,<br />
appearance. <strong>The</strong> results? Not bad.<br />
I can’t say that I have tried every<br />
water based finish since then, but<br />
new developments repeatedly get my<br />
attention, and my finishing shelf has<br />
been full <strong>of</strong> experiments with various<br />
brands. <strong>The</strong> try outs have mostly led to<br />
frustration because I can never overcome<br />
the blanched color and melted Saran<br />
Wrap look. After all, when you have<br />
carefully chosen woods for a special<br />
project, you want a coating that will<br />
accentuate, not compromise, the beauty<br />
<strong>of</strong> the wood.<br />
In spite <strong>of</strong> its shortcomings, there<br />
is no doubt that water based finish is<br />
here to stay and I have found several<br />
uses for it in my shop. For your own<br />
study, if you do a pros and cons list,<br />
you may be surprised that the positive<br />
qualities <strong>of</strong> water base will at least equal<br />
the negatives. After doing this exercise,<br />
you might look at the use <strong>of</strong> water in<br />
finishing with a new perspective.<br />
Take a typical finish schedule <strong>of</strong><br />
staining, sealing, filling and top coating.<br />
A water based finish can be the most<br />
appropriate choice for some or all <strong>of</strong><br />
these steps. Application <strong>of</strong> water stains,<br />
especially the dyes, provide excellent<br />
depth <strong>of</strong> color and light fastness. Water<br />
based sealer coats easily accept dyes and<br />
pigments to help build color. One note <strong>of</strong><br />
caution is that the first coat <strong>of</strong> water based<br />
sealer is <strong>of</strong>ten the culprit for blanching<br />
the wood, and many pr<strong>of</strong>essionals prefer<br />
a thin coat <strong>of</strong> dewaxed shellac to seal<br />
and retain natural color.<br />
Water based grain fillers can be used<br />
before or after sealer coats with good<br />
adhesion, and they have the advantage<br />
<strong>of</strong> quick and predictable dry time that<br />
solvent based fillers can’t match.<br />
Topcoats in most water based<br />
formulas are designed for ease <strong>of</strong><br />
application and are quite durable. Many<br />
rubbing compounds used to finish <strong>of</strong>f<br />
top coats contain water. <strong>The</strong> traditional<br />
rubbing agent, pumice, works well in a<br />
water slurry. Apart from clear finishing,<br />
it should be noted that solid colors such<br />
as found in acrylic paints can be used<br />
full strength or thinned with water to<br />
make glazes, and genuine milk paint<br />
relies on water for full bodied color or<br />
thin washes.<br />
Here is a list <strong>of</strong> typical uses for water<br />
based finish:<br />
• Exteriors – <strong>The</strong> list is endless from your<br />
outdoor deck to your snowshoes. Be<br />
sure to pick a water based finish that<br />
is specifically labeled for exterior use.<br />
• Cabinet Faces – Use water base when<br />
you want low odor, especially on a job<br />
site.<br />
• Cabinet Interiors – Water based finish<br />
is ideal on interior surfaces when:<br />
1) You want to avoid strong solvent<br />
odors. Caution: water based finishes<br />
need proper ventilation too. <strong>The</strong>y<br />
are not hazard free. 2) A lower sheen<br />
and flatter look is desirable such as<br />
the interior <strong>of</strong> drawers. 3) Speed and<br />
predictable drying time is needed.<br />
• Decorative Pieces – Many projects go<br />
quicker with water versus oil colors.<br />
Consider a reproduction blanket chest<br />
that calls for one or two base colors<br />
and several highlights. You could wait<br />
days for oil paints to dry or just hours<br />
by Gary Wood<br />
Water Based Finishes<br />
“<strong>New</strong> developments repeatedly get my attention”<br />
for water paints.<br />
• Utility Pieces – A production run <strong>of</strong><br />
tool handles or anything similar could<br />
be dipped or sprayed with water base<br />
finish.<br />
Manufacturers have made many<br />
claims about water based finishes,<br />
<strong>of</strong>ten characterizing them as the equal<br />
<strong>of</strong> traditional finishes. I think it is an<br />
unnecessary and unhelpful comparison.<br />
Water based finish is just different and<br />
should be used for its unique qualities<br />
rather than seen as a replacement for<br />
solvent based varnishes and lacquers.<br />
No single finish suits every need.<br />
When you have a variety <strong>of</strong> finishes on<br />
your shelf, and when you take advantage<br />
<strong>of</strong> their versatility as tools to reach a<br />
desired look on specific projects, water<br />
based finish will be one <strong>of</strong> your valued<br />
tools.<br />
If there could be one plea from many<br />
<strong>of</strong> us who are small shop pr<strong>of</strong>essionals<br />
or avid woodworkers, it might be that<br />
manufacturers would keep working to<br />
combine as much appropriate solvent<br />
with water as possible, keeping it under<br />
the threshold <strong>of</strong> required VOC levels.<br />
Some brands already contain some<br />
amount <strong>of</strong> solvent. A second request<br />
would be for the addition <strong>of</strong> more natural<br />
resins and less acrylic and urethane that<br />
are common in water based finishes. It<br />
would create a better appearance that<br />
many <strong>of</strong> us would pay for.<br />
Relying on memory is risky when<br />
it comes to details, but the water based<br />
lacquer that I tried 30 years ago seemed<br />
to have a good portion <strong>of</strong> a natural resin<br />
and it certainly had a solvent to help it<br />
penetrate and flow. Today’s technology<br />
emphasizes user friendly, green and<br />
low odor qualities but the products still<br />
need to provide great, not just good,<br />
appearance. Having said that, I use water<br />
based finish to advantage for specific<br />
purposes and always will in my shop.<br />
<strong>The</strong> <strong>Guild</strong> <strong>of</strong> <strong>New</strong> <strong>Hampshire</strong> <strong>Woodworkers</strong><br />
5
Tambours bring to mind the classic<br />
roll top desk. <strong>The</strong> small slats <strong>of</strong> wood<br />
that are the tambours create a curtain<br />
that can be drawn over the mess <strong>of</strong> a<br />
desk and secure the contents within.<br />
<strong>The</strong>y can also provide a visual consistency<br />
or massing for a piece <strong>of</strong> furniture. Plus,<br />
they appeal to our inherent sense <strong>of</strong> play<br />
(Peek-a-boo!). Admit it. <strong>The</strong>y’re kinda<br />
neat!<br />
<strong>The</strong> most common form <strong>of</strong> tambour<br />
is wooden slats glued to a backing <strong>of</strong> 10<br />
or 12 oz. artist’s canvas. <strong>The</strong>re are also<br />
Lonnie Bird tambours<br />
6 <strong>The</strong> <strong>Guild</strong> <strong>of</strong> <strong>New</strong> <strong>Hampshire</strong> <strong>Woodworkers</strong><br />
reports <strong>of</strong> silk or leather being used. To<br />
help conceal the canvas if it is exposed<br />
between the slats, it is helpful to dye the<br />
canvas black. Hide, white and yellow<br />
glues have been used to secure the<br />
canvas to the underside <strong>of</strong> the tambours.<br />
In one case, the manufacturer made a<br />
sandwich <strong>of</strong> the canvas by placing thin<br />
slats <strong>of</strong> veneer on the inside <strong>of</strong> the canvas.<br />
One <strong>of</strong> the best resources and how to<br />
make a curtain is the <strong>Guild</strong> video <strong>of</strong> Jere<br />
Osgood’s demo. Borrow it and all will be<br />
made clear!<br />
Tambour History – <strong>The</strong> tambour<br />
resolved a design problem inherent in<br />
the cylinder desk <strong>of</strong> Thomas Sheraton.<br />
<strong>The</strong> solid quarter cylinder was<br />
a large awkward shape to<br />
accommodate within a<br />
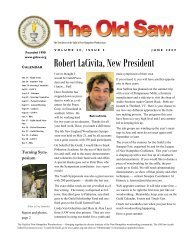
Wire cables provide a more secure approach than canvas backing – Remove material on the<br />
face at each end <strong>of</strong> the slats to create 5/16” x 3/8” long tenons that will be held in the 7/16” groove.<br />
by Joe Barry<br />
piece <strong>of</strong> furniture and took<br />
up a lot <strong>of</strong> interior space.<br />
It limited the size and<br />
depth <strong>of</strong> the pigeonholes<br />
within the desk. By making<br />
the cylinder out <strong>of</strong> slats,<br />
it could be bent around a<br />
gallery <strong>of</strong> pigeonholes to<br />
drop in behind for storage. A<br />
further refinement is to bevel<br />
or shape the outside edges<br />
<strong>of</strong> the slat allowing them<br />
to turn around an exterior<br />
radius. This led to the “S”,<br />
double curve, or “waterfall” curtain<br />
that is associated with the classic roll<br />
top desk. Typically the tambour<br />
is shaped with a bullnose or a 30°<br />
bevel on each outside edge.<br />
Tambours can also be made<br />
in other shapes. <strong>The</strong> Bureau du Roi,<br />
arguably the first roll top desk, was made<br />
for King Louis XV in the 1760s (ordered<br />
in 1760 – delivered in 1769!) had flat<br />
tambours for the marquetry surface<br />
decoration. John and Thomas Seymour<br />
used tambours shaped with a scratch<br />
stock and inlaid with bellflowers for the<br />
galleries <strong>of</strong> their lady’s desks. Hoosier<br />
cabinets had relatively flat tambours.<br />
Danish Modern used a flat square<br />
edged tambour so that the veneered<br />
face <strong>of</strong> the sideboard presented what<br />
appeared to be a solid piece <strong>of</strong> unbroken<br />
teak. Tambours have also been made in<br />
a variety <strong>of</strong> shapes and even been carved<br />
in bas relief. A more ambitious shaping<br />
into a sawn tambour can give the curtain<br />
a swelling belly like a Bombé bureau.<br />
During the reign <strong>of</strong> the roll top desk in<br />
the late 19th century, the major drawback<br />
to a canvas backing became readily<br />
apparent. In an age when every man<br />
carried a pocket knife, it was relatively<br />
easy to insert a knife between the<br />
tambours and slice the canvas bypassing<br />
any locks. <strong>The</strong> 19th century was in many<br />
ways the age <strong>of</strong> the patent gadget. In a<br />
very competitive marketplace, furniture<br />
manufacturers were always ready to<br />
market a newer and better widget. <strong>The</strong><br />
answer to the security problem was to<br />
replace the canvas with a couple <strong>of</strong> wire<br />
cables threading the tambours together.<br />
A different approach was to make the
artwork and images courtesy <strong>of</strong> Eagle America/Amana<br />
tambours interlock so that there was no space for a knife to get<br />
between them.<br />
Making articulating tambours could be a very complicated<br />
process requiring multiple steps to form the tambour.<br />
Fortunately, we now have choices in router bit sets made<br />
especially for this task. If you have ever considered building a<br />
strip canoe, you are familiar with the cove and bead bits used<br />
to make the strips. In early strip canoes, each strip had to be<br />
beveled to match the changing bevel <strong>of</strong> the previous strip. Or<br />
you relied upon the “crap in the gap” technique when applying<br />
the fiberglass coating. <strong>The</strong>n someone had the bright idea to<br />
mill a cove on one edge <strong>of</strong> the strip and a matching radius<br />
along the other edge. This allowed the pieces to mate smoothly<br />
without any gaps as the strips wrapped around the turn <strong>of</strong> the<br />
boat. <strong>The</strong> same idea has been applied to making tambours.<br />
Eagle America Bit Set – Eagle America (www.eagleamerica.com)<br />
makes a set <strong>of</strong> two bits for use in stock either 5/8˝ thick or 3/8˝<br />
thick (180-8015 for 3/8˝ $89.95 & 180-8005 for 5/8˝ stock<br />
$99.95). <strong>The</strong> thinner stock would be used for smaller items<br />
such as an appliance garage and the thicker stock for larger<br />
uses such as a desk.<br />
<strong>The</strong>y also sell a cable kit. <strong>The</strong>re is no need to go overboard<br />
and buy a Nicopress tool to secure the end <strong>of</strong> the cable.<br />
Squeezing on a sleeve with a pair <strong>of</strong> vice grips or driving in<br />
a screw alongside is enough to secure the cable. Rockler<br />
(www.rockler.com) can do all the work if you want to buy the<br />
pre-cut tambours and assemble them yourself.<br />
Amana Bit Set – Amana (www.amanatool.com) has brought<br />
out a bit set in association with Lonnie Bird. This three piece<br />
set (#54314 for $189.95) will make the ball and socket style.<br />
No additional canvas or wire is needed to assemble. <strong>The</strong><br />
tambours interlock.<br />
This style <strong>of</strong> tambour has been like the Loch Ness monster.<br />
It occasionally pops up in the woodworking magazines to<br />
tantalize briefly and disappears only to briefly show up again<br />
later. I first sighted it briefly as a letter in Fine Woodworking #15<br />
(1986) and then later in #79 (1989) it re-appeared in an article<br />
on building a roll top desk. It also briefly surfaced as a how-to<br />
in the British publication <strong>The</strong> Woodworker (Volume 102, issue<br />
8 – 1998). But building this monster required a lot <strong>of</strong> steps and<br />
custom tooling before these bits were made by Amana. Now it<br />
is a relatively straightforward process.<br />
To make the Amana style tambour there is one step that<br />
is not readily apparent on first viewing. You rip your material<br />
wide enough to make two tambours plus 1/8˝ for a saw kerf to<br />
separate them after forming. <strong>The</strong> large bit cuts the face pr<strong>of</strong>ile<br />
and half <strong>of</strong> the ball. After running all four edges across this bit,<br />
you have two tambours almost fully formed and needing only<br />
a rip pass between the two balls to separate them.<br />
Before ripping them apart, a groove is made in the two<br />
outside edges to provide relief for the ball cutter. <strong>The</strong> ball cutter<br />
makes a pass inside the groove to shape the spherical recess.<br />
<strong>The</strong> third bit is a round over bit to relieve the sharp corners<br />
around the groove and provide clearance for articulation. Now<br />
you can rip them apart! <strong>The</strong> ball slides into the spherical socket<br />
and you have the tambour without the canvas or wires. One<br />
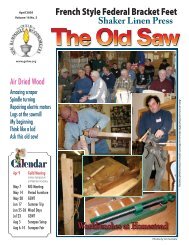
Setting Bit Height<br />
Bit A is positioned correctly when the 45˚ removes the<br />
bottom <strong>of</strong> the slat<br />
Bit BB is positioned correctly when the center point <strong>of</strong><br />
Bit "A" is on the same plane as center point <strong>of</strong> Bit "B".<br />
Center Points<br />
45° Removes Bottom<br />
Note: Routing is done with the finished side up.<br />
Eagle America style tambour – Slats can be mounted over canvas or<br />
joined with cable<br />
criticism <strong>of</strong> this style is that the neck below the ball might be<br />
fragile in ring porous woods such as oak. I’ve experimented<br />
with this bit and believe that not to be an issue with good stock<br />
selection.<br />
In this day <strong>of</strong> the internet we now have some great support<br />
materials. Both manufacturers have additional technical<br />
information linked to their catalog pages for these items. You<br />
can even watch Lonnie Bird make tambours live on YouTube!<br />
One Last Point – <strong>The</strong>se bits are made for use in a router table.<br />
<strong>The</strong>y are not designed for freehand use and you shouldn’t be<br />
trying to shape small stick like tambours<br />
freehand.<br />
Also if you really can’t be bothered,<br />
you can buy pre-made tambours from<br />
Rockler or Van Dyke’s Restorers<br />
(www.vandykes.com). Van Dykes also<br />
stocks tambour cloth for the traditional<br />
approach. Enjoy!<br />
Amana style (Lonnie Bird) tambour router bit set. Designed for<br />
creating tambours without the need for wires, canvas or glue.<br />
<strong>The</strong> <strong>Guild</strong> <strong>of</strong> <strong>New</strong> <strong>Hampshire</strong> <strong>Woodworkers</strong><br />
7
I built myself a house many years ago.<br />
When I finally made the cabinets and<br />
a few pieces <strong>of</strong> furniture, I discovered<br />
that I liked woodworking much better<br />
than carpentry but hesitated to pursue it<br />
seriously because I was not very skilled.<br />
<strong>The</strong> doors on those rustic kitchen<br />
cabinets still won’t close in the summer,<br />
and my first c<strong>of</strong>fee table has fallen apart<br />
and been reglued countless times. <strong>The</strong><br />
only joint I knew was the mortise and<br />
tenon, which I hacked out with chisels<br />
that I took to the hardware store for<br />
sharpening when they were too nicked<br />
to use.<br />
A couple <strong>of</strong> years ago, while<br />
contemplating a jelly cupboard with<br />
an ill-fitting door which I had just<br />
completed, I thought with chagrin, “I<br />
don’t know what the heck I’m doing!”<br />
Suddenly a light bulb went on in<br />
my head – my incompetence as a<br />
furnituremaker was not due to stupidity<br />
or some inherent lack <strong>of</strong> ability. It was<br />
simply due to not knowing how! <strong>The</strong><br />
solution was obvious – education.<br />
I bought Woodworking Basics:<br />
Mastering the Essentials <strong>of</strong> Craftsmanship<br />
8 <strong>The</strong> <strong>Guild</strong> <strong>of</strong> <strong>New</strong> <strong>Hampshire</strong> <strong>Woodworkers</strong><br />
by Peter Korn and read it cover to<br />
cover. I almost laughed out loud upon<br />
discovering the techniques that would<br />
solve my problems – using razor-sharp<br />
tools, starting with perfectly flat and<br />
square stock, and accurately measuring<br />
and marking cuts. It was clear, however,<br />
that learning these skills would take<br />
more than just a good book. With the<br />
blessings <strong>of</strong> my very supportive husband,<br />
I signed up for a two-week Basic<br />
Woodworking class at the Center for<br />
Furniture Craftsmanship in Rockport,<br />
Maine, taught by Peter<br />
Korn.<br />
I arrived in Rockport<br />
on a rainy July day in 2007<br />
and unpacked my bags at<br />
the home <strong>of</strong> a local family<br />
who rents rooms in their<br />
sprawling historic home<br />
near the waterfront. Over<br />
the next two weeks, I<br />
hardly saw my hosts since<br />
virtually all my time was<br />
spent either at the school<br />
or on forays to Lie Nielson<br />
Toolworks or Liberty Tool.<br />
project photos by Lauren E. Sayoc<br />
by Monica Raymond<br />
<strong>The</strong>re were eleven other students from<br />
a wide variety <strong>of</strong> backgrounds in the<br />
class. Two teenage brothers were hoping<br />
to become pr<strong>of</strong>essional woodworkers.<br />
A retired college pr<strong>of</strong>essor was starting<br />
a new hobby. A stained-glass artist<br />
wanted to incorporate wood into his<br />
work. In the next classroom woodcarvers<br />
were expanding their skills. In the other<br />
buildings on campus students in the<br />
nine-month comprehensive course and<br />
fellowships were working on a variety<br />
<strong>of</strong> projects. Each <strong>of</strong> the three workshop
uildings has a machine shop with<br />
state-<strong>of</strong>-the-art equipment, maple<br />
workbenches, and every hand tool a<br />
woodworker needs. <strong>The</strong> only thing I had<br />
to supply was a good set <strong>of</strong> chisels.<br />
Peter Korn is a consummate teacher<br />
and teaches with compassion and<br />
humor. I learned how to flatten and<br />
sharpen my chisels, mill stock flat and<br />
square, hand cut mortise and tenon<br />
joints, hand cut dovetails including<br />
half-blind dovetails, hand plane a board<br />
flat, and glue up a piece. I also attended<br />
lectures about wood movement and<br />
finishing. I had expected to learn all <strong>of</strong><br />
these things and was not disappointed.<br />
What I did not expect was to engage<br />
in discussions about art, creativity, and<br />
even philosophy. Peter talked about the<br />
day he realized that the qualities he<br />
aimed for in his furniture – grace and<br />
simplicity – were actually qualities he<br />
wished to develop in himself. I spoke<br />
about my goal <strong>of</strong> developing patience<br />
and concentration through working<br />
Machines I have in the shop —<br />
• 6˝ Delta jointer<br />
• 15˝ Makita planer (found this<br />
through Brad Purmort)<br />
• 16˝ Walker Turner bandsaw<br />
(found this through <strong>The</strong> Old Saw)<br />
• Delta table saw (contractor saw)<br />
• Delta hollow chisel mortiser<br />
(found this through Brad<br />
Purmort)<br />
• Delta bench top drill press<br />
• Baldor slow speed grinder (found<br />
this through Brad Purmort)<br />
• Several routers<br />
• Dewalt mitre saw<br />
• I hope someday to replace the<br />
table saw, drill press, and jointer<br />
with better quality machines.<br />
— Brad Purmort Woodworking<br />
Company in <strong>New</strong>port, NH<br />
with wood. Laura Mays, our Irish coteacher<br />
and a superior woodworker,<br />
questioned the fairness <strong>of</strong> charging<br />
people money for pursuing one’s own<br />
personal development. <strong>The</strong> conclusion<br />
<strong>of</strong> this very interesting discussion was<br />
the idea that if woodworking is in part<br />
an exercise in personal development,<br />
then it is worthwhile because it makes<br />
the woodworker a better person and<br />
thereby a better citizen <strong>of</strong> the world.<br />
In addition to philosophizing and<br />
attending lectures, every day we worked<br />
on our projects – a variation <strong>of</strong> a simple<br />
bench with dovetails and mortise and<br />
tenon joints. It was a joy to see each<br />
student develop his or her vision and<br />
put it into action. Some people sailed<br />
through their practice dovetails while<br />
others struggled along. Everyone got<br />
close attention from the teachers and<br />
improved their skills immensely, and all<br />
finished with a beautiful bench or stool<br />
to take home.<br />
I am the kind <strong>of</strong> person who is always<br />
rushing and always thinking <strong>of</strong> the next<br />
task or the next adventure. I have trouble<br />
staying in the present moment. But<br />
for those two weeks in woodworking<br />
school, sitting at my workbench with a<br />
razor-sharp chisel in my hand seeing a<br />
cherry footstool take shape, I thought<br />
“there is no place I’d rather be right now.”<br />
Leaving was sad, but arriving home was<br />
very exciting, as the very next week we<br />
broke ground on a new workshop.<br />
When my husband, Todd, and I<br />
bought a house in Alexandria, NH we<br />
decided we needed an outbuilding to<br />
serve as a woodworking shop for me and<br />
someday a boat-building shop for him,<br />
as well as a space for storing bicycles<br />
and skis. After getting an estimate from<br />
a local builder for a 24´ x 36 one and one<br />
half story building that was so expensive<br />
it made our jaws drop, we scaled the<br />
project down to about half that size<br />
and decided to build it ourselves. This<br />
also required us to narrow it down<br />
from an all-purpose building to a<br />
dedicated woodworking shop. Todd was<br />
a bit unhappy about this, but when I<br />
promised he could use the shop to build<br />
a boat and we incorporated an attached<br />
shed for a small boat, he became more<br />
enthusiastic. I feel incredibly lucky to be<br />
able to design and build my own shop<br />
and deeply appreciate my husband’s<br />
support.<br />
<strong>The</strong> problem I faced was that, as a<br />
beginning woodworker, I knew nothing<br />
about how to design and set up a shop.<br />
I read Sandor Nagyszalanczy’s book<br />
Setting Up Shop, which was extremely<br />
helpful. But I still felt unsure about<br />
where to put machines and benches<br />
and where to plan storage for sheet<br />
goods and lumber. I needed to plan<br />
these things in order to determine the<br />
placement <strong>of</strong> doors and windows as well<br />
as wiring. Peter Korn <strong>of</strong> the Center for<br />
Furniture Craftsmanship advised me to<br />
visit some local woodworkers’ shops and<br />
get their advice.<br />
I went online and found the NH<br />
Furniture Masters Association. I was<br />
<strong>The</strong> <strong>Guild</strong> <strong>of</strong> <strong>New</strong> <strong>Hampshire</strong> <strong>Woodworkers</strong><br />
9
pleased to find biographies and addresses<br />
<strong>of</strong> the members. I emailed Terry Moore<br />
and David Lamb, asking if I could visit<br />
them. Both immediately agreed.<br />
When I arrived at Terry Moore’s<br />
shop, his puppy ran out to greet me with<br />
barking and tail-wagging. Inside, Terry<br />
welcomed me just as warmly, albeit<br />
with a bit more reserve. I was impressed<br />
with how much he had in his mediumsized<br />
shop. I furiously took notes as he<br />
showed me around, advised me about<br />
tools, and gave me resources to track<br />
down. Soaking in as much as I could, I<br />
did not feel at all looked down upon as<br />
a beginner. Terry seemed to genuinely<br />
want to help me get started and even<br />
said “you need to get good fast because<br />
we need more women in the Furniture<br />
Masters.” Although I doubt I will ever be<br />
good enough to join this distinguished<br />
group <strong>of</strong> artists, his comment made me<br />
feel welcomed into the community <strong>of</strong><br />
woodworkers. Terry’s most ardent piece<br />
<strong>of</strong> advice was to join the <strong>Guild</strong> <strong>of</strong> NH<br />
<strong>Woodworkers</strong>. He said that it would be<br />
the best $30 I would ever spend. I have<br />
since discovered he was correct. He also<br />
<strong>of</strong>fered to help me get tools from a local<br />
high school that had discontinued its<br />
woodshop program.<br />
While I was at Terry’s shop, Brad<br />
Purmot, another local woodworker,<br />
stopped by, and he invited me to see his<br />
shop which was closer in size to the one<br />
I was building. We went to Brad’s shop,<br />
and there I was impressed by how he fit<br />
all his tools and a small workbench into<br />
a very small space. I began to realize that<br />
the size <strong>of</strong> my shop, though small, was<br />
perfectly acceptable.<br />
A few weeks later I visited David<br />
Lamb in his shop in Canterbury. He and<br />
his wife, Janet, took time out <strong>of</strong> their busy<br />
as k th i s Ol d sa w! – continued<br />
and heavy maple cauls that I use for big<br />
tops. I attach them to my horses and<br />
make sure they are parallel by shimming<br />
the feet <strong>of</strong> the horses – check in the<br />
same way you would use winding sticks.<br />
I wax the edges <strong>of</strong> the cauls to avoid<br />
glue sticking and lay my top boards on<br />
perpendicular to the cauls. Check the<br />
joints. If the edges are square and the set<br />
10 <strong>The</strong> <strong>Guild</strong> <strong>of</strong> <strong>New</strong> <strong>Hampshire</strong> <strong>Woodworkers</strong><br />
day to patiently show me their shop and<br />
answer all <strong>of</strong> my questions. David echoed<br />
Terry’s comments regarding joining the<br />
<strong>Guild</strong>. He gave me excellent advice about<br />
the business aspects <strong>of</strong> making furniture,<br />
such as to record the time it takes me<br />
to make each component <strong>of</strong> a piece in<br />
order to begin estimating prices, and<br />
to have pr<strong>of</strong>essional photographs taken<br />
<strong>of</strong> each completed piece in creating my<br />
portfolio. I also tremendously enjoyed<br />
seeing his shop, in particular the row <strong>of</strong><br />
antique bandsaws powered by a common<br />
driveshaft, which David has lovingly<br />
restored and uses in his work.<br />
Since meeting Terry, Brad, and<br />
David, all three have helped me by<br />
either hooking me up with folks who<br />
were selling used tools or answering<br />
questions that arise from time to time.<br />
And <strong>of</strong> course, I immediately joined the<br />
<strong>Guild</strong>, which has allowed me to meet<br />
many other folks who have been equally<br />
as generous with their time and advice.<br />
Regarding my shop design, I finally<br />
realized that every space and every<br />
woodworker is so different that there is<br />
no cookie-cutter approach. All I could<br />
do was take all the advice and ideas I’d<br />
read and received and do my best to<br />
come up with a plan. Inevitably there will<br />
mistakes and regrets, but that’s part <strong>of</strong><br />
the process <strong>of</strong> becoming a woodworker.<br />
My husband Todd, our good friend<br />
Mike McGraw, my father-in-law Don<br />
Smith, and I spent ten days in August,<br />
2007 framing and ro<strong>of</strong>ing the workshop.<br />
Although the days were long and the<br />
work challenging, the camaraderie<br />
was great and we had a fantastic time.<br />
I spent the year since then installing<br />
the windows, siding, wiring, insulation,<br />
heating, flooring, and inside walls. <strong>The</strong><br />
shop has a 16´ x 20´ main room and 10´<br />
can be drawn up dry with light clamp<br />
pressure, I’m ready to glue.<br />
When placing the clamps, I work<br />
“west to east” alternating one on top and<br />
one on bottom. I try to center the bar<br />
clamp screw in the center <strong>of</strong> the edge<br />
rather than put the bar right on the<br />
boards. Excessive clamp pressure can<br />
cause distortion in the top. If the top is<br />
Shop Features —<br />
• I have two 220 volt circuits - one<br />
for the bandsaw and one for a<br />
dust collector (to be installed in<br />
the future).<br />
• I have quite a few windows - a<br />
few for ventilation and five<br />
horizontal windows are high on<br />
the walls to let light in without<br />
blocking wall space.<br />
• <strong>The</strong> lighting is several rows <strong>of</strong><br />
fluorescents, plus incandescent<br />
task lighting.<br />
• <strong>The</strong>re is a l<strong>of</strong>t for wood storage,<br />
but this is inconvenient for dayto-day<br />
use since I access it via<br />
ladder.<br />
• Doors are two large 4´x8´ doors<br />
(total opening 8´x8´) - like barn<br />
doors.<br />
• <strong>The</strong> floor is plywood on top <strong>of</strong><br />
2x4s over concrete.<br />
• Heating: propane direct vent<br />
heater.<br />
• Jet air filtration unit on the ceiling.<br />
• I built a workbench from a plan<br />
in Fine Woodworking, out <strong>of</strong> 3/4˝<br />
birch plywood (you can see it in<br />
one <strong>of</strong> the photos).<br />
• <strong>The</strong> bandsaw and planer are on<br />
wheels so I can move them out <strong>of</strong><br />
the way.<br />
• Future plans: dust collector,<br />
lumber racks, sheet goods rack.<br />
x 10´ finishing room. It is 90% finished,<br />
but I simply cannot wait any longer to<br />
start making furniture! I am starting to<br />
design the first piece I will build in the<br />
new shop – a cherry blanket chest which<br />
will be a gift for Mike McGraw.<br />
laying flat on the cauls when I’m done<br />
tightening the clamps, then it is flat.<br />
Another thing I do routinely when<br />
building a project that has a substantial<br />
top is after I’m done making the top<br />
(and it is flat) I’ll screw some temporary<br />
heavy cauls to the bottom to maintain<br />
“flat” while I work on other parts <strong>of</strong> the<br />
project.
Steam Bending<br />
Windsor chairs – sound approach makes for a successful project<br />
Most Windsor chairs require bent<br />
wood parts. It is safe to say<br />
that if you want to make these chairs,<br />
you have to master this skill. However,<br />
steam bending is an art, not a science.<br />
No matter how much experience you<br />
have, some bendings are going to break.<br />
Like a military planner, the chairmaker’s<br />
goal is to keep the casualties as low as<br />
possible. That means you need to have<br />
every contingency leaning in your favor,<br />
and you cannot take short cuts. If you<br />
do, you may accomplish some successful<br />
bends, but your failure rate will be<br />
unacceptably high.<br />
Choose Your Log Carefully<br />
Begin with wood selection and use<br />
the woods most suitable for bending.<br />
About ten years ago, it was popular for<br />
woodworkers to make everything out<br />
<strong>of</strong> walnut. Right now, the “in” wood is<br />
cherry. I regularly get calls (as I did then)<br />
from people who are suffering very high<br />
failure rates. When I ask what they are<br />
bending, I am told they are trying to<br />
make an all-cherry chair (just as it used<br />
to be an all-walnut chair). This is folly,<br />
as these woods do not bend well.<br />
Windsor chairmakers traditionally<br />
used locally available oak, ash, or hickory<br />
for bendings. <strong>The</strong>se are all ring porous<br />
woods with long tough fibers. Today, as<br />
in the past, these remain the best woods<br />
for this job.<br />
You need to obtain your wood<br />
directly from the log. Wood that has<br />
been sawn into boards or planks usually<br />
does not have straight enough grain to<br />
result in a high success rate. Do not buy<br />
wood at Home Depot and try to bend it.<br />
Do not try to bend wood that has been<br />
kiln dried, as wood that has been heated<br />
does not bend well. I have had bad luck<br />
bending wood that has been heated<br />
when it was left leaning against a wall<br />
too near a stove.<br />
You have to be finicky and down<br />
right fussy when selecting your logs.<br />
When trying to describe to people<br />
what to look for I say, “Think telephone<br />
poles.” That is just what you want, trees<br />
that look like telephone poles, perfectly<br />
straight. <strong>The</strong> wood inside such a tree<br />
will generally look like the tree did on<br />
the outside. For that reason, the trunk<br />
must be straight, with no curve or twist.<br />
If there is, the wood will be bowed or<br />
twisted.<br />
by Mike Dunbar<br />
<strong>The</strong>re must be no obvious blemishes<br />
on the log’s surface. A blemish in the log<br />
will cause the layers <strong>of</strong> annual growth<br />
to deflect around it, and the stock you<br />
obtain will not be straight. Reject out <strong>of</strong><br />
hand logs with freshly trimmed limbs.<br />
It does not matter whether these limbs<br />
were live or dead.<br />
Refuse any logs with bumps or burls.<br />
Next to the shape <strong>of</strong> the log, the bark<br />
is the best indicator to what is inside.<br />
Oaks, ashes, and hickories have coarse<br />
bark with striations in it. <strong>The</strong>se should<br />
all be straight and parallel.<br />
A knot or defect inside the log is<br />
said to be “encased.” Encased defects<br />
will usually disturb the pattern <strong>of</strong> the<br />
striations in the bark and <strong>of</strong>ten create<br />
“cats faces.” <strong>The</strong>se telltale swirls are a<br />
<strong>The</strong> <strong>Guild</strong> <strong>of</strong> <strong>New</strong> <strong>Hampshire</strong> <strong>Woodworkers</strong><br />
11
sure give away that the log contains a<br />
defect, and should be rejected.<br />
Be on the look out for folds in<br />
the bark. <strong>The</strong>se appear as long (<strong>of</strong>ten<br />
dark) lines, like a scar on human skin.<br />
<strong>The</strong>se folds cover an injury the tree has<br />
sustained. Look out also for dark stains<br />
in the bark. This can indicate an injury<br />
that is still open to water, which can<br />
cause rot in the log.<br />
No matter how choosey you are,<br />
there is no guarantee that even the best<br />
looking logs will not have flaws. You<br />
cannot be sure what the wood looks like<br />
until you split it open.<br />
If you are buying the log at a mill,<br />
you obviously incur all the risk. <strong>The</strong><br />
saw mill owner is not going to let you<br />
return a log that you split open. Avoid<br />
logs that are too big or too small. We<br />
do not like them to be less than 14<br />
inches in diameter, nor greater than<br />
about 24 inches. Small logs have a<br />
greater percentage <strong>of</strong> juvenile wood<br />
– the wood that was once the sapling.<br />
This wood usually has too many small<br />
encased knots to be good for bending.<br />
Logs that are too big cannot be easily<br />
handled. Splitting them requires more<br />
wedges and back breaking work. In a<br />
big log, the splits made by the wedges<br />
frequently miss each other rather than<br />
running together, and a lot <strong>of</strong> wood will<br />
be wasted.<br />
Here at <strong>The</strong> Institute, we use forest<br />
grown trees. We are a big enough<br />
business to be able to buy our logs<br />
wholesale from a concentration yard<br />
that sells veneer logs to buyers from<br />
China and Germany. <strong>The</strong> logs are<br />
delivered here by a big logging truck<br />
and a cherry picker. If you want just one<br />
log, try a local sawmill or a logger. <strong>The</strong>y<br />
also have forest grown trees.<br />
I have successfully used oaks that<br />
grew on someone’s lawn. However,<br />
landscapers and tree services usually<br />
have urban grown trees and I would<br />
recommend avoiding these. We tried<br />
to use an urban tree in a class I taught<br />
in Atlanta many years ago. <strong>The</strong> log was<br />
beautiful, but we had almost 100%<br />
failures. I do not know whether the<br />
problem was environmental, but I never<br />
wanted to take that chance again.<br />
12 <strong>The</strong> <strong>Guild</strong> <strong>of</strong> <strong>New</strong> <strong>Hampshire</strong> <strong>Woodworkers</strong><br />
Freshness<br />
Finally, determine when the tree was<br />
felled. If it has been down too long, it<br />
may have begun to decay. Decayed or<br />
decaying wood will not bend. If you are<br />
buying from a saw mill, the operator<br />
may not know this information, but if<br />
your are buying from the logger who cut<br />
it, he should.<br />
Otherwise, your best bet is to<br />
examine the sapwood. This is the band<br />
<strong>of</strong> annual rings about an inch thick<br />
and closest to the bark. On oaks, the<br />
sapwood is usually a lighter color. <strong>The</strong><br />
sapwood contains nutrients that attract<br />
fungi. <strong>The</strong>se will usually appear as bluish<br />
or blackish spots about the size <strong>of</strong> a<br />
pencil point.<br />
In red oak, you can cut away the<br />
speckled sapwood and still use the<br />
reddish heart wood. I suspect the tannic<br />
acid in red oak protects it. However,<br />
after enough time even heart wood will<br />
be affected by decay.<br />
Trees that are cut in the summer<br />
or late spring are more likely to decay<br />
quickly. At that time <strong>of</strong> the year the<br />
tree is in its growth cycle and the sap is<br />
up. <strong>The</strong> weather is also much warmer. A<br />
tree dropped in July when temperatures<br />
are in the 90s can begin to decay in a<br />
week. A tree dropped in October when<br />
the tree is dormant and the weather cool,<br />
will remain fresh much longer. In fact,<br />
we like to put in a large supply <strong>of</strong> logs in<br />
the late fall, as they remain frozen from<br />
December through March. In the warm<br />
weather we buy small numbers <strong>of</strong> logs,<br />
and more frequently.<br />
<strong>The</strong> problem is that other than in<br />
the sapwood, you cannot always see the<br />
early stages <strong>of</strong> decay, a break down <strong>of</strong> the<br />
wood that makes it brittle and incapable<br />
<strong>of</strong> bending. Although over the phone or<br />
via email, I cannot diagnose why wood<br />
will not bend, I suspect that decay is most<br />
<strong>of</strong>ten the culprit. Your best protection is<br />
to know a tree’s history – when it was<br />
dropped and where it has been in the<br />
meanwhile.<br />
Storing Wood<br />
No matter how fresh your log, it will<br />
not remain that way. This means you<br />
need to get to work on it right away.<br />
<strong>The</strong>re is no difference between wood<br />
taken from a log that has been at the<br />
mill for six months and one that has<br />
been lying in your back yard for the<br />
same amount <strong>of</strong> time.<br />
This is the analogy I use when<br />
describing wood selection during a class.<br />
Think <strong>of</strong> yourself as a farmer putting<br />
down a cow for meat. You will not take<br />
the cow out into the field, drop it, walk<br />
away, and return three months later to<br />
cut <strong>of</strong>f a steak. <strong>The</strong> meat needs to be<br />
processed right away. Once it is cut up<br />
you have two choices – freeze it or dry<br />
it into jerky.<br />
Treat a tree the same. Split it up right<br />
away. <strong>The</strong>n, you have two options, freeze<br />
it or dry it. Here at <strong>The</strong> Institute, we<br />
have a large 6 foot chest freezer which<br />
we fill with riven wood for our classes<br />
and for sale.<br />
Unfortunately, back in the 1970s<br />
working wood that has been split<br />
from the log was been dubbed “green<br />
woodworking”. As a result many people<br />
think the wood needs to be kept wet.<br />
This is wrong, and results in a lot <strong>of</strong><br />
ruined wood. Some people try keeping<br />
the billets submerged in water. This is<br />
unnecessary. Others wrap it in plastic.
Still others wax the ends. <strong>The</strong>se steps<br />
only promote decay.<br />
If you cannot freeze your wood, allow<br />
the billets to air dry. Although successful<br />
steam bending requires the wood to<br />
be wet, the steam box will take care <strong>of</strong><br />
that. Treat the billets like you would any<br />
other wood you buy. Keep it dry and <strong>of</strong>f<br />
the ground.<br />
I remember one fellow who called<br />
because his bends were breaking. It<br />
turned out he had stored his billets on<br />
the ground under his back porch. Of<br />
course, the wood began to rot just as<br />
would a board stored on the ground. <strong>The</strong><br />
best place to store billets is in a garage<br />
or other unheated building. Unless you<br />
live in a desert, it will not air dry much<br />
below 10% - 14%. Wood stored this way<br />
will be good for years. I have successfully<br />
bent air dried wood I split into billets a<br />
decade earlier.<br />
Making Billets<br />
Here at <strong>The</strong> Institute, we split our<br />
logs with a log splitter. Every couple <strong>of</strong><br />
months we have what we call a “spilling<br />
party.” Fred, Don, and I, along with a<br />
farmer who lives down the road, split<br />
enough wood for our upcoming classes<br />
and for sales. <strong>The</strong> farmer Kevin, drives<br />
his tractor down here with a four-foot<br />
splitter mounted on the rear. Splitting<br />
the logs this way saves us a great deal <strong>of</strong><br />
back breaking labor.<br />
If you are a chairmaker working on<br />
a smaller scale, you will most likely split<br />
your logs by hand. Using a maul and<br />
splitting wedges, split the log into halves.<br />
This is called riving. Use a hatchet to<br />
snip any wood that is tearing from the<br />
two halves and holding them together.<br />
Otherwise, these tears may lengthen and<br />
waste good wood. Next, split the halves<br />
into quarters and then, the quarters into<br />
eighths. <strong>The</strong>se eighths – called billets –<br />
have a cross section that looks like a slice<br />
<strong>of</strong> pie.<br />
With a maul and wedge split away<br />
the pointed piece <strong>of</strong> the pie. This is the<br />
tree’s juvenile wood, and it is seldom<br />
useful. Next, use a drawknife to peel<br />
the bark <strong>of</strong>f each billet. Remember,<br />
the tree’s living growth layer is right<br />
under the bark. It is wet and rich with<br />
nutrients. If left this way, boring insects<br />
will quickly make your riven billets their<br />
home. After our splitting parties we take<br />
these billets and carefully following the<br />
grain, cut them on our Hitachi band<br />
resaw into arm and bow blanks. We<br />
use this big saw because we are cutting<br />
enough stock for as many as six classes<br />
at a time. You are not likely to place<br />
these demands on your equipment and<br />
so, can use your shop band saw. To make<br />
the stock more manageable, you might<br />
want to split your billets one more time,<br />
into sixteenths.<br />
Preparing the Stock<br />
Once the oak has been sawn into<br />
bending stock it is ready to be worked.<br />
In our experience, stock that has been<br />
set aside for even a couple <strong>of</strong> days and<br />
has lost a bit <strong>of</strong> water will bend better<br />
than wood that is dead fresh. <strong>The</strong> use<br />
<strong>of</strong> the term “green woodworking” leads<br />
many people to think that wetter is<br />
better. However, as long as wood is not<br />
heated by kiln drying, being placed near<br />
a stove, or stored in a hot attic, moisture<br />
content is largely irrelevant. <strong>The</strong> steam<br />
box will provide the necessary moisture.<br />
<strong>The</strong> type <strong>of</strong> chair you are making<br />
determines the stock’s shape and<br />
dimensions. When sawing, the goal is<br />
to keep the blade in one layer <strong>of</strong> growth<br />
as much as possible, as doing this<br />
perfectly results in stock with no grain<br />
direction. Following one layer <strong>of</strong> growth<br />
may result in stock that is not perfectly<br />
straight and that has a slight bow. This<br />
is not a problem, as the part is going to<br />
be bent anyway.<br />
Like most other human endeavors<br />
sawing bending stock is not always<br />
possible to do perfectly. As a result,<br />
when shaping the wood into chair backs<br />
there will sometimes be places in the<br />
stock where you will be cutting with the<br />
grain and other times, against it.<br />
When a tool begins to dive or choke,<br />
it is necessary to cut in the opposite<br />
direction. <strong>The</strong> greatest risk occurs when<br />
using the draw knife. This tool’s open<br />
blade can dive as it follows the stock’s<br />
grain and ruin the part. A light test cut<br />
is always best.<br />
Do not be concerned by the light<br />
colored sapwood. In our experience it<br />
bends well. However, it does best when<br />
in compression. <strong>The</strong>refore, when it is<br />
present, we plan our work so that it will<br />
be on the inside <strong>of</strong> the bend. In other<br />
words, so it will be placed against the<br />
bending form.<br />
Pin knots are a real hazard, as they<br />
create weak spots. It is best to plan your<br />
work so they are removed while shaping<br />
the part. If this is not possible, we again<br />
prefer to place them on the inside <strong>of</strong> the<br />
bend so they are in compression.<br />
When either sapwood, pin knots, or<br />
some other risk is present, our habit is<br />
to mark the area with large, dark Xs<br />
made with a Sharpie permanent marker.<br />
When the part comes out <strong>of</strong> the steam<br />
box, this reminds us that when making<br />
the Xs we had determined a preferred<br />
placement on the form.<br />
Mark Your Parts<br />
Since Windsor chair parts are bent<br />
from the middle, it is necessary to locate<br />
and mark the center. You have about<br />
45 seconds to bend a part. While, this<br />
is more than enough time, you do not<br />
want to be delayed by problems that<br />
could have been avoided.<br />
We also mark the centers <strong>of</strong> our<br />
bendings with a Sharpie, as it leaves a<br />
dark, easy to find mark. Do not skimp on<br />
this important step by making a faint or<br />
incomplete mark. Make the center mark<br />
all the way around a round part and on<br />
all four sides <strong>of</strong> one that is rectangular.<br />
When you take the hot, wet part out <strong>of</strong><br />
the steam box, you do not want to waste<br />
precious time looking for your mark.<br />
Do not use a mechanical pencil or a<br />
ball point. Steaming gives the wood a<br />
slight gray cast, and the faint mark made<br />
by a mechanical pencil can be hard to<br />
find. Steaming will bleed ink out <strong>of</strong> the<br />
wood and the mark will disappear.<br />
Remember steaming wood is an art,<br />
not a science. Some parts will break,<br />
even when you are doing everything<br />
right. <strong>The</strong> goal is to keep these failures at<br />
an acceptable level. This means you want<br />
to have as much in your favor as possible.<br />
<strong>The</strong> process we use at <strong>The</strong> Institute does<br />
just that. An average <strong>of</strong> 2 parts out <strong>of</strong> 34<br />
will break in a sack back class. In some<br />
classes, there are no breaks at all. In<br />
others, there are more than two.<br />
<strong>The</strong> <strong>Guild</strong> <strong>of</strong> <strong>New</strong> <strong>Hampshire</strong> <strong>Woodworkers</strong><br />
13
When Should I Bend<br />
In our experience, bending goes<br />
better some days than on others. Over<br />
the years I had observed this and began<br />
to look for the cause. <strong>The</strong> following may<br />
seem like folk lore, but it is quite true<br />
and accurate. <strong>The</strong> best bending days are<br />
those that are bone dry and crystal clear.<br />
<strong>The</strong>se are the days that make you feel<br />
like you have boundless energy. Wood<br />
taken from the steam box on these days<br />
feels dry and not very hot.<br />
<strong>The</strong> least favorable bending days are<br />
wet, gloomy, and dreary. <strong>The</strong>se are the<br />
days when there is not enough c<strong>of</strong>fee in<br />
the world to wake you up. Wood out <strong>of</strong><br />
the steam box feels wet, and is so hot we<br />
end up juggling it from hand to hand as<br />
we carry it to the bending form.<br />
This observation runs counter to what<br />
one would assume. Since wood needs to<br />
be hot and wet to bend, it seems a wet<br />
day would be our favor. However, it is<br />
not.<br />
We found an indicator that would<br />
tell us when bending conditions were<br />
good. We found it in a very unlikely<br />
place – a piece <strong>of</strong> wood called a weather<br />
stick. <strong>The</strong>se are specially cut twigs from<br />
Maine that are sold by some <strong>of</strong> the<br />
country living type catalogs for about<br />
$8. Please, Google “weather stick” rather<br />
than calling me for a phone number.<br />
When the weather is dry and<br />
providing a good bending day, the stick<br />
points upward. When the weather turns<br />
dreary and overcast, the stick turns<br />
down. Obviously, the wood in the twig<br />
is responding to the relative humidity <strong>of</strong><br />
the surrounding air, and the particular<br />
way it was cut makes it go up and down.<br />
<strong>The</strong> weather stick further underscores<br />
how much successful steam bending is<br />
art and skill. I would never recommend<br />
becoming a slave to the weather stick.<br />
However, if you are not in a hurry and<br />
have the flexibility to wait for a better<br />
day, I would. At home, you have an<br />
advantage in that you can wait for a<br />
good bending day. We have to bend on<br />
the first day <strong>of</strong> each class so our parts are<br />
dry and ready to use later in the week.<br />
Regardless <strong>of</strong> the weather, we fire up the<br />
boxes and go to work.<br />
14 <strong>The</strong> <strong>Guild</strong> <strong>of</strong> <strong>New</strong> <strong>Hampshire</strong> <strong>Woodworkers</strong><br />
<strong>The</strong> Steam Box<br />
To successfully bend wood it has to<br />
be both hot and wet. <strong>The</strong> temperature<br />
should be at least 185 degrees F with<br />
25% moisture content. With both<br />
these properties, the wood is said to<br />
be plasticized, which means capable <strong>of</strong><br />
being bent.<br />
<strong>The</strong> steam box we use is the one we<br />
developed and perfected here at <strong>The</strong><br />
Institute. We call it <strong>The</strong> Ultimate Steam<br />
Box, because it is so efficient and because<br />
it solves the problems associated with<br />
other ways <strong>of</strong> making these devices.<br />
To make the box we use Schedule 80<br />
PVC pipe – Schedule 40 will not take<br />
the heat and will crinkle up like a pretzel.<br />
Wood steam boxes require a lot <strong>of</strong><br />
steaming time just to become saturated<br />
and tight. Unless insulated, metal boxes<br />
radiate <strong>of</strong>f a lot <strong>of</strong> the heat that should<br />
be plasticizing the wood. If you touch an<br />
exposed part <strong>of</strong> a metal tube you can get<br />
a good burn. PVC is both impervious<br />
and a good insulator. I demonstrate this<br />
to a class by holding my hand on the<br />
PVC tube. Only 1/4˝ away from my skin<br />
is live steam.<br />
We boil water on a 160,000 BTU<br />
burner originally designed for cooking<br />
lobsters and crawdads. This burner<br />
creates a rolling boil and lots <strong>of</strong> steam.<br />
Electric hot plates and the camp stoves<br />
that I used early in my career, make the<br />
water simmer and do not provide the<br />
volume <strong>of</strong> steam created by these new<br />
burners.<br />
We boil our water in five gallon steel<br />
utility cans. Needless to say, we buy<br />
these brand new and never put gasoline<br />
in them. Five gallon capacity is more<br />
water than most chairmakers will need.<br />
However, in a sack back class we bend<br />
34 arms and bows in about 21/2 hours,<br />
and having to continually fill the boilers<br />
is a nuisance. For most chairmakers a<br />
two gallon can is sufficient.<br />
<strong>The</strong> steam box and boiler are<br />
connected by tight fittings. This ensures<br />
that all the steam that is generated in<br />
the boiler is conveyed to the steam<br />
box. Because the PVC is impervious<br />
and a good insulator, the steam goes<br />
right to work doing its intended job <strong>of</strong><br />
plasticizing the chair parts.<br />
You have 45 sec.
If the steam box did not have some<br />
relief, the test caps on either end would<br />
be blown <strong>of</strong>f as pressure developed in<br />
the tube. We make a 1/2˝ relief hole in<br />
the bottom <strong>of</strong> each end <strong>of</strong> the tube. <strong>The</strong><br />
steam enters the tube in the middle<br />
and travels in both directions, escaping<br />
out the vent holes. This ensures an even<br />
distribution in the box. When our boxes<br />
are running at full steam, a plume <strong>of</strong><br />
water vapor blows down from the ends<br />
<strong>of</strong> the tubes to the ground. We can look<br />
out the classroom window and tell how<br />
things are going in the bending area.<br />
Because heat rises, the parts do not<br />
sit on the bottom <strong>of</strong> the box. <strong>The</strong>re, they<br />
would also be bathed in cooler condensed<br />
water. Instead, they rest on a rack made<br />
<strong>of</strong> stainless steel bolts that pierce the<br />
tube. Regular steel bolts would leave<br />
dark purple stains on the parts.<br />
Plasticizing<br />
As little as 15 minutes is all that is<br />
required to plasticize red oak chair parts.<br />
This time can vary somewhat according<br />
to the circumstances. <strong>The</strong> wood we use<br />
is freshly cut before each class. That<br />
means our bendings already have 25%<br />
moisture content and that all we need to<br />
do is heat them. If your wood has been<br />
stored for a while and allowed to air dry,<br />
it may be around 14%. You should steam<br />
a bit longer, perhaps 20-25 minutes.<br />
Chairmakers who live in the Rocky<br />
Mountain states or at other high<br />
elevations have another problem. Water<br />
boils at a lower temperature the higher<br />
you are. I ran into this problem in 1980<br />
and 1981 when I taught chairmaking<br />
classes at BYU in Provo, Utah. We<br />
managed to bend successfully by<br />
steaming our parts even longer than usual.<br />
We left them in the box 40 - 45 minutes.<br />
Because the wood was noticeably cooler<br />
than at lower elevations, we worked even<br />
more quickly.<br />
Adding fabric s<strong>of</strong>tener to the water<br />
in the boiler has been suggested in some<br />
woodworking magazines as a way to<br />
s<strong>of</strong>ten the wood’s fibers and make it<br />
bend more easily. I have tried that trick<br />
and have not found that it makes any<br />
difference.<br />
<strong>The</strong> Moment <strong>of</strong> Truth<br />
Before removing a piece <strong>of</strong> wood<br />
from the steam box, be sure that every<br />
thing else is prepared and ready. You<br />
only have about 45 seconds to complete<br />
the bends before the wood becomes too<br />
cool, and you do not want to waste any<br />
<strong>of</strong> that time fumbling. Always check the<br />
form to make sure it is securely clamped<br />
to the bench. Be sure that the bending<br />
strap is easily accessible. Check that you<br />
have the required number <strong>of</strong> wedges<br />
and pins, as well as a hammer. I always<br />
go through this mental checklist. For<br />
beginners, I recommend refreshing the<br />
bending process in their minds by first<br />
pantomiming it.<br />
Remove the wood from the box<br />
with a pair <strong>of</strong> tongs. We use the ones<br />
sold in a super market for picking ears<br />
<strong>of</strong> corn out <strong>of</strong> boiling water. Before you<br />
open the steam box remember what you<br />
learned in your high school physics class.<br />
Released steam will rise. To avoid a burn,<br />
always open the box and approach it<br />
with the tongs from below.<br />
Remove the part from the box and<br />
moving quickly, place it in the bending<br />
strap and secure it to the bending form.<br />
While you want to move quickly when<br />
setting up the bend, remember that as<br />
you bend, speed is your enemy. You must<br />
give the wood time to compress. If you<br />
move too quickly, you shift the outside<br />
edge <strong>of</strong> the bend from compression into<br />
tension. While wood compresses very<br />
well, it has a very limited ability to stretch.<br />
Tension will cause failures. Avoid it by<br />
bending slowly and deliberately.<br />
“Do you wear gloves?” is a common<br />
question asked by students. I advise<br />
against them. As you gain experience<br />
bending you will discover that you can<br />
sometimes feel problems in time to<br />
correct them. We will sometimes feel a<br />
piece beginning to weaken and turning<br />
the part around, bend it successfully in<br />
the other direction. Roll up too, can be<br />
felt by a pair <strong>of</strong> experienced hands. You<br />
will never develop this “feel” for the<br />
wood if you wear gloves.<br />
While steamed wood is quite hot,<br />
you can juggle it back and forth while<br />
carrying it to the form, and can switch<br />
hands while bending. <strong>The</strong> wood needs<br />
to be this hot and if it is not, you will<br />
experience more failures. I always tell<br />
students, “If you’re not swearing, it’s not<br />
hot enough.<br />
Failures<br />
You cannot tell if the wood has been<br />
sufficiently heated when wearing gloves.<br />
Furthermore, bending requires dexterity.<br />
Gloves make your hands too clumsy.<br />
While we have few bending failures at<br />
<strong>The</strong> Institute, they do occur. Failures are<br />
a fact <strong>of</strong> life that a chairmaker has to<br />
accept, as bending wood is an art, not a<br />
science. Four types <strong>of</strong> failure can occur<br />
when bending. <strong>The</strong>y are: delamination,<br />
tension shear, compression failure, and<br />
roll up.<br />
Delamination is by far the most<br />
common failure. In this case, a layer<br />
<strong>of</strong> wood peels <strong>of</strong>f the outside edge <strong>of</strong><br />
the bending. A tension shear occurs<br />
when the wood fibers rupture, tearing<br />
like cloth across their width. In a<br />
compression failure, the wood on the<br />
inside <strong>of</strong> the bend fails to compress<br />
evenly, and kinks up like ribbon candy.<br />
<strong>The</strong> <strong>Guild</strong> <strong>of</strong> <strong>New</strong> <strong>Hampshire</strong> <strong>Woodworkers</strong><br />
15
Roll up occurs most commonly in pieces<br />
with a rectangular section, such as the<br />
sack back arm rail. In this case, the part<br />
does not remain in a plane as it is bent.<br />
Instead, the rear edge rolls upward.<br />
A failure is not necessarily<br />
catastrophic and can frequently be fixed.<br />
<strong>The</strong> difference between it going into<br />
the scrap pile or into a chair is usually<br />
a matter <strong>of</strong> degree. If it is not too large,<br />
a delamination can be tacked back into<br />
place with glue. It is best to wait a day or<br />
two for the wood to dry a bit.<br />
A small tension shear can be<br />
consolidated with cyanoacrylate glue,<br />
which with a sufficient number <strong>of</strong><br />
applications will actually fill the void.<br />
We saturate small compression failures<br />
with cyanoacrylate and when it is dry,<br />
smooth the crinkled, ribbon candy effect<br />
with a plane or spoke shave. We remove<br />
roll up by clamping the bending flat<br />
between two boards and setting it aside<br />
to dry.<br />
Delamination, tension shear, and<br />
compression failures can frequently be<br />
prevented by bending in a slow, steady<br />
motion. As I said above, speed is the<br />
enemy.<br />
Roll up results from one <strong>of</strong> two<br />
causes. If the part’s edge against the<br />
bending block was not made at a right<br />
angle to the upper and lower surfaces,<br />
the part’s section is a parallelogram<br />
rather than a rectangle. In this case, the<br />
rear edge will lift as the front edge is<br />
pulled tight. Second, when bending, it<br />
<strong>The</strong> kiln<br />
16 <strong>The</strong> <strong>Guild</strong> <strong>of</strong> <strong>New</strong> <strong>Hampshire</strong> <strong>Woodworkers</strong><br />
is common for students pulling a part,<br />
towards themselves to actually twist<br />
the part forward. We suggest students<br />
be conscious <strong>of</strong> this and counter it by<br />
purposefully twisting the part away from<br />
themselves. If in spite <strong>of</strong> these efforts a<br />
roll up begins, we can minimize it by<br />
allowing the bend to ramp up the side<br />
<strong>of</strong> the block. When it is cool we drive it<br />
back flat against the back board.<br />
Drying<br />
Once a part has been bent, it has to<br />
dry before it can be used in a chair. For<br />
single plane bends such as sack back and<br />
bow back side chair, we wait until the<br />
part is cool. We then tie the bending<br />
with a string and remove it from the<br />
form. <strong>The</strong> c-arm is bent in two planes<br />
and has to dry on its form. Crests are<br />
bent in a press and have to stay clamped<br />
in this device until dry.<br />
At <strong>The</strong> Institute we dry bendings in<br />
the furnace room, which we use as a kiln.<br />
During the heating season the furnace<br />
keeps the temperature around 100<br />
degrees. Because humidity is very low<br />
in the winter, the warm room will dry<br />
bendings in several days. In the summer<br />
we maintain the same temperature with<br />
a heat lamp. We lower the summer<br />
humidity with a dehumidifier.<br />
At home, you can allow a part to dry<br />
on its own if you have the time to wait.<br />
In the winter you can speed it up by<br />
placing a bending on a heating duct, or<br />
above a radiator. In the summer, a part<br />
will dry in about a week if left in the sun.<br />
When I taught on the road, we would<br />
dry summer bendings by placing them<br />
in the backs <strong>of</strong> pick up trucks with black<br />
bed liners.<br />
If you want to dry your parts more<br />
quickly, build a small kiln out <strong>of</strong> foam<br />
core board. In a pinch you can also use<br />
the kitchen oven. Set it to its lowest<br />
possible temperature and crack the door<br />
to allow the moisture to escape.<br />
Spring Back?<br />
Anyone who has ever read an article<br />
on steam bending knows that it is<br />
necessary to over bend to allow for spring<br />
back. While everyone knows this, it is flat<br />
wrong. It seems to be one <strong>of</strong> those things<br />
that having made its way into print, just<br />
keeps getting repeated. When wood is<br />
sufficiently dry it compresses further.<br />
We can tell with a glance whether or<br />
not a bending is dry. As it comes <strong>of</strong>f the<br />
form, the string is taut. Once the part<br />
is dry, the string droops. Obviously, the<br />
part did not spring back, but moved in<br />
exactly the opposite direction. When<br />
it dries, a c-arm will compress so that<br />
the wedges that hold it on its form will<br />
loosen and fall away. A fully-dried crest<br />
will fall out <strong>of</strong> its press.<br />
In fact, this extra compression<br />
presents problems for a chairmaker<br />
who bends a long time before being<br />
ready to put the part in the chair. <strong>The</strong><br />
compression set makes the amount <strong>of</strong><br />
curve too extreme for the chair. We<br />
have had good luck correcting over<br />
compression by filling the sink with hot<br />
water and soaking one side <strong>of</strong> the bend.<br />
Once it has become wet, we can force<br />
the bend back open. We then repeat the<br />
process on the other side. Once you have<br />
restored the part to the desired shape,<br />
use it in a chair immediately. Otherwise,<br />
it will compress again as it dries.<br />
Steam Box Lesson<br />
As I said earlier, most <strong>of</strong> the problems<br />
people have bending chair backs is<br />
caused by decay. However, other things<br />
can go wrong and result in repeated<br />
breaks. This is an example <strong>of</strong> a problem<br />
with the equipment. During a class a<br />
couple <strong>of</strong> summers ago, one <strong>of</strong> the other<br />
instructors called me out to the bending<br />
area. On the ground were four or five<br />
broken arm and bows. Over a little<br />
less than half its length, each part was<br />
a strange purple-brown color, and each<br />
had broken within this discolored area.<br />
However, the other end <strong>of</strong> each part had<br />
bent well.<br />
First, we examined the broken parts<br />
then, the steam box. I discovered that<br />
instead <strong>of</strong> being level, one end <strong>of</strong> the<br />
box was significantly lower than the<br />
other. <strong>The</strong> landscapers had recently<br />
replenished the crushed stone in the<br />
bending area, and one end <strong>of</strong> the saw<br />
buck that supports the steam box had<br />
sunk into the fresh stone. <strong>The</strong> steam<br />
boxes have vent holes on both ends.<br />
<strong>The</strong>se are drilled through the lower<br />
surface, just before the end caps. Since
these vents are the only escape, the steam<br />
flows evenly through the tube in both<br />
directions. This two-way flow plasticizes<br />
the entire chair back uniformly.<br />
Because the box was at an angle<br />
with one end lower than the other, the<br />
steam entering the tube in the middle<br />
rose and exited only out the higher end.<br />
None was flowing down through the<br />
lower end. However, the jet <strong>of</strong> steam<br />
entering the middle <strong>of</strong> the tube and<br />
rising did heat the air in the lower part<br />
<strong>of</strong> the tube without wetting it. This hot<br />
dry air not only failed to plasticize the<br />
wood, it began to toast it. That explained<br />
the discoloration we had observed. <strong>The</strong><br />
parts on the ground had all broken in<br />
the end that was lowest in the tube.<br />
As I described earlier, in order to<br />
bend wood it has to be both hot and wet.<br />
This wood was only hot and wet on one<br />
end, and hot and dry on the other. In fact,<br />
it was so dry and so hot, it had begun<br />
to char. We leveled the steam box and<br />
every part after that bent as it should.<br />
We quickly made replacements for<br />
the students whose parts had broken,<br />
and these bent without trouble. I saved<br />
one <strong>of</strong> the discolored parts and hung it<br />
on the shop wall. I tell this story to each<br />
class and use it to illustrate my tale.<br />
Boiler Lesson<br />
During a writing arm class one year<br />
we also experienced a series <strong>of</strong> breaks. I<br />
went out to the bending area to watch<br />
and help. As I assisted a student bending<br />
his arm I commented that the wood<br />
seemed too cool. Sure enough, it broke.<br />
Polling the staff and students, I learned<br />
that all the breaks were coming from<br />
one box. Those from the other box were<br />
bending properly. This ruled out bad<br />
wood. As I studied the box, I observed<br />
that very little steam was coming out<br />
the vent holes. Ordinarily, plumes <strong>of</strong><br />
water vapor blow down to the ground<br />
from each end <strong>of</strong> the tube. Assuming<br />
the boiler was running dry, I took it by<br />
its handle to shake it. I expected it to be<br />
nearly empty and thus, light in weight.<br />
All I remember is a moment <strong>of</strong><br />
surprise at how heavy the boiler was,<br />
because as I began to agitate the boiler<br />
a geyser <strong>of</strong> hot water and steam erupted<br />
from the filler spout. Next, I was<br />
running across the lawn with the skin <strong>of</strong><br />
my face stinging. After lots <strong>of</strong> cold water<br />
and aloe I was sufficiently recovered to<br />
look for the cause <strong>of</strong> the accident. We<br />
use utility cans as our boilers. About<br />
six months earlier the old boiler on the<br />
problem steam box had rusted through<br />
its bottom. Unable to immediately find a<br />
replacement boiler <strong>of</strong> the type we prefer,<br />
we had bought another brand.<br />
This brand <strong>of</strong> utility can had a<br />
fine mesh screen at the base <strong>of</strong><br />
the spout, which was intended to<br />
act as a filter.<br />
Over time, the steel screen<br />
began to rust and the tiny<br />
holes became more and more<br />
constricted. Eventually, this<br />
constriction cut down the flow <strong>of</strong><br />
steam up the spout, creating back<br />
pressure in the boiler.<br />
In the filler spout we have<br />
a wooden plug with a funnel<br />
though its center. This allows us<br />
to maintain the water level in<br />
the boiler without shutting down.<br />
As the water begins to boil the<br />
wooden plug becomes wet and<br />
tightens. When I agitated the<br />
can the plug let go. <strong>The</strong> water<br />
and steam trapped in the boiler<br />
by the constricted mesh filter<br />
erupted out the filler spout.<br />
Fortunately, my face was not directly<br />
over the hole. Most <strong>of</strong> the hot spray<br />
passed by with only some <strong>of</strong> it landing<br />
on my right cheek and neck. For several<br />
days I looked like I had a very oddly<br />
shaped sunburn. However, I healed<br />
quickly.<br />
Like most accidents, this one could<br />
have been avoided if I had exercised<br />
plain old common sense safety. <strong>The</strong><br />
lesson – always shut down a steam box<br />
before working on it.<br />
<strong>The</strong> <strong>Guild</strong> <strong>of</strong> <strong>New</strong> <strong>Hampshire</strong> <strong>Woodworkers</strong><br />
17
y Al Breed<br />
Half Hour Flowers<br />
Most any carving is really an<br />
exploration <strong>of</strong> what you can<br />
convince your tools to do for you.<br />
Carving small flowers is an easy way<br />
to get more familiar with grain and<br />
tool techniques. Given the small scale,<br />
amount <strong>of</strong> material and time spent,<br />
think <strong>of</strong> these as quick sketches that you<br />
need not get too attached to, that way<br />
you can be brave with your cuts and not<br />
worry about the perfection <strong>of</strong> each one.<br />
It’s OK to throw them out until you get<br />
one you like. After gluing down a bunch<br />
<strong>of</strong> basswood or pine blanks about a half<br />
inch thick by two inches in diameter<br />
with very weak hide glue and brown<br />
paper, proceed as follows.<br />
Draw a small circle in the center <strong>of</strong><br />
your blank and cut around it with a 12-6<br />
V-tool (photo 1).<br />
Round the center with a 7-15<br />
(photo 2) and then the outside with a<br />
7-20 (photo 3).<br />
Divide the circle into five petals and<br />
separate them with spiraling cuts using<br />
a 7-20 (photo 4).<br />
With a 12-6 V-tool again, make a<br />
notch in the edge <strong>of</strong> each petal (photo 5)<br />
and then form the overlap <strong>of</strong> the petals<br />
with a 7-20 (photo 6).<br />
18 <strong>The</strong> <strong>Guild</strong> <strong>of</strong> <strong>New</strong> <strong>Hampshire</strong> <strong>Woodworkers</strong><br />
Using a 5-35, hollow the petals<br />
(photo 7). Be brave and try to span the<br />
entire width <strong>of</strong> the petal with your cut.<br />
This will leave a single smooth surface<br />
with fewer tool marks than if you’d<br />
made several cuts. I use a mallet and try<br />
to keep forward pressure on the tool to<br />
keep it from rippling.<br />
Before you round the outside edges<br />
<strong>of</strong> the petals, cut notches with a 22-6<br />
or 12-6 and then connect the notches<br />
with a 7-10 or another appropriate size.<br />
Your notches don’t need to be regular<br />
(photo 8).<br />
Draw in the veins and cut them with<br />
an 11-3, or another small veiner or V-tool<br />
(photo 9). You can clean up around the<br />
center with a 7-20 beforehand. Use<br />
your fingers like a compass to enable<br />
you to make smooth curving veins. One<br />
fingertip will be the center <strong>of</strong> the circle<br />
while the others hold the tool in orbit<br />
around it. Always have your hands on<br />
the inside <strong>of</strong> the arc <strong>of</strong> the cut so that<br />
you’ll naturally describe the curve. Never<br />
try to steer the tool from the outside <strong>of</strong><br />
the arc, its way too hard to get a good<br />
line that way. If you run into oncoming<br />
grain (you’ll hear the telltale snapping<br />
sound) turn around and come from the<br />
other direction and meet the first part<br />
<strong>of</strong> the cut.<br />
This is the basic flower that I start<br />
with – common on Rococo architectural<br />
carving. <strong>The</strong>re are many variations<br />
on this theme that you can play with<br />
once you feel relaxed about carving<br />
the basic form. You can cut notches in<br />
the petals (photo 10), vein the whole<br />
petal (photo 11) or point the flower in<br />
a direction by shaping some petals with<br />
high outside edges and some with low<br />
ones. <strong>The</strong> treatment <strong>of</strong> the centers can<br />
vary also (photo 12).<br />
<strong>The</strong> best thing to do is find examples<br />
to look at when you’re carving. Ince<br />
and Mayhews has a few examples, and<br />
is available from Dover Books. Many<br />
Rococo carved mirrors or mantels<br />
contain flowers that will give you ideas<br />
you can use. Anything by Grinling<br />
Gibbons will either inspire you to<br />
greatness or scare you out <strong>of</strong> carving<br />
altogether. Most importantly, just<br />
be brave and don’t count on keeping<br />
everything you do. Glue down twelve<br />
blanks and plan on getting warmed up<br />
at about number eight! Repetition may<br />
be the devil to cabinetmakers, but it’s<br />
the mother <strong>of</strong> all carvers.
1<br />
4<br />
7<br />
10<br />
2<br />
5<br />
8<br />
11 12<br />
<strong>The</strong> <strong>Guild</strong> <strong>of</strong> <strong>New</strong> <strong>Hampshire</strong> <strong>Woodworkers</strong><br />
3<br />
6<br />
9<br />
19
at the lathe by John Siegel<br />
Duplication<br />
I met Matthew Burak twenty years ago.<br />
He was making custom furniture in<br />
Vermont and was frustrated by the fact<br />
that the turned legs <strong>of</strong>fered in catalogs<br />
were poorly designed.<br />
After we started making legs from his<br />
designs, he got the idea that there was<br />
room in the marketplace for a company<br />
that could supply well designed legs in<br />
small quantities for furniture makers<br />
who did not have the ability to turn their<br />
own. For a few years, I made a variety <strong>of</strong><br />
20 <strong>The</strong> <strong>Guild</strong> <strong>of</strong> <strong>New</strong> <strong>Hampshire</strong> <strong>Woodworkers</strong><br />
legs for Matt, usually in quantities <strong>of</strong> 40<br />
or more. Inevitably, Matt moved on to<br />
more mechanized production, and today<br />
Classic Designs by Matthew Burak has<br />
30 employees and sells millions <strong>of</strong> dollars<br />
<strong>of</strong> legs each year. For me it was a period<br />
when I honed my skills at duplication,<br />
and what I learned has served me well<br />
in my spindle turning career.<br />
In my classes, by far the most<br />
frequently asked question is, “How do<br />
I make four legs that look alike?” And<br />
the short answer is, “Make more than<br />
Centering Jig – Slide the work into the pin four times, making 1/4 turn each time.<br />
1<br />
four, and use the four that look the<br />
most alike.” This is good advice for a<br />
beginner who needs the practice. A set<br />
<strong>of</strong> legs is definitely a milestone in the<br />
beginner’s repertoire, especially anyone<br />
interested in furniture, yet none <strong>of</strong> the<br />
woodturning books in my library have a<br />
section on duplication.<br />
Before the turning can start, there<br />
are some marking jigs you can set up on<br />
your bench that speed things along and<br />
help avoid mistakes. <strong>The</strong>se jigs take time<br />
to set up, but pay <strong>of</strong>f on jobs <strong>of</strong> a dozen<br />
or more pieces.<br />
<strong>The</strong> centering jig is shown in photo 1.<br />
Slide the work along the bench and fence<br />
and into the pin four times, rotating the<br />
work a quarter turn each time. A wedge<br />
under the pin block makes it easy to<br />
adjust for different stock sizes. <strong>The</strong> pin<br />
is actually a wood screw with its head<br />
sawn <strong>of</strong>f and filed or ground to a point.<br />
Mark the location <strong>of</strong> transition<br />
cuts with another bench mounted jig<br />
– photo 2. <strong>The</strong> handscrews themselves<br />
become the marking guide. Use a s<strong>of</strong>t<br />
pencil, but sharpen it regularly to avoid<br />
the error caused by a rounded point.<br />
After the pieces are centered and<br />
marked they are still not ready for the<br />
lathe. Now is the time to put the final<br />
finish on the square parts (pommels),<br />
because it is difficult to plane, scrape,<br />
or sand these surfaces later without<br />
damaging the turning. <strong>The</strong> transition<br />
marks show us where to work. After<br />
this step, the transition marks are all but<br />
gone. No problem, we have our jig to<br />
mark them again. This system may seem<br />
inefficient because it requires marking<br />
twice, but after much experimentation, I<br />
have found it is still the best way.<br />
<strong>The</strong>re are methods you may use for<br />
repetition work that you would not<br />
use for a short run, and mostly this<br />
involves setting up jigs. Perhaps more<br />
importantly, there is a momentum and
2<br />
Transition Points Marking Jig – <strong>The</strong><br />
turning square is slightly thinner than the<br />
fence so it slips easily under the handscrews,<br />
which act as marking guides.<br />
muscle memory that kicks in after about<br />
six or eight pieces, and you may never<br />
experience this if you are only making<br />
four. In any event, success depends on a<br />
combination <strong>of</strong> taking measurements in<br />
a few critical places, then depending on<br />
your powers <strong>of</strong> observation.<br />
Learning how to visualize curves<br />
was covered in a previous article on the<br />
“S-curve”, and if you recall it involves<br />
paying attention to inflection point<br />
locations and end point angles. <strong>The</strong><br />
inflection point is where the curve<br />
changes from convex to concave and the<br />
end point angle is simply the angle <strong>of</strong> a<br />
line tangent to the curve at it’s end point.<br />
Work in Short Steps<br />
If there is one single piece <strong>of</strong> advice<br />
I can give you for successful duplication,<br />
it is to break up the job into many short<br />
operations. Do the first step, remove<br />
the workpiece and replace it with the<br />
next one. Working in this way there are<br />
fewer operations to memorize, fewer<br />
chisels out at one time, fewer calipers to<br />
use (reducing the chance <strong>of</strong> taking the<br />
wrong one and making an error), fewer<br />
changes <strong>of</strong> the tool rest and/or steady<br />
rest (one time for each step) and quicker<br />
development <strong>of</strong> “muscle memory”.<br />
I see many people who hesitate to<br />
remove the workpiece in progress from<br />
the lathe, because they fear that they<br />
will never get it back in the center again.<br />
This causes them to attempt to turn the<br />
entire piece from start to finish in one<br />
step, which is definitely the hard way.<br />
This procedural error is brought about<br />
by faulty lathe centers.<br />
Repeatability<br />
When machinists speak <strong>of</strong><br />
repeatability, they mean the ability to<br />
remove a workpiece or tool from a<br />
chuck, vise, collet, or jig, and replace<br />
it, or an identical part, in exactly the<br />
same location again. This concept is <strong>of</strong><br />
the utmost importance in the machine<br />
shop where making precision multiple<br />
parts is so <strong>of</strong>ten at hand. We can learn<br />
from these principles even for our wood<br />
lathe projects when we embark on the<br />
production <strong>of</strong> multiples. In this case the<br />
workholding jig is simply the pair <strong>of</strong><br />
opposing lathe centers.<br />
While working in short steps, it may<br />
be necessary to remove and replace the<br />
workpiece five or more times in the<br />
process. Of course this requires that<br />
your centers be well tuned. It should<br />
be possible to remove, replace, or turn<br />
end-for-end an infinite number <strong>of</strong><br />
times and have the workpiece return to<br />
the exact center every time without fuss<br />
and without fail. With a spring center<br />
point, it is possible to do this without<br />
stopping the spindle. But whatever<br />
kind <strong>of</strong> centers you have, you must be<br />
able to get “repeatability” or relocation<br />
<strong>of</strong> concentricity every time the work<br />
is removed and replaced. If you do not<br />
have this, then you are operating at a<br />
great disadvantage, and you should fix<br />
your centers.<br />
<strong>The</strong> only exceptions to the “working<br />
in steps” method is with very heavy<br />
workpieces, such as porch posts, or<br />
hollow columns where a single set <strong>of</strong><br />
end plugs are used.<br />
3<br />
Planning Steps to Minimize Vibration<br />
Working in steps does not mean you<br />
should start at one end and work toward<br />
the other. Very <strong>of</strong>ten you need to start<br />
in the middle. In most furniture work,<br />
workpiece vibration is a problem. A<br />
steady rest is frequently necessary, and<br />
this will be covered in the next article.<br />
Regardless <strong>of</strong> the steady rest, if there<br />
are details near the middle, start there,<br />
because this is where the amplitude <strong>of</strong><br />
workpiece vibration will be the greatest.<br />
Leave the foot for last, because you will<br />
not experience much vibration in that<br />
area.<br />
If you only have four legs to make you<br />
can mark out directly from the drawing<br />
as shown in my last article (Drafting for<br />
Woodturning). If you have a dozen or<br />
more, I suggest you use a marking stick.<br />
This has notches in the edge to locate the<br />
pencil for quick and accurate marking <strong>of</strong><br />
the work in motion – photo 3. Make the<br />
notches with a triangular file.<br />
You should decide how many steps the<br />
job requires. Here are some guidelines.<br />
It is practical to make transition cuts,<br />
rough out and marking in a single step.<br />
This step requires two chisels (skew<br />
and spindle roughing gouge), a pencil<br />
and marking stick. Next proceed to the<br />
groups <strong>of</strong> details, and these require two<br />
or three steps on average. During each<br />
<strong>of</strong> these steps you would commonly<br />
have two or three chisels, and one or two<br />
calipers.<br />
As you approach each group <strong>of</strong><br />
details, you will have two or three lines<br />
to make starting cuts. Simply cut in on<br />
Marking after Rough Out – Hold the marking stick against the rotating work, and use a<br />
pencil in each <strong>of</strong> the notches.<br />
<strong>The</strong> <strong>Guild</strong> <strong>of</strong> <strong>New</strong> <strong>Hampshire</strong> <strong>Woodworkers</strong><br />
21
4 5<br />
Calipers – Hold the parting tool in one hand and the calipers in the<br />
other. Be prepared to stop as soon as the calipers fall through.<br />
these lines with a parting tool, or make<br />
a vee cut with a skew chisel, and the<br />
axial measurements are thus established.<br />
Usually these are made with a parting<br />
tool, because you can slide the caliper<br />
in the parting tool slot while the cut is<br />
being made. This is an essential skill to<br />
have. It requires holding the parting tool<br />
in one hand, and the caliper in the other<br />
– photo 4. It is much harder to measure<br />
the diameter <strong>of</strong> a vee cut, and should not<br />
be attempted while the work is rotating,<br />
as the calipers may catch. Calipers for<br />
measuring the diameter <strong>of</strong> a vee have<br />
the tips ground to a narrow edge, but<br />
not quite to a sharp point – photo 5.<br />
Duplication requires the<br />
establishment <strong>of</strong> certain points in the<br />
correct measured location. After that,<br />
you simply “connect the dots”. <strong>The</strong>re are<br />
many variations <strong>of</strong> this method, but in<br />
general I think you will find that you do<br />
22 <strong>The</strong> <strong>Guild</strong> <strong>of</strong> <strong>New</strong> <strong>Hampshire</strong> <strong>Woodworkers</strong><br />
not need very many measured points to<br />
achieve consistency. <strong>The</strong> most important<br />
diameter is at the bottom <strong>of</strong> the coves,<br />
because variations here are noticeable<br />
even at a distance.<br />
Another FAQ is, “Do you use<br />
templates?” I only use templates in two<br />
situations: straight lines (for cylinders<br />
and cones) and circles (for balls). I think<br />
it’s pretty simple to use a straight edge,<br />
usually wood, to assist in making a<br />
straight line. I find this method works<br />
well on every scale, from porch columns<br />
to pool cues. Making and using ball<br />
templates is worthy <strong>of</strong> a separate article.<br />
After the turning is complete,<br />
sanding is the final step. Remove the<br />
tool rest with its base, and the steady<br />
rest completely <strong>of</strong>f the lathe bed, so they<br />
will not interfere with your hands, nor<br />
do you want sanding grit in any <strong>of</strong> that<br />
mechanism.<br />
Vee-Calipers – Special calipers have tips shaped to measure a vee.<br />
Mahogany Ball Finials – 28” high furlong markers for Belmont Park race track<br />
(Belmont Stakes) received gold leaf.
underneath. One <strong>of</strong> the best examples <strong>of</strong><br />
this category is the knuckle hinge joint.<br />
<strong>The</strong> knuckle hinge joint is most <strong>of</strong>ten<br />
used on small to medium sized tables to<br />
hinge a support, or swing leg, under a<br />
drop leaf. It can be made with flat square<br />
intersecting ends, like a moving finger<br />
joint. Or, as in the example we show<br />
here, it can be made more refined with a<br />
rounded barrel.<br />
<strong>The</strong> recent commission <strong>of</strong> a Pembroke<br />
style table presented an opportunity to<br />
revisit this clever mechanical wood joint.<br />
<strong>The</strong> process <strong>of</strong> making one breaks down<br />
into a simplified step by step process.<br />
For a Pembroke table like this one, the<br />
by Tom McLaughlin<br />
and Levi Lucks – demonstrating craftsman<br />
making the<br />
<strong>Knuckle</strong> <strong>Hinge</strong> <strong>Joint</strong><br />
Great joinery can mean the<br />
difference between a piece <strong>of</strong><br />
furniture lasting for hundreds <strong>of</strong> years or<br />
just a few. Some is internal, completely<br />
concealed or “blind”, its integrity<br />
known only to the maker. While other<br />
exposed joinery types, break through<br />
to the surface in some way. At its best,<br />
exposed joinery is the fingerprint <strong>of</strong><br />
fine craftsmanship. It moves beyond its<br />
structural intent, adding a decorative<br />
effect and reassuring beauty.<br />
My favorite kind <strong>of</strong> joinery is not<br />
the showiest, but the type you happen<br />
to discover using a piece <strong>of</strong> furniture, or<br />
when crawling around the floor looking<br />
2 3 4<br />
side rails, usually justified to the outside<br />
surface <strong>of</strong> the leg, are instead set to the<br />
inside <strong>of</strong> the leg. This leaves the necessary<br />
cavity into which the swing support will<br />
1<br />
<strong>The</strong> <strong>Guild</strong> <strong>of</strong> <strong>New</strong> <strong>Hampshire</strong> <strong>Woodworkers</strong><br />
23
5 6<br />
be fit. For a table like this, it is good to<br />
plan for the swing support material to<br />
be approximately 1˝ thick, and not less<br />
than 7/8˝.<br />
<strong>The</strong> first step is to prepare and size<br />
the material to be hinged, leaving the<br />
pieces an inch or two long, to be cut<br />
to fit into the recessed sides after the<br />
hinged joint is made. <strong>The</strong>n you will<br />
need to accurately square both ends to<br />
be joined (1).<br />
<strong>The</strong> next step is to mark on the top<br />
and bottom <strong>of</strong> both pieces intersecting<br />
ends, 45 degree, crossing lines. <strong>The</strong>n<br />
using a compass at the intersection<br />
draw a circle <strong>of</strong> diameter equal to the<br />
material thickness (2). Marking well is<br />
key. Remember, there is no mystery to<br />
executing superb joinery. You can learn<br />
rather quickly how to cut cleanly to a<br />
line. But if your lines are bad, it doesn’t<br />
matter if you are the Samurai master <strong>of</strong><br />
sawing and paring, the joint will never<br />
fit. Great joinery begins with accurate<br />
marking.<br />
24 <strong>The</strong> <strong>Guild</strong> <strong>of</strong> <strong>New</strong> <strong>Hampshire</strong> <strong>Woodworkers</strong><br />
Next, using the table saw tilted to 45<br />
degrees, make a small notch cut precisely<br />
to the diagonal line on the inside <strong>of</strong> the<br />
marked cylindrical barrel. Don’t worry<br />
about getting the depth perfect. It is<br />
best to be a little bit shy, or short. You<br />
can quickly clean it up with hand tools<br />
later (3). This cut defines where the<br />
swing support will stop when extended.<br />
In this way, the two 45 degree cuts will<br />
mate to stop the swing out at 90 degrees<br />
to the drop leaf it supports.<br />
Note, to insure accuracy without<br />
risking screwing up the cut on your<br />
good pieces, always prepare and use an<br />
identically sized and marked scrap piece<br />
to set-up and pre-test your cuts. This is<br />
something you never see Norm Abrams<br />
do, but trust me, when setting up, he and<br />
his assistants are using test pieces.<br />
With the saw still tilted at 45 degrees,<br />
cut the waste on the outer end <strong>of</strong> the<br />
cylinder to create an octagonal form.<br />
Now the rounded barrel can be shaped<br />
using a well-tuned hand plane, taking<br />
7 8 9<br />
care to use the guidelines and planing<br />
in from the ends (4). <strong>The</strong> inside <strong>of</strong> the<br />
barrel can be more easily shaped using<br />
a shoulder plane (5). Once planed to<br />
shape, the cylinder is fine tuned by<br />
sanding, using a coved sanding block<br />
with the matching concave radius (6)<br />
.Dividing the cylinder into five equal<br />
parts, a marking gauge is used to crisply<br />
mark the division points <strong>of</strong> the knuckles<br />
on both ends (7). <strong>The</strong>n using a pencil<br />
or pen, scribble on the sections to be<br />
removed on each <strong>of</strong> the mating end (8).<br />
Note that the hinged end to be fixed to<br />
the table will have three full knuckles,<br />
while the swing support will have the<br />
corresponding three spaces removed.<br />
If you are confident with a dovetail<br />
saw, saw right to the marking gauge<br />
knife line, taking care to saw on the<br />
waste, or scribbled side <strong>of</strong> the line (9).<br />
However if you prefer, you can saw just<br />
shy <strong>of</strong> the line and use a sharp chisel to<br />
pare right to it. Use the actual marking<br />
gauge line to set the chisel to insure the
10 11 12<br />
greatest accuracy. Rough out the rest <strong>of</strong><br />
the material between the knuckles using<br />
the band saw or other means, and then<br />
chisel between the knuckles to allow<br />
the outer radius <strong>of</strong> the corresponding<br />
knuckle to seat fully (10). <strong>The</strong> radius on<br />
the ends will also need to be cleaned out<br />
using a gouge chisel with the conforming<br />
curve or sweep (11).<br />
Once fitted up so that the ends seat<br />
fully and firmly, you are ready to drill for<br />
the hinge pin. Be sure your drill press<br />
is set up accurately to bore a true 90<br />
degree hole centered in the thickness <strong>of</strong><br />
the stock. Here again, a scrap test piece<br />
is your best friend. Test your drill press<br />
by boring, using a spur bit, a little more<br />
than half way in from both ends, and<br />
then try fitting the hinge pin.<br />
A 3/16˝ diameter brass, steel, or<br />
13<br />
welding rod makes a good hinge pin.<br />
An auxiliary fence attached to your drill<br />
press, the same height as the hinge parts,<br />
adds greater stability and precision.<br />
Adjust the drill press as needed until the<br />
hinge pin fits firmly without much force,<br />
indicating the hole is properly aligned.<br />
Now clamp the assembled ends against<br />
the auxiliary fence and drill on your<br />
center marks, a little more than halfway<br />
from each side (12).<br />
After the hinge pin is fit, a little<br />
tweaking may be necessary to get<br />
the joint to operate properly without<br />
binding. Look for the burnished areas<br />
on the knuckles. <strong>The</strong>se indicate where<br />
you may need to adjust by chiseling or<br />
filing. It is a good idea to cut the hinge<br />
pins about an inch longer than necessary<br />
so that it is easy to tap out and remove<br />
during the fitting stage. When ready for<br />
final assembly, you can then cut the pin<br />
to the final length and hammer flare the<br />
top end slightly to keep the pin from<br />
falling through over time.<br />
All that remains is cutting the fixed<br />
pieces to length, fitting and gluing into<br />
the recessed areas on the sides <strong>of</strong> the<br />
table. <strong>The</strong>n comes the creative phase<br />
where you will shape and sculpt the<br />
swing support, and complimentary fixed<br />
piece on the apron. Do as much <strong>of</strong> this<br />
custom shaping before you glue in the<br />
fixed portion. You will want to shape<br />
both parts in such a way that <strong>of</strong>fers a<br />
comfortable and attractive finger pull<br />
recess (13).<br />
<strong>The</strong> last step is to sit back and enjoy,<br />
and wait for someone to discover your<br />
fingerprints.<br />
<strong>The</strong> <strong>Guild</strong> <strong>of</strong> <strong>New</strong> <strong>Hampshire</strong> <strong>Woodworkers</strong><br />
25
Butt <strong>Hinge</strong><br />
Mortising Jig<br />
Here is a question for<br />
you to mull over –<br />
how long does it take you to<br />
route, chisel and install butt<br />
hinges in a cabinet door? If<br />
the answer to this question<br />
or the thought <strong>of</strong> this type <strong>of</strong><br />
operation puts you in a sour<br />
mood, please read on.<br />
I have been using a<br />
very simple system to<br />
make routing mortises for<br />
butt hinges very fast and<br />
incredibly accurate. As with<br />
most woodworking projects,<br />
a jig is the key to my system.<br />
On a kitchen I did last year,<br />
I had to mortise in about<br />
thirty pairs <strong>of</strong> butt hinges.<br />
Just the other week I did<br />
four pairs and it took under<br />
an hour to completely install<br />
26 <strong>The</strong> <strong>Guild</strong> <strong>of</strong> <strong>New</strong> <strong>Hampshire</strong> <strong>Woodworkers</strong><br />
by Chris Kovacs<br />
the hinges in the doors and<br />
cabinet frames.<br />
Once you have your<br />
hinges, you can build your<br />
jig. To start, rip a couple <strong>of</strong> 3˝<br />
wide strips <strong>of</strong> half inch MDF.<br />
I prefer to use Merit brass<br />
hinges (www.meritmetal.com).<br />
<strong>The</strong>y are extremely nice<br />
components with machined<br />
pins and your choice <strong>of</strong> tips<br />
on the ends.<br />
Cross-cut the MDF to fit<br />
exactly into the door opening<br />
<strong>of</strong> your cabinet, not just close,<br />
but a snug fit. At the table<br />
saw, use the miter fence,<br />
dado set and stop blocks to<br />
cut out the slots in the MDF<br />
that match your hinges. In<br />
the case <strong>of</strong> the jig shown, the<br />
hinge leaves were 3/4˝ x 21/2˝.<br />
<strong>The</strong> blade was raised to 3/4˝<br />
and stop blocks were set up<br />
so the hinge would be 3˝<br />
from the top and 3˝ from<br />
the bottom <strong>of</strong> the cabinet<br />
opening.<br />
In this example, the stop<br />
block is set such that the<br />
first cut is 3˝ plus the hinge<br />
length. Flip the board end<br />
for end and make the same<br />
cut on the other end <strong>of</strong> the<br />
MDF. Do this for both<br />
pieces <strong>of</strong> MDF. Once you<br />
have made all four first cuts,<br />
move the stop block away<br />
from the blade and make<br />
cut 2 as shown. I usually aim<br />
for being about 1/32˝ less than<br />
the length <strong>of</strong> my hinge. Now<br />
just nibble away the material<br />
between the cuts. Do this<br />
on both end <strong>of</strong> each piece <strong>of</strong><br />
MDF. Make sure the cut-out<br />
is nice and smooth because a<br />
pattern routing bit is going<br />
to be following your cut.<br />
Before gluing the two<br />
pieces <strong>of</strong> MDF together,<br />
clamp one <strong>of</strong> them to a<br />
scrap piece and set up your<br />
router with a 1/2˝ diameter<br />
top bearing pattern bit. This<br />
same procedure can be done<br />
using your router’s bushing<br />
set with a straight cutting<br />
bit and adjusting the length<br />
and width <strong>of</strong> your cutout to<br />
accommodate the bushing. I<br />
prefer a flush trim router bit.<br />
Set the depth <strong>of</strong> the bit.<br />
In this case it is going to
e about 5/8˝ (1/2˝ for MDF plus<br />
1/8˝ thick hinge leaf ). Make a test<br />
cut and check the depth. Get the<br />
depth right and make another test<br />
cut clearing all <strong>of</strong> the material away.<br />
You should be left with a nice clean<br />
mortise that has rounded corner.<br />
Break out your nicely sharpened<br />
chisel and square these corners.<br />
Check the fit. If anything, it<br />
should be too snug. If it is too loose,<br />
you can add tape or veneer to your<br />
notches to make them slightly<br />
smaller. In the case <strong>of</strong> being a bit<br />
snug, nudge the stop block ever<br />
so slightly and widen the cutout<br />
and go back to the scrap and make<br />
another test mortise. If still too<br />
tight, nudge some more and test<br />
again. If you nudge too much and<br />
make the test mortise too loose, have no fear, remember, we<br />
have two pieces <strong>of</strong> MDF and only one needs to be perfect.<br />
Once you get the perfect fit, make the cuts on the second<br />
piece <strong>of</strong> MDF and label it as the good piece. <strong>The</strong> router is<br />
going to ride on this piece. Glue and staple the two MDF<br />
pieces together at right angles. Once the glue has set, clamp<br />
the MDF template to your cabinet side. It should fit perfectly.<br />
Route the two mortises, remove the jig and chisel them<br />
square. With that operation complete, fit the door to the<br />
opening with whatever gap you choose. Fitting the door now<br />
is critical because once the<br />
mortises are cut in the door,<br />
there is going to be no play<br />
up or down.<br />
To make the matching<br />
mortises in the door, clamp<br />
it into a vise and clamp the<br />
jig to the hinge side <strong>of</strong> the<br />
door. Use your fingers or a<br />
ruler, to center the jig along<br />
the door edge. It should<br />
overhang the door equally<br />
on both ends. Route and<br />
chisel clean the corners <strong>of</strong><br />
the mortises. At this point,<br />
the hinges will fit perfectly<br />
in the door and match<br />
perfectly to the ones in the<br />
cabinet. <strong>The</strong> same jig can be<br />
used for both left and right<br />
doors by simply flipping it<br />
over.<br />
As a last word, when<br />
driving in the screws, use<br />
a self-centering pilot bit.<br />
Skipping this part will lead<br />
to screws being <strong>of</strong>f center and the hinge being pulled out <strong>of</strong><br />
position. Also, if you are using nice solid brass screws, make<br />
sure to drive a similar sized steel screw first to pre-thread the<br />
hole. Drive the brass screw in after dabbing the tip in a little<br />
wax and using a screwdriver and not a drill. This last bit <strong>of</strong><br />
advise will keep you from stripping screws <strong>of</strong> damaging the<br />
coatings the s<strong>of</strong>t brass screws.<br />
Although my methods for building the jig requires a different<br />
jig for different door heights, it can be modified to work on<br />
different door heights. By using short lengths <strong>of</strong> MDF (about<br />
10˝) and making only one notch in each set, pairs <strong>of</strong> MDF jigs<br />
can be attached together with a length <strong>of</strong> scrap wood. This<br />
would allow you to lengthen or shorten the jig depending on<br />
the door opening height.<br />
<strong>The</strong> <strong>Guild</strong> <strong>of</strong> <strong>New</strong> <strong>Hampshire</strong> <strong>Woodworkers</strong><br />
27
Surface Texture<br />
This article is derived from an excellent workshop put on by Graham Priddle.<br />
Sometimes the object speaks for itself<br />
but sometimes a little decoration<br />
is in order. <strong>The</strong>re are several ways to<br />
decorate a bowl or other wooden object.<br />
This article deals with texturing the<br />
surface. Among the many ways to texture<br />
surfaces are carving and branding.<br />
Branding<br />
To brand an object, you need a brand<br />
and a heat source. Let’s start with the<br />
heat source. <strong>The</strong>re are a number <strong>of</strong><br />
commercial products out there and they<br />
do a good job but are fairly light weight.<br />
You can make your own source from a<br />
battery charger but please remember that<br />
you are playing with electricity and do so<br />
at your own risk. If you would like to<br />
proceed, you will need a battery charger<br />
28 <strong>The</strong> <strong>Guild</strong> <strong>of</strong> <strong>New</strong> <strong>Hampshire</strong> <strong>Woodworkers</strong><br />
(inexpensive and without any circuit<br />
boards) or that old one lying around the<br />
garage, a standard single pole dimmer<br />
switch, and a few wire nuts. You will also<br />
need a screwdriver to remove the case,<br />
wire cutters/stripers and something<br />
to alter the case to accept the dimmer<br />
switch. You need the dimmer switch to<br />
reduce the amperage and therefore the<br />
amount <strong>of</strong> heat produced by the charger.<br />
At full power it will melt your brand.<br />
Power Source<br />
First remove the cover and find the<br />
place you are going to put the dimmer.<br />
Either install it now or after you do the<br />
wiring.<br />
Find the power wire (black) coming<br />
in from the plug. Cut it and run the plug<br />
by Dave Frechette<br />
side into the dimmer switch and the<br />
other side out <strong>of</strong> the on/<strong>of</strong>f switch.<br />
<strong>The</strong>re also should be a heat controller<br />
module. This keeps the charger from<br />
overheating and burning down your<br />
house if left unattended. Disable this<br />
as shown in the photos. Obviously if<br />
this is disabled and you leave the unit<br />
unattended, it can now burn down the<br />
house. Take appropriate precautions<br />
when using it. If you have a metal case,<br />
you will need to ground the switch.<br />
Replace the charger cover. Cut <strong>of</strong>f<br />
the charging clips. I would leave a little<br />
wire on them so you can reattach them<br />
in the future if you would like to. Set the<br />
clips aside.<br />
You now have a controllable source<br />
<strong>of</strong> electricity to heat your branding iron<br />
but no iron (or in this case – nickel).<br />
Branding Wand<br />
To make the wand you will need an<br />
8˝ piece <strong>of</strong> PVC pipe (22 mm diameter)<br />
usually used as a conduit for electrical<br />
wire, a piece <strong>of</strong> wood about 3 to 4 inches<br />
long and a half inch square in section,<br />
four electrical connectors (Radio shack<br />
#274-667, barrier strip, European style)<br />
from which two have the plastic removed,<br />
two pieces <strong>of</strong> copper wire (10-12 gauge)<br />
each about an inch and a half long, a bolt<br />
and nut to attach one set <strong>of</strong> connectors<br />
to the wood and a brand made <strong>of</strong> nickle<br />
chromium wire (18 gauge or possibly<br />
20 – MSC 73226342). You will need a<br />
saw to cut the wood and pipe and a wire<br />
cutter/stripper to prepare the copper<br />
wire. Tools required, after the wood and<br />
pipe are cut include needle nose pliers<br />
and a small screw driver.<br />
Drill a hole about 1/4˝ away from the<br />
end <strong>of</strong> the wood. Bolt on the plastic<br />
enclosed connectors. Slide the pipe over<br />
the wires <strong>of</strong> the charger and strip the
Basic battery charger<br />
ends or the wires. Attach the wire to the<br />
connectors on the long side <strong>of</strong> the wood.<br />
Attach a piece <strong>of</strong> copper wire to each<br />
side <strong>of</strong> the connectors. Attach a nonplasticised<br />
piece <strong>of</strong> connector to each<br />
end <strong>of</strong> the wires. Attach the brand to<br />
the connectors. Shove the pipe onto the<br />
wood. You have a completed brander.<br />
Branding wand with nickel chromium wire brand<br />
Make a Brand<br />
To make a brand, cut a piece <strong>of</strong> nickle<br />
chromium wire to length and using your<br />
pliers, shape it. Remember electricity<br />
flows like water and tries to flow back to<br />
the source by the shortest route. If you<br />
have a complicated design and the wires<br />
touch, the electricity will flow through<br />
the touch and not heat the entire brand.<br />
You can fine tune the shape <strong>of</strong> the brand<br />
when it is heated.<br />
Using the Brand<br />
You will not need full power. When<br />
you turn up the dimmer switch, the<br />
brand should get red hot at about 8-12<br />
amps. That is all you need and if you<br />
keep going, you will melt the brand.<br />
Try the brand on scrap wood until you<br />
are comfortable with it. If you brand<br />
everywhere on a surface, you will not<br />
need to sand around it. If you are making<br />
a bowl, you can keep the pattern in a<br />
circular area and then do your sanding<br />
<strong>of</strong> the edges on the lathe.<br />
Disable the<br />
Heat Control Module<br />
Move wire from one post to the other<br />
Painting<br />
When you are done with the<br />
branding, lightly sand <strong>of</strong>f any fuzz you<br />
may have created. Using a black acrylic<br />
paint (available in art stores) and a tooth<br />
brush, work the color into all the crevices.<br />
After the paint is dry, sand anything that<br />
went over the side. Finish the article as<br />
you normally would.<br />
Rotary Carving – Another Approach<br />
Obviously, there are many ways to<br />
carve. This article will deal with rotary<br />
carving. Again, there are a number <strong>of</strong><br />
commercial tools available. I have been<br />
using a pneumatic pencil grinder (Sioux<br />
– $135 from MSC) and have been<br />
pleased with it.<br />
<strong>The</strong> only problem I had was that it<br />
came with a 1/8˝ collet and when I called<br />
<strong>The</strong> <strong>Guild</strong> <strong>of</strong> <strong>New</strong> <strong>Hampshire</strong> <strong>Woodworkers</strong><br />
29
to get a smaller one, I was told that there<br />
were no smaller ones available and that<br />
no other manufacturers would work.<br />
However, I took one from a Dremel and<br />
put it on and it works fine. <strong>The</strong> grinder<br />
has a high number <strong>of</strong> RPM (54,000 in<br />
my case) and is easy to hold and control.<br />
If you do not have air in your shop,<br />
you will need something else. Besides the<br />
rotary tool, you will need cutting tools.<br />
Small burrs are available from jewelry<br />
supply stores. If you are in the city, there<br />
may be a jewelry supply store you can<br />
walk into but if, like me, these are not<br />
readily available, you can order from the<br />
internet. I have used Rio Grande Supply<br />
(www.riogrande.com) with success but<br />
there are a number available.<br />
30 <strong>The</strong> <strong>Guild</strong> <strong>of</strong> <strong>New</strong> <strong>Hampshire</strong> <strong>Woodworkers</strong><br />
Because I seem to like round shapes,<br />
I got some round burrs and some cups.<br />
I use the burrs to make round holes<br />
(valleys) and the cups to leave round<br />
raised centers (hills).<br />
Again the key to success is to use all<br />
the area you have mapped out and then<br />
to paint it and sand the surrounding<br />
wood before applying the final finish.<br />
Hammer Gun<br />
You can also use a hammer gun with<br />
a blunt tool in it to dimple a surface. If<br />
Grinder bits<br />
you are going to do this, apply the finish<br />
first to make it less likely for the hammer<br />
to break the wood fibers.<br />
Pneumatic pencil grinder<br />
back on the lathe for sanding if needed.<br />
<strong>The</strong> bowl is reversed and the tenon<br />
removed. If I am going to decorate the<br />
bottom, this is done next followed by<br />
painting and returning the bowl to the<br />
lathe for any finish sanding. <strong>The</strong> entire<br />
bowl is then finished.<br />
October 11 th , 2008<br />
Hand Tools<br />
O n<br />
Saturday October 11, the new<br />
Hand Tools Group held its first<br />
meeting at Dave Anderson’s shop in<br />
Chester, NH. Thirteen members showed<br />
up for the inaugural meeting. <strong>The</strong> group<br />
has decided to meet five times per year<br />
on the second Saturday <strong>of</strong> the even<br />
numbered months. <strong>The</strong> exception will<br />
be August when the guild is occupied<br />
with the Sunapee Fair.<br />
Members decided that the most<br />
logical way to proceed for the future<br />
was to center each meeting around<br />
a particular tool or category <strong>of</strong> tools.<br />
Meetings will cover such things as the<br />
choice between new and used, how to<br />
Final Steps<br />
When turning and decorating a bowl,<br />
I will turn the outside and, if I am not<br />
going to decorate it, I will sand it. I then<br />
chuck up the bowl and turn the inside. I<br />
<strong>of</strong>ten will put a “V” edge around areas<br />
that I am going<br />
to decorate to<br />
make finish<br />
sanding easier.<br />
<strong>The</strong> bowl is<br />
then removed<br />
from the lathe<br />
and branded or<br />
carved and then<br />
painted. <strong>The</strong><br />
bowl then goes<br />
restore and tune the tool, maintenance,<br />
and sharpening, and techniques for using<br />
the tool. Members will be encouraged to<br />
bring problems, questions, tools which<br />
they need identified, or those which are<br />
giving them problems.<br />
At Saturday’s meeting, John<br />
Whiteside brought a box <strong>of</strong> assorted<br />
hand tools from the mid to latter part<br />
<strong>of</strong> the 19th century for identification.<br />
Included were both factory and user<br />
made tools such as an old woman’s tooth<br />
router, calipers, hollows and rounds, a<br />
side escapement rabbet plane, beading<br />
planes, and some complex molding<br />
planes.<br />
Impact hammer gun<br />
by Dave Anderson<br />
new subgroup holds first meeting<br />
For our December 13 meeting the<br />
topic will be scrapers, scraper planes,<br />
and the accessories and tools needed to<br />
sharpen and maintain them. Included<br />
will be a demonstration <strong>of</strong> several<br />
techniques for sharpening and rolling a<br />
burr and time for members to try their<br />
hand at preparing and testing their own<br />
tools. <strong>The</strong>re will also be a discussion <strong>of</strong><br />
what is available in the marketplace.<br />
<strong>The</strong> time and location <strong>of</strong> the meeting<br />
will be listed on the guild website and<br />
further information will be available<br />
from Dave Anderson.
Miter Sled … Again<br />
Some <strong>of</strong> you may remember this sled<br />
from the picture frame article a<br />
while back. A later issue talked about a<br />
jig on a jig. Well this jig has been evolving<br />
and improving. And now it’s a jig on a<br />
jig on a jig. <strong>The</strong> intent <strong>of</strong> this article is to<br />
entice you to evolve your jigs. If you find<br />
a shortcoming, as I had with this one, fix<br />
it. I used it joyfully for over a year but<br />
each time struggled with the stops for<br />
the pieces to be mitered. Clamping on<br />
other boards, temporary solutions, but<br />
good enough for now.<br />
Well, frustration and belief in a better<br />
life won out. It has morphed into a new<br />
state that, so far, has no need for further<br />
improvement. So a quick explanation <strong>of</strong><br />
the details in case you want to upgrade,<br />
or build your first one, or just see what<br />
evolutionary thoughts can do for you.<br />
<strong>The</strong> first incarnation doesn’t exist any<br />
more. <strong>The</strong>re was a 3/4˝ setback to manually<br />
clamp on a stop bar. That worked but was<br />
consistently inconvenient. By moving<br />
the face out flush and adding a T-track,<br />
the external clamps were eliminated.<br />
Back then, a T-track was clamped on.<br />
It’s permanently mounted in this one.<br />
by Bob Oswald<br />
Second problem was that the<br />
T-tracks stuck way out, four feet into<br />
the room on each side. A real challenge<br />
to store and difficult to keep from<br />
bending something. It was also grossly<br />
inconvenient for short frame pieces. So<br />
the upgrade that finally emerged through<br />
a lot <strong>of</strong> trail and error was an extension<br />
track riding on the track. In hindsight it<br />
seemed so obvious. But it took months<br />
for a solution to evolve. Holes were<br />
drilled in this rigid extension every<br />
three inches for adjustability options.<br />
This extension allows frame lengths over<br />
six feet. And yet it collapses to about a<br />
24˝ x 24˝ jig – much easier to store.<br />
And a final tip. This long extension<br />
would dangle unceremoniously when<br />
the locking knob was<br />
adjusted, tending to<br />
swivel itself to the floor<br />
at the unsupported end.<br />
So the extension slide<br />
was actually made with<br />
a raised center section<br />
that fits in the T-track<br />
groove and holds it<br />
aligned.<br />
Bolt holds T-track for easy change to a longer track<br />
Stops in short & long positions<br />
Track slides in holder T hardware sliding stop<br />
Do I do that<br />
many picture<br />
frames that all<br />
<strong>of</strong> this was necessary? Quite honestly, no.<br />
Although I did a custom eye glass frame<br />
set recently, three large structures that<br />
were basically picture frames. It really<br />
paid <strong>of</strong>f to have the right tools in place.<br />
And the need arises <strong>of</strong>ten enough that<br />
frustration eventually wins out.<br />
Even at a few uses a year, it was such<br />
a hassle to wrestle with the pieces that<br />
the time spent was worth it. Of course<br />
some part <strong>of</strong> this current solution<br />
was simply to make the point that<br />
sometimes it’s worth an evening to “just<br />
do the job right”. And after numerous<br />
continued on Page 38<br />
Shoulder stays aligned in T-track<br />
Extension arm<br />
<strong>The</strong> <strong>Guild</strong> <strong>of</strong> <strong>New</strong> <strong>Hampshire</strong> <strong>Woodworkers</strong><br />
31
Japanese Kokeshi Dolls<br />
September 27 th , 2008<br />
Granite State Woodturners<br />
meeting at Franklin High School in Franklin, NH<br />
<strong>The</strong> Granite State Woodturners met<br />
on September 27, 2008, at Franklin<br />
High School in Franklin, NH. <strong>The</strong>re<br />
were several business related items<br />
discussed, then a presentation on<br />
Japanese Kokeshi dolls.<br />
<strong>The</strong> first item was the upcoming<br />
turning symposium, which will be held<br />
at Pinkerton Academy on Saturday,<br />
May 23, 2009. <strong>The</strong>re will also be youth<br />
turning symposium at Pinkerton the<br />
day before, Friday, May 22, 2009.<br />
Peter Breu led the discussion. This<br />
included issues concerning the number<br />
<strong>of</strong> presenters, rotation coordination,<br />
and the trade show. Peter also raised<br />
several issues concerning the video<br />
taping <strong>of</strong> the different presentations.<br />
<strong>Guild</strong> library records indicate that<br />
these tapes are immensely popular with<br />
the membership, representing onequarter<br />
<strong>of</strong> the tapes borrowed from the<br />
collection each year. Taping this event<br />
is an area where assistance is certainly<br />
needed. Anyone willing to help out with<br />
video taping should contact Peter Breu.<br />
Jon Siegel addressed the idea <strong>of</strong><br />
hands-on workshops that would focus<br />
on various woodturning techniques. This<br />
would give members an opportunity to<br />
practice these techniques first hand. Jon<br />
32 <strong>The</strong> <strong>Guild</strong> <strong>of</strong> <strong>New</strong> <strong>Hampshire</strong> <strong>Woodworkers</strong><br />
is looking for input from members with<br />
regard to topics.<br />
With business matters out <strong>of</strong> the<br />
way, I gave a presentation on Japanese<br />
Kokeshi dolls, which are limbless<br />
wooden dolls turned on the lathe and<br />
then hand-painted. Before I describe<br />
the details <strong>of</strong> the Kokeshi dolls, however,<br />
let me first explain how it was that I<br />
came to be in Japan and discover these<br />
cultural artifacts.<br />
Shortly after World War II, the<br />
United States government established<br />
the Fulbright Foundation, a program<br />
designed to promote educational and<br />
cultural exchange between the United<br />
States and other countries. One country<br />
that has participated enthusiastically in<br />
the Fulbright program is Japan, sending<br />
hundreds <strong>of</strong> its citizens to the United<br />
States to study in our educational system<br />
and learn about our culture.<br />
About twelve years ago the<br />
Government <strong>of</strong> Japan decided to<br />
reciprocate and developed a program<br />
that would allow citizens <strong>of</strong> the United<br />
States to go to Japan and learn about its<br />
educational system, manufacturing and<br />
business sectors, and its culture. This<br />
was linked together with the Fulbright<br />
program here in the US, and thus the<br />
Japan Fulbright Memorial Foundation<br />
by Matt Siranian<br />
photos by<br />
Matt Siranian<br />
Lindsay Freese<br />
Kellina Fantozzie<br />
was created. Although it is linked with,<br />
and coordinated through the Fulbright<br />
Foundation, it is a separate entity and<br />
fully funded by the Government <strong>of</strong><br />
Japan. It is <strong>of</strong>fered to teachers and school<br />
administrators only.<br />
Each spring and fall, 160 teachers<br />
and administrators are selected to travel<br />
to Japan for three weeks. During that<br />
time, participants attend classes, lectures,<br />
and symposiums where they learn about<br />
the Japanese educational system, the<br />
economy, manufacturing, industry, social<br />
issues, history, health care, political<br />
issues, arts, and culture. <strong>The</strong>se sessions<br />
take place over a week in Tokyo.
After this first week, the 160<br />
participants are broken up into 10<br />
groups <strong>of</strong> 16 people each. Each small<br />
group then travels to a different part <strong>of</strong><br />
Japan and for the next 10 days lives in<br />
a smaller Japanese city and visits local<br />
government, universities, public schools,<br />
businesses and industries, local areas <strong>of</strong><br />
interest, and finally, each person spends<br />
2 days living with a Japanese host family.<br />
This is a total-immersion program in the<br />
life and ways <strong>of</strong> the Japanese.<br />
As a high-school industrial arts<br />
teacher, I went to Japan last spring, and<br />
after a week in Tokyo I traveled north<br />
to the Osaki prefecture, a county-type<br />
area located in one <strong>of</strong> the most seismic<br />
areas <strong>of</strong> Japan. <strong>The</strong> Osaki prefecture has<br />
a number <strong>of</strong> volcanic hot springs, where<br />
people go to soak in hot, mineral-rich<br />
baths that are naturally heated by the<br />
earth. It was in this area <strong>of</strong> volcanic hot<br />
springs that I discovered the Kokeshi<br />
doll.<br />
<strong>The</strong> Kokeshi doll was first made<br />
sometime during the Edo period, 1603-<br />
1867. <strong>The</strong>re are several stories about<br />
how it originated. One story says that<br />
it was created as an inexpensive toy for<br />
children, a less-expensive alternative to<br />
porcelain dolls. Another story indicates<br />
that they were made as a means <strong>of</strong><br />
remembering children who died or were<br />
sold away during periods <strong>of</strong> famine. <strong>The</strong><br />
word Kokeshi, as I learned, is made up<br />
<strong>of</strong> two words – ko, meaning child; and<br />
keshi, meaning erasing, or absent. <strong>The</strong><br />
Kokeshi doll served to memorialize the<br />
lost child, and to appease the spirits.<br />
Nevertheless, the dolls were eventually<br />
seen by tourists who had traveled to<br />
the region to bathe in the volcanic hot<br />
springs, and were purchased as souvenirs.<br />
<strong>The</strong>y became very popular and demand<br />
for them increased. Artisans would<br />
make them during the winter months<br />
when other types <strong>of</strong> work were scarce,<br />
stockpiling them for sale to tourists in<br />
the spring and fall, when visiting the hot<br />
springs was most popular.<br />
Whereas this was a regional artifact,<br />
the original dolls were similar in the way<br />
they were turned and decorated, yet there<br />
are some noticeable differences. As I was<br />
told, there were eleven original varieties,<br />
based on the area within the prefecture<br />
where it was made and the artisans who<br />
lived there. I visited a Kokeshi museum<br />
while I was in northern Japan, and<br />
although the antique dolls were similar,<br />
certain turning and painting techniques<br />
became apparent and the dolls definitely<br />
fell into their own sub groups. <strong>The</strong>se<br />
antique dolls are now coveted by<br />
collectors and are quite valuable.<br />
<strong>The</strong> dolls range in size from very<br />
small (less than 1 inch) to quite large<br />
(over 3 feet). <strong>The</strong>y are made from<br />
dogwood, Japanese maple, cherry, and<br />
pear, with the last two being the most<br />
expensive.<br />
<strong>The</strong> dolls are turned on small – or<br />
what we would consider mid-sized –<br />
lathes, with an unusual cone-shaped<br />
jamb chuck that the material is driven on<br />
to. <strong>The</strong> chuck is hollow, and sharpened<br />
to cut in to the material and hold it. It<br />
reminded me <strong>of</strong> the very end <strong>of</strong> an apple<br />
corer. <strong>The</strong>re is no tailstock. <strong>The</strong> entire<br />
piece is turned without any support or<br />
pressure on the tailing end. <strong>The</strong> lathes<br />
do not have a traditional tools rest,<br />
but rather, a sliding wooden rest that<br />
supports the turner’s arm. <strong>The</strong>re does<br />
not appear to be any speed adjustment.<br />
<strong>The</strong> turning tools are hand-made and do<br />
not resemble our turning tools at all.<br />
<strong>The</strong> dolls are usually turned in two<br />
<strong>The</strong> <strong>Guild</strong> <strong>of</strong> <strong>New</strong> <strong>Hampshire</strong> <strong>Woodworkers</strong><br />
33
pieces, with the head being made first.<br />
<strong>The</strong> head is turned with a small tenon, or<br />
ball protruding from the end. Once this<br />
tenon is sized the head is parted <strong>of</strong>f.<br />
<strong>The</strong>n the body <strong>of</strong> the<br />
doll is turned. Most are<br />
rather simplistic, although<br />
there are some modern<br />
variations. Again, the doll<br />
is turned without a tailstock,<br />
and as it is finished, a small<br />
mortise, or socket, is turned<br />
in to the end; this mortise<br />
is ball-shaped, growing<br />
larger as it goes deeper, to<br />
accommodate the tenon,<br />
or ball, protruding from<br />
the head. While the body<br />
is still spinning the turner<br />
tries to fit the ball on the<br />
head into the socket in the<br />
body. If it’s too tight, the<br />
turner opens the mortise<br />
slightly, then fits the head<br />
again. This may take several attempts,<br />
but when all seems right the turner<br />
holds the ball-shaped tip on the head<br />
firmly—and at an angle— against the<br />
socket-shaped mortise on the body until<br />
34 <strong>The</strong> <strong>Guild</strong> <strong>of</strong> <strong>New</strong> <strong>Hampshire</strong> <strong>Woodworkers</strong><br />
it begins to smoke, and in a second or<br />
two it actually pops in to the body with<br />
a remarkably tight fit. <strong>The</strong> head will turn,<br />
but it doesn’t wobble or teeter. It’s almost<br />
as if it were made from one piece.<br />
<strong>The</strong> dolls come <strong>of</strong>f the lathe as<br />
smooth as glass. <strong>The</strong> turner uses a<br />
scraper and therefore there is very little<br />
sanding. <strong>The</strong> dolls are then painted with<br />
Japanese ink. <strong>The</strong>re are several different<br />
styles <strong>of</strong> painting, again, reflecting the<br />
eleven original styles <strong>of</strong> dolls, although<br />
there are more modern approaches that<br />
reflect the anime genre.<br />
We are now making<br />
Kokeshi dolls in my wood<br />
working classes at Franklin<br />
High School, although at<br />
this point we’re making<br />
them in one piece. We are<br />
still trying to perfect the<br />
ball-and-socket joint. It’s<br />
not as easy as the wood<br />
turner in Japan made it<br />
look. We are working with<br />
the art teacher on the<br />
painting end <strong>of</strong> the project;<br />
that’s taking some practice,<br />
too. <strong>The</strong> Kokeshi doll is<br />
beguiling in its simplicity:<br />
<strong>The</strong>re is much more craft,<br />
technique, and history<br />
behind this simplistic little<br />
artifact than seems apparent.<br />
In closing I need to thank the Japanese<br />
Fulbright Memorial Foundation and<br />
the Government <strong>of</strong> Japan for the<br />
opportunity to travel to Japan, learn<br />
about the country,<br />
and meet many<br />
wonderful people. I<br />
need to also thank<br />
the Franklin School<br />
District for its support,<br />
and finally, the <strong>Guild</strong><br />
<strong>of</strong> <strong>New</strong> <strong>Hampshire</strong><br />
<strong>Woodworkers</strong> for<br />
helping me share my<br />
great fortune with<br />
others.
October 4 th , 2008<br />
by Alan Saffron<br />
Beginner & Intermediate Group<br />
meetings held at the Salmon Falls Mill in Rollingsford, NH<br />
<strong>The</strong> Beginner & Intermediate Group<br />
met October 4 at Bob LaCivita’s<br />
shop in Rollinsford. <strong>The</strong> group was<br />
honored to have a GNHW member<br />
from upstate <strong>New</strong> York. Being a local<br />
member <strong>of</strong> the Northeast <strong>Woodworkers</strong><br />
guild, <strong>The</strong> Old Saw impressed him<br />
enough to attend his first BIG meeting.<br />
Hanging the apple cabinet doors and<br />
finally closing the cabinet as the group’s<br />
topic was the only thing on the agenda.<br />
<strong>The</strong> doors curve gently across the<br />
front <strong>of</strong> the cabinet. To match the curve<br />
on the inside <strong>of</strong> the doors, Bob used both<br />
old and new technology. He planed some<br />
<strong>of</strong> the curve out using a 1746 wooden<br />
cove plane. Needing a more aggressive<br />
solution, he used a hand power plane to<br />
plane a shallow flat top to bottom, then<br />
used sanding discs to round the edges<br />
<strong>of</strong> the flat, and finished with a power<br />
sander to refine the curve.<br />
<strong>The</strong> doors were checked for fit, and<br />
uniform space around the edges. <strong>The</strong><br />
group nodded approvingly as only<br />
the edge <strong>of</strong> one door needed a little<br />
work – after all Bob made them. To<br />
accommodate expansion, he planed the<br />
center edges at a complimentary angle<br />
so they overlap and not show a space.<br />
We all watched very closely as Bob<br />
worked on the hinges. For good design,<br />
the hinges were spaced having the top<br />
hinge a bit closer to the top then the<br />
bottom hinge to the bottom, four and<br />
six inches respectively.<br />
Layout was done with a marking<br />
knife followed by penciling for accuracy<br />
and visibility and with two marking<br />
gauges to transfer marks from the doors<br />
to the cabinet.<br />
<strong>The</strong> key measurement was to allow<br />
for one half the thickness <strong>of</strong> the hinge<br />
barrel on the door and cabinet mortises.<br />
<strong>The</strong> mortises were cut using the marking<br />
knife and a sharp chisel, first on the<br />
doors, then the cabinet.<br />
To accurately drill the screw holes,<br />
Shop Apron by Caleb Dietrich<br />
Do you wear an apron around the shop? Why not?<br />
I was thinking I would write a blurb<br />
on my apron since it is my most used<br />
tool. I can’t get on with my work without<br />
it. If I do attempt to work without<br />
it, I’m liable to drop tools on the floor<br />
trying to holster them, or feel around<br />
my chest for a pencil that is not there. I<br />
take a little heat for it on job sites where<br />
framers ask me if I’m gonna bake them<br />
a cake. I either go with it, or send one<br />
back at them. Around the shop, I joke<br />
that I’m Clark Kent until I put it on.<br />
It keeps my clothes clean and keeps<br />
my most used tools at hand. I keep a<br />
12´ tape measure in the right pocket.<br />
You could go with a 16´, but I think the<br />
12´ Stanley is made better. It’s smaller<br />
and a 25´ is never far away. I keep a 6˝<br />
combination square in the left pocket,<br />
and a pencil, a 6˝ rule, and a permanent<br />
marker in the chest pockets. A crayon<br />
could replace the marker, but I use the<br />
marker for plywood edges.<br />
Most <strong>of</strong> the tools are self explanatory,<br />
but you might not have a full grasp<br />
on what you can accomplish with a 6˝<br />
Bob used a Vix bit, which does a nice job<br />
<strong>of</strong> centering the drill in the hinge screw<br />
holes. Final fit was done with a block<br />
plane. Lastly, Bob raised a small dent in<br />
the edge <strong>of</strong> one <strong>of</strong> the doors by wetting<br />
it, and heating it with a household iron.<br />
<strong>The</strong> dent did come out. Having that<br />
household iron in his shop, makes you<br />
wonder just how <strong>of</strong>ten Bob dings and<br />
dents his stock.<br />
At the next meeting on December<br />
6, the group is going to start a cabinet<br />
with multiple drawers, each having a<br />
different design and mounting. Bob<br />
will demonstrate the processes so<br />
that the group can make their own<br />
versions in their shops as we go. Just<br />
like being in school, you can ask the<br />
teacher for help on the problems you<br />
had doing your homework. <strong>The</strong> meeting<br />
will be in Rollinsford. Contact Bob at<br />
rlacivita@metrocast.net or 603-942-1240<br />
before 9:00 PM.<br />
rule. It is a utility<br />
knife for opening<br />
packages, a glue<br />
scraper for clearing<br />
half dried glue, and<br />
useful inside a rag<br />
for wiping stain or glue out <strong>of</strong> corners.<br />
So if you haven’t thought about<br />
the usefulness, I hope this helps. I just<br />
recommend that you get one with Xing<br />
shoulder straps. I’m on my second one.<br />
My first was modified to have Xing<br />
straps before Lee Valley came out with<br />
the second generation. It was sadly<br />
thrown away about a month after the<br />
hole in the pocket became bigger than<br />
my tape measure. I’m warming up to its<br />
replacement.<br />
<strong>The</strong> <strong>Guild</strong> <strong>of</strong> <strong>New</strong> <strong>Hampshire</strong> <strong>Woodworkers</strong><br />
35
Sept 20 th , 2008<br />
Annual <strong>Guild</strong> Meeting<br />
meeting held at Camp Lincoln in Kingston, NH Dave Frechette – Incoming President<br />
Hi to all. This is for all <strong>of</strong> you that<br />
did not make the Annual Meeting.<br />
We had a great place, a great time and<br />
great weather. Well a lot <strong>of</strong> us wished<br />
we had another sweater, but at least the<br />
sun was out.<br />
<strong>The</strong> turnout was a little lacking as we<br />
had 58 bidders vs 60 last year. But the<br />
real action was on the bidding. <strong>The</strong>re are<br />
three people laughing all the way to the<br />
bank as they got items at $1, then we<br />
had a high bid <strong>of</strong> $60 for a morse taper<br />
chuck which he or she is going to the<br />
lathe thinking <strong>of</strong> the money they saved.<br />
We led <strong>of</strong>f with the annual auction.<br />
Jon Siegel did not have to carry the<br />
Jon Siegel (right) conducts the annual auction<br />
36 <strong>The</strong> <strong>Guild</strong> <strong>of</strong> <strong>New</strong> <strong>Hampshire</strong> <strong>Woodworkers</strong><br />
by Syd Lorandeau<br />
whole load this year as Gary Bashian<br />
stepped it to finish up part we through.<br />
After the accountants totaled the<br />
auction, we made $889 which is a huge<br />
help to the scholarship fund. I do not<br />
want to be a beggar but just think how<br />
much good that stuff you do not use can<br />
help those that can not afford. All in all,<br />
the auction was another success.<br />
Next came the business meeting<br />
with more than a full agenda <strong>of</strong> items to<br />
discuss. <strong>The</strong> topic that took most <strong>of</strong> the<br />
time was discussion concerning raising<br />
the dues to $40 next membership year.<br />
<strong>The</strong>re were many points <strong>of</strong> view about<br />
<strong>The</strong> Old Saw and other expenses but in<br />
the end it came down to a vote and next<br />
year the dues will be $40 – not this year<br />
but the 2008/2009 membership year<br />
beginning next September.<br />
Election <strong>of</strong> <strong>of</strong>ficers took place.<br />
Incoming <strong>of</strong>ficers are Dave Frechette<br />
(President), Mike Noel (Vice President),<br />
Peter James (returning Treasurer) and<br />
Caleb Dietrich (returning Secretary).<br />
Our outgoing president Dave<br />
Anderson was presented with a Lie-<br />
Nielson plane very nicely engraved with<br />
the symbol <strong>of</strong> the <strong>Guild</strong>. One more<br />
“Thank you” Dave Anderson for a job well<br />
done.<br />
We broke for lunch right on schedule<br />
and was served a super meal that was<br />
photos by Jim Seroskie<br />
quite outstanding, as a matter <strong>of</strong> fact<br />
I am trying to find out when Camp<br />
Lincoln is serving again as I plan to go<br />
back.<br />
Garrett Hack gave his presentation<br />
in the afternoon. You can read about on<br />
the back cover.<br />
We received a number <strong>of</strong> dues as they<br />
are now due, if you have forgotten please<br />
send them in.<br />
Dave Frechette congratulates Dave Anderson<br />
for his two years <strong>of</strong> service as <strong>Guild</strong> President
ulletin board<br />
Discounted Woodworking Books<br />
– Last Chance<br />
<strong>The</strong> November <strong>Guild</strong> meeting will be<br />
the last opportunity to order discounted<br />
woodworking books until next Fall. If<br />
you would like to take advantage <strong>of</strong> a<br />
40% or higher discount through group<br />
sales, email your order to me or take a<br />
look at the catalogs from Taunton Press<br />
and Fox Chapel that I will bring to the<br />
November meeting.<br />
I will have catalogs and take<br />
orders at <strong>Guild</strong> meetings, or you<br />
can view titles on the publishers’<br />
web sites (www.taunton.com &<br />
www.foxchapelpublishing.com) and email<br />
your order to me.<br />
If you email your order, you must<br />
include the following in addition to your<br />
name and telephone number:<br />
• For Taunton: <strong>The</strong> exact title, author,<br />
type <strong>of</strong> item (hard or s<strong>of</strong>t cover book,<br />
video or DVD), the list price and the<br />
Taunton Product Code (NOT the<br />
ISBN #).<br />
• For Fox Chapel: <strong>The</strong> exact title, author,<br />
type <strong>of</strong> item (hard or s<strong>of</strong>t cover book,<br />
video or DVD), list price and the<br />
ISBN #.<br />
Books should be available in early<br />
December for pick up at my home in<br />
Mont Vernon, NH, or at a future guild<br />
meeting. Note that we do not mail books<br />
to member homes.<br />
All email orders will be acknowledged<br />
within one week. So if you do not get a<br />
response, please call me – I have vigorous<br />
anti-spam s<strong>of</strong>tware.<br />
I’ll email you with the net cost<br />
when the books arrive. Payment is due<br />
immediately and the books are not<br />
returnable. This gives us a premium<br />
discount. Happy hunting for some really<br />
good woodworking books.<br />
Discounted magazine subscriptions,<br />
also an annual event, takes place in the<br />
February time frame – watch for the<br />
next Old Saw for details.<br />
Tony Immorlica - Book Coordinator<br />
603-6763-9629 (evenings) or<br />
aaijr@comcast.net<br />
Beginner & Intermediate Group<br />
<strong>The</strong> next two BIG meetings will be held<br />
December 6, 2008 and February 7, 2009<br />
at 9:30 in my shop. <strong>The</strong> shop is located<br />
at <strong>The</strong> Salmon Falls Mill in Rollingsford,<br />
NH, studios 215 & 217. For directions<br />
go to www.millartists.com. Please let me<br />
know if you plan to attend.<br />
Robert LaCivita: rlacivita@metrocast.net or<br />
603-942-1240 please call before 9:00 pm<br />
Granite State Woodturners<br />
<strong>The</strong> Granite State Woodturners is<br />
both a subgroup <strong>of</strong> the <strong>Guild</strong>, and a<br />
chapter <strong>of</strong> the American Association<br />
<strong>of</strong> Woodturners. <strong>The</strong> group covers all<br />
aspects <strong>of</strong> turning, from the conventional<br />
spindle and bowl turning to segmented,<br />
ornamental, and other types <strong>of</strong> turning.<br />
Meetings typically include a<br />
presentation or demonstration, and a<br />
short business meeting. Once a year there<br />
is a design critique, and occasionally<br />
other meeting formats are used, like field<br />
trips or open shops. GSWT also puts on<br />
the <strong>New</strong> England Turning Symposium<br />
every three years.<br />
Meetings are the fourth Saturday <strong>of</strong><br />
odd numbered months, typically from<br />
9:00am to 1:00pm, and are open to the<br />
guild membership, AAW membership<br />
and the general public. Contact DJ<br />
Delorie to be added to the e-mail<br />
notification list.<br />
DJ Delorie: dj@delorie.com<br />
Granite State Woodcarvers<br />
This small group <strong>of</strong> dedicated<br />
woodcarvers meets Thursday nights at<br />
Rundlett Middle School in Concord,<br />
NH. Meetings are 6:00pm-9:00pm<br />
during the school year. For info or<br />
directions contact:<br />
Lou Barchey: 603-753-2708 or<br />
barchey@comcast.net<br />
Period Furniture<br />
<strong>The</strong> next Period Furniture Group<br />
meeting will be at Dave MacRae’s shop<br />
in Weare NH. <strong>The</strong> special guest speaker<br />
demonstrator will be NH Furniture<br />
Master Jere Osgood. Jere will be doing<br />
a presentation on furniture design,<br />
presenting a slide show that he has put<br />
together and also do a dry run demo<br />
on one <strong>of</strong> the joints he has used in his<br />
furnituremaking.<br />
After Jere is done with his<br />
presentation we would like to see what<br />
you the members are working on. If you<br />
are currently working on a project or<br />
have a finished item, bring it with you<br />
for a show and tell.<br />
We have to limit attendance to<br />
25. If you would like to attend you<br />
need to email me and I will send you<br />
a confirmation email. I will also send<br />
you the directions in that email. We also<br />
need a person to bring a slide projector<br />
as Jere’s is broken. Let me know if you<br />
have one to bring. If you would like to<br />
attend the meetings, please contact John<br />
Faro or Mike Noel to be added to the<br />
list.<br />
John Faro: 603-968-9800 or<br />
Jff960@metrocast.net<br />
Mike Noel: 603-744-3821 or<br />
mnlwoods@netzero.net<br />
Luthiers<br />
<strong>The</strong> <strong>Guild</strong> Luthiers is a special<br />
interest group focused on the making<br />
<strong>of</strong> stringed instruments. People <strong>of</strong> all<br />
levels <strong>of</strong> expertise are welcome to join.<br />
Ordinarily we meet on the 3rd Sunday <strong>of</strong><br />
September, November, January, March,<br />
and June.<br />
We also have started an annual table<br />
at the Sunapee Craftsman’s Fair, which<br />
has been very successful. In addition, we<br />
are affiliated with the <strong>New</strong> England<br />
Luthiers, a sister organization based in<br />
Massachusetts. Several times a year our<br />
meetings are held jointly with them.<br />
To receive meeting notifications,<br />
contact John Whiteside.<br />
John Whiteside: 603-679-5443 or<br />
johninfremont@comcast.net<br />
Hand Tools<br />
<strong>The</strong> <strong>Guild</strong> Hand Tools subgroup will<br />
meet five times per year on the second<br />
Saturday <strong>of</strong> the even numbered months.<br />
<strong>The</strong> exception will be August. Meetings<br />
are held at Dave Anderson’s shop in<br />
Chester, NH.<br />
Contact Dave for more information.<br />
Dave Anderson: 603-887-6267 or<br />
dsachester@gsinet.net<br />
<strong>The</strong> <strong>Guild</strong> <strong>of</strong> <strong>New</strong> <strong>Hampshire</strong> <strong>Woodworkers</strong><br />
37
Mi t e r e d sl e d – continued<br />
days trying to visualize the solution, the<br />
actual construction time for a complete<br />
new jig was about an hour. Hopefully this<br />
will give you some ideas for that jig you<br />
Tru-Cut LLC<br />
“Trust us with your good stuff”<br />
CNC Carbide Blade Sharpening<br />
Planers/Routers/Shapers/Drills<br />
Satisfaction Guaranteed<br />
10% Off to GNHW Members<br />
603-826-4131<br />
213 River Rd • Charlestown • NH<br />
Rich Burnett – Owner<br />
mtoolrepair@comcast.net<br />
603-622-0207 • www.tool-repair.com<br />
Complete Repair Service<br />
MANCHESTER TOOL REPAIR<br />
722 East Industrial Park Dr Unit 3 • Manchester, NH<br />
10% Discount When You Present Your Card<br />
MAINE COAST LUMBER, INC<br />
17 WHITE BIRCH LANE<br />
YORK, ME 03909<br />
(207) 363-7426 • (800) 899-1664<br />
HARDWOOD PLYWOODS - HARDWOOD LUMBER<br />
SOFTWOOD LUMBER - MELAMINE<br />
MARINE PLYWOODS<br />
EDGE BANDING - VENEER - MDO - MDF<br />
PARTICLE BOARD - CUSTOM MOULDINGS<br />
DOVETAILED DRAWERS - TARGET COATINGS<br />
www.mainecoastlumber.com<br />
All guild members receive a 10% discount<br />
Gary R. Wood & Co.<br />
Select Finishing Supplies<br />
Shellacs, waxes, stains,<br />
varnishes & tools for an elegant finish.<br />
Your questions are always welcome!<br />
24 Gristmill Hill Rd • Canaan, NH<br />
www.garyrwood.com 603-523-4337<br />
10% discount to <strong>Guild</strong> members<br />
CTW<br />
38 <strong>The</strong> <strong>Guild</strong> <strong>of</strong> <strong>New</strong> <strong>Hampshire</strong> <strong>Woodworkers</strong><br />
have been struggling with or haven’t even<br />
made yet.<br />
<strong>The</strong> latest and final incarceration is not<br />
show. It adds slots where the miter bars<br />
MINUTEMAN<br />
PRESS ®<br />
Printing by MinuteMan Press • 88 Main St, Nashua, NH • 603-883-4890<br />
Serving NH for Over 30 years<br />
Highest Level <strong>of</strong> Customer Service<br />
Quality Stationary & Powered Hand Tools<br />
10% Discount to <strong>Guild</strong> Members<br />
Except machinery, power tools & already discounted items<br />
<br />
<br />
10% Discount to <strong>Guild</strong> Members<br />
Dave Anderson<br />
dave@chestertoolworks.com<br />
C HESTER T OOL W ORKS LLC<br />
www.chestertoolworks.com<br />
<br />
<br />
603-887-6267<br />
146 Jennifer Drive • Chester, NH 03036<br />
Introductory level to advanced courses<br />
Specialty classes<br />
Three to one teacher ratio<br />
Choose from 3 hr/wk for 4 wk,<br />
2-day workshops or 5-day workshops<br />
10% Discount to <strong>Guild</strong> Members<br />
<br />
are attached. <strong>The</strong>y are then secured with<br />
bolts from the top so they can be easily<br />
adjusted, especially to fit different table<br />
saws.<br />
Discount to <strong>Guild</strong> Members<br />
1-888-TURNING<br />
<br />
Big Tree Tools, Inc.<br />
<strong>The</strong> Belt and Buff Sharpening System<br />
from Big Tree Tools, Inc. is not just for<br />
woodturners. <strong>The</strong> NEW MODEL includes the Versa-Jig for<br />
sharpening carving and cabinet chisels, as well as plane<br />
irons. Price to <strong>Guild</strong> members for complete system: $355.<br />
<br />
Hand-Made Guitars &<br />
Guitar-Making Lessons<br />
10% discount for GNHW Members<br />
email: johninfremont@comcast.net<br />
<strong>The</strong> Millwork Shop<br />
at Trumbull-Nelson Construction Co., Inc.<br />
Rt. 120 - Hanover, <strong>New</strong> <strong>Hampshire</strong><br />
Milling Services, Hardwoods & Plywoods<br />
Contact Mitch Ross – 603/643-3658<br />
Fax 603-643-2924 • nrcarey@t-n.com • www.t-n.com<br />
10% discount to GNHW Members<br />
®<br />
NAVIS<br />
PACK&SHIP CENTERS<br />
North Road Guitars<br />
234 North Road<br />
Fremont, NH 03044<br />
(603) 679-5443<br />
10% Discount to<br />
<strong>Guild</strong> Members<br />
Reliable No-Hassle Shipping Partner for Your<br />
Fine Furniture, Arts & Antiques<br />
One-Stop White Glove Packaging & Shipping<br />
In-State, Out-<strong>of</strong>-State & International Delivery<br />
Local Pickup & Warehousing<br />
25 yrs Experience Specializing in FLAV<br />
www.gonavis.com/nh1063 • 603-424-1035<br />
180 Locations in US – 5 Miles from Manchester Airport
Read Mike Dunbar’s Weekly Blog<br />
www.thewindsorinstitute.com<br />
e<br />
Windsor<br />
Institute<br />
10% Discount for Sack Back Class &<br />
Supplies Purchased During that Class<br />
44 Timber Swamp Rd • Hampton, NH 03842 • 603-929-9801<br />
ROCKLER ®<br />
WOODWORKING AND HARDWARE<br />
373 S Broadway (Rt 28)<br />
Salem, NH 03079<br />
603-898-5941<br />
2154 Massachusetts Ave<br />
Cambridge, MA 02140<br />
617-497-1136<br />
MILL OUTLET STORE • 10% DISCOUNT FOR GUILD MEMBERS<br />
Northern and Appalachian Hardwoods<br />
Ash • Basswood • Birch • Cherry • Maple • Mahogany • Oak • Poplar • Walnut<br />
4/4 - 16/4 Rough or Surfaced Kiln Dried Lumber<br />
Fixed and Special widths • FSC-certified wood from well-managed forests<br />
visit www.northlandforest.com for stocking info<br />
36 Depot Road,Kingston,NH • 603.642.8275<br />
45 Goslin Rd<br />
<strong>New</strong>ington, NH 03801<br />
800-234-3818<br />
10% Discount<br />
to <strong>Guild</strong> Members<br />
29 Andover St<br />
Danvers, MA 01923<br />
978-774-0241<br />
Class schedules on rockler.com • Instructor inquires welcome www.westerntool.com • 603-627-4957<br />
Sawmill & Lumber<br />
10% discount to members!<br />
603-798-5135<br />
www.goosebaylumber.com<br />
83 Dover Rd (US Route 4)<br />
Chichester, <strong>New</strong> <strong>Hampshire</strong><br />
(10 Minutes from I-93 Concord • Take exit 15 east)<br />
Specializing in Bird’s Eye & Curly Maple<br />
Green & Kiln Dried Bowl Blanks & Turning Squares<br />
Rare & Hard to Find Domestic & Imported Hardwoods<br />
10% discount for <strong>Guild</strong> members<br />
313 Montvale Ave<br />
Woburn, MA 01801<br />
781-935-6414<br />
Except machinery, power tools & already discounted items<br />
10% Discount on Stock Items to <strong>Guild</strong> Members<br />
– HARDWOOD DISTRIBUTION CENTER –<br />
Route 125 • Brentwood, NH<br />
P.O. BOX 426, KINGSTON, NH 03848<br />
TEL 1-800-442-1812 • 603-679-1230 • FAX 603-679-1960<br />
e<br />
Contractor’s<br />
Choice! <br />
<strong>The</strong> Wood Finishing School<br />
978-363-2638<br />
www.patinarestoration.net<br />
Learn wood finishing<br />
individually or as part <strong>of</strong> a group<br />
Twenty-seven years experience<br />
10% Discount for <strong>Guild</strong> Members<br />
Teaching & Class Instruction Only<br />
Bruce Hamilton Antique Restoration<br />
Williams & Hussey Machine Co., Inc.<br />
Straight, Round, and Elliptical<br />
Molding<br />
Simple, Easy, Safe<br />
Quality Construction<br />
Seven Year Warranty<br />
MADE IN THE USA<br />
10% Discount to GNHW Members<br />
Tim Corcoran<br />
Store Manager<br />
10% Discount<br />
to <strong>Guild</strong> Members<br />
on Non-Powered Tools<br />
Manchester, NH store only<br />
Low Prices – Guaranteed<br />
100 Cahill Ave • Manchester, NH<br />
Off South Willow St. in front <strong>of</strong> Home Depot<br />
<strong>The</strong> Breed School<br />
American 18th Century Furniture<br />
By Hand<br />
13 Liberty Street, South Berwick, ME 03908<br />
15% Discount to GNHW Members!<br />
www.allanbreed.com • 603-749-6231<br />
email: breeds@comcast.net<br />
OFFER EXCLUDES CUSTOM KNIVES AND OTHER PROMOTIONS<br />
800.258.1380 • www.williamsnhussey.com<br />
CLASSIC DESIGNS<br />
by MATTHEW BURAK<br />
SOLUTIONS FOR THE PROFESSIONAL WOODWORKER<br />
Table Legs, Columns, Cabinet Feet<br />
Windsor Chair Kits & Parts<br />
Wolfgang’s Wood<br />
Specialty Native Woods<br />
Furniture Making Classes<br />
336 Baptist Road<br />
Canterbury, NH<br />
603-783-9700<br />
Strafford, NH<br />
603-664-7691<br />
10% Off to GNHW Members<br />
Come into the woods...<br />
10% annual discount for GNHW<br />
Enjoy a mini<br />
apprenticeship<br />
with some <strong>of</strong><br />
America’s best<br />
woodworkers!<br />
www.experiencewoodworking.com<br />
PHONE: 603-659-2345<br />
TOLL FREE: 1-888-659-2345<br />
52 BALD HILL ROAD<br />
NEWMARKET, NH 03857<br />
HOMESTEAD<br />
WOODWORKING SCHOOL<br />
Alan S. Mitchell<br />
Director<br />
10% Discount to<br />
GNHW Members<br />
1.800.843.7405<br />
www.tablelegs.com<br />
10% Discount to GNHW Members<br />
Email: woodschool@comcast.net<br />
Web: www.woodschoolnh.com<br />
We Care!<br />
www.ghevarts.com<br />
TEL (603) 763-4525<br />
10% Discount<br />
to <strong>Guild</strong> Members<br />
Non-Sale Lumber Items Only<br />
GH Evarts & Co., Inc.<br />
Kiln Dried Hardwood Lumber<br />
From Our Sawmill Near Lebanon, NH<br />
Route 4A • West Springfield, NH<br />
<strong>The</strong> <strong>Guild</strong> <strong>of</strong> <strong>New</strong> <strong>Hampshire</strong> <strong>Woodworkers</strong><br />
39
“Wo r k i n g EfficiEntly a n d ac c u r a t E l y ”<br />
Those who attended <strong>The</strong> <strong>Guild</strong>’s Annual<br />
Meeting were privileged to see a lecture<br />
and demonstration given by a very<br />
prolific and well regarded member <strong>of</strong> the<br />
woodworking community. Garrett Hack,<br />
whose credentials are too many to be listed,<br />
may be best known by his furniture and<br />
articles which are <strong>of</strong>ten published in Fine<br />
Woodworking. He divides his pr<strong>of</strong>essional<br />
life as an author, teacher and woodworker.<br />
On that afternoon he gave a talk on the<br />
importance <strong>of</strong> working efficiently and<br />
accurately in the shop, an ability that helps<br />
allow time for his other ventures.<br />
Garrett began his talk by warning about<br />
the high cost <strong>of</strong> mental mistakes. Errors that<br />
create extra shop time, wasted materials,<br />
and/or an inferior final product can generally<br />
be avoided. He emphasized the importance<br />
<strong>of</strong> careful planning, and taking steps that<br />
might initially seem to extend the length <strong>of</strong><br />
the process.<br />
Develop a Full-sized Drawing: Craft or<br />
even butcher paper were recommended as<br />
options for sheets large enough to handle the<br />
task. A top, front and side view will help you<br />
visualize the project and carefully consider<br />
the proportion and grain direction <strong>of</strong> its<br />
parts. Garrett also makes detailed drawings<br />
<strong>of</strong> the joinery, and uses this phase to create<br />
curves and dimensions he can refer to and<br />
work from throughout the building process.<br />
While in the design and drawing phase,<br />
Garrett will also make critical design decisions<br />
that affect the time and effort that will be put<br />
into the piece. He gave the example <strong>of</strong> using<br />
a “country cock bead” on the top and bottom<br />
<strong>of</strong> a drawer rather that extending it up and<br />
down the sides where the end grain can be<br />
difficult to deal with.<br />
As he talked about designing a piece <strong>of</strong><br />
furniture, I could relate it to a poet working<br />
until each word has been individually chosen.<br />
Though he did admit that he is open to the<br />
design evolving later in the process, it is clear<br />
that he is very thorough and meticulous as<br />
he goes through the revisions.<br />
Create a Pattern: Although I have made<br />
this into a separate step, it is more <strong>of</strong> a natural<br />
progression when Garrett talks about it. I can<br />
imagine him drawing with pencil and paper<br />
then jumping up to quickly shape something<br />
out <strong>of</strong> a wood scrap to help him visualize.<br />
He talked about the usefulness <strong>of</strong> wooden<br />
patterns for finalizing the design. He then<br />
focused on their purpose in shaping the<br />
parts <strong>of</strong> the project. Garrett uses the patterns<br />
to lay out tapers, joinery, curves and other<br />
aspects <strong>of</strong> a piece.<br />
He demonstrated the usefulness <strong>of</strong> a 1/4˝<br />
template <strong>of</strong> a tapered leg. He first used it to<br />
visually decide if he would like to splay the<br />
legs. He then set it on rough stock to choose<br />
grain direction. Afterwards, he used it as a<br />
tapering jig to pass the stock through the<br />
band saw. Finally, he used it as a story pole to<br />
layout the joinery.<br />
Work Efficiently and Accurately in the<br />
Shop: Beginning where most projects<br />
do, Garrett talked about surfacing stock,<br />
developing a marking system that labels<br />
grain direction, reference faces for joinery,<br />
and orientation <strong>of</strong> the parts. Specifically, he<br />
talked about orientating the pattern on the<br />
photos by Jim Seroskie<br />
stock to choose the grain direction <strong>of</strong> your<br />
piece rather than simply jointing an edge<br />
and working <strong>of</strong>f it. He also addressed the<br />
luxury <strong>of</strong> having extra parts.<br />
From the machines, Garrett moves on to<br />
do much <strong>of</strong> his work with hand tools. And no<br />
one attending thought Garrett would make<br />
it through a presentation without talking<br />
about the importance <strong>of</strong> hand planes. He<br />
demonstrated the accuracy and efficiency<br />
<strong>of</strong> edge jointing, surfacing, and shaping<br />
with hand planes, all together eliminating<br />
the step <strong>of</strong> sanding while creating an<br />
unmatched surface.<br />
Throughout the talk he emphasized<br />
knowing what is <strong>of</strong> critical importance,<br />
and not getting carried away with some<br />
trivial aspect being perfect. As an example<br />
he asked , “Who has ever noticed that the<br />
underside <strong>of</strong> a table apron was slightly<br />
out <strong>of</strong> square?” His point being that, in<br />
woodworking, “square” and “flat” <strong>of</strong>ten only<br />
need to be visually acceptable.<br />
In fact, as he performed many specific<br />
demonstrations <strong>of</strong> working efficiently and<br />
accurately, it seemed clear he was also<br />
hinting toward a woodworking mind-set<br />
or consciousness that would have to be<br />
adopted in order to cover the expansive<br />
topic <strong>of</strong> his lecture. It is what I enjoyed most<br />
about the talk. I walked away feeling I could<br />
better understand how Garrett approaches<br />
his work. – Caleb Dietrich<br />
Garrett Hack