Louvre Assembly Instruction - Exaco
Louvre Assembly Instruction - Exaco
Louvre Assembly Instruction - Exaco

Create successful ePaper yourself
Turn your PDF publications into a flip-book with our unique Google optimized e-Paper software.
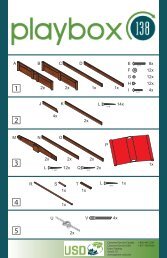
<strong>Louvre</strong> <strong>Assembly</strong> <strong>Instruction</strong><br />
For the louvre assembly you will need 1 top cill, 1 bottom<br />
cill, 2 side jambs(one with handle), 4 self tapping screws,<br />
4 crop head bolts and nuts and glass blades or polycarbonate<br />
blades (including 4 alu.clips and 2 PVC anti-dust<br />
strip).<br />
Procedure:<br />
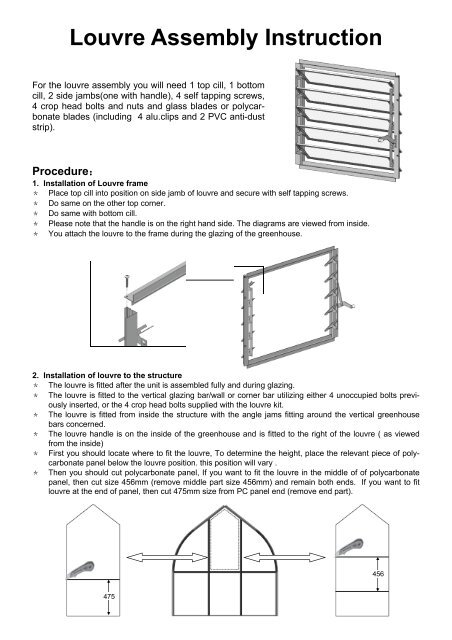
1. Installation of <strong>Louvre</strong> frame<br />
* Place top cill into position on side jamb of louvre and secure with self tapping screws.<br />
* Do same on the other top corner.<br />
* Do same with bottom cill.<br />
* Please note that the handle is on the right hand side. The diagrams are viewed from inside.<br />
* You attach the louvre to the frame during the glazing of the greenhouse.<br />
2. Installation of louvre to the structure<br />
* The louvre is fitted after the unit is assembled fully and during glazing.<br />
* The louvre is fitted to the vertical glazing bar/wall or corner bar utilizing either 4 unoccupied bolts previously<br />
inserted, or the 4 crop head bolts supplied with the louvre kit.<br />
* The louvre is fitted from inside the structure with the angle jams fitting around the vertical greenhouse<br />
bars concerned.<br />
* The louvre handle is on the inside of the greenhouse and is fitted to the right of the louvre ( as viewed<br />
from the inside)<br />
* First you should locate where to fit the louvre, To determine the height, place the relevant piece of polycarbonate<br />
panel below the louvre position. this position will vary .<br />
* Then you should cut polycarbonate panel, If you want to fit the louvre in the middle of of polycarbonate<br />
panel, then cut size 456mm (remove middle part size 456mm) and remain both ends. If you want to fit<br />
louvre at the end of panel, then cut 475mm size from PC panel end (remove end part).<br />
475<br />
456
* Put the PVC anti-dust strip p6 on the end of cutted & remained panel<br />
Instead<br />
p6<br />
* Offer the louvre frame to the bolts, add a nut to each bolt and fingertip tighten.<br />
* Put the Alu.clip on the top and bottom cill first<br />
* Slide the louvre frame to the top of the pane of polycarbonate so that the bottom cill of the louvre rests on<br />
the polycarbonate panel.<br />
* Tighten all nuts<br />
<strong>Louvre</strong> frame installation is now complete.<br />
3. Glazing the louvre<br />
The louvre must be glazing after it has been installed to the<br />
structure<br />
* Open the louvre using the handle<br />
* Slide each individual blade of polycarbonate panel between<br />
the jams into the aluminium holders<br />
* The glass(polycarbonate) will come to rest in the holder<br />
at the bottom of the jams.<br />
Note:<br />
456 x 610<br />
For Polycarbonate------The polycarbonate blades are<br />
supplied with an aluminium cover strip which serves to reinforce<br />
and protect the insulating flutes-simply fit them to<br />
either side of the glazing.<br />
p6<br />
Alu. Cover Strip<br />
PC Panel 573x97x4mm<br />
Alu. Cover Strip<br />
For Toughened Glass------The louvre blades for the toughened glass model have specially rounded edges<br />
and, therefore, can be fitted directly into the louvre.