MMD6NP Manual - General Tools And Instruments
MMD6NP Manual - General Tools And Instruments
MMD6NP Manual - General Tools And Instruments

You also want an ePaper? Increase the reach of your titles
YUMPU automatically turns print PDFs into web optimized ePapers that Google loves.
6.2 Slide the battery cover away from the instrument<br />
and remove batteries.<br />
6.3 Install the batteries (4 x 1.5~ AAASize) correctly<br />
into the case.<br />
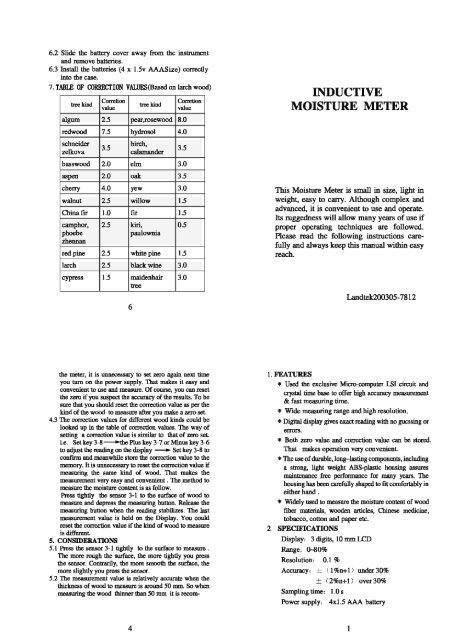
7. TABLE OF CORRECTION VALUESBased on larch wood)<br />
Corretion Corretion<br />
I treehnd I vdue I I vdue I<br />
1 ;I: 1 1<br />
1<br />
lredwood hydrosol<br />
schneider birch,<br />
zelkova calamander<br />
1 basswood 12.0 1 elm 13.0 1<br />
1 aspen 12.0 1 oak 13.5 1<br />
cherry<br />
walnut<br />
China fir<br />
camphor,<br />
red pine<br />
4.0<br />
2.5<br />
1.0<br />
yew<br />
willow<br />
fir<br />
I I paulownia<br />
2.5 kiri,<br />
2.5<br />
white pine<br />
0.5<br />
I I<br />
larch 2.5 black wine 3.0<br />
1 cypress 1 1.5 1 maidenhair 13.0 1<br />
tree<br />
3.0<br />
1.5<br />
1.5<br />
1.5<br />
the meter, it is unnecessary to set zero again next time<br />
you turn on the power supply. That makes it easy and<br />
convenient to use and measure. Of course, you can reset<br />
the zero if you suspect the accuracy of the results. To be<br />
sure that you should reset the correction value as per the<br />
kind of the wood to measure after you make a zero set.<br />
4.3 The correction values for different wood kinds could be<br />
looked up in the table of correction values. The way of<br />
setting a correction value is similar to that of zero set.<br />
i.e. Set key 3-8 -e Plus key 3-7 or Minus key 3-6<br />
to adjust the reading on the display -+ Set key 3-8 to<br />
confirm and meanwhile store the correction value to the<br />
memoy. It is unnecessary to reset the correction value if<br />
measuring the same kind of wood. That makes the<br />
measurement very easy and convenient . The method to<br />
measure the moisture content is as follow.<br />
Press tightly the sensor 3-1 to the surface of wood to<br />
measure and depress the measuring button. Release the<br />
measuring button when the reading stabilizes. The last<br />
measurement value is held on the Display. You could<br />
reset the correction value if the kind of wood to measure<br />
is different.<br />
5. CONSIDERATIONS<br />
5.1 Press the sensor 3-1 tightly to the surface to measure .<br />
The more rough the surface, the more tightly you press<br />
the sensor. Contrarily, the more smooth the surface, the<br />
more slightly you press the sensor.<br />
5.2 The measurement value is relatively accurate when the<br />
thickness of wood to measure is around 50 mm. So when<br />
measuring the wood thinner than 50 mm it is recom-<br />
INDUCTIVE<br />
MOISTURE METER<br />
This Moisture Meter is small in size, light in<br />
weight, easy to carry. Although complex and<br />
advanced, it is convenient to use and operate.<br />
Its ruggedness will allow many years of use if<br />
proper operating techniques are followed.<br />
Please read the following instructions care-<br />
fully and always keep this manual within easy<br />
reach.<br />
1. FEATURES<br />
* Used the exclusive Micro-computer LSI circuit and<br />
crystal time base to offer high accuracy measurement<br />
& fast measuring time.<br />
* Wide measuring range and high resolution.<br />
* Digital display gives exact reading with no guessing or<br />
errors.<br />
* Both zero value and correction value can be stored.<br />
That makes operation very convenient.<br />
* The use of durable, long-lasting components, including<br />
a strong, light weight ABS-plastic housing assures<br />
maintenance free performance for many years. The<br />
housing has been carefully shaped to fit comfortably in<br />
either hand .<br />
* Widely used to measure the moisture content of wood<br />
fiber materials, wooden articles, Chinese medicine,<br />
tobacco, cotton and paper etc.<br />
2. SPECIFICATIONS<br />
Display: 3 digits, 10 mm LCD<br />
Range: 0-80%<br />
Resolution: 0.1 %<br />
Accuracy: * i l%n+l under 30%<br />
+ ( 2%n+l) over 30%<br />
Sampling time: 1.0 s<br />
Power supply: 4xl.5 AAA battery
TABLE OF CONTENTS<br />
1. FEATURES ................... 1<br />
2. SPECIFICATIONS. ............. 1<br />
3. FRONT PANEL DESCRIPTIONS ... 2<br />
4. MEASURING PROCEDURE.. ....... 3<br />
5. CONSIDERATIONS.. ............ 4<br />
6. BATTERY REPLACEMENT.. ....... 5<br />
7. T BLE OF CORRECTION V LUES . . 6<br />
Operating condition: Temp. 0-50'C, Humidity 40%<br />
Size: 218x76x53rnm<br />
Weight: about 260g ( including batteries<br />
Accessory:<br />
Carryingcase ............. 1 pc.<br />
Operation manual. ......... 1 PC.<br />
3. FRONT PANEL DESCRIPTIONS<br />
- 3-11<br />
3-1 Sensor<br />
3-2 Measuring indicator<br />
3-3 Display<br />
3-4 Calibration<br />
3-5 Measuring button<br />
3-6 minus key for correction values<br />
mended to pile up to nearly 50 mm. Otherwise, you<br />
should make corrections as per following:<br />
10-2Omm ; the result plus 0.6<br />
21-30mm ; the result plus 0.3<br />
5.3 Under 50 mm of the sensor, any hand or metal is not<br />
allowed. Or it will incur the error.<br />
5.4 Keep the surface clean before taking measurement.<br />
5.5 For the wood marinated in the seawater for some time,<br />
the measurement value is much higher than the normal<br />
because of the influence of too much salt.<br />
5.6 There is no way to measure the wood that is narrower<br />
than the size of the sensor 3-1( See the following figure).<br />
n n<br />
right false<br />
5.7 The measurement result may be different if taking the<br />
measurement from different directions of the wood. That<br />
is because water in the wood is not distributed evenly.<br />
The better way is to measure from 4 different sides and<br />
get the result by calculating the arithmetical mean value.<br />
6. BA'ITERY REPLACEMENT<br />
6.1 When it is necessary to replace the battery, i.e. battery<br />
voltage less than approx. 4.5, the battery symbol will<br />
3-7 Plus key fa correction values<br />
3-8 Set key for correction values<br />
3-9 2ao set key<br />
3-10 power key<br />
3-11 Battery compartment/cover<br />
4. MEASURING PROCEDURE<br />
4.1 Push the power key 3-10 for a while to switch on power<br />
supply.<br />
4.2 Zero set<br />
4.2.1 Push the set key 3-8 for a while to make the correction<br />
value flash on the Display 3-3.<br />
4.2.2 Push the Plus key 3-7 or Minus key 3-6 to adjust the<br />
reading on the display to zero. (Every time depressing<br />
the Plus key 3-7 or Minus key 3-6 for a while, The<br />
flashing reading on the display will increase or decrease<br />
by 0.5. If depressing for a long time, the flashing read-<br />
ing will change rapidly. The range of correction values<br />
is 0-10.<br />
4.2.3 Depress the set key 3-8 for a while to store the flashing<br />
reading "0.0" to the memory of the meter while the<br />
steady zero will be displayed.<br />
4.2.4 Hold the moisture meter and don't let the sensor 3-1<br />
touch anythmg except Air. The measuring indicator and<br />
a certain value appear on the Display after depressing the<br />
measuring button. Zero "0" will appear on the Display<br />
if pushing the Zero set key 3-9 for a while when the<br />
measurement values are steady. The above operation is<br />
the procedure of zero set. Please remember: in the<br />
process of zero set, you must depress the measuring<br />
button and don't let the sensor 3-1 touch anything<br />
except Air. Since the zero set is stored in the memory of