PA30IS Series Powered Air-Purifying Respirator PA3IS ... - Bullard
PA30IS Series Powered Air-Purifying Respirator PA3IS ... - Bullard
PA30IS Series Powered Air-Purifying Respirator PA3IS ... - Bullard

Create successful ePaper yourself
Turn your PDF publications into a flip-book with our unique Google optimized e-Paper software.
Mounting and Replacing Cartridges on the Blower Unit<br />
The useful life of a chemical cartridge for vapors and gases will vary with the<br />
concentration and nature of the contaminant, the breathing rate of the respirator<br />
wearer, and ambient temperature and humidity.<br />
The Occupational Safety and Health Administration (OSHA) regulations 29 CFR<br />
1910.134 require that the employer must implement a change schedule when<br />
using <strong>Air</strong>-<strong>Purifying</strong> respirators for protection against gases and vapors, if there<br />
is no end-of-service-life indicator on the cartridges. The change schedule must<br />
be based on objective data that will ensure that the cartridges are replaced<br />
before the end of their service life. Factors to consider include workplace conditions<br />
such as contaminant concentration, relative humidity, temperature, work<br />
activities, respirator use pattern (e.g., continuous or intermittent use), presence<br />
of other contaminants, potential for contaminant migration/desorption, health<br />
effects of the gas or vapor, and the presence of any warning properties. Contact<br />
<strong>Bullard</strong> for further information on change-out schedules.<br />
High efficiency particulate filters must be replaced when retained particles clog<br />
the filters and reduce air flow below acceptable levels, as indicated by testing<br />
with the <strong>Air</strong> Flow Indicator.<br />
To Replace Cartridges<br />
Remove the air-purifying element from its packaging, and inspect for damage. If<br />
in doubt do not use.<br />
Check that the air-purifying element has not exceeded its “use-by” date and that<br />
the connecting thread is in good condition.<br />
Check that the air-purifying element is appropriate to the hazard. If in doubt<br />
consult your respirator program administrator or supervisor.<br />
Check that the threads in the blower unit port are in good condition and clear of<br />
contaminant.<br />
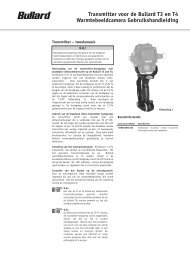
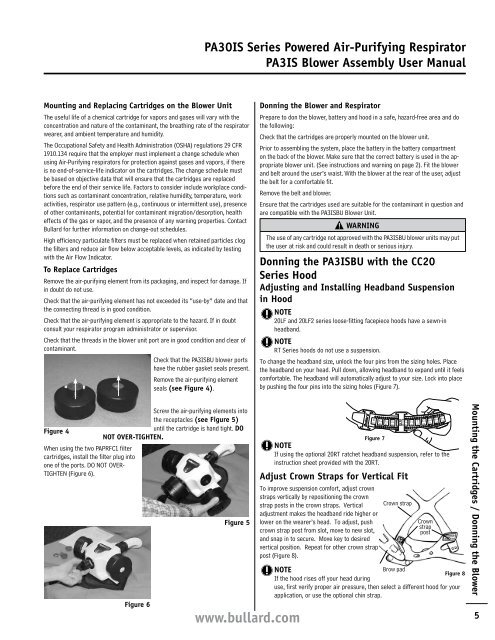
Check that the <strong>PA3IS</strong>BU blower ports<br />
have the rubber gasket seals present.<br />
Remove the air-purifying element<br />
seals (see Figure 4).<br />
Screw the air-purifying elements into<br />
the receptacles (see Figure 5)<br />
Figure 4<br />
until the cartridge is hand tight. DO<br />
NOT OVER-TIGHTEN.<br />
When using the two PAPRFC1 filter<br />
cartridges, install the filter plug into<br />
one of the ports. DO NOT OVER-<br />
TIGHTEN (Figure 6).<br />
Figure 6<br />
<strong>PA30IS</strong> <strong>Series</strong> <strong>Powered</strong> <strong>Air</strong>-<strong>Purifying</strong> <strong>Respirator</strong><br />
<strong>PA3IS</strong> Blower Assembly User Manual<br />
Figure 5<br />
www.bullard.com<br />
Donning the Blower and <strong>Respirator</strong><br />
Prepare to don the blower, battery and hood in a safe, hazard-free area and do<br />
the following:<br />
Check that the cartridges are properly mounted on the blower unit.<br />
Prior to assembling the system, place the battery in the battery compartment<br />
on the back of the blower. Make sure that the correct battery is used in the appropriate<br />
blower unit. (See instructions and warning on page 2). Fit the blower<br />
and belt around the user’s waist. With the blower at the rear of the user, adjust<br />
the belt for a comfortable fit.<br />
Remove the belt and blower.<br />
Ensure that the cartridges used are suitable for the contaminant in question and<br />
are compatible with the <strong>PA3IS</strong>BU Blower Unit.<br />
WARNING<br />
The use of any cartridge not approved with the <strong>PA3IS</strong>BU blower units may put<br />
the user at risk and could result in death or serious injury.<br />
Donning the <strong>PA3IS</strong>BU with the CC20<br />
<strong>Series</strong> Hood<br />
Adjusting and Installing Headband Suspension<br />
in Hood<br />
NOTE<br />
20LF and 20LF2 series loose-fitting facepiece hoods have a sewn-in<br />
headband.<br />
NOTE<br />
RT <strong>Series</strong> hoods do not use a suspension.<br />
To change the headband size, unlock the four pins from the sizing holes. Place<br />
the headband on your head. Pull down, allowing headband to expand until it feels<br />
comfortable. The headband will automatically adjust to your size. Lock into place<br />
by pushing the four pins into the sizing holes (Figure 7).<br />
Figure 7<br />
NOTE<br />
If using the optional 20RT ratchet headband suspension, refer to the<br />
instruction sheet provided with the 20RT.<br />
Adjust Crown Straps for Vertical Fit<br />
To improve suspension comfort, adjust crown<br />
straps vertically by repositioning the crown<br />
strap posts in the crown straps. Vertical<br />
adjustment makes the headband ride higher or<br />
lower on the wearer’s head. To adjust, push<br />
crown strap post from slot, move to new slot,<br />
and snap in to secure. Move key to desired<br />
vertical position. Repeat for other crown strap<br />
post (Figure 8).<br />
NOTE<br />
Brow pad<br />
Figure 8<br />
If the hood rises off your head during<br />
use, first verify proper air pressure, then select a different hood for your<br />
application, or use the optional chin strap.<br />
8<br />
64<br />
7 63<br />
7 62<br />
7 61<br />
SIZE<br />
7 60<br />
7 59<br />
7 58<br />
7/8 3/4 5/8 1/2 3/8 1/8<br />
Crown strap<br />
7<br />
57<br />
6 56<br />
7/8<br />
6 55<br />
Crown<br />
strap<br />
post<br />
6 54<br />
6 53<br />
3/4 5/8 1/2<br />
Mounting the Cartridges / Donning the Blower<br />
5