Instruction Manual (Australia - New Zealand) - Black & Decker
Instruction Manual (Australia - New Zealand) - Black & Decker
Instruction Manual (Australia - New Zealand) - Black & Decker

You also want an ePaper? Increase the reach of your titles
YUMPU automatically turns print PDFs into web optimized ePapers that Google loves.
C O R D L E S S C O M P A C T D R I L L S<br />
INSTRUCTION MANUAL<br />
Cataloge Numbers<br />
PS1800 PS1440 PS2400<br />
T HANK YOU FOR CHOOSING<br />
BEFORE RETURNING THIS PRODUCT<br />
FOR ANY REASON PLEASE CALL<br />
1-800-654-155<br />
BEFORE YOU CALL, HAVE THE CATALOG No. AND DATE CODE AVAILABLE. IN MOST CASES, A<br />
BLACK & DECKER REPRESENTATIVE CAN RESOLVE THE PROBLEM OVER THE PHONE. IF YOU HAVE<br />
A SUGGESTION OR COMMENT, GIVE US A CALL. YOUR FEEDBACK IS VITAL TO BLACK & DECKER.<br />
SAVE THIS MANUAL FOR FUTURE REFERENCE.<br />
CHOOSING B LACK & D ECKER !
General Safety Rules<br />
WARNING! Read all instructions. Failure to follow all instructions listed below<br />
may result in electric shock, fire and/or serious injury. The term “power tool” in all<br />
of the warnings listed below refers to your mains-operated (corded) power tool or<br />
battery-operated (cordless) power tool.<br />
SAVE THESE INSTRUCTIONS<br />
1) Work area safety<br />
a) Keep work area clean and well lit. Cluttered or dark areas invite accidents.<br />
b) Do not operate power tools in explosive atmospheres, such as in the presence<br />
of flammable liquids, gases or dust . Power tools create sparks which may ignite<br />
the dust or fumes.<br />
c) Keep children and bystanders away while operating a power tool. Distractions<br />
can cause you to lose control<br />
2) Electrical safety<br />
a) Power tool plugs must match the outlet. Never modify the plug in any way. Do<br />
not use any adapter plugs with earthed (grounded) power tools. Unmodied<br />
plugs and matching outlets will reduce risk of electric shock<br />
b) Avoid body contact with earthed or grounded surfaces such as pipes,<br />
radiators, ranges and refrigerators. There is an increased risk of electric shock if<br />
your body is earthed or grounded.<br />
c) Do not expose power tools to rain or wet conditions. Water entering a power tool<br />
will increase the risk of electric shock<br />
d) Do not abuse the cord. Never use the cord for carrying, pulling or unplugging<br />
the power tool. Keep cord away from heat, oil, sharp edges or moving parts.<br />
Damaged or entangled cords increase the risk of electric shock.<br />
e) When operating a power tool outdoors, use an extension cord suitable for<br />
outdoor use. Use of a cord suitable for outdoor use reduces the risk of electric<br />
shock.<br />
3) Personal safety<br />
a) Stay alert, watch what you are doing and use common sense when operating a<br />
power tool. Do not use a power tool while you are tired or under the influence<br />
of drugs, alcohol or medication. A moment of inattention while operating power tool<br />
may result in serious personal injury.<br />
b) Use safety equipment. Always wear eye protection. Safety equipment such as<br />
dust mask, non-skid safety shoes, hard hat, or hearing protection used for appropriate<br />
conditions will reduce personal injuries.<br />
c) Avoid accidental starting. Ensure the switch is in the off-position before<br />
plugging in. Carrying power tools with your nger on the switch or plugging in power<br />
tools that have the switch on invites accidents.<br />
d) Remove any adjusting key or wrench before turning the power tool on. A<br />
wrench or a key left attached to a rotating part of the power tool may result in<br />
personal injury.<br />
e) Do not overreach. Keep proper footing and balance at all times. This enables<br />
better control of the power tool in unexpected situations.<br />
f) Dress properly. Do not wear loose clothing or jewelry. Keep your hair, clothing<br />
and gloves away from moving parts. Loose clothes, jewelry or long hair can be<br />
caught in moving parts. Air vents often cover moving parts and should also be<br />
avoided.<br />
g) If devices are provided for the connection of dust extraction and collection<br />
facilities, ensure these are connected and properly used. Use of these devices<br />
can reduce dust-related hazards.<br />
4) Power tool use and care<br />
a) Do not force the power tool. Use the correct power tool for your application.<br />
2
The correct power tool will do the job better and safer at the rate for which it was<br />
designed.<br />
b) Do not use the power tool if the switch does not turn it on and off. Any power<br />
tool that cannot be controlled with the switch is dangerous and must be repaired.<br />
c) Disconnect the plug from the power source and/or the battery pack from the<br />
power tool before making any adjustments, changing accessories, or storing<br />
power tools. Such preventive safety measures reduce the risk of starting the power<br />
tool accidentally.<br />
d) Store idle power tools out of the reach of children and do not allow persons<br />
unfamiliar with the power tool or these instructions to operate the power tool.<br />
Power tools are dangerous in the hands of untrained users.<br />
e) Maintain power tools. Check for misalignment or binding of moving parts,<br />
breakage of parts and any other condition that may affect the power tools<br />
operation. If damaged, have the power tool repaired before use. Many accidents<br />
are caused by poorly maintained power tools.<br />
f) Keep cutting tools sharp and clean. Properly maintained cutting tools with sharp<br />
cutting edges are less likely to bind and are easier to control.<br />
g) Use the power tool, accessories and tool bits etc., in accordance with these<br />
instructions and in the manner intended for the particular type of power tool,<br />
taking into account the working conditions and the work to be performed. Use<br />
of the power tool for operations dierent from those intended could result in a<br />
hazardous situation.<br />
5) Battery tool use and care<br />
a) Ensure the switch is in the off position before inserting battery pack. Inserting<br />
the battery pack into power tools that have the switch on invites accidents.<br />
b) Recharge only with the charger specified by the manufacturer. A charger that is<br />
suitable for one type of battery pack may create a risk of re when used with another<br />
battery pack.<br />
c) Use power tools only with specifically designated battery packs. Use of any<br />
other battery packs may create a risk of injury and fire.<br />
d) When battery pack is not in use, keep it away from other metal objects like<br />
paper clips, coins, keys, nails, screws, or other small metal objects that can<br />
make a connection from one terminal to another. Shorting the battery terminals<br />
together may cause burns or a re.<br />
e) Under abusive conditions, liquid may be ejected from the battery, avoid contact.<br />
If contact accidentally occurs, flush with water. If liquid contacts eyes,<br />
additionally seek medical help. Liquid ejected from the battery may cause irritation<br />
or burns.<br />
6) Service<br />
a) Have your power tool serviced by a qualified repair person using only identical<br />
replacement parts. This will ensure that the safety of the power tool is maintained.<br />
SPECIFIC SAFETY RULES<br />
• Wear ear protectors with impact drills. Exposure to noise can cause hearing loss.<br />
• Hold tool by insulated gripping surfaces when performing an operation where the<br />
cutting tool may contact hidden wiring or its own cord. Contact with a "live" wire will<br />
make exposed metal parts of the tool "live" and shock the operator.<br />
• When working on a ladder or on scaolding be sure to lay the tool down on its side<br />
when not in use. Some tools with large battery packs will stand upright but may be easily<br />
knocked over.<br />
• Use clamps or another practical way to secure and support the work piece to a<br />
stable platform. Holding the work by hand or against your body leaves it unstable and<br />
may lead to loss of control.<br />
WARNING: Some dust created by power sanding, sawing, grinding, drilling, and<br />
other construction activities contains chemicals known to cause cancer, birth<br />
defects or other reproductive harm. Some examples of these chemicals are:<br />
3
• lead from lead-based paints,<br />
• crystalline silica from bricks and cement and other masonry products, and<br />
• arsenic and chromium from chemically-treated lumber (CCA).<br />
Your risk from these exposures varies, depending on how often you do this type of<br />
work. To reduce your exposure to these chemicals: work in a well ventilated area, and<br />
work with approved safety equipment, such as those dust masks that are specially<br />
designed to filter out microscopic particles.<br />
• Avoid prolonged contact with dust from power sanding, sawing, grinding,<br />
drilling, and other construction activities. Wear protective clothing and wash<br />
exposed areas with soap and water. Allowing dust to get into your mouth, eyes, or lay<br />
on the skin may promote absorption of harmful chemicals.<br />
WARNING: Use of this tool can generate and/or disperse dust, which may cause<br />
serious and permanent respiratory or other injury . Always use NIOSH/OSHA<br />
approved respiratory protection appropriate for the dust exposure. Direct particles<br />
away from face and body.<br />
The label on your tool may include the following symbols.<br />
V ..........................volts A..........................amperes<br />
Hz ........................hertz W ........................watts<br />
min ........................minutes ......................alternating<br />
current<br />
......................direct current<br />
n o ........................no load speed<br />
.......................... Class II Construction ........................earthing terminal<br />
........................safety alert symbol .../min ..................revolutions or<br />
reciprocations<br />
per minute<br />
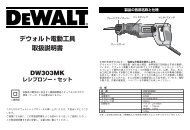
FUNCTIONAL DESCRIPTION<br />
1. Variable speed switch<br />
2. Forward/reverse slider<br />
3. Torque adjustment collar<br />
4. Chuck<br />
5. Battery<br />
4<br />
4<br />
3 1<br />
BATTERY CAP INFORMATION FIGURE A<br />
Battery pack storage and carrying caps (1) are provided for use whenever the battery<br />
pack is out of the tool or charger. Remove cap before placing battery pack in charger or<br />
tool.<br />
WARNING: Do not store or carry battery pack so that metal objects can contact<br />
exposed battery pack terminals. For example, do not place battery pack in aprons,<br />
pockets, tool boxes, product kit boxes, drawers, etc. with loose nails, screws, keys, etc.<br />
without battery cap. Transporting batteries can possibly cause fires if the battery pack<br />
terminals inadvertently come in contact with conductive materials such as keys, coins,<br />
hand tools and the like. The US Department of Transportation Hazardous Material<br />
Regulations (HMR) actually prohibit transporting batteries in commerce or on airplanes<br />
(i.e. packed in suitcases and carryon luggage) UNLESS they are properly protected from<br />
short circuits. So when transporting individual batteries, make sure that the battery pack<br />
terminals are protected and well insulated from materials that could contact them and<br />
cause a short circuit.<br />
5<br />
2
B 7<br />
C<br />
D<br />
F<br />
5<br />
10<br />
3<br />
A<br />
5<br />
E<br />
G<br />
4<br />
Blank<br />
2<br />
1<br />
6
SAFETY WARNINGS AND INSTRUCTIONS: CHARGING<br />
1. This manual contains important safety and operating instructions.<br />
2. Before using battery charger, read all instructions and cautionary markings on<br />
battery charger, battery pack, and product using battery pack.<br />
3. CAUTION: To reduce the risk of injury, charge only <strong>Black</strong> &<strong>Decker</strong> Batteries.<br />
Other types of batteries may burst causing personal injury and damage.<br />
4. Do not expose charger to rain or snow.<br />
5. Use of an attachment not recommended or sold by <strong>Black</strong> & <strong>Decker</strong> may result in a<br />
risk of fire, electric shock, or injury to persons.<br />
6. To reduce risk of damage to electric plug and cord, pull by plug rather than cord when<br />
disconnecting charger.<br />
7. Make sure cord is located so that it will not be stepped on, tripped over, or otherwise<br />
subjected to damage or stress.<br />
8. An extension cord should not be used unless absolutely necessary. Use of improper<br />
extension cord could result in a risk of fire, electric shock or electrocution.<br />
a. Two-wire cords can be used with 2-wire or 3-wire extension cords. Only round<br />
jacketed extension cords should be used, and we recommend that they be listed by<br />
Underwriters Laboratories (U.L.). If the extension is to be used outside, the cord must<br />
be suitable for outdoor use. Any cord marked for outdoor use can also be used for<br />
indoor work. The letters "W" or "WA" on the cord jacket indicate that the cord is<br />
suitable for outdoor use.<br />
b. An extension cord must have adequate wire size (AWG or American Wire Gauge) for<br />
safety, and to prevent loss of power and overheating. The smaller the gauge number<br />
of the wire, the greater the capacity of the cable; that is, 16 gauge has more capacity<br />
than 18 gauge. When using more than one extension to make up the total length, be<br />
sure each extension contains at least the minimum wire size.<br />
9. Use only the supplied charger when charging your drill. The use of any other charger<br />
could damage the drill or create a hazardous condition.<br />
10. Use only one charger when charging.<br />
11. Do not attempt to open the charger. There are no customer serviceable parts inside.<br />
Return to any authorized <strong>Black</strong> & <strong>Decker</strong> service center.<br />
12. DO NOT incinerate the battery pack even if they are severely damaged or completely<br />
worn out. The battery pack can explode in a fire.<br />
13. A small leakage of liquid from the battery pack cells may occur under extreme usage,<br />
charging or temperature conditions. This does not indicate a failure. However, if the<br />
outer seal is broken and this leakage gets on your skin:<br />
a. Wash quickly with soap and water.<br />
b. Neutralize with a mild acid such as lemon juice or vinegar.<br />
c. If the battery liquid gets in your eyes, flush them with clean water for a minimum of 10<br />
minutes and seek immediate medical attention. MEDICAL NOTE: The liquid is a<br />
25-35% solution of potassium hydroxide.<br />
6
CHARGING THE BATTERY PACK FIGURE B<br />
THE BATTERY PACK IS NOT FULLY CHARGED AT THE FACTORY. BEFORE<br />
ATTEMPTING TO CHARGE THE BATTERY PACK, THOROUGHLY READ ALL OF THE<br />
SAFETY INSTRUCTIONS.<br />
The charger is designed to use standard household 230 volt 50 Hz power.<br />
1. Plug the charger (7) into any standard 230 Volt 50 Hz electrical outlet. NOTE: Do not<br />
charge by means of an engine generator or DC power source. Use only 230V AC<br />
2. Slide the charger onto the battery pack (5) as shown in figure B and let the battery<br />
pack charge initially for 9 hours . After the initial charge, under normal usage, your<br />
battery pack should be fully charged in 3 to 9 hours .<br />
3. Unplug charger, and remove the battery pack. Place the battery pack in the tool<br />
and be certain that it is inserted fully into the tool cavity until it “clicks” into<br />
place.<br />
NOTE: To remove the battery pack from the drill, press down on the release button<br />
(10) on the back of the battery pack ( figure D ) and slide out.<br />
IMPORTANT CHARGING NOTES<br />
1. After normal usage, your battery pack should be fully charged in 3 to 9 hours. If the<br />
battery pack is run-down completely, it may take up to 9 hours to become fully<br />
charged. Your battery pack was sent from the factory in an uncharged condition.<br />
Before attempting to use it, it must be charged for at least 9 hours.<br />
2. DO NOT charge the battery pack in an air temperature below 40°F (4,5 °C) or above<br />
105°F.(40,5 °C) This is important and will prevent serious damage to the battery pack.<br />
Longest life and best performance can be obtained if battery pack is charged when<br />
air temperature is about 75°F.(24°C).<br />
3. While charging, the charger may hum and become warm to touch. This is a normal<br />
condition and does not indicate a problem.<br />
4. If the battery pack does not charge properly—(1) Check current at receptacle by<br />
plugging in a lamp or other appliance. (2) Check to see if receptacle is connected to<br />
a light switch which turns power off when you turn out the lights. (3) Move charger<br />
and battery pack to a surrounding air temperature of 40°F (4,5 °C) to 105°F.(40,5 °C)<br />
(4) If the receptacle and temperature are OK, and you do not get proper charging,<br />
take or send the battery pack and charger to your local <strong>Black</strong> &<strong>Decker</strong> service<br />
center. See Tools Electric in yellow pages.<br />
5. The battery pack should be recharged when it fails to produce sufficient power on<br />
jobs which were easily done previously. DO NOT CONTINUE using product with its<br />
battery pack in a depleted condition.<br />
6. To prolong battery life, avoid leaving the battery pack on charge for extended periods of<br />
time (over 30 days without use). Although overcharging is not a safety concern, it can<br />
significantly reduce overall battery life.<br />
7. The battery pack will reach optimum performance after being cycled 5 times during<br />
normal usage. There is no need to run the batteries down completely before<br />
recharging. Normal usage is the best method of discharging and recharging the<br />
batteries.<br />
SAFETY WARNINGS AND INSTRUCTIONS: DRILLS<br />
1. Hold drill firmly with one hand on the grip and the other hand on the bottom of the<br />
battery pack.<br />
2. When attaching accessories in the drill chuck, hand tighten the keyless chuck firmly.<br />
WARNING: Drill may stall (if overloaded or improperly used) causing a twist. Always<br />
expect the stall. Grip the drill firmly with both hands to control the twisting action and<br />
prevent loss of control which could cause personal injury. If a stall does occur, release<br />
the trigger immediately and determine the reason for the stall before re-starting.<br />
• Young children and the infirm. This appliance is not intended for use by young<br />
children or infirm persons without supervision. Young children should be supervised<br />
to ensure that they do not play with this appliance.<br />
• Replacement of the supply cord. If t he supply cord is damaged, it must be replaced<br />
by the manufacturer or an authorised DEWALT Service Centre in order to<br />
avoid a hazard.<br />
7
OPERATING INSTRUCTIONS<br />
TRIGGER SWITCH & REVERSING BUTTON (FIGURE E)<br />
• The drill is turned ON and OFF by pulling and releasing the trigger switch (1). The<br />
farther the trigger is depressed, the higher the speed of the drill.<br />
• A forward/reverse control button (2) determines the direction of the tool and also<br />
serves as a lock off button.<br />
• To select forward rotation, release the trigger switch and depress the forward/reverse<br />
control button to the left.<br />
• To select reverse, depress the forward/reverse control button the opposite direction.<br />
NOTE: The center position of the control button locks the tool in the off position.<br />
When changing the position of the control button, be sure the trigger is released.<br />
TORQUE CONTROL (FIGURE F)<br />
This tool is fitted with a collar (3) to select the operating mode and to set the torque for<br />
tightening screws. Large screws and hard workpiece materials require a higher torque<br />
setting than small screws and soft workpiece materials.<br />
• For drilling in wood, metal and plastics, set the collar to the drilling position symbol .<br />
• For screwdriving, set the collar to the desired setting. If you do not yet know the<br />
appropriate setting, proceed as follows:<br />
• Set the collar to the lowest torque setting.<br />
• Tighten the first screw.<br />
• If the clutch ratchets before the desired result is achieved, increase the collar setting<br />
and continue tightening the screw. Repeat until you reach the correct setting. Use this<br />
setting for the remaining screws.<br />
KEYLESS CHUCK (FIGURE G)<br />
To insert a drill bit or other accessory:<br />
1. Grasp the rear half of the chuck (4) with one hand and use your other hand to rotate<br />
the front half in the counterclockwise direction, as viewed from the chuck end.<br />
2. Insert the bit or other accessory fully into the chuck, and tighten securely by holding<br />
the rear half of the chuck and rotating the front portion in the clockwise direction as<br />
viewed from the chuck end.<br />
WARNING: Do not attempt to tighten drill bits (or any other accessory) by gripping the<br />
front part of the chuck and turning the tool on. Damage to the chuck and personal injury<br />
may occur when changing accessories.<br />
SCREW DRIVING<br />
For driving fasteners, the reversing button should be pushed to the left. Use reverse<br />
(button pushed to the right) for removing fasteners. When moving from forward to reverse,<br />
or vice versa, always release the trigger switch first.<br />
ON BOARD BIT STORAGE<br />
A bit storage slot is built-in to the area just above the battery pack.<br />
DRILLING<br />
• Use sharp drill bits only.<br />
• Support and secure work properly, as instructed in the Safety <strong>Instruction</strong>s.<br />
• Use appropriate and required safety equipment, as instructed in the Safety <strong>Instruction</strong>s.<br />
• Secure and maintain work area, as instructed in the Safety <strong>Instruction</strong>s.<br />
• Run the drill very slowly, using light pressure, until the hole is started enough to keep the<br />
drill bit from slipping out of it.<br />
• Apply pressure in a straight line with the bit. Use enough pressure to keep the bit biting<br />
but not so much as to stall the motor or deflect the bit.<br />
• Hold the drill firmly with two hands to control its twisting action.<br />
• DO NOT CLICK THE TRIGGER OF A STALLED DRILL OFF AND ON IN AN ATTEMPT<br />
TO START IT. DAMAGE TO THE DRILL CAN RESULT.<br />
• Minimize stalling on breakthrough by reducing pressure and slowly drilling through the<br />
last part of the hole.<br />
• Keep the motor running while pulling the bit out of a drilled hole. This will help reduce<br />
jamming.<br />
• Make sure switch turns drill on and off.<br />
8
MAINTENANCE<br />
Use only mild soap and damp cloth to clean the tool. Never let any liquid get inside the<br />
tool; never immerse any part of the tool into a liquid.<br />
IMPORTANT: To assure product SAFETY and RELIABILITY, repairs, maintenance and<br />
adjustment (other than those listed in this manual) should be performed by authorized<br />
service centers or other qualified service personnel, always using identical replacement<br />
parts.<br />
TROUBLESHOOTING<br />
Problem Possible Cause Possible Solution<br />
• Unit will not start. • Battery pack not installed properly. • Check battery pack<br />
installation.<br />
• Battery pack not charged. • Check battery pack charging<br />
requirements.<br />
• Battery pack will not charge. • Battery pack not inserted into charger. • Insert battery pack into<br />
charger until red LED<br />
appears.<br />
• Charger not plugged in. • Plug charger into a working<br />
outlet. Refer to “Important<br />
Charging Notes” for more<br />
details.<br />
• Check current at<br />
receptacle by plugging in a<br />
lamp or other appliance.<br />
• Check to see if<br />
receptacle is connected to<br />
a light switch which turns<br />
power off when<br />
you turn out the lights.<br />
• Surrounding air temperature • Move charger and battery<br />
too hot or too cold. pack to a surrounding air<br />
temperature of above 40<br />
degrees F (4,5°C) or below<br />
105 degrees F (+40,5°C).<br />
For assistance with your product, visit our website www.blackanddecker.com for the location of the<br />
service center nearest you or call the BLACK & DECKER help line at 1-800-654-155.<br />
Accessories<br />
Recommended accessories for use with your tool are available from your local dealer or<br />
authorized service center. If you need assistance regarding accessories, please call:<br />
1-800-654-144.<br />
WARNING: The use of any accessory not recommended for use with this tool could<br />
be hazardous.<br />
9
SERVICE INFORMATION<br />
All <strong>Black</strong> & <strong>Decker</strong> Service Centers are staffed with trained personnel to provide<br />
customers with efficient and reliable power tool service. Whether you need technical<br />
advice, repair, or genuine factory replacement parts, contact the <strong>Black</strong> & <strong>Decker</strong> location<br />
nearest you. To find your local service location, refer to the yellow page directory under<br />
"Tools—Electric" or call: 1-800-544-6986 or visit www.blackanddecker.com<br />
AUSTRALIA AND NEW ZEALAND<br />
4 YEAR REPAIR GUARANTEE<br />
<strong>Black</strong> & <strong>Decker</strong> welcomes you as a purchaser of this product from our range of Home Workshop,<br />
Garden tools and Accessories. All our products are engineered and manufactured to ensure the<br />
highest standard s of reliability and performance during use, and are supported in After Sales<br />
Service by a wide network of <strong>Black</strong> & <strong>Decker</strong> Authorised Service Centers .<br />
BLACK & DECKER SUPPLEMENTARY GUARANTEE<br />
Subject to conditions stated below, <strong>Black</strong> & <strong>Decker</strong> guarantees tha t it will correct by repair or parts<br />
replacement, without charge, any defect in the product this Guarantee Card accompanies arising<br />
from faulty workmanship or materials where such defect arises within four years from the date of<br />
purchase of the product. A p roduct subject to claim under this guarantee should be returned as a<br />
complete unit to the most convenient <strong>Black</strong> & <strong>Decker</strong> Authorised Service Centre or Agent.<br />
CONDITIONS<br />
The <strong>Black</strong> & <strong>Decker</strong> Supplementary Guarantee does not apply in the following cases:<br />
• wher e the product has been used for trade or industrial purposes:<br />
• where any defect or failure is attributed to accident, misuse, abuse, negligence or non -<br />
observance of local regulations on the part of the owner or user: or<br />
• where the product has been serviced b y a person not authorized by <strong>Black</strong> & <strong>Decker</strong> to do<br />
so, or with non approved parts: or<br />
• to loose accessories.<br />
In order to enforce the <strong>Black</strong> & <strong>Decker</strong> Supplementary Guarantee, proof of purchase is required<br />
(Guarantee Card and or store receipt). The period of t he <strong>Black</strong> & <strong>Decker</strong> Supplementary Guarantee<br />
begins from the original date of purchase not withstanding any subsequent repair or parts<br />
replacement. No guarantees other than contained in this document, whether written or verbal, are<br />
authorized to be made on be half of <strong>Black</strong> & <strong>Decker</strong> . All other conditions and guarantees whether<br />
expressed or implied by law, are, to the extent permitted by law, hereby excluded. The <strong>Black</strong> &<br />
<strong>Decker</strong> Supplementary Guarantee does not apply out <strong>Australia</strong> and <strong>New</strong> <strong>Zealand</strong>.<br />
PURCHASERS STAT UTORY RIGHTS<br />
The <strong>Black</strong> & <strong>Decker</strong> Supplementary Guarantee set out above does not exclude any conditions or<br />
guarantees that may be mandatorily implied by law, and your attention is drawn to the provisions of<br />
the Consumer Guarantee Act 1993 (<strong>New</strong> <strong>Zealand</strong> only ),<br />
Trade Practices Act 1974 and State legislation (<strong>Australia</strong> only), which confers rights upon<br />
consumers. The <strong>Black</strong> & <strong>Decker</strong> Supplementary Guarantee is in addition to any rights conferred on a<br />
consumer under the Act, where applicable and any other rights p rovided under applicable<br />
legislation.<br />
10
<strong>Black</strong>&<strong>Decker</strong> (<strong>Australia</strong>) PTY.LTD.<br />
20 Fletcher Road<br />
Mooroolbark 3138<br />
Victoria <strong>Australia</strong><br />
Tel: (61 3)8720 5100<br />
Fax:(61 3)9727 5940<br />
Service Department:<br />
Tel: 1800-654-155<br />
11<br />
<strong>Black</strong>&<strong>Decker</strong> <strong>New</strong> <strong>Zealand</strong><br />
5 Te Apunga Place<br />
MT WELLINGTON NEW ZEALAND<br />
Tel: 0800 339 258<br />
Fax: 64 9 259 1122
90538252