B - Ardiehl.de
B - Ardiehl.de
B - Ardiehl.de

Create successful ePaper yourself
Turn your PDF publications into a flip-book with our unique Google optimized e-Paper software.
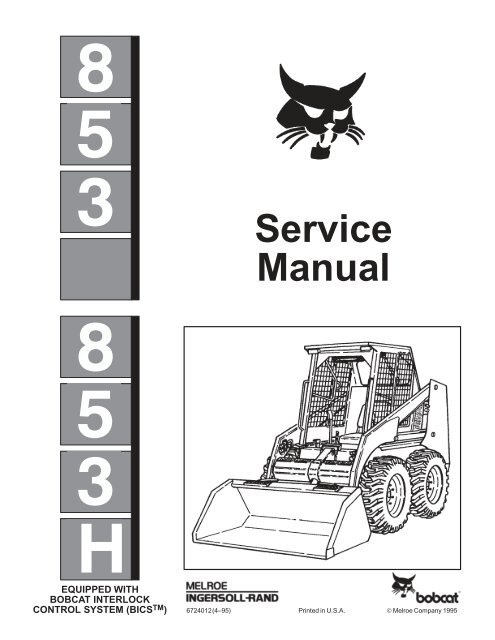
EQUIPPED WITH<br />
BOBCAT INTERLOCK<br />
CONTROL SYSTEM (BICS TM )<br />
Service<br />
Manual<br />
6724012 (4–95) Printed in U.S.A. © Melroe Company 1995
WARNING<br />
Never service the Bobcat Skid-<br />
Steer Loa<strong>de</strong>r without instructions.<br />
Have good ventilation when<br />
welding or grinding painted<br />
parts.<br />
Wear dust mask when grinding<br />
painted parts. Toxic dust and gas<br />
can be produced.<br />
Avoid exhaust fume leaks which<br />
can kill without warning. Exhaust<br />
system must be tightly sealed.<br />
B-6590<br />
Stop, cool and clean engine of<br />
flammable materials before<br />
checking fluids.<br />
Never service or adjust loa<strong>de</strong>r<br />
with the engine running unless<br />
instructed to do so in the<br />
manual.<br />
Avoid contact with leaking<br />
hydraulic fluid or diesel fuel<br />
un<strong>de</strong>r pressure. It can penetrate<br />
the skin or eyes.<br />
Never fill fuel tank with engine<br />
running, while smoking or when<br />
near open flame.<br />
MAINTENANCE SAFETY<br />
Instructions are necessary before operating or servicing machine. Read and<br />
un<strong>de</strong>rstand the Operation & Maintenance Manual, Operator’s Handbook and<br />
signs (<strong>de</strong>cals) on machine. Follow warnings and instructions in the manuals<br />
when making repairs, adjustments or servicing. Check for correct function after<br />
adjustments, repairs or service. Untrained operators and failure to follow<br />
instructions can cause injury or <strong>de</strong>ath. W-2003-0903<br />
Safety Alert Symbol: This symbol with a warning statement, means: “Warning, be alert! Your safety is<br />
involved!” Carefully read the message that follows.<br />
CORRECT<br />
B-10731a<br />
WRONG<br />
B-11799<br />
WRONG<br />
CORRECT<br />
B-12365<br />
Use the correct procedure to lift or<br />
lower operator cab.<br />
WRONG<br />
B-15231<br />
Disconnecting or loosening any<br />
hydraulic tubeline, hose, fitting,<br />
component or a part failure can<br />
cause lift arms to drop. Do not go<br />
un<strong>de</strong>r lift arms when raised<br />
unless supported by an<br />
approved lift arm support <strong>de</strong>vice.<br />
Replace it if damaged.<br />
WRONG<br />
B-6580<br />
B-16102<br />
Keep body, jewelry and clothing<br />
away from moving parts,<br />
electrical contact, hot parts and<br />
exhaust.<br />
Wear eye protection to guard<br />
from battery acid, compressed<br />
springs, fluids un<strong>de</strong>r pressure<br />
and flying <strong>de</strong>bris when engines<br />
are running or tools are used.<br />
Use eye protection approved for<br />
type of welding.<br />
Keep rear door closed except for<br />
service. Close and latch door<br />
before operating the loa<strong>de</strong>r.<br />
Cleaning and maintenance are<br />
required daily.<br />
Never work on loa<strong>de</strong>r with lift<br />
arms up unless lift arms are held<br />
by an approved lift arm support<br />
<strong>de</strong>vice. Replace if damaged.<br />
Never modify equipment or add<br />
attachments not approved by<br />
Bobcat Company.<br />
Lead-acid batteries<br />
B-6589<br />
B-16102<br />
produce<br />
flammable and explosive gases.<br />
Keep arcs, sparks, flames and<br />
lighted<br />
batteries.<br />
tobacco away from<br />
Batteries contain acid which<br />
burns eyes or skin on contact.<br />
Wear protective clothing. If acid<br />
contacts body, flush well with<br />
water. For eye contact flush well<br />
and get immediate medical<br />
attention.<br />
Maintenance procedures which are given in the Operation & Maintenance Manual can be performed by the owner/<br />
operator without any specific technical training. Maintenance procedures which are not in the Operation & Maintenance<br />
Manual must be performed ONLY BY QUALIFIED BOBCAT SERVICE PERSONNEL. Always use genuine Bobcat<br />
replacement parts. The Service Safety Training Course is available from your Bobcat <strong>de</strong>aler.<br />
CORRECT<br />
B-7469<br />
WRONG<br />
B-15280<br />
WRONG<br />
MSW01-0805
FOREWORD . . . . . . . . . . . . . . . . . . . . . . . . . . . . . . . . . . . . . . . . . . . . . . . . . . . . . . ii<br />
SAFETY INSTRUCTIONS . . . . . . . . . . . . . . . . . . . . . . . . . . . . . . . . . . . . . . . . . . . v<br />
SERIAL NUMBER LOCATIONS . . . . . . . . . . . . . . . . . . . . . . . . . . . . . . . . . . . . . vii<br />
DELIVERY REPORT . . . . . . . . . . . . . . . . . . . . . . . . . . . . . . . . . . . . . . . . . . . . . . vii<br />
BOBCAT LOADER IDENTIFICATION . . . . . . . . . . . . . . . . . . . . . . . . . . . . . . . . viii<br />
PREVENTIVE MAINTENANCE . . . . . . . . . . . . . . . . . . . . . . . . . . . . . . . . . . . . 1–1<br />
HYDRAULIC SYSTEM . . . . . . . . . . . . . . . . . . . . . . . . . . . . . . . . . . . . . . . . . . . . 2–1<br />
HYDROSTATIC SYSTEM . . . . . . . . . . . . . . . . . . . . . . . . . . . . . . . . . . . . . . . . . 3–1<br />
DRIVE SYSTEM . . . . . . . . . . . . . . . . . . . . . . . . . . . . . . . . . . . . . . . . . . . . . . . . . 4–1<br />
MAIN FRAME . . . . . . . . . . . . . . . . . . . . . . . . . . . . . . . . . . . . . . . . . . . . . . . . . . . 5–1<br />
ELECTRICAL SYSTEM . . . . . . . . . . . . . . . . . . . . . . . . . . . . . . . . . . . . . . . . . . . 6–1<br />
ENGINE SERVICE . . . . . . . . . . . . . . . . . . . . . . . . . . . . . . . . . . . . . . . . . . . . . . . 7–1<br />
SYSTEM ANALYSIS . . . . . . . . . . . . . . . . . . . . . . . . . . . . . . . . . . . . . . . . . . . . . . 8–1<br />
SPECIFICATIONS . . . . . . . . . . . . . . . . . . . . . . . . . . . . . . . . . . . . . . . . . . . . . . . . 9–1<br />
Revised June 97<br />
CONTENTS<br />
PREVENTIVE<br />
MAINTENANCE<br />
HYDRAULIC<br />
SYSTEM<br />
HYDROSTATIC<br />
SYSTEM<br />
DRIVE<br />
SYSTEM<br />
MAIN<br />
FRAME<br />
ELECTRICAL<br />
SYSTEM<br />
ENGINE<br />
SERVICE<br />
SYSTEM<br />
ANALYSIS<br />
SPECIFICATIONS<br />
853, 853H Loa<strong>de</strong>r<br />
i Service Manual
FOREWORD<br />
This manual is for the Bobcat loa<strong>de</strong>r mechanic. It provi<strong>de</strong>s necessary servicing and adjustment<br />
procedures for the Bobcat loa<strong>de</strong>r and its component parts and systems. Refer to the Operation &<br />
Maintenance Manual for operating instructions, starting procedure, daily checks, etc.<br />
A general inspection of the following items must be ma<strong>de</strong> after the loa<strong>de</strong>r has had service or repair:<br />
1. Check that the ROPS/FOPS<br />
(Including si<strong>de</strong>screens) is in<br />
good condition and is not<br />
modified.<br />
2. Check that ROPS mounting<br />
hardware is tightened and is<br />
Melroe approved.<br />
3. The seat belt must be correctly<br />
installed, functional and in<br />
good condition.<br />
4. The seat bar and pedal<br />
interlocks must be correctly<br />
adjusted, clean and lubricated.<br />
5. Machine signs must be legible<br />
and in the correct location.<br />
6. Steering levers and foot pedals<br />
must return to neutral.<br />
7. Check for correct function of<br />
the work lights.<br />
8. The parking brake must<br />
function correctly.<br />
ii<br />
9. Enclosure door latches must<br />
open and close freely.<br />
10. Bob–Tach wedges and<br />
linkages must function<br />
correctly and be in good<br />
condition.<br />
11. Safety treads must in good<br />
condition.<br />
12. Check for correct function of<br />
indicator lamps (Optional on<br />
some mo<strong>de</strong>ls).<br />
13. Check hydraulic fluid level,<br />
engine oil level and fuel supply.<br />
14. Inspect for fuel, oil or hydraulic<br />
fluid leaks.<br />
15. Lubricate the loa<strong>de</strong>r.<br />
16. Check the condition of the<br />
battery and cables.<br />
853, 853H Loa<strong>de</strong>r<br />
Service Manual
17. Inspect the air cleaner for<br />
damage or leaks. Check the<br />
condition of the element.<br />
18. Check the electrical charging<br />
system.<br />
19. Check tires for wear and<br />
pressure.<br />
20. Inspect for loose or broken<br />
parts or connections.<br />
21. Operate the loa<strong>de</strong>r and check<br />
all functions.<br />
22. Check for any field<br />
modification not completed.<br />
23. Check for correct function of<br />
the Bobcat Interlock Control<br />
System (BICS) before the<br />
machine is returned to the<br />
customer.<br />
Recommend to the owner that all<br />
necessary corrections be ma<strong>de</strong><br />
before the machine is returned to<br />
service.<br />
853, 853H Loa<strong>de</strong>r<br />
iii Service Manual
iv<br />
853, 853H Loa<strong>de</strong>r<br />
Service Manual
SAFETY INSTRUCTIONS<br />
Instructions are necessary before operating or servicing machine. Read Operation & Maintenance Manual,<br />
Handbook and signs (<strong>de</strong>cals) on machine. Follow warnings and instructions in the manuals when making<br />
repairs, adjustments or servicing. Check for correct function after adjustments, repairs or service. Failure<br />
to follow instructions can cause injury or <strong>de</strong>ath.<br />
W–2003–1289<br />
The following publications provi<strong>de</strong> information on the safe use and maintenance of the loa<strong>de</strong>r and attachments:<br />
• The Delivery Report is used to assure that complete instructions have been given to the new owner and that the machine<br />
is in safe operating condition.<br />
• The Operation & Maintenance Manual <strong>de</strong>livered with the loa<strong>de</strong>r gives operating information as well as routine<br />
maintenance and service procedures. It is a part of the loa<strong>de</strong>r and must stay with the machine when it is sold. Replacement<br />
Operation & Maintenance Manuals can be or<strong>de</strong>red from your Bobcat loa<strong>de</strong>r <strong>de</strong>aler.<br />
• The loa<strong>de</strong>r has machine signs (<strong>de</strong>cals) which instruct on the safe operation and care. The signs and their locations are<br />
shown in the Operation & Maintenance Manual. Replacement signs are available from your Bobcat loa<strong>de</strong>r <strong>de</strong>aler.<br />
• The loa<strong>de</strong>r has a plastic Operator’s Handbook fastened to the operator cab. Its brief instructions are convenient to the<br />
operator. The handbook is available from your <strong>de</strong>aler in English edition or French, German, Italian, Dutch, Spanish,<br />
Portuguese, Finnish, Danish & Swedish editions.<br />
• The EMI Safety Manual (available in Spanish) <strong>de</strong>livered with the loa<strong>de</strong>r gives general safety information.<br />
• The Service Manual and Parts Manual are available from your <strong>de</strong>aler for use by mechanics to do shop–type service and<br />
repair work.<br />
• The Skid–Steer Loa<strong>de</strong>r Operator Training Course is available through your local Bobcat <strong>de</strong>aler. This course is inten<strong>de</strong>d<br />
to provi<strong>de</strong> rules and practices for correct operation of the Bobcat loa<strong>de</strong>r. The course is available in English and Spanish<br />
versions.<br />
• The Bobcat Skid–Steer Loa<strong>de</strong>r Safety Vi<strong>de</strong>o is available from your Bobcat Dealer.<br />
Warnings on the machine and in the<br />
manuals are for your safety. Failure to<br />
obey warnings can cause injury or<br />
<strong>de</strong>ath.<br />
W–2044–1285<br />
This notice i<strong>de</strong>ntifies procedures<br />
which must be followed to avoid<br />
damage to the machine.<br />
I–2019–0284<br />
Safety Alert Symbol: This Safety Symbol is used for important safety messages. When you see this<br />
symbol follow the safety message to avoid personal injury or <strong>de</strong>ath.<br />
Revised June 97<br />
853, 853H Loa<strong>de</strong>r<br />
v Service Manual
SAFETY INSTRUCTIONS (Cont’d)<br />
• Wear tight fitting clothing. Always wear safety glasses when maintaining or servicing loa<strong>de</strong>r. Safety glasses, hearing<br />
protection or loa<strong>de</strong>r special applications kit are required for some work. See your <strong>de</strong>aler for Melroe Safety equipment.<br />
• Know where fire extinguishers and first aid kits are located and how to use them.<br />
• Do not use the Bobcat loa<strong>de</strong>r where exhaust, arcs, sparks or hot components can contact flammable material, explosive<br />
dust or gases.<br />
• The engine compartment and engine cooling system must be inspected every day and cleaned if necessary to prevent<br />
fire hazard and overheating.<br />
• Check all electrical wiring and connections for damage. Keep the battery terminals clean and tight. Repair or replace any<br />
damaged part.<br />
• Check fuel and hydraulic tubes, hoses and fittings for damage and leakage. Never use open flame or bare skin to check<br />
for leaks. Tighten or replace any parts that show leakage. Always clean fluid spills. Do not use gasoline or diesel fuel for<br />
cleaning parts. Use commercial nonflammable solvents.<br />
• Follow any environmental safety regulations when disposing of used fluids such as engine oil, grease or anti–freeze.<br />
• Do not use ether or starting fluids on this engine. It has glow plugs. These starting aids can cause explosion and injure<br />
you or bystan<strong>de</strong>rs.<br />
• Always clean the loa<strong>de</strong>r and disconnect the battery before doing any welding. Cover rubber hoses, battery and all other<br />
flammable parts. Keep a fire extinguisher near the loa<strong>de</strong>r when welding. Have good ventilation when grinding or welding<br />
painted parts. Wear dust mask when grinding painted parts. Toxic dust or gas can be produced.<br />
• Stop the engine and let it cool before adding fuel. No smoking!<br />
• Use the procedure in the Operation & Maintenance or Service Manuals for connecting the battery.<br />
• Use the procedure in the Operation & Maintenance or Service Manuals for cleaning the spark arrestor muffler.<br />
A fire extinguisher is available from your local <strong>de</strong>aler. The fire extinguisher can be installed in the location shown [A].<br />
Revised June 97 vi<br />
A<br />
P–03705<br />
853, 853H Loa<strong>de</strong>r<br />
Service Manual
SERIAL NUMBER LOCATIONS<br />
Always use the serial number of the loa<strong>de</strong>r when<br />
requesting service information or when or<strong>de</strong>ring parts.<br />
Early or later mo<strong>de</strong>ls (i<strong>de</strong>ntification ma<strong>de</strong> by serial<br />
number) may use different parts, or it may be necessary<br />
to use a different procedure in doing a specific service<br />
operation.<br />
LOADER SERIAL NUMBER<br />
The loa<strong>de</strong>r serial number plate is located on the insi<strong>de</strong> of<br />
the left upright, above the grill [A].<br />
Explanation of loa<strong>de</strong>r Serial Number:<br />
XXXX XXXXX<br />
ENGINE SERIAL NUMBER<br />
Module 2. – Production<br />
Sequence (Series)<br />
Module 1. – Mo<strong>de</strong>l/Engine<br />
Version<br />
The four digit Mo<strong>de</strong>l/Engine Combination module number<br />
i<strong>de</strong>ntifies the mo<strong>de</strong>l number and engine combination.<br />
This number (in parenthesis besi<strong>de</strong> the mo<strong>de</strong>l number) is<br />
used in the Service Manual to more easily i<strong>de</strong>ntify the<br />
standard, optional and field accessory equipment<br />
inclu<strong>de</strong>d or available for each specific mo<strong>de</strong>l.<br />
The five digit Production Sequence Number i<strong>de</strong>ntifies the<br />
or<strong>de</strong>r which the loa<strong>de</strong>r is produced.<br />
The serial number is located above the starter on the<br />
engine block [B].<br />
DELIVERY REPORT<br />
The Delivery Report must be filled out by the <strong>de</strong>aler and<br />
signed by the owner or operator when the Bobcat loa<strong>de</strong>r<br />
is <strong>de</strong>livered. An explanation of the form must be given to<br />
the owner. Make sure it is filled out completely [C].<br />
A<br />
B<br />
C<br />
P–00369<br />
P–00370<br />
853, 853H Loa<strong>de</strong>r<br />
vii Service Manual
BOBCAT LOADER IDENTIFICATION<br />
FRONT LIGHTS<br />
GRAB HANDLES<br />
STEERING LEVER<br />
TILT CYLINDER<br />
BUCKET<br />
REAR WINDOW<br />
REAR GRILL<br />
TAIL LIGHT<br />
REAR LIGHT<br />
SEAT BELT<br />
SEAT BAR<br />
REAR DOOR<br />
BUCKET STEPS<br />
REAR<br />
TIE DOWN<br />
FLASHERS (OPT.)<br />
SAFETY TREAD<br />
OPERATOR SEAT<br />
REAR AUXILIARY<br />
QUICK COUPLERS<br />
FRONT AUXILIARY<br />
QUICK COUPLERS<br />
OPERATOR CAB<br />
(ROPS & FOPS)<br />
LIFT ARM<br />
LIFT ARM<br />
SUPPORT DEVICE<br />
TIRES*<br />
LIFT CYLINDER<br />
B–12555<br />
B–12556<br />
* TIRES – Flotation tires are shown. The Bobcat loa<strong>de</strong>r is based–equipped with standard tires.<br />
BUCKET – Several different buckets and other attachments are available for the Bobcat loa<strong>de</strong>r.<br />
ROPS, FOPS – Roll Over Protective Structure, per SAE J1040 and ISO 3471 and Falling Object Protective<br />
Structure per SAE J1043 and ISO 3449 Level I. Level ll FOPS is available for protection from heavy falling<br />
objects. The Bobcat loa<strong>de</strong>r is base–equipped with a standard operator cab as shown. Extra insulated cab is<br />
available as an option (Reduced noise level).<br />
viii<br />
853, 853H Loa<strong>de</strong>r<br />
Service Manual
All 853 & 853H Bobcat loa<strong>de</strong>rs are equipped with the following standard items:<br />
Bob–Tach Seat Belt<br />
Servo Assist Steering Seat Bar<br />
Spark Arrestor Muffler Parking Brake<br />
Lift Arm Support Device Gauges/Warning Lights<br />
Operator Cab (W/ROPS & FOPS Approval) Bobcat Interlock Control System (BICS TM )<br />
Below is a listing of the optional equipment which is available through your Bobcat Loa<strong>de</strong>r <strong>de</strong>aler.<br />
853 & 853H<br />
Tires<br />
8.25–15 6 PR . . . . . . . . . . . . . . . . . . . . . . . . . . . .<br />
Std.<br />
12.00–16.5, Segmented . . . . . . . . . . . . . . . . . . . .<br />
Opt.<br />
12.00–16.5, 6 PR Flotation . . . . . . . . . . . . . . . . .<br />
Opt.<br />
12–16.5 8 PR Bobcat Heavy Duty Flotation . . .<br />
Opt.<br />
8.00–16 Solid . . . . . . . . . . . . . . . . . . . . . . . . . . . . .<br />
Opt.<br />
10.00–33 Solid . . . . . . . . . . . . . . . . . . . . . . . . . . . .<br />
Opt.<br />
Operator Cab<br />
Sound Cab (85 dBa) . . . . . . . . . . . . . . . . . . . . . . .<br />
Deluxe Cab (90 dBa) . . . . . . . . . . . . . . . . . . . . . .<br />
Opt. (Std. in Europe)<br />
Opt.<br />
Suspension Seat . . . . . . . . . . . . . . . . . . . . . . . . . .<br />
Operating Lights (Front & Rear) . . . . . . . . . . . . .<br />
Opt. & FA (Std. in Europe)<br />
Opt. & FA (Std. in Europe)<br />
Horn . . . . . . . . . . . . . . . . . . . . . . . . . . . . . . . . . . . . .<br />
Back–up Alarm . . . . . . . . . . . . . . . . . . . . . . . . . . . .<br />
FA (Std. in Europe)<br />
FA<br />
Heated Enclosed Cab . . . . . . . . . . . . . . . . . . . . . .<br />
Top Window . . . . . . . . . . . . . . . . . . . . . . . . . . . . . .<br />
Opt. & FA<br />
Opt. & FA (Std. in Europe)<br />
Rear Window . . . . . . . . . . . . . . . . . . . . . . . . . . . . .<br />
Cab Enclosure Panels . . . . . . . . . . . . . . . . . . . . .<br />
Opt. & FA (Std. in Europe)<br />
FA<br />
Vinyl Cab Enclosure . . . . . . . . . . . . . . . . . . . . . . .<br />
Hand Control Conversion . . . . . . . . . . . . . . . . . . .<br />
FA<br />
FA<br />
Cover Kit (Pedals Area) . . . . . . . . . . . . . . . . . . . .<br />
Cover Kit (Hydraulic Reservoir Area) . . . . . . . . .<br />
FA (Std. in Europe)<br />
FA<br />
Fire Extinguisher . . . . . . . . . . . . . . . . . . . . . . . . . .<br />
FA<br />
Flasher Lights . . . . . . . . . . . . . . . . . . . . . . . . . . . . .<br />
Strobe or Rotating Beacon Light . . . . . . . . . . . . .<br />
FA<br />
FA<br />
3’’ Seat Belt . . . . . . . . . . . . . . . . . . . . . . . . . . . . . .<br />
Special Applications Kit (Inclu<strong>de</strong>s Front Door,<br />
FA<br />
Top & Rear Windows) . . . . . . . . . . . . . . . . . . . . .<br />
FA<br />
Hydraulics<br />
Front Auxiliary Hydraulics . . . . . . . . . . . . . . . . . . Opt. & FA (Std. in Europe)<br />
Rear Auxiliary Hydraulics . . . . . . . . . . . . . . . . . . .<br />
Hydraulic Bucket Positioning . . . . . . . . . . . . . . . .<br />
Opt. & FA<br />
Opt. & FA (Std. in Europe)<br />
Bucket Positioner On/Off . . . . . . . . . . . . . . . . . . .<br />
High HP Hydraulics . . . . . . . . . . . . . . . . . . . . . . . .<br />
FA (Std. in Europe)<br />
Opt.<br />
Other<br />
Catalytic Purifier . . . . . . . . . . . . . . . . . . . . . . . . . . .<br />
Engine Block Heater . . . . . . . . . . . . . . . . . . . . . . .<br />
FA<br />
FA<br />
Single Point Lift . . . . . . . . . . . . . . . . . . . . . . . . . . .<br />
Four Point Lift . . . . . . . . . . . . . . . . . . . . . . . . . . . . .<br />
FA<br />
FA<br />
Locking Fuel Cap . . . . . . . . . . . . . . . . . . . . . . . . . .<br />
Radiator Screen Kit . . . . . . . . . . . . . . . . . . . . . . . .<br />
FA<br />
FA<br />
Rear Door Bumpers . . . . . . . . . . . . . . . . . . . . . . .<br />
Tailgate Lock . . . . . . . . . . . . . . . . . . . . . . . . . . . . .<br />
FA<br />
FA (Std. in Europe)<br />
Tool Box . . . . . . . . . . . . . . . . . . . . . . . . . . . . . . . . . FA (Std. in Europe)<br />
Instrumentation<br />
Bobcat Operation Sensing System (BOSS®) . .<br />
Opt.<br />
Std. = Standard Equipment<br />
Opt. = Factory Installed Option<br />
FA = Field Accessory<br />
Specifications subject to<br />
change without notice<br />
OPTIONS AND ACCESSORIES<br />
853, 853H Loa<strong>de</strong>r<br />
ix Service Manual
853, 853H BICS Service Manual #6724012 – Contents Section<br />
x<br />
853, 853H Loa<strong>de</strong>r<br />
Service Manual
PREVENTIVE MAINTENANCE<br />
Page<br />
Number<br />
AIR CLEANER SERVICE<br />
Replacing Filter Element . . . . . . . . . . . . . . . . . . . . . . . . . . . . . . . . . . . . . . . . 1–11<br />
ALTERNATOR BELT<br />
Adjusting the Alternator Belt . . . . . . . . . . . . . . . . . . . . . . . . . . . . . . . . . . . . 1–18<br />
ENGINE COOLING SYSTEM<br />
Cleaning the Cooling System . . . . . . . . . . . . . . . . . . . . . . . . . . . . . . . . . . . 1–17<br />
Checking the Coolant Level . . . . . . . . . . . . . . . . . . . . . . . . . . . . . . . . . . . . 1–17<br />
Removing Coolant From the Cooling System . . . . . . . . . . . . . . . . . . . . . 1–18<br />
ENGINE LUBRICATION SYSTEM<br />
Checking Engine Oil . . . . . . . . . . . . . . . . . . . . . . . . . . . . . . . . . . . . . . . . . . . 1–15<br />
Replacing Oil and Filter . . . . . . . . . . . . . . . . . . . . . . . . . . . . . . . . . . . . . . . . 1–15<br />
FAN GEARBOX<br />
Checking and Maintaining . . . . . . . . . . . . . . . . . . . . . . . . . . . . . . . . . . . . . . 1–25<br />
FINAL DRIVE TRANSMISSION (CHAINCASE)<br />
Checking and Adding Oil . . . . . . . . . . . . . . . . . . . . . . . . . . . . . . . . . . . . . . . 1–25<br />
Removing Oil From the Chaincase . . . . . . . . . . . . . . . . . . . . . . . . . . . . . . 1–25<br />
FUEL SYSTEM<br />
Filling the Fuel Tank . . . . . . . . . . . . . . . . . . . . . . . . . . . . . . . . . . . . . . . . . . . 1–13<br />
Fuel Filter . . . . . . . . . . . . . . . . . . . . . . . . . . . . . . . . . . . . . . . . . . . . . . . . . . . . 1–13<br />
Fuel Specifications . . . . . . . . . . . . . . . . . . . . . . . . . . . . . . . . . . . . . . . . . . . . 1–13<br />
Removing Air From the Fuel System . . . . . . . . . . . . . . . . . . . . . . . . . . . . . 1–14<br />
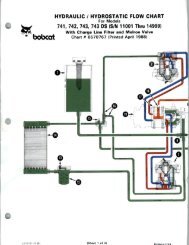
HYDRAULIC/HYDROSTATIC SYSTEM<br />
Checking and Adding Fluid . . . . . . . . . . . . . . . . . . . . . . . . . . . . . . . . . . . . . 1–20<br />
Replacing Hydraulic/Hydrostatic Filters . . . . . . . . . . . . . . . . . . . . . . . . . . . 1–20<br />
Hydraulic Reservoir Breather Cap . . . . . . . . . . . . . . . . . . . . . . . . . . . . . . . 1–22<br />
Replacing Hydraulic Fluid . . . . . . . . . . . . . . . . . . . . . . . . . . . . . . . . . . . . . . 1–21<br />
LIFT ARM SUPPORT DEVICE<br />
Engaging the Lift Arm Support Device . . . . . . . . . . . . . . . . . . . . . . . . . . . 1–7<br />
Disengaging the Lift Arm Support Device . . . . . . . . . . . . . . . . . . . . . . . . . 1–7<br />
LIFTING AND BLOCKING THE LOADER<br />
Procedure . . . . . . . . . . . . . . . . . . . . . . . . . . . . . . . . . . . . . . . . . . . . . . . . . . . . 1–4<br />
LIFTING THE LOADER<br />
Four Point Lift . . . . . . . . . . . . . . . . . . . . . . . . . . . . . . . . . . . . . . . . . . . . . . . .<br />
Single Point Lift . . . . . . . . . . . . . . . . . . . . . . . . . . . . . . . . . . . . . . . . . . . . . . .<br />
1–6<br />
1–6<br />
LUBRICATING THE LOADER<br />
Procedure . . . . . . . . . . . . . . . . . . . . . . . . . . . . . . . . . . . . . . . . . . . . . . . . . . . . 1–26<br />
OPERATOR CAB<br />
Description . . . . . . . . . . . . . . . . . . . . . . . . . . . . . . . . . . . . . . . . . . . . . . . . . . . 1–8<br />
Lowering the Operator Cab . . . . . . . . . . . . . . . . . . . . . . . . . . . . . . . . . . . . . 1–9<br />
Raising the Operator Cab . . . . . . . . . . . . . . . . . . . . . . . . . . . . . . . . . . . . . . 1–8<br />
Emergency Exit . . . . . . . . . . . . . . . . . . . . . . . . . . . . . . . . . . . . . . . . . . . . . . . 1–9<br />
REMOTE START SWITCH<br />
Procedure . . . . . . . . . . . . . . . . . . . . . . . . . . . . . . . . . . . . . . . . . . . . . . . . . . . . 1–28<br />
PREVENTIVE<br />
MAINTENANCE<br />
853, 853H BICS Loa<strong>de</strong>r<br />
–1–1– Service Manual
PREVENTIVE MAINTENANCE (Cont’d)<br />
–1–2–<br />
Page<br />
Number<br />
SEAT BAR RESTRAINT SYSTEM<br />
Description . . . . . . . . . . . . . . . . . . . . . . . . . . . . . . . . . . . . . . . . . . . . . . . . . . . 1–10<br />
Seat Bar Inspection . . . . . . . . . . . . . . . . . . . . . . . . . . . . . . . . . . . . . . . . . . . 1–10<br />
Seat Bar Maintenance . . . . . . . . . . . . . . . . . . . . . . . . . . . . . . . . . . . . . . . . . 1–10<br />
SERVICE SCHEDULE<br />
Chart . . . . . . . . . . . . . . . . . . . . . . . . . . . . . . . . . . . . . . . . . . . . . . . . . . . . . . . . . . 1–3<br />
SPARK ARRESTOR MUFFLER<br />
Cleaning Procedure . . . . . . . . . . . . . . . . . . . . . . . . . . . . . . . . . . . . . . . . . . . 1–23<br />
TIRE MAINTENANCE<br />
Tire Mounting . . . . . . . . . . . . . . . . . . . . . . . . . . . . . . . . . . . . . . . . . . . . . . . . . 1–24<br />
Tire Rotation . . . . . . . . . . . . . . . . . . . . . . . . . . . . . . . . . . . . . . . . . . . . . . . . . . 1–24<br />
Wheel Nuts . . . . . . . . . . . . . . . . . . . . . . . . . . . . . . . . . . . . . . . . . . . . . . . . . . . 1–24<br />
TOWING THE LOADER<br />
Procedure . . . . . . . . . . . . . . . . . . . . . . . . . . . . . . . . . . . . . . . . . . . . . . . . . . . . 1–5<br />
TRANSPORTING THE LOADER<br />
Procedure . . . . . . . . . . . . . . . . . . . . . . . . . . . . . . . . . . . . . . . . . . . . . . . . . . . . 1–5<br />
USING A BOOSTER BATTERY (JUMP STARTING)<br />
Procedure . . . . . . . . . . . . . . . . . . . . . . . . . . . . . . . . . . . . . . . . . . . . . . . . . . . . 1–19<br />
853, 853H BICS Loa<strong>de</strong>r<br />
Service Manual
SERVICE SCHEDULE<br />
Maintenance work must be done at regular intervals. Failure to do so will result in excessive wear and early failures. The<br />
service schedule is a gui<strong>de</strong> for correct maintenance of the Bobcat loa<strong>de</strong>r.<br />
Engine Oil Check the oil level & add oil as nee<strong>de</strong>d.<br />
Air Cleaner Check condition indicator or display panel. Service only when<br />
required.<br />
Engine Cooling System Clean <strong>de</strong>bris from oil cooler, radiator & grill. Check coolant level cold<br />
in recovery tank. See Page 1–18 for correct coolant mixture.<br />
Lift Arms, Cyl., Bob–Tach Lubricate with multi–purpose lithium based grease (12 places).<br />
Pivot Pins & Wedges<br />
Engine Air System Check for leaks & damaged components.<br />
Tires Check for damaged tires & correct air pressure.<br />
Seat Belt, Seat Bar & Pedal Check the condition of seat belt. Check the seat bar & pedal interlocks<br />
Interlocks for correct operation. Clean dirt & <strong>de</strong>bris from moving parts.<br />
Bobcat Interlock Control Check BICS functions. Clean dirt, <strong>de</strong>bris or objects from un<strong>de</strong>r<br />
System (BICS) or behind seat as required.<br />
Safety Signs & Safety Check for damaged signs (<strong>de</strong>cals) & safety tread. Replace any<br />
Tread signs or safety treads that are damaged or worn.<br />
Operator Cab Check the fastening bolts, washers & nuts. Check the condition of cab.<br />
Fuel Filter Remove the trapped water.<br />
Hydraulic Fluid, Hoses Check fluid level & add as nee<strong>de</strong>d. Check for damage & leaks.<br />
& Tubelines Repair & replace as nee<strong>de</strong>d.<br />
Final Drive Transmission Check oil level.<br />
(Chaincase)<br />
Battery Check cables & electrolyte level.<br />
Control Pedals & Steering Check for correct operation. Repair or adjust as nee<strong>de</strong>d.<br />
Wheel Nuts Check for loose wheel nuts & tighten to 105–115 ft.–lbs. (142–156 Nm)<br />
torque.<br />
Parking Brake Check operation.<br />
Alternator Belt Check tension & adjust as nee<strong>de</strong>d.<br />
Engine Oil & Filter Replace oil & filter.<br />
Spark Arrestor Muffler Clean the spark chamber.<br />
Engine/Hydro. Drive Belt * Check for wear or damage. Adjust as nee<strong>de</strong>d.<br />
Fuel Filter Replace filter element.<br />
Steering Shaft Grease three fittings.<br />
Hyd./Hydro. Filter Replace the filter element.<br />
Hydraulic Reservoir Replace the reservoir breather cap.<br />
Breather Cap<br />
Fan Drive Gearbox Check gear lube level.<br />
Final Drive Transmission Replace the oil in the chaincase.<br />
Hydraulic Reservoir Replace the fluid.<br />
Hydraulic Motors Replace the two case drain filters.<br />
Bobcat Interlock Control Check lift arm bypass control.<br />
System (BICS)<br />
Instructions are necessary before operating or servicing machine.<br />
Read Operation Maintenance Manual, Handbook and signs (<strong>de</strong>cals)<br />
on machine. Follow warnings and instructions in the manual when<br />
making repairs, adjustments or servicing. Check for correct function<br />
after adjustments, repairs or service. Failure to follow instructions can<br />
cause injury or <strong>de</strong>ath.<br />
W–2003–1289<br />
ITEM SERVICE REQUIRED 8–10 50 100 250 1000<br />
Check wheel nut torque every 8 hours for the first 24 hours.<br />
Also replace hydraulic/hydrostatic filter element when the transmission warning light comes ‘‘ON’’.<br />
Or every 12 months.<br />
* Inspect the new belt after first 50 hours.<br />
Clean or replace case drain filters in the event of any major hydraulic or hydrostatic repair.<br />
853, 853H BICS Loa<strong>de</strong>r<br />
–1–3– Service Manual
Instructions are necessary before operating or<br />
servicing machine. Read Operation &<br />
Maintenance Manuals, Handbook and signs<br />
(<strong>de</strong>cals) on machine. Follow warnings and<br />
instructions in the manuals when making<br />
repairs, adjustments or servicing. Check for<br />
correct function after adjustments, repairs or<br />
service. Failure to follow instructions can<br />
cause injury or <strong>de</strong>ath.<br />
W–2003–1289<br />
Read the Removal & Installation, Disassembly &<br />
Assembly, etc. completely to become familiar with the<br />
procedure before beginning [A].<br />
LIFTING AND BLOCKING THE LOADER<br />
Procedure<br />
Always park the loa<strong>de</strong>r on a level surface.<br />
Put jackstands un<strong>de</strong>r the front axles and rear<br />
corners of the frame before running the engine<br />
for service. Failure to use jackstands can allow<br />
the machine to fall or move and cause injury or<br />
<strong>de</strong>ath.<br />
W–2017–0286<br />
Put floor jack un<strong>de</strong>r the rear of the loa<strong>de</strong>r [B].<br />
Lift the rear of the loa<strong>de</strong>r and install jackstands [B].<br />
Put the floor jack un<strong>de</strong>r the front the loa<strong>de</strong>r [C].<br />
Lift the front of the loa<strong>de</strong>r and put jackstands un<strong>de</strong>r the<br />
axle tubes [C].<br />
NOTE: Make sure the jackstands do not touch the<br />
tires.<br />
Revised June 97<br />
–1–4–<br />
A<br />
B<br />
C<br />
B–07023<br />
P–04736<br />
P–04734<br />
853, 853H BICS Loa<strong>de</strong>r<br />
Service Manual
TRANSPORTING THE LOADER<br />
Procedure<br />
A<strong>de</strong>quately <strong>de</strong>signed ramps of sufficient<br />
strength are nee<strong>de</strong>d to support the weight of<br />
the machine when loading onto a transport<br />
vehicle. Wood ramps can break and cause<br />
personal injury.<br />
W–2058–0494<br />
A loa<strong>de</strong>r with an empty bucket or no attachment must be<br />
loa<strong>de</strong>d backward onto the transport vehicle [A].<br />
Be sure the transport and towing vehicles are of a<strong>de</strong>quate<br />
size and capacity.<br />
Use the following procedure to fasten the Bobcat loa<strong>de</strong>r<br />
to the transport vehicle to prevent the loa<strong>de</strong>r from moving<br />
during sud<strong>de</strong>n stops or when going up or down slopes [B].<br />
Lower the bucket or attachment to the floor. Stop the<br />
engine. Engage the parking brake. Install chains at the<br />
front and rear loa<strong>de</strong>r tie down positions (Inset) [B]. Fasten<br />
each end of the chain to the transport vehicle and tighten<br />
the chain with a chain tightener.<br />
TOWING THE LOADER<br />
Procedure<br />
To prevent damage to the loa<strong>de</strong>rs hydrostatic system, the<br />
loa<strong>de</strong>r must be towed only a short distance at slow speed.<br />
(Example: Moving the loa<strong>de</strong>r onto a transport vehicle.)<br />
The towing chain (or cable) must be rated at 1–1/2 times<br />
the weight of the loa<strong>de</strong>r. (See Specification Page 9–1.)<br />
• Turn the key switch to ON and press the Traction<br />
Lock Overri<strong>de</strong> button.<br />
• Tow the Bobcat at 2 MPH (3,2 km/hr.) or less for not<br />
more than 25 feet (7,6 meters).<br />
If the electrical system is not functioning, part, of the<br />
brake system must be disassembled to move the loa<strong>de</strong>r.<br />
See Traction Lock removal and installation procedure.<br />
(Page 8–1.)<br />
STOPPING THE BOBCAT LOADER<br />
When the steering levers are moved to the neutral<br />
position, the hydrostatic transmission will act as a service<br />
brake and stop the loa<strong>de</strong>r.<br />
A<br />
B<br />
P–05090 P–05077<br />
6707867<br />
MC–01241<br />
MC–01242<br />
853, 853H BICS Loa<strong>de</strong>r<br />
–1–5– Service Manual
LIFTING THE LOADER<br />
Four Point Lift<br />
AVOID INJURY OR DEATH<br />
• Before lifting, check fasteners on four point<br />
lift.<br />
• Never allow ri<strong>de</strong>rs in the cab or bystan<strong>de</strong>rs<br />
within 15 feet (5 meters) while lifting the<br />
machine.<br />
W–2046–1290<br />
The loa<strong>de</strong>r can be lifted with the four point lift which is<br />
available as a kit from your Bobcat loa<strong>de</strong>r <strong>de</strong>aler.<br />
Attach cables or chains to lift eyes as shown [A].<br />
Single Point Lift<br />
AVOID INJURY OR DEATH<br />
• Before lifting, check fasteners on single<br />
point lift and operator cab.<br />
• Assemble front cab fasteners as shown in<br />
manual.<br />
• Never allow ri<strong>de</strong>rs in the cab or bystan<strong>de</strong>rs<br />
within 15 feet (5 meters) while lifting the<br />
machine.<br />
W–2007–1285<br />
The loa<strong>de</strong>r can also be lifted with the single point lift which<br />
is available as a kit from your Bobcat loa<strong>de</strong>r <strong>de</strong>aler.<br />
Install the kit and lift as shown [B].<br />
The single point lift, supplied by Melroe Company is<br />
<strong>de</strong>signed to lift and support the Bobcat loa<strong>de</strong>r without<br />
affecting roll over and falling object protection features of<br />
the operator cab.<br />
–1–6–<br />
A<br />
B<br />
MC–01434<br />
MC–01664<br />
853, 853H BICS Loa<strong>de</strong>r<br />
Service Manual
LIFT ARM SUPPORT DEVICE<br />
Never work on a machine with the lift arms up<br />
unless the lift arms are secured by a lift arm<br />
support <strong>de</strong>vice. Failure to use an approved lift<br />
arm support <strong>de</strong>vice can allow the lift arms or<br />
attachment to fall and cause injury or <strong>de</strong>ath.<br />
W–2059–0991<br />
Engaging the Lift Arm Support Device<br />
Maintenance and service work can be done with the lift<br />
arms lowered. If the lift arms must be raised for service,<br />
use the following procedure:<br />
Put jackstands un<strong>de</strong>r the rear corners of the loa<strong>de</strong>r.<br />
Disconnect the spring from the lift arm support <strong>de</strong>vice<br />
retaining pin, hold onto the lift arm support <strong>de</strong>vice and<br />
remove the retaining pin [A].<br />
Lower the lift arm support <strong>de</strong>vice on top of the lift cylin<strong>de</strong>r.<br />
Hook the free end of the spring (item 1) [B] to the lift arm<br />
support <strong>de</strong>vice so there will be no interference with the<br />
support <strong>de</strong>vice engagement.<br />
With the operator in the seat, seat belt fastened and seat<br />
bar lowered, start the engine.<br />
Raise the lift arms, until the lift arm support <strong>de</strong>vice drops<br />
onto the lift cylin<strong>de</strong>r rod [C].<br />
Lower the lift arms slowly until the support <strong>de</strong>vice is held<br />
between the lift arm and the lift cylin<strong>de</strong>r. Stop the engine.<br />
Raise the seat and move pedals until both pedals lock.<br />
Install pin (Item 1) [C] into the rear of the lift arm support<br />
<strong>de</strong>vice below the cylin<strong>de</strong>r rod.<br />
Disengaging the Lift Arm Support Device<br />
Remove the pin from the lift arm support <strong>de</strong>vice.<br />
Connect the spring (Item 1) [D] from the lift arm support<br />
<strong>de</strong>vice to the bracket below the lift arms.<br />
With the operator in the seat, seat belt fastened and seat<br />
bar lowered, start the engine.<br />
Raise the lift arms a small amount and the spring will lift<br />
the support <strong>de</strong>vice off the lift cylin<strong>de</strong>r rod. Lower the lift<br />
arms. Stop the engine.<br />
Raise the seat bar and move pedals until both pedals<br />
lock.<br />
Disconnect the spring from the bracket.<br />
Raise the support <strong>de</strong>vice into storage position and insert<br />
pin through lift arm support <strong>de</strong>vice and bracket [A].<br />
Connect spring to pin [A].<br />
Revised June 97<br />
A<br />
B<br />
C<br />
D<br />
1<br />
1<br />
P–02133<br />
P–02118<br />
P–00095<br />
P–01542<br />
853, 853H BICS Loa<strong>de</strong>r<br />
–1–7– Service Manual<br />
1
OPERATOR CAB<br />
Description<br />
The Bobcat loa<strong>de</strong>r has an operator cab (ROPS and<br />
FOPS) as standard equipment to protect the operator<br />
from rollover and falling objects. Check with your <strong>de</strong>aler<br />
if the operator cab has been damaged. The seat belt must<br />
be worn for roll over protection.<br />
ROPS/FOPS Roll Over Protective Structure per SAE<br />
J104 and ISO 3471, and Falling Object Protective<br />
Structure per SAE J1043 and ISO 3449, Level l. Level ll<br />
is available.<br />
Level l – Protection from falling bricks, small concrete<br />
blocks and hand tools encountered in operations such as<br />
highway maintenance, landscaping, and other<br />
construction site services.<br />
Level ll – Protection from falling trees, rocks; for<br />
machines involved in site clearing, overhead <strong>de</strong>molition<br />
or forestry.<br />
Never modify operator cab by welding,<br />
grinding, drilling holes or adding attachments<br />
unless instructed to do so by Melroe Company.<br />
Changes to the cab can cause loss of operator<br />
protection from rollover and falling objects,<br />
and result in injury or <strong>de</strong>ath.<br />
Raising the Operator Cab<br />
Stop the loa<strong>de</strong>r on a level surface. Lower the lift arms. If<br />
the lift arms must be up while raising the operator cab,<br />
install the lift arm support <strong>de</strong>vice. (See Page 1–7.)<br />
Before the cab or the lift arms are raised for<br />
service, jackstands must be put un<strong>de</strong>r the rear<br />
corners of the frame. Failure to use jackstands<br />
may allow the machine to tip backward causing<br />
injury or <strong>de</strong>ath.<br />
W–2014–1285<br />
Loosen the nut (Item 1) [A] (both si<strong>de</strong>s) at the front corner<br />
of the operator cab.<br />
Remove the nut and plate (both si<strong>de</strong>s) [B].<br />
W–2069–1285<br />
Lift on the grab handle and bottom of the operator cab<br />
slowly until the cab latching mechanism engages and the<br />
cab is all the way up [C].<br />
–1–8–<br />
A<br />
B<br />
C<br />
1<br />
CD–15126<br />
CD–15125<br />
P–00380<br />
853, 853H BICS Loa<strong>de</strong>r<br />
Service Manual
OPERATOR CAB (Cont’d)<br />
Lowering the Operator Cab<br />
NOTE: Make sure the seat bar is fully raised or<br />
lowered when lowering the cab. Always use<br />
the grab handles to lower the cab.<br />
Pull down on the bottom of the operator cab until it stops<br />
at the latching mechanism. Release the latching<br />
mechanism (Item 1) [A] and pull the cab all the way down.<br />
Install the plate and nut (Item 1) [B] (both si<strong>de</strong>s).<br />
Tighten the nuts to 40–50 ft.–lbs. (54–68 Nm) torque [B].<br />
Emergency Exit<br />
The front opening on the operator cab and rear window<br />
provi<strong>de</strong> exits.<br />
To exit through the rear window, use the following<br />
procedure:<br />
Pull on the tag on the top of the rear window to remove the<br />
rubber cord [C].<br />
Push the rear window out of the rear of the operator cab.<br />
Exit through the rear of the operator cab [D].<br />
A<br />
B<br />
C<br />
D<br />
1<br />
1<br />
CD–15124<br />
CD–15126<br />
P–00660<br />
P–00383<br />
853, 853H BICS Loa<strong>de</strong>r<br />
–1–9– Service Manual
SEAT BAR RESTRAINT SYSTEM<br />
Description<br />
The seat bar restraint system has a pivoting seat bar with<br />
arm rests and has spring loa<strong>de</strong>d interlocks for the lift and<br />
tilt control pedals. The operator controls the use of the<br />
seat bar. The seat bar in the down position helps to keep<br />
the operator in the seat. The interlocks require the<br />
operator to lower the seat bar in or<strong>de</strong>r to operate the foot<br />
pedal controls. When the seat bar is up, the lift and tilt<br />
pedals are locked when returned to the neutral position.<br />
AVOID INJURY OR DEATH<br />
The seat bar system must lock the lift and tilt<br />
control pedals in neutral when the seat bar is<br />
up. Service the system if pedals do not lock<br />
correctly.<br />
W–2105–1285<br />
Seat Bar Inspection<br />
Sit in the seat and fasten the seat belt. Engage the<br />
parking brake. Pull the seat bar all the way down. Start the<br />
engine. Operate each foot pedal to check both the lift and<br />
tilt functions. Raise the lift arms until the bucket is about<br />
2 feet (600 mm) off the ground.<br />
Raise the seat bar. Try to move each foot pedal. Pedals<br />
must be firmly locked in neutral position. There must be<br />
no motion of the lift arms or tilt (bucket) when the pedals<br />
are pushed.<br />
Pull the seat bar down, lower the lift arms. Operate the lift<br />
pedals. While the lift arms are going up, raise the seat bar<br />
and the lift arms should stop.<br />
Lower the seat bar, lower the lift arms and place the<br />
bucket flat on the ground. Stop the engine. Raise the seat<br />
bar and operate the foot pedals to be sure that the pedals<br />
are firmly locked in the neutral position. Unbuckle the seat<br />
belt.<br />
AVOID INJURY OR DEATH<br />
Never operate loa<strong>de</strong>r without pedal lock shield<br />
6705474 on both interlocks. Shields prevent<br />
foot from unlocking interlocks when leaving<br />
loa<strong>de</strong>r seat.<br />
W–2162–1194<br />
Seat Bar Maintenance<br />
See the Service Schedule Page 1–3 and on the loa<strong>de</strong>r for<br />
correct service interval.<br />
Clean any <strong>de</strong>bris or dirt from the moving parts [A] & [B].<br />
Inspect the linkage bolts and nuts for tightness. The<br />
correct torque is 25–28 ft.–lbs. (34–38 Nm).<br />
If the seat bar system does not function correctly, check<br />
for free movement of each linkage part. Check for<br />
excessive wear. Adjust pedal control linkage. Replace<br />
parts that are worn or damaged. Use only genuine Melroe<br />
replacement parts.<br />
–1–10–<br />
A<br />
B<br />
Clean<br />
P–03269<br />
P–03270<br />
Pedal Lock<br />
Shield<br />
P–01223<br />
853, 853H BICS Loa<strong>de</strong>r<br />
Service Manual
AIR CLEANER SERVICE<br />
Replacing Filter Element<br />
WITH CONDITION INDICATOR: Replace the large<br />
(outer) filter element only when the red ring shows in the<br />
window of the condition indicator (Item 1) [A].<br />
NOTE: Before replacing the filter element, push the<br />
button on the condition indicator (Item 2) [A].<br />
Start the engine. If the red ring does not<br />
show, do not replace the filter element.<br />
Replace the inner filter every third time the outer filter is<br />
replaced or when the red ring still shows in the indicator<br />
window after the outer filter has been replaced.<br />
WITH BOSS® OPTION: It is important to change the air<br />
filter element only when the service co<strong>de</strong>s (on the<br />
BOSS® option instrument panel) shows the symbols<br />
[AF.2] [B].<br />
Service the air cleaner as follows:<br />
Remove the dust cover wing nut (Item 1) [C].<br />
Remove the dust cover.<br />
A<br />
B<br />
C<br />
2<br />
1<br />
1<br />
CD–15118<br />
MC–02042<br />
CD–15117<br />
853, 853H BICS Loa<strong>de</strong>r<br />
–1–11– Service Manual
AIR CLEANER SERVICE (Cont’d)<br />
Replacing Filter Element (Cont’d)<br />
Remove the wing nut (Item 1) [A] at the large air filter<br />
element.<br />
Remove the large filter element [B].<br />
NOTE: Make sure all sealing surfaces are free of dirt<br />
and <strong>de</strong>bris.<br />
Install the new filter element and washer and tighten the<br />
wing nut.<br />
Check the air intake hose for damage. Check the air<br />
cleaner housing for damage. Check to make sure all<br />
connections are tight.<br />
Only replace the inner filter element un<strong>de</strong>r the following<br />
conditions:<br />
1. Replace the inner filter element every third time the<br />
outer filter is replaced.<br />
2. If the service co<strong>de</strong>s show symbols (See Page 8–1)<br />
during full engine speed, replace the inner filter<br />
element only after the outer filter element has been<br />
changed.<br />
Remove the inner filter wing nut (Item 1) [C] to remove the<br />
filter element.<br />
–1–12–<br />
A<br />
B<br />
C<br />
1<br />
1<br />
CD–15119<br />
CD–15120<br />
CD–15121<br />
853, 853H BICS Loa<strong>de</strong>r<br />
Service Manual
FUEL SYSTEM<br />
Fuel Specifications<br />
Use only clean, high quality diesel fuel, Gra<strong>de</strong> No. 1 or<br />
Gra<strong>de</strong> No. 2 .<br />
The following is one suggested blending gui<strong>de</strong>line which<br />
should prevent fuel gelling problems:<br />
Temp. F° (C°) No. 2 No.1<br />
+15°(9°) 100% 0%<br />
Down to –20° (–29°) 50% 50%<br />
Below –20° (29°) 0% 100%<br />
We recommend an operator contact their fuel supplier for<br />
local recommendations.<br />
Filling the Fuel Tank<br />
Stop and cool the engine before adding fuel.<br />
NO SMOKING! Failure to obey warnings can<br />
cause an explosion or fire.<br />
W–2063–0887<br />
Remove the fuel fill cap (Item 1) [A].<br />
Use a clean, approved safety container to add fuel of the<br />
correct specifications. Add fuel only in an area that has<br />
free movement of air and no open flames or sparks. NO<br />
SMOKING! [B].<br />
Install and tighten the fuel fill cap [A].<br />
Fuel Filter<br />
Always clean up spilled fuel or oil. Keep heat,<br />
flames, sparks or lighted tobacco away from<br />
fuel and oil. Failure to use care around<br />
combustibles can cause explosion or fire<br />
which can result in injury or <strong>de</strong>ath. W–2103–1285<br />
See the Service Schedule Page 1–3 for the service<br />
interval when to remove the water from the fuel filter.<br />
Loosen the drain (Item 1) [C] at the bottom of the filter<br />
element to drain any water from the filter.<br />
See the Service Schedule Page 1–3 for the service<br />
interval when to replace the fuel filter.<br />
To replace the fuel filter element (Item 2) [C], use a filter<br />
wrench to remove the filter element.<br />
Clean the area around the filter housing. Put oil on the<br />
seal of the new filter element. Install the fuel filter, and<br />
hand tighten. Remove the air from the fuel system. (See<br />
Page 1–14.)<br />
A<br />
B<br />
C<br />
2<br />
1<br />
1<br />
P–02124<br />
WRONG<br />
B–13456<br />
CD–15123<br />
853, 853H BICS Loa<strong>de</strong>r<br />
–1–13– Service Manual
FUEL SYSTEM (Cont’d)<br />
Removing Air From the Fuel System<br />
After replacing the fuel filter element or when the fuel tank<br />
has run out of fuel, the air must be removed from the fuel<br />
system prior to starting the engine.<br />
Diesel fuel or hydraulic fluid un<strong>de</strong>r pressure<br />
can penetrate skin or eyes causing serious<br />
injury. Fluid leaks un<strong>de</strong>r pressure may not be<br />
visible. Use a piece of cardboard or wood to<br />
find leaks. Do not use your bare hand. Wear<br />
safety goggles. If fluid enters skin or eyes, get<br />
immediate medical attention.<br />
W–2074–1285<br />
Loosen the air vent plug (Item 1) [A] at the top of the fuel<br />
filter.<br />
Operate the priming bulb (Item 2) [A] until fuel flows from<br />
the filter vent. Tighten the fuel filter vent plug (Item 1) [A].<br />
Loosen the air vent plug at the top of the fuel injection<br />
pump [B].<br />
Again operate the priming bulb (Item 2) [A] until fuel flows<br />
from the air vent plug with no air bubbles showing.<br />
Tighten the air vent plug at the fuel injection pump [B].<br />
Always clean up spilled fuel or oil. Keep heat,<br />
flames, sparks or lighted tobacco away from<br />
fuel and oil. Failure to use care around<br />
combustibles can cause explosion or fire<br />
which can result in injury or <strong>de</strong>ath. W–2103–1285<br />
–1–14–<br />
A<br />
B<br />
1<br />
2<br />
CD–15123<br />
CD–10847<br />
853, 853H BICS Loa<strong>de</strong>r<br />
Service Manual
ENGINE LUBRICATION SYSTEM<br />
Checking Engine Oil<br />
Check the engine oil level every day.<br />
Before starting the engine for the work shift, open the rear<br />
door. Remove the dipstick (Item 1) [A].<br />
Keep the oil level between the marks on the dipstick.<br />
Use a good quality motor oil that meets API Service<br />
Classification of CC, CD or CE (See Oil Chart below).<br />
RECOMMENDED SAE VISCOSITY NUMBER<br />
(LUBRICATION OILS FOR ENGINE CRANKCASE)<br />
TEMPERATURE RANGE ANTICIPATED BEFORE<br />
NEXT OIL CHANGE<br />
Replacing Oil and Filter<br />
See the Service Schedule Page 1–3 for the service<br />
interval for replacing the engine oil and filter.<br />
Run the engine until it is at operating temperature. Stop<br />
the engine.<br />
Open the rear door. Remove the drain plug (Item 1) [B].<br />
Drain the oil into a container.<br />
Remove the oil filter (Item 1) [C].<br />
Clean the filter housing surface. Put clean oil on the new<br />
oil filter gasket. Install the filter and hand tighten only.<br />
Install and tighten the drain plug.<br />
A<br />
B<br />
C<br />
1<br />
1<br />
1<br />
CD–15112<br />
CD–15113<br />
CD–15122<br />
853, 853H BICS Loa<strong>de</strong>r<br />
–1–15– Service Manual
ENGINE LUBRICATION SYSTEM (Cont’d)<br />
Replacing Oil & Filter (Cont’d)<br />
Remove the oil filler cap (Item 1) [A].<br />
Put 8 qts. (7,6 L) of oil in the engine. (See Oil Chart, Page<br />
1–15.)<br />
Start the engine and let it run for several minutes. Stop the<br />
engine. Check for leaks at the oil filter. Add oil as nee<strong>de</strong>d<br />
if it is not at the top mark on the dipstick.<br />
Always clean up spilled fuel or oil. Keep heat,<br />
flames, sparks or lighted tobacco away from<br />
fuel and oil. Failure to use care around<br />
combustibles can cause explosion or fire<br />
which can result in injury or <strong>de</strong>ath. W–2103–1285<br />
–1–16–<br />
A<br />
1<br />
CD–15114<br />
853, 853H BICS Loa<strong>de</strong>r<br />
Service Manual
ENGINE COOLING SYSTEM<br />
Cleaning the Cooling System<br />
Check the cooling system every day to prevent<br />
over–heating, loss of performance or engine damage.<br />
Wear safety glasses to prevent eye injury when<br />
any of the following conditions exist:<br />
• When fluids are un<strong>de</strong>r pressure.<br />
• Flying <strong>de</strong>bris or loose material is present.<br />
• Engine is running.<br />
• Tools are being used.<br />
W–2019–1285<br />
Raise the rear grill.<br />
Use air pressure or water pressure to clean the top of the<br />
oil cooler [A].<br />
Raise the oil cooler and clean the top of the radiator [B].<br />
Check cooling system for leaks.<br />
Checking the Coolant Level<br />
Open the rear door. Check the coolant level in the coolant<br />
recovery tank on the right si<strong>de</strong> of the engine [C].<br />
The coolant recovery tank must be 1/3 full.<br />
Propylene Glycol<br />
Add premixed coolant, 47% water and 53% propylene<br />
glycol to the recovery tank if the coolant level is low.<br />
One gallon and one pint of propylene flycol mixed with one<br />
gallon of water is the correct mixture of coolant to provi<strong>de</strong><br />
a –34°F (–37°C) freeze protection.<br />
Ethylene Glycol<br />
Add premixed coolant, 50% water and 50% ethylene<br />
glycol to the recovery tank if the coolant level is low.<br />
A<br />
B<br />
C<br />
P–00378<br />
P–00381<br />
CD–15011<br />
853, 853H BICS Loa<strong>de</strong>r<br />
–1–17– Service Manual
ENGINE COOLING SYSTEM (Cont’d)<br />
Removing Coolant From the Cooling System<br />
Do not remove radiator cap when the engine is<br />
hot. You can be seriously burned. W–2070–1285<br />
Open the rear door. Open the rear grill.<br />
Remove the radiator cap (Item 1) [A].<br />
Remove the drain plug (Item 1) [B] from the si<strong>de</strong> of the<br />
engine block. Drain the coolant into a container.<br />
After all the coolant is removed, install and tighten the<br />
drain plug.<br />
Propylene Glycol<br />
Add premixed coolant; 47% water and 53% propylene<br />
glycol to the recovery tank if the coolant level is low.<br />
One gallon and one pint of propylene glycol mixed with<br />
one gallon of water is the correct mixture of coolant to<br />
provi<strong>de</strong> a –34°F (–37°C) freeze protection.<br />
Mix the coolant in a separate container. (See<br />
Specifications for correct capacity, Page 9–1.)<br />
Fill the radiator and engine block with the premixed<br />
coolant. Install the radiator cap.<br />
Fill the coolant recovery tank 1/3 full.<br />
Run the engine until it is at operating temperature. Stop<br />
the engine. Check the coolant level in the recovery tank<br />
when cool. Add coolant to the recovery tank as nee<strong>de</strong>d.<br />
ALTERNATOR BELT<br />
Adjusting the Alternator Belt<br />
Stop the engine.<br />
Raise the operator cab. (See Page 1–8.)<br />
Loosen the alternator mounting bolt (Item 1) [C].<br />
Loosen the adjustment bolt (Item 2) [C].<br />
Move the alternator until the belt has 5/16’’ (8,0 mm)<br />
movement at the middle of the belt span with 15 lbs. (66<br />
N) of force.<br />
–1–18–<br />
A<br />
B<br />
C<br />
2<br />
1<br />
1<br />
P–00379<br />
P–02125<br />
1<br />
CD–09339<br />
853, 853H BICS Loa<strong>de</strong>r<br />
Service Manual
USING A BOOSTER BATTERY (Jump Starting)<br />
Procedure<br />
If it is necessary to use a booster battery to start the<br />
engine, BE CAREFUL! There must be one person in the<br />
operator’s seat and one person to connect and<br />
disconnect the battery cables.<br />
The ignition must be in the OFF position. The booster<br />
battery to be used must be 12 volt.<br />
Batteries contain acid which burns eyes and<br />
skin on contact. Wear goggles, protective<br />
clothing and rubber gloves to keep acid off<br />
body.<br />
In case of acid contact, wash immediately with<br />
water for several minutes and get medical<br />
attention in case of eye contact.<br />
W–2065–1286<br />
Keep arcs, sparks, flames and lighted tobacco<br />
away from batteries. When ‘‘jumping’’ from<br />
booster battery make final connection<br />
(negative) at engine frame.<br />
Do not jump start or charge a frozen battery.<br />
Warm battery to 60°F. (16°C.) before connecting<br />
to a charger. Unplug charger before connecting<br />
or disconnecting cables to battery.<br />
Battery gas can explo<strong>de</strong> and cause serious<br />
injury.<br />
W–2066–0490<br />
Connect the end of the first cable (Item 1) [A] to the<br />
positive (+) terminal of the booster battery. Connect the<br />
other end of the same cable (Item 2) [A] to the positive<br />
terminal on the starter solenoid.<br />
Connect the end of the second cable (Item 3) [A] to the<br />
negative (–) terminal of the booster battery. Connect the<br />
other end of the same cable (Item 4) [A] to the engine.<br />
Keep cables away from moving parts. Start the engine.<br />
(See Cold Temperature Starting Condition, Operation &<br />
Maintenance Manual).<br />
After the engine has started, remove the ground (–) cable<br />
(Item 4) [A] first. Remove the cable from the positive<br />
terminal on the starter solenoid.<br />
A<br />
1<br />
2<br />
CD–15010<br />
CD–15009<br />
Damage to the alternator can occur if:<br />
• Engine is operated with battery cables<br />
disconnected.<br />
• Battery cables are connected when using a<br />
fast charger or when welding on the loa<strong>de</strong>r<br />
(Remove both cables from the battery).<br />
• Extra battery cables (booster cables) are<br />
connected wrong.<br />
I–2023–1285<br />
853, 853H BICS Loa<strong>de</strong>r<br />
–1–19– Service Manual<br />
3<br />
4
HYDRAULIC/HYDROSTATIC SYSTEM<br />
Checking and Adding Fluid<br />
Use only recommen<strong>de</strong>d fluid in the hydraulic system.<br />
(See Specifications Section for the correct fluid, Page<br />
9–1.)<br />
To check the reservoir, use the following procedure:<br />
Put the Bobcat loa<strong>de</strong>r on a level surface. Lower the lift<br />
arms and tilt the Bob–Tach fully back.<br />
Stop the engine.<br />
Remove the dipstick [A].<br />
The fluid level must be between the marks on the dipstick.<br />
If fluid is nee<strong>de</strong>d, remove the fill cap (Item 1) [B].<br />
NOTE: Before installing the fill cap, make sure the<br />
rubber gasket is installed on the fill cap (Inset<br />
[B].<br />
Add the fluid as nee<strong>de</strong>d to bring the level to the top mark<br />
on the dipstick [A].<br />
Replacing Hydraulic/Hydrostatic Filters<br />
See the Service Schedule Page 1–3 for the correct<br />
service interval.<br />
Raise the operator cab. (See Page 1–8.)<br />
Use a filter wrench and remove the filter elements (Item<br />
1) [C] & [D].<br />
Clean the surface of the filter housing where the element<br />
seal contacts the housing. Put clean oil on the rubber seal<br />
of the filter element.<br />
Install and hand tighten the filter elements.<br />
–1–20–<br />
A<br />
B<br />
C<br />
D<br />
1<br />
1<br />
1<br />
CD–15162<br />
CD–15135<br />
CD–15161<br />
CD–15127<br />
CD–15128<br />
853, 853H BICS Loa<strong>de</strong>r<br />
Service Manual
HYDRAULIC/HYDROSTATIC SYSTEM (Cont’d)<br />
Replacing Hydraulic Fluid<br />
See the Service Schedule Page 1–3 for the service<br />
interval.<br />
The fluid must also be replaced if it becomes<br />
contaminated or after major repairs.<br />
Remove the reservoir fill cap (Item 1) [A].<br />
NOTE: Before installing the fill cap, make sure the<br />
rubber gasket is installed on the fill cap<br />
(Inset) [A].<br />
Remove the screen (Item 1) [B] and thoroughly clean with<br />
clean solvent.<br />
Raise the operator cab. (See Page 1–8.)<br />
Disconnect the hose from the hydrostatic motor case<br />
drain filter (Item 1) [C].<br />
NOTE: There is a 90 micron filter in each hydrostatic<br />
motor case drain line.<br />
Remove the two case drain filters (Item 1) [C] &[D] (one<br />
for each hydrostatic motor) and clean thoroughly.<br />
When all the fluid is removed from the reservoir, connect<br />
and tighten the filters and case drain hoses.<br />
Add the correct fluid to the reservoir until the fluid level is<br />
between the marks on the dipstick. DO NOT fill above the<br />
top mark on the dipstick.<br />
Diesel fuel or hydraulic fluid un<strong>de</strong>r pressure<br />
can penetrate skin or eyes causing serious<br />
injury. Fluid leaks un<strong>de</strong>r pressure may not be<br />
visible. Use a piece of cardboard or wood to<br />
find leaks. Do not use your bare hand. Wear<br />
safety goggles. If fluid enters skin or eyes, get<br />
immediate medical attention.<br />
W–2074–1285<br />
Always clean up spilled fuel or oil. Keep heat,<br />
flames, sparks or lighted tobacco away from<br />
fuel and oil. Failure to use care around<br />
combustibles can cause explosion or fire<br />
which can result in injury or <strong>de</strong>ath.<br />
W–2103–1285<br />
Lower the operator cab. Start the engine and operate the<br />
loa<strong>de</strong>r hydraulic controls. Stop the engine. Check for<br />
leaks. Check the fluid level in the reservoir and add as<br />
nee<strong>de</strong>d.<br />
A<br />
B<br />
C<br />
D<br />
1<br />
1<br />
1<br />
CD–15135<br />
CD–15161<br />
CD–15163<br />
P–05028<br />
P–05027<br />
853, 853H BICS Loa<strong>de</strong>r<br />
–1–21– Service Manual<br />
1
HYDRAULIC/HYDROSTATIC SYSTEM (Cont’d)<br />
Hydraulic Reservoir Breather Cap<br />
See Service Schedule Page 1–3 for the correct service<br />
interval.<br />
Remove the breather cap [A].<br />
NOTE: Make sure the rubber gasket is installed on<br />
the breather cap (Inset) [A].<br />
Make sure the baffle washer is installed in the hydraulic<br />
reservoir [B].<br />
–1–22–<br />
A<br />
B<br />
CD–15134<br />
CD–15132<br />
CD–15133<br />
853, 853H BICS Loa<strong>de</strong>r<br />
Service Manual
SPARK ARRESTOR MUFFLER<br />
Cleaning Procedure<br />
See the Service Schedule Page 1–3 for service interval<br />
for cleaning the spark arrestor muffler.<br />
Do not operate the loa<strong>de</strong>r with a <strong>de</strong>fective exhaust<br />
system.<br />
This loa<strong>de</strong>r is factory equipped with a U.S.D.A.<br />
Forestry Service approved spark arrestor<br />
muffler. It is necessary to do maintenance on<br />
this spark arrestor muffler to keep it in working<br />
condition. The spark arrestor muffler must be<br />
serviced by dumping the spark chamber every<br />
100 hours of operation.<br />
If this machine is operated on flammable forest,<br />
brush or grass covered land, it must be<br />
equipped with a spark arrestor attached to the<br />
exhaust system and maintained in working<br />
or<strong>de</strong>r. Failure to do so will be in violation of<br />
California State Law, Section 4442 PRC.<br />
Make reference to local laws and regulations for<br />
spark arrestor requirements.<br />
I–2022–1285<br />
Stop the engine. Open the rear door and rear grill.<br />
Remove the plug (Item 1) [A] from the bottom of the<br />
muffler.<br />
When the engine is running during service, the<br />
steering levers must be in neutral and the<br />
parking brake engaged. Failure to do so can<br />
cause injury or <strong>de</strong>ath.<br />
W–2006–0284<br />
Start the engine and run for about 10 seconds while a<br />
second person, wearing safety glasses, holds a piece of<br />
wood over the outlet of the muffler.<br />
Stop the engine. Put anti–seize coating on plug. Install<br />
and tighten the plug. Lower the rear grill and close the rear<br />
door.<br />
A<br />
1<br />
CD–15172<br />
When an engine is running in an enclosed area,<br />
fresh air must be ad<strong>de</strong>d to avoid concentration<br />
of exhaust fumes. If the engine is stationary,<br />
vent the exhaust outsi<strong>de</strong>. Exhaust fumes<br />
contain odorless, invisible gases which can kill<br />
without warning.<br />
W–2050–1285<br />
Stop engine and allow the muffler to cool before<br />
cleaning the spark chamber. Wear safety<br />
glasses or goggles. Failure to obey can cause<br />
serious injury.<br />
W–2011–1285<br />
Never use machine in atmosphere with<br />
explosive dust or gases or where exhaust can<br />
contact flammable material. Failure to obey<br />
warnings can cause injury or <strong>de</strong>ath.<br />
W–2068–1285<br />
853, 853H BICS Loa<strong>de</strong>r<br />
–1–23– Service Manual
TIRE MAINTENANCE<br />
Wheel Nuts<br />
See the Service Schedule Page 1–3 for the service<br />
interval to check the wheel nuts. The correct torque is<br />
105–115 ft.–lbs. (142–156 Nm) torque [A].<br />
Tire Rotation<br />
Check the tires regularly for wear, damage and pressure.<br />
(See Specifications Page 9–1 for the correct tire<br />
pressure.)<br />
Rear tires usually wear faster than front tires. To keep tire<br />
wear even, move the front tires to the rear and rear tires<br />
to the front [B].<br />
It is important to keep the same size tires on each si<strong>de</strong> of<br />
the loa<strong>de</strong>r. If different sizes are used, each tire will be<br />
turning at a different rate and cause excessive wear. The<br />
tread bars of all the tires must face the same direction.<br />
Recommen<strong>de</strong>d tire pressure must be maintained to avoid<br />
excessive tire wear and loss of stability and handling<br />
capability. Check for the correct pressure before<br />
operating the loa<strong>de</strong>r.<br />
Tire Mounting<br />
Tires are to be repaired only by an authorized person<br />
using the proper procedures and safety equipment. Tires<br />
and rims must always be checked for correct size before<br />
mounting. Check rim and tire bead for damage.<br />
The rim flange must be cleaned and free of rust. The tire<br />
bead and rim flange must be lubricated with a rubber<br />
lubricant before mounting the tire, avoid excessive<br />
pressure which can rupture the tire and cause serious<br />
injury or <strong>de</strong>ath. During inflation of the tire, check the tire<br />
pressure frequently to avoid over inflation.<br />
Do not inflate tires above specified pressure.<br />
Failure to use correct tire mounting procedure<br />
can cause an explosion which can result in<br />
injury or <strong>de</strong>ath.<br />
W–2078–1285<br />
Inflate tires to the MAXIMUM pressure shown<br />
on the si<strong>de</strong>wall of the tire. DO NOT mix brands<br />
of tires used on the same loa<strong>de</strong>r.<br />
I–2057–0794<br />
–1–24–<br />
A<br />
B<br />
CD–15165<br />
B–09976<br />
853, 853H BICS Loa<strong>de</strong>r<br />
Service Manual
FINAL DRIVE TRANSMISSION (CHAINCASE)<br />
853, 853H BICS Service Manual #6724012 – Preventive Maintenance Section Part 1 of 2<br />
Checking and Adding Oil<br />
The chaincase contains the final drive sprockets and<br />
chains and uses the same type of oil as the<br />
hydraulic/hydrostatic system. (See Specifications<br />
Section Page 9–1.)<br />
To check the chaincase oil level, use the following<br />
procedure:<br />
Drive the loa<strong>de</strong>r on a level surface. Stop the engine.<br />
Remove the plug (Item 1) [A] from the front of the<br />
chaincase housing.<br />
If oil can be reached with the tip of the your finger through<br />
the hole the oil level is correct.<br />
If the level is low, add oil through the check plug hole until<br />
the oil flows from the hole. Install and tighten the plug.<br />
Removing Oil From the Chaincase<br />
To drain the oil from the chaincase, remove the cover<br />
(Item 1) [B] which is installed over the drain plug at the<br />
rear of the chaincase.<br />
Remove the drain plug (Item 1) [C] and drain the oil into<br />
a container.<br />
NOTE: When installing the drain plug into the<br />
chaincase, always use a NEW drain plug.<br />
FAN GEARBOX<br />
Checking and Maintaining<br />
See the Service Schedule Page 1–3 for the correct<br />
service interval.<br />
Raise the operator cab. (See Page 1–8.)<br />
Remove the plug (Item 1) [D] to check the lubricant level.<br />
If the level is low, add SAE 90W gear lube through the<br />
check plug hole until the lubricant flows from the hole.<br />
Install and tighten the plug.<br />
A<br />
B<br />
C<br />
D<br />
1<br />
1<br />
1<br />
P–01551<br />
P–01616<br />
P–01619<br />
CD–15164<br />
853, 853H BICS Loa<strong>de</strong>r<br />
–1–25– Service Manual<br />
1
LUBRICATING THE LOADER<br />
Procedure<br />
Lubricate the loa<strong>de</strong>r as specified in the Service Schedule<br />
Page 1–3 for the best performance of the loa<strong>de</strong>r.<br />
Record the operating hours each time you lubricate the<br />
Bobcat loa<strong>de</strong>r.<br />
Always use a good quality lithium based multi–purpose<br />
grease when you lubricate the loa<strong>de</strong>r. Apply the lubricant<br />
until extra grease shows.<br />
Lubricate the following locations on the loa<strong>de</strong>r:<br />
1. Rod End Lift Cylin<strong>de</strong>r (Both Si<strong>de</strong>s) [A].<br />
2. Base End Lift Cylin<strong>de</strong>r (Both Si<strong>de</strong>s) [B].<br />
3. Lift Arm Pivot Pin (Both Si<strong>de</strong>s) [C].<br />
4. Base End Tilt Cylin<strong>de</strong>r [D].<br />
–1–26–<br />
A<br />
B<br />
C<br />
D<br />
2<br />
4<br />
1<br />
3<br />
CD–15169<br />
CD–15171<br />
CD–15170<br />
CD–15168<br />
853, 853H BICS Loa<strong>de</strong>r<br />
Service Manual
LUBRICATING THE LOADER (Cont’d)<br />
Procedure (Cont’d)<br />
5. Rod End Tilt Cylin<strong>de</strong>r [A].<br />
6. Bob–Tach Pivot Pin (Both Si<strong>de</strong>s) [B].<br />
7. Bob–Tach Wedge (Both Si<strong>de</strong>s) [B].<br />
8. 250 Hours: Steering Lever Shaft and Centering<br />
Mechanism [C].<br />
A<br />
B<br />
C<br />
8<br />
5<br />
CD–15167<br />
CD–15166<br />
CD–15013<br />
853, 853H BICS Loa<strong>de</strong>r<br />
–1–27– Service Manual<br />
7<br />
6
REMOTE START SWITCH<br />
Procedure<br />
The tool listed will be nee<strong>de</strong>d to do the following<br />
procedure:<br />
MEL1429 – Remote Start Switch<br />
The Remote Start Switch is required when the service<br />
technician is adjusting the steering linkage, checking the<br />
hydraulic/hydrostatic system.<br />
Lift and block the loa<strong>de</strong>r. (See Page 1–4.)<br />
Raise the lift arms and install an approved lift arm support<br />
<strong>de</strong>vice. (See Page 1–7.)<br />
Raise the operator cab. (See Page 1–8.)<br />
Disconnect the operator cab wire harness from the<br />
engine wire harness [A].<br />
Connect the remote start switch to the engine harness<br />
connectors (Item 1) [B].<br />
Put jackstands un<strong>de</strong>r the front axles and rear<br />
corners of the frame before running the engine<br />
for service. Failure to use jackstands can allow<br />
the machine to fall or move and cause injury or<br />
<strong>de</strong>ath.<br />
W–2017–0286<br />
Never work on a machine with the lift arms up<br />
unless the lift arms are secured by a lift arm<br />
support <strong>de</strong>vice. Failure to use an approved lift<br />
arm support <strong>de</strong>vice can allow the lift arms or<br />
attachment to fall and cause injury or <strong>de</strong>ath.<br />
W–2059–0991<br />
–1–28–<br />
A<br />
B<br />
1<br />
P–04732<br />
P–04758<br />
853, 853H BICS Loa<strong>de</strong>r<br />
Service Manual
REMOTE START SWITCH (Cont’d)<br />
Procedure (Cont’d)<br />
Put the traction lock overri<strong>de</strong> switch (Item 1) [A] in the<br />
ON position so the traction function is locked. The<br />
wheels are not able to turn.<br />
Turn the key to the right and start the engine.<br />
Move the traction lock overri<strong>de</strong> switch (Item 1) [B] to the<br />
OFF position so the traction function is unlocked. The<br />
wheels are now able to turn.<br />
The auxiliary mo<strong>de</strong> switch (Item 2) [B] is used to turn the<br />
front auxiliary quick couplers ON and OFF during relief<br />
pressure and flow tests.<br />
A<br />
B<br />
2<br />
1<br />
P–04713<br />
P–04714<br />
853, 853H BICS Loa<strong>de</strong>r<br />
–1–29– Service Manual<br />
1
853, 853H BICS Service Manual #6724012 – Preventive Maintenance Section Part 2 of 2<br />
–1–30–<br />
853, 853H BICS Loa<strong>de</strong>r<br />
Service Manual
HYDRAULIC SYSTEM<br />
Page<br />
Number<br />
BUCKET POSITION VALVE (OPTIONAL)<br />
Removal and Installation . . . . . . . . . . . . . . . . . . . . . . . . . . . . . . . . . . . . . . . 2–64<br />
CONTROL PEDALS<br />
Pedal Adjustment . . . . . . . . . . . . . . . . . . . . . . . . . . . . . . . . . . . . . . . . . . . . . 2–68<br />
Removal and Installation . . . . . . . . . . . . . . . . . . . . . . . . . . . . . . . . . . . . . . . 2–68<br />
DUAL PRESSURE MAIN RELIEF VALVE – 853H<br />
Adjusting the Low Setting . . . . . . . . . . . . . . . . . . . . . . . . . . . . . . . . . . . . . . 2–25<br />
Adjusting the High Setting . . . . . . . . . . . . . . . . . . . . . . . . . . . . . . . . . . . . . . 2–26<br />
Checking the Low Setting . . . . . . . . . . . . . . . . . . . . . . . . . . . . . . . . . . . . . . 2–22<br />
Checking the High Setting . . . . . . . . . . . . . . . . . . . . . . . . . . . . . . . . . . . . . . 2–23<br />
HYDRAULIC CONTROL VALVE<br />
Anti–Cavitation Valve . . . . . . . . . . . . . . . . . . . . . . . . . . . . . . . . . . . . . . . . . . 2–33<br />
Auxiliary Electric Solenoid . . . . . . . . . . . . . . . . . . . . . . . . . . . . . . . . . . . . . . 2–42<br />
Auxiliary Spool . . . . . . . . . . . . . . . . . . . . . . . . . . . . . . . . . . . . . . . . . . . . . . . . 2–41<br />
Base End Restrictor . . . . . . . . . . . . . . . . . . . . . . . . . . . . . . . . . . . . . . . . . . . 2–43<br />
Disassembly and Assembly . . . . . . . . . . . . . . . . . . . . . . . . . . . . . . . . . . . . 2–31<br />
‘‘H’’ Port – Auxiliary Section . . . . . . . . . . . . . . . . . . . . . . . . . . . . . . . . . . . . . 2–43<br />
I<strong>de</strong>ntification Chart . . . . . . . . . . . . . . . . . . . . . . . . . . . . . . . . . . . . . . . . . . . . 2–30<br />
Inspection . . . . . . . . . . . . . . . . . . . . . . . . . . . . . . . . . . . . . . . . . . . . . . . . . . . . 2–43<br />
Lift Spool and Detent . . . . . . . . . . . . . . . . . . . . . . . . . . . . . . . . . . . . . . . . . . 2–35<br />
Load Check Valve . . . . . . . . . . . . . . . . . . . . . . . . . . . . . . . . . . . . . . . . . . . . . 2–31<br />
Main Relief Valve . . . . . . . . . . . . . . . . . . . . . . . . . . . . . . . . . . . . . . . . . . . . . . 2–32<br />
Main Relief Valve Removal and Installation . . . . . . . . . . . . . . . . . . . . . . .<br />
Port Relief Valve . . . . . . . . . . . . . . . . . . . . . . . . . . . . . . . . . . . . . . . . . . . . . .<br />
2–25<br />
2–32<br />
Removal and Installation . . . . . . . . . . . . . . . . . . . . . . . . . . . . . . . . . . . . . . . 2–28<br />
Rubber Boot . . . . . . . . . . . . . . . . . . . . . . . . . . . . . . . . . . . . . . . . . . . . . . . . . . 2–34<br />
Spool Seal Installation . . . . . . . . . . . . . . . . . . . . . . . . . . . . . . . . . . . . . . . . . 2–44<br />
Tilt Spool and centering Spring . . . . . . . . . . . . . . . . . . . . . . . . . . . . . . . . . . 2–40<br />
HYDRAULIC CYLINDERS<br />
Assembly . . . . . . . . . . . . . . . . . . . . . . . . . . . . . . . . . . . . . . . . . . . . . . . . . . . . 2–13<br />
Disassembly . . . . . . . . . . . . . . . . . . . . . . . . . . . . . . . . . . . . . . . . . . . . . . . . . . . 2–11<br />
Lift Cylin<strong>de</strong>r I<strong>de</strong>ntification . . . . . . . . . . . . . . . . . . . . . . . . . . . . . . . . . . . . . . . 2–9<br />
Tilt Cylin<strong>de</strong>r I<strong>de</strong>ntification . . . . . . . . . . . . . . . . . . . . . . . . . . . . . . . . . . . . . . . 2–10<br />
HYDRAULIC FILTER HOUSING<br />
Removal and Installation . . . . . . . . . . . . . . . . . . . . . . . . . . . . . . . . . . . . . . . 2–67<br />
HYDRAULIC FLUID RESERVOIR<br />
Removal and Installation . . . . . . . . . . . . . . . . . . . . . . . . . . . . . . . . . . . . . . . 2–65<br />
HYDRAULIC PUMP<br />
Assembly . . . . . . . . . . . . . . . . . . . . . . . . . . . . . . . . . . . . . . . . . . . . . . . . . . . . 2–51<br />
Checking the Output of the Pump . . . . . . . . . . . . . . . . . . . . . . . . . . . . . . . 2–45<br />
Disassembly . . . . . . . . . . . . . . . . . . . . . . . . . . . . . . . . . . . . . . . . . . . . . . . . . . 2–48<br />
Inspection . . . . . . . . . . . . . . . . . . . . . . . . . . . . . . . . . . . . . . . . . . . . . . . . . . . . 2–50<br />
Parts I<strong>de</strong>ntification . . . . . . . . . . . . . . . . . . . . . . . . . . . . . . . . . . . . . . . . . . . . 2–47<br />
Removal and Installation . . . . . . . . . . . . . . . . . . . . . . . . . . . . . . . . . . . . . . . 2–46<br />
HYDRAULIC<br />
SYSTEM<br />
853, 853H BICS Loa<strong>de</strong>r<br />
–2–1– Service Manual
HYDRAULIC SYSTEM (Cont’d)<br />
–2–2–<br />
Page<br />
Number<br />
HYDRAULIC PUMP (DoubleGear) 853H<br />
Assembly . . . . . . . . . . . . . . . . . . . . . . . . . . . . . . . . . . . . . . . . . . . . . . . . . . . . 2–61<br />
Checking the Output of the Pump . . . . . . . . . . . . . . . . . . . . . . . . . . . . . . . 2–53<br />
Disassembly . . . . . . . . . . . . . . . . . . . . . . . . . . . . . . . . . . . . . . . . . . . . . . . . . . 2–56<br />
Inspection . . . . . . . . . . . . . . . . . . . . . . . . . . . . . . . . . . . . . . . . . . . . . . . . . . . . 2–60<br />
Parts I<strong>de</strong>ntification . . . . . . . . . . . . . . . . . . . . . . . . . . . . . . . . . . . . . . . . . . . . 2–55<br />
Removal and Installation . . . . . . . . . . . . . . . . . . . . . . . . . . . . . . . . . . . . . . . 2–54<br />
HYDRAULIC SYSTEM INFORMATION<br />
Flare Connections . . . . . . . . . . . . . . . . . . . . . . . . . . . . . . . . . . . . . . . . . . . . .<br />
O–ring Face Seal Connection . . . . . . . . . . . . . . . . . . . . . . . . . . . . . . . . . . .<br />
2–4<br />
2–4<br />
Straight Thread O–ring Fitting . . . . . . . . . . . . . . . . . . . . . . . . . . . . . . . . . . 2–4<br />
Tubelines and Hoses . . . . . . . . . . . . . . . . . . . . . . . . . . . . . . . . . . . . . . . . . . 2–4<br />
HYDROSTATIC FILTER HOUSING<br />
Removal and Installation . . . . . . . . . . . . . . . . . . . . . . . . . . . . . . . . . . . . . . . 2–66<br />
LIFT CYLINDER(S)<br />
Checking the Lift Cylin<strong>de</strong>r . . . . . . . . . . . . . . . . . . . . . . . . . . . . . . . . . . . . . . 2–5<br />
Removal and Installation . . . . . . . . . . . . . . . . . . . . . . . . . . . . . . . . . . . . . . . 2–5<br />
MAIN RELIEF VALVE<br />
Checking the Main Relief Valve . . . . . . . . . . . . . . . . . . . . . . . . . . . . . . . . . 2–19<br />
Checking the Main Relief Valve Without Auxiliaries . . . . . . . . . . . . . . . . 2–20<br />
Removal and Installation . . . . . . . . . . . . . . . . . . . . . . . . . . . . . . . . . . . . . . . 2–21<br />
PEDAL INTERLOCK LINKAGE<br />
Pedal Interlock Linkage Adjustment . . . . . . . . . . . . . . . . . . . . . . . . . . . . . . 2–70<br />
Removal and Installation . . . . . . . . . . . . . . . . . . . . . . . . . . . . . . . . . . . . . . . 2–69<br />
SELECT VALVE (G.E.M. Block) 853H<br />
Checking the Main Relief Valve . . . . . . . . . . . . . . . . . . . . . . . . . . . . . . . . . 2–27<br />
TILT CYLINDER<br />
Checking the Tilt Cylin<strong>de</strong>r . . . . . . . . . . . . . . . . . . . . . . . . . . . . . . . . . . . . . . 2–7<br />
Removal and Installation . . . . . . . . . . . . . . . . . . . . . . . . . . . . . . . . . . . . . . . 2–7<br />
Rod End Seal . . . . . . . . . . . . . . . . . . . . . . . . . . . . . . . . . . . . . . . . . . . . . . . . . 2–7<br />
TROUBLESHOOTING<br />
Chart . . . . . . . . . . . . . . . . . . . . . . . . . . . . . . . . . . . . . . . . . . . . . . . . . . . . . . . . 2–3<br />
TIGHTEN ALL HARDWARE PER SIZE TO GRADE 5 TORQUE (SEE<br />
STANDARD TORQUE SPECIFICATIONS FOR BOLTS, SECTION 9)<br />
UNLESS OTHERWISE SPECIFIED.<br />
853, 853H BICS Loa<strong>de</strong>r<br />
Service Manual
1 FLUID RESERVOIR:<br />
Cap . . . . 15.5 Qts (14,7 L)<br />
Screen Filter. . . . . 60 Mesh<br />
2 HYDRAULIC FILTER:<br />
#4 Synthetic Media<br />
3 DIFFERENTIAL PRESSURE SWITCH:<br />
36-44 PSI (248-303 kPa)<br />
Standard Loa<strong>de</strong>r (Normally Open)<br />
B.O.S.S. Loa<strong>de</strong>r (Normally Closed)<br />
4 FILTER BYPASS<br />
45-55 PSI (311-379 kPa)<br />
5 CHECK VALVE . . LIFT CYLINDER<br />
6<br />
FLOW CONTROL SPOOL<br />
7 FLOW ADJUSTMENT VALVE<br />
8<br />
9<br />
10<br />
CHECK VALVE . . TILT CYLINDER<br />
UNLOADING SPOOL<br />
MANUAL BYPASS CONTROL<br />
11 CHECK VALVES<br />
12 LIFT LOCK BYPASS VALVE CONTROL<br />
SPOOL<br />
13 CONTROL SPOOL<br />
14 TILT LOCK VALVE SOLENOID<br />
15 LOAD CHECK VALVES (2)<br />
16 MAIN RELIEF VALVE:<br />
@ Quick Couplers<br />
2700-2750 PSI (18616-18961 kPa)<br />
17 ANTI-CAVITATION VALVES<br />
18<br />
19<br />
20<br />
21<br />
22<br />
PORT RELIEF VALVE:<br />
3500 PSI (24132 kPa)<br />
ONE WAY RESTRICTOR VALVE<br />
AUXILIARY CONTROL SOLENOIDS<br />
PORT RELIEF VALVE. . . (Optional)<br />
2500 PSI (17238 kPa)<br />
DRIVE MOTOR SHUTTLE VALVES<br />
23 SHUTTLE RELIEF VALVES<br />
290 PSI (2000 kPa)<br />
HYDRAULIC/HYDROSTATIC SCHEMATIC<br />
853 BICS TM<br />
S/N 512816001 and Above<br />
S/N 509718001 and Above<br />
(Printed June 1997)<br />
LEGEND<br />
24<br />
26<br />
HIGH PRESSURE RELIEF/REPLENISHING<br />
VALVES. .<br />
Standard . 4350 PSI (29993 kPa)<br />
Option . 4000 PSI (27580 kPa)<br />
Option . 5000 PSI (34475 kPa)<br />
25 DISPLACEMENT CONTROL VALVES<br />
HYDRAULIC PUMP . . . .Gear Type<br />
18.0 GPM (68,1 L/min.) @ 2750 RPM<br />
CHARGE PUMP . . . 14-15 GPM<br />
(52,9-56,7 L/Min.) @ 2750 RPM<br />
28 CHARGE RELIEF VALVE<br />
0 0<br />
100 F. (38 C.) Fluid @ Full RPM<br />
Neutral . . . . 310-330 PSI<br />
(2137-2275 kPa)<br />
Stroked . . . . 300-320 PSI<br />
(2069-2206 kPa)<br />
29 HYDRAULIC MUFFLER . (Optional)<br />
NOTE: Unless otherwise specified<br />
springs have NO significant<br />
pressure value.<br />
Printed in U.S.A. MC 2142LE (5-30-97)<br />
27<br />
30 HYDROSTATIC FILTER<br />
#4 Synthetic Media<br />
31 "P1" & "F1" CONTROL SPOOL<br />
32<br />
"P2" & "F2" CONTROL SPOOL<br />
33 DIVERTER CONTROL SPOOL -<br />
ELECTRICALLY ACTIVATED<br />
34 CASE DRAIN CONTROL SPOOL<br />
For D2 Control Spool -<br />
Neutral Position<br />
35 "D2" CONTROL SPOOL<br />
36<br />
"D1" CONTROL SPOOL
HYDRAULIC/HYDROSTATIC<br />
SCHEMATIC<br />
853 BICS TM S/N 512816001 and Above<br />
S/N 508418001 and Above<br />
(Printed June 1997)<br />
DRIVE<br />
MOTOR<br />
30<br />
Printed in U.S.A.<br />
29<br />
4<br />
OIL<br />
COOLER<br />
HYDROSTATIC<br />
FILTER<br />
22<br />
3<br />
23<br />
SHUTTLE VALVE<br />
SHUTTLE<br />
RELIEF<br />
VALVE<br />
HYDR.<br />
MUFFLER<br />
(OPTIONAL)<br />
DIVERTER VALVE (OPTIONAL)<br />
WITHOUT Bleed Off<br />
HYDROSTATIC<br />
PUMPS<br />
25<br />
DISPLACEMENT<br />
CONTROL<br />
VALVE<br />
OUTLET<br />
OUTLET<br />
28<br />
DISPLACEMENT<br />
CONTROL<br />
VALVE<br />
25<br />
33<br />
34<br />
24<br />
PILOT PRESSURE<br />
INPUT<br />
DRIVE MOTOR<br />
HYD. PUMP<br />
24<br />
CHARGE PUMP<br />
27<br />
32<br />
26<br />
36<br />
31<br />
22<br />
SHUTTLE<br />
VALVE<br />
23<br />
SHUTTLE<br />
RELIEF<br />
VALVE<br />
35<br />
MOTOR<br />
CASE<br />
DRAIN<br />
FILTER<br />
INLET<br />
INLET<br />
CASE<br />
DRAIN<br />
D1<br />
D2<br />
P1<br />
P2<br />
F1<br />
F2<br />
FRONT<br />
AUXILIARY<br />
FEMALE<br />
MALE<br />
REAR<br />
AUXILIARY<br />
MOTOR<br />
CASE<br />
DRAIN<br />
FILTER<br />
FEMALE<br />
MALE<br />
1<br />
RESERVOIR<br />
AUXILIARY<br />
CONTROL<br />
SOLENOID<br />
20<br />
TILT CYLINDER<br />
ANTI-CAVITATION<br />
VALVE<br />
18<br />
LIFT CYLINDER<br />
ANTI-CAVITATION<br />
VALVE<br />
CONTROL VALVE<br />
TILT LOCK VALVE<br />
WITH SOLENOID<br />
11<br />
MAIN RELIEF<br />
VALVE<br />
CHECK<br />
VALVE<br />
PORT<br />
RELIEF<br />
16<br />
SCREEN FILTER<br />
21<br />
PP<br />
AUXILIARY SPOOL<br />
NEUTRAL POSITION<br />
TILT CYLINDER SPOOL<br />
NEUTRAL POSITION<br />
17<br />
17<br />
HYDRAULIC<br />
FILTER<br />
2<br />
AUXILIARY PORT<br />
RELIEF VALVE<br />
(OPTIONAL)<br />
PT<br />
4<br />
ANTI-DRAIN<br />
BACK<br />
CHECK<br />
14<br />
3<br />
X<br />
ELECTRIC SOLENOID<br />
15<br />
TILT CYLINDER<br />
LOAD CHECK<br />
LIFT CYLINDER SPOOL<br />
NEUTRAL POSITION<br />
15<br />
LIFT CYLINDER LOAD CHECK<br />
B1<br />
P2<br />
19<br />
13<br />
CONTROL SPOOL<br />
AUXILIARY<br />
CONTROL<br />
SOLENOID<br />
20<br />
A<br />
X<br />
BUCKET POSITION VALVE (OPTIONAL)<br />
FLOW<br />
ADJUSTMENT<br />
VALVE<br />
LIFT CYLINDER<br />
CHECK VALVE<br />
B<br />
5<br />
7<br />
CONTROL SPOOL<br />
12<br />
L1<br />
P1<br />
MC 2142 (5-30-97)<br />
6<br />
FLOW<br />
CONTROL<br />
SPOOL<br />
LIFT CYLINDERS<br />
PT<br />
WORKING CIRCUITS<br />
PILOT CIRCUITS<br />
DRAIN CIRCUITS<br />
COMPONENTS<br />
TILT CYLINDER<br />
CHECK VALVE<br />
LIFT LOCK VALVE<br />
WITH MANUAL<br />
OVERRIDE VALVE<br />
CHECK VALVE<br />
11<br />
8<br />
UNLOADING<br />
SPOOL<br />
TILT CYLINDER<br />
WITH CUSHION<br />
10<br />
MANUAL BYPASS<br />
CONTROL<br />
9<br />
D<br />
C
HYDRAULIC/HYDROSTATIC SCHEMATIC<br />
853H BICS TM S/N 512816001 and Above<br />
S/N 508418001 and Above<br />
1 FLUID RESERVOIR:<br />
Capacity . 16.0 Qts (15,1 L)<br />
Screen Filter. . . . . 60 Mesh<br />
2 HYDRAULIC FILTER:<br />
#3 Synthetic Media<br />
3 DIFFERENTIAL PRESSURE SWITCH:<br />
36-44 PSI (248-303 kPa)<br />
Standard Loa<strong>de</strong>r (Normally Open)<br />
B.O.S.S. Loa<strong>de</strong>r (Normally Closed)<br />
4 FILTER BYPASS:<br />
45-55 PSI (311-379 kPa)<br />
5 CHECK VALVE . . LIFT CYLINDER<br />
6<br />
FLOW CONTROL SPOOL (Optional)<br />
7 FLOW ADJUSTMENT VALVE (Opt.)<br />
8<br />
9<br />
10<br />
CHECK VALVE . . TILT CYLINDER<br />
(Optional)<br />
UNLOADING SPOOL (Optional)<br />
MANUAL BYPASS CONTROL<br />
11 CHECK VALVES<br />
(Printed June 1997)<br />
12 LIFT LOCK BYPASS VALVE CONTROL<br />
SPOOL<br />
13 CONTROL SPOOL<br />
14 TILT LOCK VALVE SOLENOID<br />
15 LOAD CHECK VALVES (2)<br />
16<br />
17<br />
18<br />
19<br />
20<br />
21<br />
22<br />
MAIN RELIEF VALVE:<br />
@ Quick Couplers<br />
SYSTEM MAIN RELIEF:<br />
2800 PSI (19306 kPa)<br />
HI FLOW MAIN RELIEF:<br />
3300 PSI (22754 kPa)<br />
ANTI-CAVITATION VALVES<br />
PORT RELIEF VALVE:<br />
3500 PSI (24132 kPa)<br />
ONE WAY RESTRICTOR VALVE<br />
AUXILIARY CONTROL SOLENOIDS<br />
PORT RELIEF VALVE. . . (Optional)<br />
2500 PSI (17238 kPa)<br />
DRIVE MOTOR SHUTTLE VALVES<br />
LEGEND<br />
23 SHUTTLE RELIEF VALVES:<br />
290 PSI (2000 kPa)<br />
24 HIGH PRESSURE RELIEF/REPLENISHING<br />
VALVES:<br />
STANDARD . 4350 PSI (29993 kPa)<br />
OPTION . . 4000 PSI (27580 kPa)<br />
OPTION . . 5000 PSI (34475 kPa)<br />
25 DISPLACEMENT CONTROL VALVES<br />
26 AUXILIARY HYDRAULIC PUMP:<br />
6.0 GPM (22,7 L/min.)<br />
@ 2750 RPM<br />
@ 1150 PSI (7929 kPa)<br />
27 HYDRAULIC PUMP . . . .Gear Type<br />
PUMP CAPACITY:<br />
18.0 GPM (68,1 L/min.)<br />
HI FLOW CAPACITY:<br />
24.0 GPM (90,8 L/min.)<br />
@ 2750 RPM @ 1150 PSI (7929 kPa)<br />
28 CHARGE PUMP . . 14.0-15.0 GPM<br />
(52,9-56,7 L/min.) @ 2750 RPM<br />
29 CHARGE RELIEF VALVE<br />
0 0 100 F. (38 C.) Fluid @ Full RPM<br />
Neutral . . . . 310-330 PSI<br />
(2137-2275 kPa)<br />
Stroked . . . . 300-320 PSI<br />
(2069-2206 kPa)<br />
30 CASE DRAIN FILTER . . 90 Micron<br />
31 HYDROSTATIC FILTER<br />
#3 Synthetic Media<br />
32 TWO COIL SOLENOID VALVE<br />
HIGH FLOW SOLENOID<br />
NOTE: Unless otherwise specified<br />
springs have NO significant<br />
pressure value.<br />
Printed in U.S.A. MC 2202LE (5-29-97)<br />
33<br />
34<br />
HIGH FLOW MAIN RELIEF VALVE<br />
35 PILOT TO OPEN CHECK VALVE<br />
36 DIVERTER SOLENOID
HYDRAULIC/HYDROSTATIC SCHEMATIC<br />
853H BICS TM S/N 512816001 and Above<br />
S/N 509718001 and Above<br />
(Printed June 1997)<br />
SELECT VALVE -<br />
WITHOUT SHUTTLE VALVE<br />
OIL<br />
COOLER<br />
31<br />
DRIVE<br />
MOTOR<br />
Printed in U.S.A.<br />
Press.<br />
4<br />
HYDROSTATIC<br />
FILTER<br />
HYDRAULIC MUFFLER<br />
(OPTIONAL)<br />
22<br />
30<br />
35<br />
PP<br />
3<br />
23<br />
40<br />
34<br />
C1 C2<br />
32<br />
36<br />
35<br />
40 35<br />
T<br />
HYDROSTATIC PUMPS<br />
OUTLET<br />
25<br />
33<br />
25<br />
OUTLET<br />
OUTLET<br />
29<br />
PB<br />
24<br />
24<br />
28<br />
26<br />
27<br />
REAR QUICK<br />
COUPLERS<br />
(Optional)<br />
MALE FEMALE<br />
MALE FEMALE<br />
DRIVE MOTOR<br />
23<br />
30<br />
INLET<br />
INLET<br />
22<br />
FEMALE<br />
MALE<br />
1<br />
RIGHT SIDE<br />
LIFT ARM<br />
CONTROL VALVE<br />
20<br />
17<br />
2<br />
ANTI-DRAIN<br />
BACK<br />
CHECK<br />
TILT LOCK VALVE<br />
WITH SOLENOID<br />
11<br />
AUXILIARY SPOOL<br />
NEUTRAL POSITION<br />
TILT CYLINDER SPOOL<br />
NEUTRAL POSITION<br />
17<br />
4<br />
21<br />
HYDRAULIC<br />
FILTER<br />
18<br />
SCREEN<br />
14<br />
FILTER ELECTRIC SOLENOID<br />
PP<br />
PT<br />
3<br />
16<br />
X<br />
15<br />
LIFT CYLINDER SPOOL<br />
NEUTRAL POSITION<br />
15<br />
B1<br />
P2<br />
20<br />
13<br />
FRONT AUXILIARY<br />
19<br />
FEMALE<br />
MALE<br />
DRAIN<br />
X<br />
A<br />
BUCKET POSITION VALVE<br />
(OPTIONAL)<br />
B<br />
5<br />
12<br />
7<br />
L1<br />
P1<br />
6<br />
LIFT CYLINDERS<br />
LIFT LOCK VALVE<br />
WITH MANUAL<br />
OVERRIDE VALVE<br />
11<br />
8<br />
TILT CYLINDER<br />
PT<br />
10<br />
WORKING CIRCUITS<br />
PILOT CIRCUITS<br />
DRAIN CIRCUITS<br />
COMPONENTS<br />
MC 2202 (5-30-97)<br />
9<br />
D<br />
C
HYDRAULIC SYSTEM<br />
TROUBLESHOOTING<br />
Chart<br />
The following troubleshooting chart is provi<strong>de</strong>d for<br />
assistance in locating and correcting problems which are<br />
most common. Many of the recommen<strong>de</strong>d procedures<br />
must be done by authorized Bobcat Service Personnel<br />
only.<br />
Check for correct function after adjustments,<br />
repairs or service. Failure to make correct<br />
repairs or adjustments can cause injury or<br />
<strong>de</strong>ath.<br />
W–2004–1285<br />
PROBLEM CAUSE<br />
The hydraulic system will not operate. 1, 2, 3, 5, 8<br />
The transmission warning light comes ‘‘ON’’ when hydraulics are<br />
operating. (853 Standard) 1, 3<br />
Slow hydraulic system action. 1, 3, 4, 6, 8<br />
Hydraulic action is not smooth. 1, 4, 5, 6, 7<br />
Lift arms go up slowly at full engine RPM. 1, 3, 4, 5, 6, 7, 8, 9<br />
The lift arms or Bob–Tach will move when the pedal is in neutral position. 4<br />
The lift arms come down with the pedal in the neutral position. 4, 9, 10, 11<br />
1. The fluid level is not correct.<br />
KEY TO CORRECT THE CAUSE<br />
2. The pedal linkage is disconnected.<br />
3. The hydraulic pump has damage.<br />
4. The pedal linkage is not adjusted correctly.<br />
5. Relief valve is not at the correct pressure.<br />
6. Suction leak on the inlet si<strong>de</strong> of the hydraulic pump.<br />
7. Fluid is cold. Wrong viscosity fluid (See Section 9).<br />
8. Using the loa<strong>de</strong>r for more than its rated capacity.<br />
9. Internal leak in the lift cylin<strong>de</strong>r(s).<br />
10. External leak from the lift cylin<strong>de</strong>r(s).<br />
11. Damaged lift spool.<br />
853, 853H BICS Loa<strong>de</strong>r<br />
–2–3– Service Manual
HYDRAULIC SYSTEM INFORMATION<br />
When making repairs on hydrostatic and<br />
hydraulic systems, clean the work area before<br />
disassembly and keep all parts clean. Always<br />
use caps and plugs on hoses, tubelines and<br />
ports to keep dirt out. Dirt can quickly damage<br />
the system.<br />
I–2003–0284<br />
Flare Connections<br />
Use the following procedure to tighten the flare fitting:<br />
Tighten the nut until it makes contact with the seat. Make<br />
a mark across the flats of both the male and female parts<br />
of the connection [A].<br />
Use the chart to find the correct tightness nee<strong>de</strong>d.[B]. If<br />
the fitting leaks after tightening, disconnect it and inspect<br />
the seat area for damage.<br />
O–ring Face Seal Connection<br />
When the fitting is tightened, you can feel when the fitting<br />
is tight to eliminate leakage caused by un<strong>de</strong>r or over<br />
torqued fittings. Use Vaseline petroleum jelly to hold the<br />
O–ring in position until the fittings are assembled [C].<br />
Straight Thread O–ring Fitting<br />
Lubricate the O–ring before installing the fitting. Loosen<br />
the jam nut and install the fitting. Tighten the jam nut until<br />
the washer is tight against the surface [D].<br />
Tubelines and Hoses<br />
Replace any tubelines that are bent or flattened. They will<br />
restrict flow, which will slow hydraulic action and cause<br />
heat.<br />
Replace hoses which show signs of wear, damage or<br />
weather cracked rubber.<br />
Always use two wrenches when loosening and tightening<br />
hose or tubeline fittings.<br />
–2–4–<br />
A<br />
B<br />
C<br />
D<br />
Nut<br />
Washer<br />
O–ring<br />
Mark a Line on Nut<br />
Flats of Both Nuts<br />
Tighten to Correct<br />
Amount from Chart<br />
Nut<br />
O–ring<br />
Washer<br />
A–01897<br />
Tube Size Rotate No.<br />
Wrench Size Outsi<strong>de</strong> Dia. Thread Size of Hex Flats<br />
5/8’’ 5/16’’ 1/2’’ – 20 2–1/2<br />
11/16’’ 3/8’’ 9/16’’ – 18 2<br />
7/8’’ 1/2’’ 3/4’’ – 16 2<br />
1’’ 5/8’’ 7/8’’ – 14 1–1/2 – 2<br />
1–1/4’’ 3/4’’ 1–1/16’’ – 12 1<br />
1–3/8’’ 1’’ 1–5/16’’ – 12 3/4 – 1<br />
2’’ 1–1/4’’ 1–5/8’’ – 12 3/4 – 1<br />
2–1/4’’ 1–1/2’’ 1–7/8’’ – 12 1/2 – 3/4<br />
B–07575<br />
A–01852<br />
853, 853H BICS Loa<strong>de</strong>r<br />
Service Manual
LIFT CYLINDER(S)<br />
Checking the Lift Cylin<strong>de</strong>r<br />
Lower the lift arms. Stop the engine. Raise the seat bar.<br />
Hydraulic fluid escaping un<strong>de</strong>r pressure can<br />
have sufficient force to enter a person’s body<br />
by penetrating the skin. This can cause serious<br />
injury and possibly <strong>de</strong>ath if proper medical<br />
treatment by a physician familiar with this<br />
injury is not received immediately. W–2145–0290<br />
Check only one cylin<strong>de</strong>r at a time. Disconnect the hose<br />
(Item 1) [A] which goes to the base end of the lift cylin<strong>de</strong>r.<br />
Install a plug (Item1) [B] in the hose and tighten.<br />
Install a test hose between the cylin<strong>de</strong>r and a drain pan.<br />
Engage the parking brake. Lower the seat bar. Start the<br />
engine and push the top (toe) of the lift pedal.<br />
If there is any leakage from the open port, remove the lift<br />
cylin<strong>de</strong>r for repair. Repeat the procedure to check the<br />
other lift cylin<strong>de</strong>r.<br />
Removal and Installation<br />
Raise the lift arms so the rod end retaining pin will clear<br />
the loa<strong>de</strong>r frame for removal.<br />
Have a second person put jackstands un<strong>de</strong>r the<br />
Bob–Tach to support the lift arms [C]. Stop the engine.<br />
Raise the operator cab. (See Page 1–1.)<br />
Remove the retaining bolt and nut (Item 1) [D] from the<br />
retaining pin on the rod end of the cylin<strong>de</strong>r.<br />
Installation: Tighten the retainer bolt and nut to 18–20<br />
ft.–lbs. (24–27 Nm) torque.<br />
Remove the retaining pin from the rod end of the cylin<strong>de</strong>r.<br />
Revised June 97<br />
A<br />
B<br />
C<br />
D<br />
1<br />
1<br />
1<br />
CD–15067<br />
CD–15068<br />
CD–15066<br />
CD–15069<br />
853, 853H BICS Loa<strong>de</strong>r<br />
–2–5– Service Manual
LIFT CYLINDER(S) (Cont’d)<br />
Removal and Installation (Cont’d)<br />
Remove the retaining bolt and nut (Item 1) [A] from the<br />
retaining pin on the base end of the cylin<strong>de</strong>r.<br />
Installation: Tighten the retainer bolt and nut to 18–20<br />
ft.–lbs. (24–27 Nm) torque.<br />
Remove the retaining pin from the base end of the<br />
cylin<strong>de</strong>r [B].<br />
Sli<strong>de</strong> the cylin<strong>de</strong>r forward for clearance to disconnect the<br />
hoses.<br />
Mark the hoses for correct installation.<br />
Disconnect the two hoses (Item 1) [C] from the lift<br />
cylin<strong>de</strong>r.<br />
Remove the lift cylin<strong>de</strong>r.<br />
Always clean up spilled fuel or oil. Keep heat,<br />
flames, sparks or lighted tobacco away from<br />
fuel and oil. Failure to use care around<br />
combustibles can cause explosion or fire<br />
which can result in injury or <strong>de</strong>ath. W–2103–1285<br />
–2–6–<br />
A<br />
B<br />
C<br />
1<br />
1<br />
CD–15070<br />
CD–15072<br />
CD–15073<br />
853, 853H BICS Loa<strong>de</strong>r<br />
Service Manual
TILT CYLINDER<br />
Checking the Tilt Cylin<strong>de</strong>r<br />
Remove the attachment. Roll the Bob–Tach fully back.<br />
Stop the engine. Raise the seat bar.<br />
Hydraulic fluid escaping un<strong>de</strong>r pressure can<br />
have sufficient force to enter a person’s body<br />
by penetrating the skin. This can cause serious<br />
injury and possibly <strong>de</strong>ath if proper medical<br />
treatment by a physician familiar with this<br />
injury is not received immediately.<br />
W–2145–0290<br />
Disconnect the hose (Item 1) [A] which goes to the base<br />
end of the tilt cylin<strong>de</strong>r.<br />
Put a plug in the hose and tighten.<br />
Engage the parking brake. Lower the seat bar. Start the<br />
engine and push the bottom (heel) of the tilt pedal. If there<br />
is leakage from the open port, remove the tilt cylin<strong>de</strong>r for<br />
repair.<br />
Removal and Installation<br />
Remove the attachment. Roll the Bob–Tach fully forward<br />
[B].<br />
Stop the engine. Raise the seat bar.<br />
Disconnect both hydraulic hoses (Items 1 & 2) [A].<br />
Remove the retainer bolt and nut (Item 1) [C] from the rod<br />
end pivot pin.<br />
Installation: Tighten the retainer nut to 18–20 ft.–lbs.<br />
(24–27 Nm) torque.<br />
Remove the grease fitting from the rod end pivot pin.<br />
Remove the rod end pivot pin (Item 1) [D].<br />
A<br />
B<br />
C<br />
D<br />
1<br />
1<br />
1<br />
2<br />
CD–15074<br />
CD–15075<br />
CD–15076<br />
P–03904<br />
853, 853H BICS Loa<strong>de</strong>r<br />
–2–7– Service Manual
TILT CYLINDER (Cont’d)<br />
Removal and Installation (Cont’d)<br />
Remove the retainer bolt and nut (Item 1) [A] from the<br />
base end pivot pin.<br />
Installation: Tighten the retainer nut and bolt to 18–20<br />
ft.–lbs. (24–27 Nm) torque.<br />
Always clean up spilled fuel or oil. Keep heat,<br />
flames, sparks or lighted tobacco away from<br />
fuel and oil. Failure to use care around<br />
combustibles can cause explosion or fire<br />
which can result in injury or <strong>de</strong>ath.<br />
W–2103–1285<br />
Remove the base end pivot pin (Item 1) [B].<br />
Remove the tilt cylin<strong>de</strong>r from the loa<strong>de</strong>r.<br />
Rod End Seal<br />
Remove the old seal (both si<strong>de</strong>s) from the rod end of the<br />
tilt cylin<strong>de</strong>r.<br />
Install the new seals with the lip facing out [C].<br />
Using two pieces of shim stock, install the rod end of the<br />
tilt cylin<strong>de</strong>r into the Bob–Tach [D].<br />
Be careful not to damage the new seals during<br />
installation.<br />
Revised June 96<br />
–2–8–<br />
A<br />
B<br />
C<br />
D<br />
1<br />
1<br />
1<br />
CD–15077<br />
CD–15078<br />
P–03911<br />
P–03910<br />
853, 853H BICS Loa<strong>de</strong>r<br />
Service Manual
HYDRAULIC CYLINDER<br />
Lift Cylin<strong>de</strong>r I<strong>de</strong>ntification<br />
1. Rod<br />
2. Case<br />
3. O–ring<br />
4. Nut<br />
5. Piston<br />
6. Ring<br />
7. O–ring<br />
8. Spacer<br />
9. O–ring<br />
10. Washer<br />
11. Head<br />
12. Seal<br />
13. Seal<br />
14. Plug<br />
15. O–ring<br />
16. Tube<br />
16<br />
14<br />
15<br />
* Tighten to 180 ft.–lbs. (244 Nm) torque.<br />
14<br />
15<br />
2<br />
*4<br />
9<br />
3<br />
10<br />
6<br />
11<br />
7<br />
5<br />
12<br />
8<br />
13<br />
1<br />
TS–01060<br />
853, 853H BICS Loa<strong>de</strong>r<br />
–2–9– Service Manual
HYDRAULIC CYLINDER (Cont’d)<br />
Tilt Cylin<strong>de</strong>r I<strong>de</strong>ntification<br />
1. Case<br />
2. Tube<br />
3. Plug<br />
4. O–ring<br />
5. Nut<br />
6. Clamp<br />
7. Nut<br />
8. Piston<br />
9. Seal<br />
10. O–ring<br />
11. O–ring<br />
12. Washer<br />
13. O–ring<br />
14. Head<br />
15. Seal<br />
16. Seal<br />
17. Rod<br />
18. Bushing<br />
MC–1688<br />
* Tighten to 600 ft.–lbs. (813 Nm) torque.<br />
6<br />
7<br />
Revised June 97 –2–10–<br />
*5<br />
1<br />
4<br />
3<br />
8<br />
9<br />
2<br />
10<br />
11<br />
12<br />
13<br />
18<br />
14<br />
15<br />
16<br />
MC–01688<br />
17<br />
TS–01098<br />
853, 853H BICS Loa<strong>de</strong>r<br />
Service Manual
HYDRAULIC CYLINDER (Cont’d)<br />
Disassembly<br />
Tools necessary for the disassembly/assembly<br />
procedures:<br />
MEL1074 – O–ring Seal Hook<br />
MEL1075 – Adjustable Gland Nut Wrench<br />
MEL1396 – Seal Installation Tool<br />
MEL1033 – Rod Seal Installation Tool<br />
Piston Ring Compressor<br />
NOTE: The drawings may not show the cylin<strong>de</strong>r<br />
exactly as it appears, but the procedure is<br />
correct for all cylin<strong>de</strong>rs.<br />
Put the base end of the hydraulic cylin<strong>de</strong>r in a drain pan.<br />
Move the rod in and out to remove the fluid from the<br />
cylin<strong>de</strong>r. Move the rod slowly so the fluid will go directly<br />
into the drain pan.<br />
Put the base end of the cylin<strong>de</strong>r in a vise.<br />
Use the adjustable gland nut wrench to loosen the head<br />
[A].<br />
Remove the rod assembly from the cylin<strong>de</strong>r case [B].<br />
Remove the cylin<strong>de</strong>r case from the vise.<br />
Put the rod end in the vise.<br />
Remove the nut from the piston end of the rod [C].<br />
Pull the piston off the rod (Item 1) [D].<br />
Pull the head (Item 2) [D] off the rod.<br />
A<br />
B<br />
C<br />
D<br />
1<br />
2<br />
B–07000<br />
B–07001<br />
B–07002<br />
B–07003<br />
853, 853H BICS Loa<strong>de</strong>r<br />
–2–11– Service Manual
HYDRAULIC CYLINDER (Cont’d)<br />
Disassembly (Cont’d)<br />
If the head has a seal, remove the seal from the head [A].<br />
Remove the O–ring and backup washer from the head<br />
[B].<br />
Remove the wiper seal [C].<br />
Remove the oil seal from the head [D].<br />
–2–12–<br />
A<br />
B<br />
C<br />
D<br />
B–07004<br />
B–07199<br />
B–07005<br />
B–07006<br />
853, 853H BICS Loa<strong>de</strong>r<br />
Service Manual
HYDRAULIC CYLINDER (Cont’d)<br />
Disassembly (Cont’d)<br />
Remove the piston seal from the piston [A].<br />
Remove the O–ring from the piston [B].<br />
Wash the cylin<strong>de</strong>r parts in solvent and air dry them.<br />
While servicing the cylin<strong>de</strong>r do not damage the parts.<br />
Inspect for nicks, scratches or otherwise damaged or<br />
bent parts before assembling the cylin<strong>de</strong>r. Replace parts<br />
that appear damaged in any way. The cylin<strong>de</strong>r may not<br />
function correctly if there is damage to any of the parts.<br />
Destroy all the O–rings and seals and replace them with<br />
NEW O–rings and seals.<br />
Assembly<br />
Install the O–ring on the piston [C].<br />
NOTE: Do not overstretch the seal.<br />
Install the seal on the tool and stretch it until it fits the<br />
piston [D].<br />
Allow the O–ring to stretch for 30 seconds before<br />
removing it from the tool.<br />
A<br />
B<br />
C<br />
D<br />
B–03689<br />
B–03703<br />
B–12812<br />
B–12809<br />
853, 853H BICS Loa<strong>de</strong>r<br />
–2–13– Service Manual
HYDRAULIC CYLINDER (Cont’d)<br />
Assembly (Cont’d)<br />
Install the seal on the piston [A].<br />
Use a ring compressor to compress the seal to the correct<br />
size [B].<br />
Leave the piston in the ring compressor for three minutes.<br />
Install the oil seal on the rod seal tool [C].<br />
NOTE: The O–ring si<strong>de</strong> of the oil seal goes toward<br />
the insi<strong>de</strong> of the cylin<strong>de</strong>r.<br />
Install the oil seal in the head [D].<br />
–2–14–<br />
A<br />
B<br />
C<br />
D<br />
B–12813<br />
B–12811<br />
B–03702<br />
B–03671<br />
853, 853H BICS Loa<strong>de</strong>r<br />
Service Manual
HYDRAULIC CYLINDER (Cont’d)<br />
Assembly (Cont’d)<br />
Install the wiper seal with the lip toward the outsi<strong>de</strong> of the<br />
head [A].<br />
Install the backup washer on the head [B] & [C].<br />
Install the O–ring next to the backup ring [D].<br />
A<br />
B<br />
C<br />
D<br />
B–03682<br />
B–07008<br />
B–07200<br />
B–07007<br />
853, 853H BICS Loa<strong>de</strong>r<br />
–2–15– Service Manual
HYDRAULIC CYLINDER (Cont’d)<br />
Assembly (Cont’d)<br />
If a seal was removed from the head use the following<br />
procedure to install a new one.<br />
NOTE: Do not overstretch the seal.<br />
Install the seal on the tool and stretch it until it fits the<br />
piston [A].<br />
Allow the O–ring to stretch for 30 seconds before<br />
removing it from the tool.<br />
NOTE: Do not turn (roll) the seal as you install it.<br />
Damage to the seal may result.<br />
Use a ring compressor to compress the seal to the correct<br />
size [B]. Leave the tool over the seal for five minutes.<br />
Install the head on the rod [C].<br />
Install the piston on the rod [D].<br />
–2–16–<br />
A<br />
B<br />
C<br />
D<br />
B–12809<br />
B–14305<br />
B–07011<br />
B–07198<br />
853, 853H BICS Loa<strong>de</strong>r<br />
Service Manual
HYDRAULIC CYLINDER (Cont’d)<br />
Assembly (Cont’d)<br />
Install the nut (Item 1) [A] on the rod.<br />
See Page 2–9 or 2–10 for the correct torque<br />
specifications.<br />
Remove the rod from the vise.<br />
Install the cylin<strong>de</strong>r case in the vise.<br />
Put oil on the seal surface of the cylin<strong>de</strong>r case [B].<br />
Put oil on the teflon seal on the piston [C].<br />
Revised June 97<br />
A<br />
B<br />
C<br />
1<br />
B–07002<br />
B–07013<br />
B–07012<br />
853, 853H BICS Loa<strong>de</strong>r<br />
–2–17– Service Manual
HYDRAULIC CYLINDER (Cont’d)<br />
Assembly (Cont’d)<br />
Install the rod assembly in the cylin<strong>de</strong>r case [A].<br />
Put oil on the seals on the head [B].<br />
Put oil on the threads of the head.<br />
Use the adjustable gland nut wrench to tighten the head<br />
[C].<br />
Replace the seal on the rod end (if so equipped) if it shows<br />
signs of wear or damage [D].<br />
–2–18–<br />
A<br />
B<br />
C<br />
D<br />
B–07001<br />
B–07014<br />
B–07000<br />
B–07015<br />
853, 853H BICS Loa<strong>de</strong>r<br />
Service Manual
MAIN RELIEF VALVE<br />
Checking the Main Relief Valve<br />
The tools listed will be nee<strong>de</strong>d to do the following<br />
procedure:<br />
MEL10003 – Hydraulic Tester<br />
MEL10006 – Hydraulic Test Kit<br />
Turn the key switch to the OFF position, as the engine<br />
stops running, turn the key switch all the way to the left to<br />
release the hydraulic pressure at the front auxiliary quick<br />
couplers.<br />
Lift and block the loa<strong>de</strong>r. (See Page 1–1.)<br />
Connect the IN port of the hydraulic tester to the female<br />
quick coupler on the loa<strong>de</strong>r [A].<br />
Connect the OUT port of the hydraulic tester to the male<br />
quick coupler on the loa<strong>de</strong>r [A].<br />
The hydraulic tester must be in the fully open<br />
position before you start the engine.<br />
I–2024–0284<br />
Put jackstands un<strong>de</strong>r the front axles and rear<br />
corners of the frame before running the engine<br />
for service. Failure to use jackstands can allow<br />
the machine to fall or move and cause injury or<br />
<strong>de</strong>ath.<br />
W–2017–0286<br />
Start the engine and run at low engine idle RPM. Push the<br />
mo<strong>de</strong> switch (Item 1) [B] two times (on the instrument<br />
panel) to engage the front auxiliary hydraulics, the light<br />
(Item 2) [B] will come ON.<br />
Push the button (Item 1) [C] for fluid pressure to the quick<br />
couplers.<br />
Watch the flow meter on the hydraulic tester to make sure<br />
the flow is correct. Increase the engine speed to full RPM.<br />
There should be 18.0 GPM (68 L/min.) free flow. Turn the<br />
restrictor control, on the tester, until the main relief valve<br />
opens. The correct pressure for the main relief is<br />
2700–2750 PSI (18617–18961 kPa).<br />
If the relief pressure is not correct, stop the engine.<br />
Replace or adjust the main relief valve. (See Page 2–21.)<br />
Revised June 96<br />
A<br />
B<br />
C<br />
Left<br />
Steering<br />
Lever<br />
Control<br />
(Optional)<br />
2<br />
P–02154<br />
1<br />
P–05061<br />
B–13443<br />
Right<br />
Steering<br />
Lever<br />
Control<br />
(Optional)<br />
P–02152<br />
853, 853H BICS Loa<strong>de</strong>r<br />
–2–19– Service Manual<br />
1
MAIN RELIEF VALVE (Cont’d)<br />
Checking the Main Relief Valve Without Auxiliaries<br />
The tools listed will be nee<strong>de</strong>d to do the following<br />
procedure:<br />
MEL10003 – Hydraulic Tester<br />
MEL10006 – Hydraulic Test Kit<br />
Stop the engine.<br />
Lift and block the loa<strong>de</strong>r. (See Page 1–1.)<br />
Disconnect the hydraulic hoses (Item 1) [A] at the tilt<br />
cylin<strong>de</strong>r.<br />
Connect the hydraulic tester to the tilt cylin<strong>de</strong>r hoses [B].<br />
Have a second person in the operator seat, with seat bar<br />
in down position.<br />
The hydraulic tester must be in the fully open<br />
position before you start the engine.<br />
Start the engine and run at idle RPM.<br />
I–2024–0284<br />
Push the tilt pedal at the top (toe) or bottom (heel) until<br />
the hydraulic tester shows the correct fluid flow through<br />
the flow meter.<br />
Increase the engine RPM to maximum.<br />
There should be 18.0 GPM (68,1 L/min.) free flow.<br />
Turn the restrictor control, at the tester, to increase the<br />
pressure until the main relief valve opens.<br />
The correct pressure is 2700–2750 PSI (18617–18961<br />
kPa).<br />
If not, stop the engine.<br />
Replace or adjust the main relief valve. (See Page 2–21.)<br />
When an engine is running in an enclosed<br />
area, fresh air must be ad<strong>de</strong>d to avoid<br />
concentration of exhaust fumes. If the engine<br />
is stationary, vent the exhaust outsi<strong>de</strong>.<br />
Exhaust fumes contain odorless, invisible<br />
gases which can kill without warning.<br />
W–2050–1285<br />
–2–20–<br />
A<br />
B<br />
1<br />
P–01187<br />
P–01193<br />
853, 853H BICS Loa<strong>de</strong>r<br />
Service Manual
MAIN RELIEF VALVE (Cont’d)<br />
Removal and Installation<br />
Raise the operator cab. (See Page 1–1.)<br />
When making repairs on hydrostatic and<br />
hydraulic systems, clean the work area before<br />
disassembly and keep all parts clean. Always<br />
use caps and plugs on hoses, tubelines and<br />
ports to keep dirt out. Dirt can quickly damage<br />
the system.<br />
I–2003–0284<br />
The main relief valve (Item 1) [A] is located at the right<br />
rear of the control valve.<br />
Clean the area around the control valve.<br />
Loosen and remove the main relief valve [B].<br />
Installation: Tighten the main relief valve to 35–40<br />
ft.–lbs. (47–54 Nm) torque.<br />
Remove the O–rings and back–up washers.<br />
Clean the main relief valve in clean solvent. Use air<br />
pressure to dry the valve.<br />
Install new O–rings and backup washers. Install the main<br />
relief valve and tighten [A]. Check the pressure again.<br />
(See Page 2–19 or 2–20.)<br />
If the pressure is not correct, adjust the main relief valve.<br />
Remove the end cap (Item 1) [C].<br />
Turn the adjusting screw in or out until the pressure is<br />
correct.<br />
NOTE: If the correct pressure can not be reached,<br />
replace the main relief valve. Check the<br />
pressure setting of the new relief valve.<br />
A<br />
B<br />
C<br />
1<br />
1<br />
CD–15094<br />
P–4777<br />
CD–15091<br />
CD–15093<br />
853, 853H BICS Loa<strong>de</strong>r<br />
–2–21– Service Manual
DUAL PRESSURE MAIN RELIEF VALVE – 853H<br />
Checking the Low Setting<br />
The tools listed will be nee<strong>de</strong>d to do the following<br />
procedure:<br />
MEL10003 – Hydraulic Tester<br />
MEL10006 – Hydraulic Test Kit<br />
Turn the key switch to the OFF position. Before the<br />
engine stops running, turn the key switch all the way to the<br />
left to release the hydraulic pressure at the front auxiliary<br />
quick couplers.<br />
Lift and block the loa<strong>de</strong>r. (See Page 1–1.)<br />
Connect the IN port of the hydraulic tester to the female<br />
quick coupler on the loa<strong>de</strong>r [A].<br />
Connect the OUT port of the hydraulic tester to the male<br />
quick coupler on the loa<strong>de</strong>r [A].<br />
NOTE: Flow will be out from the female coupler on<br />
the loa<strong>de</strong>r.<br />
The hydraulic tester must be in the fully open<br />
position before you start the engine. I–2024–0284<br />
When the engine is running during service, the<br />
steering levers must be in neutral and the<br />
parking brake engaged. Failure to do so can<br />
cause injury or <strong>de</strong>ath.<br />
W–2006–0284<br />
Start the engine and run at low idle RPM. Push the mo<strong>de</strong><br />
switch (Item 1) [B] twice (on the instrument panel) to<br />
engage the front auxiliary hydraulics ‘‘<strong>de</strong>tent’’, both lights<br />
(Items 2 & 3) [B] will come ON.<br />
NOTE: High horsepower switch should be in the<br />
OFF position.<br />
Push the button (Item 1) [C] for fluid flow to the quick<br />
couplers.<br />
Watch the flow meter on the hydraulic tester to make sure<br />
the flow is correct. Increase the engine speed to full RPM.<br />
There should be approximately 18.0 GPM (68,1 L/min.)<br />
free flow. Turn the restrictor control, on the tester, until the<br />
main relief valve opens. The correct pressure for the main<br />
relief is 2700–2750 PSI (18617–18961 kPa).<br />
Push the button (Item 1) [C] to disengage the ‘‘<strong>de</strong>tent’’<br />
flow to the front quick couplers.<br />
If the relief pressure is not correct, stop the engine. Adjust<br />
or replace the main relief valve. (See Page 2–25.)<br />
–2–22–<br />
A<br />
B<br />
C<br />
Left<br />
Steering<br />
Lever<br />
Control<br />
2<br />
P–02130<br />
1<br />
Right<br />
Steering<br />
Lever<br />
Control<br />
P–05195<br />
P–00998<br />
P–02129<br />
Put jackstands un<strong>de</strong>r the front axles and rear<br />
corners of the frame before running the engine<br />
for service. Failure to use jackstands can allow<br />
the machine to fall or move and cause injury or<br />
<strong>de</strong>ath.<br />
W–2017–0286<br />
3<br />
1<br />
853, 853H BICS Loa<strong>de</strong>r<br />
Service Manual
DUAL PRESSURE MAIN RELIEF VALVE – 853H<br />
(Cont’d)<br />
Checking the High Setting<br />
The tools listed will be nee<strong>de</strong>d to do the following<br />
procedure:<br />
MEL10003 – Hydraulic Tester<br />
MEL10006 – Hydraulic Test Kit<br />
Turn the key switch to the OFF position. Before the<br />
engine stops running, turn the key switch all the way to the<br />
left to release the hydraulic pressure at the front auxiliary<br />
quick couplers.<br />
Lift and block the loa<strong>de</strong>r. (See Page 1–1.).<br />
Connect the hydraulic tester to the auxiliary quick coupler<br />
[A].<br />
The IN port on the tester connects to the female coupler<br />
on the loa<strong>de</strong>r.<br />
The OUT port from the tester connects to the male<br />
coupler on the loa<strong>de</strong>r.<br />
The hydraulic tester must be in the fully open<br />
position before you start the engine. I–2024–0284<br />
Put jackstands un<strong>de</strong>r the front axles and rear<br />
corners of the frame before running the engine<br />
for service. Failure to use jackstands can allow<br />
the machine to fall or move and cause injury or<br />
<strong>de</strong>ath.<br />
W–2017–0286<br />
Obtain a 3/8 inch (9,5 mm) I.D. hose (Item 1) [B] with a<br />
3000 PSI (20685 kPa) rating or greater.<br />
The hose loop (Item 1) [B] should be a total of 28 inches<br />
(711 mm) in length (including quick couplers).<br />
A small male coupler (Item 2) [B] (P/N 6648969) is<br />
nee<strong>de</strong>d for one end of the hose, and a small female<br />
coupler (Item 3) [B] (P/N 6648967) is nee<strong>de</strong>d for the other<br />
end of the hose.<br />
A 15K–5 fitting is also nee<strong>de</strong>d for each end of the hose<br />
[B].<br />
A 79K–6 O–ring is used toward the coupler si<strong>de</strong> of each<br />
fitting (this O–ring is inclu<strong>de</strong>d with each fitting).<br />
Install a 15K–5 fitting on each end of the hose loop.<br />
Install the female coupler (Item 3) [B] on one end of the<br />
hose loop.<br />
Drill orifice (P/N 6655091) size to .070 inch. Install the<br />
threa<strong>de</strong>d orifice (Item 1) [C] in the male coupler (Item 2)<br />
[C] and install the coupler on the fitting.<br />
A<br />
B<br />
C<br />
2<br />
1<br />
1<br />
2<br />
P–05195<br />
P–04717<br />
P–04757<br />
853, 853H BICS Loa<strong>de</strong>r<br />
–2–23– Service Manual<br />
3
DUAL PRESSURE MAIN RELIEF VALVE – 853H<br />
(Cont’d)<br />
Checking the High Setting (Cont’d)<br />
Install the hose (Item 1) [A] on the secondary auxiliary<br />
quick couplers as shown.<br />
NOTE: The hose loop (Item 1) [A] (with .070 inch<br />
orifice), provi<strong>de</strong>s restriction and pilot<br />
pressure necessary to shift the dual stage<br />
main relief valve to the high pressure setting.<br />
When the engine is running during service, the<br />
steering levers must be in neutral and the<br />
parking brake engaged. Failure to do so can<br />
cause injury or <strong>de</strong>ath.<br />
W–2006–0284<br />
Start the engine and run at low idle RPM. Increase the<br />
engine speed to full RPM. Push the mo<strong>de</strong> switch (Item 1)<br />
[B] twice (on the instrument panel) to engage the front<br />
auxiliary hydraulics ‘‘<strong>de</strong>tent’’, the lights (Items 2 & 3) [B]<br />
will come ON.<br />
NOTE: The High Horsepower switch should be in the<br />
OFF position.<br />
Push the button (Item 1) [C] to engage the ‘‘<strong>de</strong>tent’’<br />
position to the front auxiliary quick couplers.<br />
Push and hold the button (Item 2) [C] for fluid flow through<br />
the secondary auxiliary couplers and hose loop.<br />
Watch the flow meter on the hydraulic tester to be sure the<br />
flow is correct.<br />
There should be approximately 18.0 GPM (68,1 L/min.)<br />
free flow. Turn the restrictor control on the tester, until the<br />
main relief valve opens. The correct pressure for the main<br />
relief is 3000 PSI (20685 kPa).<br />
Release the button (Item 2) [C] and push the button (Item<br />
1) [C] to disengage the ‘‘<strong>de</strong>tent’’ position to the front<br />
auxiliary quick couplers.<br />
If the relief pressure is not correct, stop the engine.<br />
Replace or adjust the main relief valve. (See Page 2–26.)<br />
–2–24–<br />
A<br />
B<br />
C<br />
2<br />
Left<br />
Steering<br />
Lever<br />
Control<br />
2<br />
1<br />
P–02130<br />
3<br />
1<br />
Right<br />
Steering<br />
Lever<br />
Control<br />
P–05196<br />
1<br />
P–00998<br />
P–02129<br />
853, 853H BICS Loa<strong>de</strong>r<br />
Service Manual
DUAL PRESSURE MAIN RELIEF VALVE – 853H<br />
(Cont’d)<br />
853, 853H BICS Service Manual #6724012 – Hydraulic System Section Part 1 of 3<br />
Adjusting the Low Setting<br />
NOTE: Adjust the low pressure setting before<br />
adjusting the high pressure setting.<br />
Correct pressure for the low setting is 2700–2750 PSI<br />
(18617–18961 kPa). (See Page 2–22) for the correct<br />
procedure to check the setting.<br />
To adjust the low pressure setting on the main relief valve,<br />
(Item 1) [A] disconnect the pilot hose (Item 2) [A] from the<br />
adapter fitting (Item 3) [A].<br />
Remove the adapter fitting (Item 3) [A].<br />
Remove the high pressure adjustment housing (Item 1)<br />
[B] from the main relief valve.<br />
Use a 1/4’’ allen wrench (Item 1) [C] to turn the adjusting<br />
screw (Item 2) [C] in to increase pressure or out to<br />
<strong>de</strong>crease pressure.<br />
One turn is equal to approximately 490 PSI (3379 kPa).<br />
Reinstall the high pressure adjustment housing and<br />
adapter.<br />
Reconnect the pilot hose.<br />
Start the engine and increase the engine speed to full<br />
RPM. Check for the correct pressure setting.<br />
Repeat the procedure until the pressure setting is<br />
approximately 2700–2750 PSI (18617–18961 kPa).<br />
When the correct pressure setting is reached, the next<br />
step is to set the high pressure adjustment on the main<br />
relief valve (See Page 2–23 for the correct procedure).<br />
Stop the engine.<br />
A<br />
B<br />
C<br />
2 1<br />
3<br />
1<br />
Select Valve<br />
(GEM Block)<br />
Control Valve<br />
2<br />
1<br />
E–02232<br />
MC–01654<br />
MC–01654<br />
853, 853H BICS Loa<strong>de</strong>r<br />
–2–25– Service Manual
DUAL PRESSURE MAIN RELIEF VALVE – 853H<br />
(Cont’d)<br />
Adjusting the High Setting<br />
NOTE: Adjust the low pressure setting before<br />
adjusting the high pressure setting.<br />
Correct pressure for the high setting is 3000 PSI (20685<br />
kPa). (See Page 2–23) for the correct procedure to check<br />
the setting.<br />
To adjust the high pressure setting on the main relief valve<br />
(Item 1) [A] disconnect the pilot hose (Item 2) [A] from the<br />
adapter fitting (Item 3) [A].<br />
Remove the adapter fitting (Item 3) [A].<br />
Use a 1/4’’ allen wrench (Item 1) [B] to press the push pin<br />
(Item 2) [B] in until it bottoms out.<br />
Turn the adjusting gui<strong>de</strong> (Item 3) [B] in to increase<br />
pressure or out to <strong>de</strong>crease pressure.<br />
One turn is equal to approximately 390 PSI (2689 kPa).<br />
Reinstall the adapter fitting and pilot hose.<br />
Check for the high pressure setting.<br />
Reconfirm the correct adjustment.<br />
Repeat the adjustment procedure if necessary.<br />
–2–26–<br />
A<br />
B<br />
2 1<br />
3<br />
2<br />
1<br />
Select Valve<br />
(G.E.M Block)<br />
Control Valve<br />
3<br />
E–02232<br />
MC–01654<br />
853, 853H BICS Loa<strong>de</strong>r<br />
Service Manual
SELECT VALVE (G.E.M. Block) 853H<br />
Checking the Main Relief Valve<br />
The tools listed will be nee<strong>de</strong>d to do the following<br />
procedure:<br />
MEL10003 – Hydraulic Tester<br />
MEL10006 – Hydraulic Test Kit<br />
Lift and block the loa<strong>de</strong>r (Page 1–1).<br />
Connect the IN port of the hydraulic tester to the female<br />
quick couplers (Item 1) [A] on the loa<strong>de</strong>r.<br />
Connect the OUT port of the hydraulic tester to the male<br />
quick coupler (Item 2) [A] on the loa<strong>de</strong>r.<br />
The hydraulic tester must be in the fully open<br />
position before you start the engine. I–2024–0284<br />
Put jackstands un<strong>de</strong>r the front axles and rear<br />
corners of the frame before running the engine<br />
for service. Failure to use jackstands can allow<br />
the machine to fall or move and cause injury or<br />
<strong>de</strong>ath.<br />
W–2017–0286<br />
Start the engine and run at low idle RPM. Push the mo<strong>de</strong><br />
switch (Item 1) [B] once (on the instrument panel) to<br />
engage the front auxiliary hydraulics momentary, the light<br />
(Item 2) [B] will come ON.<br />
Push the rocker switch (Item 3) [B] for fluid pressure to<br />
the secondary quick couplers.<br />
Watch the flow meter on the hydraulic tester to make sure<br />
the flow is correct. Increase the engine speed to full RPM.<br />
The free flow should be approximately 8.0 GPM (30,3<br />
L/min.). Turn the restrictor control, on the tester, until the<br />
main relief valve opens. The correct pressure for the main<br />
relief is approximately 3000 PSI (20685 kPa).<br />
Release the rocker switch (Item 3) [B] to disengage the<br />
flow to the secondary quick couplers.<br />
If the relief pressure is not correct, stop the engine. Adjust<br />
or replace the main relief valve in the select valve (Item<br />
1) [C]. The select valve (G.E.M. Block) is located at the<br />
left si<strong>de</strong> un<strong>de</strong>r the control panel.<br />
Remove the cap from the relief valve (Item 1) [D] and turn<br />
the adjusting screw in or out until the correct pressure is<br />
reached.<br />
A<br />
B<br />
C<br />
D<br />
1<br />
3<br />
Left<br />
Steering<br />
Lever<br />
Control<br />
P–02130<br />
1<br />
2<br />
1<br />
P–04761<br />
P–00998<br />
P–05201<br />
P–05200<br />
853, 853H BICS Loa<strong>de</strong>r<br />
–2–27– Service Manual<br />
2<br />
1
HYDRAULIC CONTROL VALVE<br />
Removal and Installation<br />
When making repairs on hydrostatic and<br />
hydraulic systems, clean the work area before<br />
disassembly and keep all parts clean. Always<br />
use caps and plugs on hoses, tubelines and<br />
ports to keep dirt out. Dirt can quickly damage<br />
the system.<br />
I–2003–0284<br />
Raise the lift arms and install an approved lift arm support<br />
<strong>de</strong>vice. (See Page 1–1.)<br />
Stop the engine. Raise the seat bar.<br />
Raise the operator cab. (See Page 1–1.)<br />
Clean the area around the control valve.<br />
Remove the lift lock valve (Item 1) [A]. (See Page 8–1.)<br />
Disconnect the solenoid harness connectors (Item 1) [A].<br />
Remove the tubeline clamp (Item 1) [B] from the<br />
tubelines.<br />
Disconnect the linkage (Items 1 & 2) [C] from the lift and<br />
tilt spools.<br />
Remove the lift lock valve support bracket from the loa<strong>de</strong>r<br />
frame [D].<br />
–2–28–<br />
A<br />
B<br />
C<br />
D<br />
1<br />
1<br />
1<br />
2<br />
2<br />
P–04779<br />
P–04784<br />
P–04785<br />
P–04787<br />
853, 853H BICS Loa<strong>de</strong>r<br />
Service Manual
HYDRAULIC CONTROL VALVE (Cont’d)<br />
Removal and Installation (Cont’d)<br />
Disconnect the tubeline (Item 1) [A] from the tee fitting<br />
and control valve lift section.<br />
Disconnect the inlet hose (Item 1) [B].<br />
Disconnect the tubeline (Item 2) [B] from the lift section.<br />
Disconnect the charge tubeline (Item 1) [C] to the tilt lock<br />
valve.<br />
Disconnect the two tubelines (Item 2) [C] from the tilt<br />
section.<br />
Disconnect the auxiliary tubelines (Item 3) [C].<br />
Disconnect the charge tubeline (Item 4) [C].<br />
Disconnect the outlet tubeline (Item 1) [D].<br />
Remove the control valve mounting bolts (Item 2) [D].<br />
Installation: Tighten the mounting bolts to 25 ft.–lbs. (34<br />
Nm) torque.<br />
Remove the control valve from the mounting bracket.<br />
Always clean up spilled fuel or oil. Keep heat,<br />
flames, sparks or lighted tobacco away from<br />
fuel and oil. Failure to use care around<br />
combustibles can cause explosion or fire<br />
which can result in injury or <strong>de</strong>ath. W–2103–1285<br />
A<br />
B<br />
C<br />
D<br />
4<br />
2<br />
1<br />
2 2<br />
3<br />
2<br />
1<br />
1<br />
P–04780<br />
P–04786<br />
P–04788<br />
P–04803<br />
853, 853H BICS Loa<strong>de</strong>r<br />
–2–29– Service Manual<br />
1<br />
2
HYDRAULIC CONTROL VALVE (Cont’d)<br />
I<strong>de</strong>ntification Chart<br />
Item 853, 853H Loa<strong>de</strong>r<br />
A1 Lift Cylin<strong>de</strong>r Rod End<br />
A2 Tilt Cylin<strong>de</strong>r Rod End<br />
A3 Auxiliary Hydraulics<br />
B1 Lift Cylin<strong>de</strong>r Base End Restrictor<br />
B2 Tilt Cylin<strong>de</strong>r Base End<br />
B3 Auxiliary Hydraulics<br />
C1 Load Check Valve/Lift Function<br />
C2 Load Check Valve/Tilt Function<br />
C3 NO Load Check Valve Auxiliary Function<br />
C4 Outlet Fluid Flow<br />
D1 Lift Spool<br />
D2 Tilt Spool<br />
D3 Auxiliary Spool<br />
E1 Anti–Cavitation Valve<br />
E2 Plug<br />
F1 Port Relief<br />
F2 Anti–Cavitation Valve<br />
G1 Lift Spool Detent<br />
G2 Tilt Spool Centering Spring<br />
G3 Auxiliary Spool<br />
H1 Auxiliary Electric Solenoid<br />
H2 Plug/Port Relief (Optional)<br />
H3 Auxiliary Electric Solenoid<br />
MR Main Relief Valve<br />
–2–30–<br />
A<br />
D1<br />
D2<br />
D3<br />
E1<br />
H1<br />
H2<br />
H3<br />
MR<br />
F1<br />
F2<br />
G1<br />
G2<br />
G3<br />
MC–02130<br />
853, 853H BICS Loa<strong>de</strong>r<br />
Service Manual
HYDRAULIC CONTROL VALVE (Cont’d)<br />
Disassembly and Assembly<br />
The anti–cavitation valve, port relief valves and plugs are<br />
at different locations in the control valve.(See Page<br />
2–30.) (Control Valve I<strong>de</strong>ntification Chart) for the correct<br />
location of the parts.<br />
When making repairs on hydrostatic and<br />
hydraulic systems, clean the work area before<br />
disassembly and keep all parts clean. Always<br />
use caps and plugs on hoses, tubelines and<br />
ports to keep dirt out. Dirt can quickly damage<br />
the system.<br />
I–2003–0284<br />
Mark each valve section and spool so that the parts will<br />
be returned to its original bore during assembly.<br />
Use bolts to fasten the control valve to a work bench for<br />
easier disassembly and assembly.<br />
Load Check Valve<br />
Loosen the load check plug (Item 1) [A].<br />
Assembly: Always use new O–ring. Tighten the plug to<br />
35–40 ft.–lbs. (47–54 Nm) torque.<br />
Remove the load check plug [B].<br />
Remove the spring and poppet [C].<br />
A<br />
B<br />
C<br />
1<br />
CD–15087<br />
CD–15088<br />
CD–15089<br />
853, 853H BICS Loa<strong>de</strong>r<br />
–2–31– Service Manual
HYDRAULIC CONTROL VALVE (Cont’d)<br />
Main Relief Valve<br />
Loosen the main relief valve (Item 1) [A].<br />
Assembly: Always use new O–rings and back–up<br />
washers. Tighten to 35–40 ft.–lbs. (47–54 Nm) torque.<br />
Remove the main relief valve [B].<br />
Remove the O–ring, sleeve, and gli<strong>de</strong> ring from the main<br />
relief valve [C].<br />
Port Relief Valve<br />
Loosen the port relief valve (Item 1) [D].<br />
Assembly: Always use new O–rings and back–up<br />
washers. Tighten to 35–40 ft.–lbs. (47–54 Nm) torque.<br />
Revised June 96<br />
–2–32–<br />
A<br />
B<br />
C<br />
D<br />
1<br />
1<br />
1<br />
2 3 4<br />
1. Relief Valve<br />
2. O–ring<br />
3. Sleeve<br />
4. Gli<strong>de</strong> Ring<br />
5. O–ring<br />
CD–15090<br />
CD–15091<br />
5<br />
B–06764<br />
CD–15092<br />
CD–15094<br />
853, 853H BICS Loa<strong>de</strong>r<br />
Service Manual
HYDRAULIC CONTROL VALVE (Cont’d)<br />
Port Relief Valve (Cont’d)<br />
Remove the port relief valve [A].<br />
Remove the O–rings and backup washer from the port<br />
relief valve [B].<br />
Anti–Cavitation Valve<br />
Loosen the anti–cavitation valve (Item 1) [C].<br />
Assembly: Always use new O–rings and backup<br />
washers. Tighten to 35–40 ft.–lbs. (47–54 Nm) torque.<br />
Remove the anti–cavitation valve from the control valve<br />
[D].<br />
A<br />
B<br />
C<br />
D<br />
1<br />
1 2<br />
CD–15095<br />
3 4<br />
E–01509<br />
1. Relief Valve<br />
2. O–ring<br />
3. Backup Washer<br />
4. O–ring<br />
CD–15096<br />
CD–15099<br />
CD–15098<br />
853, 853H BICS Loa<strong>de</strong>r<br />
–2–33– Service Manual
HYDRAULIC CONTROL VALVE (Cont’d)<br />
Anti–Cavitation Valve (Cont’d)<br />
Remove the O–rings and backup washer from the<br />
anti–cavitation valve [A].<br />
Rubber Boot<br />
Loosen the two screws (Item 1) [B] on the rubber boot<br />
retainer.<br />
Assembly: Tighten the screws to 90–100 in.–lbs.<br />
(10,2–11,3 Nm) torque.<br />
Remove the screws [C].<br />
Remove the rubber boot and retainer [D].<br />
–2–34–<br />
A<br />
B<br />
C<br />
D<br />
1<br />
1<br />
2<br />
3 4<br />
E–01509<br />
1. Anti–Cavitation Valve<br />
2. O–ring<br />
3. Backup Washer<br />
4. O–ring<br />
CD–15097<br />
CD–15100<br />
CD–15101<br />
CD–15102<br />
853, 853H BICS Loa<strong>de</strong>r<br />
Service Manual
HYDRAULIC CONTROL VALVE (Cont’d)<br />
Lift Spool and Detent<br />
The tool listed will be nee<strong>de</strong>d to do the following<br />
procedure:<br />
MEL1278 – Detent Tool<br />
Remove the cap from the <strong>de</strong>tent end cap [A].<br />
Use a screwdriver to remove the snap ring (Item 1) [B].<br />
Remove the washer (Item 2) [B].<br />
Remove the screws (Item 1) [C] from the <strong>de</strong>tent sleeve.<br />
Remove the <strong>de</strong>tent sleeve (Item 2) [C].<br />
The <strong>de</strong>tent assembly has small springs and<br />
balls. Do not lose these parts during<br />
disassembly and assembly.<br />
I–2012–0284<br />
Wrap a rag around the <strong>de</strong>tent assembly [D].<br />
A<br />
B<br />
C<br />
D<br />
2<br />
1<br />
2<br />
1<br />
CD–15103<br />
CD–15104<br />
CD–15105<br />
CD–15041<br />
853, 853H BICS Loa<strong>de</strong>r<br />
–2–35– Service Manual
HYDRAULIC CONTROL VALVE (Cont’d)<br />
Lift Spool Detent (Cont’d)<br />
Remove the <strong>de</strong>tent sleeve, <strong>de</strong>tent balls and spring [A].<br />
Remove the spool, centering spring, backup washer, seal<br />
and spool assembly from the control valve [B].<br />
At the other end of the spool bore, remove the backup<br />
washer and seal [C].<br />
Put the linkage end of the spool in the vise [D].<br />
NOTE: Be careful when removing the <strong>de</strong>tent adapter,<br />
because there is spring pressure.<br />
Loosen the <strong>de</strong>tent adapter [D].<br />
–2–36–<br />
A<br />
B<br />
C<br />
D<br />
CD–15042<br />
CD–15043<br />
CD–15044<br />
CD–15045<br />
853, 853H BICS Loa<strong>de</strong>r<br />
Service Manual
HYDRAULIC CONTROL VALVE (Cont’d)<br />
Lift Spool Detent (Cont’d)<br />
Remove the <strong>de</strong>tent adapter, and cap and centering spring<br />
[A]<br />
Remove the backup washer and spool seal [B].<br />
Remove the stud from the end of the spool [C].<br />
Removal of the plastic plug:<br />
a. Make a center point in the plug using a 1/16 inch drill.<br />
b. Drill a hole all the way through the plug using a 7/64<br />
inch tap drill.<br />
c. Turn a 6–32 tap into the plug. Pull the tap and plug<br />
out of the spool. Be careful, do not break the tap.<br />
d. Clean all the <strong>de</strong>bris from insi<strong>de</strong> the spool bore.<br />
NOTE: DO NOT USE LOCTITE ON THE STUD<br />
THREADS.<br />
Assembly: Install the new plastic plug. Install the stud so<br />
that the end is about 0.60 inch (15,2 mm) from the spool.<br />
A<br />
B<br />
C<br />
D<br />
Plastic<br />
Plug<br />
0.60 inch<br />
(15,2 mm)<br />
CD–15046<br />
CD–15047<br />
CD–15048<br />
B–09973<br />
853, 853H BICS Loa<strong>de</strong>r<br />
–2–37– Service Manual
HYDRAULIC CONTROL VALVE (Cont’d)<br />
Lift Spool and Detent (Cont’d)<br />
Put grease on all the <strong>de</strong>tent component surfaces before<br />
assembly [A].<br />
Install the <strong>de</strong>tent balls and spring into the <strong>de</strong>tent adapter.<br />
Hold the <strong>de</strong>tent balls in position with the tool (MEL1278)<br />
and install the <strong>de</strong>tent adapter into the end cap [B].<br />
Install the new spool seal (Item 1) [C] and backup washer<br />
(Item 2) [C].<br />
Install the centering spring, end cap/<strong>de</strong>tent adapter on the<br />
valve spool. Tighten the <strong>de</strong>tent adapter to 90–100 in.–lbs.<br />
(10,2–11,3 Nm) torque [D].<br />
–2–38–<br />
A<br />
B<br />
C<br />
D<br />
1<br />
2<br />
CD–15049<br />
CD–15050<br />
CD–15047<br />
CD–15045<br />
853, 853H BICS Loa<strong>de</strong>r<br />
Service Manual
HYDRAULIC CONTROL VALVE (Cont’d)<br />
Lift Spool and Detent (Cont’d)<br />
Install the <strong>de</strong>tent balls and spring [A].<br />
Hold the <strong>de</strong>tent balls and spring in position with the tool<br />
(MEL1278) [B].<br />
Install the <strong>de</strong>tent sleeve (Item 1) [C] over the balls and<br />
into position.<br />
A<br />
B<br />
C<br />
1<br />
CD–15051<br />
CD–15052<br />
CD–15053<br />
853, 853H BICS Loa<strong>de</strong>r<br />
–2–39– Service Manual
HYDRAULIC CONTROL VALVE (Cont’d)<br />
Tilt Spool and Centering Spring<br />
Remove the end cap screws (Item 1) [A].<br />
Assembly: Tighten the screws to 90–100 in.–lbs.<br />
(10,2–11,3 Nm) torque.<br />
Remove the end cap [B].<br />
Remove the spool, centering spring, backup washer and<br />
spool seal [C].<br />
Assembly: If the centering spring bolt is removed, tighten<br />
to 90–100 in.–lbs. (10,2–11,3 Nm) torque. Put grease on<br />
all the centering spring component parts. Always use new<br />
spool seal.<br />
–2–40–<br />
A<br />
B<br />
C<br />
1<br />
CD–15054<br />
CD–15055<br />
CD–15056<br />
853, 853H BICS Loa<strong>de</strong>r<br />
Service Manual
HYDRAULIC CONTROL VALVE (Cont’d)<br />
Auxiliary Spool<br />
Remove the end plate screws (Item 1) [A].<br />
Assembly: Tighten the screws to 90–100 in.–lbs.<br />
(10,2–11,3 Nm) torque.<br />
Remove the end plate, O–ring and spring (both si<strong>de</strong>s) [B].<br />
Remove the washer (Item 1) [C] (both si<strong>de</strong>s).<br />
Remove the auxiliary spool (Item 2) [C].<br />
A<br />
B<br />
C<br />
2<br />
1<br />
CD–15054<br />
CD–15057<br />
1<br />
CD–15058<br />
853, 853H BICS Loa<strong>de</strong>r<br />
–2–41– Service Manual
HYDRAULIC CONTROL VALVE (Cont’d)<br />
Auxiliary Electric Solenoid<br />
Remove the nut (Item 1) [A] from the end of the solenoid.<br />
Assembly: Tighten the nut to 9–12 in.–lbs. (1,02–1,36<br />
Nm) torque.<br />
Remove the solenoid metal housing [B].<br />
Remove the solenoid coil and end plate [C].<br />
Remove the electric solenoid valve (Item 1) [D].<br />
Assembly: Tighten the electric solenoid valve to 96–144<br />
in.–lbs. (10,8–16 Nm) torque. Always install new O–rings<br />
and backup washers.<br />
–2–42–<br />
A<br />
B<br />
C<br />
D<br />
1<br />
1<br />
CD–15059<br />
CD–15060<br />
CD–15061<br />
CD–15062<br />
853, 853H BICS Loa<strong>de</strong>r<br />
Service Manual
HYDRAULIC CONTROL VALVE (Cont’d)<br />
H Port – Auxiliary Section<br />
Loosen the plug (Item 1) [A].<br />
Assembly: Tighten the plug to 35–40 ft.–lbs. (47–54 Nm)<br />
torque.<br />
Remove the plug from the control valve [B].<br />
Replace the O–ring.<br />
Depending on the application of the auxiliaries, the control<br />
valve may be equipped with a port relief valve (H port).<br />
Remove the port relief valve (Item 1) [C].<br />
Assembly: Replace the O–rings and backup washers.<br />
Tighten the port relief valve to 35–40 ft.–lbs. (47–54 Nm)<br />
torque.<br />
Base End Restrictor<br />
Remove the adapter fitting (Item 1) [D] and remove the<br />
restrictor (Item 2) [D].<br />
Inspection<br />
Check the spools for wear or scratches.<br />
Check that the spools are not loose in their bore.<br />
Check that the centering springs are not broken.<br />
Check that the load check valve seats are not worn.<br />
Check the load check poppets for damage.<br />
Check the rubber boots and retainers that they are not<br />
worn or damaged.<br />
Replace the parts as nee<strong>de</strong>d.<br />
A<br />
B<br />
C<br />
D<br />
1<br />
1<br />
2<br />
1<br />
CD–15085<br />
CD–15063<br />
CD–15064<br />
CD–15065<br />
853, 853H BICS Loa<strong>de</strong>r<br />
–2–43– Service Manual
HYDRAULIC CONTROL VALVE (Cont’d)<br />
Spool Seal Installation<br />
To install new spool seals when the centering spring (tilt<br />
spool) or the <strong>de</strong>tent assembly (lift spool) are not removed<br />
from the spool, use the following procedure:<br />
Check the seal surface area (in the control valve) for rust,<br />
corrosion, scratches, etc. Correct any irregularities<br />
before continuing.<br />
Put plastic material on the valve spool [A].<br />
Put clean oil on the spool seal. Install the spool seal (Item<br />
1) [A] on the spool being careful not to damage the seal<br />
on the sharp edges.<br />
Remove the plastic material.<br />
Install the spool into the control valve.<br />
Sli<strong>de</strong> the linkage end spool seal over the rubber boot<br />
groove [B].<br />
Be careful not to damage the spool seal.<br />
Install the backup washer [B].<br />
Continue assembling the control valve.<br />
–2–44–<br />
A<br />
B<br />
1<br />
CD–15080<br />
CD–15081<br />
853, 853H BICS Loa<strong>de</strong>r<br />
Service Manual
HYDRAULIC PUMP<br />
Checking the Output of the Pump<br />
The tools listed will be nee<strong>de</strong>d to do the following<br />
procedure:<br />
MEL10003 – Hydraulic Tester<br />
MEL10006 – Hydraulic Test Kit<br />
NOTE: Make sure all the air is removed from the<br />
hydraulic system before beginning the test.<br />
Air in the system can give an inaccurate test.<br />
*Relief pressure must be per specification<br />
before the test is done.<br />
Lift and block the loa<strong>de</strong>r. (See Page 1–1.)<br />
Raise the operator cab. (See Page 1–1.)<br />
Connect the remote start switch. (See Page 1–1.)<br />
Disconnect the OUTLET hose from the pump [A].<br />
Connect the INLET hose from the tester to the OUTLET<br />
of the pump. Connect the OUTLET hose from the tester<br />
to the hose which was disconnected from the pump [B].<br />
Put jackstands un<strong>de</strong>r the front axles and rear<br />
corners of the frame before running the engine<br />
for service. Failure to use jackstands can allow<br />
the machine to fall or move and cause injury or<br />
<strong>de</strong>ath.<br />
W–2017–0286<br />
Start the engine and run at low idle RPM. Make sure the<br />
tester is connected correctly. If no flow is indicated on the<br />
tester, the hoses are connected wrong. With the hoses<br />
connected correctly, increase the engine speed to full<br />
RPM.<br />
Warm the fluid to 140°F. (60°C.) by turning the restrictor<br />
control on the tester to about 1000 PSI (6895 kPa). DO<br />
NOT exceed system relief pressure. Open the restrictor<br />
control and record the free flow (GPM) at full RPM.<br />
Push the mo<strong>de</strong> switch (on the remote start switch) to<br />
engage the front auxiliary hydraulics, the light will come<br />
ON. Push the button (on the right steering lever) for fluid<br />
pressure to the quick coupler (fluid pressure will go over<br />
main relief). Record the highest pressure (PSI) and flow<br />
(GPM). The high pressure flow must be at least 80% of<br />
free flow.<br />
HIGH PRESSURE FLOW (GPM)<br />
% = X 100<br />
FREE FLOW (GPM)<br />
A low percentage may indicate a pump problem.<br />
A<br />
B<br />
P–04869<br />
P–05032<br />
853, 853H BICS Loa<strong>de</strong>r<br />
–2–45– Service Manual
HYDRAULIC PUMP (Cont’d)<br />
Removal and Installation<br />
When making repairs on hydrostatic and<br />
hydraulic systems, clean the work area before<br />
disassembly and keep all parts clean. Always<br />
use caps and plugs on hoses, tubelines and<br />
ports to keep dirt out. Dirt can quickly damage<br />
the system.<br />
I–2003–0284<br />
Raise the operator cab. (See Page 1–1.)<br />
Drain the hydraulic reservoir. (See Page 1–1.)<br />
Disconnect the hose (Item 1) [A] from the pump outlet.<br />
Install a cap on the fitting.<br />
Disconnect the hose (Item 1) [B] from the pump inlet.<br />
Disconnect the second hose (Item 1) [C] from the pump<br />
inlet.<br />
Remove the pump mounting bolts (Item 1) [D].<br />
Remove the hydraulic pump.<br />
Always clean up spilled fuel or oil. Keep heat,<br />
flames, sparks or lighted tobacco away from<br />
fuel and oil. Failure to use care around<br />
combustibles can cause explosion or fire<br />
which can result in injury or <strong>de</strong>ath. W–2103–1285<br />
–2–46–<br />
A<br />
B<br />
C<br />
D<br />
1<br />
1<br />
1<br />
1<br />
P–04869<br />
P–04865<br />
P–04857<br />
P–04866<br />
853, 853H BICS Loa<strong>de</strong>r<br />
Service Manual
HYDRAULIC PUMP (Cont’d)<br />
Parts I<strong>de</strong>ntification<br />
1<br />
10<br />
9<br />
Ref. Description<br />
2 3<br />
1. BOLT<br />
2. WASHER<br />
3. END HOUSING<br />
4. O–RING SEAL<br />
5. SEAL<br />
6. RING<br />
7. BODY<br />
8. BEARING HOUSING<br />
9. DRIVE GEAR<br />
10. IDLER GEAR<br />
11. BOLT<br />
12. WASHER<br />
13. COVER<br />
14. SEAL<br />
4<br />
8 6<br />
5<br />
5<br />
6<br />
4<br />
11<br />
7<br />
12<br />
13<br />
8<br />
14<br />
TS–01022<br />
853, 853H BICS Loa<strong>de</strong>r<br />
–2–47– Service Manual
HYDRAULIC PUMP (Cont’d)<br />
Disassembly<br />
When making repairs on hydrostatic and<br />
hydraulic systems, clean the work area before<br />
disassembly and keep all parts clean. Always<br />
use caps and plugs on hoses, tubelines and<br />
ports to keep dirt out. Dirt can quickly damage<br />
the system.<br />
I–2003–0284<br />
Mark the pump sections for correct assembly [A].<br />
Remove the pump housing bolts (Item 1) [B].<br />
Remove the end housing (Item 1) [C].<br />
Remove the mounting flange end housing (Item 1) [D].<br />
–2–48–<br />
A<br />
B<br />
C<br />
D<br />
1<br />
1<br />
1<br />
Marks<br />
CD–15160<br />
1<br />
CD–15141<br />
CD–15142<br />
CD–15143<br />
853, 853H BICS Loa<strong>de</strong>r<br />
Service Manual
HYDRAULIC PUMP (Cont’d)<br />
Disassembly (Cont’d)<br />
Remove the gears/bearings assembly [A].<br />
Remove the O–rings (Item 1) [B] from the pump housing.<br />
Remove the bearing housing (Item 1) [C] from the gears.<br />
Remove the backup seals/O–ring seals (Item 2) [C] from<br />
the bearing housing.<br />
Remove the drive gear shaft seals (Item 1) [D].<br />
A<br />
B<br />
C<br />
D<br />
2<br />
1<br />
2<br />
1<br />
CD–15144<br />
CD–15145<br />
1<br />
CD–15146<br />
CD–15150<br />
853, 853H BICS Loa<strong>de</strong>r<br />
–2–49– Service Manual<br />
1
HYDRAULIC PUMP (Cont’d)<br />
853, 853H BICS Service Manual #6724012 – Hydraulic System Section Part 2 of 3<br />
Inspection<br />
Wash all parts in clean solvent.<br />
Use air pressure to dry them.<br />
Make a visual inspection of all the parts.<br />
After visual inspection, those parts which are of<br />
questionable condition must be repaired.<br />
Check the drive and idler gears [A].<br />
If excessive wear is visible on the journals, si<strong>de</strong> or face of<br />
the gears they must be replaced. If the splines are worn,<br />
replace the drive gear.<br />
Check the bushings in the housing [B].<br />
If the bushings are worn, scratched, and etc., replace<br />
them as nee<strong>de</strong>d.<br />
Check the pump housing [C].<br />
Check the surface in the gear area for scratches, wear<br />
and etc.<br />
Replace all parts as nee<strong>de</strong>d.<br />
–2–50–<br />
A<br />
B<br />
C<br />
CD–15148<br />
CD–15147<br />
CD–15149<br />
853, 853H BICS Loa<strong>de</strong>r<br />
Service Manual
HYDRAULIC PUMP (Cont’d)<br />
Assembly<br />
Always use new O–rings and seals when assembling the<br />
hydraulic pump.<br />
When making repairs on hydrostatic and<br />
hydraulic systems, clean the work area before<br />
disassembly and keep all parts clean. Always<br />
use caps and plugs on hoses, tubelines and<br />
ports to keep dirt out. Dirt can quickly damage<br />
the system.<br />
I–2003–0284<br />
Install the two seals (Item 1) [A] into the mounting flange<br />
housing using the correct size driver tool.<br />
Install the insi<strong>de</strong> seal with the lip facing the drive gear and<br />
the outsi<strong>de</strong> seal with the lip facing outward.<br />
Install the bearing housing/gears assembly into the pump<br />
housing [B].<br />
Install the backup seals/O–ring seals (Item 1) [C].<br />
Install the large O–ring (Item 2) [C].<br />
Install the mounting flange housing on the pump housing<br />
[D].<br />
A<br />
B<br />
C<br />
D<br />
2<br />
1<br />
1<br />
CD–15150<br />
CD–15151<br />
CD–15152<br />
CD–15153<br />
853, 853H BICS Loa<strong>de</strong>r<br />
–2–51– Service Manual
HYDRAULIC PUMP (Cont’d)<br />
Assembly (Cont’d)<br />
Install the backup seals/O–ring seals (Item 1) [A].<br />
Install the large O–ring (Item 2) [A].<br />
Install the end housing (Item 1) [B].<br />
Install the four pump housing bolts [B].<br />
Tighten the bolts to 45–50 ft.–lbs. (61–68 Nm) torque [C].<br />
–2–52–<br />
A<br />
B<br />
C<br />
2<br />
1<br />
1<br />
CD–15154<br />
CD–15155<br />
CD–15156<br />
853, 853H BICS Loa<strong>de</strong>r<br />
Service Manual
HYDRAULIC PUMP (Double Gear) 853H<br />
Checking the Output of the Pump<br />
The tools listed will be nee<strong>de</strong>d to do the following<br />
procedure:<br />
MEL10003 – Hydraulic Tester<br />
MEL10006 – Hydraulic Test Kit<br />
NOTE: Make sure all the air is removed from the<br />
hydraulic system before beginning the test.<br />
Air in the system can give an inaccurate test.<br />
*Relief pressure must be per specification<br />
before the test is done.<br />
Lift and block the loa<strong>de</strong>r. (See Page 1–1.)<br />
Raise the operator cab. (See Page 1–1.)<br />
Connect the remote start switch. (See Page 1–1.)<br />
Disconnect the OUTLET hose (Item 1) [A] Large Section;<br />
or (Item 2) [A] Small Section from the pump.<br />
Connect the INLET hose from the tester to the OUTLET<br />
of the pump. Connect the OUTLET hose from the tester<br />
to the hose which was disconnected from the pump [B].<br />
Put jackstands un<strong>de</strong>r the front axles and rear<br />
corners of the frame before running the engine<br />
for service. Failure to use jackstands can allow<br />
the machine to fall or move and cause injury or<br />
<strong>de</strong>ath.<br />
W–2017–0286<br />
Start the engine and run at low idle RPM. Make sure the<br />
tester is connected correctly. If no flow is indicated on the<br />
tester, the hoses are connected wrong. With the hoses<br />
connected correctly, increase the engine speed to full<br />
RPM.<br />
Warm the fluid to 140°F. (60°C.) by turning the restrictor<br />
control on the tester to about 1000 PSI (6895 kPa). DO<br />
NOT exceed system relief pressure. Open the restrictor<br />
control and record the free flow (GPM) at full RPM.<br />
Push the mo<strong>de</strong> switch (on the remote start switch) to<br />
engage the front auxiliary hydraulics, the light will come<br />
ON. Push the button (on the right steering lever) for fluid<br />
pressure to the quick coupler (fluid pressure will go over<br />
main relief). Record the highest pressure (PSI) and flow<br />
(GPM). The high pressure flow must be at least 80% of<br />
free flow.<br />
% =<br />
HIGH PRESSURE FLOW (GPM)<br />
X 100<br />
FREE FLOW (GPM)<br />
A low percentage may indicate a pump problem.<br />
A<br />
B<br />
1<br />
2<br />
P–5199<br />
P–5198<br />
853, 853H BICS Loa<strong>de</strong>r<br />
–2–53– Service Manual
HYDRAULIC PUMP (Double Gear) 853H (Cont’d)<br />
Removal and Installation<br />
When making repairs on hydrostatic and<br />
hydraulic systems, clean the work area before<br />
disassembly and keep all parts clean. Always<br />
use caps and plugs on hoses, tubelines and<br />
ports to keep dirt out. Dirt can quickly damage<br />
the system.<br />
I–2003–0284<br />
Raise the operator cab. (See Page 1–1.)<br />
Drain the hydraulic reservoir. (See Page 1–1.)<br />
Disconnect the high pressure hose (Item 1) [A] from the<br />
large section. Disconnect the high pressure hose (Item 2)<br />
[A] from the small section of the pump.<br />
Install caps over the fittings.<br />
Disconnect the inlet hoses from the large and small<br />
sections of the pump.<br />
Remove the two mounting bolts (Item 1) [B].<br />
Remove the hydraulic pump.<br />
–2–54–<br />
A<br />
B<br />
1<br />
2<br />
P–05199<br />
1<br />
P–05202<br />
853, 853H BICS Loa<strong>de</strong>r<br />
Service Manual
HYDRAULIC PUMP (Double Gear) 853H (Cont’d)<br />
Parts I<strong>de</strong>ntification<br />
1<br />
13<br />
11<br />
10<br />
20<br />
2<br />
14<br />
3<br />
15<br />
9<br />
15<br />
Ref. Description Ref. Description<br />
1. BOLT 14. SEAL<br />
2. WASHER 15. RING<br />
3. COVER 16. BODY<br />
4. O–RING SEAL 17. BEARING<br />
5. SEAL 18. DRIVE GEAR<br />
6. RING 19. IDLER GEAR<br />
7. BODY 20. BEARING<br />
8. DOWEL 21. COVER<br />
9. BEARING 22. SEAL<br />
10. DRIVE GEAR 23. BOLT<br />
11. IDLER GEAR 24. SEAL<br />
12. COVER 25. WASHER<br />
13. O–RING SEAL 26. BOLT<br />
4<br />
6<br />
14<br />
5<br />
5<br />
16<br />
6<br />
13<br />
4<br />
7<br />
21<br />
17<br />
9<br />
25<br />
12<br />
22<br />
24<br />
19<br />
18<br />
8<br />
26<br />
23<br />
TS–01078<br />
853, 853H BICS Loa<strong>de</strong>r<br />
–2–55– Service Manual
HYDRAULIC PUMP (Double Gear) 853H (Cont’d)<br />
Disassembly<br />
When making repairs on hydrostatic and<br />
hydraulic systems, clean the work area before<br />
disassembly and keep all parts clean. Always<br />
use caps and plugs on hoses, tubelines and<br />
ports to keep dirt out. Dirt can quickly damage<br />
the system.<br />
I–2003–0284<br />
Mark the pump sections for correct assembly [A].<br />
Remove the four pump housing bolts (Item 1) [B] from the<br />
small gear pump end housing.<br />
Remove the small gear pump end housing (Item 2) [B].<br />
Remove the small gear pump housing (Item 3) [B] from<br />
the center housing.<br />
Remove the O–ring (Item 1) [C] from the end housing.<br />
Remove the backup seal/O–ring seal (Item 2) [C] from<br />
the pump housing.<br />
Remove the O–ring (Item 1) [D] from the center housing.<br />
Remove the backup seal/O–ring seal (Item 2) [D].<br />
–2–56–<br />
A<br />
B<br />
C<br />
D<br />
Mark<br />
3<br />
1<br />
2<br />
2<br />
Mark<br />
1<br />
CD–15159<br />
CD–15017<br />
1<br />
CD–15018<br />
2<br />
CD–15019<br />
853, 853H BICS Loa<strong>de</strong>r<br />
Service Manual
HYDRAULIC PUMP (Double Gear) 853H (Cont’d)<br />
Disassembly (Cont’d)<br />
Remove the bearing housing/gears assembly from the<br />
housing [A].<br />
Remove the drive and idler gear from the bearing housing<br />
[B].<br />
Remove the two hex head bolts (Item 1) [C] and two allen<br />
head bolts (Item 2) [C] from the mounting flange housing.<br />
Remove the mounting flange housing (Item 3) [C].<br />
Remove the O–ring (Item 1) [D].<br />
Remove the backup seal/O–ring seal (Item 2) [D].<br />
A<br />
B<br />
C<br />
D<br />
2<br />
3<br />
2<br />
CD–15020<br />
CD–15021<br />
1<br />
CD–15022<br />
1<br />
CD–15023<br />
853, 853H BICS Loa<strong>de</strong>r<br />
–2–57– Service Manual
HYDRAULIC PUMP (Double Gear) 853H (Cont’d)<br />
Disassembly (Cont’d)<br />
Remove the center housing (Item 1) [A] from the large<br />
gear pump housing.<br />
Remove the O–ring (Item 1) [B].<br />
Remove the backup seal/O–ring seal (Item 2) [B].<br />
Remove the bearing housing/gears assembly from the<br />
large pump housing [C].<br />
Remove the drive and idler gear from the bearing<br />
housings [D].<br />
–2–58–<br />
A<br />
B<br />
C<br />
D<br />
2<br />
1<br />
CD–15024<br />
1<br />
CD–15025<br />
CD–15026<br />
CD–15027<br />
853, 853H BICS Loa<strong>de</strong>r<br />
Service Manual
HYDRAULIC PUMP (Double Gear) 853H (Cont’d)<br />
Disassembly (Cont’d)<br />
Remove the two seals (Item 1) [A] from the mounting<br />
flange housing.<br />
Check the connecting coupler (Item 1) [D] in the center<br />
housing. If worn or damaged, use a press and correct size<br />
driver tool to remove it from the center housing.<br />
A<br />
B<br />
1<br />
CD–15032<br />
CD–15031<br />
853, 853H BICS Loa<strong>de</strong>r<br />
–2–59– Service Manual<br />
1
HYDRAULIC PUMP (Double Gear) 853H (Cont’d)<br />
Inspection<br />
Wash all parts in clean solvent.<br />
Use air pressure to dry them.<br />
Make a visual inspection of all the parts.<br />
After visual inspection, those parts which are of<br />
questionable condition must be replaced.<br />
Check the bushings in the large and small bearing<br />
housings [A].<br />
If the bushings are worn, scratched, and etc., replace<br />
them as nee<strong>de</strong>d.<br />
Check the drive and idler gears for the large and small<br />
pumps [B].<br />
If excessive wear is visible on the journals, si<strong>de</strong> or face of<br />
the gears they must be replaced. If the splines are worn,<br />
replace the drive gear(s).<br />
Check the large and small pump housing [C].<br />
Check the surfaces in the gear area for scratches, wear<br />
and etc.<br />
Replace all parts as nee<strong>de</strong>d.<br />
–2–60–<br />
A<br />
B<br />
C<br />
CD–15028<br />
CD–15029<br />
CD–15030<br />
853, 853H BICS Loa<strong>de</strong>r<br />
Service Manual
HYDRAULIC PUMP (Double Gear) 853H (Cont’d)<br />
Assembly<br />
Always use new O–rings and seals when assembling the<br />
hydraulic pump.<br />
When making repairs on hydrostatic and<br />
hydraulic systems, clean the work area before<br />
disassembly and keep all parts clean. Always<br />
use caps and plugs on hoses, tubelines and<br />
ports to keep dirt out. Dirt can quickly damage<br />
the system.<br />
I–2003–0284<br />
Install the two seals (Item 1) [A] into the mounting flange<br />
housing using the correct size driver tool.<br />
Install the insi<strong>de</strong> seal with the lip facing the drive gear and<br />
the outsi<strong>de</strong> seal with the lip facing outward.<br />
Install the large drive and idler gears into the bearing<br />
housing (Item 1) [B].<br />
Install the bearing housing/gears assembly into the large<br />
pump housing [C].<br />
Install the backup seal/O–ring seal (Item 1) [C].<br />
Install the large O–ring (Item 2) [C].<br />
Turn the large pump housing around; install the backup<br />
seal/O–ring seal (Item 1) [D].<br />
Install the large O–ring (Item 2) [D].<br />
A<br />
B<br />
C<br />
D<br />
2<br />
1<br />
1<br />
1<br />
2<br />
CD–15032<br />
CD–15026<br />
CD–15033<br />
CD–15034<br />
853, 853H BICS Loa<strong>de</strong>r<br />
–2–61– Service Manual<br />
1
HYDRAULIC PUMP (Double Gear) 853H (Cont’d)<br />
Assembly (Cont’d)<br />
Install the center housing (Item 1) [A] on the large pump<br />
housing.<br />
Install the mounting flange housing (Item 1) [B] on the<br />
large pump housing.<br />
Install the hex head bolts (Item 1) [C] and allen head bolts<br />
(Item 2) [C]. Finger tighten only.<br />
Install the drive and idler gears into the bearing housing<br />
(Item 1) [D].<br />
–2–62–<br />
A<br />
B<br />
C<br />
D<br />
1<br />
1<br />
1<br />
1<br />
2<br />
CD–15035<br />
CD–15036<br />
CD–15037<br />
CD–15020<br />
853, 853H BICS Loa<strong>de</strong>r<br />
Service Manual
HYDRAULIC PUMP (Double Gear) 853H (Cont’d)<br />
Assembly (Cont’d)<br />
Install the bearing housing/gears assembly into the pump<br />
housing [A].<br />
Install the large O–ring (Item 1) [A].<br />
Install the backup seal/O–ring seal (Item 2) [A].<br />
Install pump housing on the center housing [B].<br />
Install the large O–ring (Item 1) [B].<br />
Install the backup seal/O–ring seal (Item 2) [B].<br />
Install the end housing.<br />
Install the four pump housing bolts.<br />
Tighten the small pump housing bolts to 20–25 ft.–lbs.<br />
(27–34 Nm) torque [C].<br />
Tighten the large pump housing bolts (hex head & allen<br />
head) to 33–41 ft.–lbs. (45–56 Nm) torque [D].<br />
A<br />
B<br />
C<br />
D<br />
1<br />
2<br />
2<br />
CD–15019<br />
CD–15017<br />
CD–15084<br />
CD–15038<br />
853, 853H BICS Loa<strong>de</strong>r<br />
–2–63– Service Manual<br />
1
BUCKET POSITION VALVE (Optional)<br />
Removal and Installation<br />
Remove the steering levers/front panel assembly. (See<br />
Page 3–1.)<br />
Remove the lift lock valve. (See Page 8–1.)<br />
Mark all the tubelines for correct assembly.<br />
Disconnect the tubelines (Items 1 & 2) [A] from the tee<br />
fitting at the bucket position valve.<br />
Disconnect the tubeline (Item 1) [B] from the control<br />
valve.<br />
Disconnect the two tubelines (Item 2) [B] at the rear of the<br />
bucket position valve.<br />
Remove the two mounting bolts and nuts (Item 3) [B].<br />
Installation: Tighten the mounting bolts and nuts to<br />
15–16 ft.–lbs. (20–22 Nm) torque.<br />
Remove the bucket position valve [C].<br />
Always clean up spilled fuel or oil. Keep heat,<br />
flames, sparks or lighted tobacco away from<br />
fuel and oil. Failure to use care around<br />
combustibles can cause explosion or fire<br />
which can result in injury or <strong>de</strong>ath. W–2103–1285<br />
–2–64–<br />
A<br />
2<br />
B<br />
C<br />
1<br />
1<br />
3<br />
2<br />
P–04744<br />
P–04746<br />
P–04756<br />
853, 853H BICS Loa<strong>de</strong>r<br />
Service Manual
HYDRAULIC FLUID RESERVOIR<br />
Removal and Installation<br />
Raise the operator cab. (See Page 1–1)<br />
Disconnect the hose (Item 1) [A] at the case drain filter<br />
and drain the fluid into a container.<br />
Loosen the hose clamp and disconnect the reservoir<br />
outlet hose (Item 1) [B].<br />
Disconnect the case drain hose (Item 2) [B] at the<br />
reservoir.<br />
Remove the bolt and plate from the mounting strap (Item<br />
1) [C] & [D].<br />
Installation: Tighten the bolt to 16–20 ft.–lbs. (21–27<br />
Nm) torque.<br />
Remove the mounting strap.<br />
Remove the hydraulic reservoir from the loa<strong>de</strong>r.<br />
A<br />
B<br />
C<br />
D<br />
1<br />
1<br />
1 2<br />
1<br />
CD–15130<br />
P–04856<br />
CD–15132<br />
P–4858<br />
853, 853H BICS Loa<strong>de</strong>r<br />
–2–65– Service Manual
HYDROSTATIC FILTER HOUSING<br />
Removal and Installation<br />
When making repairs on hydrostatic and<br />
hydraulic systems, clean the work area before<br />
disassembly and keep all parts clean. Always<br />
use caps and plugs on hoses, tubelines and<br />
ports to keep dirt out. Dirt can quickly damage<br />
the system.<br />
I–2003–0284<br />
Disconnect the wires (Item 1) [A] from the sen<strong>de</strong>r.<br />
Disconnect the tubelines (Items 2 & 3) [A].<br />
Disconnect the hose (Item 1) [B].<br />
Remove the four mounting bolts (Item 2) [B].<br />
Installation: Tighten the mounting bolts to 25 ft.–lbs. (34<br />
Nm) torque.<br />
Remove the filter/filter housing assembly.<br />
Always clean up spilled fuel or oil. Keep heat,<br />
flames, sparks or lighted tobacco away from<br />
fuel and oil. Failure to use care around<br />
combustibles can cause explosion or fire<br />
which can result in injury or <strong>de</strong>ath. W–2103–1285<br />
–2–66–<br />
A<br />
B<br />
1<br />
2<br />
3<br />
1<br />
2<br />
1<br />
P–04871<br />
P–04853<br />
853, 853H BICS Loa<strong>de</strong>r<br />
Service Manual
HYDRAULIC FILTER HOUSING<br />
Removal and Installation<br />
When making repairs on hydrostatic and<br />
hydraulic systems, clean the work area before<br />
disassembly and keep all parts clean. Always<br />
use caps and plugs on hoses, tubelines and<br />
ports to keep dirt out. Dirt can quickly damage<br />
the system.<br />
I–2003–0284<br />
Remove the hydrostatic filter housing. (See Page 2–66.)<br />
Disconnect the wire (Item 1) [A] from the sen<strong>de</strong>r.<br />
Disconnect the tubeline (Item 2) [A].<br />
Disconnect the hose (Item 1) [B].<br />
Remove the four mounting bolts (Item 2) [B].<br />
Installation: Tighten the mounting bolts to 25 ft.–lbs. (34<br />
Nm) torque.<br />
Remove the hydraulic filter/filter housing assembly.<br />
A<br />
B<br />
1<br />
2<br />
1<br />
2<br />
P–04872<br />
P–04861<br />
853, 853H BICS Loa<strong>de</strong>r<br />
–2–67– Service Manual
CONTROL PEDALS<br />
Removal and Installation<br />
Remove the bolt and nut (Item 1) [A] from the pedal<br />
linkage.<br />
Installation: Tighten the bolt and nut to 21–25 ft.–lbs.<br />
(28–34 Nm) torque.<br />
Check the rubber bushing in the pedal for wear and<br />
replace as nee<strong>de</strong>d.<br />
Remove the two mounting bolts (Item 1) [B].<br />
Remove the pedal assembly from the loa<strong>de</strong>r.<br />
Pedal Adjustment<br />
After installing the pedal, adjust the pedal so that there is<br />
clearance un<strong>de</strong>r the rear of the pedal and the valve spool<br />
must travel full stroke without hitting the floor panel.<br />
AVOID INJURY OR DEATH<br />
Adjust locking tabs on pedal control linkage so<br />
that lift and tilt control pedals are locked in<br />
neutral when the seat bar is up.<br />
W–2104–1285<br />
NOTE: See Page 2–69 for correct procedure to<br />
adjust the pedal interlock linkage.<br />
–2–68–<br />
A<br />
B<br />
1<br />
1<br />
P–04771<br />
P–04770<br />
853, 853H BICS Loa<strong>de</strong>r<br />
Service Manual
PEDAL INTERLOCK LINKAGE<br />
Removal and Installation<br />
Raise the lift arms and install an approved lift arm support<br />
<strong>de</strong>vice. (See Page 1–1.)<br />
Raise the operator cab. (See Page 1–1.)<br />
Remove the interlock shield mounting nuts (Item 1) [A].<br />
Installation: Tighten the shield mounting nuts to 25–28<br />
ft.–lbs. (34–38 Nm) torque.<br />
Remove the interlock shield (Item 2) [A].<br />
Remove the interlock mounting nuts and plastic washers<br />
from behind the nuts [B].<br />
Remove the interlock (Item 1) [B] and plastic washers<br />
from behind the interlock.<br />
Installation: Hold the insi<strong>de</strong> plastic washer up with an<br />
O–ring pick or a small screwdriver so the plastic washer<br />
does not become wedged between the si<strong>de</strong> panel and the<br />
interlock nut [C].<br />
Installation: Tighten the interlock mounting nuts to<br />
84–95 in.–lbs. (9,5–10,8 Nm) torque.<br />
To install new interlock mounting bolts, remove the top<br />
bolt from the front panel and loosen the two bolts at the<br />
bottom of the panel [D].<br />
A<br />
B<br />
C<br />
D<br />
2<br />
1<br />
P–01216<br />
P–01210<br />
P–01219<br />
P–01213<br />
853, 853H BICS Loa<strong>de</strong>r<br />
–2–69– Service Manual<br />
1
PEDAL INTERLOCK LINKAGE (Cont’d)<br />
853, 853H BICS Service Manual #6724012 – Hydraulic System Section Part 3 of 3<br />
Removal and Installation (Cont’d)<br />
Remove the panel from the loa<strong>de</strong>r frame [A].<br />
Install the mounting bolts (Item 1) [B] through the back of<br />
the panel as shown.<br />
Pedal Interlock Linkage Adjustment<br />
Check the pedal interlock linkage so it is free and locks<br />
both pedals.<br />
Check that the tab (Item 1) [C] on the linkage, sli<strong>de</strong>s into<br />
the slot on the interlock and holds the pedal in locked<br />
position.<br />
If not, loosen the bolts and adjust the tab for correct<br />
engagement.<br />
Tighten the bolts to 25–28 ft.–lbs. (34–38 Nm) torque.<br />
AVOID INJURY OR DEATH<br />
Adjust locking tabs on pedal control linkage so<br />
that lift and tilt control pedals are locked in<br />
neutral when the seat bar is up.<br />
W–2104–1285<br />
The locking tab should fit into the slot of the interlock as<br />
shown in figure [D], when adjusted correctly.<br />
–2–70–<br />
A<br />
B<br />
C<br />
D<br />
1<br />
1<br />
P–01215<br />
P–01212<br />
P–01214<br />
P–04051<br />
853, 853H BICS Loa<strong>de</strong>r<br />
Service Manual
Revised June 96<br />
HYDROSTATIC SYSTEM<br />
Page<br />
Number<br />
DRIVE BELT<br />
Adjusting the Drive Belt . . . . . . . . . . . . . . . . . . . . . . . . . . . . . . . . . . . . . . . . 3–63<br />
Replacing the Drive Belt . . . . . . . . . . . . . . . . . . . . . . . . . . . . . . . . . . . . . . . 3–64<br />
DRIVE BELT SHIELD<br />
Removal and Installation . . . . . . . . . . . . . . . . . . . . . . . . . . . . . . . . . . . . . . . 3–62<br />
DRIVE BELT TENSIONER PULLEY<br />
Assembly . . . . . . . . . . . . . . . . . . . . . . . . . . . . . . . . . . . . . . . . . . . . . . . . . . . . 3–68<br />
Checking Pulley End Play . . . . . . . . . . . . . . . . . . . . . . . . . . . . . . . . . . . . . . 3–72<br />
Disassembly . . . . . . . . . . . . . . . . . . . . . . . . . . . . . . . . . . . . . . . . . . . . . . . . . . 3–66<br />
Removal and Installation . . . . . . . . . . . . . . . . . . . . . . . . . . . . . . . . . . . . . . . 3–65<br />
FRONT PANEL<br />
Removal and Installation . . . . . . . . . . . . . . . . . . . . . . . . . . . . . . . . . . . . . . . 3–5<br />
HYDROSTATIC MOTOR<br />
Assembly . . . . . . . . . . . . . . . . . . . . . . . . . . . . . . . . . . . . . . . . . . . . . . . . . . . . 3–23<br />
Disassembly . . . . . . . . . . . . . . . . . . . . . . . . . . . . . . . . . . . . . . . . . . . . . . . . . . 3–17<br />
Inspection . . . . . . . . . . . . . . . . . . . . . . . . . . . . . . . . . . . . . . . . . . . . . . . . . . . . 3–22<br />
Parts I<strong>de</strong>ntification . . . . . . . . . . . . . . . . . . . . . . . . . . . . . . . . . . . . . . . . . . . . 3–16<br />
Removal and Installation . . . . . . . . . . . . . . . . . . . . . . . . . . . . . . . . . . . . . . . 3–15<br />
Timing the Hydrostatic Motor . . . . . . . . . . . . . . . . . . . . . . . . . . . . . . . . . . . 3–26<br />
HYDROSTATIC PUMP<br />
Assembly . . . . . . . . . . . . . . . . . . . . . . . . . . . . . . . . . . . . . . . . . . . . . . . . . . . . 3–48<br />
Charge Pump Assembly . . . . . . . . . . . . . . . . . . . . . . . . . . . . . . . . . . . . . . . 3–57<br />
Charge Pump Disassembly . . . . . . . . . . . . . . . . . . . . . . . . . . . . . . . . . . . . . 3–36<br />
Disassembly . . . . . . . . . . . . . . . . . . . . . . . . . . . . . . . . . . . . . . . . . . . . . . . . . . 3–37<br />
Hydraulic Pump Installation . . . . . . . . . . . . . . . . . . . . . . . . . . . . . . . . . . . . . 3–59<br />
Hydraulic Pump Removal . . . . . . . . . . . . . . . . . . . . . . . . . . . . . . . . . . . . . . 3–35<br />
Hydrostatic Pump Connection . . . . . . . . . . . . . . . . . . . . . . . . . . . . . . . . . .<br />
Hydrostatic Pump Neutral Adjustment . . . . . . . . . . . . . . . . . . . . . . . . . . . .<br />
3–58<br />
3–60<br />
Hydrostatic Pump Separation . . . . . . . . . . . . . . . . . . . . . . . . . . . . . . . . . . . 3–35<br />
Inspection . . . . . . . . . . . . . . . . . . . . . . . . . . . . . . . . . . . . . . . . . . . . . . . . . . . . 3–46<br />
Parts I<strong>de</strong>ntification . . . . . . . . . . . . . . . . . . . . . . . . . . . . . . . . . . . . . . . . . . . . 3–31<br />
Removal and Installation . . . . . . . . . . . . . . . . . . . . . . . . . . . . . . . . . . . . . . . 3–27<br />
Replenishing/High Pressure Relief Valve . . . . . . . . . . . . . . . . . . . . . . . . . 3–29<br />
HYDROSTATIC SYSTEM INFORMATION<br />
Replenishing Valve Function . . . . . . . . . . . . . . . . . . . . . . . . . . . . . . . . . . . . 3–4<br />
OIL COOLER<br />
Removal and Installation . . . . . . . . . . . . . . . . . . . . . . . . . . . . . . . . . . . . . . . 3–73<br />
STEERING LEVERS<br />
Adjusting Lever Freeplay . . . . . . . . . . . . . . . . . . . . . . . . . . . . . . . . . . . . . . . 3–10<br />
Adjusting the Steering Neutral Setting . . . . . . . . . . . . . . . . . . . . . . . . . . . . 3–13<br />
Adjusting the Wheel RPM Forward Compared to Reverse Travel . . . . . 3–11<br />
Adjusting the Wheel RPM Left Compared to Right Si<strong>de</strong> . . . . . . . . . . . . 3–14<br />
Disassembly and Assembly . . . . . . . . . . . . . . . . . . . . . . . . . . . . . . . . . . . . 3–7<br />
Pre–Adjustment Checks . . . . . . . . . . . . . . . . . . . . . . . . . . . . . . . . . . . . . . . 3–9<br />
TROUBLESHOOTING<br />
Chart . . . . . . . . . . . . . . . . . . . . . . . . . . . . . . . . . . . . . . . . . . . . . . . . . . . . . . . . 3–3<br />
HYDROSTATIC<br />
SYSTEM<br />
853, 853H BICS Loa<strong>de</strong>r<br />
–3–1– Service Manual
Revised June 96<br />
–3–2–<br />
853, 853H BICS Loa<strong>de</strong>r<br />
Service Manual
TROUBLESHOOTING<br />
Chart<br />
The following troubleshooting chart is provi<strong>de</strong>d for<br />
assistance in locating and correcting problems which are<br />
most common. Many of the recommen<strong>de</strong>d procedures<br />
must be done by authorized Bobcat Service Personnel<br />
only.<br />
Check for correct function after adjustments,<br />
repairs or service. Failure to make correct<br />
repairs or adjustments can cause injury or<br />
<strong>de</strong>ath.<br />
W–2004–1285<br />
No drive on one si<strong>de</strong>, in one direction. 1, 2<br />
No drive on one si<strong>de</strong> in both directions. 2, 3, 4, 5<br />
The loa<strong>de</strong>r does not move in a straight line. 2, 3, 5, 6, 7<br />
The hydrostatic system is overheating. 8, 9, 10, 11<br />
Service co<strong>de</strong> HP 2 appears (Warnings, low charge pressure) or the<br />
warning light comes ON (853 Standard). 8, 11, 12, 13, 14<br />
Revised June 96<br />
1. The hydrostatic pump replenishing valves not seating.<br />
2. The steering linkage needs adjustment.<br />
3. The hydrostatic pump has damage.<br />
4. The final drive chains are broken.<br />
5. The hydrostatic motor has damage.<br />
6. The tires do not have the correct tire pressure.<br />
7. The tires are not the same size.<br />
8. The hydrostatic fluid is not at the correct level.<br />
9. The oil cooler has a restriction.<br />
10. The temperature sending switch is not operating correctly.<br />
11. The loa<strong>de</strong>r is not being operated at the correct RPM.<br />
12. The sen<strong>de</strong>r is <strong>de</strong>fective.<br />
13. Pump is <strong>de</strong>fective or worn hydrostatics.<br />
14. Hydraulic filter is plugged.<br />
PROBLEM CAUSE<br />
KEY TO CORRECT THE CAUSE<br />
853, 853H BICS Loa<strong>de</strong>r<br />
–3–3– Service Manual
HYDROSTATIC SYSTEM INFORMATION<br />
When making repairs on hydrostatic and<br />
hydraulic systems, clean the work area before<br />
disassembly and keep all parts clean. Always<br />
use caps and plugs on hoses, tubelines and<br />
ports to keep dirt out. Dirt can quickly damage<br />
the system.<br />
I–2003–0284<br />
Replenishing Valve Function<br />
The functions of the replenishing valves are:<br />
1. To give replacement fluid to the low pressure si<strong>de</strong> of<br />
the hydrostatic circuit. Replacement fluid is nee<strong>de</strong>d<br />
because of normal internal leakage and the<br />
controlled flow to the oil cooler for cooling; Function<br />
1 [A].<br />
2. To keep high pressure fluid out of the low pressure<br />
si<strong>de</strong> of the hydrostatic circuitry; Function 2 [A].<br />
Revised June 96<br />
–3–4–<br />
A<br />
FUNCTION 1<br />
FUNCTION 2<br />
CHARGE OIL<br />
Valve Moves for Charge<br />
Oil Replacement<br />
Valve Stays on Seat to<br />
Hold High Pressure for Drive<br />
B–02804<br />
853, 853H BICS Loa<strong>de</strong>r<br />
Service Manual
FRONT PANEL<br />
Removal and Installation<br />
Put jackstands un<strong>de</strong>r the front axles and rear<br />
corners of the frame before running the engine<br />
for service. Failure to use jackstands can allow<br />
the machine to fall or move and cause injury or<br />
<strong>de</strong>ath.<br />
W–2017–0286<br />
Raise the lift arms and install an approved lift arm support<br />
<strong>de</strong>vice. (See Page 1–1.)<br />
Raise the operator cab. (See Page 1–1.)<br />
Remove the mounting bolts (Item 1) [A] from the throttle<br />
lever.<br />
Disconnect the linkage rod (Item 1) [B] from the throttle<br />
lever.<br />
Hold the lock nut and remove the knob (Item 1) [C] from<br />
the lift lock valve.<br />
Disconnect the wire harness connectors (Item 1) [D]from<br />
the steering lever wire harness.<br />
NOTE: The 853 without front auxiliary hydraulics<br />
does not have electric control handle.<br />
Remove the right si<strong>de</strong> steering shock (Item 2) [D].<br />
Revised June 96<br />
A<br />
B<br />
1<br />
C<br />
D<br />
2<br />
1<br />
1<br />
1<br />
P–04731<br />
P–04735<br />
P–04733<br />
P–04737<br />
853, 853H BICS Loa<strong>de</strong>r<br />
–3–5– Service Manual
FRONT PANEL (Cont’d)<br />
Removal and Installation (Cont’d)<br />
Remove the steering cable U–bolt (Item 1) [A].<br />
Disconnect the steering cable ball joint (Item 2) [A].<br />
Remove the steering cable U–bolt (Item 1) [B].<br />
Disconnect the steering cable ball joint (Item 2) [B].<br />
Remove the top mounting bolt (Item 3) [A] & [B].<br />
Remove the two mounting bolts (Item 1) [C] at the si<strong>de</strong><br />
of the front panel (both si<strong>de</strong>s).<br />
Remove the three mounting bolts (Item 2) [C] along the<br />
bottom of the front panel.<br />
Remove the front panel.<br />
Revised June 96<br />
–3–6–<br />
A<br />
B<br />
C<br />
1<br />
3<br />
1<br />
2 1<br />
2<br />
3<br />
2<br />
P–04743<br />
P–04742<br />
P–04741<br />
853, 853H BICS Loa<strong>de</strong>r<br />
Service Manual
STEERING LEVERS<br />
Disassembly and Assembly<br />
Remove the front panel/steering lever assembly. (See<br />
Page 3–5.)<br />
Remove the steering shaft centering mechanism bolt and<br />
nut (Item 1) [A] and spring.<br />
Disconnect the steering shock (Item 1) [B].<br />
Loosen both U–bolts (Item 2) [B] at the steering lever.<br />
Remove the steering lever.<br />
Loosen both U–bolts (Item 1) [C] at the steering lever.<br />
Remove the steering lever.<br />
Assembly: The steering levers must be mounted flush<br />
with the back of the mounting plate (Item 3) [B].<br />
Remove the steering shaft assembly bolts (Item 2) [C]<br />
(both si<strong>de</strong>s).<br />
Remove the steering shaft.<br />
Disassemble the right and left steering shaft from the<br />
cross shaft [D].<br />
Install new nylon bushings (Item 1) [D] as nee<strong>de</strong>d at the<br />
ends of the steering shaft.<br />
Revised June 96<br />
A<br />
B<br />
C<br />
D<br />
1<br />
1<br />
3<br />
1<br />
P–05033<br />
P–05034<br />
2<br />
P–05035<br />
1<br />
P–05039<br />
853, 853H BICS Loa<strong>de</strong>r<br />
–3–7– Service Manual<br />
2<br />
1
STEERING LEVERS (Cont’d)<br />
Disassembly and Assembly (Cont’d)<br />
Check the nylon bushing (Item 1) [A] and replace as<br />
nee<strong>de</strong>d.<br />
Assembly: Make sure the wave washer (Item 2) [A] is<br />
between the nylon bushings.<br />
Check and replace the cams (Item 3) [A] if worn or<br />
damaged.<br />
NOTE: The cams must not rotate on the mounting<br />
bolts.<br />
Remove the bolts (Item 1) [B] to remove the steering<br />
shaft mounting bracket (Item 1) [C] and the steering lever<br />
stop plate (Item 2) [C].<br />
To remove the centering mechanism bracket from the<br />
front panel, remove the two nuts and bolts (Item 1) [D].<br />
Revised June 96<br />
–3–8–<br />
A<br />
B<br />
C<br />
D<br />
3<br />
2<br />
1<br />
1<br />
2<br />
1<br />
1<br />
1<br />
P–05040<br />
P–05037<br />
P–05036<br />
P–05038<br />
853, 853H BICS Loa<strong>de</strong>r<br />
Service Manual
STEERING LEVERS (Cont’d)<br />
Pre–Adjustment Checks<br />
Read this adjustment completely to become familiar with<br />
the procedure before beginning the adjustment.<br />
The loa<strong>de</strong>r should not creep (slow wheel movement)<br />
when the steering levers are at rest in the neutral position.<br />
The following special tool will be nee<strong>de</strong>d to do the<br />
following procedure:<br />
MEL1429A – Remote Start Switch<br />
Lift and block the loa<strong>de</strong>r. (See Page 1–1.)<br />
Raise the operator cab. (See Page 1–1.)<br />
Connect the remote start switch. (See Page 1–1.)<br />
When working on the left si<strong>de</strong> of the hydrostatic<br />
pump, BE CAREFUL to keep your fingers and<br />
tools clear of the cooling fan belt.<br />
W–2184–0395<br />
Check the following items (Steps 1, 2 & 3) before making<br />
any adjustments on the steering linkage:<br />
1. Always check tire pressure and tire size before<br />
making any adjustments. Inflate tires to maximum<br />
pressure shown on the si<strong>de</strong>wall of the tire. Be sure<br />
the tires do not vary more than 1 inch (25,4 mm) in<br />
circumference [A] which could cause different rate<br />
of travel and the loa<strong>de</strong>r drifting to one si<strong>de</strong> with both<br />
steering levers at equal travel.<br />
2. To be sure the hydrostatic pump is in neutral, block<br />
the neutral spring bracket out with a <strong>de</strong>ep socket<br />
(approximately 7/16 inch) so you can no longer feel<br />
the linkage neutral setting [B] & [C].<br />
3. Start the engine. Move the levers while observing<br />
the neutral position on the pump servo spool valve.<br />
You can feel and see the spring (Item 1) [D] of the<br />
pump neutral adjustment. If the wheels do not move<br />
when the pump is in the neutral position, then the<br />
pump is correctly adjusted. Only linkage adjustment<br />
will be necessary for neutral position. If the wheels<br />
move when the pump levers are in neutral position,<br />
see Page 3–59 for the pump neutral adjustment.<br />
4. Stop the engine. Remove the socket [B].<br />
Revised June 96<br />
A<br />
B<br />
C<br />
D<br />
Detent<br />
Bracket<br />
1<br />
Socket<br />
P–02865<br />
P–02866<br />
MC–01944<br />
P–07927<br />
853, 853H BICS Loa<strong>de</strong>r<br />
–3–9– Service Manual
STEERING LEVERS (Cont’d)<br />
Adjusting Lever Freeplay<br />
Read this adjustment completely to become familiar with<br />
the procedure before beginning the adjustment.<br />
Use the following procedure to adjust the steering linkage<br />
so both steering levers have no free play against the<br />
cam. To remove the free play, move the right cam to<br />
match the left cam so there is no free play between the<br />
two cams in the pocket of the <strong>de</strong>tent bracket [C]. Use the<br />
following procedure to adjust the the cam free play.<br />
1. Only the right si<strong>de</strong> cam is adjustable in slotted hole<br />
in bellcrank (Item 1) [B]. The left si<strong>de</strong> cam is fixed<br />
and will not require adjustment. The cam should not<br />
rotate on the mounting bolt. If cam rotates, tighten<br />
the jam nut (Item 1) [A] against the cam while<br />
holding cam mounting bolt (Item 3) [A].<br />
2. Loose the cam mounting bolt nut (Item 2) [A] and<br />
move the cam to the rear to get free play in the left<br />
hand lever.<br />
3. Tighten the cam bolt. Use a punch and hammer, hit<br />
the cam nut (cam mounting bolt is still tight) until the<br />
free play is removed from the left hand lever [B].<br />
The cam must be centered in the <strong>de</strong>tent bracket<br />
pocket [C].<br />
4. Recheck the torque at the cam bolt to be sure it is<br />
still tight. Check again to be sure there is no free play<br />
in the cams. If there is any free play the neutral<br />
setting can not be obtained.<br />
Revised June 96<br />
–3–10–<br />
A<br />
B<br />
C<br />
Detent<br />
Bracket<br />
Pocket<br />
2<br />
1<br />
Cam<br />
1<br />
3<br />
P–02867<br />
P–02868<br />
MC–01944<br />
853, 853H BICS Loa<strong>de</strong>r<br />
Service Manual
STEERING LEVERS (Cont’d)<br />
Adjusting the Wheel RPM Forward Compared to<br />
Reverse Travel<br />
Read this adjustment completely to become familiar with<br />
the procedure before beginning the adjustment.<br />
NOTE: This procedure adjusts the position of the<br />
steering levers in the panel when in neutral.<br />
Levers centered in steering panel give equal<br />
travel forward compared to reverse.<br />
1. Disconnect the two bolts of the pintle links (both<br />
si<strong>de</strong>s) (Item 1) [A].<br />
2. Fully lower steering lever stop and tighten (both<br />
si<strong>de</strong>s) (Item 1) [B].<br />
NOTE: Before measuring, move the steering lever a<br />
small amount to be sure the cam is in the<br />
<strong>de</strong>tent pocket with no freeplay.<br />
3. Move the lever to full forward, measure the distance<br />
from the U–bolt to the lock nut. Record this<br />
measurement [C].<br />
EXAMPLE ONLY: 3.66 inch (82 mm)<br />
4. Move the lever to full reverse, measure the distance<br />
from the U–bolt to the lock nut. Make a record of this<br />
measurement [D].<br />
EXAMPLE ONLY: 2.76 inch (70 mm)<br />
Revised June 96<br />
A<br />
B<br />
C<br />
D<br />
3.66 inch<br />
(93 mm)<br />
2.76 inch<br />
(70 mm)<br />
1<br />
FORWARD<br />
REVERSE<br />
P–07927<br />
P–02875<br />
MC–01944<br />
MC–01943<br />
853, 853H BICS Loa<strong>de</strong>r<br />
–3–11– Service Manual<br />
1
STEERING LEVERS (Cont’d)<br />
Adjusting the Wheel RPM Forward Compared to<br />
Reverse Travel (Cont’d)<br />
5. Move the lever to the neutral position. Measure the<br />
distance from the U–bolt to the lock nut [A]. Neutral<br />
must be adjusted to 3.21 inch (82 mm) per example.<br />
EXAMPLE:<br />
Forward 3.66 inch (93 mm)<br />
Reverse – 2.76 inch (70 mm)<br />
0.90 inch (23 mm) Total Travel*<br />
Divi<strong>de</strong>d by Two = 0.45 inch (11 mm) Half the Travel<br />
+ 2.76 inch (70 mm) Reverse Travel<br />
3.21 inch (82 mm) Is Neutral<br />
If adjustment is required, loosen the mounting bolts (Item<br />
1) [B].<br />
Moving the neutral spring bracket up will allow more<br />
forward stroke and more forward wheel RPM. Moving it<br />
down will allow more rearward stroke and more reverse<br />
wheel RPM.<br />
Use a screwdriver to move the neutral spring bracket<br />
(Item 1) [C] down or a large pliers to move it up in its<br />
slotted holes.<br />
NOTE: Keep the bracket vertical to be sure that the<br />
cams make full contact in the pocket of the<br />
<strong>de</strong>tent bracket.<br />
Tighten the mounting bolts on the spring bracket (Item 1)<br />
[B].<br />
Neutral to forward cable travel must be within 0.010 inch<br />
(0,25 mm) left compared to right si<strong>de</strong>.<br />
Install pintle link bolts (Item 1) [D] (both si<strong>de</strong>s).<br />
Revised June 96<br />
–3–12–<br />
A<br />
B<br />
C<br />
1<br />
D<br />
3.21 inch<br />
(82 mm)<br />
N–00301<br />
1<br />
1<br />
NEUTRAL<br />
1<br />
MC–01943<br />
CD–11204<br />
P–02875<br />
N–00302<br />
P–07927<br />
853, 853H BICS Loa<strong>de</strong>r<br />
Service Manual
STEERING LEVERS (Cont’d)<br />
Adjusting the Steering Neutral Setting<br />
Read this adjustment completely to become familiar with<br />
the procedure before beginning the adjustment.<br />
NOTE: This procedure adjusts the creep (wheel<br />
movement in neutral) and <strong>de</strong>ad–band (lever<br />
travel before wheels start to turn). Adjusting<br />
steering cable length will match lever neutral<br />
and pump neutral.<br />
NOTE: The following adjustments (Steps a, b, c & d)<br />
are not necessary if the thread engagement<br />
in the ball joint is equal on both ends of the<br />
cable (Item 1) [A] & [B].<br />
a. Disconnect the cable ball joint from the steering<br />
lever shaft (Item 2) [A].<br />
b. Loosen the jam nut and turn the ball joint all the<br />
way to the end of the threads (toward cable<br />
housing).<br />
c. At the pumps, loosen the jam nut and turn the<br />
inner cable until the ball joint is all the way to the<br />
end of the threads (toward the cable housing).<br />
d. Connect the steering cable ball joint.<br />
1. Start the engine. WHEN THE ENGINE IS<br />
RUNNING, THE WHEELS WILL BE TURNING.<br />
Put jackstands un<strong>de</strong>r the front axles and rear<br />
corners of the frame before running the engine<br />
for service. Failure to use jackstands can allow<br />
the machine to fall or move and cause injury or<br />
<strong>de</strong>ath.<br />
W–2017–0286<br />
2. The steering cable ends have right and left hand<br />
threads. By turning the inner cable, it will shorten or<br />
lengthen the cable. Turn the inner cable until the<br />
wheels stop turning [C].<br />
NOTE: Before measuring, move the steering lever a<br />
small amount to be sure the cam is in the<br />
<strong>de</strong>tent pocket with no freeplay.<br />
3. Use a straight edge for a measuring reference point<br />
positioned against the pedal lock links (Item 1) [D].<br />
Put a ruler between reference and steering lever to<br />
measure lever travel from neutral until wheel starts<br />
to travel forward. Then measure from neutral until<br />
wheel starts to travel reverse [D].<br />
4. Adjust cable length by turning the inner cable until<br />
the two measurements are equal [C]. Tighten the<br />
jam nut (both ends).<br />
5. Repeat the procedure for the other si<strong>de</strong> of the<br />
loa<strong>de</strong>r.<br />
Revised June 96<br />
A<br />
B<br />
C<br />
D<br />
1 2<br />
1<br />
P–07721<br />
P–07723<br />
P–02869<br />
P–07724<br />
853, 853H BICS Loa<strong>de</strong>r<br />
–3–13– Service Manual<br />
1
STEERING LEVERS (Cont’d)<br />
Adjusting the Wheel RPM Left Compared to Right<br />
Si<strong>de</strong><br />
NOTE: This procedure is for MINOR adjustment in<br />
full forward travel only. Steering neutral<br />
setting must be correctly adjusted before<br />
this procedure.<br />
1. Loosen the bolts at the stop (Item 1) [A] and lower<br />
the lever stops (both si<strong>de</strong>s).<br />
2. Start the engine.<br />
Put jackstands un<strong>de</strong>r the front axles and rear<br />
corners of the frame before running the engine<br />
for service. Failure to use jackstands can allow<br />
the machine to fall or move and cause injury or<br />
<strong>de</strong>ath.<br />
W–2017–0286<br />
3. Check wheel RPM left and right si<strong>de</strong> [B]. They<br />
should be the same. If not, the stop (Item 1) [A] can<br />
be used for MINOR adjustment. Bring the stop up<br />
on the faster si<strong>de</strong> until RPM is equal. (Tighten stop<br />
before re–checking) tighten remaining si<strong>de</strong> in down<br />
position.<br />
Revised June 96<br />
–3–14–<br />
A<br />
B<br />
1<br />
P–02875<br />
P–07959<br />
853, 853H BICS Loa<strong>de</strong>r<br />
Service Manual
HYDROSTATIC MOTOR<br />
Removal and Installation<br />
When making repairs on hydrostatic and<br />
hydraulic systems, clean the work area before<br />
disassembly and keep all parts clean. Always<br />
use caps and plugs on hoses, tubelines and<br />
ports to keep dirt out. Dirt can quickly damage<br />
the system.<br />
I–2003–0284<br />
Lift and block the loa<strong>de</strong>r. (See Page 1–1.)<br />
Raise the lift arms and install an approved lift arm support<br />
<strong>de</strong>vice. (See Page 1–1.)<br />
Raise the operator cab. (See Page 1–1.)<br />
Remove the front tire/wheel assembly.<br />
Remove the four mounting bolts for the motor cover (Item<br />
1) [A].<br />
Remove the motor cover.<br />
Mark the hoses for correct installation.<br />
Disconnect the case drain hose (Item 1) [B].<br />
Disconnect the high pressure hoses (Item 2) [B].<br />
Remove the four mounting bolts (Item 1) [C] from the<br />
motor.<br />
Installation: Tighten the bolts to 65–70 ft.–lbs. (88–95<br />
Nm) torque.<br />
Remove the hydrostatic motor from the gearcase.<br />
Installation: Replace the large O–ring (Item 1) [D] and<br />
face seals on the motor fittings before installing the motor.<br />
Always clean up spilled fuel or oil. Keep heat,<br />
flames, sparks or lighted tobacco away from<br />
fuel and oil. Failure to use care around<br />
combustibles can cause explosion or fire<br />
which can result in injury or <strong>de</strong>ath. W–2103–1285<br />
Revised June 96<br />
A<br />
B<br />
C<br />
D<br />
2<br />
1<br />
1<br />
1<br />
1<br />
P–04804<br />
P–04801<br />
1<br />
P–04802<br />
P–04799<br />
853, 853H BICS Loa<strong>de</strong>r<br />
–3–15– Service Manual
HYDROSTATIC MOTOR (Cont’d)<br />
Parts I<strong>de</strong>ntification<br />
26<br />
Revised June 96<br />
18<br />
7<br />
8<br />
1<br />
9<br />
Ref. Description Ref. Description<br />
12<br />
1 FLANGE, mounting 15 HOUSING, valve<br />
2 O–RING 16 BOLT<br />
3 DRIVE 17 BOLT<br />
4 O–RING 18 SEAL<br />
5 GEROLER 19 PLUG<br />
6 PLATE, valve 20 O–RING<br />
7 DRIVE, valve 21 SPRING<br />
8 VALVE 22 POPPET<br />
9 PLATE, balance assy. 23 PISTON<br />
10 SEAL, outer 24 PLUG<br />
11 SEAL, inner 25 PLUG<br />
12 SPRING 26 BEARING, bronze<br />
13 O–RING 27 SHUTTLE<br />
14 O–RING<br />
11<br />
2<br />
20<br />
19<br />
10<br />
27<br />
21<br />
13<br />
3<br />
4<br />
–3–16–<br />
23<br />
25<br />
22<br />
14<br />
27<br />
24<br />
22<br />
21<br />
5<br />
15<br />
4<br />
2<br />
17<br />
16<br />
6<br />
D–02124<br />
853, 853H BICS Loa<strong>de</strong>r<br />
Service Manual
HYDROSTATIC MOTOR (Cont’d)<br />
Disassembly<br />
When making repairs on hydrostatic and<br />
hydraulic systems, clean the work area before<br />
disassembly and keep all parts clean. Always<br />
use caps and plugs on hoses, tubelines and<br />
ports to keep dirt out. Dirt can quickly damage<br />
the system.<br />
I–2003–0284<br />
Put a mark across the sections for correct assembly.<br />
Remove the four bolts from the motor [A].<br />
Lift the valve housing straight up [B]. If done carefully, the<br />
springs and balance plate will stay on the valve.<br />
Remove the O–rings.<br />
Remove the plug at the shuttle valve [C].<br />
Remove the spring and shuttle [D].<br />
Revised June 96<br />
A<br />
B<br />
C<br />
D<br />
B–08695<br />
B–08692<br />
B–08748<br />
B–08742<br />
853, 853H BICS Loa<strong>de</strong>r<br />
–3–17– Service Manual
HYDROSTATIC MOTOR (Cont’d)<br />
Disassembly (Cont’d)<br />
Remove the shuttle valve spool [A].<br />
Use a punch, through the housing and remove the<br />
poppet, spring, O–ring and plug from the other si<strong>de</strong> [B].<br />
Remove the balance plate [C].<br />
Revised June 96<br />
–3–18–<br />
A<br />
B<br />
C<br />
B–08741<br />
B–08696<br />
B–08731<br />
853, 853H BICS Loa<strong>de</strong>r<br />
Service Manual
HYDROSTATIC MOTOR (Cont’d)<br />
Disassembly (Cont’d)<br />
Remove the inner seal from the balance plate [A].<br />
Remove the outer seal from the balance plate [B].<br />
Remove the valve [C].<br />
Remove the valve plate [D].<br />
Revised June 96<br />
A<br />
Outer<br />
Seal<br />
B<br />
Pin<br />
Outer<br />
Seal<br />
C<br />
D<br />
Pin<br />
Balance<br />
Plate<br />
Inner Seal Pin<br />
Balance<br />
Plate<br />
Inner Seal Pin<br />
Outer<br />
Seal<br />
B–08733<br />
B–03046<br />
Outer<br />
Seal<br />
B–08732<br />
B–03046<br />
B–08738<br />
B–09737<br />
853, 853H BICS Loa<strong>de</strong>r<br />
–3–19– Service Manual
HYDROSTATIC MOTOR (Cont’d)<br />
Disassembly (Cont’d)<br />
Remove the valve drive [A].<br />
Remove the geroler [B].<br />
Make sure to keep the rollers in the geroler.<br />
Remove the drive shaft [C].<br />
Remove the O–rings from the housing [D].<br />
Revised June 96<br />
–3–20–<br />
A<br />
B<br />
C<br />
D<br />
B–08729<br />
B–08739<br />
B–08736<br />
B–08730<br />
853, 853H BICS Loa<strong>de</strong>r<br />
Service Manual
HYDROSTATIC MOTOR (Cont’d)<br />
Disassembly (Cont’d)<br />
Remove the O–rings insi<strong>de</strong> the bore of the mounting<br />
flange [A].<br />
The bushing is a gui<strong>de</strong> to center the motor on the<br />
gearcase. If the bushing needs replacing, use the<br />
following procedure:<br />
1. Drill several holes in the bushing [B].<br />
2. Use a chisel and hammer, remove the bushing from<br />
the mounting flange [C].<br />
3. Use a hydraulic press to install the new bushing.<br />
Revised June 96<br />
A<br />
B<br />
C<br />
B–04636<br />
B–09469<br />
B–09470<br />
853, 853H BICS Loa<strong>de</strong>r<br />
–3–21– Service Manual
HYDROSTATIC MOTOR (Cont’d)<br />
Inspection<br />
Clean all the parts in solvent and use air pressure to dry<br />
them. DO NOT use cloth or paper because small pieces<br />
of material can get into the system and cause damage.<br />
Before the motor is assembled, check the following items:<br />
Check the geroler rollers and rotor for wear and scratches<br />
[A].<br />
NOTE: Put all the rollers back in their original<br />
position.<br />
Check the valve plate for scratches [B].<br />
Check the balance plate for scratches [C].<br />
Check the valve drive and the main drive for wear.<br />
Check the end plate surface for scratches [D].<br />
Revised June 96<br />
–3–22–<br />
A<br />
B<br />
C<br />
D<br />
B–06392<br />
B–06394<br />
B–06390<br />
B–06391<br />
B–06389<br />
B–06388<br />
853, 853H BICS Loa<strong>de</strong>r<br />
Service Manual
HYDROSTATIC MOTOR (Cont’d)<br />
Assembly<br />
When making repairs on hydrostatic and<br />
hydraulic systems, clean the work area before<br />
disassembly and keep all parts clean. Always<br />
use caps and plugs on hoses, tubelines and<br />
ports to keep dirt out. Dirt can quickly damage<br />
the system.<br />
I–2003–0284<br />
NOTE: Always use new O–rings, gaskets and seals<br />
when assembling the hydrostatic motor.<br />
If the bushing was removed use a hydraulic press and<br />
bushing driver tool to install the new bushing.<br />
Install new O–rings in the bore of the mounting flange [A].<br />
Install new O–rings on the housing [B].<br />
Install the drive shaft [C].<br />
Make sure to keep the rollers in the geroler and install the<br />
geroler [D].<br />
NOTE: See Page 3–26 for timing of the motor when<br />
installing the valve, valve drive and geroler.<br />
Revised June 96<br />
A<br />
B<br />
C<br />
D<br />
B–04636<br />
B–08730<br />
B–08736<br />
B–08739<br />
853, 853H BICS Loa<strong>de</strong>r<br />
–3–23– Service Manual
HYDROSTATIC MOTOR (Cont’d)<br />
Assembly (Cont’d)<br />
Install the valve drive [A].<br />
NOTE: See Page 3–26 for timing of the motor when<br />
installing the valve, valve drive and geroler.<br />
Install the valve plate [B].<br />
Install the valve [C].<br />
Put grease on the seals. Install the outer seal on the<br />
balance plate as shown in Figure [D].<br />
Revised June 96<br />
–3–24–<br />
A<br />
B<br />
C<br />
D<br />
Outer<br />
Seal<br />
Pin<br />
Balance<br />
Plate<br />
Inner Seal<br />
Outer<br />
Seal<br />
Pin<br />
B–08729<br />
B–08737<br />
B–08738<br />
B–08732<br />
B–03046<br />
853, 853H BICS Loa<strong>de</strong>r<br />
Service Manual
HYDROSTATIC MOTOR (Cont’d)<br />
853, 853H BICS Service Manual #6724012 –Hydrostatic System Section Part 1 of 3<br />
Assembly (Cont’d)<br />
Put grease on the seals. Install the inner seal on the<br />
balance plate as shown in Figure [A].<br />
Install the poppet, shuttle valve, spring and plug into the<br />
end housing [B].<br />
Install the balance plate in the end housing, put your<br />
finger through the hole and hold the balance plate in<br />
position until the housing is in position [C].<br />
Install the four bolts in the motor.<br />
Tighten the bolts to 63 ft.–lbs. (85 Nm) torque as the<br />
sequence shows in Figure [D].<br />
Revised June 96<br />
A<br />
B<br />
C<br />
D<br />
Outer<br />
Seal<br />
Pin<br />
Balance<br />
Plate<br />
Inner Seal<br />
4<br />
Outer<br />
Seal<br />
Pin<br />
2 3<br />
B–08733<br />
B–03046<br />
D–02124<br />
B–08690<br />
1<br />
A–02658<br />
B–08695<br />
853, 853H BICS Loa<strong>de</strong>r<br />
–3–25– Service Manual
HYDROSTATIC MOTOR (Cont’d)<br />
Timing the Hydrostatic Motor<br />
The timing of the motor controls the direction of rotation<br />
of the drive shaft of the motor. The timing parts are as<br />
follows:<br />
1. Geroler (Item 1) [A].<br />
2. Valve Drive (Item 2) [A].<br />
3. Valve Plate (Item 3) [A].<br />
4. Valve (Item 4) [A].<br />
Find the largest opening between the geroler star and the<br />
geroler ring and mark the outsi<strong>de</strong> of the geroler ring at that<br />
point [A].<br />
Align the two drain holes and the three pressure holes in<br />
the geroler ring with the same holes in the mounting<br />
flange and install the geroler assembly.<br />
Install new O–rings.<br />
Install the valve drive [A].<br />
Align the drain hole in the valve plate with the drain hole<br />
in the geroler. Install the valve plate with the O–ring<br />
toward the geroler. Make sure the slot opening of the<br />
valve plate is in alignment with the largest opening of the<br />
geroler.<br />
Install the valve plate.<br />
Install the valve on the valve plate. Make alignment with<br />
one of the si<strong>de</strong> openings with the mark on the geroler.<br />
Turn the valve clockwise a small amount until the teeth<br />
on the valve drive engage.<br />
Continue with the rest of the assembly procedure.<br />
Revised June 96<br />
–3–26–<br />
A<br />
Largest Opening<br />
Pressure<br />
Relief Hole (3)<br />
Geroler<br />
Ring<br />
1<br />
Rotate Valve Clockwise<br />
1/2 Tooth to Engage Spline<br />
Anyone of 6 Ports<br />
Open to Outsi<strong>de</strong> of Valve<br />
Valve<br />
2<br />
Geroler<br />
Star<br />
Valve Plate<br />
3<br />
Valve Drive<br />
4<br />
Case Drain<br />
Hole (2)<br />
C–02384<br />
853, 853H BICS Loa<strong>de</strong>r<br />
Service Manual
HYDROSTATIC PUMP<br />
Removal and Installation<br />
Remove the hydrostatic pump/engine assembly from the<br />
loa<strong>de</strong>. (See Page 7–1.)<br />
Remove the belt shield clips (Item 1) [A] and belt shield<br />
(Item 2) [A].<br />
Loosen the tensioner pulley nut (Item 1) [B].<br />
Remove the drive belt (Item 2) [B].<br />
Installation: Tighten the drive belt to the correct<br />
specifications. (See Page 3–61.)<br />
Remove the washer and nut (Item 1) [C] from the<br />
hydrostatic pump drive shaft.<br />
Installation: Tighten the nut to 175–200 ft.–lbs.<br />
(237–271 Nm) torque.<br />
Install the nut on the end of the pump drive shaft (without<br />
washer).<br />
Use a puller (Item 1) [D] to remove the pulley from the<br />
pump drive shaft.<br />
Revised June 96<br />
A<br />
2<br />
B<br />
C<br />
D<br />
1<br />
1 1<br />
2 1<br />
1<br />
P–04924<br />
P–04926<br />
1<br />
P–04931<br />
P–04932<br />
853, 853H BICS Loa<strong>de</strong>r<br />
–3–27– Service Manual
HYDROSTATIC PUMP (Cont’d)<br />
Removal and Installation (Cont’d)<br />
Remove the two mounting bolts (Item 1) [A] and nuts<br />
(Item 1) [B].<br />
Installation: Tighten the mounting bolts and nuts to<br />
65–70 ft.–lbs. (88–95 Nm) torque. Make sure the key<br />
(Item 2) [A] is installed.<br />
Remove the mounting bolt (Item 1) [C] at the hydraulic<br />
pump end of the pump.<br />
Remove the hydrostatic pump from the mounting bracket<br />
and drive belt housing.<br />
Revised June 96<br />
–3–28–<br />
A<br />
B<br />
C<br />
1<br />
1<br />
2<br />
1<br />
1<br />
P–04933<br />
P–04935<br />
P–04946<br />
853, 853H BICS Loa<strong>de</strong>r<br />
Service Manual
HYDROSTATIC PUMP (Cont’d)<br />
Replenishing/High Pressure Relief Valve<br />
There are four replenishing/high pressure relief valves<br />
(Item 1) [A] in the hydrostatic pump. Two are located at<br />
the front of the pump and two at the rear of the pump.<br />
See Page 3–4 for valve function.<br />
Remove the plug spring and high pressure relief valve<br />
from the pump [B].<br />
Check for damage and replace as nee<strong>de</strong>d.<br />
Ref. Description<br />
1.<br />
2.<br />
PLUG<br />
O–RING<br />
3.<br />
4.<br />
SPRING<br />
HIGH PRESSURE RELIEF<br />
Revised June 96<br />
A<br />
B<br />
4<br />
1<br />
P–04936<br />
P–04938<br />
853, 853H BICS Loa<strong>de</strong>r<br />
–3–29– Service Manual<br />
3<br />
2<br />
1
HYDROSTATIC PUMP (Cont’d)<br />
Parts I<strong>de</strong>ntification<br />
59<br />
60<br />
61 62<br />
Revised June 96<br />
58<br />
1<br />
57<br />
2<br />
49<br />
TOP OF PUMP<br />
3<br />
48<br />
19<br />
56<br />
4<br />
47<br />
12<br />
11<br />
10<br />
9<br />
6<br />
5<br />
8<br />
51<br />
14<br />
15<br />
16<br />
17<br />
7<br />
46<br />
55 5453<br />
50 52<br />
51<br />
63<br />
13<br />
70<br />
20<br />
19<br />
18<br />
21<br />
22<br />
12<br />
30<br />
45<br />
65<br />
9<br />
10<br />
11<br />
69<br />
44<br />
64<br />
66<br />
67<br />
23<br />
24<br />
–3–30–<br />
25<br />
26<br />
27<br />
28 29<br />
34<br />
43<br />
68<br />
32<br />
31<br />
71<br />
30<br />
41<br />
42<br />
67<br />
68<br />
40<br />
74<br />
75<br />
31<br />
32<br />
33<br />
34<br />
36<br />
37<br />
36<br />
35<br />
35<br />
39<br />
72<br />
73 72<br />
74<br />
38<br />
76<br />
77<br />
76<br />
78<br />
E–02012<br />
853, 853H BICS Loa<strong>de</strong>r<br />
Service Manual
HYDROSTATIC PUMP (Cont’d)<br />
Parts I<strong>de</strong>ntification (Cont’d)<br />
Revised June 96<br />
Ref. Description Ref. Description<br />
1 O–RING 40 BEARING<br />
2 O–RING 41 GASKET<br />
3 O–RING 42 PIN<br />
4 COVER 43 SERVO COVER<br />
5 ROTOR ASSY. 44 NUT<br />
6 PIN 45 COVER<br />
7 COUPLER 46 HOUSING<br />
8 PIN 47 O–RING PLATE<br />
9 RELIEF VALVE 48 ADAPTER<br />
10 SPRING 49 BOLT<br />
11 O–RING 50 ORIFICE<br />
12 PLUG 51 PLUG<br />
13 PLUG 52 SLEEVE<br />
14 O–RING 53 O–RING<br />
15 SHIM 54 O–RING<br />
16 SPRING 55 SPOOL<br />
17 CHARGE RELIEF VALVE 56 O–RING<br />
18 O–RING 57 SPRING<br />
19 RING 58 BRACKET<br />
20 BYPASS VALVE 59 BOLT<br />
21 BOLT 60 NUT<br />
22 GUIDE 61 WASHER<br />
23 SPRING 62 HANDLE<br />
24 STOP 63 SHAFT<br />
25 GUIDE 64 KEY<br />
26 SNAP RING 65 PIN<br />
27 NUT 66 SWASH PLATE<br />
28 LOCKING NUT 67 PIN<br />
29 BOLT 68 JOURNAL BEARING<br />
30 PLUG 69 PIN<br />
31 BOLT 70 SLEEVE<br />
32 WASHER 71 FRONT COVER<br />
33 SERVO COVER 72 BOLT<br />
34 GASKET 73 PIN<br />
35 SEAL 74 SNAP RING<br />
36 RING 75 BEARING<br />
37 SERVO PISTON 76 SNAP RING<br />
38 ROTATING GROUP ASSY. 77 SEAL<br />
39 VALVE PLATE 78 NUT<br />
853, 853H BICS Loa<strong>de</strong>r<br />
–3–31– Service Manual
HYDROSTATIC PUMP (Cont’d)<br />
Parts I<strong>de</strong>ntification (Cont’d)<br />
1<br />
3<br />
2<br />
4<br />
61<br />
TOP OF PUMP<br />
Revised June 96<br />
5 6<br />
60<br />
62 63<br />
7<br />
59<br />
8<br />
58<br />
51<br />
9<br />
12<br />
44 57<br />
11<br />
10<br />
56<br />
13<br />
14<br />
55 54<br />
11<br />
51<br />
53<br />
15<br />
52<br />
–3–32–<br />
16<br />
18<br />
17<br />
50<br />
19<br />
49<br />
20<br />
21<br />
24<br />
48<br />
21<br />
31<br />
32<br />
33<br />
34<br />
47<br />
46<br />
35<br />
22<br />
22<br />
23<br />
26<br />
24<br />
27<br />
28<br />
26<br />
29<br />
30<br />
39<br />
38<br />
37<br />
25<br />
25<br />
36<br />
36<br />
37<br />
38<br />
39<br />
40<br />
41<br />
43<br />
44<br />
45<br />
42<br />
42<br />
E–02011<br />
853, 853H BICS Loa<strong>de</strong>r<br />
Service Manual
HYDROSTATIC PUMP (Cont’d)<br />
Parts I<strong>de</strong>ntification (Cont’d)<br />
Revised June 96<br />
Ref. Description Ref. Description<br />
1 O–RING 33 LOCKING NUT<br />
2 SNAP RING 34 NUT<br />
3 BEARING 35 RING<br />
4 SNAP RING 36 PLUG<br />
5 BOLT 37 O–RING<br />
6 BOLT 38 SPRING<br />
7 PIN 39 RELIEF VALVE<br />
8 COVER 40 PLUG<br />
9 GASKET 41 HOUSING<br />
10 JOURNAL BEARING 42 O–RING<br />
11 PIN 43 O–RING<br />
12 SLEEVE 44 RING<br />
13 PIN 45 BY–PASS VALVE<br />
14 PIN 46 COVER<br />
15 SWASH PLATE 47 NUT<br />
16 ROTATING GROUP ASSY. 48 COVER<br />
17 VALVE PLATE 49 STUD<br />
18 PIN 50 NUT<br />
19 SHAFT 51 PLUG<br />
20 BEARING 52 ORIFICE<br />
21 BOLT 53 SLEEVE<br />
22 PLUG 54 O–RING<br />
23 SERVO COVER 55 O–RING<br />
24 GASKET 56 SPOOL<br />
25 SEAL 57 O–RING<br />
26 RING 58 SPRING<br />
27 SERVO PISTON 59 BRACKET<br />
28 BOLT 60 BOLT<br />
29 GUIDE 61 NUT<br />
30 SPRING 62 WASHER<br />
31 STOP 63 HANDLE<br />
32 GUIDE<br />
853, 853H BICS Loa<strong>de</strong>r<br />
–3–33– Service Manual
Revised June 96<br />
–3–34–<br />
853, 853H BICS Loa<strong>de</strong>r<br />
Service Manual
HYDROSTATIC PUMP (Cont’d)<br />
Hydraulic Pump Removal<br />
When making repairs on hydrostatic and<br />
hydraulic systems, clean the work area before<br />
disassembly and keep all parts clean. Always<br />
use caps and plugs on hoses, tubelines and<br />
ports to keep dirt out. Dirt can quickly damage<br />
the system.<br />
I–2003–0284<br />
Remove the two hydraulic pump mounting bolts [A].<br />
Remove the hydraulic pump and O–ring [B].<br />
Hydrostatic Pump Separation<br />
Remove the bolt from both si<strong>de</strong>s of the pump assembly<br />
[C].<br />
Remove the nut and lift bracket [D].<br />
Revised June 96<br />
A<br />
B<br />
C<br />
D<br />
CD–00048<br />
CD–00049<br />
CD–00050<br />
CD–00051<br />
853, 853H BICS Loa<strong>de</strong>r<br />
–3–35– Service Manual
HYDROSTATIC PUMP (Cont’d)<br />
Hydrostatic Pump Separation (Cont’d)<br />
Separate the two pumps [A].<br />
Remove the large O–ring (Item 1) [A] and two small<br />
O–rings (Item 2) [A] from the rear pump.<br />
Charge Pump Disassembly<br />
Remove the two O–rings from the gerotor cover [B].<br />
Remove the gerotor pump assembly and splined coupler<br />
from the rear pump [C].<br />
Remove the splined coupler and drive pin (Item 1) [D].<br />
Revised June 96<br />
–3–36–<br />
A<br />
B<br />
C<br />
D<br />
1<br />
2<br />
2<br />
2<br />
CD–00052<br />
CD–00053<br />
CD–00054<br />
CD–00055<br />
853, 853H BICS Loa<strong>de</strong>r<br />
Service Manual
HYDROSTATIC PUMP (Cont’d)<br />
Charge Pump Disassembly (Cont’d)<br />
Remove the gerotor assembly from the gerotor cover [A].<br />
Check all charge pump components for wear or damage.<br />
Replace parts as necessary.<br />
Disassembly<br />
When making repairs on hydrostatic and<br />
hydraulic systems, clean the work area before<br />
disassembly and keep all parts clean. Always<br />
use caps and plugs on hoses, tubelines and<br />
ports to keep dirt out. Dirt can quickly damage<br />
the system.<br />
I–2003–0284<br />
Use the following procedure to disassemble both front<br />
and rear hydrostatic pumps. Procedures to be performed<br />
on the front or rear pump only are marked.<br />
NOTE: Keep front and rear pump parts separate<br />
during disassembly and assembly.<br />
Remove the plug, shims (if equipped), spring and high<br />
pressure relief valve cartridge from each si<strong>de</strong> of the pump<br />
[B].<br />
♦ Remove the plug, shims (if equipped), spring and<br />
charge pressure relief valve [C].<br />
◊ Remove the by–pass valve [D].<br />
◊ Front Pump<br />
♦ Rear Pump<br />
Revised June 96<br />
A<br />
B<br />
C<br />
D<br />
CD–00056<br />
CD–00057<br />
CD–00059<br />
CD–00060<br />
853, 853H BICS Loa<strong>de</strong>r<br />
–3–37– Service Manual
HYDROSTATIC PUMP (Cont’d)<br />
Disassembly (Cont’d)<br />
◊ Remove the three bolts at the adapter housing [A].<br />
♦ Remove the adapter housing and plate (Item 1) [B].<br />
Remove the plug at the control inlet orifice port [C].<br />
Remove the screened orifice plug (Item 1) [D].<br />
◊ Front Pump<br />
♦ Rear Pump<br />
Revised June 96<br />
–3–38–<br />
A<br />
B<br />
C<br />
D<br />
1<br />
1<br />
CD–00061<br />
CD–00062<br />
CD–00063<br />
CD–00064<br />
853, 853H BICS Loa<strong>de</strong>r<br />
Service Manual
HYDROSTATIC PUMP (Cont’d)<br />
Disassembly (Cont’d)<br />
Mark the position of the neutral bracket for reference<br />
during assembly [A].<br />
NOTE: Removal of any part of the mechanical<br />
control will result in the loss of the neutral<br />
setting and will require neutral adjustment.<br />
Refer to Page 3–9 for the correct neutral<br />
adjustment procedure. The neutral<br />
adjustment procedure must be performed<br />
with the pump installed and engine running.<br />
Remove the flange head screw [B].<br />
Remove the control lever and spool assembly [C].<br />
If necessary, remove the spring from the control lever and<br />
spool assembly [D].<br />
Revised June 96<br />
A<br />
B<br />
C<br />
D<br />
CD–00065<br />
CD–00066<br />
CD–00067<br />
CD–00111<br />
853, 853H BICS Loa<strong>de</strong>r<br />
–3–39– Service Manual
HYDROSTATIC PUMP (Cont’d)<br />
Disassembly (Cont’d)<br />
If disassembly of the control lever and spool assembly is<br />
necessary, locate the notch (Item 1) [A] in the end of the<br />
spool. Mark the control lever and neutral bracket on the<br />
same si<strong>de</strong> as the spool notch.<br />
Disassembly as shown in Figure [B]:<br />
Remove the nut (Item 1) [B], lock washer (Item 2) [B],<br />
control lever (Item 3) [B], neutral bracket (Item 4) [B],<br />
back–up washer (Item 5) [B] and O–ring (Item 6) [B] from<br />
the spool (Item 7) [B].<br />
Gripping the outsi<strong>de</strong> of the control sleeve with a pliers,<br />
remove the control sleeve [C].<br />
NOTE: Do not grip the insi<strong>de</strong> diameter of the control<br />
sleeve.<br />
Remove the seven end housing bolts [D].<br />
Revised June 96<br />
–3–40–<br />
A<br />
B<br />
C<br />
D<br />
1<br />
2<br />
3<br />
4<br />
5<br />
1<br />
6<br />
7<br />
CD–00112<br />
CD–00113<br />
CD–00068<br />
CD–00070<br />
853, 853H BICS Loa<strong>de</strong>r<br />
Service Manual
HYDROSTATIC PUMP (Cont’d)<br />
Disassembly (Cont’d)<br />
Remove the end housing with the shaft assembly [A].<br />
Remove the gasket [A].<br />
Remove the swashplate journal bearings from the end<br />
housing [B].<br />
◊ Remove the snap ring at the seal [C].<br />
◊ Use an electric drill with a magnetized or greased bit<br />
to make a small hole in the seal [D].<br />
NOTE: Be careful not to damage the bearing behind<br />
the seal.<br />
◊ Front Pump<br />
♦ Rear Pump<br />
Revised June 96<br />
A<br />
B<br />
C<br />
D<br />
CD–00071<br />
CD–00090<br />
CD–00092<br />
CD–00093<br />
853, 853H BICS Loa<strong>de</strong>r<br />
–3–41– Service Manual
HYDROSTATIC PUMP (Cont’d)<br />
Disassembly (Cont’d)<br />
◊ Install a seal puller and remove the seal [A].<br />
Remove the large snap ring at the bearing [B].<br />
Remove the shaft and bearing assembly [C].<br />
Remove the swashplate from the housing [D].<br />
◊ Front Pump<br />
♦ Rear Pump<br />
Revised June 96<br />
–3–42–<br />
A<br />
B<br />
C<br />
D<br />
CD–00094<br />
CD–00088<br />
CD–00089<br />
CD–00072<br />
853, 853H BICS Loa<strong>de</strong>r<br />
Service Manual
HYDROSTATIC PUMP (Cont’d)<br />
Disassembly (Cont’d)<br />
Remove the gui<strong>de</strong> from the swashplate [A].<br />
Using a snap ring pliers, remove the rotating group<br />
assembly [B].<br />
To remove the valve plate, use an O–ring pick tool to lift<br />
the valve plate up. Remove the valve plate from the<br />
housing [C].<br />
♦ Remove the five bolts and bracket (Item 1) [D] from<br />
the end cap.<br />
◊ Front Pump<br />
♦ Rear Pump<br />
Revised June 96<br />
A<br />
B<br />
C<br />
D<br />
1<br />
CD–00099<br />
CD–00074<br />
CD–00073<br />
CD–00076<br />
853, 853H BICS Loa<strong>de</strong>r<br />
–3–43– Service Manual
HYDROSTATIC PUMP (Cont’d)<br />
Disassembly (Cont’d)<br />
Remove the end cap and gasket [A].<br />
Measure and record the distance between the piston and<br />
housing [B].<br />
While holding the centering screw stationary, remove the<br />
neutral adjustment lock nut [C].<br />
Remove the five bolts from the end cap [D].<br />
Revised June 96<br />
–3–44–<br />
A<br />
B<br />
C<br />
D<br />
CD–00077<br />
CD–00078<br />
CD–00079<br />
CD–00081<br />
853, 853H BICS Loa<strong>de</strong>r<br />
Service Manual
HYDROSTATIC PUMP (Cont’d)<br />
Disassembly (Cont’d)<br />
Turn the end cap off the centering screw. Remove the<br />
gasket [A].<br />
Push the end of the piston into the housing and remove<br />
the seal [B].<br />
Remove the piston from the housing by pulling on the<br />
centering screw [B].<br />
Disassembly of the piston as shown in Fig. [C]:<br />
Remove the seal (Item 1) [C] from the centering screw<br />
end of the piston. Remove the O–ring (Item 2) [C] and<br />
bearing ring (Item 3) [C] from both ends of the spool.<br />
If it is necessary to disassemble the piston, use the<br />
following procedure:<br />
Loosen the jam nut (Item 1) [D]. Tighten the nut at the<br />
piston to release spring tension on the snap ring.<br />
Revised June 96<br />
A<br />
B<br />
C<br />
D<br />
1 2 3 3<br />
1<br />
CD–00083<br />
CD–00085<br />
2<br />
CD–00109<br />
CD–00107<br />
853, 853H BICS Loa<strong>de</strong>r<br />
–3–45– Service Manual
HYDROSTATIC PUMP (Cont’d)<br />
Disassembly (Cont’d)<br />
Remove the snap ring and centering spring assembly<br />
from the piston [A].<br />
Disassemble the centering spring assembly as shown in<br />
Figure [B]:<br />
Remove the lock nut (Item 1) [B], nut (Item 2) [B], short<br />
spring gui<strong>de</strong> (Item 3) [B], spring (Item 4) [B], stop (Item<br />
5) [B] and long spring gui<strong>de</strong> (Item 6) [B] from the<br />
centering screw (Item 7) [B].<br />
Inspection<br />
Clean all parts in solvent and use air pressure to dry them.<br />
DO NOT use cloth or paper because small pieces of<br />
material can get into the system and cause damage.<br />
Lubricate all internal pump parts with clean hydraulic oil<br />
before assembly.<br />
Check the two bearing locater pins (Item 1) [C] in the end<br />
housing. The pins must measure 0.0625–0.080 inch<br />
(1,65–2,03 mm) from the end housing surface to the end<br />
of the pins.<br />
Check the shaft for wear or damage in the splined and<br />
bearing areas [D].<br />
Check the bearing for proper operation. Remove from the<br />
shaft only if necessary to replace [D].<br />
Revised June 96<br />
–3–46–<br />
A<br />
B<br />
C<br />
D<br />
1<br />
2<br />
3<br />
1<br />
4<br />
1<br />
5<br />
CD–00106<br />
6<br />
7<br />
CD–00105<br />
CD–00098<br />
CD–00110<br />
853, 853H BICS Loa<strong>de</strong>r<br />
Service Manual
HYDROSTATIC PUMP (Cont’d)<br />
Inspection (Cont’d)<br />
Check the needle bearing (Item 1) [A] in the housing for<br />
proper operation.<br />
If the bearing must be replaced, use the correct driver to<br />
remove and install the bearing. The numbered end of the<br />
bearing must be installed toward the insi<strong>de</strong> of the pump<br />
housing. When installed correctly, the end of the bearing<br />
must measure 0.08–0.10 inch (2,0–2,5 mm) above the<br />
machined housing surface.<br />
Check the locating spring pin (Item 2) [A].<br />
The pin must measure 0.165–0.185 inch (4,19–4,70 mm)<br />
from the housing to the end of the pin.<br />
Check the swashplate (Item 1) [B] and valve plate (Item<br />
2) [B].<br />
The surface finish must be smooth and free of scratches.<br />
If scratches can be felt with a fingernail, replace the parts.<br />
Check the four small holes in the swashplate surface to<br />
make sure they are open.<br />
Check the gui<strong>de</strong> pin (Item 3) [B].<br />
The gui<strong>de</strong> pin must measure 0.29–0.31 inch (7,4–7,9<br />
mm) from the swashplate surface to the end of the pin.<br />
Check the spring pin (Item 4) [B].<br />
The spring pin must be installed with the split toward the<br />
center of the swashplate. The spring pin must measure<br />
0.33–0.5 inch (8,4–8,9 mm) from the swashplate to the<br />
end of the pin.<br />
Check the end of the piston block. The surface must be<br />
smooth and free of scratches [C].<br />
Check that each piston moves freely in its bore [D].<br />
Check each piston and piston shoe for wear or scratches.<br />
Check the cylin<strong>de</strong>r bores in the piston block for wear or<br />
scratches.<br />
Check the shoe plate. The shoe plate must be flat with no<br />
sign of cracks or wear.<br />
Revised June 96<br />
A<br />
B<br />
C<br />
D<br />
2<br />
1<br />
1<br />
CD–00075<br />
CD–00100<br />
CD–00101<br />
CD–00102<br />
853, 853H BICS Loa<strong>de</strong>r<br />
–3–47– Service Manual<br />
3<br />
4<br />
2
HYDROSTATIC PUMP (Cont’d)<br />
Inspection (Cont’d)<br />
Check the spherical washer for wear or damage [A].<br />
Check the three pins [B].<br />
The pins must not be bent. All pins must be the same<br />
length.<br />
NOTE: If there is any <strong>de</strong>fect in the rotating group, the<br />
complete rotating group must be replaced.<br />
Assembly<br />
If disassembly, assembly as shown in Fig. [C]:<br />
Apply oil to and install the long spring gui<strong>de</strong> (Item 1) [C],<br />
stop (Item 2) [C], spring (Item 3) [C], short spring gui<strong>de</strong><br />
(Item 4) [C], nut (Item 5) [C] and lock nut (Item 6) [C] onto<br />
the centering screw (Item 7) [C].<br />
Hold the centering screw from turning and tighten the nut<br />
to compress the spring.<br />
Install the centering spring assembly and snap ring into<br />
the piston [D].<br />
Revised June 96<br />
–3–48–<br />
A<br />
B<br />
C<br />
D<br />
6<br />
5<br />
4<br />
3<br />
2<br />
CD–00103<br />
CD–00104<br />
1<br />
7<br />
CD–00105<br />
CD–00106<br />
853, 853H BICS Loa<strong>de</strong>r<br />
Service Manual
HYDROSTATIC PUMP (Cont’d)<br />
Assembly (Cont’d)<br />
To seat the snap ring, loosen the nut until the centering<br />
screw is loose [A].<br />
Tighten the nut until all axial looseness is removed<br />
between the centering screw and spring gui<strong>de</strong>s but stop<br />
tightening the nut before the spring assembly becomes<br />
loose in the piston [A].<br />
NOTE: It will be impossible to set the pump neutral<br />
position if there is any free play between the<br />
piston and spring assembly or between the<br />
spring assembly and centering screw.<br />
While holding the nut, tighten the jam nut to 18–27 ft.–lbs.<br />
(24–37 Nm) torque.<br />
Install the rings, O–rings and seals as shown in Figure<br />
[B]:<br />
Apply oil to two new bearing rings (Item 1) [B], two new<br />
O–rings (Item 2) [B] and two new seals (Item 3) [B].<br />
Install a bearing ring (Item 1) [B] and O–ring (Item 2) [B]<br />
onto each end of the piston.<br />
Install a seal (Item 3) [B] over the O–ring on the end<br />
opposite the centering screw.<br />
Apply oil to the spool. Carefully install the spool, centering<br />
screw first, into the housing toward the outlet port si<strong>de</strong> of<br />
the housing [C].<br />
With the centering screw toward the front it makes neutral<br />
adjustment easier.<br />
Push the piston through the housing just far enough to<br />
install the new seal over the O–ring [D].<br />
Carefully push the piston back into the housing.<br />
Revised June 96<br />
A<br />
B<br />
C<br />
D<br />
CD–00107<br />
2 1 1 2 3<br />
CD–00108<br />
CD–00087<br />
CD–00086<br />
853, 853H BICS Loa<strong>de</strong>r<br />
–3–49– Service Manual
HYDROSTATIC PUMP (Cont’d)<br />
853, 853H BICS Service Manual #6724012 – Hydrostatic System Section Part 2 of 3<br />
Assembly (Cont’d)<br />
Install a new gasket. Install the end cap over the centering<br />
screw. Turn the end cap up to the housing [A].<br />
Install the five bolts into the end cap [B].<br />
Tighten the bolts to 10–13 ft.–lbs. (14–18 Nm) torque.<br />
Center the piston using the measurement recor<strong>de</strong>d<br />
during disassembly [C].<br />
NOTE: The approximate distance between the<br />
piston and housing edge is 0.5 inch (12,7<br />
mm). Any measured adjustment is<br />
approximate. The final neutral adjustment<br />
must be performed with the pump installed<br />
and engine running.<br />
While holding the centering screw stationary, install the<br />
neutral adjustment lock nut [D].<br />
Revised June 96<br />
–3–50–<br />
A<br />
B<br />
C<br />
D<br />
CD–00084<br />
CD–00081<br />
CD–00080<br />
CD–00079<br />
853, 853H BICS Loa<strong>de</strong>r<br />
Service Manual
HYDROSTATIC PUMP (Cont’d)<br />
Assembly (Cont’d)<br />
Install a new gasket and the end cap [A].<br />
Install the five bolts into the end cap [B].<br />
Tighten the bolts to 10–13 ft.–lbs. (14–18 Nm) torque.<br />
Apply oil to the valve plate.<br />
Install the valve plate, bronze si<strong>de</strong> up, into the housing<br />
[C].<br />
The notch (Item 1) [C] in the valve plate must engage the<br />
locating spring pin in the housing.<br />
Apply oil to the needle bearing at the base of the housing.<br />
Apply oil to all parts and surfaces in the rotating group.<br />
Using a snap ring pliers, lower the rotating group into the<br />
housing [D].<br />
A<br />
B<br />
C<br />
D<br />
1<br />
CD–00077<br />
CD–00076<br />
CD–00073<br />
CD–00074<br />
853, 853H BICS Loa<strong>de</strong>r<br />
–3–51– Service Manual
HYDROSTATIC PUMP (Cont’d)<br />
Assembly (Cont’d)<br />
Apply oil to the gui<strong>de</strong> and swashplate. Install the gui<strong>de</strong><br />
onto the swashplate with the gui<strong>de</strong> offset positioned to<br />
provi<strong>de</strong> clearance for the journal bearing [A].<br />
Install the swashplate into the housing [B].<br />
Adjust the swashplate so that the gui<strong>de</strong> engages the<br />
piston.<br />
Center the rotating group and swashplate over the needle<br />
bearing.<br />
Check that the spherical washer is on top of the three<br />
pins.<br />
Apply oil to the bearing and shaft. Install the shaft and<br />
bearing assembly into the end housing [C].<br />
Install the snap ring [D].<br />
–3–52–<br />
A<br />
B<br />
C<br />
D<br />
CD–00099<br />
CD–00072<br />
CD–00089<br />
CD–00088<br />
853, 853H BICS Loa<strong>de</strong>r<br />
Service Manual
HYDROSTATIC PUMP (Cont’d)<br />
Assembly (Cont’d)<br />
◊ Apply a light coating of grease to the lips of a new<br />
seal. Using a correct size driver tool, install the new<br />
seal [A].<br />
◊ Install the snap ring [B].<br />
Apply oil to both journal bearings. Install the journal<br />
bearings on the end housing [C].<br />
Check that the journal bearings are seated on the bearing<br />
locater pins.<br />
NOTE: Petroleum jelly can be applied between the<br />
journal bearings and end housing to retain<br />
the journal bearings during installation on<br />
the pump.<br />
Install a new gasket. Carefully install the end housing and<br />
shaft assembly [D].<br />
When the shaft and end housing are properly installed the<br />
rotating group spring will hold the end housing. A<br />
maximum distance of 0.125 inch (3,2 mm) away from the<br />
housing.<br />
◊ Front Pump<br />
♦ Rear Pump<br />
Revised June 96<br />
A<br />
B<br />
C<br />
D<br />
CD–00095<br />
CD–00092<br />
CD–00090<br />
CD–00071<br />
853, 853H BICS Loa<strong>de</strong>r<br />
–3–53– Service Manual
HYDROSTATIC PUMP (Cont’d)<br />
Assembly (Cont’d)<br />
Install the seven end housing bolts [A].<br />
Evenly tighten the six 7/16 inch bolts to 60–74 ft.–lbs.<br />
(81–100 Nm) torque and 3/8 inch bolt to 39–47 ft.–lbs.<br />
(53–64 Nm) torque.<br />
Rotate the shaft periodically while tightening the bolts to<br />
assure the correct pump assembly. When fully<br />
assembled a torque of 4–8 ft.–lbs. (5,4–10,8 Nm) will be<br />
required to turn the shaft.<br />
Apply petroleum jelly to a new O–ring and back–up<br />
washer. Install the O–ring (Item 1) [B] and back–up<br />
washer (Item 2) [B] on the control sleeve.<br />
Apply oil to the control sleeve. Install the sleeve into the<br />
housing [B].<br />
The notch (Item 3) [B] in the control sleeve must be<br />
installed toward the end housing and engage the spring<br />
pin in the swashplate.<br />
Apply petroleum jelly to a new O–ring and back–up<br />
washer. Install the O–ring (Item 1) [C] and back–up<br />
washer (Item 2) [C] onto the spool.<br />
Install the neutral bracket (Item 3) [C] and control lever<br />
(Item 4) [C] on the spool aligning the marks ma<strong>de</strong> during<br />
disassembly with the notch (Item 7) [C] in the end of the<br />
spool (Item 8) [C].<br />
NOTE: The notch (Item 7) [C], on either spool must<br />
face the servo during assembly.<br />
Install the lock washer (Item 5) [C] and nut (Item 6) [C]<br />
onto the spool.<br />
Tighten the nut to 10–12 ft.–lbs. (13,6–16,3 Nm) torque.<br />
Install the spring on the control lever and spool assembly<br />
[D].<br />
Revised June 97<br />
–3–54–<br />
A<br />
B<br />
C<br />
D<br />
6<br />
5<br />
3<br />
1<br />
4<br />
3<br />
2<br />
1<br />
2<br />
7<br />
8<br />
CD–00070<br />
CD–00069<br />
CD–00113<br />
CD–00111<br />
853, 853H BICS Loa<strong>de</strong>r<br />
Service Manual
HYDROSTATIC PUMP (Cont’d)<br />
Assembly (Cont’d)<br />
Apply oil to the spool. Install the control lever and spool<br />
assembly into the housing [A].<br />
NOTE: Be sure the notch (Item 1) [B] in the servo<br />
spool faces toward the servo piston during<br />
assembly.<br />
Align the neutral bracket with the reference mark ma<strong>de</strong><br />
during disassembly. Install the flange head screw [B].<br />
NOTE: Removal of any part of the mechanical<br />
control will result in the loss of the neutral<br />
setting and will require neutral adjustment.<br />
Refer to Page 3–60 for the correct neutral<br />
adjustment procedure. The neutral<br />
adjustment procedure must be performed<br />
with the pump installed and engine running.<br />
Install the screened orifice plug [C].<br />
Tighten the plug to 8–12 ft.–lbs. (10,8–16,3 Nm) torque.<br />
Apply thread sealant to the plug threads. Install the plug<br />
into the housing [D].<br />
Revised June 97<br />
A<br />
B<br />
C<br />
D<br />
1<br />
CD–00067<br />
CD–00066<br />
CD–00064<br />
CD–00063<br />
853, 853H BICS Loa<strong>de</strong>r<br />
–3–55– Service Manual
HYDROSTATIC PUMP (Cont’d)<br />
Assembly (Cont’d)<br />
◊ Apply oil to the three mol<strong>de</strong>d O–rings on the plate<br />
(Item 1) [A]. Install the plate onto the housing.<br />
Install the adapter housing [A].<br />
♦ Install the three bolts into the adapter housing [B].<br />
Evenly tighten the bolts to 16–21 ft.–lbs. (22–28 Nm)<br />
torque.<br />
♦ Apply petroleum jelly to a new O–ring and back–up<br />
washer. Install the back–up washer (Item 1) [C] and<br />
O–ring (Item 2) [C] onto the bypass valve.<br />
Install the by–pass valve [C].<br />
Tighten the valve to 7–10 ft.–lbs. (9,5–13,6 Nm) torque.<br />
♦ Apply petroleum jelly to a new O–ring. Install the<br />
O–ring on the plug [D].<br />
Apply oil to the charge pressure relief valve. Install the<br />
charge pressure relief valve, spring, shims (if equipped)<br />
and plug [D].<br />
Tighten the plug to 30–70 ft.–lbs. (41–95 Nm) torque.<br />
◊ Front Pump<br />
♦ Rear Pump<br />
Revised June 96<br />
–3–56–<br />
A<br />
B<br />
C<br />
D<br />
1<br />
2<br />
1<br />
CD–00062<br />
CD–00061<br />
CD–00060<br />
CD–00059<br />
853, 853H BICS Loa<strong>de</strong>r<br />
Service Manual
HYDROSTATIC PUMP (Cont’d)<br />
Assembly (Cont’d)<br />
Apply petroleum jelly to a new O–ring. Install the O–ring<br />
on the plug [A].<br />
Apply oil to the high pressure relief valve cartridge. Install<br />
the high pressure relief valve cartridge, spring, shims (if<br />
equipped) and plug [A].<br />
Tighten the plug to 70–170 ft.–lbs. (95–230 Nm) torque.<br />
Charge Pump Assembly<br />
Apply oil to the gerotor assembly and gerotor cover.<br />
Install the gerotor assembly into the gerotor cover [B].<br />
Apply oil to the splined coupler (Item 1) [C] and drive pin<br />
(Item 2) [C].<br />
Install the splined coupler and drive pin into the gerotor<br />
assembly [C].<br />
The drive pin must be engaged in the gerotor slot.<br />
Install the gerotor assembly into the rear pump [D].<br />
NOTE: The gerotor assembly must be installed for<br />
the correct rotation.<br />
Pumps with split hydrostatic porting (two ports facing<br />
forward and two facing rearward) the pin (Item 1) [D] must<br />
be installed in the bottom holes (Item 2) [D].<br />
Make sure to install the gerotor assembly for the correct<br />
rotation. The pin (Item 1) [D] must be installed in the top<br />
hole (Item 3) [D] in the housing.<br />
Revised Mar. 03<br />
A<br />
B<br />
C<br />
D<br />
1<br />
1<br />
2<br />
3<br />
2<br />
CD–00057<br />
CD–00056<br />
CD–00055<br />
CD–00054<br />
853, 853H BICS Loa<strong>de</strong>r<br />
–3–57– Service Manual
HYDROSTATIC PUMP (Cont’d)<br />
Charge Pump Assembly (Cont’d)<br />
Apply petroleum jelly to two new O–rings. Install the<br />
O–rings on the gerotor cover [A].<br />
Hydrostatic Pump Connection<br />
Apply petroleum jelly to two new small O–rings (Item 1)<br />
[B] and a large O–ring (Item 2) [B]. Install the O–rings on<br />
the rear pump.<br />
Connect the two hydrostatic pumps [B].<br />
Install the lift bracket and nut [C].<br />
Install a bolt on both si<strong>de</strong>s of the pump assembly [D].<br />
Evenly tighten the two bolts and nuts to 67–82 ft.–lbs.<br />
(91–111 Nm) torque.<br />
Rotate the tan<strong>de</strong>m pump input shaft to check for proper<br />
assembly.<br />
–3–58–<br />
A<br />
B<br />
C<br />
D<br />
2<br />
1<br />
1<br />
CD–00053<br />
CD–00052<br />
CD–00051<br />
CD–00050<br />
853, 853H BICS Loa<strong>de</strong>r<br />
Service Manual
HYDROSTATIC PUMP (Cont’d)<br />
Hydraulic Pump Installation<br />
Apply petroleum jelly to a new O–ring. Install the O–ring<br />
on the hydraulic pump [A].<br />
Install the hydraulic pump on the tan<strong>de</strong>m pump assembly<br />
[A].<br />
Install the two bolts [B].<br />
Tighten the bolts evenly to 25–27 ft.–lbs. (34–37 Nm)<br />
torque.<br />
A<br />
B<br />
CD–0049<br />
CD–0048<br />
853, 853H BICS Loa<strong>de</strong>r<br />
–3–59– Service Manual
HYDROSTATIC PUMP (Cont’d)<br />
Hydrostatic Pump Neutral Adjustment<br />
When working on the left si<strong>de</strong> of the hydrostatic<br />
pump, Be Careful to keep your fingers and tools<br />
clear of the cooling fan belt.<br />
W–2185–0395<br />
After the hydrostatic pump has been rebuilt, the neutral<br />
for the servo valve spool will have to be adjusted. Use the<br />
following procedure:<br />
NOTE: The hydrostatic pump must be installed in<br />
the loa<strong>de</strong>r for this procedure.<br />
The following tool will be nee<strong>de</strong>d to do the following<br />
procedure:<br />
MEL1429A – Remote Start Switch<br />
Lift and block the loa<strong>de</strong>r. (See Page 1–1.)<br />
Raise the lift arms and install an approved lift arm support<br />
<strong>de</strong>vise. (See Page 1–1.)<br />
Raise the operator cab. (See Page 1–1.)<br />
Connect the remote start switch. (See Page 1–1.)<br />
1. Block the neutral spring bracket out with a large<br />
socket (1–1/8 inch) so you can feel and see the<br />
linkage neutral setting [A] & [B].<br />
The pump neutral adjustment bracket (Item 1) [C]<br />
controls the position of the spool lever arm (Item 2) [C]<br />
with a centering spring (Item 1) [D].<br />
Inspect centering spring ends for damage or wear.<br />
Replace the spring if there is excessive freeplay between<br />
spool lever arm (Item 2) [C] and spring ends (Item 1) [D].<br />
2. Loosen the bolt (Item 2) [D] for the neutral<br />
adjustment bracket.<br />
–3–60–<br />
A<br />
B<br />
C<br />
D<br />
2<br />
1<br />
1<br />
1<br />
2<br />
Socket<br />
Cam<br />
P–02866<br />
MC–01944<br />
P–07927<br />
P–07928<br />
853, 853H BICS Loa<strong>de</strong>r<br />
Service Manual
HYDROSTATIC PUMP (Cont’d)<br />
Hydrostatic Pump Neutral Adjustment (Cont’d)<br />
3. Clamp the control lever to the neutral adjustment<br />
bracket with a small locking pliers [A].<br />
4. Start the engine. With the engine running at full<br />
RPM, move the control lever forward until the<br />
wheels just begin to move. Mark the position on the<br />
bracket (felt tip pen) [B].<br />
5. Move the control lever in reverse until the wheels<br />
just begin to move. Mark this position.<br />
6. Stop the engine.<br />
7. Position the neutral adjustment bracket between<br />
the two marks and tighten the holddown bolt [C].<br />
Remove the locking pliers. Start the engine and<br />
check in both directions to be sure the pump will<br />
return to neutral.<br />
8. Remove the socket from blocking the neutral spring<br />
bracket [D].<br />
9. Adjust the steering neutral setting. (See Page<br />
3–12.)<br />
A<br />
B<br />
C<br />
D<br />
P–07929<br />
P–07930<br />
P–07931<br />
P–02866<br />
853, 853H BICS Loa<strong>de</strong>r<br />
–3–61– Service Manual
DRIVE BELT SHIELD<br />
Removal and Installation<br />
Stop the engine.<br />
Open the rear door.<br />
Remove the three belt shield holddown clips (Item 1) [A].<br />
Remove the belt shield (Item 1) [B] from the drive belt<br />
housing. B<br />
–3–62–<br />
A<br />
1<br />
1<br />
1<br />
P–05041<br />
P–05096<br />
853, 853H BICS Loa<strong>de</strong>r<br />
Service Manual
DRIVE BELT<br />
Adjusting the Drive Belt<br />
See the Service Schedule Page 1–1 for the service<br />
interval.<br />
To adjust the drive belt between the engine flywheel and<br />
the hydrostatic pump pulley, use the following procedure:<br />
Raise the operator cab. (See Page 1–1.)<br />
Remove the belt shield. (See Page 3–62.)<br />
Use the following tools to check the belt tension:<br />
MEL1404 – Bar<br />
MEL1406 – Spring Scale<br />
1. Install the tool on the drive belt. The pin (Item 1) [A]<br />
must be pulled tight against the engine drive pulley.<br />
2. Make a mark (Item 2) [A] on the cast flange just<br />
above the tool handle.<br />
3. Install the spring scale on the tool handle. The line<br />
of pull (Item 3) [A] on the spring scale must be at<br />
approximately 90° from the tool handle.<br />
4. Loosen bolt (Item 4) [A] and jam nut (Item 5) [A].<br />
5. Tighten adjustment nut (Item 6) [A] to increase belt<br />
tension; loosen to <strong>de</strong>crease belt tension.<br />
6. Tighten bolt (Item 4) [A] and jam nut (Item 5) [A].<br />
NEW BELT: (less than .5 hours use): With 14 lbs. (62 N)<br />
for force, the tool should move 1.25 inches (32 mm) (the<br />
width of the tool handle). Run the engine approximately<br />
5 minutes and readjust the tension.<br />
USED BELT: (more than .5 hours use): With 12 lbs. (52<br />
N) of force, the tool should move 1.25 inches (32 mm) (the<br />
width of the tool handle).<br />
Always readjust if a tension check results in a reading of<br />
less than 10 lbs. (44N) of force.<br />
A<br />
1<br />
1.25 inch (32 mm)<br />
3<br />
90 o<br />
2<br />
5<br />
6<br />
4<br />
P–04927<br />
B–13459<br />
853, 853H BICS Loa<strong>de</strong>r<br />
–3–63– Service Manual
DRIVE BELT (Cont’d)<br />
Replacing the Drive Belt<br />
Raise the operator cab. (See Page 1–1.)<br />
Remove the belt shield. (See Page 3–62.)<br />
Loosen the bolt (Item 1) [A] on the idler pulley tensioner<br />
mounting bracket.<br />
Loosen the jam nut (Item 2) [A] and turn the nut (Item 3)<br />
[A] to release the belt tension.<br />
Remove the drive belt from the hydrostatic pump pulley<br />
and flywheel pulley.<br />
Remove the drive belt [B].<br />
Installation: Install the new drive belt and adjust. (See<br />
Page 3–63.)<br />
–3–64–<br />
A<br />
B<br />
2<br />
3<br />
1<br />
P–04926<br />
B–05095<br />
853, 853H BICS Loa<strong>de</strong>r<br />
Service Manual
DRIVE BELT TENSIONER PULLEY<br />
Removal and Installation<br />
Remove the three belt shield holddown clips (Item 1) [A].<br />
Remove the belt shield.<br />
Loosen the tensioner pulley mounting bolt (Item 1) [B].<br />
Loosen the jam nut and lock nut (Item 2) [B].<br />
Remove the drive belt.<br />
Installation: Tighten the drive belt to the correct<br />
specifications. (See Page 3–63.)<br />
Remove the jam nut and lock nut (Item 1) [C].<br />
Remove the mounting bolt (Item 2) [C].<br />
Remove the tensioner pulley assembly.<br />
A<br />
B<br />
C<br />
1<br />
1 1<br />
1<br />
2<br />
P–04924<br />
P–04926<br />
P–04929<br />
853, 853H BICS Loa<strong>de</strong>r<br />
–3–65– Service Manual<br />
2<br />
1
DRIVE BELT TENSIONER PULLEY (Cont’d)<br />
Disassembly<br />
NOTE: Be careful, the pulley hub is full of oil.<br />
Remove the cap [A].<br />
Remove the bolt and washer [B].<br />
Install a long bolt into the shaft [C].<br />
Remove the idler pulley and bearing from the shaft using<br />
a press [D].<br />
–3–66–<br />
A<br />
B<br />
C<br />
D<br />
CD–12634<br />
CD–12635<br />
CD–12636<br />
CD–12637<br />
853, 853H BICS Loa<strong>de</strong>r<br />
Service Manual
DRIVE BELT TENSIONER PULLEY (Cont’d)<br />
Disassembly (Cont’d)<br />
Install a bearing puller behind the seal and wear sleeve<br />
[A].<br />
PHOTO CLARITY ONLY: If the bearing puller is installed<br />
behind the bearing, seal and wear sleeve, the wear sleeve<br />
will also be removed [B].<br />
Remove the bearing, seal and wear sleeve using the<br />
press [C].<br />
A<br />
B<br />
C<br />
CD–12638<br />
CD–12639<br />
CD–12640<br />
853, 853H BICS Loa<strong>de</strong>r<br />
–3–67– Service Manual
DRIVE BELT TENSIONER PULLEY (Cont’d)<br />
Assembly<br />
NOTE: The bearings, cups and spacers are a<br />
matched set and must be replaced as a unit.<br />
If the spacer is replaced, compress the new spacer and<br />
install into the pulley [A].<br />
Use a driver tool (1–5/16’’ diameter) and push the spacer<br />
into the machined groove [B].<br />
Install the bearing cup using the driver tool (both si<strong>de</strong>s)<br />
[C].<br />
NOTE: The seal si<strong>de</strong> of the pulley hub has the larger<br />
I.D. diameter.<br />
Install the taper roller bearing to the pulley (seal si<strong>de</strong>) [D].<br />
–3–68–<br />
A<br />
B<br />
C<br />
D<br />
CD–12641<br />
CD–12642<br />
CD–12643<br />
CD–12644<br />
853, 853H BICS Loa<strong>de</strong>r<br />
Service Manual
DRIVE BELT TENSIONER PULLEY (Cont’d)<br />
Assembly (Cont’d)<br />
Put sealant (P/N 6633538) around the diameter of the<br />
shaft where the wear sleeve is installed on the shaft [A].<br />
Put grease (P/N 6599719) on the seal lips (Item 1) [B].<br />
Make sure the grease is between the outsi<strong>de</strong> and insi<strong>de</strong><br />
lips and all the way around the seal.<br />
Press the seal into the pulley hub larger diameter using<br />
a press [C].<br />
NOTE: The wear sleeve and the seal must be<br />
replaced as a unit.<br />
DO NOT damage the seal lips with the sharp edge of the<br />
wear sleeve. Install the wear sleeve into the seal.<br />
Use a spacer tube which goes over the shaft and pushes<br />
on the insi<strong>de</strong> diameter of the taper bearing, install the<br />
pulley, seal and wear sleeve onto the shaft [D].<br />
A<br />
B<br />
C<br />
D<br />
CD–12645<br />
MC–01648<br />
CD–12646<br />
CD–12647<br />
853, 853H BICS Loa<strong>de</strong>r<br />
–3–69– Service Manual<br />
1
DRIVE BELT TENSIONER PULLEY (Cont’d)<br />
Assembly (Cont’d)<br />
Install the small bearing spacer [A].<br />
Install the taper roller bearing pushing on the I.D. of the<br />
bearing [B].<br />
Put LOCTITE (P/N 6540410) on the bolt threads [C].<br />
Install the bolt and washer into the shaft [D].<br />
–3–70–<br />
A<br />
B<br />
C<br />
D<br />
CD–12648<br />
CD–12649<br />
CD–12650<br />
CD–12651<br />
853, 853H BICS Loa<strong>de</strong>r<br />
Service Manual
DRIVE BELT TENSIONER PULLEY (Cont’d)<br />
Assembly (Cont’d)<br />
Tighten the bolt to 25–28 ft.–lbs. (43–38 Nm) torque [A].<br />
Use only 15W/50 synthetic oil (Example: Mobil One) for<br />
the bearings. Use the cap and add oil until it is at the 0.50’’<br />
(12,7 mm) mark on the scale, which should be 0.75 oz.<br />
(20 C.C.) of oil [B].<br />
Add the oil slowly, at one location of the bearing which will<br />
allow the trapped air to escape from the other si<strong>de</strong> [C].<br />
NOTE: Oil capacity is very critical, do not add any<br />
more and/or any less oil to the idler pulley.<br />
Check the cap sealing edge to make sure it is not<br />
damaged. Replace the cap as nee<strong>de</strong>d.<br />
Make sure the sealing edge on the hub bore and cap<br />
sealing edge is clean and free of oil, put a bead of sealant<br />
(P/N 6633538) on the cap [D].<br />
Install the cap.<br />
A<br />
B<br />
C<br />
D<br />
Measure Oil<br />
Level in the<br />
Center of the Cap<br />
0.50’’ (12,7)<br />
0.75 oz.<br />
(20 C.C.)<br />
Capacity<br />
OIL LEVEL<br />
CD–12652<br />
MC–01648<br />
MC–01648<br />
CD–12653<br />
853, 853H BICS Loa<strong>de</strong>r<br />
–3–71– Service Manual
DRIVE BELT TENSIONER PULLEY (Cont’d)<br />
Checking Pulley End Play<br />
Install the pulley/mounting bracket assembly in to vise.<br />
Install a dial indicator on the pulley hub [A].<br />
Move the pulley by hand, back and forth. The correct end<br />
play is 0.005–0.013’’ (0,13–0,33 mm) [B].<br />
If the end play is not correct, there is no adjustment.<br />
Replace the hub, pulley and/or bearings.<br />
–3–72–<br />
A<br />
B<br />
CD–12655<br />
CD–12656<br />
853, 853H BICS Loa<strong>de</strong>r<br />
Service Manual
OIL COOLER<br />
Removal and Installation<br />
Disconnect the inlet hose (Item 1) [A] from the oil cooler.<br />
Disconnect the outlet hose (Item 1) [B] from the oil cooler.<br />
Remove the oil cooler [C].<br />
A<br />
B<br />
C<br />
1<br />
P–04884<br />
P–04885<br />
P–04887<br />
853, 853H BICS Loa<strong>de</strong>r<br />
–3–73– Service Manual<br />
1
853, 853H BICS Service Manual #6724012 – Hydrostatic System Section Part 3 of 3<br />
–3–74–<br />
853, 853H BICS Loa<strong>de</strong>r<br />
Service Manual
DRIVE SYSTEM<br />
Page<br />
Number<br />
AXLE SEAL<br />
Removal and Installation . . . . . . . . . . . . . . . . . . . . . . . . . . . . . . . . . . . . . . . 4–8<br />
AXLE, SPROCKET AND BEARINGS<br />
Removal and Installation . . . . . . . . . . . . . . . . . . . . . . . . . . . . . . . . . . . . . . . 4–10<br />
CHAINCASE FLUID<br />
Removing the Fluid From the Chaincase . . . . . . . . . . . . . . . . . . . . . . . . . 4–26<br />
DRIVE CHAIN<br />
Removal and Installation . . . . . . . . . . . . . . . . . . . . . . . . . . . . . . . . . . . . . . . 4–25<br />
FRONT CHAINCASE COVER<br />
Removal and Installation . . . . . . . . . . . . . . . . . . . . . . . . . . . . . . . . . . . . . . . 4–7<br />
PARKING BRAKE DISC<br />
Removal and Installation . . . . . . . . . . . . . . . . . . . . . . . . . . . . . . . . . . . . . . . 4–5<br />
PARKING BRAKE PEDAL<br />
Disassembly and Assembly . . . . . . . . . . . . . . . . . . . . . . . . . . . . . . . . . . . . 4–4<br />
Removal and Installation . . . . . . . . . . . . . . . . . . . . . . . . . . . . . . . . . . . . . . . 4–3<br />
REAR CHAINCASE COVER<br />
Removal and Installation . . . . . . . . . . . . . . . . . . . . . . . . . . . . . . . . . . . . . . . 4–7<br />
REDUCTION GEARCASE<br />
Assembly . . . . . . . . . . . . . . . . . . . . . . . . . . . . . . . . . . . . . . . . . . . . . . . . . . . . 4–21<br />
Checking Reduction Gearcase . . . . . . . . . . . . . . . . . . . . . . . . . . . . . . . . . . 4–16<br />
Disassembly . . . . . . . . . . . . . . . . . . . . . . . . . . . . . . . . . . . . . . . . . . . . . . . . . . 4–16<br />
Reduction Gearcase Seal . . . . . . . . . . . . . . . . . . . . . . . . . . . . . . . . . . . . . . 4–14<br />
Removal and Installation . . . . . . . . . . . . . . . . . . . . . . . . . . . . . . . . . . . . . . . 4–15<br />
DRIVE<br />
SYSTEM<br />
853, 853H BICS Loa<strong>de</strong>r<br />
–4–1– Service Manual
–4–2–<br />
853, 853H BICS Loa<strong>de</strong>r<br />
Service Manual
DRIVE SYSTEM<br />
PARKING BRAKE PEDAL<br />
Removal and Installation<br />
Raise the loa<strong>de</strong>r operator cab. (See Page 1–1.)<br />
Remove the front panel. (See Page 3–1.)<br />
Remove the two mounting bolts (Item 1) [A] for the foot<br />
rest (both si<strong>de</strong>s).<br />
Remove the foot rest (both si<strong>de</strong>s).<br />
Remove the lower panel mounting bolt (Item 1) [B] (both<br />
si<strong>de</strong>s).<br />
Remove the lower panel.<br />
Disconnect the wire harness connectors (Item 1) [C] for<br />
the parking brake.<br />
Remove the mounting bolts (Item 1) [D] for the parking<br />
brake pedal.<br />
Remove the parking brake pedal assembly.<br />
A<br />
B<br />
C<br />
D<br />
1<br />
1<br />
1<br />
1<br />
P–04775<br />
P–04767<br />
P–04769<br />
P–04768<br />
853, 853H BICS Loa<strong>de</strong>r<br />
–4–3– Service Manual
PARKING BRAKE PEDAL (Cont’d)<br />
Disassembly and Assembly<br />
Loosen and remove the mounting bolt (Item 1) [A] and nut<br />
from the spring mounting bracket (Item 2) [A].<br />
Remove the brake pedal spring (Item 3) [A] from the<br />
tension spring mounting bracket (Item 2) [A] and from the<br />
brake pedal mounting bracket (Item 4) [A].<br />
Remove the (2) mounting bolts, washers and nuts (Item<br />
5) [A] from the brake pedal sensor.<br />
Remove the harness mounting clamp (Item 1) [B] from<br />
the pedal mounting bracket (Item 4) [A].<br />
Remove the sensor harness from the pedal mounting<br />
bracket.<br />
Remove the pedal mounting bolt (Item 6) [A], plastic<br />
spacers and bushing nut from the brake pedal.<br />
Remove the pedal from the pedal mounting bracket.<br />
Photo [B] shows the parking brake disassembled to<br />
i<strong>de</strong>ntify the existing parts in the brake assembly.<br />
–4–4–<br />
A<br />
B<br />
3<br />
4<br />
5<br />
1<br />
6<br />
2<br />
1<br />
P–04189<br />
P–04156<br />
853, 853H BICS Loa<strong>de</strong>r<br />
Service Manual
PARKING BRAKE DISC<br />
Removal and Installation<br />
Raise the lift arms and install an approved lift arm support<br />
<strong>de</strong>vice. (See Page 1–1.)<br />
Raise the loa<strong>de</strong>r operator cab. (See Page 1–1.)<br />
Disconnect the traction lock solenoid wiring harness<br />
connector (Item 1) [A].<br />
Remove the traction lock solenoid (Item 2) [A]. (See Page<br />
8–1.)<br />
Remove the bolt and nut (Item 1) [B] to disconnect the lift<br />
linkage from crossmember.<br />
Remove the crossmember bolt (Item 2) [B].<br />
Disconnect the crossmember from the control valve lift<br />
spool (Item 1) [C].<br />
Remove the crossmember from the pivot [D].<br />
Installation: Check the nylon bushing (Item 1) [D] for<br />
wear and replace as nee<strong>de</strong>d.<br />
Remove the center cover mounting bolts (Item 2) [D].<br />
A<br />
B<br />
C<br />
D<br />
2<br />
1<br />
2<br />
2<br />
2<br />
1<br />
1<br />
2<br />
P–04769<br />
P–04778<br />
P–04779<br />
P–04772<br />
853, 853H BICS Loa<strong>de</strong>r<br />
–4–5– Service Manual<br />
1
PARKING BRAKE DISC (Cont’d)<br />
Removal and Installation (Cont’d)<br />
Remove the center chaincase cover/disc gui<strong>de</strong>s<br />
assembly [A].<br />
Installation: Make sure the brake discs go between the<br />
disc gui<strong>de</strong> slots.<br />
NOTE: *Later serial number machines do not use<br />
disc gui<strong>de</strong>s (Item 1) [A]. A snap ring is used<br />
on both si<strong>de</strong>s of disc to limit disc movement<br />
on these machines.<br />
*Later <strong>de</strong>sign (no disc gui<strong>de</strong>s)<br />
853 (S/N 508418265 & Above)<br />
853H (S/N 509718407 & Above)<br />
853 (S/N 512821967, 22021, 22028 & Above)<br />
A snap ring pliers with 90° tips is nee<strong>de</strong>d for removing the<br />
brake disc snap ring.<br />
Remove the snap ring from the end of the disc hub (Item<br />
1) [B] (both si<strong>de</strong>s).<br />
Sli<strong>de</strong> the brake disc (Item 1) [C] of the disc hub and<br />
remove from chaincase.<br />
Inspect the brake disc gui<strong>de</strong>s for wear or damage and<br />
replace as nee<strong>de</strong>d.<br />
The brake disc gui<strong>de</strong>s can be replaced by removing the<br />
gui<strong>de</strong> mounting bolts (Item 1) [D].<br />
Revised June 96<br />
–4–6–<br />
A<br />
B<br />
C<br />
D<br />
1<br />
1<br />
1<br />
1<br />
P–04781<br />
P–04783<br />
P–04782<br />
P–04851<br />
853, 853H BICS Loa<strong>de</strong>r<br />
Service Manual
FRONT CHAINCASE COVER<br />
Removal and Installation<br />
Remove the front panel. (See Page 3–1.)<br />
Remove the parking brake pedal. (See Page 4–3)<br />
Remove the mounting bolts from the front chaincase<br />
cover (Item 1) [A].<br />
Remove the cover.<br />
REAR CHAINCASE COVER<br />
Removal and Installation<br />
Raise the lift arms and install an approved lift arm support<br />
<strong>de</strong>vice. (See Page 1–1.)<br />
Raise the operator cab. (See Page 1–1.)<br />
Remove the mounting bolts from the rear chaincase<br />
cover (Item 1) [A].<br />
Remove the cover.<br />
A<br />
B<br />
1<br />
1<br />
P–04800<br />
P–05028<br />
853, 853H BICS Loa<strong>de</strong>r<br />
–4–7– Service Manual
AXLE SEAL<br />
Removal and Installation<br />
Lift and block the loa<strong>de</strong>r. (See Page 1–1.)<br />
Remove the tire/wheel assembly.<br />
Installation: Tighten the wheel nuts to 105–115 ft.–lbs.<br />
(142–155 Nm) torque.<br />
Remove the bolts (Item 1) [A] and plate.<br />
Installation: Tighten the bolts to 175–190 ft.–lbs.<br />
(240–260 Nm) torque.<br />
Remove the two wheel studs (Item 2) [A] across from<br />
each other.<br />
Install puller (Item 1) [B] on the wheel hub.<br />
NEVER STAND IN–LINE OF THE HUB WHEN<br />
REMOVING A HUB FROM AN AXLE. The hub<br />
has a tapered fit on the axle end and can come<br />
off the axle with great force and cause serious<br />
injury.<br />
W–2186–0395<br />
Remove the hub from the axle.<br />
Remove the key (Item 1) [C] from the axle.<br />
Drill a hole into the axle seal [D].<br />
–4–8–<br />
A<br />
B<br />
C<br />
D<br />
2<br />
1<br />
1<br />
1<br />
2<br />
P–04850<br />
P–04849<br />
P–04848<br />
P–04815<br />
853, 853H BICS Loa<strong>de</strong>r<br />
Service Manual
AXLE SEAL (Cont’d)<br />
Removal and Installation (Cont’d)<br />
Install a sli<strong>de</strong> hammer (Item 1) [A] with a screw tip end into<br />
the axle seal.<br />
Remove the axle seal.<br />
The tool listed will be nee<strong>de</strong>d to do the following<br />
procedure:<br />
MEL1407 – Seal Installation Tool<br />
If the axle is damaged or worn, an axle repair sleeve kit<br />
is available from Melroe Parts Sales in Chicago.<br />
NOTE: If a new wear ring is being installed with new<br />
seal, put LOCTITE sealant on the insi<strong>de</strong><br />
diameter of the wear ring.<br />
Place the taper on the wear ring so it faces the outsi<strong>de</strong> [B].<br />
Place the seal with the lip facing in [B].<br />
Use a hammer, install the new axle seal until the tool is<br />
flush with the edge of the axle tube [C].<br />
A<br />
B<br />
C<br />
1<br />
Taper<br />
P–04817<br />
B–13493<br />
P–04814<br />
853, 853H BICS Loa<strong>de</strong>r<br />
–4–9– Service Manual
AXLE, SPROCKET AND BEARINGS<br />
Removal and Installation<br />
The tools listed will be nee<strong>de</strong>d to do the following<br />
procedure:<br />
MEL1242 – Port–a–Power<br />
MEL1202B – Axle Bearing Service Set<br />
NOTE: The procedure shown for removal and<br />
installation of the axle, sprocket and<br />
bearings is for a front axle. This procedure<br />
will be the same for the rear axle also (See<br />
Page 4–7 for rear chaincase cover removal).<br />
Raise the lift arms and install an approved lift arm support<br />
<strong>de</strong>vice. (See Page 1–1.)<br />
Lift and block the loa<strong>de</strong>r. (See Page 1–1)<br />
Remove the front panel/steering lever assembly. (See<br />
Page 3–1.)<br />
Remove the front cover. (See Page 4–7.)<br />
Remove the fluid from the chaincase. (See Page 4–26.)<br />
Loosen the axle sprocket bolt (Item 1) [A].<br />
Installation: Tighten the axle sprocket bolt to 475–525<br />
ft.–lbs. (644–710 Nm) torque.<br />
Remove the bolts (Item 1) [B] and plate.<br />
Installation: Tighten the bolts to 175–190 ft.–lbs.<br />
(240–260 Nm) torque.<br />
Remove the two wheel studs (Item 2) [B] across from<br />
each other.<br />
Install a puller (Item 1) [C] on the wheel hub.<br />
NEVER STAND IN–LINE OF THE HUB WHEN<br />
REMOVING A HUB FROM AN AXLE. The hub<br />
has a tapered fit on the axle end and can come<br />
off the axle with great force and cause serious<br />
injury.<br />
W–2186–0395<br />
Remove the hub from the axle.<br />
Install a Port–a–Power ram between the two sprockets<br />
[D].<br />
–4–10–<br />
A<br />
B<br />
C<br />
D<br />
2<br />
1<br />
1<br />
1<br />
1<br />
2<br />
2<br />
P–04810<br />
P–04850<br />
P–04849<br />
P–04809<br />
853, 853H BICS Loa<strong>de</strong>r<br />
Service Manual
AXLE, BEARINGS AND SPROCKET (Cont’d)<br />
Removal and Installation (Cont’d)<br />
Push the axle out until the ram is at the end of the stroke.<br />
Add a spacer and push the axle out again. Repeat this<br />
procedure until the axle is out of the sprocket.<br />
Remove the drive chain from the sprocket.<br />
Remove the sprocket (Item 1) [A] and inner bearing (Item<br />
2) [A].<br />
Installation: Pack the inner and outer bearing with<br />
grease before installing them.<br />
A bearing puller (Item 1) [B] is nee<strong>de</strong>d to do the following<br />
procedure:<br />
Be sure the bearing puller makes good contact with the<br />
inner race and press the bearing off the mounting surface<br />
of the axle [B].<br />
NOTE: Hold onto the axle during removal as it will<br />
sli<strong>de</strong> freely after the bearing is removed from<br />
the mounting surface.<br />
Press the splined end of the axle free from the bearing<br />
[C].<br />
Installation: Put the spline end of the axle shaft into the<br />
bearing and press the bearing onto the axle.<br />
NOTE: Hold onto the axle during installation as it<br />
will sli<strong>de</strong> freely after the bearing is pressed<br />
over the splined end of the shaft.<br />
Put a piece of tubing (Item 1) [D] that contacts inner race<br />
of the bearing only.<br />
Press the bearing onto the mounting surface until the<br />
bearing is fully seated [D].<br />
A<br />
B<br />
C<br />
D<br />
1<br />
2<br />
1<br />
P–04808<br />
P–04170<br />
P–04171<br />
P–04175<br />
853, 853H BICS Loa<strong>de</strong>r<br />
–4–11– Service Manual<br />
1
AXLE, BEARINGS AND SPROCKET (Cont’d)<br />
Removal and Installation (Cont’d)<br />
Use the tools provi<strong>de</strong>d in the MEL1202B Axle Bearing<br />
Service Set for bearing cup removal and installation. A<br />
sli<strong>de</strong> hammer is also nee<strong>de</strong>d.<br />
Use the long rod and bearing cup tool to remove the inner<br />
bearing cup [A].<br />
To remove the outer bearing cup, install a bearing cup tool<br />
on the sli<strong>de</strong> hammer.<br />
Leave the bearing cup tool loose until the tool is installed<br />
insi<strong>de</strong> the tube [B].<br />
Pull the tool against the bearing cup and tighten the nut.<br />
Use the sli<strong>de</strong> hammer and remove the bearing cup from<br />
the axle tube [C].<br />
–4–12–<br />
A<br />
B<br />
C<br />
P–04812<br />
P–04818<br />
P–04816<br />
853, 853H BICS Loa<strong>de</strong>r<br />
Service Manual
AXLE, BEARING AND SPROCKET (Cont’d)<br />
Removal and Installation (Cont’d)<br />
Use the bearing cup installation tools (Item 1) [A] and<br />
(Item 1) [B].<br />
Put the inner cup (Item 2) [A] in the axle tube.<br />
Install the long trea<strong>de</strong>d rod (Item 2) [B] into the axle tube<br />
and through the installation tool (Item 1) [A].<br />
Install the nut (Item 3) [A].<br />
Install the installation tool (Item 1) [B] on the threa<strong>de</strong>d<br />
rod. Install the nut.<br />
Hold the insi<strong>de</strong> nut (Item 3) [A] with a wrench and tighten<br />
the outsi<strong>de</strong> nut [B].<br />
Tighten the nut until the bearing cup is seated.<br />
Remove the installation tools and threa<strong>de</strong>d rod.<br />
To install the outer bearing cup, install the bearing cup tool<br />
on the driver handle.<br />
Install the bearing cup into the axle tube, and put the tool<br />
into the bearing cup.<br />
Hit the driver handle with a hammer until the bearing cup<br />
is seated insi<strong>de</strong> the axle tube [C].<br />
A<br />
B<br />
C<br />
2<br />
3<br />
1<br />
2<br />
P–04807<br />
P–04811<br />
P–04813<br />
853, 853H BICS Loa<strong>de</strong>r<br />
–4–13– Service Manual<br />
1
REDUCTION GEARCASE<br />
Reduction Gearcase Seal<br />
The tool listed will be nee<strong>de</strong>d to do the following<br />
procedure:<br />
MEL1047 – Seal Installation Tool<br />
Lift and block the loa<strong>de</strong>r. (See Page 1–1.)<br />
Remove the hydrostatic motor. (See Page 3–1.)<br />
Drill a hole into the reduction gearcase seal [A].<br />
Install a sli<strong>de</strong> hammer with a screw tip end into the seal<br />
[B].<br />
Remove the reduction gearcase seal.<br />
Install the new quad ring on the installation tool.<br />
Install the backup washer.<br />
Use a hammer, hit the installation tool until the quad ring<br />
is fully seated [C].<br />
–4–14–<br />
A<br />
B<br />
C<br />
P–04795<br />
P–04798<br />
P–04806<br />
853, 853H BICS Loa<strong>de</strong>r<br />
Service Manual
REDUCTION GEARCASE (Cont’d)<br />
Removal and Installation<br />
Lift and block the loa<strong>de</strong>r. (See Page 1–1.)<br />
Raise the lift arms and install an approved lift arm support<br />
<strong>de</strong>vice (Page 1–1).<br />
Raise the operator cab (Page 1–1).<br />
Remove the front panel/steering levers assembly (Page<br />
3–1).<br />
Remove the hydraulic control valve if the right si<strong>de</strong><br />
reduction gearcase is removed (Page 2–1).<br />
Remove the center cover (Page 4–5).<br />
Remove the front cover (Page 4–7).<br />
Remove the fluid from the chaincase (Page 4–26).<br />
Remove the hydrostatic motor (Page 3–1).<br />
Remove the front axle (Page 4–10).<br />
Remove the reduction gearcase mounting bolts (Item 1)<br />
[A].<br />
Installation: Tighten the mounting bolts to the following<br />
torque:<br />
3/4 inch Bolt – 220–245 ft.–lbs. (300–330 Nm)<br />
1/2 inch Bolt – 65–70 ft.–lbs. (88–95 Nm)<br />
Remove the front and the rear drive chains from the<br />
cluster sprocket.<br />
Connect a chain hoist as shown in figure [B].<br />
Remove the reduction gearcase from the chaincase [B].<br />
Installation: Make sure the ring (Item 1) [C] and the<br />
O–ring (Item 2) [C] are in position before tightening the<br />
bolts.<br />
A<br />
B<br />
C<br />
1<br />
1<br />
2<br />
1<br />
P–04805<br />
P–04819<br />
P–04797<br />
853, 853H BICS Loa<strong>de</strong>r<br />
–4–15– Service Manual
REDUCTION GEARCASE (Cont’d)<br />
Checking Reduction Gearcase<br />
Before disassembly of the gearcase do the following<br />
checks:<br />
Install a dial indicator on the input shaft [A]. The end play<br />
must be between 0.00–0.010 inch (0,0254 mm). If not, the<br />
following parts may need replacing: Bearing, bearing<br />
cups, gear or gearcase housing.<br />
Install the dial indicator on the output shaft [B]. The end<br />
play must be between 0.00–0.010 inch (0,0254 mm). If<br />
not, the following parts may need replacing: Bearing,<br />
bearing cups, gear or gearcase housing.<br />
Remove the seal (Page 4–14).<br />
Install a feeler gauge between the teeth of the gears [C].<br />
The back lash must be between 0.003–0.009 inch<br />
(0,076–0,228 mm). If not, the following parts may need<br />
replacing: Large gear or the shaft.<br />
Measure the bore diameter for the seal. Correct diameter<br />
is 3.750 ± 0.001 inch (95,25 ± 0,025 mm). Install a dial<br />
indicator on the input shaft. Set the indicator so the stylus<br />
is against the pilot bore for the drive motor. Rotate the<br />
shaft 360 <strong>de</strong>grees. Maximum run–out should not exceed<br />
0.009 inch (0,23 mm). If either check (Bore I.D. &<br />
Run–Out) is not within these specifications, replace the<br />
gearbox.<br />
Disassembly<br />
The tool listed will be nee<strong>de</strong>d to do the following<br />
procedure:<br />
MEL1047 – Seal Installation Tool<br />
Remove the bolts from the end plate [D].<br />
–4–16–<br />
A<br />
B<br />
C<br />
D<br />
B–13458<br />
B–13457<br />
B–08673<br />
B–08705<br />
853, 853H BICS Loa<strong>de</strong>r<br />
Service Manual
REDUCTION GEARCASE (Cont’d)<br />
Disassembly (Cont’d)<br />
Remove the end plate [A].<br />
Remove the dust cap [B].<br />
Loosen the bolt from the output shaft [C].<br />
Remove the bolt and washer [D].<br />
A<br />
B<br />
C<br />
D<br />
B–08704<br />
B–08728<br />
B–08721<br />
B–08727<br />
853, 853H BICS Loa<strong>de</strong>r<br />
–4–17– Service Manual
REDUCTION GEARCASE (Cont’d)<br />
Disassembly (Cont’d)<br />
Remove the bolt from the disc hub [A].<br />
Remove the bolt and washer [B].<br />
Remove the disc hub and key [C].<br />
Put the gearcase housing in the press and remove the<br />
output shaft [D].<br />
–4–18–<br />
A<br />
B<br />
C<br />
D<br />
B–08751<br />
B–08752<br />
B–08750<br />
B–08682<br />
853, 853H BICS Loa<strong>de</strong>r<br />
Service Manual
REDUCTION GEARCASE (Cont’d)<br />
Disassembly (Cont’d)<br />
Remove the bearing [A].<br />
Remove the spacer [B].<br />
Remove the output shaft [C].<br />
Remove the large gear [D].<br />
A<br />
B<br />
C<br />
D<br />
B–08707<br />
B–08706<br />
B–08749<br />
B–08722<br />
853, 853H BICS Loa<strong>de</strong>r<br />
–4–19– Service Manual
REDUCTION GEARCASE (Cont’d)<br />
Disassembly (Cont’d)<br />
Remove the bearing at the input shaft [A].<br />
Use a press and remove the input shaft [B].<br />
Remove the input shaft assembly from the housing [C].<br />
Use a punch and hammer and remove the bearing cups<br />
as nee<strong>de</strong>d [D].<br />
–4–20–<br />
A<br />
B<br />
C<br />
D<br />
B–08745<br />
B–08679<br />
B–08744<br />
B–08678<br />
853, 853H BICS Loa<strong>de</strong>r<br />
Service Manual
REDUCTION GEARCASE (Cont’d)<br />
Assembly<br />
Using a press and bearing cup tool, install the bearing cup<br />
in the housing.<br />
Install the input shaft [A].<br />
Install the bearing on the input shaft [B].<br />
Install the large gear into the housing [C].<br />
Install the output shaft into the housing and large gear [D].<br />
A<br />
B<br />
C<br />
D<br />
B–08744<br />
B–08745<br />
B–08722<br />
B–08749<br />
853, 853H BICS Loa<strong>de</strong>r<br />
–4–21– Service Manual
REDUCTION GEARCASE (Cont’d)<br />
Assembly (Cont’d)<br />
Install the spacer [A].<br />
Install the bearing [B].<br />
Put LOCTITE on the bolt.<br />
Install the bolt and washer [C].<br />
Tighten the bolt to 210–235 ft.–lbs. (285–305 Nm) torque<br />
[D].<br />
Put Boretite sealant on the edge of the dust cup and install<br />
the dust cup into the housing.<br />
–4–22–<br />
A<br />
B<br />
C<br />
D<br />
B–08706<br />
B–08707<br />
B–08727<br />
B–08721<br />
853, 853H BICS Loa<strong>de</strong>r<br />
Service Manual
REDUCTION GEARCASE (Cont’d)<br />
Assembly (Cont’d)<br />
Install the key and hub on the input shaft [A].<br />
Put LOCTITE on the bolt.<br />
Install the bolt and washer [B].<br />
Tighten the bolt to 210–235 ft.–lbs. (285–305 Nm) torque<br />
[C].<br />
Instal the end plate on the housing [D].<br />
A<br />
B<br />
C<br />
D<br />
B–08750<br />
B–08752<br />
B–08751<br />
B–08704<br />
853, 853H BICS Loa<strong>de</strong>r<br />
–4–23– Service Manual
REDUCTION GEARCASE (Cont’d)<br />
Assembly (Cont’d)<br />
Install the end plate bolts and tighten to 13–14 ft.–lbs.<br />
(Nm) torque [A].<br />
Install a new quad ring. Install the backup washer [B].<br />
Install the new seal using the seal installation tool [C].<br />
–4–24–<br />
A<br />
B<br />
C<br />
B–08705<br />
B–08675<br />
B–08734<br />
853, 853H BICS Loa<strong>de</strong>r<br />
Service Manual
DRIVE CHAIN<br />
853, 853H BICS Service Manual #6724012 – Drive System Section Part 1 of 2<br />
Removal and Installation<br />
Raise the lift arms and install an approved lift arm support<br />
<strong>de</strong>vice (Page 1–1).<br />
Lift and block the loa<strong>de</strong>r (Page 1–1).<br />
Raise the operator cab (Page 1–1).<br />
Removing the front panel/steering lever assembly (Page<br />
3–1).<br />
Remove the center chaincase cover (Page 4–5).<br />
Remove the front and rear chaincase cover (Page 4–7).<br />
Remove the fluid from the chaincase (Page 4–26).<br />
Remove the rear axle (Page 4–10).<br />
NOTE: It is necessary to remove the rear axle and<br />
drive chain [A]. If the front chain has to be<br />
removed.<br />
A<br />
Front Drive<br />
Chain<br />
Rear Drive<br />
Chain<br />
P–04805<br />
853, 853H BICS Loa<strong>de</strong>r<br />
–4–25– Service Manual
CHAINCASE FLUID<br />
853, 853H BICS Service Manual #6724012 – Drive System Section Part 2 of 2<br />
Removing the Fluid From the Chaincase<br />
To drain the oil from the chaincase, remove the cover<br />
(Item 1) [A] which is installed over the drain plug at the<br />
rear of the chaincase.<br />
Remove the drain plug (Item 1) [B] and drain the oil into<br />
a container.<br />
Check the drain plug and replace if necessary.<br />
–4–26–<br />
A<br />
B<br />
1<br />
1<br />
P–1616<br />
P–1619<br />
853, 853H BICS Loa<strong>de</strong>r<br />
Service Manual
MAIN FRAME<br />
Page<br />
Number<br />
BOB–TACH<br />
Bob–Tach Lever and Wedge . . . . . . . . . . . . . . . . . . . . . . . . . . . . . . . . . . . . 5–14<br />
Bob–Tach Stops . . . . . . . . . . . . . . . . . . . . . . . . . . . . . . . . . . . . . . . . . . . . . . 5–15<br />
Removal and Installation . . . . . . . . . . . . . . . . . . . . . . . . . . . . . . . . . . . . . . . 5–12<br />
FUEL TANK<br />
Fuel Level Sen<strong>de</strong>r . . . . . . . . . . . . . . . . . . . . . . . . . . . . . . . . . . . . . . . . . . . . . 5–21<br />
Inlet Screen . . . . . . . . . . . . . . . . . . . . . . . . . . . . . . . . . . . . . . . . . . . . . . . . . . 5–21<br />
Removal and Installation . . . . . . . . . . . . . . . . . . . . . . . . . . . . . . . . . . . . . . . 5–20<br />
LIFT ARMS<br />
Removal and Installation . . . . . . . . . . . . . . . . . . . . . . . . . . . . . . . . . . . . . . . 5–16<br />
OPERATOR CAB<br />
Removal and Installation . . . . . . . . . . . . . . . . . . . . . . . . . . . . . . . . . . . . . . . 5–9<br />
OPERATOR CAB GAS CYLINDER<br />
Disassembly and Assembly . . . . . . . . . . . . . . . . . . . . . . . . . . . . . . . . . . . . 5–8<br />
Removal and Installation . . . . . . . . . . . . . . . . . . . . . . . . . . . . . . . . . . . . . . . 5–7<br />
OPERATOR SEAT<br />
Removal and Installation . . . . . . . . . . . . . . . . . . . . . . . . . . . . . . . . . . . . . . . . 5–11<br />
REAR DOOR<br />
Bumper Removal and Installation . . . . . . . . . . . . . . . . . . . . . . . . . . . . . . . 5–19<br />
Door Latch and Catch Adjustment . . . . . . . . . . . . . . . . . . . . . . . . . . . . . . . 5–19<br />
Door Latch Removal and Installation . . . . . . . . . . . . . . . . . . . . . . . . . . . . . 5–19<br />
Hood Removal and Installation . . . . . . . . . . . . . . . . . . . . . . . . . . . . . . . . . . 5–19<br />
Removal and Installation . . . . . . . . . . . . . . . . . . . . . . . . . . . . . . . . . . . . . . . 5–18<br />
REAR GRILL<br />
Removal and Installation . . . . . . . . . . . . . . . . . . . . . . . . . . . . . . . . . . . . . . . 5–17<br />
SEAT BAR<br />
Assembly . . . . . . . . . . . . . . . . . . . . . . . . . . . . . . . . . . . . . . . . . . . . . . . . . . . . 5–5<br />
Compressing the Gas Cylin<strong>de</strong>r . . . . . . . . . . . . . . . . . . . . . . . . . . . . . . . . . . 5–6<br />
Removal and Installation . . . . . . . . . . . . . . . . . . . . . . . . . . . . . . . . . . . . . . . 5–3<br />
MAIN<br />
FRAME<br />
853, 853H BICS Loa<strong>de</strong>r<br />
–5–1– Service Manual
–5–2–<br />
853, 853H BICS Loa<strong>de</strong>r<br />
Service Manual
MAIN FRAME<br />
SEAT BAR<br />
Removal and Installation<br />
The tool listed is nee<strong>de</strong>d for the following procedure:<br />
MEL1426 – Gas Spring Retainer Tool<br />
Lower the operator seat bar.<br />
Install the gas spring retainer tool on the gas cylin<strong>de</strong>r<br />
(Item 1) [A].<br />
Install the end of the tool that is bent at a 90° angle in the<br />
clevis of the cylin<strong>de</strong>r as shown [B].<br />
Install the curved end of the tool on the base end of the<br />
gas cylin<strong>de</strong>r.<br />
Secure the tool to the gas cylin<strong>de</strong>r with a hose clamp<br />
(Item 2) [A].<br />
Remove the cotter pin (Item 1) [B] from the clevis pin.<br />
Remove the clevis pin (Item 1) [C] from the gas cylin<strong>de</strong>r.<br />
Use a 17/32 inch tappet wrench (Item 1) [D] to hold the<br />
ball joint on the gas cylin<strong>de</strong>r.<br />
Remove the mounting nut from the ball joint [D].<br />
Installation: Be careful not to overtighten the mounting<br />
nut on the ball joint.<br />
Remove the gas cylin<strong>de</strong>r from the seat bar.<br />
Cylin<strong>de</strong>r contains high pressure gas. Do not<br />
open. Opening cylin<strong>de</strong>r can release rod and<br />
cause injury or <strong>de</strong>ath.<br />
W–2113–0288<br />
Replace the gas cylin<strong>de</strong>r if it malfunctions.<br />
A<br />
B<br />
C<br />
D<br />
1<br />
1<br />
1<br />
2<br />
1<br />
P–03978<br />
P–03248<br />
P–03979<br />
P–03249<br />
853, 853H BICS Loa<strong>de</strong>r<br />
–5–3– Service Manual
SEAT BAR (Cont’d)<br />
Removal and Installation (Cont’d)<br />
Disconnect the seat bar sensor connector (Item 1) [A].<br />
Remove the seat bar mounting bolt (Item 1) [B] (both<br />
si<strong>de</strong>s).<br />
Installation: Tighten the seat bar mounting bolts to<br />
25–28 ft.–lbs. (34–38 Nm) torque.<br />
Remove the seat bar sensor mounting bolt (Item 2) [B]<br />
and nut.<br />
Installation: Tighten the sensor mounting bolt to 80–90<br />
in.–lbs. (9–10 Nm) torque.<br />
Remove the sensor assembly from the magnetic bushing<br />
on the seat bar.<br />
Installation: Be sure the two tabs on the pivot bushing<br />
are located in the slot on the cab as shown [C].<br />
Pull both ends of the seat bar which are mounted to the<br />
operator cab, back from the mounting positions on the<br />
operator cab [D].<br />
Remove the magnetic bushing mounting bolt, washer,<br />
magnetic bushing, plastic bushing and pivot bushing from<br />
the seat bar [D]. Refer to Page 8–1 for correct assembly<br />
procedure of the seat bar sensor assembly.<br />
Remove the mounting bolt, gas cylin<strong>de</strong>r mounting<br />
bracket, plastic bushing and pivot bushing from the seat<br />
bar [D]. Refer to Page 5–3 for correct assembly<br />
procedure of the gas cylin<strong>de</strong>r mounting assembly.<br />
–5–4–<br />
A<br />
B<br />
C<br />
D<br />
P–03982<br />
1<br />
2<br />
1<br />
1<br />
P–03981<br />
P–03246<br />
P–03247<br />
P–03983<br />
853, 853H BICS Loa<strong>de</strong>r<br />
Service Manual
SEAT BAR (Cont’d)<br />
Removal and Installation (Cont’d)<br />
To remove the seat bar from the operator cab, the seat bar<br />
needs to be put in the correct location.<br />
Use the squares in the right si<strong>de</strong> of the operator cab si<strong>de</strong><br />
screen to locate the seat bar correctly [A].<br />
Put the pad<strong>de</strong>d corner of the seat bar five squares back<br />
from the front of the operator cab si<strong>de</strong> screen and four<br />
squares up from the bottom of the screen [A].<br />
The arm of the seat bar (Item 1) [B] should also be located<br />
outsi<strong>de</strong> of the operator cab, just below the bottom edge<br />
of the cab.<br />
Grab both ends of the seat bar as shown and pull the left<br />
si<strong>de</strong> of the seat bar out of the operator cab until the seat<br />
bar is free [B].<br />
Remove the seat bar from the operator cab.<br />
Reverse removal procedure to install the seat bar.<br />
See the following assembly procedure when installing the<br />
seat bar.<br />
Assembly<br />
Assemble the parts as shown for the left si<strong>de</strong> of the seat<br />
bar pivot assembly [C]:<br />
Mounting Bolt – (Item 1).<br />
Washer – (Item 2).<br />
Keyed Plastic Bushing – (Item 3).<br />
Magnetic Bushing Assembly (Item 4).<br />
Sensor Bracket – (Item 5).<br />
Pivot Bushing – (Item 6).<br />
Mounting Bolt – (Item 7).<br />
Sensor Mounting Bolt (Item 8).<br />
Sensor Mounting Nut (Item 9).<br />
A<br />
B<br />
C<br />
1<br />
7 6 3 2 1<br />
8 5 4<br />
9<br />
P–03984<br />
P–04065<br />
Left Si<strong>de</strong><br />
of Seat Bar<br />
P–03284<br />
853, 853H BICS Loa<strong>de</strong>r<br />
–5–5– Service Manual
SEAT BAR (Cont’d)<br />
Assembly (Cont’d)<br />
Assemble the parts as shown for the right si<strong>de</strong> of the seat<br />
bar pivot assembly [A]:<br />
Mounting Bolt (Item 1).<br />
Pivot Bushing (Item 2).<br />
Keyed Plastic Bushing (Item 3).<br />
Gas Spring Mounting Bracket (Item 4).<br />
Mounting Bolt (Item 5).<br />
Install the right si<strong>de</strong> pivot assembly as shown. Tighten the<br />
mounting bolt (Item 1) [B] to 180–200 in.–lbs. (21–23 Nm)<br />
torque.<br />
NOTE: Be sure the bend in the gas spring bracket<br />
faces in toward the operator when installing<br />
the gas spring bracket. Sli<strong>de</strong> the bracket all<br />
the way forward so the front edge of the<br />
bracket fits tightly against the operator cab.<br />
Compressing the Gas Cylin<strong>de</strong>r<br />
To compress the seat bar gas spring, it is necessary to<br />
use the gas spring retainer tool MEL1426.<br />
Use the following procedure to compress the gas spring:<br />
Cylin<strong>de</strong>r contains high pressure gas. Do not<br />
open. Opening cylin<strong>de</strong>r can release rod and<br />
cause injury or <strong>de</strong>ath.<br />
W–2113–0288<br />
Open the rear door of the loa<strong>de</strong>r and install the gas spring<br />
(Item 1 – ball stud end) [C] in the hole located in the loa<strong>de</strong>r<br />
frame.<br />
NOTE: Install the ball stud threads up through the<br />
hole and install a nut (Item 2) [C] on the ball<br />
stud.<br />
Put the clevis end of the gas cylin<strong>de</strong>r on the edge of the<br />
rear door as shown [C] and install a vise grip (Item 3) [C]<br />
on the bottom edge of the door to keep the gas cylin<strong>de</strong>r<br />
from sliding along the edge.<br />
Pull the door in and compress the gas cylin<strong>de</strong>r [D].<br />
Install the retainer tool (Item 1) [D] with the 90° bend in<br />
the clevis of the rod end of the gas cylin<strong>de</strong>r. Install the<br />
curved end of the tool around the base end of the gas<br />
spring.<br />
Install the clamp (Item 2) [D] around the gas cylin<strong>de</strong>r to<br />
hold the retainer tool in place. Remove the nut and<br />
remove the gas spring from the rear door.<br />
–5–6–<br />
A<br />
B<br />
C<br />
D<br />
5<br />
2<br />
4<br />
1<br />
2<br />
3 2 1<br />
1<br />
3<br />
1<br />
Right Si<strong>de</strong><br />
of Seat Bar<br />
P–03289<br />
P–03319<br />
P–03285<br />
P–03288<br />
853, 853H BICS Loa<strong>de</strong>r<br />
Service Manual
OPERATOR CAB GAS CYLINDER<br />
Removal and Installation<br />
Cylin<strong>de</strong>r contains high pressure gas. Do not<br />
open. Opening cylin<strong>de</strong>r can release rod and<br />
cause injury or <strong>de</strong>ath.<br />
W–2113–0288<br />
Remove the operator cab stop (Item 1) [A] (both si<strong>de</strong>s).<br />
NOTE: Be careful not to break the rear window when<br />
the cab is raised after the cab stops are<br />
removed.<br />
Raise the operator cab (See Page 1–1).<br />
Remove the nuts (Item 1) [B] from the gas cylin<strong>de</strong>r<br />
mounting bracket.<br />
Move the mounting bracket to relieve any remaining<br />
tension on the gas cylin<strong>de</strong>r [C].<br />
Remove the cotter pin (Item 1) [D] from the top pivot pin.<br />
Remove the pivot pin and bushing from the gas cylin<strong>de</strong>r.<br />
Remove the gas cylin<strong>de</strong>r.<br />
A<br />
B<br />
C<br />
D<br />
1<br />
CD–15014<br />
CD–15015<br />
CD–15016<br />
1<br />
CD–15173<br />
853, 853H BICS Loa<strong>de</strong>r<br />
–5–7– Service Manual<br />
1
OPERATOR CAB GAS CYLINDER (Cont’d)<br />
Disassembly and Assembly<br />
Remove the clevis (Item 1) [A] and washer (Item 2) [A]<br />
from the end of the gas cylin<strong>de</strong>r.<br />
Remove the gas cylin<strong>de</strong>r from the outer housing.<br />
Assembly: Install a replacement cylin<strong>de</strong>r insi<strong>de</strong> the<br />
cylin<strong>de</strong>r housing.<br />
Apply a small amount of LOCTITE on the threads of the<br />
cylin<strong>de</strong>r rod [B].<br />
Reinstall the washer and clevis on the cylin<strong>de</strong>r rod.<br />
–5–8–<br />
A<br />
B<br />
1<br />
2<br />
P–01008<br />
P–01006<br />
853, 853H BICS Loa<strong>de</strong>r<br />
Service Manual
OPERATOR CAB<br />
Removal and Installation<br />
Remove the cab nut and holddown plate (Item 1) [A] (both<br />
si<strong>de</strong>s).<br />
Installation: Tighten the nut to 40–50 ft.–lbs. (54–68 Nm)<br />
torque.<br />
Remove both gas cylin<strong>de</strong>rs (Page 5–7).<br />
Disconnect the wiring harness connectors (Item 1) [B].<br />
Disconnect the ground wire (Item 2) [B].<br />
Connect a chain hoist to the operator cab grab handles<br />
and lower the operator cab when the gas cylin<strong>de</strong>rs are<br />
disconnected [C].<br />
Revised June 97<br />
A<br />
B<br />
C<br />
1<br />
1 2<br />
CD–15125<br />
P–04860<br />
P–05051<br />
853, 853H BICS Loa<strong>de</strong>r<br />
–5–9– Service Manual
OPERATOR CAB (Cont’d)<br />
Removal and Installation (Cont’d)<br />
Remove the nut (Item 1) [A] from the pivot bolt (both<br />
si<strong>de</strong>s).<br />
Installation: Tighten the pivot bolt and nut to 25–35<br />
ft.–lbs. (34–47 Nm) torque.<br />
Remove the pivot bolt (both si<strong>de</strong>s).<br />
Move the operator cab forward a small amount for<br />
clearance at the pivot mounting brackets [B].<br />
Install the pivot bolt, washer (one on each si<strong>de</strong>) and nut<br />
(Item 1) [B] (both si<strong>de</strong>s).<br />
Install the sling un<strong>de</strong>r the pivot bolt and pivot of the<br />
operator cab [B].<br />
Connect the slings to a chain hoist and remove the<br />
operator cab from the loa<strong>de</strong>r [C].<br />
–5–10–<br />
A<br />
B<br />
C<br />
1<br />
1<br />
P–05048<br />
P–05049<br />
P–05050<br />
853, 853H BICS Loa<strong>de</strong>r<br />
Service Manual
OPERATOR SEAT<br />
Removal and Installation<br />
Use the following procedure to remove the operator seat<br />
from the operator cab:<br />
Raise the operator cab (See Page 1–1).<br />
Locate the operator seat sensor (Item 1) [A] on the<br />
bottom of the seat pan.<br />
Disconnect the seat sensor connector and remove the<br />
seat sensor assembly (See Page 8–1).<br />
Remove the three seat mounting nuts (Item 1) [B] and<br />
washers from the operator seat mounting studs.<br />
Lower the operator cab and remove the operator seat<br />
from the cab.<br />
NOTE: There are two spacers (Item 1) [C] located<br />
between seat track and the seat pan on each<br />
front mounting stud. Be sure not to lose the<br />
spacers when removing the seat.<br />
Remove the seat spring (Item 2) [C] from un<strong>de</strong>r the right<br />
seat track when removing the operator seat.<br />
Installation: Install the seat spring (Item 1) [D] with the<br />
bend of the seat spring in the position shown.<br />
Inspect the seat adjustment track (Item 3) [C].<br />
Remove the mounting bolt from each end of the track and<br />
replace the adjustment track if necessary.<br />
Reverse the removal procedure to install the operator<br />
seat.<br />
A<br />
B<br />
C<br />
D<br />
Seat<br />
Pan<br />
1<br />
3<br />
1<br />
2<br />
Operator<br />
Seat<br />
1<br />
1<br />
Seat<br />
Spring<br />
P–03987<br />
P–03999<br />
P–03996<br />
MC–02043<br />
853, 853H BICS Loa<strong>de</strong>r<br />
–5–11– Service Manual<br />
1
BOB–TACH<br />
Removal and Installation<br />
Tilt the Bob–Tach forward, so it is parallel to the floor. Put<br />
blocks approximately 3 inches thick un<strong>de</strong>r each si<strong>de</strong> of<br />
the Bob–Tach (Item 1) [A]. Lower the Bob–Tach onto the<br />
blocks [A].<br />
Remove the retainer bolt (Item 1) [B] from the pivot pin.<br />
Installation: Tighten the retainer bolt to 18–20 ft.–lbs.<br />
(24–27 Nm) torque.<br />
Remove the grease fitting from the pivot pin (Item 1) [C].<br />
Remove the rod end pivot pin (Item 1) [C].<br />
Remove the tilt cylin<strong>de</strong>r rod end.<br />
Remove the seals (Item 1) [D].<br />
–5–12–<br />
A<br />
B<br />
C<br />
D<br />
1<br />
1<br />
1<br />
1<br />
CD–15075<br />
P–04601<br />
P–03915<br />
P–03911<br />
853, 853H BICS Loa<strong>de</strong>r<br />
Service Manual
BOB–TACH (Cont’d)<br />
Removal and Installation (Cont’d)<br />
Installation: Use two pieces of shim stock (light<br />
cardboard), install the rod end of the tilt cylin<strong>de</strong>r into the<br />
Bob–Tach [A].<br />
Be careful not to damage the seals during installation.<br />
NOTE: Removal procedure is shown for the right<br />
si<strong>de</strong>. Left si<strong>de</strong> procedure is the same.<br />
Remove the grease fitting (Item 1) [B] from the Bob–Tach<br />
frame for the pivot pin (both si<strong>de</strong>s) [C].<br />
NOTE: The grease fitting must be removed to<br />
prevent the pivot pin from being hydraulic<br />
locked in the Bob–Tach frame.<br />
Loosen the bolt (Item 2) [B] at the Bob–Tach pivot pin.<br />
Installation: Tighten the bolt to 250–260 ft.–lbs.<br />
(339–353 Nm) torque.<br />
Strike the head of the bolt (Item 2) [B] to push the pivot<br />
pin into the Bob–Tach frame.<br />
Remove the bolt (Item 2) [B].<br />
Use a punch to push the pivot pin all the way into the<br />
Bob–Tach frame.<br />
Installation: A longer bolt is necessary to install through<br />
lift arms into the pivot pin, to pull the pivot pin into the lift<br />
arms.<br />
NOTE: Use tapered reamer MEL1233 to clean the<br />
tapered hole in the lift arms. The tapered hole<br />
must be clean and free of <strong>de</strong>bris to provi<strong>de</strong> a<br />
good contact surface for the pivot pin.<br />
Remove the Bob–Tach frame from the lift arms [C].<br />
Remove the seal dust cup (Item 1) [C].<br />
Remove the rubber seal [D].<br />
A<br />
B<br />
C<br />
D<br />
2<br />
1<br />
P–03910<br />
P–03913<br />
P–03908<br />
P–03909<br />
853, 853H BICS Loa<strong>de</strong>r<br />
–5–13– Service Manual<br />
1
BOB–TACH (Cont’d)<br />
Removal and Installation (Cont’d)<br />
Install the Bob–Tach mounting bolt (Item 1) [A] into the<br />
pivot pin (Item 2) [A]. Remove the pivot pin from the<br />
Bob–Tach frame.<br />
Check for wear and damage. Replace the pivot pins as<br />
nee<strong>de</strong>d.<br />
Installation: Push the pivot pin (Item 2) [A] into the<br />
Bob–Tach frame. Position the end of the pin flush with the<br />
end of the Bob–Tach bushing (Item 3) [A].<br />
Reverse the removal procedure to install the Bob–Tach.<br />
Bob–Tach Lever and Wedge<br />
Use the following procedure to remove and install the<br />
Bob–Tach lever (Item 1) [B], spring and wedge:<br />
Remove the lever mounting bolt and nut (Item 1) [C],<br />
washer (Item 2) [C] and spring (Item 3) [C].<br />
Installation: Tighten the nut to 25–28 ft.–lbs. (34–38 Nm)<br />
torque.<br />
Remove the Bob–Tach lever (Item 1) [D].<br />
–5–14–<br />
A<br />
B<br />
C<br />
D<br />
1<br />
1 2<br />
2<br />
3<br />
1<br />
1<br />
3<br />
P–03912<br />
P–03930<br />
P–03928<br />
P–03924<br />
853, 853H BICS Loa<strong>de</strong>r<br />
Service Manual
BOB–TACH (Cont’d)<br />
Bob–Tach Lever and Wedge (Cont’d)<br />
Using a punch and hammer, remove the roll pin (Item 1)<br />
[A] from the Bob–Tach wedge and spring, bolt and clevis<br />
assembly.<br />
Remove the spring, bolt and clevis assembly (Item 1) [B].<br />
Remove the wedge (Item 2) [B] from the Bob–Tach<br />
frame.<br />
Always replace bent or broken wedges.<br />
If the bolt (Item 1) [C], handle pivot (Item 2) [C], spring<br />
(Item 3) [C] or clevis (Item 4) [C] are damaged, put the<br />
assembly in the vise. Loosen and remove the bolt (Item<br />
1) [C] with a 5/16 inch allen wrench.<br />
Replace the worn or damaged parts as nee<strong>de</strong>d.<br />
Reverse the removal procedure to install the Bob–Tach<br />
Lever and Wedge.<br />
Bob–Tach Stops<br />
Remove and replace the Bob–Tach stop (Item 1) [D]<br />
(both si<strong>de</strong>s) if worn or damaged.<br />
NOTE: The Bob–Tach stop (Item 1) [D] must contact<br />
the lift arm at the same time the tilt cylin<strong>de</strong>r<br />
reaches full extension. Use available shims<br />
to adjust the Bob–Tach stop and tilt cylin<strong>de</strong>r<br />
sequence as closely as possible.<br />
A<br />
B<br />
C<br />
D<br />
4<br />
3<br />
1<br />
1<br />
1<br />
2<br />
P–03925<br />
P–03926<br />
1<br />
P–03929<br />
P–03914<br />
853, 853H BICS Loa<strong>de</strong>r<br />
–5–15– Service Manual<br />
2
LIFT ARMS<br />
Removal and Installation<br />
Roll the Bob–Tach (Item 1) [A] fully forward.<br />
Stop the engine.<br />
Remove the Bob–Tach (Item 1) [A] from the lift arms<br />
(Page 5–13).<br />
Install the slings (Item 2) [A] on the lift arms.<br />
Connect a chain hoist to the slings [A].<br />
Remove the retainer bolt and nut (Item 1) [B] from the rod<br />
end lift cylin<strong>de</strong>r pivot pin (both si<strong>de</strong>s).<br />
Installation: Tighten the retainer bolt and nut to 18–20<br />
ft.–lbs. (24–27 Nm) torque.<br />
Raise the lift arms with the chain hoist so there is enough<br />
clearance to remove the rod end pivot pin.<br />
Remove the lift cylin<strong>de</strong>r rod end pivot pin (both si<strong>de</strong>s).<br />
Lower the lift arms.<br />
Disconnect the auxiliary hydraulic tubelines and hoses<br />
(Item 1) [C] if so equipped (both si<strong>de</strong>s).<br />
Remove the retainer bolt and nut (Item 2) [C] from the lift<br />
arm pivot pin.<br />
Installation: Tighten the retainer bolt and nut to 18–20<br />
ft.–lbs. (24–27 Nm) torque.<br />
Remove the lift arm pivot pin.<br />
Raise the lift arms with the chain hoist and remove from<br />
the loa<strong>de</strong>r frame.<br />
–5–16–<br />
A<br />
1<br />
B<br />
C<br />
2<br />
1<br />
1<br />
2<br />
2<br />
P–05052<br />
CD–15169<br />
P–05053<br />
853, 853H BICS Loa<strong>de</strong>r<br />
Service Manual
REAR GRILL<br />
Removal and Installation<br />
Raise the rear grill.<br />
Support the rear grill.<br />
Remove the nut (Item 1) [A] to disconnect the gas<br />
cylin<strong>de</strong>r from the rear grill.<br />
Lower the rear grill.<br />
Remove the cotter pin (Item 1) [B] from the pivot pin (both<br />
si<strong>de</strong>s).<br />
Remove the pivot pin (Item 1) [C] (both si<strong>de</strong>s).<br />
Remove the rear grill from the loa<strong>de</strong>r [D].<br />
A<br />
B<br />
C<br />
D<br />
1<br />
1<br />
P–04881<br />
P–04882<br />
P–04883<br />
P–04886<br />
853, 853H BICS Loa<strong>de</strong>r<br />
–5–17– Service Manual<br />
1
REAR DOOR<br />
Removal and Installation<br />
Open the rear door, disconnect the wiring harness<br />
connector (Item 1) [A].<br />
Remove the nuts (Item 2) [A] from the pivot bolts.<br />
Installation: Tighten the bolts and nuts to 25–28 ft.–lbs.<br />
(34–38 Nm) torque.<br />
Connect a 1/4 inch chain to the rear door using two bolts<br />
(Item 1) [B].<br />
Insi<strong>de</strong> the rear door, secure the chain with washers and<br />
nuts.<br />
Connect a chain hoist to the chain.<br />
Remove the rear door pivot bolts.<br />
Lift the rear door away from the loa<strong>de</strong>r frame and put the<br />
door flat on the floor.<br />
–5–18–<br />
A<br />
B<br />
1<br />
2<br />
2<br />
1<br />
P–05042<br />
P–05041<br />
853, 853H BICS Loa<strong>de</strong>r<br />
Service Manual
REAR DOOR (Cont’d)<br />
Hood Removal and Installation<br />
Remove the rear lights harness from the rear door hood<br />
if so equipped.<br />
Remove the mounting bolts from the rear door hood (Item<br />
1) [A].<br />
Installation: Tighten the hood mounting bolts to 25–28<br />
ft.–lbs. (34–38 Nm) torque.<br />
Remove the hood from the rear door.<br />
Bumper Removal and Installation<br />
Remove the rear bumper mounting bolts (Item 1) [B] with<br />
a 7/32 inch allen wrench.<br />
Installation: Tighten the mounting bolts to 180–200<br />
in.–lbs. (21–23 Nm) torque.<br />
Remove the bumper (Item 2) [B] from the rear door.<br />
Door Latch Removal and Installation<br />
Remove the door latch mounting bolts (Item 1) [C] from<br />
the door latch mechanism.<br />
Installation: Tighten the mounting bolts to 80–90 in.–lbs.<br />
(9–10 Nm) torque.<br />
Remove the latch and handle mechanisms from the rear<br />
door.<br />
Door Latch and Catch Adjustment<br />
AVOID INJURY<br />
Never service or adjust the machine when the<br />
engine is running unless instructed to do so in<br />
the manual.<br />
W–2012–0290<br />
The door catch (Item 1) [D] can be adjusted si<strong>de</strong> to si<strong>de</strong><br />
for alignment with the door latch.<br />
The door latch mechanism (Item 1) [C] can be adjusted<br />
forward or backward for alignment with the door catch.<br />
A<br />
B<br />
C<br />
D<br />
2<br />
1<br />
1<br />
1<br />
P–05043<br />
P–04281<br />
P–05044<br />
P–05045<br />
853, 853H BICS Loa<strong>de</strong>r<br />
–5–19– Service Manual<br />
1
FUEL TANK<br />
Removal and Installation<br />
Remove the cover (Item 1) [A] which is installed over the<br />
drain plug.<br />
Remove the drain plug (Item 1) [B].<br />
Drain the fuel into a container.<br />
Check the drain plug and replace if necessary.<br />
Remove the engine/hydrostatic pump assembly from the<br />
loa<strong>de</strong>r (Page 7–1).<br />
Disconnect the fuel fill hose (Item 1) [C].<br />
Disconnect the tank vent hose (Item 2) [C].<br />
Remove the bolts (Item 1) [D] from the battery holddown<br />
plate.<br />
Remove the battery holddown plate from the loa<strong>de</strong>r.<br />
–5–20–<br />
A<br />
B<br />
C<br />
D<br />
1<br />
1<br />
1<br />
1<br />
2<br />
P–01616<br />
P–01619<br />
P–04855<br />
P–04959<br />
853, 853H BICS Loa<strong>de</strong>r<br />
Service Manual
FUEL TANK (Cont’d)<br />
Removal and Installation (Cont’d)<br />
Remove the mounting plate (Item 1) [A] for the battery<br />
holddown plate.<br />
Lift the fuel tank and remove it from the loa<strong>de</strong>r frame [B].<br />
Fuel Level Sen<strong>de</strong>r<br />
Loosen the fuel level sen<strong>de</strong>r (Item 1) [B].<br />
Remove the fuel level sen<strong>de</strong>r from the fuel tank [C].<br />
Inlet Screen<br />
The inlet screen (Item 1) [D] is located at fuel tank fill<br />
neck.<br />
Disconnect the fuel fill hose.<br />
Remove the inlet screen (Item 1) [D].<br />
Wash the screen in clean solvent.<br />
Dry the screen and check for damage. Replace as<br />
nee<strong>de</strong>d.<br />
A<br />
B<br />
C<br />
D<br />
1<br />
1<br />
P–04960<br />
P–04961<br />
P–04962<br />
P–05007<br />
853, 853H BICS Loa<strong>de</strong>r<br />
–5–21– Service Manual<br />
1
853, 853H BICS Service Manual #6724012 – Main Frame Section<br />
–5–22–<br />
853, 853H BICS Loa<strong>de</strong>r<br />
Service Manual
ELECTRICAL SYSTEM<br />
Page<br />
Number<br />
ALTERNATOR<br />
Alternator Output Test . . . . . . . . . . . . . . . . . . . . . . . . . . . . . . . . . . . . . . . . . 6–6<br />
Alternator Regulator Test . . . . . . . . . . . . . . . . . . . . . . . . . . . . . . . . . . . . . . . 6–7<br />
Assembly . . . . . . . . . . . . . . . . . . . . . . . . . . . . . . . . . . . . . . . . . . . . . . . . . . . . . 6–11<br />
Disassembly and Inspection . . . . . . . . . . . . . . . . . . . . . . . . . . . . . . . . . . . .<br />
Rectifier (Dio<strong>de</strong>) Test . . . . . . . . . . . . . . . . . . . . . . . . . . . . . . . . . . . . . . . . . .<br />
6–9<br />
6–6<br />
Rectifier Continuity (Dio<strong>de</strong>) Test . . . . . . . . . . . . . . . . . . . . . . . . . . . . . . . . . 6–10<br />
Removal and Installation . . . . . . . . . . . . . . . . . . . . . . . . . . . . . . . . . . . . . . . 6–8<br />
Rotor Continuity Test . . . . . . . . . . . . . . . . . . . . . . . . . . . . . . . . . . . . . . . . . . 6–10<br />
Rotor Ground Test . . . . . . . . . . . . . . . . . . . . . . . . . . . . . . . . . . . . . . . . . . . . .<br />
Stator Continuity Test . . . . . . . . . . . . . . . . . . . . . . . . . . . . . . . . . . . . . . . . . .<br />
6–10<br />
6–9<br />
Stator Ground Test . . . . . . . . . . . . . . . . . . . . . . . . . . . . . . . . . . . . . . . . . . . . 6–9<br />
BATTERY<br />
Removal and Installation . . . . . . . . . . . . . . . . . . . . . . . . . . . . . . . . . . . . . . . 6–5<br />
ELECTRICAL SYSTEM INFORMATION<br />
Description . . . . . . . . . . . . . . . . . . . . . . . . . . . . . . . . . . . . . . . . . . . . . . . . . . . 6–4<br />
Fuse Location . . . . . . . . . . . . . . . . . . . . . . . . . . . . . . . . . . . . . . . . . . . . . . . . 6–4<br />
FRONT LIGHTS<br />
Removal and Installation . . . . . . . . . . . . . . . . . . . . . . . . . . . . . . . . . . . . . . . 6–19<br />
RELAY SWITCHES<br />
Location . . . . . . . . . . . . . . . . . . . . . . . . . . . . . . . . . . . . . . . . . . . . . . . . . . . . . 6–20<br />
STANDARD INSTRUMENT PANEL<br />
Removal and Installation . . . . . . . . . . . . . . . . . . . . . . . . . . . . . . . . . . . . . . . 6–18<br />
STARTER<br />
Checking the Starter . . . . . . . . . . . . . . . . . . . . . . . . . . . . . . . . . . . . . . . . . . . 6–13<br />
Cleaning and Inspection . . . . . . . . . . . . . . . . . . . . . . . . . . . . . . . . . . . . . . . 6–17<br />
Disassembly and Assembly . . . . . . . . . . . . . . . . . . . . . . . . . . . . . . . . . . . . 6–15<br />
Parts I<strong>de</strong>ntification . . . . . . . . . . . . . . . . . . . . . . . . . . . . . . . . . . . . . . . . . . . . 6–14<br />
Removal and Installation . . . . . . . . . . . . . . . . . . . . . . . . . . . . . . . . . . . . . . . 6–12<br />
TROUBLESHOOTING<br />
Chart . . . . . . . . . . . . . . . . . . . . . . . . . . . . . . . . . . . . . . . . . . . . . . . . . . . . . . . . 6–3<br />
ELECTRICAL<br />
SYSTEM<br />
853, 853H BICS Loa<strong>de</strong>r<br />
–6–1– Service Manual
–6–2–<br />
853, 853H BICS Loa<strong>de</strong>r<br />
Service Manual
WIRE LEGEND<br />
NO.'s COLOR GAUGE<br />
PARTS LEGEND<br />
12 Orange<br />
16 1 Connector-Water Kit<br />
12A Orange<br />
12B Orange<br />
12B Orange(40 Power Harness)<br />
16<br />
14<br />
16<br />
2<br />
3<br />
Connector - Auxiliary/Hydraulic BASE<br />
Connector - Fused and Switched<br />
12C Orange<br />
12D Orange<br />
12E Orange<br />
19 Red/White<br />
16<br />
16<br />
16<br />
14<br />
4<br />
5<br />
Connector - Power and Fused<br />
(Angle Broom)<br />
Connector-Stump Grin<strong>de</strong>r<br />
50 Black<br />
50A Black<br />
50B Black<br />
50C Black<br />
14<br />
16<br />
16<br />
16<br />
6<br />
7<br />
(High Flow Valve)<br />
Power Relay - Stump Grin<strong>de</strong>r<br />
Power Relay - Angle Broom<br />
50D Black<br />
50E Black<br />
50W Black<br />
16<br />
14<br />
16<br />
8 Power Relay - Front/Rear<br />
Auxiliary<br />
56A Dk. Green/Yellow<br />
16 9 Plug-In Connector - Lift Arm<br />
56B Yellow<br />
56BA Yellow<br />
56BAA Yellow<br />
56BB Dk. Blue<br />
16<br />
16<br />
16<br />
16 10<br />
Harness - Boom Electrical<br />
Attachment Connector<br />
Dio<strong>de</strong> Module<br />
56BBA Dk. Blue<br />
56BBB Dk. Blue<br />
56R Dk. Green<br />
16<br />
16<br />
16<br />
11<br />
12<br />
Connector - Dio<strong>de</strong> Module<br />
Connector - Right Control Handle<br />
56RA Dk. Green<br />
56RAA Dk. Green<br />
56RB White (*Orange/White)<br />
16<br />
16<br />
16<br />
13<br />
14<br />
Connector - Loa<strong>de</strong>r Control Harness<br />
Connector - Left Control Handle<br />
56RBA Orange/White<br />
56RBB Orange/White<br />
56S Dk. Green<br />
56SA Dk. Green<br />
16<br />
16<br />
16<br />
16<br />
15<br />
16<br />
Adapter Connector - Optional<br />
Attachment Harness<br />
New to Old Adapter Harness<br />
56SG Dk. Green<br />
16<br />
6706391<br />
56W Lt. Green/White<br />
57B Yellow/Red (*Lt. Blue)<br />
57BA Lt. Blue<br />
57BB Lt. Blue<br />
16<br />
16<br />
16<br />
16<br />
17<br />
18<br />
Adapter Connector - Ol<strong>de</strong>r<br />
Mo<strong>de</strong>l Attachments<br />
Gra<strong>de</strong>r Harness 6707303<br />
57BBA Lt. Green<br />
57BBB Lt. Green<br />
57BBC Lt. Green<br />
16<br />
16<br />
16<br />
19 Lift Arm (PWM) Attachment<br />
Harness 6705901 Rev. D<br />
57BC Yellow/White<br />
16 20 Attachment Power Harness<br />
57C Orange/Dk. Blue<br />
57CA Orange/Dk. Blue<br />
57CB Orange/Dk. Blue<br />
16<br />
16<br />
16 21<br />
6706552 Rev. A<br />
Power Wiring Harness<br />
57RB Yellow/Red (*Red)<br />
16<br />
6706446 Rev. A<br />
57RR Yellow/Lt. Green<br />
(*Brown/White)<br />
57RRA Yellow/Lt. Green (*Brown)<br />
16<br />
16<br />
22 Jumper Wire -<br />
Stump Grin<strong>de</strong>r 50 ONLY<br />
57RRB Brown<br />
16<br />
57RRC Brown<br />
16<br />
57RRD Red<br />
14<br />
57RRE White<br />
16<br />
57RRF Brown/Yellow<br />
16<br />
64 Orange/Blue 16<br />
* Alternate Color Used On<br />
Some Harnesses.<br />
Printed in U.S.A.<br />
(Lift Arm Harness 6705901 Rev.D)<br />
853 BICS TM ATTACHMENT (OPTIONAL) WIRING DIAGRAM - SHEET 1<br />
(S/N 512816001-21196)<br />
(S/N 508418001-18149)<br />
(S/N 509718001-18255)<br />
(Printed June 1997)<br />
MC 2063LT (4-11-97)
B A<br />
B<br />
A<br />
BLACK<br />
DK.GREEN/RED<br />
B<br />
A<br />
21<br />
B<br />
L<br />
A<br />
M<br />
ORANGE<br />
Printed in U.S.A.<br />
DK. GREEN/YELLOW<br />
BLACK<br />
20<br />
RED/WHITE<br />
(Lift Arm Harness 6705901 Rev.D)<br />
853 BICS TM ATTACHMENT (OPTIONAL) WIRING DIAGRAM - SHEET 1<br />
(S/N 512816001-21196)<br />
(S/N 508418001-18149)<br />
A<br />
B<br />
22<br />
Module 10-pin<br />
Connector<br />
A<br />
A<br />
B<br />
A<br />
B A<br />
A<br />
B<br />
56SB<br />
A<br />
E<br />
F<br />
A<br />
B<br />
(S/N 509718001-18255)<br />
(Printed June 1997)<br />
1<br />
N<br />
J<br />
4<br />
B<br />
A<br />
P<br />
3<br />
2<br />
B A<br />
A<br />
B<br />
B<br />
A<br />
B A<br />
A<br />
5<br />
A<br />
A<br />
B<br />
B A<br />
19<br />
56A<br />
12B<br />
50<br />
A<br />
56W<br />
50W<br />
56SG<br />
6<br />
50A<br />
57BBC<br />
87A<br />
30<br />
87<br />
86<br />
NO<br />
56SA<br />
NC<br />
56SG<br />
85<br />
14<br />
G H<br />
B A<br />
B<br />
A<br />
56BB<br />
56RB<br />
C B A<br />
C<br />
B<br />
A<br />
57RRA<br />
57B<br />
50B<br />
57RRD<br />
19<br />
57RB<br />
57RR<br />
87A<br />
30<br />
87<br />
86<br />
12A<br />
57RRE<br />
85<br />
14<br />
50C<br />
57BBA<br />
57BC<br />
A B C<br />
A<br />
B<br />
C<br />
57RB<br />
87A<br />
30<br />
87<br />
86<br />
57C<br />
85<br />
50D<br />
57BBB<br />
57RRF<br />
57RR<br />
87A<br />
30<br />
87<br />
86<br />
NO NC NO NC NO NC<br />
7 8 8<br />
L<br />
K<br />
K<br />
J H<br />
K<br />
B<br />
G<br />
L<br />
M<br />
C<br />
D<br />
A<br />
F<br />
E<br />
13<br />
ORANGE<br />
ORANGE<br />
H<br />
A<br />
G<br />
57CA<br />
85<br />
YELLOW<br />
RED<br />
BROWN<br />
57RRC<br />
56S<br />
57BB<br />
D<br />
56B<br />
B C<br />
A<br />
56R<br />
56W<br />
12<br />
D<br />
M<br />
C<br />
57RRE<br />
57RRB<br />
56BA<br />
56RA<br />
57BC<br />
56BBA<br />
56RBA<br />
57BA<br />
57RRF<br />
57RRD<br />
50E<br />
57BB<br />
57RRC<br />
56RBB<br />
56BBB<br />
56RAA<br />
56BAA<br />
12C<br />
57CB<br />
56S<br />
G<br />
F<br />
E<br />
D<br />
C<br />
B<br />
A<br />
K<br />
J<br />
L<br />
K J<br />
B<br />
H<br />
A<br />
B<br />
C<br />
D<br />
E<br />
F<br />
G<br />
H<br />
K L<br />
M<br />
N<br />
P<br />
E<br />
M<br />
D<br />
F<br />
C A<br />
57CB L<br />
G 56RAA<br />
H 56BAA<br />
12C K<br />
B 50E<br />
G<br />
LOADER<br />
CONNECTOR<br />
IS VIEWED<br />
FROM THE<br />
MATING SIDE<br />
N P<br />
F BLUE<br />
* E BLACK<br />
CONNECTOR IS VIEWED<br />
* FROM THE MATING SIDE<br />
12<br />
15 18<br />
A<br />
E<br />
F<br />
G<br />
H<br />
J<br />
56SA<br />
56RC<br />
56BC<br />
56R<br />
56B<br />
G 56J<br />
H 56J<br />
19<br />
BROWN<br />
BLACK<br />
BLUE<br />
RED<br />
YELLOW<br />
ORANGE<br />
11<br />
E<br />
9<br />
Connects To E Engine Wiring Diagram – Sheet 1 or 2<br />
F Connects To F Engine Wiring Diagram – Sheet 1 or 2<br />
G Connects To<br />
56SA<br />
56RC<br />
56BC<br />
56R<br />
56B<br />
10<br />
E<br />
F<br />
A<br />
A<br />
B<br />
C<br />
D<br />
E<br />
F<br />
G<br />
H<br />
K<br />
L<br />
M<br />
LT<br />
TM<br />
CENTER<br />
GD<br />
RT<br />
G<br />
56SA<br />
56RC<br />
56BC<br />
56R<br />
56B<br />
56RBB<br />
56BBB<br />
57RRD<br />
17<br />
Controls Wiring Diagram – Sheet 1, 2, 3, or 4<br />
H Connects To H Controls Wiring Diagram – Sheet 1, 2, 3, or 4<br />
J Connects To J<br />
K Connects To<br />
L Connects To<br />
K<br />
L<br />
Controls Wiring Diagram – Sheet 1, 2, 3, or 4<br />
Controls Wiring Diagram – Sheet 1, 2, 3, or 4<br />
Controls Wiring Diagram – Sheet 1 or 3<br />
M Connects To M Controls Wiring Diagram – Sheet 1 or 3<br />
N Connects To N<br />
P Connects To<br />
P<br />
Controls Wiring Diagram – Sheet 2 or 4<br />
Controls Wiring Diagram – Sheet 3 or 4<br />
BLUE CENTER<br />
YELLOW<br />
BROWN<br />
16<br />
RED<br />
15<br />
BLACK<br />
BROWN<br />
BLACK<br />
BLUE<br />
RED<br />
YELLOW<br />
BLACK E<br />
BLUE F<br />
BROWN A<br />
RED<br />
YELLOW<br />
YELLOW<br />
BROWN<br />
RED<br />
BLACK<br />
G<br />
RT<br />
LT<br />
RT<br />
LT<br />
GD<br />
H<br />
GD<br />
TM<br />
BLUE CENTER<br />
56SA<br />
RT<br />
LT<br />
56RC<br />
56BC<br />
56R<br />
56B<br />
GD<br />
LT<br />
F<br />
E P<br />
D<br />
N<br />
M<br />
A C<br />
G<br />
B<br />
L<br />
H<br />
J<br />
K<br />
ADAPTER<br />
CONNECTOR<br />
IS VIEWED<br />
FROM THE<br />
MATING SIDE<br />
TM<br />
RT<br />
LT<br />
MC2063T (5-26-97)<br />
GD<br />
TM<br />
TM<br />
CENTER<br />
GD<br />
RT<br />
TM<br />
17
WIRE LEGEND<br />
NO.'s COLOR GAUGE<br />
12 Orange<br />
16<br />
12A Orange<br />
16<br />
12B Orange 14<br />
12C Orange<br />
16<br />
19 Red/White<br />
14<br />
50 Black<br />
14<br />
50A Black<br />
16<br />
50B Black<br />
16<br />
50C Black<br />
16<br />
50D Black<br />
16<br />
50E Black<br />
14<br />
50W Black<br />
16<br />
50Z Black 16<br />
56A Dk. Green/Yellow<br />
16<br />
56B Yellow<br />
16<br />
56BA Yellow<br />
16<br />
56BAA Yellow<br />
16<br />
56BB Dk. Blue<br />
16<br />
56BBA Dk. Blue<br />
16<br />
56BBB Dk. Blue<br />
16<br />
56R Dk. Green<br />
16<br />
56RA Dk. Green 16<br />
56RAA Dk. Green<br />
16<br />
56RB White<br />
16<br />
56RBA Orange/White<br />
16<br />
56RBB Orange/White<br />
16<br />
56S Dk. Green<br />
16<br />
56SA Dk. Green<br />
16<br />
56SG Dk. Green<br />
16<br />
56W Lt. Green/White<br />
16<br />
57B Yellow/Red<br />
16<br />
57BA Lt. Blue<br />
16<br />
57BB Lt. Blue<br />
16<br />
57BBA Lt. Green<br />
16<br />
57BBB Lt. Green<br />
16<br />
57BBC Lt. Green<br />
16<br />
57BC Yellow/White<br />
16<br />
57C Orange/Dk. Blue<br />
16<br />
57CA Orange/Dk. Blue<br />
16<br />
57CB Orange/Dk. Blue 16<br />
57J Lt. Green 16<br />
57N Pink 16<br />
57P White 16<br />
57RB Yellow/Red<br />
16<br />
57RR Yellow/Lt. Green<br />
16<br />
57RRA Yellow/Lt. Green<br />
16<br />
57RRB Brown<br />
16<br />
57RRC Brown<br />
16<br />
57RRD Red<br />
14<br />
57RRE White<br />
16<br />
57RRF Brown/Yellow<br />
16<br />
Printed in U.S.A.<br />
ATTACHMENT (OPTIONAL) WIRING DIAGRAM - SHEET 2<br />
(Harness 6710299 and 6710300 Rev. A)<br />
853 BICS TM (S/N 512821197 and Above)<br />
(S/N 508418150 and Above)<br />
(S/N 509718256 and Above)<br />
(Printed June 1997)<br />
1<br />
2<br />
3<br />
4<br />
5<br />
6<br />
7<br />
8<br />
9<br />
10<br />
11<br />
12<br />
13<br />
14<br />
15<br />
16<br />
17<br />
18<br />
Connector-Water Kit<br />
NOT USED<br />
PARTS LEGEND<br />
Connector - Fused and Switched<br />
Connector - Power and Fused<br />
(Angle Broom)<br />
Input to the C<br />
W/in PWM<br />
NOT USED Connector-Stump Grin<strong>de</strong>r<br />
(High Flow Valve)<br />
Power Relay - Stump Grin<strong>de</strong>r 6670312<br />
Power Relay - Angle Broom<br />
6670312<br />
Power Relay - Front/Rear<br />
Auxiliary<br />
Boom Connector<br />
6670312<br />
Dio<strong>de</strong> Module Assy. 6664388<br />
Connector - Dio<strong>de</strong> Module<br />
Connector - Control Harness<br />
NOT USED Connector - Loa<strong>de</strong>r Control Harness<br />
Connector - Left Control Handle<br />
Main Frame Attachment Harness (Opt.)<br />
6710300 Rev. A<br />
KL Attachments issue<br />
Boom Attachment Harness (Opt.)<br />
6710299 No Rev.<br />
Attachment Connector<br />
Adapter Connector - Optional<br />
Attachment Harness<br />
19 New to Old Adapter Harness (Opt.)<br />
6706391<br />
No Rev.<br />
20 Adapter Connector - Ol<strong>de</strong>r<br />
Mo<strong>de</strong>l Attachments<br />
21 NOT USED<br />
A ttachment C ontrol H arn<br />
C onnector<br />
Only 700's after PWM<br />
Attachment Control Harness<br />
MC 2211LJ (1-16-98)<br />
Connector - Auxi
(Harness 6710299 and 6710300 Rev. A)<br />
853 BICS TM ATTACHMENT (OPTIONAL) WIRING DIAGRAM - SHEET 2<br />
(S/N 512821197 and Above)<br />
(S/N 508418150 and Above)<br />
(S/N 509718256 and Above)<br />
E Connects To E Engine Wiring Diagram – Sheet 1 or 2<br />
F Connects To F<br />
G Connects To G<br />
H Connects To H<br />
J<br />
K Connects To K<br />
N<br />
P<br />
Printed in U.S.A.<br />
Connects To<br />
Connects To<br />
Connects To<br />
(Printed June 1997)<br />
J<br />
N<br />
P<br />
N<br />
2<br />
B<br />
A<br />
A<br />
56A<br />
Engine Wiring Diagram – Sheet 1 or 2<br />
Controls Wiring Diagram – Sheet 2 or 4<br />
Controls Wiring Diagram – Sheet 2 or 4<br />
Controls Wiring Diagram – Sheet 2 or 4<br />
Controls Wiring Diagram – Sheet 2 or 4<br />
Controls Wiring Diagram – Sheet 2 or 4<br />
4<br />
3<br />
B A<br />
Controls Wiring Diagram – Sheet 4<br />
F<br />
E<br />
P<br />
B A<br />
5<br />
A<br />
A<br />
B<br />
B A<br />
19<br />
12B<br />
50<br />
A<br />
1<br />
B<br />
A<br />
56SG<br />
A<br />
B<br />
56W<br />
50W<br />
50A<br />
14<br />
87<br />
86<br />
57BBC<br />
56SA<br />
87A<br />
30<br />
NO NC<br />
6<br />
B A<br />
B<br />
A<br />
56BB<br />
56RB<br />
56SG<br />
85<br />
G<br />
H<br />
C B A<br />
C<br />
B<br />
A<br />
57RRA<br />
57B<br />
50B<br />
57RRD<br />
19<br />
87<br />
86<br />
57RB<br />
57RR<br />
87A<br />
30<br />
7<br />
12A<br />
NO NC<br />
57RRE<br />
85<br />
14<br />
50C<br />
57BBA<br />
57BC<br />
87<br />
86<br />
L<br />
M<br />
K<br />
A B C<br />
B<br />
C<br />
A<br />
57RB<br />
87A<br />
30<br />
NO NC<br />
K<br />
57C<br />
13<br />
50D<br />
57BBB<br />
57RRF<br />
8 8<br />
C<br />
J<br />
B<br />
D<br />
N P<br />
85<br />
L<br />
K<br />
H<br />
A<br />
E<br />
G<br />
F<br />
87<br />
86<br />
H<br />
A<br />
G<br />
21<br />
57RR<br />
87A<br />
30<br />
NO NC<br />
ORANGE<br />
ORANGE<br />
57CA<br />
85<br />
C B A<br />
C<br />
B<br />
A<br />
57P<br />
57N<br />
57J<br />
YELLOW<br />
RED<br />
BROWN<br />
F BLUE<br />
E BLACK<br />
56RBB<br />
57RRC<br />
57BB<br />
50E<br />
D<br />
56B<br />
57RRD<br />
56BBB<br />
18<br />
J<br />
C<br />
B<br />
A<br />
56R<br />
56W<br />
12<br />
12C<br />
E<br />
D<br />
C<br />
B<br />
A<br />
F<br />
50Z<br />
A<br />
K<br />
E<br />
F<br />
G<br />
H<br />
57RRE<br />
57RRB<br />
56BA<br />
56RA<br />
57BC<br />
56BBA<br />
56RBA<br />
57BA<br />
57RRF<br />
F<br />
12<br />
15<br />
56SA<br />
56RC<br />
56BC<br />
56R<br />
56B<br />
G<br />
F<br />
E<br />
D<br />
C<br />
B<br />
A<br />
K<br />
J<br />
11<br />
57RRD<br />
50E<br />
57BB<br />
57RRC<br />
56RBB<br />
56BBB<br />
56RAA<br />
56BAA<br />
57J<br />
12C<br />
57CB<br />
56S<br />
57N<br />
57P<br />
A<br />
B<br />
C<br />
D<br />
E<br />
F<br />
G<br />
H<br />
J<br />
K<br />
LM<br />
N<br />
P<br />
G<br />
10<br />
P<br />
N<br />
H<br />
M<br />
L<br />
J<br />
A<br />
B<br />
C<br />
D<br />
E<br />
F<br />
G<br />
H<br />
J<br />
K<br />
LM<br />
N<br />
P<br />
57RRD<br />
50E<br />
57BB<br />
57RRC<br />
56RBB<br />
56BBB<br />
56RAA<br />
56BAA<br />
57J<br />
12C<br />
57CB<br />
56S<br />
57N<br />
57P<br />
57J<br />
57P<br />
57N<br />
56BAA<br />
56S<br />
57CB<br />
56RAA<br />
57P<br />
57N<br />
56S<br />
12C<br />
57CB<br />
56BBB<br />
56BAA<br />
57RRD<br />
56RAA<br />
56BBB<br />
56RBB<br />
9 9<br />
BROWN<br />
BLACK<br />
BLUE<br />
RED<br />
YELLOW<br />
19<br />
56SA<br />
56RC<br />
56BC<br />
56R<br />
56B<br />
LOADER CONNECTOR IS VIEWED<br />
FROM THE MATING SIDE<br />
LT<br />
TM<br />
CENTER<br />
GD<br />
RT<br />
16<br />
P<br />
N<br />
M<br />
L<br />
K<br />
20<br />
F<br />
A<br />
G<br />
F<br />
E<br />
H<br />
YELLOW<br />
BROWN<br />
RED<br />
G<br />
F<br />
BLACK<br />
H J<br />
E<br />
A<br />
B<br />
D<br />
P<br />
17<br />
C<br />
RT<br />
LT<br />
K<br />
N<br />
L<br />
M<br />
G<br />
BLUE CENTER<br />
GD<br />
TM<br />
A<br />
B<br />
C<br />
D<br />
E<br />
F<br />
G<br />
H<br />
J<br />
K<br />
LM<br />
N<br />
P<br />
J 57J<br />
E 56RBB<br />
D 57RRC<br />
C 57BB<br />
H<br />
B<br />
A<br />
P<br />
J<br />
B<br />
K<br />
C<br />
D<br />
L<br />
M<br />
N<br />
57RRD<br />
50E<br />
57BB<br />
57RRC<br />
56RBB<br />
56BBB<br />
56RAA<br />
56BAA<br />
57J<br />
12C<br />
57CB<br />
56S<br />
57N<br />
57P<br />
57P<br />
56BAA<br />
50E<br />
57RRD<br />
56RAA<br />
RT<br />
LT<br />
MC2211P (10-15-97)<br />
GD<br />
57J<br />
50E<br />
12C<br />
57BB<br />
57CB<br />
56S<br />
57N<br />
57RRC<br />
TM
ELECTRICAL SYSTEM<br />
TROUBLESHOOTING<br />
Chart<br />
The following troubleshooting chart is provi<strong>de</strong>d for<br />
assistance in locating and correcting problems. Many of<br />
the recommen<strong>de</strong>d procedures must be done by<br />
authorized Bobcat Service Personnel only.<br />
1. Alternator belt is loose or damaged.<br />
2. Battery connections are dirty or loose.<br />
3. Battery is damaged.<br />
4. The cable & wire connection are not making a good contact.<br />
5. The alternator is damaged.<br />
6. The engine is locked.<br />
7. The starter is damaged.<br />
8. The wiring or the solenoid is damaged.<br />
9. Check the fuses.<br />
PROBLEM CAUSE<br />
Battery will not take a charge. 2, 3, 4<br />
Alternator will not charge. 1, 4<br />
Starter will not turn the engine. 2, 3, 4, 6, 7, 8, 9<br />
KEY TO CORRECT THE CAUSE<br />
Instructions are necessary before operating or<br />
servicing machine. Read Operation &<br />
Maintenance Manuals, Handbook and signs<br />
(<strong>de</strong>cals) on machine. Follow warnings and<br />
instructions in the manuals when making<br />
repairs, adjustments or servicing. Check for<br />
correct function after adjustments, repairs or<br />
service. Failure to follow instructions can<br />
cause injury or <strong>de</strong>ath.<br />
W–2003–1289<br />
853, 853H BICS Loa<strong>de</strong>r<br />
–6–3– Service Manual
ELECTRICAL SYSTEM INFORMATION<br />
Description<br />
The loa<strong>de</strong>r has a 12 volt, negative ground alternator<br />
charging system. The electrical system is protected by<br />
fuses (Item 1) [A] located in the engine compartment. The<br />
fuses will protect the electrical system when there is an<br />
electrical overload. The reason for the overload must be<br />
found before starting the engine again.<br />
Fuse Location (Standard & BOSS® Option)<br />
The electrical system for loa<strong>de</strong>rs is protected by eight<br />
fuses located in the fuse block (Item 1) [B]. Remove the<br />
fuse block cover to access the fuses.<br />
The <strong>de</strong>cal insi<strong>de</strong> the rear door specifies the fuse sizes<br />
used in various loa<strong>de</strong>r circuits [C].<br />
Always check for pinching, rubbing or<br />
abrading of wire harnesses. Route away from<br />
and use nylon tie straps to hold the harness<br />
away from hot or moving parts.<br />
I–2114–0596<br />
–6–4–<br />
A<br />
B<br />
C<br />
1<br />
AUX.<br />
1<br />
CD–15011<br />
CD–15007<br />
6707786<br />
853, 853H BICS Loa<strong>de</strong>r<br />
Service Manual
BATTERY<br />
Removal and Installation<br />
Batteries contain acid which burns eyes and<br />
skin on contact. Wear goggles, protective<br />
clothing and rubber gloves to keep acid off<br />
body.<br />
In case of acid contact, wash immediately with<br />
water for several minutes and get medical<br />
attention in case of eye contact.<br />
W–2065–1286<br />
Open the rear door.<br />
Disconnect the negative(–) cable (Item 1) [A] from the<br />
battery.<br />
Disconnect the positive (+) cable (Item 1) [B] from the<br />
battery.<br />
Remove the nuts from the holddown clamp (Item 2) [B]<br />
and remove the battery holddown clamp.<br />
Remove the battery from the loa<strong>de</strong>r [C].<br />
Keep arcs, sparks, flames and lighted tobacco<br />
away from batteries. When ‘‘jumping’’ from<br />
booster battery make final connection<br />
(negative) at engine frame.<br />
Do not jump start or charge a frozen battery.<br />
Warm battery to 60°F. (16°C.) before connecting<br />
to a charger. Unplug charger before connecting<br />
or disconnecting cables to battery.<br />
Battery gas can explo<strong>de</strong> and cause serious<br />
injury.<br />
W–2066–0490<br />
Always clean the terminals and cable ends when<br />
installing a new battery [D].<br />
When installing the battery in the loa<strong>de</strong>r, do not touch any<br />
metal parts with the battery terminal posts.<br />
Connect and tighten the battery cables. Connect the<br />
negative (–) cable last to prevent sparks.<br />
A<br />
B<br />
C<br />
D<br />
1<br />
2<br />
1<br />
P–00744<br />
CD–15008<br />
CD–15136<br />
CD–15137<br />
P–00746<br />
853, 853H BICS Loa<strong>de</strong>r<br />
–6–5– Service Manual
ALTERNATOR<br />
Alternator Output Test<br />
Put jackstands un<strong>de</strong>r the front axles and rear<br />
corners of the frame before running the engine<br />
for service. Failure to use jackstands can allow<br />
the machine to fall or move and cause injury or<br />
<strong>de</strong>ath.<br />
W–2017–0286<br />
Lift and block the loa<strong>de</strong>r (See Page 1–1).<br />
Disconnect the negative (–) cable from the battery.<br />
Disconnect the red wire (Item 1) [A] from the alternator.<br />
Connect the wire to the negative (–) si<strong>de</strong> of the ammeter.<br />
Connect the positive (+) si<strong>de</strong> of the ammeter to the output<br />
terminal on the alternator (Item 1) [A].<br />
Disconnect the fuel stop solenoid connector.<br />
Connect the negative (–) cable to the battery.<br />
Turn on the lights and crank the engine for 30 seconds to<br />
discharge the battery.<br />
Connect the fuel stop solenoid, start the engine and run<br />
at 2600 RPM.<br />
If ammeter reading is between 45–55 amps. @ 2600<br />
RPM the alternator is good and no further testing is<br />
nee<strong>de</strong>d.<br />
If the reading is low, remove the screws and pull the<br />
regulator cover away from the alternator and continue<br />
testing (below).<br />
Rectifier (Dio<strong>de</strong>) Test<br />
NOTE: The alternator is removed from the loa<strong>de</strong>r for<br />
clarity purposes.<br />
Disconnect the negative (–) cable from the battery.<br />
Install the wire in their original location on the back of the<br />
alternator.<br />
Connect a jumper wire (Item 1) [B] to the alternator output<br />
terminal and the regulator terminal.<br />
Connect the battery negative (–) cable.<br />
Start the engine and run at 2600 RPM.<br />
If the reading is within 45–55 amps. @ 2600 RPM replace<br />
the rectifier (dio<strong>de</strong>) assembly or replace the alternator.<br />
If the reading is low, do the Alternator Regulator Test.<br />
–6–6–<br />
A<br />
B<br />
1<br />
1<br />
Output<br />
Terminal<br />
Regulator<br />
Terminal<br />
P–4944<br />
P–1304<br />
853, 853H BICS Loa<strong>de</strong>r<br />
Service Manual
ALTERNATOR (Cont’d)<br />
Alternator Regulator Test<br />
When an engine is running in an enclosed<br />
area, fresh air must be ad<strong>de</strong>d to avoid<br />
concentration of exhaust fumes. If the engine<br />
is stationary, vent the exhaust outsi<strong>de</strong>.<br />
Exhaust fumes contain odorless, invisible<br />
gases which can kill without warning.<br />
W–2050–1285<br />
Connect the positive (+) voltmeter lead to the positive (+)<br />
battery terminal [A].<br />
Connect the negative (–) voltmeter lead to the negative<br />
(–) battery terminal [A].<br />
Start the engine and run at 1500–2000 RPM.<br />
The voltmeter should read between 13.9–14.7 volts.<br />
If the reading is low, stop the engine and disconnect the<br />
battery negative (–) cable.<br />
NOTE: The alternator is removed from the loa<strong>de</strong>r for<br />
clarity purposes.<br />
Remove the wires from the back of the alternator.<br />
Remove the regulator cover from the back of the<br />
alternator.<br />
Install the wires on the back of the alternator.<br />
Connect a jumper wire (Item 1) [B] from the brush<br />
terminal to the ground stud.<br />
Connect the negative (–) battery cable and start the<br />
engine. Run at 1500 RPM.<br />
If the voltmeter reading is 14.5 or above, replace the<br />
regulator.<br />
If the voltmeter reading is below 14.5, repair or replace the<br />
alternator.<br />
A<br />
B<br />
Brush<br />
Terminal<br />
Ground<br />
Stud<br />
P–05054<br />
P–01364<br />
853, 853H BICS Loa<strong>de</strong>r<br />
–6–7– Service Manual<br />
1
ALTERNATOR (Cont’d)<br />
Removal and Installation<br />
NOTE: The engine/hydrostatic pump assembly is<br />
shown removed for photo clarity purpose<br />
only.<br />
Damage to the alternator can occur if:<br />
• Engine is operated with battery cables<br />
disconnected.<br />
• Battery cables are connected when using a<br />
fast charger or when welding on the loa<strong>de</strong>r<br />
(Remove both cables from the battery).<br />
• Extra battery cables (booster cables) are<br />
connected wrong.<br />
I–2023–1285<br />
Raise the lift arms and install an approved lift arm support<br />
<strong>de</strong>vice. (See Page 1–1.)<br />
Raise the operator cab. (See Page 1–1.)<br />
Open the rear door. Disconnect the negative (–) battery<br />
cable.<br />
Disconnect the orange wire (Item 1) [A] from the<br />
alternator.<br />
Disconnect the wiring harness connector (Item 2) [A].<br />
Loosen the adjustment bolt (Item 1) [B].<br />
Remove the alternator belt.<br />
Remove the adjustment bolt (Item 1) [B].<br />
Remove the mounting bolt, nut and spacer (Item 2) [B].<br />
Remove the alternator.<br />
–6–8–<br />
A<br />
B<br />
2<br />
1<br />
2<br />
1<br />
P–04944<br />
P–04945<br />
853, 853H BICS Loa<strong>de</strong>r<br />
Service Manual
ALTERNATOR (Cont’d)<br />
Disassembly and Inspection<br />
Disassemble the alternator. (See Parts I<strong>de</strong>ntification [A].)<br />
Remove the regulator cover and regulator.<br />
Remove the four bolts holding halves together.<br />
Pry the halves apart.<br />
Use a soft jaw vise to hold rotor while removing pulley nut.<br />
Remove front case half from the rotor using a plastic<br />
hammer.<br />
Unsol<strong>de</strong>r the stator leads from the rectifier. Remove the<br />
stator.<br />
Stator Continuity Test<br />
Use an ohmmeter to test the stator.<br />
Touch the probes to two of the bare stator wires [B].<br />
Move one of the probes to the third wire.<br />
The readings should be the same.<br />
If there is no continuity, replace the stator.<br />
Stator Ground Test<br />
Touch one probe to a bare stator lead and the other probe<br />
to the bare metal surface of the stator [C].<br />
There should be no continuity.<br />
Replace the stator if there is continuity.<br />
A<br />
B<br />
C<br />
1. Nut 9. Rectifier (Dio<strong>de</strong>)<br />
2. Pulley 10. Case Half (Rear)<br />
3. Fan 11. Con<strong>de</strong>nser Assy.<br />
4. Bolt 12. Strap<br />
5. Case Half (Front) 13. Regulator<br />
6. Bearing 14. Brush<br />
7. Rotor 15. Cover<br />
8. Stator<br />
4<br />
9<br />
1<br />
6<br />
10<br />
15<br />
2<br />
7<br />
13<br />
11<br />
3<br />
14<br />
12<br />
8<br />
C–03312<br />
P–01369<br />
P–01386<br />
853, 853H BICS Loa<strong>de</strong>r<br />
–6–9– Service Manual
ALTERNATOR (Cont’d)<br />
Rotor Continuity Test<br />
Touch the probes to the slip rings [A].<br />
The ohmmeter should read between 3.0–33.0 ohms.<br />
If there is no continuity replace the rotor.<br />
Rotor Ground Test<br />
Touch one probe to one of the slip rings and the other<br />
probe to the rotor shaft [B].<br />
There should be no continuity.<br />
Replace the rotor if there is continuity.<br />
Rectifier Continuity (Dio<strong>de</strong>) Test<br />
NOTE: In the dio<strong>de</strong> tests there should be continuity<br />
in one direction only. If the dio<strong>de</strong> being<br />
tested shows no continuity or continuity in<br />
both directions, replace the rectifier<br />
assembly.<br />
Touch the probes to the terminals of each dio<strong>de</strong> and read<br />
the meter [C].<br />
Reverse the probes to check the dio<strong>de</strong> in the other<br />
direction.<br />
There should be continuity in one direction only.<br />
Touch one probe to the dio<strong>de</strong> and the other probe to the<br />
connected heatsink and read the meter [D].<br />
Reverse the probes to check the dio<strong>de</strong> in the other<br />
direction.<br />
There should be continuity in one direction only.<br />
–6–10–<br />
A<br />
B<br />
C<br />
D<br />
P–01365<br />
P–01378<br />
P–01373<br />
P–01370<br />
853, 853H BICS Loa<strong>de</strong>r<br />
Service Manual
ALTERNATOR (Cont’d)<br />
Assembly<br />
Reverse the or<strong>de</strong>r of disassembly.<br />
Place the rotor in soft jaws when tightening the shaft nut.<br />
Tighten to 50 ft.–lbs. (68 Nm) torque [A].<br />
Install the rear case half and the remaining parts.<br />
A<br />
P–01808<br />
853, 853H BICS Loa<strong>de</strong>r<br />
–6–11– Service Manual
STARTER<br />
Removal and Installation<br />
Disconnect the negative (–) cable from the battery.<br />
Disconnect the positive (+) cable (Item 1) [A] and starter<br />
wires from the starter solenoid.<br />
Remove the starter mounting bolt (Item 1) [B] and engine<br />
harness ground wires from the starter.<br />
Remove the other two mounting bolts (Item 1) [C].<br />
Remove the starter from the engine.<br />
–6–12–<br />
A<br />
B<br />
C<br />
1<br />
1<br />
CD–15138<br />
CD–15140<br />
1<br />
CD–15139<br />
853, 853H BICS Loa<strong>de</strong>r<br />
Service Manual
STARTER (Cont’d)<br />
Checking the Starter<br />
The key switch must be in the ‘‘OFF’’ position.<br />
The battery must be at full charge.<br />
The cable connections on the battery must be clean and<br />
tight.<br />
Connect a jumper wire between ‘‘S’’ terminal and ‘‘BAT’’<br />
terminal [A].<br />
If the starter turns but does not turn the engine, the starter<br />
drive has a <strong>de</strong>fect.<br />
Connect a jumper wire between the ‘‘M’’ terminal and the<br />
‘‘BAT’’ terminal [B].<br />
If the starter turns, the <strong>de</strong>fect is in the solenoid.<br />
If the starter does not turn, the starter is <strong>de</strong>fective.<br />
A<br />
B<br />
Bat<br />
S<br />
M<br />
Cranking<br />
Motor<br />
Bat<br />
S<br />
M<br />
Cranking<br />
Motor<br />
A–01991<br />
A–01992<br />
853, 853H BICS Loa<strong>de</strong>r<br />
–6–13– Service Manual
STARTER (Cont’d)<br />
Parts I<strong>de</strong>ntification<br />
10<br />
9<br />
11<br />
26<br />
28 29<br />
25 24<br />
27<br />
30<br />
41<br />
5<br />
13<br />
12<br />
6<br />
8<br />
4<br />
14<br />
3<br />
23<br />
7<br />
15<br />
34<br />
31<br />
35<br />
32<br />
16<br />
2<br />
1<br />
19<br />
17 18 20<br />
21<br />
22<br />
22<br />
21<br />
33<br />
34<br />
–6–14–<br />
39<br />
38<br />
36 37 40<br />
1 Screw<br />
2. Solenoid<br />
3. Bolt<br />
4. Lever<br />
5. Washer<br />
6. Nut<br />
7. Plug<br />
8. Washer<br />
9. Housing Drive<br />
10. Washer<br />
11. Bushing<br />
12. Ring<br />
13. Stop<br />
14. Drive<br />
15. Drive Support<br />
16. Support<br />
17. Drive Shaft<br />
18. Washer<br />
19. Washer<br />
20. Washer<br />
21. Screw<br />
22. Brush<br />
23. Frame Assy.<br />
24. Gasket<br />
25. Pin<br />
26. Armature Support<br />
27. Bolt<br />
28. Spacer<br />
29. Bearing<br />
30. Armature<br />
31. Bearing<br />
32. Spring<br />
33. Hol<strong>de</strong>r Assy.<br />
34. Brush<br />
35. Screw<br />
36. O–ring<br />
37. Frame<br />
38. Washer<br />
39. Screw<br />
40. Bolt<br />
41. Ring<br />
D–02119<br />
853, 853H BICS Loa<strong>de</strong>r<br />
Service Manual
STARTER (Cont’d)<br />
Disassembly and Assembly<br />
Remove the starter thru–bolts [A].<br />
Remove the screws for the brush hol<strong>de</strong>rs [B].<br />
Remove the starter end cap [C].<br />
Remove the starter housing/armature assembly from the<br />
reduction gear drive [D].<br />
A<br />
B<br />
C<br />
D<br />
CD–08924<br />
CD–08925<br />
CD–08926<br />
CD–08927<br />
853, 853H BICS Loa<strong>de</strong>r<br />
–6–15– Service Manual
STARTER (Cont’d)<br />
Disassembly and Assembly (Cont’d)<br />
Remove the armature and brushes from the starter<br />
housing [A].<br />
Remove the bolts from the reduction gear housing [B].<br />
Remove the reduction gear housing [C].<br />
–6–16–<br />
A<br />
B<br />
C<br />
CD–08928<br />
CD–08929<br />
CD–08930<br />
853, 853H BICS Loa<strong>de</strong>r<br />
Service Manual
STARTER (Cont’d)<br />
Cleaning and Inspection<br />
Use a brush and air pressure to clean the drive, field coils,<br />
armature and starter housing.<br />
NOTE: DO NOT use solvent to clean the drive<br />
assembly. The solvent will remove the<br />
lubricant and the drive will slip.<br />
Check the following items:<br />
Armature<br />
Broken or burned insulation<br />
Loose connections at commutator<br />
Open or groun<strong>de</strong>d circuits [A] & [B]<br />
Worn shaft or bearings<br />
Rough commutator<br />
Brush Hol<strong>de</strong>rs<br />
Broken springs<br />
Broken insulation<br />
Spring tension<br />
Field Coils<br />
Broken or burned insulation<br />
Electrical continuity<br />
Brush connections<br />
Drive Gears<br />
Worn teeth<br />
Tooth engagement<br />
A<br />
B<br />
A–01995<br />
A–01994<br />
853, 853H BICS Loa<strong>de</strong>r<br />
–6–17– Service Manual
STANDARD INSTRUMENT PANEL<br />
Removal and Installation<br />
Pry the rubber light mount loose from the operator cab<br />
(both si<strong>de</strong>s) [A].<br />
Lower the light from the operator cab and locate the three<br />
instrument panel mounting bolts (Item 1) [B] (both si<strong>de</strong>s).<br />
Remove the three mounting bolts (Item 1) [B].<br />
Installation: Be careful not to overtighten the instrument<br />
panel mounting bolts to prevent stripping the threa<strong>de</strong>d<br />
holes in the panels.<br />
Pull the left instrument panel down and disconnect the<br />
wire harness connectors from the panel. Remove the<br />
panel [C].<br />
Repeat steps [A] and [B]. Pull the right instrument panel<br />
down and disconnect the wire harness connectors from<br />
the panel. Remove the panel [D].<br />
Reverse the removal procedure to install the instrument<br />
panel.<br />
–6–18–<br />
A<br />
B<br />
C<br />
D<br />
1<br />
1<br />
P–03995<br />
P–03955<br />
P–03951<br />
P–03953<br />
853, 853H BICS Loa<strong>de</strong>r<br />
Service Manual
FRONT LIGHTS<br />
Removal and Installation<br />
The front lights are mounted in the upper corners of the<br />
operator cab [A].<br />
Pry the rubber light mount free from the operator cab [B].<br />
Pull the light down and remove the three mounting bolts<br />
(Item 1) [C] from the instrument panel.<br />
Disconnect the front light connector from the instrument<br />
panel. Remove the front light from the operator cab.<br />
Reverse the removal procedure to install the front light.<br />
A<br />
B<br />
C<br />
1<br />
1<br />
P–03956<br />
P–03995<br />
P–03955<br />
853, 853H BICS Loa<strong>de</strong>r<br />
–6–19– Service Manual
RELAY SWITCHES<br />
853, 853H BICS Service Manual #6724012 – Electrical System Section<br />
Location<br />
The loa<strong>de</strong>r engine harness has relay switches located at<br />
the coolant recovery tank [A] and [B].<br />
There are four switches (Item 1) [A] on the Standard<br />
equipped loa<strong>de</strong>r.<br />
The switches are for the starter, switch power, glow plug<br />
and brake.<br />
There are five switches on the BOSS® equipped loa<strong>de</strong>r<br />
[B].<br />
The switches are for the starter, switch power, glow plug,<br />
brake and engine shutdown.<br />
Remove the screw from the mounting tab on the switch<br />
and replace if the switch malfunctions.<br />
–6–20–<br />
A<br />
B<br />
1<br />
STANDARD<br />
BOSS®<br />
1<br />
P–04897<br />
P–05190<br />
853, 853H BICS Loa<strong>de</strong>r<br />
Service Manual
ENGINE SERVICE<br />
Page<br />
Number<br />
AIR CLEANER HOUSING<br />
Removal and Installation . . . . . . . . . . . . . . . . . . . . . . . . . . . . . . . . . . . . . . . 7–9<br />
BELT SHIELD<br />
Removal and Installation . . . . . . . . . . . . . . . . . . . . . . . . . . . . . . . . . . . . . . . 7–37<br />
BLOWER FAN<br />
Removal and Installation . . . . . . . . . . . . . . . . . . . . . . . . . . . . . . . . . . . . . . . 7–13<br />
BLOWER HOUSING/FAN GEARBOX<br />
Removal and Installation . . . . . . . . . . . . . . . . . . . . . . . . . . . . . . . . . . . . . . . 7–10<br />
CAMSHAFT<br />
Camshaft Bearings . . . . . . . . . . . . . . . . . . . . . . . . . . . . . . . . . . . . . . . . . . . . 7–77<br />
Checking . . . . . . . . . . . . . . . . . . . . . . . . . . . . . . . . . . . . . . . . . . . . . . . . . . . . . 7–76<br />
Removal and Installation . . . . . . . . . . . . . . . . . . . . . . . . . . . . . . . . . . . . . . . 7–76<br />
Tappets . . . . . . . . . . . . . . . . . . . . . . . . . . . . . . . . . . . . . . . . . . . . . . . . . . . . . . 7–77<br />
Tappet Installation . . . . . . . . . . . . . . . . . . . . . . . . . . . . . . . . . . . . . . . . . . . . . 7–78<br />
CAMSHAFT GEAR<br />
Removal and Installation . . . . . . . . . . . . . . . . . . . . . . . . . . . . . . . . . . . . . . . 7–74<br />
COOLANT RECOVERY TANK<br />
Removal and Installation . . . . . . . . . . . . . . . . . . . . . . . . . . . . . . . . . . . . . . . 7–7<br />
CRANKSHAFT<br />
Checking the Crankshaft . . . . . . . . . . . . . . . . . . . . . . . . . . . . . . . . . . . . . . . 7–65<br />
Checking Tuffriding Coating . . . . . . . . . . . . . . . . . . . . . . . . . . . . . . . . . . . . 7–65<br />
Removal and Installation . . . . . . . . . . . . . . . . . . . . . . . . . . . . . . . . . . . . . . . 7–65<br />
CRANKSHAFT GEAR<br />
Removal and Installation . . . . . . . . . . . . . . . . . . . . . . . . . . . . . . . . . . . . . . . 7–67<br />
CYLINDER LINERS<br />
Checking the Cylin<strong>de</strong>r Bore . . . . . . . . . . . . . . . . . . . . . . . . . . . . . . . . . . . . . 7–61<br />
Installation . . . . . . . . . . . . . . . . . . . . . . . . . . . . . . . . . . . . . . . . . . . . . . . . . . . 7–61<br />
Removal . . . . . . . . . . . . . . . . . . . . . . . . . . . . . . . . . . . . . . . . . . . . . . . . . . . . . 7–61<br />
CYLINDER HEAD<br />
Cylin<strong>de</strong>r Head Surface Alignment . . . . . . . . . . . . . . . . . . . . . . . . . . . . . . . 7–50<br />
Exhaust Manifold . . . . . . . . . . . . . . . . . . . . . . . . . . . . . . . . . . . . . . . . . . . . . . 7–50<br />
Removal and Installation . . . . . . . . . . . . . . . . . . . . . . . . . . . . . . . . . . . . . . . 7–49<br />
ENGINE<br />
Engine Mount Replacement . . . . . . . . . . . . . . . . . . . . . . . . . . . . . . . . . . . . 7–35<br />
Removal and Installation . . . . . . . . . . . . . . . . . . . . . . . . . . . . . . . . . . . . . . . 7–28<br />
ENGINE COMPRESSION<br />
Checking . . . . . . . . . . . . . . . . . . . . . . . . . . . . . . . . . . . . . . . . . . . . . . . . . . . . . 7–38<br />
ENGINE MUFFLER<br />
Removal and Installation . . . . . . . . . . . . . . . . . . . . . . . . . . . . . . . . . . . . . . . 7–8<br />
ENGINE SPEED CONTROL<br />
Assembly . . . . . . . . . . . . . . . . . . . . . . . . . . . . . . . . . . . . . . . . . . . . . . . . . . . . 7–4<br />
Disassembly . . . . . . . . . . . . . . . . . . . . . . . . . . . . . . . . . . . . . . . . . . . . . . . . . . 7–4<br />
Removal and Installation . . . . . . . . . . . . . . . . . . . . . . . . . . . . . . . . . . . . . . . 7–4<br />
FAN DRIVE TENSION PULLEY<br />
Removal and Installation . . . . . . . . . . . . . . . . . . . . . . . . . . . . . . . . . . . . . . . 7–12<br />
FAN GEARBOX<br />
Assembly . . . . . . . . . . . . . . . . . . . . . . . . . . . . . . . . . . . . . . . . . . . . . . . . . . . . 7–20<br />
Checking Backlash . . . . . . . . . . . . . . . . . . . . . . . . . . . . . . . . . . . . . . . . . . . . 7–25<br />
Disassembly . . . . . . . . . . . . . . . . . . . . . . . . . . . . . . . . . . . . . . . . . . . . . . . . . . 7–15<br />
Parts I<strong>de</strong>ntification . . . . . . . . . . . . . . . . . . . . . . . . . . . . . . . . . . . . . . . . . . . . 7–14<br />
FLYWHEEL<br />
Flywheel Ring Gear . . . . . . . . . . . . . . . . . . . . . . . . . . . . . . . . . . . . . . . . . . . 7–36<br />
Removal and Installation . . . . . . . . . . . . . . . . . . . . . . . . . . . . . . . . . . . . . . . 7–36<br />
FUEL INJECTOR NOZZLES<br />
Checking . . . . . . . . . . . . . . . . . . . . . . . . . . . . . . . . . . . . . . . . . . . . . . . . . . . . . 7–47<br />
Removal and Installation . . . . . . . . . . . . . . . . . . . . . . . . . . . . . . . . . . . . . . . 7–46<br />
FUEL INJECTION PUMP<br />
Description . . . . . . . . . . . . . . . . . . . . . . . . . . . . . . . . . . . . . . . . . . . . . . . . . . . 7–40<br />
Removal and Installation . . . . . . . . . . . . . . . . . . . . . . . . . . . . . . . . . . . . . . . 7–40<br />
Timing the Injection Pump . . . . . . . . . . . . . . . . . . . . . . . . . . . . . . . . . . . . . . 7–44<br />
FUEL INJECTION PUMP IDLER GEAR<br />
Bearing Installation . . . . . . . . . . . . . . . . . . . . . . . . . . . . . . . . . . . . . . . . . . . . 7–73<br />
Removal and Installation . . . . . . . . . . . . . . . . . . . . . . . . . . . . . . . . . . . . . . . 7–73<br />
ENGINE<br />
SERVICE<br />
853, 853H BICS Loa<strong>de</strong>r<br />
–7–1– Service Manual
ENGINE SERVICE (Cont’d)<br />
Page<br />
Number<br />
GLOW PLUGS<br />
Checking the Glow Plugs . . . . . . . . . . . . . . . . . . . . . . . . . . . . . . . . . . . . . . . 7–39<br />
Removal and Installation . . . . . . . . . . . . . . . . . . . . . . . . . . . . . . . . . . . . . . . 7–39<br />
IDLER GEAR AND HUB<br />
Checking . . . . . . . . . . . . . . . . . . . . . . . . . . . . . . . . . . . . . . . . . . . . . . . . . . . . . 7–71<br />
Removal . . . . . . . . . . . . . . . . . . . . . . . . . . . . . . . . . . . . . . . . . . . . . . . . . . . . . 7–71<br />
Installation . . . . . . . . . . . . . . . . . . . . . . . . . . . . . . . . . . . . . . . . . . . . . . . . . . . 7–72<br />
MAIN BEARINGS<br />
Description . . . . . . . . . . . . . . . . . . . . . . . . . . . . . . . . . . . . . . . . . . . . . . . . . . . 7–62<br />
Crankshaft End Play . . . . . . . . . . . . . . . . . . . . . . . . . . . . . . . . . . . . . . . . . . . 7–64<br />
Installation . . . . . . . . . . . . . . . . . . . . . . . . . . . . . . . . . . . . . . . . . . . . . . . . . . . 7–63<br />
Removal . . . . . . . . . . . . . . . . . . . . . . . . . . . . . . . . . . . . . . . . . . . . . . . . . . . . . 7–62<br />
OIL PAN<br />
Removal . . . . . . . . . . . . . . . . . . . . . . . . . . . . . . . . . . . . . . . . . . . . . . . . . . . . . 7–79<br />
Installation . . . . . . . . . . . . . . . . . . . . . . . . . . . . . . . . . . . . . . . . . . . . . . . . . . . 7–79<br />
OIL PUMP<br />
Checking . . . . . . . . . . . . . . . . . . . . . . . . . . . . . . . . . . . . . . . . . . . . . . . . . . . . . 7–80<br />
Gear Replacement . . . . . . . . . . . . . . . . . . . . . . . . . . . . . . . . . . . . . . . . . . . . 7–81<br />
Oil Filter Housing and Block . . . . . . . . . . . . . . . . . . . . . . . . . . . . . . . . . . . . 7–82<br />
Oil Pump Relief Valve . . . . . . . . . . . . . . . . . . . . . . . . . . . . . . . . . . . . . . . . . . 7–82<br />
Removal and Installation . . . . . . . . . . . . . . . . . . . . . . . . . . . . . . . . . . . . . . . 7–80<br />
Rotor Replacement . . . . . . . . . . . . . . . . . . . . . . . . . . . . . . . . . . . . . . . . . . . . 7–82<br />
PISTON AND CONNECTING ROD<br />
Assembly . . . . . . . . . . . . . . . . . . . . . . . . . . . . . . . . . . . . . . . . . . . . . . . . . . . . 7–59<br />
Checking . . . . . . . . . . . . . . . . . . . . . . . . . . . . . . . . . . . . . . . . . . . . . . . . . . . . . 7–56<br />
Disassembly . . . . . . . . . . . . . . . . . . . . . . . . . . . . . . . . . . . . . . . . . . . . . . . . . . 7–55<br />
Installation . . . . . . . . . . . . . . . . . . . . . . . . . . . . . . . . . . . . . . . . . . . . . . . . . . . 7–60<br />
Removal . . . . . . . . . . . . . . . . . . . . . . . . . . . . . . . . . . . . . . . . . . . . . . . . . . . . . 7–55<br />
RADIATOR<br />
Removal and Installation . . . . . . . . . . . . . . . . . . . . . . . . . . . . . . . . . . . . . . . 7–5<br />
ROCKER ARM AND SHAFT<br />
Checking Rocker Arms and Push Rods . . . . . . . . . . . . . . . . . . . . . . . . . . 7–54<br />
Disassembly and Assembly . . . . . . . . . . . . . . . . . . . . . . . . . . . . . . . . . . . . 7–54<br />
TIMING GEARCASE<br />
Removal and Installation . . . . . . . . . . . . . . . . . . . . . . . . . . . . . . . . . . . . . . . 7–75<br />
TIMING GEARCASE COVER<br />
Removal and Installation . . . . . . . . . . . . . . . . . . . . . . . . . . . . . . . . . . . . . . . 7–69<br />
TIMING GEARCASE COVER SEAL<br />
Removal and Installation . . . . . . . . . . . . . . . . . . . . . . . . . . . . . . . . . . . . . . . 7–68<br />
THERMOSTAT<br />
Checking the Thermostat . . . . . . . . . . . . . . . . . . . . . . . . . . . . . . . . . . . . . . . 7–86<br />
Removal and Installation . . . . . . . . . . . . . . . . . . . . . . . . . . . . . . . . . . . . . . . 7–86<br />
TROUBLESHOOTING<br />
Chart . . . . . . . . . . . . . . . . . . . . . . . . . . . . . . . . . . . . . . . . . . . . . . . . . . . . . . . . 7–3<br />
VALVE CLEARANCE<br />
Adjustment . . . . . . . . . . . . . . . . . . . . . . . . . . . . . . . . . . . . . . . . . . . . . . . . . . . 7–38<br />
VALVE, VALVE SEAT AND GUIDE<br />
Installation . . . . . . . . . . . . . . . . . . . . . . . . . . . . . . . . . . . . . . . . . . . . . . . . . . . 7–51<br />
Reconditioning the Valve and Valve Seat . . . . . . . . . . . . . . . . . . . . . . . . . 7–51<br />
Removal . . . . . . . . . . . . . . . . . . . . . . . . . . . . . . . . . . . . . . . . . . . . . . . . . . . . . 7–51<br />
Valve Gui<strong>de</strong> . . . . . . . . . . . . . . . . . . . . . . . . . . . . . . . . . . . . . . . . . . . . . . . . . . 7–52<br />
Valve Seat Insert . . . . . . . . . . . . . . . . . . . . . . . . . . . . . . . . . . . . . . . . . . . . . . 7–52<br />
Valve Spring . . . . . . . . . . . . . . . . . . . . . . . . . . . . . . . . . . . . . . . . . . . . . . . . . . 7–53<br />
WATER JACKET TUBE<br />
Removal and Installation . . . . . . . . . . . . . . . . . . . . . . . . . . . . . . . . . . . . . . . 7–87<br />
WATER PUMP<br />
Assembly . . . . . . . . . . . . . . . . . . . . . . . . . . . . . . . . . . . . . . . . . . . . . . . . . . . . 7–84<br />
Disassembly . . . . . . . . . . . . . . . . . . . . . . . . . . . . . . . . . . . . . . . . . . . . . . . . . . 7–83<br />
Removal and Installation . . . . . . . . . . . . . . . . . . . . . . . . . . . . . . . . . . . . . . . 7–83<br />
–7–2–<br />
853, 853H BICS Loa<strong>de</strong>r<br />
Service Manual
ENGINE SERVICE<br />
TROUBLESHOOTING<br />
Chart<br />
The following troubleshooting chart is provi<strong>de</strong>d for assistance in locating and correcting problems which are most common.<br />
Many of the recommen<strong>de</strong>d procedures must be done by authorized Bobcat Service Personnel only.<br />
PROBLEM CAUSE<br />
Slow cranking speed. 1, 2, 3, 4<br />
Engine will not start. 2, 5, 6, 7, 8, 9, 11, 12, 13, 14, 15, 16, 17, 19, 27, 28, 29<br />
Difficult to start. 5, 7, 8, 9, 10, 11, 12, 13, 15, 16, 17, 18, 19, 20, 25, 27, 28, 29<br />
No power for engine. 8, 9, 10, 11, 12, 13, 15, 16, 17, 18, 20, 21, 22, 23, 27, 28, 29<br />
Engine is mis–firing. 8, 9, 11, 12, 13, 15, 16, 17, 21, 22, 24, 25, 26, 28<br />
Too much fuel consumption. 10, 12, 13, 15, 16, 17, 19, 20, 21, 23, 24, 25, 27, 28, 29<br />
Black exhaust. 10, 12, 13, 15, 16, 17, 19, 20, 21, 23, 24, 25, 27, 28, 29<br />
Blue/white exhaust. 4, 10, 15, 16, 17, 21, 23, 27, 29, 30, 50<br />
Low oil pressure. 4, 31, 32, 33, 34, 35, 37, 39, 52<br />
Engine knocking. 13, 15, 16, 19, 22, 24, 25, 27, 29, 31, 40, 41, 53<br />
Engine running rough. 7, 8, 9, 10, 11, 12, 13, 17, 18, 22, 24, 25, 26, 29, 40, 53<br />
Vibration. 12, 13, 17, 21, 22, 25, 26, 29, 40, 42, 43<br />
High oil pressure warning. 4, 33, 36<br />
Overheating. 10, 12, 13, 15, 16, 20, 21, 40, 44, 45, 46, 47, 48, 51<br />
Too much crankcase pressure. 22, 27, 29, 30, 40, 49<br />
Poor compression. 10, 16, 21, 24, 25, 27, 28, 29, 30, 41, 53<br />
Start and stop. 9, 10, 11<br />
KEY TO CORRECT THE CAUSE<br />
1. Battery capacity low. 28. Worn valve and seats.<br />
2. Bad electrical connections. 29. Broken, worn or sticking piston rings.<br />
3. Faulty starter motor. 30. Worn valve stems or gui<strong>de</strong>s.<br />
4. Incorrect gra<strong>de</strong> of oil. 31. Worn or damaged bearings.<br />
5. Low cranking speed. 32. Not enough oil in the oil pan.<br />
6. Fuel tank empty. 33. Switch/sensor is <strong>de</strong>fective.<br />
7. Faulty stop control operation. 34. Oil pump worn.<br />
8. Plugged fuel line. 35. Pressure relief valve is sticking open.<br />
9. Plugged fuel filter. 36. Pressure relief valve is sticking closed.<br />
10. Restriction in the air cleaner. 37. Broken relief valve spring.<br />
11. Air in the fuel system. 38. Faulty suction pipe.<br />
12. Faulty fuel injection pump. 39. Plugged oil filter.<br />
13. Faulty fuel injectors. 40. Piston seizure.<br />
14. Broken injection pump drive. 41. Incorrect piston height.<br />
15. Incorrect injection pump timing. 42. Faulty engine mounting.<br />
16. Incorrect valve timing. 43. Incorrect alignment of flywheel.<br />
17. Poor compression. 44. Faulty thermostat.<br />
18. Plugged fuel tank vent. 45. Restriction in water jacket.<br />
19. Incorrect gra<strong>de</strong> of fuel. 46. Loose alternator belt.<br />
20. Exhaust pipe restriction. 47. Plugged radiator.<br />
21. Cylin<strong>de</strong>r head gasket leaking. 48. Faulty water pump.<br />
22. Overheating. 49. Plugged breather pipe.<br />
23. Cold running. 50. Damaged valve stem oil <strong>de</strong>flectors.<br />
24. Incorrect tappet adjustment. 51. Coolant level too low.<br />
25. Sticking valves. 52. Plugged oil pump pipe strainer.<br />
26. Incorrect high pressure fuel pipes. 53. Broken valve spring.<br />
27. Worn cylin<strong>de</strong>r bores.<br />
853, 853H BICS Loa<strong>de</strong>r<br />
–7–3– Service Manual
ENGINE SPEED CONTROL<br />
Removal and Installation<br />
Raise the lift arms. (See Page 1–1.)<br />
Raise the operator cab. (See Page 1–1.)<br />
Remove the two mounting bolts (Item 1) [A] and nuts from<br />
the speed control mounting bracket.<br />
Installation: Tighten the bolts (Item 2) [A] evenly until the<br />
speed control lever moves back and forth at a<br />
comfortable tension.<br />
Pull the speed control away from the loa<strong>de</strong>r frame and<br />
disconnect the speed control rod (Item 1) [B] from the<br />
control.<br />
Installation: Be sure to install the control rod in the<br />
bottom hole of the speed control.<br />
Installation: Install the stop bracket (Item 1) [C] in the<br />
same location. It is necessary for the front and rear stop<br />
on the bracket to be located correctly.<br />
Reverse the removal procedure to install the engine<br />
speed control.<br />
Disassembly<br />
Loosen the two control lever mounting bolts and remove<br />
the mounting nuts (Item 2) [C].<br />
Assembly: Do not lubricate the engine speed control.<br />
Replace any worn or damaged parts if necessary.<br />
–7–4–<br />
A<br />
B<br />
C<br />
1<br />
1<br />
1<br />
2<br />
1<br />
2<br />
P–04731<br />
P–04735<br />
P–04068<br />
853, 853H BICS Loa<strong>de</strong>r<br />
Service Manual
RADIATOR<br />
Removal and Installation<br />
Open the rear door.<br />
Remove the rear grill. (See Page 5–1.)<br />
Remove the oil cooler. (See Page 3–1.)<br />
Remove the engine muffler. (See Page 7–8.)<br />
Loosen the radiator cap.<br />
Connect a hose to the engine block drain (Item 1) [A].<br />
Open the block drain (Item 1) [A] and drain coolant into<br />
a container.<br />
Disconnect the hose (Item 1) [B].<br />
Disconnect the hose (Item 1) [C].<br />
Remove the radiator mounting bolts (Item 1) [D] (both<br />
si<strong>de</strong>s).<br />
Installation: Mix coolant in a separate container. (See<br />
Specifications for correct capacity Page 9–1.)<br />
Propylene Glycol<br />
Add premixed coolant: 47% water and 53% propylene<br />
glycol to the recovery tank if the coolant level is low.<br />
One gallon and one pint of propylene glycol mixed with<br />
one gallon of water is the correct mixture of coolant to<br />
provi<strong>de</strong> a –34°F (–37°C) freeze protection.<br />
Use a refractometer to check the condition of propylene<br />
glycol in your cooling system.<br />
Ethylene Glycol<br />
Add premixed coolant: 50% water and 50% ethylene<br />
glycol to the recovery tank if the coolant level is low.<br />
A<br />
B<br />
C<br />
D<br />
1<br />
1<br />
1<br />
1<br />
P–04896<br />
P–04894<br />
P–04895<br />
P–04893<br />
853, 853H BICS Loa<strong>de</strong>r<br />
–7–5– Service Manual
RADIATOR (Cont’d)<br />
Removal and Installation (Cont’d)<br />
Disconnect the over–fill hose (Item 1) [A].<br />
If so equipped, disconnect the wires from the water level<br />
sensor (Item 1) [B].<br />
Remove the radiator from the loa<strong>de</strong>r.<br />
Installation: Be sure the rubber bumpers (Item 2) [A] are<br />
located at each si<strong>de</strong> (Item 1) [C] before installing the<br />
radiator tabs into the loa<strong>de</strong>r frame.<br />
–7–6–<br />
A<br />
B<br />
C<br />
2<br />
BOSS®<br />
1 1<br />
1<br />
1<br />
P–04904<br />
P–05191<br />
P–04905<br />
853, 853H BICS Loa<strong>de</strong>r<br />
Service Manual
COOLANT RECOVERY TANK<br />
Removal and Installation<br />
Open the rear door.<br />
Raise the rear grill.<br />
Remove the mounting bolt (Item 1) [A] from the<br />
fuses/relay switches mounting bracket.<br />
Lift the coolant recovery tank from the bracket [B].<br />
Disconnect the overflow hose (Item 1) [B].<br />
Remove the two mounting bolts (Item 1) [C] from the<br />
recovery tank mounting bracket.<br />
Remove the mounting bracket.<br />
Revised June 97<br />
A<br />
B<br />
C<br />
1<br />
1<br />
P–04897<br />
P–04898<br />
P–04899<br />
853, 853H BICS Loa<strong>de</strong>r<br />
–7–7– Service Manual<br />
1
ENGINE MUFFLER<br />
Removal and Installation<br />
Open the rear door.<br />
Raise the rear grill.<br />
Remove the air cleaner. (See Page 7–9.)<br />
Loosen the exhaust pipe clamp (Item 1) [A].<br />
Disconnect the exhaust pipe from the muffler.<br />
Remove the mounting bolt (Item 1) [B] from the muffler<br />
(both si<strong>de</strong>s).<br />
Remove the muffler from the loa<strong>de</strong>r.<br />
Revised June 97<br />
–7–8–<br />
A<br />
B<br />
1<br />
1<br />
P–04892<br />
P–04888<br />
853, 853H BICS Loa<strong>de</strong>r<br />
Service Manual
AIR CLEANER HOUSING<br />
Removal and Installation<br />
Loosen the hose clamp (Item 1) [A].<br />
Disconnect the hose from the intake manifold.<br />
Loosen the hose clamp (Item 1) [B].<br />
Disconnect the intake hose from the air cleaner housing.<br />
NOTE: The manual indicator (Item 1) [C] is equipped<br />
on the 853 standard loa<strong>de</strong>r only.<br />
Remove the two mounting bolts (Item 2) [C] (at the top)<br />
and one mounting bolt at the bottom of the housing.<br />
Remove the air cleaner housing.<br />
NOTE: Disconnect the wires (Item 1) [D] from the<br />
sensor at the rear of the air cleaner housing.<br />
The sensor is equipped on 853 BOSS®<br />
option loa<strong>de</strong>rs only.<br />
A<br />
B<br />
C<br />
D<br />
1<br />
1<br />
1<br />
BOSS®<br />
1<br />
2<br />
P–04889<br />
P–04890<br />
P–04891<br />
P–05194<br />
853, 853H BICS Loa<strong>de</strong>r<br />
–7–9– Service Manual
BLOWER HOUSING/FAN GEARBOX<br />
Removal and Installation<br />
Raise the lift arms and install an approved lift arm support<br />
<strong>de</strong>vice. (See Page 1–1.)<br />
Raise the operator cab. (See Page 1–1.)<br />
Remove the mounting bolts (Item 1) [A] from the gas<br />
cylin<strong>de</strong>r mounting bracket.<br />
Installation: Tighten the mounting bolts to 80–90 in.–lbs.<br />
(9–10 Nm) torque.<br />
Remove the hydraulic fluid reservoir. (See Page 2–1.)<br />
Disconnect the wiring harness connectors (Item 1) [B].<br />
Remove the harness clamp (Item 2) [B].<br />
Disconnect the breather hose from the fan drive housing.<br />
Lay the electrical harness down for clearance at the<br />
blower housing.<br />
Remove the clamp and belt shield (Item 1) [C] for the fan<br />
drive.<br />
Remove the fan drive belt.<br />
Installation: When checking the fan gearbox oil level,<br />
make sure the level does not go above the top of the shaft<br />
in the gearbox [C]. Use 90W gear lube oil if the level is low.<br />
Use a putty knife to remove the sealant from the blower<br />
housing and loa<strong>de</strong>r frame [D].<br />
Revised June 97<br />
–7–10–<br />
A<br />
B<br />
C<br />
D<br />
2<br />
Oil Level<br />
1<br />
1<br />
CD–15015<br />
P–04860<br />
1<br />
P–04863<br />
P–04862<br />
853, 853H BICS Loa<strong>de</strong>r<br />
Service Manual
BLOWER HOUSING/FAN GEARBOX (Cont’d)<br />
Removal and Installation (Cont’d)<br />
Installation: Use R.T.V. sealant to reseal the blower<br />
housing to the loa<strong>de</strong>r frame [A].<br />
Remove the four mounting bolts (Item 1) [B] and spacer<br />
tubes (two outsi<strong>de</strong> housing and two insi<strong>de</strong> housing).<br />
NOTE: Remove the two rear mounting bolts first.<br />
Installation: Use sealant on each end of the insi<strong>de</strong><br />
spacer tubes to prevent the tubes from falling out of the<br />
housing during installation.<br />
Installation: Tighten the mounting bolts to 25–28 ft.–lbs.<br />
(34–38 Nm) torque.<br />
Sli<strong>de</strong> the blower housing forward and remove the fan/fan<br />
gearbox assembly [C].<br />
Remove the blower housing.<br />
See Page 7–15 for Disassembly of the Fan Gearbox.<br />
The blower housing must be moved away from the loa<strong>de</strong>r<br />
frame if the si<strong>de</strong> grills have to be replaced.<br />
To replace the si<strong>de</strong> grill, remove the four mounting screws<br />
(Item 1) [D] from the blower housing.<br />
Install the new grill and replace the screws.<br />
A<br />
B<br />
C<br />
D<br />
1<br />
1<br />
1<br />
P–04877<br />
P–04859<br />
P–04864<br />
P–04876<br />
853, 853H BICS Loa<strong>de</strong>r<br />
–7–11– Service Manual<br />
1
FAN DRIVE TENSION PULLEY<br />
Removal and Installation<br />
Remove the fan drive belt.<br />
Remove the idler pulley bolt (Item 1) [A].<br />
Remove the spacers, bolt and washers from the arm [B].<br />
Installation: Put a small amount of grease around the<br />
outsi<strong>de</strong> edge (Item 1) [B] on the grease rings (both si<strong>de</strong>s).<br />
–<br />
Remove the bolt (Item 1) [C] & [D].<br />
Remove the thrust washer (Item 2) [D], O–rings (Item 3)<br />
[D] and spring (Item 4) [D].<br />
Check all parts for damage or wear and replace them as<br />
nee<strong>de</strong>d.<br />
Reverse the removal procedure to install the tension<br />
pulley.<br />
NOTE: When making repairs, replace the bronze<br />
bushing (Item 5) [D] with a new style nylon<br />
bushing. Clean all parts and assemble dry.<br />
Do not lubricate. (See Parts Manual for<br />
correct part numbers.)<br />
Revised June 97<br />
–7–12–<br />
A<br />
B<br />
C<br />
D<br />
4<br />
P–04956<br />
5<br />
3<br />
1<br />
3<br />
2<br />
1<br />
P–04954<br />
1<br />
P–00581<br />
P–04955<br />
1<br />
N–00303<br />
853, 853H BICS Loa<strong>de</strong>r<br />
Service Manual
BLOWER FAN<br />
Removal and Installation<br />
Remove the lock nut and spacer [A].<br />
Installation: Tighten the nut to 45–55 ft.–lbs. (61–75 Nm)<br />
torque.<br />
Use the following procedure to remove the fan from the<br />
shaft:<br />
AVOID INJURY OR DEATH<br />
Wear safety goggles to prevent eye injury<br />
when drilling or grinding.<br />
W–2108–1186<br />
Install the nut (Item 1) [B] on the tapered shaft to protect<br />
the shaft and threads.<br />
Install the puller on the fan as shown [B].<br />
As the center bolt (Item 2) [B] is tightened, periodically<br />
strike the bolt head to loosen the fan from the shaft .<br />
Remove the fan from the tapered shaft [C].<br />
To remove the blower housing mounting plate, remove<br />
the six bolts (Item 1) [D].<br />
A<br />
B<br />
C<br />
D<br />
1<br />
2<br />
1<br />
CD–09952<br />
CD–09953<br />
1<br />
P–03006<br />
CD–09954<br />
853, 853H BICS Loa<strong>de</strong>r<br />
–7–13– Service Manual<br />
1
FAN GEARBOX<br />
Parts I<strong>de</strong>ntification<br />
1. Seal<br />
2. Snap Ring (Small)<br />
3. Shims (1.0 inch O.D.)<br />
4. Bearing<br />
5. Shaft (Long)<br />
6. Shims (2.0 inch O.D.)<br />
7. Long Key<br />
8. Shaft (Short)<br />
9. Short Key<br />
10. Long Housing<br />
11. Nut<br />
12. Gear<br />
13. Washer<br />
14. Screw<br />
15. Square Shim<br />
*16. Short Housing<br />
17. Bolt<br />
18. Snap Ring (Large)<br />
19. Cap<br />
20. Long Housing Assy.<br />
21. Short Housing Assy.<br />
22. Fill Plug<br />
1<br />
10<br />
* Individual Part not available<br />
2<br />
11<br />
22<br />
3<br />
4<br />
20<br />
4<br />
12<br />
–7–14–<br />
13<br />
5<br />
14<br />
15<br />
7<br />
8<br />
1<br />
18<br />
6<br />
4<br />
*16<br />
17<br />
12<br />
4<br />
13<br />
14<br />
3<br />
17<br />
12<br />
18<br />
19<br />
2<br />
21<br />
20<br />
TS–01002<br />
853, 853H BICS Loa<strong>de</strong>r<br />
Service Manual
FAN GEARBOX (Cont’d)<br />
Disassembly<br />
NOTE: When repairing the gearbox or<strong>de</strong>r the<br />
following as nee<strong>de</strong>d:<br />
1. Complete Assembly<br />
2. Long Housing Assembly<br />
3. Long Housing<br />
4. Short Housing Assembly (See Note<br />
Below)<br />
5. Internal Parts<br />
NOTE: The short housing is only available as an<br />
assembly. See the parts i<strong>de</strong>ntification page<br />
(Page 7–14) for reference (Or<strong>de</strong>r parts from<br />
Melroe Parts Sales).<br />
NOTE: Be sure to count the number and thickness of<br />
shims during disassembly. Install the shims<br />
in the original location during assembly.<br />
Remove the fan and blower housing mounting plate. (See<br />
Page 7–13.)<br />
Long Housing<br />
Loosen the set screws (Item 1) [A] and remove the pulley<br />
(Item 2) [A].<br />
Remove the long key (Item 3) [A].<br />
Remove the four mounting bolts and the part number tag<br />
[B].<br />
Remove the oil from the gearbox.<br />
AVOID INJURY OR DEATH<br />
Wear safety goggles to prevent eye injury<br />
when drilling or grinding.<br />
W–2108–1186<br />
Drill an 1/8 inch (13 mm) hole in the seal. Use a sli<strong>de</strong><br />
hammer tool to remove the seal [C].<br />
Remove the small snap ring [D].<br />
A<br />
B<br />
Part Number<br />
Tag<br />
C<br />
D<br />
3<br />
1<br />
2<br />
P–03005<br />
P–02983<br />
P–02999<br />
P–02964<br />
853, 853H BICS Loa<strong>de</strong>r<br />
–7–15– Service Manual
FAN GEARBOX (Cont’d)<br />
Disassembly (Cont’d)<br />
Remove the small shims [A].<br />
Remove the screw and washer from the shaft [B].<br />
Support the lower flange and press the shaft from the<br />
bearing [C].<br />
NOTE: The gear and the other bearing (pulley end)<br />
will be removed with the shaft.<br />
Support the bearing and press the shaft from the bearing<br />
[D].<br />
–7–16–<br />
A<br />
B<br />
C<br />
D<br />
P–02963<br />
P–02966<br />
P–03004<br />
P–03298<br />
853, 853H BICS Loa<strong>de</strong>r<br />
Service Manual
FAN GEARBOX (Cont’d)<br />
Disassembly (Cont’d)<br />
Short Housing<br />
Remove the end cap [A].<br />
Use care not to damage the housing.<br />
AVOID INJURY OR DEATH<br />
Wear safety goggles to prevent eye injury<br />
when drilling or grinding.<br />
W–2108–1186<br />
Drill an 1/8 inch (3 mm) hole in the seal. Use a sli<strong>de</strong><br />
hammer tool to remove the seal [B].<br />
Remove the large snap ring from the flange end of the<br />
housing [C].<br />
Remove the large shims from the housing [D].<br />
NOTE: Use the same size and thickness of shims<br />
during assembly.<br />
A<br />
B<br />
C<br />
D<br />
P–02997<br />
P–02996<br />
P–02970<br />
P–02969<br />
853, 853H BICS Loa<strong>de</strong>r<br />
–7–17– Service Manual
FAN GEARBOX (Cont’d)<br />
Disassembly (Cont’d)<br />
Remove the screw and washer (Item 1) [A] from the<br />
shaft.<br />
Remove the snap ring from the cap end of the housing<br />
[B].<br />
Press the shaft from the housing [C].<br />
NOTE: Both bearings may come out of the housing<br />
with the shaft. If one bearing remains in the<br />
housing, use a non metal object to tap the<br />
bearing from the housing.<br />
Press the bearing from the tapered end of the shaft [D].<br />
–7–18–<br />
A<br />
B<br />
C<br />
D<br />
1<br />
P–02978<br />
P–02973<br />
P–02998<br />
P–03088<br />
853, 853H BICS Loa<strong>de</strong>r<br />
Service Manual
FAN GEARBOX (Cont’d)<br />
Disassembly (Cont’d)<br />
Press the bearing, shims and gear from the shaft [A].<br />
Remove the key (Item 1) [B] from the shaft.<br />
A<br />
B<br />
P–03001<br />
P–02972<br />
853, 853H BICS Loa<strong>de</strong>r<br />
–7–19– Service Manual<br />
1
FAN GEARBOX (Cont’d)<br />
Assembly<br />
NOTE: See Note Page 7–15 when or<strong>de</strong>ring parts for<br />
the Fan Gearbox. Always replace seals<br />
during assembly. Replace the parts in the<br />
gearbox as nee<strong>de</strong>d.<br />
NOTE: Do not install the seals and cap in the<br />
housing until after the backlash has been<br />
checked.<br />
NOTE: Use care when pressing the bearings into the<br />
aluminum housing. The housing can be<br />
damaged if too much pressure is used.<br />
NOTE: For procedures requiring the use of LOCTITE<br />
adhesive, thoroughly clean and dry affected<br />
parts before the application of LOCTITE.<br />
Long Housing<br />
Press a bearing on the short keyed end of the long shaft<br />
[A].<br />
Install the long housing on the shaft [B].<br />
Be sure the bearing is seated in the bore at the lower end<br />
of the housing.<br />
Install a bearing on the long keyed end of the shaft [C].<br />
Support the lower bearing and press the other bearing in<br />
the housing until the bearings seat in the housing [C].<br />
Install on the bearing, the same number and size shims<br />
that were removed during disassembly [D].<br />
–7–20–<br />
A<br />
B<br />
C<br />
D<br />
P–02961<br />
P–02960<br />
P–02962<br />
P–02963<br />
853, 853H BICS Loa<strong>de</strong>r<br />
Service Manual
FAN GEARBOX (Cont’d)<br />
Assembly (Cont’d)<br />
Install the small snap ring in the groove above the shims<br />
[A].<br />
Install the gear key in the flange end of the shaft [B].<br />
Align the key and gear. While supporting the bearing on<br />
the other end, press the gear on the shaft until it seats<br />
against the bearing [C].<br />
Install the washer [D].<br />
Put liquid adhesive (LOCTITE #242) on the screw<br />
threads. Install and tighten the screw [D].<br />
A<br />
B<br />
C<br />
D<br />
P–02964<br />
P–02965<br />
P–02967<br />
P–02966<br />
853, 853H BICS Loa<strong>de</strong>r<br />
–7–21– Service Manual
FAN GEARBOX (Cont’d)<br />
Assembly (Cont’d)<br />
Short Housing<br />
Install a bearing in the flanged end of the housing [A].<br />
Install the large shims on the bearing (flanged end) [B].<br />
Install the large snap ring in the groove above the shims<br />
[C].<br />
Install the short key (Item 1) [D].<br />
Align and press the gear on the shaft (teeth toward the<br />
tapered end of the shaft) [D].<br />
–7–22–<br />
A<br />
B<br />
C<br />
D<br />
1<br />
P–02968<br />
P–02969<br />
P–02970<br />
P–02971<br />
853, 853H BICS Loa<strong>de</strong>r<br />
Service Manual
FAN GEARBOX (Cont’d)<br />
Assembly (Cont’d)<br />
After the gear is seated, drive the key down insi<strong>de</strong> the<br />
gear key way [A].<br />
NOTE: This will prevent damage to the shims when<br />
the bearing is installed later.<br />
Install the shaft in the housing, tapered end in the bearing<br />
at the round flange end of the housing [B].<br />
Install on the shaft, the same number and size shims that<br />
were removed during disassembly [C].<br />
Install a bearing on the gear end of the shaft [D].<br />
A<br />
B<br />
C<br />
D<br />
P–02975<br />
P–02976<br />
P–02977<br />
P–02974<br />
853, 853H BICS Loa<strong>de</strong>r<br />
–7–23– Service Manual
FAN GEARBOX (Cont’d)<br />
Assembly (Cont’d)<br />
Install the snap ring in the groove above the bearing [A].<br />
Install the washer (Item 1) [B] on the shaft. Put liquid<br />
adhesive (LOCTITE #242) on the screw threads and<br />
install the screw [B].<br />
–7–24–<br />
A<br />
B<br />
1<br />
P–02973<br />
P–02978<br />
853, 853H BICS Loa<strong>de</strong>r<br />
Service Manual
FAN GEARBOX (Cont’d)<br />
853, 853H BICS Service Manual #6724012 – Engine Service Section Part 1 of 4<br />
Checking Backlash<br />
NOTE: For procedures requiring the use of LOCTITE<br />
adhesive, thoroughly clean and dry affected<br />
parts before the application of LOCTITE.<br />
The backlash tolerance between the gears should be<br />
0.005–0.008 inch (0,127–0,203 mm).<br />
To check the gear backlash use the following procedure:<br />
Put the short housing in a vise, square flange facing up<br />
as shown [A].<br />
Install the same size and number of square shims (if<br />
present during disassembly) between the two housings<br />
[B].<br />
Set the long housing on the short housing with a small<br />
amount of liquid adhesive (LOCTITE #242) between the<br />
mounting surfaces.<br />
NOTE: If square shims are used, put a small amount<br />
of the liquid adhesive on both si<strong>de</strong>s of all<br />
shims.<br />
Install the four mounting bolts through the flange holes<br />
[C].<br />
Install the part number tag [C].<br />
Install and tighten the nut to 25–28 ft.–lbs. (34–38 Nm)<br />
torque.<br />
Install the long key (Item 1) [D] and the pulley (Item 2) [D].<br />
Install a bolt in the set screw hole to maintain a 1.000 inch<br />
(25,4 mm) distance from the shaft center to the bolt head<br />
(to be used with a dial indicator) [D].<br />
A<br />
B<br />
C<br />
Part Number<br />
Tag<br />
D<br />
1<br />
1.000 inch<br />
(25,4 mm)<br />
2<br />
P–02987<br />
P–02981<br />
P–02983<br />
P–02984<br />
853, 853H BICS Loa<strong>de</strong>r<br />
–7–25– Service Manual
FAN GEARBOX (Cont’d)<br />
Checking Backlash (Cont’d)<br />
Put the fan nut (Item 1) [A] on the shaft and tighten snugly.<br />
Install a locking pliers on the fan nut and support the<br />
handle against the long housing [A].<br />
Using a magnetic based dial indicator mounted on a<br />
bench vise, touch the dial stem on the bolt (Item 1) [B].<br />
Hold the locking pliers against the long housing and rotate<br />
the pulley back and forth to read the dial gauge [B].<br />
If the backlash is GREATER than 0.008 inch (0,203 mm),<br />
do the following:<br />
1. Remove a square shim(s) (if present) between the<br />
two housings.<br />
2. Remove a large shim(s) from the tapered end of the<br />
short shaft and add a small shim(s) of the same<br />
thickness between the bearing and the gear on the<br />
screw end of the shaft.<br />
If the backlash is LESS than 0.005 inch (0,127 mm) do the<br />
following:<br />
1. Add a square shim(s) between the two housings.<br />
2. Remove a small shim(s) between the bearing and<br />
the gear on the screw end of the short shaft and add<br />
a large shim(s) of the same thickness between the<br />
snap ring and the bearing on the tapered end of the<br />
shaft.<br />
–7–26–<br />
A<br />
B<br />
1<br />
1<br />
P–02982<br />
P–02979<br />
853, 853H BICS Loa<strong>de</strong>r<br />
Service Manual
FAN GEARBOX (Cont’d)<br />
Checking Backlash (Cont’d)<br />
When the backlash is correct, install the seals, cap and<br />
gear oil as follows:<br />
Remove the bolts from the flanges and separate the two<br />
housings.<br />
Put liquid adhesive (LOCTITE 242) on the outsi<strong>de</strong><br />
diameter of the seal(s) [A].<br />
Install the seal(s) flush with the housing surface [B] & [C].<br />
Clean any oil from the flange surface.<br />
Install the long housing on the short housing flange.<br />
Install the four bolts and part number tag.<br />
Install and tighten the nuts to 25–28 ft.–lbs. (34–38 Nm)<br />
torque.<br />
A<br />
B<br />
C<br />
P–03089<br />
LONG HOUSING<br />
P–02985<br />
SHORT HOUSING<br />
P–02986<br />
853, 853H BICS Loa<strong>de</strong>r<br />
–7–27– Service Manual
ENGINE<br />
Removal and Installation<br />
Raise the lift arms and install an approved lift arm support<br />
<strong>de</strong>vice. (See Page 1–1.)<br />
Raise the operator cab. (See Page 1–1.)<br />
Disconnect the case drain hose (Item 1) [A] and drain the<br />
hydraulic fluid into a container.<br />
After the fluid is removed from the reservoir, loosen both<br />
hose clamps and remove the hose (Item 2) [A] from the<br />
reservoir and hydrostatic pump.<br />
Loosen both hose clamps and remove the fuel vent hose<br />
(Item 1) [B].<br />
Loosen both hose clamps and remove the fuel fill hose<br />
(Item 2) [B].<br />
Remove the fan drive belt (Item 1) [C].<br />
Loosen the hose clamps and remove the hose (Item 1)<br />
[D] from the filter and the hydrostatic pump.<br />
–7–28–<br />
A<br />
B<br />
C<br />
D<br />
1<br />
2<br />
2<br />
1<br />
1<br />
P–04856<br />
1<br />
P–04855<br />
P–04863<br />
P–04861<br />
853, 853H BICS Loa<strong>de</strong>r<br />
Service Manual
ENGINE (Cont’d)<br />
Removal and Installation (Cont’d)<br />
Disconnect the wires (Item 1) [A] at both filters.<br />
Disconnect the BICS wiring harness connectors (Item<br />
2) [A] from the engine electrical harness.<br />
Disconnect the wiring connector (Item 3) [A].<br />
Disconnect the electrical harness connectors (Item 1)<br />
[B].<br />
NOTE: The electrical harness will be removed with<br />
the engine.<br />
Remove the bolt from the harness clip (Item 2) [B].<br />
Disconnect the hose (Item 1) [C] from the oil cooler.<br />
Disconnect the hose (Items 2 & 3) [C] from the<br />
hydrostatic pump.<br />
When making repairs on hydrostatic and<br />
hydraulic systems, clean the work area before<br />
disassembly and keep all parts clean. Always<br />
use caps and plugs on hoses, tubelines and<br />
ports to keep dirt out. Dirt can quickly damage<br />
the system.<br />
I–2003–0284<br />
A<br />
2<br />
B<br />
C<br />
2<br />
1<br />
1<br />
1<br />
2<br />
3<br />
3<br />
P–04871<br />
P–04860<br />
P–04867<br />
853, 853H BICS Loa<strong>de</strong>r<br />
–7–29– Service Manual
ENGINE (Cont’d)<br />
Removal and Installation (Cont’d)<br />
Disconnect the steering cables (Item 1) [A].<br />
Installation: See Page 3–1 for transmission neutral<br />
adjustment.<br />
Mark the high pressure hoses for correct installation.<br />
Disconnect the four high pressure hoses (Item 2) [A] from<br />
the pump.<br />
Disconnect the high pressure hose (Item 1) [B] from the<br />
hydraulic pump.<br />
Disconnect the case drain filter hose (Item 1) [C] from the<br />
pump.<br />
Remove the bolt and nut (Item 2) [B] at the left front<br />
engine mount.<br />
Remove the bolt (Item 1) [D] at the right front engine<br />
mount.<br />
NOTE: The nut is held in the housing and will not<br />
turn (Inset) [D].<br />
Installation: Tighten the mounting bolts and nuts to<br />
90–100 ft.–lbs. (125–130 Nm) torque.<br />
–7–30–<br />
A<br />
B<br />
C<br />
D<br />
1<br />
1<br />
2<br />
2<br />
1<br />
1<br />
2<br />
P–04878<br />
P–04870<br />
P–04879<br />
P–04934<br />
P–05008<br />
853, 853H BICS Loa<strong>de</strong>r<br />
Service Manual
ENGINE (Cont’d)<br />
Removal and Installation (Cont’d)<br />
Remove the battery. (See Page 6–1.)<br />
Remove the air cleaner housing. (See Page 7–9.)<br />
After the air cleaner hose is disconnected, remove the air<br />
horn (Item 1) [A] from the intake manifold.<br />
Plug the intake manifold to prevent material from falling<br />
into manifold.<br />
Remove the rear grill. (See Page 5–1.)<br />
Remove the muffler. (See Page 7–8.)<br />
Loosen the radiator cap.<br />
Connect a hose to the engine block drain (Item 1) [B].<br />
Open the drain and drain coolant into a container.<br />
Loosen the hose clamp and disconnect the radiator hose<br />
(Item 1) [C].<br />
Loosen the hose clamp and disconnect the radiator hose<br />
(Item 1) [D].<br />
A<br />
B<br />
C<br />
D<br />
1<br />
1<br />
1<br />
1<br />
P–04889<br />
P–04896<br />
P–04895<br />
P–04894<br />
853, 853H BICS Loa<strong>de</strong>r<br />
–7–31– Service Manual
ENGINE (Cont’d)<br />
Removal and Installation (Cont’d)<br />
Remove the mounting bolt (Item 1) [A] for the<br />
relays/fuses mounting bracket.<br />
Disconnect the electrical connector (Item 2) [A].<br />
Remove the coolant recovery tank and bracket (Page<br />
7–7).<br />
Disconnect the throttle linkage (Item 1) [B] from the<br />
bellcrank.<br />
Disconnect the ground cable (Item 1) [C] from the loa<strong>de</strong>r<br />
frame.<br />
Disconnect the fuel hose (Item 2) [C] from the fuel filter.<br />
Disconnect the fuel return hose (Item 1) [D] from the<br />
injection pump.<br />
Installation: Remove the air from the fuel system (Page<br />
1–1).<br />
–7–32–<br />
A<br />
B<br />
C<br />
D<br />
1<br />
1<br />
2<br />
1<br />
1<br />
2<br />
P–04897<br />
P–04900<br />
P–04901<br />
P–04906<br />
853, 853H BICS Loa<strong>de</strong>r<br />
Service Manual
ENGINE (Cont’d)<br />
Removal and Installation (Cont’d)<br />
Remove the left rear engine mount bolt and nut [A].<br />
Remove the right rear engine mount bolt (Item 1) [B].<br />
Installation: Tighten the bolts and nuts to 65–70 (88–95<br />
Nm) torque.<br />
Use the dimensions from Figure [C] to make the engine<br />
removal and installation brackets.<br />
C<br />
1.75<br />
(44,5)<br />
INCHES<br />
(MM)<br />
0.5<br />
(12,7)<br />
2.0<br />
(51)<br />
0.3125 Dia. (2)<br />
Revised June 97<br />
4.0<br />
(102)<br />
Use Two 3/8’’ x 1–1/4’’ Bolts<br />
for Drilled and Tapped Holes<br />
4.25<br />
(108)<br />
0.5<br />
(12,7)<br />
1–1/2’’ I.S. Dia.<br />
2–1/2’’ O.S. Dia.<br />
1–1/2’’ Square Tubing<br />
1.0 (25)<br />
0.375<br />
(9,5)<br />
0.6875<br />
(17,5)<br />
4.0<br />
(102)<br />
2.0 (51)<br />
1.0<br />
(25)<br />
13.0<br />
(330)<br />
1/4’’ (4)<br />
Thick Gusset<br />
45°<br />
9.0<br />
(229)<br />
2.5<br />
(64)<br />
1.125<br />
(28,6)<br />
1.75<br />
(44,5)<br />
A<br />
2.5 (64)<br />
1.0<br />
(25)<br />
1.375<br />
(35,0)<br />
B<br />
16.0<br />
(406)<br />
0.66 (16,8)<br />
(2) 2 x 2 x 1/4<br />
Gusset<br />
17.750<br />
1<br />
0.75<br />
(19,05)<br />
4.5<br />
(114)<br />
0.50 (12,7)<br />
0.60<br />
(15,2)<br />
3.1<br />
(78,7)<br />
8.525<br />
(218)<br />
9/16<br />
Dia. Hole (2)<br />
3/8 Dia. (3)<br />
1.125<br />
(28,6)<br />
0.775<br />
(19,7)<br />
2–1/2 x 2–1/2 x 22<br />
1/4’’ Thick<br />
P–04903<br />
P–04902<br />
2–1/2 x 2–1/2 x 6<br />
1/4’’ Angle Iron<br />
0.60 (15,2)<br />
3/8 Dia. Hole (4)<br />
Gusset<br />
MC–01801<br />
MC–01799<br />
B–13452<br />
853, 853H BICS Loa<strong>de</strong>r<br />
–7–33– Service Manual
ENGINE (Cont’d)<br />
Removal and Installation (Cont’d)<br />
The engine lift eye bracket (Item 1) [A] has been turned<br />
down for clearance at the exhaust pipe. Turn the lift eye<br />
bracket and install the bolt.<br />
The valve cover (Item 2) [A] will have to be removed for<br />
clearance for the engine lift brackets.<br />
Install the engine lift brackets on the engine as shown in<br />
Figure [A].<br />
Connect a chain hoist to the ring (Item 3) [A] on the lift<br />
bracket.<br />
Remove the engine/hydrostatic pump assembly from the<br />
loa<strong>de</strong>r [B].<br />
–7–34–<br />
A<br />
B<br />
1<br />
2<br />
3<br />
B–13488<br />
P–04923<br />
853, 853H BICS Loa<strong>de</strong>r<br />
Service Manual
ENGINE (Cont’d)<br />
Engine Mount Replacement<br />
Use the following procedure to install new engine mounts:<br />
Remove the existing mount from the engine. Refer to<br />
engine removal and installation for engine mount<br />
locations.<br />
Replace all four engine mounts (2 front and 2 rear).<br />
Use the parts shown to install the new engine mounts [A].<br />
Item 1 – Square Nut – Used on left si<strong>de</strong> engine mounts<br />
Item 2 – Hex Nut – Used on right si<strong>de</strong> engine mounts<br />
Item 3 – Mount Washer<br />
Item 4 – Engine Mount<br />
Item 5 – Tube Spacer – Front 1.47 inch (37,3 mm)<br />
Rear 1.57 inch (39,9 mm)<br />
Item 6 – Snubbing Washer<br />
Item 7 – Mounting Bolt<br />
Install the new engine mount as shown in the cut away<br />
si<strong>de</strong> view [B].<br />
Tighten the mounting bolts to 90–100 ft.–lbs. (125–130<br />
Nm) torque.<br />
A<br />
B<br />
Loa<strong>de</strong>r<br />
Frame<br />
Washer<br />
Snubbing<br />
Washer<br />
3<br />
4<br />
6<br />
1<br />
5<br />
7<br />
2<br />
Spacer<br />
Engine<br />
Mounting<br />
Bracket<br />
MC–01771<br />
Engine<br />
Mount<br />
MC–01765<br />
853, 853H BICS Loa<strong>de</strong>r<br />
–7–35– Service Manual
FLYWHEEL<br />
Removal and Installation<br />
Remove the drive belt (Page 3–1).<br />
Remove the bolts (Item 1) [A] from the flywheel.<br />
Installation: Put LOCTITE on the flywheel bolts. Tighten<br />
the bolts to 83–90 ft.–lbs. (113–122 Nm) torque.<br />
Remove the flywheel from the engine crankshaft [B].<br />
Flywheel Ring Gear<br />
The ring gear on the flywheel is an interference fit. Heat<br />
the ring gear enough to expand it and hit it with a hammer<br />
to remove it evenly.<br />
Clean the outer surface of the flywheel to give it a smooth<br />
fit.<br />
Clean the new ring gear and heat it to a temperature of<br />
450–500°F (232–260°C).<br />
Fit the ring gear over the flywheel. Make sure the gear is<br />
on the seat correctly.<br />
–7–36–<br />
A<br />
B<br />
1<br />
P–4928<br />
P–4939<br />
853, 853H BICS Loa<strong>de</strong>r<br />
Service Manual
BELT SHIELD<br />
Removal and Installation<br />
Remove the mounting bolt (Item 1) [A] from the<br />
thermostat housing.<br />
Remove the mounting bolt (Item 2) [A] from the cylin<strong>de</strong>r<br />
head.<br />
Remove the mounting bolt (Item 3) [A].<br />
Remove the mounting bolt (Item 1) [B] from the alternator<br />
mounting bracket.<br />
Remove the belt shield from the engine.<br />
A<br />
B<br />
1<br />
2<br />
3<br />
P–04947<br />
P–04945<br />
853, 853H BICS Loa<strong>de</strong>r<br />
–7–37– Service Manual<br />
1
VALVE CLEARANCE<br />
Adjustment<br />
Make the valve clearance adjustment with engine<br />
stopped and cold.<br />
The correct clearance is 0.016 inch (0,41 mm) with the<br />
engine cold [A].<br />
Put the correct size feeler gauge between the rocker arm<br />
and the valve stem. Turn the adjustment bolt until the<br />
clearance is correct [B].<br />
Use the following sequence to set the valve clearance:<br />
Front Rear<br />
Cylin<strong>de</strong>r No. 1 2 3 4<br />
Valve arrangement I E I E I E I E<br />
Piston in No. 1 cylin<strong>de</strong>r is<br />
at TDC on compression<br />
stroke<br />
Piston in No. 4 cylin<strong>de</strong>r is<br />
at TDC on compression<br />
stroke<br />
ENGINE COMPRESSION<br />
Checking<br />
• • • •<br />
• • • •<br />
The tools listed will be nee<strong>de</strong>d to do the following<br />
procedure:<br />
OEM1074 – Engine Compression Kit<br />
MEL1268 – Compression Gauge Test Adapter<br />
The engine must be at operating temperature.<br />
Remove the glow plugs (Page 7–39) [C].<br />
Install the correct compression adapter into the cylin<strong>de</strong>r<br />
head.<br />
Connect the compression gauge [D].<br />
The engine must be turning at about 175 RPM.<br />
The compression must be between 300–500 PSI<br />
(2069–3448 kPa) with no more than 50 PSI (345 kPa)<br />
difference between cylin<strong>de</strong>rs.<br />
The engine has an open crankcase ventilation system.<br />
The ventilation hose comes from the valve cover tube<br />
(Item 1) [D] and passes down the si<strong>de</strong> of the engine block.<br />
–7–38–<br />
A<br />
B<br />
C<br />
D<br />
1<br />
0.016 inch<br />
(0,41 mm)<br />
Cold<br />
B–04123<br />
B–08934<br />
B–08922<br />
B–08920<br />
853, 853H BICS Loa<strong>de</strong>r<br />
Service Manual
GLOW PLUGS<br />
Removal and Installation<br />
Disconnect the negative (–) cable from the battery.<br />
Remove the electrical bar holddown nuts at the glow<br />
plugs [A].<br />
Remove the electrical connector bar [B].<br />
Remove the glow plug from the cylin<strong>de</strong>r head [C].<br />
Checking the Glow Plugs<br />
Connect the voltmeter to the terminal end of the glow<br />
plug. Touch the other lead from the voltmeter to the<br />
heating end of the glow plug [D].<br />
The reading must be approximately 1.5 ohms. If the<br />
resistance is zero ohms the glow plug has a short circuit.<br />
If the resistance is infinite, the coil of the glow plug is<br />
broken.<br />
A<br />
B<br />
C<br />
D<br />
B–08957<br />
B–08919<br />
B–08923<br />
B–11571<br />
853, 853H BICS Loa<strong>de</strong>r<br />
–7–39– Service Manual
FUEL INJECTION PUMP<br />
Description<br />
The injection pump contains parts which have a very<br />
close tolerance and its operation has a direct effect on the<br />
performance of the engine.<br />
Do not attempt to maintain or adjust unless<br />
you are trained and have the correct<br />
equipment.<br />
I–2028–0289<br />
Removal and Installation<br />
Disconnect the throttle linkage.<br />
Disconnect the shut–off wire [A].<br />
Remove the valve cover.<br />
Rotate the engine until No. 1 piston is at TDC. Both valves<br />
at No. 1 cylin<strong>de</strong>r are not moving and have clearance [B].<br />
–7–40–<br />
A<br />
B<br />
B–08976<br />
B–08935<br />
853, 853H BICS Loa<strong>de</strong>r<br />
Service Manual
FUEL INJECTION PUMP (Cont’d)<br />
Removal and Installation (Cont’d)<br />
The TDC mark (Item 1) [A] is located on the engine pulley<br />
v–belt groove.<br />
There are two sets of timing marks on the engine pulley,<br />
one at 12 o’clock and the other at the 3 o’clock position.<br />
Use the timing marks located at the 3 o’clock position<br />
(Inset) [A].<br />
Use the parting line (off–set) (Item 2) [A] or (Item 1) [B]<br />
of the timing case cover to make alignment of the TDC<br />
mark.<br />
Align the mark on the injection pump gear with the pointer<br />
in the window [C].<br />
A<br />
B<br />
C<br />
1<br />
2<br />
12 o’clock Position<br />
12° 14°<br />
16°<br />
TDC<br />
3 o’clock<br />
Position<br />
MC–01665<br />
P–04949<br />
P–04952<br />
B–08939<br />
853, 853H BICS Loa<strong>de</strong>r<br />
–7–41– Service Manual<br />
1
FUEL INJECTION PUMP (Cont’d)<br />
Removal and Installation (Cont’d)<br />
Do not bend the high pressure fuel injection<br />
tubes when removing or installing them.<br />
I–2029–0289<br />
Disconnect the high pressure fuel lines at the injection<br />
pump [A].<br />
Disconnect the fuel lines at the injectors [B].<br />
Installation: Tighten the fittings on the high pressure fuel<br />
lines to 14–29 ft.–lbs. (19–39 Nm) torque.<br />
Remove the high pressure fuel lines from the engine [C].<br />
Align the injection removal zero mark (Item 1) [D] in the<br />
window before removing the injection pump.<br />
NOTE: The crankshaft will not be on top <strong>de</strong>ad center.<br />
Remove the bolts at the front of the timing case cover [D].<br />
Installation: Tighten bolts & nuts to 10–17 ft.–lbs. (14–23<br />
Nm) torque.<br />
Revised Mar. 03<br />
–7–42–<br />
A<br />
B<br />
C<br />
D<br />
1<br />
B–08975<br />
B–08917<br />
B–08915<br />
B–08938<br />
853, 853H BICS Loa<strong>de</strong>r<br />
Service Manual
FUEL INJECTION PUMP (Cont’d)<br />
Removal and Installation (Cont’d)<br />
Remove the fuel injection pump [A].<br />
Installation: After the injection pump is installed, the air<br />
must be removed from the fuel system (Page 1–1).<br />
Also the injection pump timing must be set (Page 7–44).<br />
A<br />
B–08913<br />
853, 853H BICS Loa<strong>de</strong>r<br />
–7–43– Service Manual
FUEL INJECTION PUMP (Cont’d)<br />
Timing the Injection Pump<br />
The tools listed will be nee<strong>de</strong>d to do the following<br />
procedure:<br />
MEL1201 – Timing Tool<br />
Remove the valve cover.<br />
Rotate the engine until No. 1 piston is at TDC. Both valves<br />
at No. 1 cylin<strong>de</strong>r are not moving and have clearance [A].<br />
The TDC mark (Item 1) [B] is located on the engine pulley<br />
v–belt groove.<br />
There are two sets of timing marks on the engine pulley<br />
one at 12 o’clock and the other at the 3 o’clock position.<br />
Use the timing mark located at the 3 o’clock position<br />
(Inset) [B].<br />
Use the parting line (off–set) (Item 2) [B] or (Item 1) [C]<br />
of the timing case cover to make alignment of the TDC<br />
mark.<br />
Remove the plug at the rear of the injection pump [D].<br />
–7–44–<br />
A<br />
B<br />
C<br />
D<br />
1<br />
1<br />
12 o’clock Position<br />
2<br />
B–08935<br />
12° 14°<br />
16°<br />
TDC<br />
3 o’clock<br />
Position<br />
MC–01665<br />
P–04949<br />
P–04952<br />
B–08921<br />
853, 853H BICS Loa<strong>de</strong>r<br />
Service Manual
FUEL INJECTION PUMP (Cont’d)<br />
Timing the Injection Pump (Cont’d)<br />
Install the timing tool and dial indicator [A].<br />
Rotate the engine counterclockwise so the front pulley<br />
mark goes 30° to 40° before TDC.<br />
Set the dial indicator to zero [B].<br />
Rotate the engine back to 17° BTDC mark on the front<br />
pulley.<br />
The dial indicator must read approximately 0.020 inch<br />
(0,50 mm) [B].<br />
If not, loosen the bolts at the injection pump flange [C].<br />
Move the injection pump to obtain the 0.020–0.022 inch<br />
(0,50–0,59 mm) reading at the dial indicator with the front<br />
pulley marks at the 17° BTDC.<br />
Repeat the procedure until the timing is correct.<br />
A<br />
B<br />
C<br />
B–08977<br />
B–08977<br />
B–08910<br />
853, 853H BICS Loa<strong>de</strong>r<br />
–7–45– Service Manual
FUEL INJECTOR NOZZLES<br />
Removal and Installation<br />
Diesel fuel or hydraulic fluid un<strong>de</strong>r pressure<br />
can penetrate skin or eyes causing serious<br />
injury. Fluid leaks un<strong>de</strong>r pressure may not be<br />
visible. Use a piece of cardboard or wood to<br />
find leaks. Do not use your bare hand. Wear<br />
safety goggles. If fluid enters skin or eyes, get<br />
immediate medical attention.<br />
W–2074–1285<br />
Some problems caused by faulty injector nozzles:<br />
The engine is hard to start or will not start.<br />
Rough engine operation and idle.<br />
The engine will not have full power.<br />
The engine exhaust smoke is black, white or blue.<br />
Do not bend the high pressure fuel injection<br />
tubes when removing or installing them.<br />
I–2029–0289<br />
Disconnect the high pressure fuel lines at the fuel<br />
injection pump [A].<br />
Installation: Tighten the fittings on the high pressure fuel<br />
lines to 14–29 ft.–lbs. (19–39 Nm) torque.<br />
Disconnect the fuel lines at the fuel injectors [B].<br />
Remove the high pressure fuel lines from the engine [C].<br />
Remove the low pressure hoses from the fuel injector<br />
nozzles [D].<br />
–7–46–<br />
A<br />
B<br />
C<br />
D<br />
B–08975<br />
B–08917<br />
B–08915<br />
B–08918<br />
853, 853H BICS Loa<strong>de</strong>r<br />
Service Manual
FUEL INJECTOR NOZZLES (Cont’d)<br />
Removal and Installation (Cont’d)<br />
Remove the nut at the fuel injector holddown clamp [A].<br />
Installation: Tighten the nuts to 23–32 ft.–lbs. (31–43<br />
Nm) torque.<br />
Use a screwdriver and pry the injector from the cylin<strong>de</strong>r<br />
head [B].<br />
Remove the injector nozzle from the head [C].<br />
Checking<br />
Do not disassemble or test the fuel injector<br />
nozzles unless you have the correct service<br />
and testing tools.<br />
I–2027–0284<br />
The tools listed will be nee<strong>de</strong>d to do the following<br />
procedure:<br />
OEM1064 – Injection Nozzle Tester<br />
OEM1065 – Accessory Set<br />
Connect the nozzle to the test pump, in a down position<br />
[D].<br />
Operate the test pump until the nozzle valve opens:<br />
Injection Pressure: 2630 PSI (18134 kPa)<br />
A<br />
B<br />
C<br />
D<br />
B–08914<br />
B–08924<br />
B–08916<br />
B–08971<br />
853, 853H BICS Loa<strong>de</strong>r<br />
–7–47– Service Manual
FUEL INJECTOR NOZZLES (Cont’d)<br />
Checking (Cont’d)<br />
If the pressure is not correct, do the following:<br />
Disassemble the injector nozzle and clean.<br />
Replace the shim (Item 6) [A].<br />
Check the pressure again.<br />
Keep away from fuel un<strong>de</strong>r pressure in injector<br />
system. It may not be visible. Wear safety<br />
goggles. Fuel un<strong>de</strong>r pressure can penetrate<br />
skin or eyes causing serious injury. If fluid<br />
enters skin or eyes, get immediate medical<br />
attention.<br />
W–2072–1285<br />
Tighten the retaining nut (Item 1) [A] when assembling<br />
the injector nozzle to 29–32 ft.–lbs. (39–43 Nm) torque.<br />
Checking nozzles spray pattern [B]:<br />
Does not come out the si<strong>de</strong> of the nozzle. Does not have<br />
drops coming from the nozzle. Does not have a solid<br />
stream coming from nozzle.<br />
Any of the above conditions show a <strong>de</strong>fect or dirty injector<br />
nozzle. Clean or replace any injector nozzle that does not<br />
operate correctly.<br />
–7–48–<br />
A<br />
6<br />
5<br />
1<br />
4<br />
3<br />
2<br />
1. Retaining Nut<br />
2. Injection Nozzle<br />
3. Spacer<br />
4. Push Rod<br />
5. Spring<br />
6. Adjusting Shim<br />
7. Nozzle Hol<strong>de</strong>r<br />
B<br />
CORRECT<br />
INCORRECT<br />
7<br />
B–08959<br />
B–08895<br />
853, 853H BICS Loa<strong>de</strong>r<br />
Service Manual
CYLINDER HEAD<br />
Removal and Installation<br />
The tools listed will be nee<strong>de</strong>d to do the following<br />
procedure:<br />
MEL1267 – Cylin<strong>de</strong>r Head Bolt Wrench<br />
Clean all the <strong>de</strong>bris from the cylin<strong>de</strong>r head and engine.<br />
Remove the coolant from the engine and radiator.<br />
Remove the radiator hoses.<br />
Remove the fuel injectors and fuel tubelines. (See Page<br />
7–46.)<br />
Remove the valve cover nuts in the correct sequence [A].<br />
Installation: Tighten the nuts to 6–13 ft.–lbs. (8–17 Nm)<br />
torque in the correct sequence [A].<br />
Remove the rocker arm assembly bolts in the correct<br />
sequence [B].<br />
Installation: Tighten the bolts in the correct sequence to<br />
36–43 ft.–lbs. (49–58 Nm) torque.<br />
Remove the cylin<strong>de</strong>r head bolts in the correct sequence<br />
[C].<br />
Installation: Lubricate the bolts and tighten them in two<br />
steps as listed, in the correct numerical sequence [D].<br />
Step 1 Step 2<br />
New Bolts 29 ft.–lbs. (39 Nm) 59–67 ft.–lbs.<br />
(80–91 Nm)<br />
Used Bolts 62 ft.–lbs. (83 Nm) 72–80 ft.–lbs.<br />
(97–108 Nm)<br />
NOTE: When removing the head, do not use a sharp<br />
tool between the head and the engine block.<br />
Always put the cylin<strong>de</strong>r head on a flat<br />
surface, such as wood, to prevent damage to<br />
the machined surface.<br />
Remove the head from the engine.<br />
See Page 7–51 for removing and reconditioning the<br />
valves.<br />
After the cylin<strong>de</strong>r head is installed, adjust the valve<br />
clearance. (See Page 7–38.)<br />
A<br />
B<br />
C<br />
D<br />
1<br />
3<br />
1 3 4 2<br />
1<br />
2<br />
5<br />
17<br />
18<br />
6<br />
13<br />
14<br />
10 18 11<br />
9<br />
10<br />
14<br />
13<br />
6<br />
5<br />
17<br />
2<br />
15<br />
16<br />
3<br />
4<br />
2<br />
12<br />
9 1 8<br />
7<br />
8<br />
7<br />
12<br />
11<br />
4<br />
B–08186<br />
3<br />
B–08189<br />
16<br />
15<br />
B–08188<br />
B–08189<br />
853, 853H BICS Loa<strong>de</strong>r<br />
–7–49– Service Manual
CYLINDER HEAD (Cont’d)<br />
853, 853H BICS Service Manual #6724012 – Engine Service Section Part 2 of 4<br />
Cylin<strong>de</strong>r Head Surface Alignment<br />
Check the surface of the head with the straight edge [A].<br />
Check the head at six different directions [B].<br />
The standard distortion is 0.002 inch (0,05 mm) and the<br />
maximum limit is 0.008 inch (0,20 mm).<br />
When the head distortion exceeds the maximum limit,<br />
regrind the head with a maximum limit of 0.012 inch (0,30<br />
mm).<br />
Exhaust Manifold<br />
If the exhaust manifold has been removed, use the<br />
correct torque sequence and tighten the bolts to 10–17<br />
ft.–lbs. (14–23 Nm) torque [C].<br />
–7–50–<br />
A<br />
B<br />
C<br />
3<br />
4 8 5 1<br />
7<br />
6<br />
B–08198<br />
B–08197<br />
2<br />
B–08187<br />
853, 853H BICS Loa<strong>de</strong>r<br />
Service Manual
VALVES, VALVE SEAT AND GUIDE<br />
Removal<br />
The tools listed will be nee<strong>de</strong>d to do the following<br />
procedure:<br />
MEL1266 – Valve Stem Seal Installer<br />
Mark the valves and parts so they are returned to their<br />
original position when assembling.<br />
Remove the valve spring locks [A], using a spring<br />
compressor [B].<br />
Remove the valve springs, spring seats, oil seal and valve<br />
[A].<br />
Before reassembly, check the valves, valve seats and<br />
gui<strong>de</strong>s.<br />
Installation<br />
Make sure the head is clean.<br />
Put oil on the valve gui<strong>de</strong>s and valve stems.<br />
Put each valve in the correct location.<br />
Install the valve springs, spring seats and oil seals [A].<br />
NOTE: Install the valve springs with their closed<br />
pitched (painted si<strong>de</strong>) end toward the<br />
cylin<strong>de</strong>r head.<br />
Use a valve spring compressor and install the valve<br />
spring locks.<br />
Tap the valve stem with a hammer a small amount to seat<br />
the valve stem locks.<br />
Reconditioning the Valve and Valve Seats<br />
Use the correct equipment to grind the valve and valve<br />
seats.<br />
The angle of the intake and exhaust valves is 45° [C].<br />
The valve head thickness is as listed [C]:<br />
Standard – 0.071 inch (1,8 mm)<br />
Limit – 0.059 inch (1,5 mm)<br />
A<br />
1. Spring Seat<br />
2. Springs<br />
3. Valve<br />
4. Oil Seal<br />
5. Spring Seat<br />
B<br />
C<br />
5<br />
Thickness<br />
4<br />
4<br />
1<br />
2<br />
B–08192<br />
B–08193<br />
45°<br />
B–08202<br />
853, 853H BICS Loa<strong>de</strong>r<br />
–7–51– Service Manual
VALVES, VALVE SEAT AND GUIDE (Cont’d)<br />
Reconditioning the Valve and Valve Seats (Cont’d)<br />
Check the valve head <strong>de</strong>pth in the cylin<strong>de</strong>r head after<br />
grinding the valves and seat. The correct specifications<br />
are as follows[A]:<br />
Intake – Standard 0.029 inch (0,73 mm)<br />
Limit 0.05 inch (1,28 mm)<br />
Exhaust – Standard 0.028 inch (0,70 mm)<br />
Limit 0.047 inch (1,20 mm<br />
Check the valve seat contact width [A]:<br />
Intake – Standard 0.067 inch (1,70 mm)<br />
Limit 0.087 inch (2,20 mm)<br />
Exhaust – Standard 0.079 inch (2,0 mm)<br />
Limit 0.098 inch (2,5 mm)<br />
Valve Seat Insert<br />
To remove the valve seat insert, put a bead of weld around<br />
the inner face of the insert and allow to cool a few minutes,<br />
then pry them out [B].<br />
Press the new valve seat insert into the bore using a<br />
hydraulic press.<br />
After installation, grind the insert to the correct angle and<br />
check the <strong>de</strong>pth of the valve.<br />
Valve Gui<strong>de</strong><br />
The tools listed will be nee<strong>de</strong>d to do the following<br />
procedure:<br />
MEL1259 – Valve Gui<strong>de</strong> Remover<br />
Check the valve gui<strong>de</strong>s for wear with a dial indicator [C].<br />
If the movement is more than the listed specifications,<br />
replace the gui<strong>de</strong>.<br />
Intake – Standard 0.0015–0.0027 inch<br />
(0,039–0,068 mm)<br />
Limit 0.008 inch (0,2 mm)<br />
Exhaust – Standard 0.0025–0.0038 inch<br />
(0,064–0,96 mm)<br />
Limit 0.010 inch (0,25 mm)<br />
NOTE: Check the valve stem for wear before<br />
replacing the valve gui<strong>de</strong> [D].<br />
–7–52–<br />
A<br />
B<br />
C<br />
D<br />
Valve Seat<br />
Insert<br />
Intake<br />
Standard<br />
Exhaust<br />
Standard<br />
Depression<br />
Welding<br />
Bead<br />
0.3128–0.3134 inch<br />
(7,946–7,961 mm)<br />
0.3119–0.3124 inch<br />
(7,921–7,936 mm)<br />
Contact<br />
Width<br />
B–08199<br />
B–08201<br />
0.40 inch<br />
(10 mm)<br />
B–08205<br />
Limit 0.310 inch<br />
(7,88 mm)<br />
B–08204<br />
853, 853H BICS Loa<strong>de</strong>r<br />
Service Manual
VALVES, VALVE SEAT AND GUIDE (Cont’d)<br />
Valve Gui<strong>de</strong> (Cont’d)<br />
Remove the gui<strong>de</strong> [A].<br />
Install the new gui<strong>de</strong> [B].<br />
The height of the valve gui<strong>de</strong> top edge to the cylin<strong>de</strong>r is<br />
0.51 inch. (13 mm).<br />
Valve Spring<br />
Check the free length and inclination [C].<br />
Std. Limit<br />
Inner 1.783 inch 1.748 inch<br />
(45,3 mm) (44,4 mm)<br />
Free Length Outer 1.957 inch 1.898 inch<br />
(49,7 mm) (48,2 mm)<br />
Inclination<br />
Inner ––– 0.118 inch<br />
(3,0 mm)<br />
Outer ––– 0.126 inch<br />
(3,2 mm)<br />
Check the valve spring tension [D].<br />
Set Length Std. Limit<br />
Inner 1.46 inch 13 lbs. 11 lbs.<br />
(37 mm) (5,9 kg) (5,02 kg)<br />
Outer 1.54 inch 46 lbs. 40 lbs.<br />
(39,0 mm) (20,9 kg) (18,1 kg)<br />
A<br />
B<br />
C<br />
D<br />
Free Length<br />
Inclination<br />
Square<br />
B–08206<br />
B–08207<br />
B–08208<br />
B–08209<br />
853, 853H BICS Loa<strong>de</strong>r<br />
–7–53– Service Manual
ROCKER ARM AND SHAFT<br />
Disassembly and Assembly<br />
Mark the rocker arms and support brackets for correct<br />
assembly.<br />
Remove the snap ring (Item 1) [A] from each end of the<br />
shaft (Item 5) [A].<br />
Remove the rocker arms (Items 2 & 4) and support<br />
brackets (Item 3) [A].<br />
Assembly: The support bracket with the oil hole is toward<br />
the front of the engine.<br />
Inspect all the parts for wear or damage.<br />
Check the rocker arm O.D. [B].<br />
Standard – 0.7478–0.7486 inch (18,98–19 mm)<br />
Limit – 0.7427 inch (18,85 mm)<br />
Checking Rocker Arm and Push Rods<br />
Check the rocker arm [C].<br />
Rocker arm diameter.<br />
Standard – 0.7489–0.7497 inch (19,01–19,03 mm)<br />
Limit – 0.7505 inch (19,05 mm)<br />
Clearance between rocker arm and shaft.<br />
Standard – 0.0003–0.002 inch (0,01–0,05 mm)<br />
Limit – 0.0078 inch (0,2 mm)<br />
Replace the parts as nee<strong>de</strong>d.<br />
Check the push rods for run–out [D].<br />
Limit – 0.012 inch (0,3 mm)<br />
–7–54–<br />
A<br />
B<br />
C<br />
D<br />
1<br />
2<br />
3<br />
4<br />
5<br />
B–08191<br />
B–08214<br />
B–08215<br />
B–08213<br />
853, 853H BICS Loa<strong>de</strong>r<br />
Service Manual
PISTON AND CONNECTING ROD<br />
Removal<br />
Remove the cylin<strong>de</strong>r head. (See Page 7–49.)<br />
Remove the oil pan. (See Page 7–79.)<br />
Remove the ridge and carbon <strong>de</strong>posits at the top of the<br />
cylin<strong>de</strong>r bore with a ridge reamer.<br />
Make sure the pistons have i<strong>de</strong>ntification marks [A].<br />
Rotate the crankshaft until a pair of connecting rods are<br />
at the bottom <strong>de</strong>ad center. Make sure the connecting rod<br />
caps and the rods have i<strong>de</strong>ntification marks.<br />
Remove the nuts and remove the bearing caps [B].<br />
NOTE: If the bearings are to be used again, they<br />
must be i<strong>de</strong>ntified so they are returned to<br />
their original location.<br />
Using a hammer handle, push the piston and rod out of<br />
the block [C].<br />
After the pair has been removed, rotate the engine<br />
crankshaft and remove the other pair of pistons.<br />
Disassembly<br />
Remove the rings from the pistons [D].<br />
A<br />
B<br />
C<br />
D<br />
1 2 3 4<br />
F F F F<br />
B–03248<br />
A–02344<br />
B–08909<br />
B–08194<br />
853, 853H BICS Loa<strong>de</strong>r<br />
–7–55– Service Manual
PISTON AND CONNECTING ROD (Cont’d)<br />
Disassembly (Cont’d)<br />
Remove the piston pin snap ring [A].<br />
Drive out the piston pin using a brass rod [B].<br />
Checking<br />
Clean all the parts in clean solvent.<br />
Check the clearance of the new rings in the piston<br />
grooves [C].<br />
Standard Limit<br />
1st 0.0035–0.0049 inch 0.006 inch<br />
Compression (0,09–(0,125 mm) (0,15 mm)<br />
2nd 0.002–0.0033 inch 0.006 inch<br />
Compression (0,05–0,085 mm) (0,15 mm)<br />
Oil 0.001–0.003 inch 0.006 inch<br />
(0,03–0,07 mm) (0,15 mm)<br />
Check the piston diameter [D].<br />
Pistons are available in two sizes.<br />
Piston Gra<strong>de</strong> A 3.6608–3.6616 inch<br />
(92,985–93,004 mm)<br />
Piston Gra<strong>de</strong> C 3.6616–3.6624 inch<br />
(93,005–93,024 mm)<br />
Refer to parts fiche when or<strong>de</strong>ring pistons, piston rods<br />
and cylin<strong>de</strong>r liners.<br />
–7–56–<br />
A<br />
B<br />
C<br />
D<br />
B–08195<br />
P–08196<br />
B–08228<br />
2.9 inch<br />
(74 mm)<br />
B–08227<br />
853, 853H BICS Loa<strong>de</strong>r<br />
Service Manual
PISTON AND CONNECTING ROD (Cont’d)<br />
Checking (Cont’d)<br />
Check the ring gap in the cylin<strong>de</strong>r bore [A].<br />
Standard Limit<br />
Compression 0.008–0.016 inch 0.059 inch<br />
(0,2–0,4 mm) (1,5 mm)<br />
Oil 0.004–0.012 inch 0.059 inch<br />
(0,1–0,3 mm) (1,5 mm)<br />
Check the piston pin diameter [B].<br />
Standard – 1.220 inch (31 mm)<br />
Limit – 1.219 inch (30,97 mm)<br />
Check the clearance between piston pin and piston pin<br />
bore [C].<br />
Clearance – 0.00008–0.00006 inch<br />
(0,002–0,015 mm)<br />
Check the connecting rod alignment [D].<br />
Standard – 0.002 inch (0,5 mm) or less<br />
Limit – 0.0079 inch (0,2 mm)<br />
A<br />
B<br />
C<br />
D<br />
B–08229<br />
P–08230<br />
B–08231<br />
B–08232<br />
853, 853H BICS Loa<strong>de</strong>r<br />
–7–57– Service Manual
PISTON AND CONNECTING ROD (Cont’d)<br />
Checking (Cont’d)<br />
Check the connecting rod small end bushing [A].<br />
Standard – 1.2208–1.2211 inch (31,008–31,015 mm)<br />
Check the clearance between the piston pin and<br />
connecting rod [B].<br />
Standard – 0.0003–0.00079 inch (0,008–0,02 mm)<br />
Limit – 0.0002 inch (0,5 mm)<br />
Replace the small end bushing if not within specifications<br />
using a hydraulic press [C].<br />
After installation of a new bushing, finish the bushing bore<br />
to the correct specifications [D].<br />
–7–58–<br />
A<br />
B<br />
C<br />
D<br />
B–08233<br />
P–08230<br />
B–08200<br />
B–08203<br />
853, 853H BICS Loa<strong>de</strong>r<br />
Service Manual
PISTON AND CONNECTING ROD (Cont’d)<br />
Assembly<br />
Heat the piston to about 140°F (60°C) [A].<br />
Assemble the piston and connecting rod [B].<br />
Install the piston to the connecting rod. The piston head<br />
front mark (Item 1) [C] and the connecting rod ‘‘ISUZU’’<br />
casting mark (Item 2) [C] must be facing the same<br />
direction.<br />
Install the piston pin. Install the snap rings [D].<br />
A<br />
B<br />
C<br />
D<br />
1<br />
2<br />
B–08251<br />
C–02936<br />
B–08252<br />
B–08195<br />
853, 853H BICS Loa<strong>de</strong>r<br />
–7–59– Service Manual
PISTON AND CONNECTING ROD (Cont’d)<br />
Assembly (Cont’d)<br />
Install the rings on the piston [A].<br />
The face with the mark NPR or TOP must be turned up<br />
for the 1st and 2nd compression rings.<br />
Installation<br />
Using a ring compressor tool, compress the rings on the<br />
piston. Make sure the mark is to the front of the engine<br />
and install the piston in the block [B].<br />
Put oil on the bearings. Install the bearing cap [C].<br />
Tighten the nuts to 58–65 ft.–lbs. (78–88 Nm) torque [D].<br />
Rotate the crankshaft to put the other pair of crank pins<br />
at bottom <strong>de</strong>ad center. Repeat the procedure and install<br />
the other pair of pistons.<br />
–7–60–<br />
A<br />
B<br />
C<br />
D<br />
Marked Si<strong>de</strong> Up<br />
58–65 ft.–lbs.<br />
(78–88 Nm)<br />
1st Comp.<br />
2nd Comp.<br />
Oil<br />
B–08253<br />
B–03337<br />
B–03208<br />
B–03325<br />
853, 853H BICS Loa<strong>de</strong>r<br />
Service Manual
CYLINDER LINERS<br />
Checking the Cylin<strong>de</strong>r Bore<br />
The tools listed will be nee<strong>de</strong>d to do the following<br />
procedure:<br />
MEL1180 – Puller Set<br />
MEL1261 – Cylin<strong>de</strong>r Liner Remover Ankle<br />
Check the cylin<strong>de</strong>r bore with an insi<strong>de</strong> micrometer. The<br />
checks must be ma<strong>de</strong> at parallel and right angles to the<br />
center line of the bore [A].<br />
Measuring point is done approximately 0.75 inch (20 mm)<br />
below the top of the cylin<strong>de</strong>r bore.<br />
Standard – 3.6622–3.6638 inch (93,021–93,060 mm)<br />
Limit – 3.6653 inch (93,100 mm)<br />
Removal<br />
Remove all the parts from the engine.<br />
Using a cylin<strong>de</strong>r liner tool, remove the cylin<strong>de</strong>r liner from<br />
the engine block [B].<br />
There is only one size liner available.<br />
Installation<br />
The tools listed will be nee<strong>de</strong>d to do the following<br />
procedure:<br />
MEL1262 – Cylin<strong>de</strong>r Liner Installer<br />
Clean the bore and remove any metal burrs.<br />
Clean the grease from the cylin<strong>de</strong>r liner and dry it.<br />
Use dry ice to cool the cylin<strong>de</strong>r liner, so it will install easier<br />
and smoothly into the engine block.<br />
Using the correct tool, install the cylin<strong>de</strong>r liner [C].<br />
First apply a load of 1103 lbs. (500 kg) using a hydraulic<br />
press.<br />
NOTE: Do Not use a hammer to install the cylin<strong>de</strong>r<br />
liners.<br />
Then, apply a final load of 5513 lbs. (2500 kg). Push the<br />
liner in until 0–0.0039 inch (0–0,1 mm) of the liner is above<br />
the block face [D].<br />
NOTE: The liners are chrome plated and must not be<br />
honed after installation.<br />
Measure the insi<strong>de</strong> diameter of the liner and select the<br />
correct size piston for the liner.<br />
Minimum Diameter<br />
Piston Gra<strong>de</strong> A 3.6622–3.6630 inch<br />
(93,021–93,040 mm)<br />
Piston Gra<strong>de</strong> C 3.6630–3.6638 inch<br />
(93,041–93,060 mm)<br />
Refer to parts fiche when or<strong>de</strong>ring pistons, piston rods<br />
and cylin<strong>de</strong>r liners.<br />
A<br />
B<br />
C<br />
D<br />
.75 inch<br />
(20 mm)<br />
B–08223<br />
B–08224<br />
B–08225<br />
B–08226<br />
853, 853H BICS Loa<strong>de</strong>r<br />
–7–61– Service Manual
MAIN BEARINGS<br />
Description<br />
The crankshaft has five main bearings. The end play is<br />
controlled by a thrust washer on both si<strong>de</strong>s of the center<br />
main bearing.<br />
Each main bearing cap has an i<strong>de</strong>ntification mark in<br />
relation to the engine block [A].<br />
The position of each cap can not be changed from the<br />
original location.<br />
Removal<br />
Remove the oil pan. (See Page 7–79.)<br />
Remove the oil pump. (See Page 7–80.)<br />
Remove the bolts from the main bearing caps.<br />
Remove the main bearing cap and remove the bearing<br />
from the cap half.<br />
Remove the top half of the bearing by pushing on one si<strong>de</strong><br />
of the bearing half and rotating the crankshaft [B].<br />
On the center main bearing, remove the cap.<br />
Remove the top half of the bearing and thrust washers by<br />
pushing on one si<strong>de</strong> of the bearing and rotating the<br />
crankshaft [C].<br />
–7–62–<br />
A<br />
FRONT<br />
B<br />
C<br />
B–08256<br />
B–01865<br />
B–08255<br />
853, 853H BICS Loa<strong>de</strong>r<br />
Service Manual
MAIN BEARINGS (Cont’d)<br />
Installation<br />
Check the bearing spread as listed [A].<br />
Limit – 2.93 inch (74,5 mm)<br />
Check to see if the bearing has enough tension, so that<br />
finger pressure is nee<strong>de</strong>d to fit the bearing into the cap<br />
[B].<br />
Check the crankshaft journals before installing the main<br />
bearings. (See Page 7–65.)<br />
Make sure to position the bearing halves in their correct<br />
locations [C].<br />
Lubricate the new bearings. Install them by putting the<br />
end without the tab into the block and rotating the<br />
crankshaft until the tab is on its seat.<br />
Install the other bearing half in the bearing cap. Lubricate<br />
the bearing and install the cap on the engine block.<br />
Lubricate the bolts, install them finger tight only.<br />
Install the center main bearing and thrust washers [D].<br />
The thrust washer must be installed so that their oil<br />
grooves are turned to the rotating face of the crankshaft.<br />
Repeat the procedure until all the main bearings and caps<br />
are installed.<br />
A<br />
B<br />
C<br />
D<br />
With Oil Hole<br />
and Groove<br />
(Upper Si<strong>de</strong>)<br />
No Oil Groove<br />
and Hole<br />
(Lower Si<strong>de</strong>)<br />
B–08241<br />
B–08242<br />
Fit Correctly<br />
B–08254<br />
B–08255<br />
853, 853H BICS Loa<strong>de</strong>r<br />
–7–63– Service Manual
MAIN BEARINGS (Cont’d)<br />
Installation (Cont’d)<br />
Tighten the crankshaft bearing cap bolts in the correct<br />
sequence [A].<br />
Torque – 116–130 ft.–lbs. (157–176 Nm).<br />
Crankshaft End Play<br />
The end play can be checked by either a feeler gauge [B]<br />
or dial indicator [C].<br />
Std. Limit<br />
End Play 0.004 inch (0,1 mm) 0.012 inch (0,3 mm)<br />
The fitting of oversize thrust washer can be used to<br />
correct the end play if it is over the specifications.<br />
–7–64–<br />
A<br />
B<br />
C<br />
10<br />
9<br />
5<br />
6<br />
2<br />
1<br />
3<br />
4<br />
7<br />
8<br />
B–08257<br />
B–03347<br />
B–03291<br />
853, 853H BICS Loa<strong>de</strong>r<br />
Service Manual
CRANKSHAFT<br />
Removal and Installation<br />
Remove the oil pan. (See Page 7–79.)<br />
Remove the oil pump. (See Page 7–80.)<br />
Remove the crankshaft pulley, timing gearcase cover and<br />
timing gears. (See Page 7–69.)<br />
Remove the flywheel.<br />
Remove the connecting rod cap. (See Page 7–55.)<br />
Remove the main bearing cap. (See Page 7–62.)<br />
Lift the crankshaft out of the engine block.<br />
Checking Tuffriding (Soft Nitriding) Coating<br />
Clean the crankshaft thoroughly using an organic solvent.<br />
Make sure there is no oil or grease in the area to be tested.<br />
Using a glass rod, put a drop of cupric ammonium chlori<strong>de</strong><br />
5/10% solution at the test location [A].<br />
If no change takes place after an interval of 30–40<br />
seconds, the crankshaft can be re–used if within<br />
specifications.<br />
Replace the crankshaft, if within the 30–40 seconds, the<br />
original color of the solution (light blue in color) becomes<br />
transparent where the test solution was dropped and will<br />
discolor to a copper color.<br />
Immediately after the test is completed, wipe off the area<br />
with a cloth and thoroughly rinse with water.<br />
NOTE: Since the crankshaft is tuffri<strong>de</strong> coated it<br />
cannot be reground.<br />
Checking the Crankshaft<br />
Check the crankshaft connecting rod journals [B].<br />
Standard – 2.0833–2.0839 inch (52,915–52,930 mm)<br />
Limit – 2.0829 inch (52,906 mm)<br />
A<br />
The portion to be tested<br />
shall be held horizontally so<br />
as not to let the test No testing solution<br />
solution flow. near the oil hole.<br />
The sliding surface<br />
of the pin<br />
or journal<br />
B<br />
Approximately<br />
0.393 inch (10 mm)<br />
B–08243<br />
B–08244<br />
853, 853H BICS Loa<strong>de</strong>r<br />
–7–65– Service Manual
CRANKSHAFT (Cont’d)<br />
Checking the Crankshaft (Cont’d)<br />
Check the crankshaft main bearing journals [A].<br />
Standard – 2.7526–2.7532 inch (69,917–69,932 mm)<br />
Limit – 2.7524 inch (69,910)<br />
Check the clearance between connecting rod bearing<br />
and crankshaft journal [B].<br />
Install the bearing and cap and tighten nuts to 58–65<br />
ft.–lbs. (79–88 Nm) torque. Put oil on the bearing and<br />
measure.<br />
Nominal Diameter – 2.09 inch (53 mm)<br />
Clearance between journal and bearing:<br />
Standard – 0.0011–0.0026 inch (0,029–0,066 mm)<br />
Limit – 0.004 inch (0,10 mm)<br />
Check the clearance between main bearings and<br />
crankshaft journals [C].<br />
Install the main bearing and caps and tighten the bolts to<br />
116–130 ft.–lbs. (157–176 Nm) torque. Put oil on the main<br />
bearings and measure.<br />
Nominal Diameter – 2.76 inch (70 mm)<br />
Clearance between the journal and bearing:<br />
Standard – 0.0014–0.0031 inch (0,035–0,080 mm)<br />
Limit – 0.0043 inch (0,11 mm)<br />
Check the crankshaft run–out [D].<br />
Standard – 0.0019 inch (0,05 mm) or less<br />
Limit – 0.003 inch (0,08 mm)<br />
–7–66–<br />
A<br />
B<br />
C<br />
D<br />
B–08246<br />
B–08245<br />
B–08247<br />
B–08248<br />
853, 853H BICS Loa<strong>de</strong>r<br />
Service Manual
CRANKSHAFT GEAR<br />
Removal and Installation<br />
The tools listed will be nee<strong>de</strong>d to do the following<br />
procedure:<br />
MEL1263 – Crankshaft Gear Installer<br />
MEL1264 – Crankshaft Rear Oil Seal<br />
Use a puller to remove the gear [A].<br />
Use the correct size driver tool to install the gear [B].<br />
Clean the crankshaft and check that all the oil passages<br />
are clean and open.<br />
Clean the engine block, lubricate and install the upper<br />
halves of the main bearings.<br />
Put the crankshaft carefully in position.<br />
Install the main bearing caps and bolts. (See Page 7–63.)<br />
Check the crankshaft so that it rotates freely. Check the<br />
end play. (See Page 7–64.)<br />
Install a new rear oil seal [C]. Using the correct size driver<br />
tool.<br />
Lubricate the connecting rod bearings. Install the<br />
bearings and rod caps. (See Page 7–60.)<br />
Install the oil pump. (See Page 7–80.)<br />
Install the oil pan. (See Page 7–79.)<br />
Install the timing gears, timing gearcase cover and new<br />
front seal. (See Page 7–69.)<br />
Install the flywheel. (See Page 7–36.)<br />
A<br />
B<br />
C<br />
B–08249<br />
B–08250<br />
B–08261<br />
853, 853H BICS Loa<strong>de</strong>r<br />
–7–67– Service Manual
TIMING GEARCASE COVER SEAL<br />
Removal and Installation<br />
The tool listed will be nee<strong>de</strong>d to do the following<br />
procedure:<br />
MEL1265 – Crankshaft Front Oil Seal Installer<br />
Remove the alternator and belt. (See Page 6–1.)<br />
Remove the bolt at the crankshaft pulley [A].<br />
Installation: Tighten the bolt to 123–152 ft.–lbs.<br />
(167–206 Nm) torque.<br />
Install a standard puller and remove the crankshaft pulley<br />
[B].<br />
Use a screwdriver and pry the front seal out of the timing<br />
case cover [C].<br />
Use the seal installation tool and install the new seal [D].<br />
–7–68–<br />
A<br />
B<br />
C<br />
D<br />
B–08945<br />
B–08983<br />
B–08943<br />
B–08946<br />
B–08948<br />
853, 853H BICS Loa<strong>de</strong>r<br />
Service Manual
TIMING GEARCASE COVER<br />
Removal and Installation<br />
Remove the alternator and belt. (See Page 6–1.)<br />
Remove the bolt at the crankshaft pulley [A].<br />
Installation: Tighten the bolt to 123–152 ft.–lbs.<br />
(167–206 Nm) torque.<br />
Use a puller to remove the crankshaft pulley [B].<br />
Remove the bolts which fasten the noise dampening<br />
shield to the timing case cover [C].<br />
Remove the noise dampening shield [D].<br />
A<br />
B<br />
C<br />
D<br />
B–08945<br />
B–08943<br />
B–08947<br />
B–08942<br />
853, 853H BICS Loa<strong>de</strong>r<br />
–7–69– Service Manual
TIMING GEARCASE COVER (Cont’d)<br />
Removal and Installation (Cont’d)<br />
Remove the bolts from the timing gearcase cover [A].<br />
Installation: Tighten the bolts to 10 ft.–lbs. (14 Nm)<br />
torque.<br />
Use an allen wrench to remove the allen head bolt from<br />
the cover [B].<br />
Installation: Tighten the bolt to 11–17 ft.–lbs. (15–23<br />
Nm) torque.<br />
Remove the timing gearcase cover [C].<br />
Installation: Put the O–ring gasket in the groove and<br />
hold it in position using Form–A–Gasket so it will not fall<br />
out when installing the cover [D].<br />
–7–70–<br />
A<br />
B<br />
C<br />
D<br />
B–08940<br />
B–08941<br />
B–08974<br />
B–08956<br />
853, 853H BICS Loa<strong>de</strong>r<br />
Service Manual
IDLER GEAR AND HUB<br />
Removal<br />
Remove the timing gearcase cover. (See Page 7–69.)<br />
Remove the bolts at the tube for gear lubrication [A].<br />
Remove the tube [B].<br />
Remove the bolts at the idler gear [C].<br />
Installation: Tighten the bolts to 10–12 ft.–lbs. (14–16<br />
Nm) torque.<br />
Remove the idler gear and hub [D].<br />
Checking<br />
Check the idler gear hub.<br />
Standard – 1.7695–1.7707 inch (44,945–44,975 mm)<br />
Limit – 1.7656 inch (44,845 mm)<br />
Check the clearance between the idler gear and hub.<br />
Limit – 0.0079 inch (0,2 mm)<br />
Check the end play at the gear and hub.<br />
Standard – 0.003 inch (0,07 mm)<br />
Limit – 0.008 inch (0,2 mm)<br />
A<br />
B<br />
C<br />
D<br />
B–08929<br />
B–08928<br />
B–08926<br />
B–08933<br />
853, 853H BICS Loa<strong>de</strong>r<br />
–7–71– Service Manual
IDLER GEAR AND HUB (Cont’d)<br />
Installation<br />
Install the idler gear on the hub.<br />
Make sure the timing marks are in alignment with the<br />
crankshaft, camshaft and fuel injection pump idler gears<br />
[A].<br />
Check the backlash between the gears. The correct<br />
backlash is 0.003 inch (0,178 mm).<br />
NOTE: The zero marks (Item 1) [A], for the injector<br />
pump removal, will align with the marks in<br />
the timing case cover.<br />
Revised Mar. 03<br />
–7–72–<br />
A<br />
1<br />
1<br />
B–08995<br />
853, 853H BICS Loa<strong>de</strong>r<br />
Service Manual
FUEL INJECTION PUMP IDLER GEAR<br />
Removal and Installation<br />
Remove the timing gearcase cover. (See Page 7–69.)<br />
Remove the idler gear. (See Page 7–71.)<br />
Remove the bolt at the fuel injection pump idler gear [A].<br />
Installation: Tighten the bolt to 72–87 ft.–lbs. (98–118<br />
Nm) torque.<br />
Remove the idler gear and bearing [B].<br />
If the bearing needs replacement, remove the snap ring<br />
at the bearing [C].<br />
Use a press to remove and install the new bearing.<br />
Bearing Installation<br />
When installing the new bearing, make sure the<br />
projection and height is correct [D].<br />
Projection – 0.016–0.024 inch (0,4–0,6 mm)<br />
Height – 0.933–0.945 inch (23,7–24 mm)<br />
A<br />
B<br />
C<br />
D<br />
Projection<br />
B–08930<br />
B–08927<br />
B–08955<br />
B–08896<br />
853, 853H BICS Loa<strong>de</strong>r<br />
–7–73– Service Manual
CAMSHAFT GEAR<br />
Removal and Installation<br />
Remove the timing gearcase cover. (See Page 7–69.)<br />
Remove the idler gear. (See Page 7–71.)<br />
Remove the bolt at the camshaft gear [A].<br />
Installation: Tighten the bolt to 72–87 ft.–lbs. (98–118<br />
Nm) torque.<br />
Install the puller and remove the gear [B].<br />
Remove the bolts at the retainer plate [C].<br />
Installation: Tighten the bolts to 11–17 ft.–lbs. (15–23<br />
Nm) torque.<br />
Remove the retainer plate [D].<br />
Installation: Check the camshaft end play.<br />
Standard – 0.002–0.0045 inch (0,05–0,114 mm)<br />
Limit – 0.0079 inch (0,2 mm)<br />
–7–74–<br />
A<br />
B<br />
C<br />
D<br />
B–08931<br />
B–08932<br />
B–08980<br />
B–08979<br />
853, 853H BICS Loa<strong>de</strong>r<br />
Service Manual
TIMING GEARCASE<br />
853, 853H BICS Service Manual #6724012 – Engine Service Section Part 3 of 4<br />
Removal and Installation<br />
Remove the timing gearcase cover. (See Page 7–69.)<br />
Remove the idler gear. (See Page 7–71.)<br />
Remove the fuel injection pump. (See Page 7–40.)<br />
Remove the fuel injection pump idler gear. (See Page<br />
7–73.)<br />
Remove the camshaft gear. (See Page 7–74.)<br />
Remove the water pump. (See Page 7–83.)<br />
Remove the oil pan. (See Page 7–79.)<br />
Remove the bolts at the timing case [A].<br />
Installation: Tighten the bolts to 11–17 ft.–lbs. (15–23<br />
Nm) torque.<br />
Remove the timing case [B].<br />
Installation: After the timing case cover is installed with<br />
the new gasket, cut the excess gasket at the engine block<br />
[C].<br />
A<br />
B<br />
C<br />
B–08925<br />
B–08937<br />
B–08952<br />
853, 853H BICS Loa<strong>de</strong>r<br />
–7–75– Service Manual
CAMSHAFT<br />
Removal and Installation<br />
Remove the rocker arm cover, rocker arm assembly and<br />
the push rods. (See Page 7–54.)<br />
Remove the timing gearcase cover. (See Page 7–69.)<br />
Remove the camshaft gear. (See Page 7–74.)<br />
Remove the oil pan and oil pump. (See Pages 7–79 &<br />
7–80.)<br />
Remove the camshaft from the engine.<br />
Checking<br />
Check the camshaft journals [A].<br />
Standard – 1.9662–1.9675 inch (49,945–49,975 mm)<br />
Limit – 1.9528 inch (49,60 mm)<br />
Check the bearing insi<strong>de</strong> diameter [B].<br />
Standard – 1.9685–1.9697 inch (50,0–50,03 mm)<br />
Clearance between camshaft journal and bearing:<br />
Standard – 0.002 inch. (0,05 mm)<br />
Limit – 0.0047 inch (0,12 mm)<br />
Check camshaft run–out [C].<br />
Limit – 0.0039 inch (0,1 mm)<br />
Check cam lobe height [D].<br />
Standard – 1.654 inch (42,02 mm)<br />
Limit – 1.640 inch (41,65 mm)<br />
–7–76–<br />
A<br />
B<br />
C<br />
D<br />
B–08217<br />
B–08218<br />
B–08221<br />
B–08222<br />
853, 853H BICS Loa<strong>de</strong>r<br />
Service Manual
CAMSHAFT (Cont’d)<br />
Camshaft Bearings<br />
The tools listed will be nee<strong>de</strong>d to do the following<br />
procedure:<br />
MEL1260 – Camshaft Bearing Remover/Installer<br />
Use the correct tool to remove the bearings [A].<br />
When installing the new bearings, make sure to align the<br />
oil hole in the bearing with the hole in the engine block<br />
(Item 1) [B].<br />
Tappets<br />
Remove the tappets from the engine block. Mark the<br />
cylin<strong>de</strong>r number on each tappet after removal [C].<br />
Inspect the tappets for wear, damage or abnormal<br />
conditions [D].<br />
A<br />
B<br />
C<br />
D<br />
1<br />
Pitted Crack Normal Contact<br />
Irregular Contact<br />
B–08219<br />
B–08220<br />
B–08190<br />
B–08210<br />
853, 853H BICS Loa<strong>de</strong>r<br />
–7–77– Service Manual
CAMSHAFT (Cont’d)<br />
Tappets (Cont’d)<br />
Check the diameter of the tappets [A].<br />
Standard – 0.511–0.5114 inch (12,98–12,99 mm)<br />
Limit – 0.510 inch (12,95 mm)<br />
Clearance between tappet and engine block bore as<br />
listed [B].<br />
Standard – 0.0012 inch (0,03 mm)<br />
Limit – 0.0039 inch (0,09 mm)<br />
Tappet Installation<br />
Lubricate the tappets before installation.<br />
Lubricate the camshaft bearings and journals. Install the<br />
camshaft, carefully not to damage the bearings.<br />
Install the camshaft gear. (See Page 7–74.)<br />
Check the camshaft end play using a feeler gauge [C].<br />
Standard – 0.0002–0.0045 inch (0,05–0,114 mm)<br />
Limit – 0.0079 inch (0,2 mm)<br />
After the rocker arm assembly is installed, make sure to<br />
set the valve clearance. (See Page 7–38.)<br />
–7–78–<br />
A<br />
B<br />
C<br />
B–08211<br />
B–08212<br />
B–08216<br />
853, 853H BICS Loa<strong>de</strong>r<br />
Service Manual
OIL PAN<br />
Removal<br />
Remove the oil drain plug and remove the oil.<br />
Remove the fastening bolts and nuts from the oil pan [A].<br />
Installation<br />
Clean the surface on the oil pan and engine block.<br />
Put Three Bond (TB–1207B) at the front and rear main<br />
bearing caps (Item 1) [B] & [C].<br />
Put liquid gasket on the oil pan surface area of the engine<br />
block.<br />
Install the oil pan. Install and tighten the bolts in the<br />
sequence shown [D].<br />
Tighten the bolts and nuts to 13–18 ft.–lbs. (19–26 Nm)<br />
torque.<br />
A<br />
B<br />
C<br />
D<br />
1<br />
B–08953<br />
B–08418<br />
B–08911<br />
B–12200<br />
853, 853H BICS Loa<strong>de</strong>r<br />
–7–79– Service Manual<br />
1<br />
1
OIL PUMP<br />
Removal and Installation<br />
Remove the oil pan. (See Page 7–79.)<br />
Remove the bolts at the oil pump [A].<br />
Installation: Tighten the bolts to 10–17 ft.–lbs. (14–23<br />
Nm) torque.<br />
Remove the oil pump assembly from the engine block [B].<br />
Checking<br />
Disassemble the oil pump as illustrated [C].<br />
–7–80–<br />
A<br />
B<br />
C<br />
1. Oil Pipe<br />
2. Strainer<br />
3. Pump Cover<br />
4. Vane<br />
2<br />
1<br />
4<br />
3<br />
B–08912<br />
B–08982<br />
B–08420<br />
853, 853H BICS Loa<strong>de</strong>r<br />
Service Manual
OIL PUMP (Cont’d)<br />
Checking (Cont’d)<br />
Check the clearance between vane and body [A].<br />
Standard – 0.0008–0.0028 inch (0,02–0,07 mm)<br />
Limit – 0.0059 inch (0,15 mm)<br />
Check the clearance between the rotor and vane [B].<br />
Standard – 0.0055 inch (0,14 mm) or less.<br />
Check the clearance between the vane and pump body<br />
[B].<br />
Standard – 0.0079–0.0105 inch (0,2–0,27 mm)<br />
Check clearance between rotor shaft and pump body.<br />
Standard – 0.0016 inch (0,04 mm)<br />
Limit – 0.0079 inch (0,2 mm)<br />
Gear Replacement<br />
File off one end of the roll pin at the gear. Use a punch and<br />
hammer and remove the pin [C].<br />
NOTE: It may be necessary to drill a hole in one si<strong>de</strong><br />
of the gear for service as it does not have a<br />
hole on both si<strong>de</strong>s [D].<br />
Installation: Install the gear and new pin. Peen the end<br />
of the pin after installation.<br />
A<br />
B<br />
C<br />
D<br />
B–08422<br />
B–08421<br />
B–08423<br />
B–08424<br />
B–08425<br />
853, 853H BICS Loa<strong>de</strong>r<br />
–7–81– Service Manual
OIL PUMP (Cont’d)<br />
Rotor Replacement<br />
Remove the pin at the rotor using a punch and hammer<br />
[A].<br />
Installation: When installing the new pin in the rotor,<br />
make sure to check the end of the pin that it does not<br />
project from the end of the rotor [A].<br />
After the oil pump is assembled, put oil into the pump and<br />
turn the shaft to prime the pump.<br />
Oil Pump Relief Valve<br />
Remove the relief valve from the oil filter housing [B].<br />
Check the relief valve and clean. Replace as nee<strong>de</strong>d.<br />
Oil Filter Housing and Block<br />
To remove the oil filter block & housing, disconnect the<br />
tubelines (Item 1) [C] & [D].<br />
remove the four mounting bolts (Item 2) [C] at the block.<br />
Remove the two mounting bolts (Item 2) [D] at the oil filter<br />
housing.<br />
–7–82–<br />
A<br />
B<br />
C<br />
D<br />
1<br />
2<br />
B–08426<br />
1<br />
2<br />
B–08427<br />
B–08949<br />
2<br />
P–04943<br />
P–04953<br />
853, 853H BICS Loa<strong>de</strong>r<br />
Service Manual
WATER PUMP<br />
Removal and Installation<br />
Remove the alternator belt.<br />
Remove the water pump pulley [A].<br />
Remove the water pump bolts [B].<br />
Installation: Tighten the bolts to 11–18 ft.–lbs. (15–24<br />
Nm) torque.<br />
Remove the water pump from the engine block [C].<br />
Disassembly<br />
Remove the hub for the pulley using a press [D].<br />
A<br />
B<br />
C<br />
D<br />
B–08951<br />
B–08950<br />
B–08972<br />
B–08429<br />
853, 853H BICS Loa<strong>de</strong>r<br />
–7–83– Service Manual
WATER PUMP (Cont’d)<br />
Disassembly (Cont’d)<br />
Disassemble the water pump [A].<br />
Check the bearing for abnormal noise, binding or wear<br />
[B].<br />
Replace the parts as nee<strong>de</strong>d.<br />
Assembly<br />
Apply a thin coat of liquid gasket cement to the outer<br />
surface of the seal unit before assembly [C].<br />
Press the bearing assembly into position by aligning the<br />
set screw hole in the bearing with that in the pump body<br />
[D].<br />
–7–84–<br />
A<br />
B<br />
C<br />
D<br />
B–08428<br />
B–08430<br />
B–08432<br />
B–08431<br />
853, 853H BICS Loa<strong>de</strong>r<br />
Service Manual
WATER PUMP (Cont’d)<br />
Assembly (Cont’d)<br />
After installation, check that the rear face of the impeller<br />
has the correct height [A].<br />
Height – 0.98 inch (25 mm)<br />
Check the distance between the pulley hub and pump<br />
body [B].<br />
Distance – 3.12–3.14 inch (79,2–79,8 mm)<br />
A<br />
B<br />
0.98 inch<br />
(25 mm)<br />
B–08433<br />
3.12–3.14 inch<br />
(79,2–79,8 mm)<br />
B–08434<br />
853, 853H BICS Loa<strong>de</strong>r<br />
–7–85– Service Manual
THERMOSTAT<br />
Removal and Installation<br />
Remove the bolts from the thermostat housing [A].<br />
Installation: Tighten the bolts to 10–17 ft.–lbs. (14–23<br />
Nm) torque.<br />
Remove the thermostat.<br />
Checking the Thermostat<br />
Check the thermostat opening temperature [B].<br />
Standard – 176–183°F (80–84°C)<br />
Check the thermostat valve lift.<br />
Standard – Approximately 0.3 inch (8 mm) @ 203°F<br />
(95°C)<br />
If the thermostat housing assembly is removed, tighten<br />
the bolts to 10–17 ft.–lbs. (14–34 Nm) torque [C].<br />
–7–86–<br />
A<br />
B<br />
C<br />
B–08954<br />
B–08435<br />
B–08419<br />
853, 853H BICS Loa<strong>de</strong>r<br />
Service Manual
WATER JACKET TUBE<br />
Removal and Installation<br />
Remove the timing gearcase cover. (See Page 7–69.)<br />
Remove the idler gear and hub. (See Page 7–71.)<br />
Remove the fuel injection pump. (See Page 7–40.)<br />
Remove the fuel injection pump idler gear. (See Page<br />
7–73.)<br />
Remove the camshaft gear. (See Page 7–74.)<br />
Remove the timing case. (See Page 7–75.)<br />
Remove the water pump. (See Page 7–83.)<br />
Grip the edge of the water jacket tube with a vise grip. Use<br />
a screwdriver to pry the jacket from the engine block [A].<br />
Remove the water jacket tube from the engine block [B].<br />
A<br />
B<br />
B–08981<br />
B–08936<br />
853, 853H BICS Loa<strong>de</strong>r<br />
–7–87– Service Manual
853, 853H BICS Service Manual #6724012 – Engine Service Section Part 4 of 4<br />
–7–88–<br />
853, 853H BICS Loa<strong>de</strong>r<br />
Service Manual
SYSTEMS ANALYSIS<br />
Page<br />
Number<br />
BICS SYSTEM CONTROLLER<br />
Controller Test . . . . . . . . . . . . . . . . . . . . . . . . . . . . . . . . . . . . . . . . . . . . . . . . . 8–11<br />
Removal and Installation . . . . . . . . . . . . . . . . . . . . . . . . . . . . . . . . . . . . . . . 8–10<br />
BOBCAT INTERLOCK CONTROL SYSTEM (BICS)<br />
Inspecting the BICS System Controller<br />
(Engine STOPPED – Key ON) . . . . . . . . . . . . . . . . . . . . . . . . . . . . . . . . . . 8–3<br />
Inspecting the Lift Arm By–Pass Control . . . . . . . . . . . . . . . . . . . . . . . . . . 8–3<br />
Inspecting the Seat and Seat Bar Sensors (Engine RUNNING) . . . . . . 8–3<br />
Inspecting the Traction Lock (Engine RUNNING) . . . . . . . . . . . . . . . . . . 8–3<br />
Maintenance . . . . . . . . . . . . . . . . . . . . . . . . . . . . . . . . . . . . . . . . . . . . . . . . . 8–3<br />
Troubleshooting Chart . . . . . . . . . . . . . . . . . . . . . . . . . . . . . . . . . . . . . . . . . 8–4<br />
Troubleshooting Gui<strong>de</strong> . . . . . . . . . . . . . . . . . . . . . . . . . . . . . . . . . . . . . . . . . 8–5<br />
BOSS® DIAGNOSTIC TOOL<br />
Procedure . . . . . . . . . . . . . . . . . . . . . . . . . . . . . . . . . . . . . . . . . . . . . . . . . . . . 8–21<br />
BOSS® INSTRUMENT PANEL<br />
Removal and Installation . . . . . . . . . . . . . . . . . . . . . . . . . . . . . . . . . . . . . . . 8–27<br />
ELECTRICAL/HYDRAULIC CONTROLS REFERENCE<br />
Controls I<strong>de</strong>ntification Chart . . . . . . . . . . . . . . . . . . . . . . . . . . . . . . . . . . . . 8–32<br />
LIFT LOCK BY–PASS CONTROL VALVE<br />
Disassembly and Assembly . . . . . . . . . . . . . . . . . . . . . . . . . . . . . . . . . . . . 8–18<br />
Removal and Installation . . . . . . . . . . . . . . . . . . . . . . . . . . . . . . . . . . . . . . . 8–17<br />
MONITOR SERVICE CODES<br />
Alphabetic Co<strong>de</strong>s . . . . . . . . . . . . . . . . . . . . . . . . . . . . . . . . . . . . . . . . . . . . . 8–22<br />
Numeric Co<strong>de</strong>s . . . . . . . . . . . . . . . . . . . . . . . . . . . . . . . . . . . . . . . . . . . . . . . 8–22<br />
Service Co<strong>de</strong>s . . . . . . . . . . . . . . . . . . . . . . . . . . . . . . . . . . . . . . . . . . . . . . . . 8–23<br />
OPERATION SENSING SYSTEM UNIT<br />
Removal and Installation . . . . . . . . . . . . . . . . . . . . . . . . . . . . . . . . . . . . . . . 8–26<br />
PWM CONTROL HANDLE<br />
Handle Testing . . . . . . . . . . . . . . . . . . . . . . . . . . . . . . . . . . . . . . . . . . . . . . . . 8–31<br />
PWM ELECTRIC SOLENOID<br />
Solenoid Coil Testing . . . . . . . . . . . . . . . . . . . . . . . . . . . . . . . . . . . . . . . . . . 8–31<br />
PWM MODULE<br />
Description . . . . . . . . . . . . . . . . . . . . . . . . . . . . . . . . . . . . . . . . . . . . . . . . . . . 8–28<br />
PWM TROUBLESHOOTING<br />
Chart . . . . . . . . . . . . . . . . . . . . . . . . . . . . . . . . . . . . . . . . . . . . . . . . . . . . . . . . 8–30<br />
Conditions . . . . . . . . . . . . . . . . . . . . . . . . . . . . . . . . . . . . . . . . . . . . . . . . . . . . 8–29<br />
RPM SENSOR<br />
Adjustment . . . . . . . . . . . . . . . . . . . . . . . . . . . . . . . . . . . . . . . . . . . . . . . . . . . 8–21<br />
SEAT BAR SENSOR<br />
Removal and Installation . . . . . . . . . . . . . . . . . . . . . . . . . . . . . . . . . . . . . . . 8–12<br />
Seat Bar Sensor Test . . . . . . . . . . . . . . . . . . . . . . . . . . . . . . . . . . . . . . . . . . 8–13<br />
SEAT SENSOR<br />
Removal and Installation . . . . . . . . . . . . . . . . . . . . . . . . . . . . . . . . . . . . . . . 8–14<br />
Seat Sensor Test . . . . . . . . . . . . . . . . . . . . . . . . . . . . . . . . . . . . . . . . . . . . . . 8–15<br />
Revised Mar. 03<br />
Continued On Next Page<br />
SYSTEMS<br />
ANALYSIS<br />
853,853H BICS Loa<strong>de</strong>r<br />
–8–1– Service Manual
SYSTEMS ANALYSIS (Cont’d)<br />
Page<br />
Number<br />
SENDER AND SENSOR<br />
Components . . . . . . . . . . . . . . . . . . . . . . . . . . . . . . . . . . . . . . . . . . . . . . . . . . 8–21<br />
Service Checks . . . . . . . . . . . . . . . . . . . . . . . . . . . . . . . . . . . . . . . . . . . . . . . 8–21<br />
TILT LOCK VALVE<br />
Disassembly and Assembly . . . . . . . . . . . . . . . . . . . . . . . . . . . . . . . . . . . . 8–20<br />
Removal and Installation . . . . . . . . . . . . . . . . . . . . . . . . . . . . . . . . . . . . . . . 8–19<br />
TRACTION LOCK<br />
Removal and Installation . . . . . . . . . . . . . . . . . . . . . . . . . . . . . . . . . . . . . . . 8–16<br />
TROUBLESHOOTING THE BOSS® & L.C.D. DISPLAY . . . . . . . . . . . . . 8–25<br />
Revised June 97<br />
–8–2–<br />
853, 853H BICS Loa<strong>de</strong>r<br />
Service Manual
BOBCAT INTERLOCK CONTROL SYSTEM (BICS)<br />
Inspecting the BICS System Controller (Engine<br />
STOPPED – Key ON)<br />
1. Sit in the operator’s seat. Turn key ON, lower the<br />
seat bar and disengage the parking brake. All five<br />
(5) BICS Controller lights should be ON (Items 1, 2,<br />
3, 4 & 5) [A].<br />
2. Engage the parking brake, raise the seat bar fully.<br />
Seat bar light (Item 2) [A], valve light (Item 3) [A]<br />
and traction light (Item 4) [A] should be OFF.<br />
3. Raise up slightly off the seat. Seat light (Item 1) [A]<br />
should be OFF.<br />
NOTE: Record what lights are blinking (if any) and<br />
number of blinks. Refer to BICS<br />
Troubleshooting Chart, Page 8–4.<br />
4. Exit the loa<strong>de</strong>r and press traction lock overri<strong>de</strong><br />
button. Traction light (Item 4) [A] should be ON.<br />
Press overri<strong>de</strong> button again and traction light (Item<br />
4) [A] should be OFF.<br />
Inspecting the Seat and Seat Bar Sensors (Engine<br />
RUNNING)<br />
5. Sit in the operator’s seat, lower the seat bar and<br />
engage the parking brake. Fasten the seat belt.<br />
6. Start the engine and operate at low idle. While<br />
raising the lift arms, raise the seat bar fully. The lift<br />
arms should stop. Repeat using the tilt function.<br />
NOTE: The auxiliary hydraulic functions are not<br />
affected by the Bobcat Interlock Control<br />
System (BICS).<br />
Inspecting the Traction Lock (Engine RUNNING)<br />
7. Fasten the seat belt, disengage the parking brake,<br />
and raise the seat bar fully. Move the steering levers<br />
slowly forward and backward. The traction lock<br />
should be engaged. Lower the seat bar.<br />
8. Engage the parking brake pedal and move the<br />
steering levers slowly forward and backward. The<br />
traction lock should be engaged.<br />
Inspecting the Lift Arm By–Pass Control<br />
9. Raise the lift arms six feet (2 m) off the ground. Stop<br />
the engine, pull and hold the by–pass control knob.<br />
Push the toe of the left foot pedal or move the left<br />
hand control in toward the operator (hand controls)<br />
and the lift arms should lower slowly.<br />
Maintenance<br />
Clean any <strong>de</strong>bris, dirt or objects from un<strong>de</strong>r or behind the<br />
operator seat [B] & [C]. The rear of the seat must move<br />
up and down.<br />
Clearance is necessary un<strong>de</strong>r the seat spring (Item 1) [C]<br />
and the seat, to allow the seat to move up and down freely.<br />
With a<strong>de</strong>quate clearance, the seat sensor will be allowed<br />
to function properly.<br />
Inspect seat bar pivot area for tightness of linkage bolts.<br />
Replace parts that are damaged. Use only genuine<br />
Melroe replacement parts.<br />
Revised June 96<br />
A<br />
B<br />
C<br />
Seat<br />
Sensor<br />
1<br />
2<br />
3<br />
4<br />
5<br />
Clean area behind<br />
and un<strong>de</strong>r seat.<br />
Operator<br />
Seat<br />
1<br />
Seat<br />
Spring<br />
P–03760<br />
P–03763<br />
MC–02043<br />
AVOID INJURY OR DEATH<br />
The Bobcat Interlock Control System (BICS)<br />
must <strong>de</strong>activate the lift, tilt and traction drive<br />
functions. If it does not, contact your <strong>de</strong>aler for<br />
service. DO NOT modify the system.<br />
W–2151–0394<br />
853,853H BICS Loa<strong>de</strong>r<br />
–8–3– Service Manual
BOBCAT INTERLOCK CONTROL SYSTEM (BICS)<br />
Troubleshooting Chart<br />
The following list shows the effects which can happen to the loa<strong>de</strong>r, and the probable causes when the BICS Controller<br />
lights are off or flashing. Have the service procedure performed ONLY BY QUALIFIED BOBCAT SERVICE PERSONNEL.<br />
Flashing Indicator Means System Problem<br />
Effect on Operation<br />
of Loa<strong>de</strong>r<br />
(See Your Bobcat Dealer for Service)<br />
Indicator<br />
Light Light ON Light OFF<br />
When Light Is<br />
OFF<br />
Number of<br />
Flashes Cause<br />
Seat Operator in Seat No Operator in Seat Lift and tilt functions<br />
will not operate.<br />
2 Seat sensor circuit shorted to battery<br />
voltage*.<br />
3 Seat sensor circuit shorted to ground<br />
Seat Bar Seat Bar Down Seat Bar Up Lift, tilt and traction 2 Seat bar sensor circuit shorted to<br />
functions will not battery voltage*.<br />
operate. 3 Seat bar sensor circuit shorted to<br />
ground.<br />
Valve Control Valve Can Control Valve Lift and tilt functions 1 Valve output circuit is open.<br />
Be Used Cannot Be Used will not operate. 2 Valve output circuit shorted to battery<br />
voltage*.<br />
3 Valve output circuit shorted to ground.<br />
3 Valve output circuit is not groun<strong>de</strong>d.<br />
Traction Loa<strong>de</strong>r can be Loa<strong>de</strong>r cannot be Loa<strong>de</strong>r cannot be 1 Traction lock hold coil circuit is open.<br />
moved forward & moved forward and moved forward and 2 Traction lock hold coil circuit shorted<br />
backward. backward. backward. to battery voltage*.<br />
3 Traction lock hold coil circuit shorted<br />
to ground.<br />
4 Traction lock pull coil circuit is open.<br />
5 Traction lock pull coil circuit is shorted<br />
to battery voltage*.<br />
6 Traction lock pull coil circuit is shorted<br />
to ground.<br />
Power BICS Controller BICS Controller is Lift, tilt and traction<br />
is operating not operating functions will not<br />
correctly. correctly. operate.<br />
NOTES:<br />
(1) If the seat and/or seat bar sensor circuits are open, the corresponding lights will be OFF. If one of the lights<br />
stay OFF, check the circuit for continuity. See Inspection & Maintenance Instructions in Preventive<br />
Maintenance section.<br />
(2) If all five lights flash repeatedly, the voltage supply is greater than 16 volts or less than 9 volts.<br />
(3) Flashing patterns will repeat every 3.25 seconds.<br />
(4) If seat indicator light does not go ON, check for <strong>de</strong>bris, dirt or objects un<strong>de</strong>r or behind the seat.<br />
NOTE: If the Seat Bar is lowered before the seat sensor is activated, a 10 second <strong>de</strong>lay will occur before the valve<br />
and traction lights come on. (only loa<strong>de</strong>rs with BICS controller S/N’s above 200,000 will have this <strong>de</strong>lay.)<br />
* Normal BICS operating voltage is less than the electrical system voltage. If voltage is more, the circuit is shorted<br />
to system voltage.<br />
–8–4–<br />
853, 853H BICS Loa<strong>de</strong>r<br />
Service Manual
BOBCAT INTERLOCK CONTROL SYSTEM (BICS)<br />
(Cont’d)<br />
Troubleshooting Gui<strong>de</strong><br />
The following troubleshooting gui<strong>de</strong> is provi<strong>de</strong>d for<br />
assistance in locating and correcting BICS system<br />
problems. It is recommen<strong>de</strong>d that these procedures be<br />
done by authorized Bobcat Service Personnel only.<br />
BICS SYSTEM CONTROLLER<br />
1. Check that ignition switch is ‘‘ON’’.<br />
2. Check BICS 10 amp. fuse.<br />
Check for correct function after adjustments,<br />
repairs or service. Failure to make correct<br />
repairs or adjustments can cause injury or<br />
<strong>de</strong>ath.<br />
W–2004–1285<br />
PROBLEM SOLUTION #<br />
Power indicator light does not come ‘‘ON’’. 1, 2, 3, 6<br />
All indicator lights flashing. 4<br />
One of the indicator lights flashing. 5<br />
Intermittent indicator lights. 6, 7, 8, 9<br />
SOLUTION SUGGESTIONS<br />
3. Check wiring and connections. Make sure the connector is securely connected<br />
to the controller. Remove controller and pull on connector to check.<br />
4. Look at indicator light windows, if they are milky white in appearance, it is most<br />
likely caused by moisture in the controller. Allow to dry or replace the controller.<br />
5. Refer to BICS controller troubleshooting chart (See Page 8–1).<br />
6. Check wire connections to make sure connectors are locked into place.<br />
7. Check pins in connectors for pins pushed back or bent.<br />
8. Move the system wiring back & forth to try to find area that may be causing the<br />
intermittent connection.<br />
9. Use sensor tester MEL1428 to isolate problem between sensor and controller<br />
and wiring.<br />
853,853H BICS Loa<strong>de</strong>r<br />
–8–5– Service Manual
BOBCAT INTERLOCK CONTROL SYSTEM (BICS)<br />
(Cont’d)<br />
Troubleshooting Gui<strong>de</strong> (Cont’d)<br />
The following troubleshooting gui<strong>de</strong> is provi<strong>de</strong>d for<br />
assistance in locating and correcting BICS system<br />
problems. It is recommen<strong>de</strong>d that these procedures be<br />
done by authorized Bobcat Service Personnel only.<br />
TRACTION LOCK<br />
1. Check that controller power indicator light is ‘‘ON’’.<br />
2. Make sure brake pedal is not engaged.<br />
Check for correct function after adjustments,<br />
repairs or service. Failure to make correct<br />
repairs or adjustments can cause injury or<br />
<strong>de</strong>ath.<br />
W–2004–1285<br />
3. Maneuver loa<strong>de</strong>r to allow brake discs to move and remove pressure on the brake<br />
wedge so it can retract.<br />
4. If all lights indicate the brake should be released, but it doesn’t, check the brake<br />
25 amp. fuse.<br />
5. When checking fuse, also check other fuses. Check the fuse block for correct<br />
orientation and location of fuses (See Electrical System, Page 6–1).<br />
6. To test the solenoid, the pull coil should be .4 to .5 ohms and the hold coil 10.5 to<br />
11.0 ohms.<br />
7. Check brake solenoid and cover mounting hardware for the correct torque.<br />
8. Remove brake cover and check wedges for binding in the wedge gui<strong>de</strong>s.<br />
9. Check wire connections for loose connector body.<br />
10. Check for loose or bent pins in connectors.<br />
PROBLEM SOLUTION #<br />
Traction lock stays engaged. 1, 2, 3, 4, 5, 6, 7, 8<br />
Intermittent activation of traction lock. 9, 10, 11<br />
SOLUTION SUGGESTIONS<br />
11. Check for loose spa<strong>de</strong> connectors in fuse hol<strong>de</strong>r.<br />
–8–6–<br />
853, 853H BICS Loa<strong>de</strong>r<br />
Service Manual
BOBCAT INTERLOCK CONTROL SYSTEM (BICS)<br />
(Cont’d)<br />
Troubleshooting Gui<strong>de</strong> (Cont’d)<br />
The following troubleshooting gui<strong>de</strong> is provi<strong>de</strong>d for<br />
assistance in locating and correcting BICS system<br />
problems It is recommen<strong>de</strong>d that these procedures be<br />
done by authorized Bobcat Service Personnel only.<br />
SEAT SENSOR<br />
Check for correct function after adjustments,<br />
repairs or service. Failure to make correct<br />
repairs or adjustments can cause injury or<br />
<strong>de</strong>ath.<br />
W–2004–1285<br />
PROBLEM SOLUTION #<br />
Seat indicator light does not come ON with operator in seat. 1, 2, 3, 4, 5, 6, 7, 8, 9, 10, 11<br />
Seat indicator light stays ON when operator is out of seat. 2, 3, 6, 10, 11, 12, 13, 14<br />
Intermittent indicator light during operation. 11, 15, 16, 17, 18<br />
SOLUTION SUGGESTIONS<br />
1. Check to make sure power indicator light is ON.<br />
2. Check for <strong>de</strong>bris un<strong>de</strong>r and around seat.<br />
3. Look for any obstruction around seat.<br />
4. Check to make sure seat rail lowers when weight is in seat.<br />
5. Raise cab and check for magnet collar movement when weight is ad<strong>de</strong>d to seat.<br />
(Magnet collar should extend approximately 3/8’’ beyond the sensor assembly<br />
with weight in the seat).<br />
6. Use sensor tester to check operation of sensor and controller. Follow instructions<br />
on tester.<br />
7. Check to make sure the magnet gui<strong>de</strong> pin is in place.<br />
8. Check for contamination on magnets such as metal particles or for shipping plate<br />
over magnets.<br />
9. Check to make sure both magnets are in collar.<br />
10. Check for binding of magnet collar or bushing with hex head on other si<strong>de</strong> for<br />
binding.<br />
11. Check for correct mounting. One spring for standard seat. Two springs for<br />
suspension seats. Thick washers should be un<strong>de</strong>r front seat mounting rails on<br />
both si<strong>de</strong>s.<br />
12. Check for loose hardware mounting magnet collar. Check to make sure the<br />
magnet collar bushing is threa<strong>de</strong>d on all the way so it is contacting seat rail.<br />
13. Check to make sure seat rail raises when weight is removed from the seat.<br />
14. Raise cab and check for magnet collar movement when weight is removed from<br />
seat. (Magnet collar should extend approximately 1/8’’ beyond the sensor<br />
assembly without weight in seat).<br />
15. With smaller operators that operate with the seat forward some mounting<br />
alterations may be required. (See solution suggestions 16, 17 and 18).<br />
16. Adjust suspension seat to lightest weight setting.<br />
17. Check to make sure the seat rails move up and down freely when weight is ad<strong>de</strong>d.<br />
18. Add washer between the bushing and the magnet collar assembly which sli<strong>de</strong>s on<br />
and the seat rail. This will reduce the amount of seat travel required to activate<br />
the system. Must check, with seat moved all the way back, that indicator light<br />
does not stay on with operator out of seat. If light does not go out with operator<br />
out of the seat, the washer must be removed.<br />
853,853H BICS Loa<strong>de</strong>r<br />
–8–7– Service Manual
BOBCAT INTERLOCK CONTROL SYSTEM (BICS)<br />
(Cont’d)<br />
Troubleshooting Gui<strong>de</strong> (Cont’d)<br />
The following troubleshooting gui<strong>de</strong> is provi<strong>de</strong>d for<br />
assistance in locating and correcting BICS system<br />
problems. It is recommen<strong>de</strong>d that these procedures be<br />
done by authorized Bobcat Service Personnel only.<br />
SEAT BAR SENSOR<br />
1. Check controller power indicator light. It must be ON.<br />
2. Check sensor wire connection.<br />
Check for correct function after adjustments,<br />
repairs or service. Failure to make correct<br />
repairs or adjustments can cause injury or<br />
<strong>de</strong>ath.<br />
W–2004–1285<br />
3. Use the BICS sensor tester MEL1428 to check sensor and controller.<br />
4. Check for loose hardware.<br />
PROBLEM SOLUTION #<br />
Indicator light does not come ON when seat bar is lowered. 1, 2, 3, 4, 5, 6<br />
SOLUTION SUGGESTIONS<br />
5. Check keyed bushing to make sure magnet collar rotates with seat bar.<br />
6. Check magnet collar magnets for contamination such as metal particles.<br />
–8–8–<br />
853, 853H BICS Loa<strong>de</strong>r<br />
Service Manual
BOBCAT INTERLOCK CONTROL SYSTEM (BICS)<br />
(Cont’d)<br />
Troubleshooting Gui<strong>de</strong> (Cont’d)<br />
The following troubleshooting gui<strong>de</strong> is provi<strong>de</strong>d for<br />
assistance in locating and correcting BICS system<br />
problems. It is recommen<strong>de</strong>d that these procedures be<br />
done by authorized Bobcat Service Personnel only.<br />
LIFT LOCK BY–PASS VALVE<br />
Check for correct function after adjustments,<br />
repairs or service. Failure to make correct<br />
repairs or adjustments can cause injury or<br />
<strong>de</strong>ath.<br />
W–2004–1285<br />
By–pass valve stuck. 1<br />
By–pass valve stem bent or broke. 2<br />
1. Rotate shaft.<br />
2. Replace manual spool cartridge.<br />
PROBLEM SOLUTION #<br />
SOLUTION SUGGESTIONS<br />
853,853H BICS Loa<strong>de</strong>r<br />
–8–9– Service Manual
BICS SYSTEM CONTROLLER<br />
Removal and Installation<br />
Raise the loa<strong>de</strong>r operator cab. (See Page 1–1.)<br />
The controller mounting bolts are located on the back of<br />
the operator cab [A].<br />
Remove the top mounting bolt (Item 1) [A] from the<br />
controller.<br />
Loosen the two lower mounting bolts (Item 2) [A].<br />
Lower the operator cab.<br />
NOTE: The operator seat is removed in photo [B] for<br />
clarity purpose only. The seat does not need<br />
to be removed to remove the controller.<br />
Sli<strong>de</strong> the controller (Item 1) [B] up and remove it from the<br />
back of the operator cab.<br />
Disconnect the electrical harness from the controller and<br />
remove the controller from the loa<strong>de</strong>r.<br />
NOTE: Install the harness connector (Item 1) [C] into<br />
the controller (Item 2) [C] before installing the<br />
controller.<br />
Be sure the connector to the BICS controller<br />
is correctly engaged in the controller when<br />
installing the controller. An audible snap can<br />
be heard when the connector is correctly<br />
installed. Try to pull the connector out of the<br />
controller, if it cannot be removed it has been<br />
correctly installed [C].<br />
Installation: Tighten the controller mounting bolts to<br />
80–90 in.–lbs. (9–10 Nm) torque.<br />
Reverse the removal procedure to install the controller.<br />
–8–10–<br />
A<br />
B<br />
C<br />
1<br />
1<br />
1<br />
2<br />
2<br />
P–03997<br />
P–03994<br />
P–04707<br />
853, 853H BICS Loa<strong>de</strong>r<br />
Service Manual
BICS SYSTEM CONTROLLER (Cont’d)<br />
Controller Test<br />
MEL1428 Sensor Tester is necessary for the following<br />
procedure:<br />
Turn the key to the ON position. DO NOT START THE<br />
ENGINE.<br />
After completing the procedure for the Seat sensor test<br />
or the Seat Bar sensor test, do the Controller test. Refer<br />
to Page 8–3 for correct procedures to do the Seat Bar<br />
sensor test or the Seat sensor test.<br />
Move the toggle switch (Item 1) [A] on the sensor tester<br />
(Item 2) [A] to the Present position.<br />
If the controller is working correctly, the Seat light (Item<br />
1) [B] on the controller will illuminate when the tester is<br />
connected to the Seat sensor.<br />
When the tester is connected to Seat Bar sensor, the Seat<br />
Bar light (Item 1) [C] will illuminate if the controller is<br />
working correctly.<br />
Move the toggle switch (Item 1) [D] on the sensor tester<br />
(Item 2) [D] to the Absent position.<br />
The Seat light (Item 1) [B] or the Seat Bar light (Item 1)<br />
[C] should go off.<br />
If the tests above fail, there is a problem with the BICS<br />
system controller or the wiring harness.<br />
Refer to Page 8–3 for the correct procedure to inspect the<br />
BICS System Controller.<br />
A<br />
B<br />
1<br />
C<br />
D<br />
1<br />
1<br />
1<br />
2<br />
P–04703<br />
P–04706<br />
P–04704<br />
2<br />
P–04699<br />
853,853H BICS Loa<strong>de</strong>r<br />
–8–11– Service Manual
SEAT BAR SENSOR<br />
Removal and Installation<br />
Disconnect the seat bar sensor connector (Item 1) [A].<br />
Remove the mounting bolt (Item 1) [B] from the pivot<br />
bushing.<br />
Installation: Tighten the mounting bolt to 25–28 ft.–lbs.<br />
(34–38 Nm) torque.<br />
Remove the sensor mounting bolt (Item 2) [B] and nut.<br />
Be careful to not overtighten the sensor<br />
mounting bolt and nut to prevent breakage of<br />
the sensor.<br />
I–2088–1095<br />
Installation: Be sure the tabs on the pivot bushing are<br />
positioned in the slotted hole (Item 1) [C] of the operator<br />
cab as shown.<br />
Pull the seat bar back and remove the assembly as<br />
follows:<br />
NOTE: The sensor assembly [D] is shown removed<br />
from the operator cab for clarity purpose<br />
only. The sensor assembly can be removed<br />
without removing the seat bar from the<br />
operator cab.<br />
Remove the pivot bushing mounting bolt (Item 1) [D] and<br />
washer (Item 2) [D] from the pivot bushing (Item 3) [D].<br />
Installation: Tighten the pivot bushing mounting bolt to<br />
180–200 in.–lbs. (21–23 Nm) torque.<br />
Remove the pivot bushing (Item 3) [D], sensor (Item 4)<br />
[D], magnet (Item 5) [D] and plastic bushing (Item 6) [D]<br />
from the seat bar.<br />
Inspect all parts for damage and wear and replace if<br />
necessary.<br />
Reverse the removal procedure to install the seat bar<br />
sensor.<br />
Refer to Page 5–1 for seat bar removal and installation<br />
procedure.<br />
–8–12–<br />
A<br />
B<br />
C<br />
D<br />
3 6 2 1<br />
4<br />
5<br />
1<br />
2<br />
1<br />
1<br />
P–04702<br />
P–03246<br />
P–03247<br />
Left Si<strong>de</strong><br />
of Seat Bar<br />
P–03284<br />
853, 853H BICS Loa<strong>de</strong>r<br />
Service Manual
SEAT BAR SENSOR (Cont’d)<br />
Seat Bar Sensor Test<br />
Use MEL1428 Sensor Tester for the following procedure:<br />
Turn the key to the ON position. DO NOT START THE<br />
ENGINE.<br />
Disconnect the seat bar sensor connector (Item 1) [A].<br />
Connect MEL1428 Sensor Tester (Item 1) [B] inline as<br />
shown to the seat bar sensor connectors. Also see inset<br />
[B].<br />
The power light (Item 1) [C] on the sensor tester will<br />
illuminate.<br />
Lower the seat bar. The sensor test light (Item 1) [D]<br />
should illuminate.<br />
Raise the seat bar. The sensor test light (Item 1) [D]<br />
should go off.<br />
If the above tests fails, there is a problem with the seat bar<br />
sensor.<br />
Refer to Page 8–3 for the correct procedure to inspect the<br />
Seat Bar Sensor.<br />
Refer to Page 5–1 for seat bar removal and installation<br />
procedure.<br />
A<br />
B<br />
C<br />
D<br />
1<br />
1<br />
1<br />
P–04702<br />
P–04701<br />
P–04700<br />
P–04698<br />
P–04699<br />
853,853H BICS Loa<strong>de</strong>r<br />
–8–13– Service Manual<br />
1
SEAT SENSOR<br />
Removal and Installation<br />
Raise the loa<strong>de</strong>r operator cab. (See Page 1–1.)<br />
Locate the seat sensor (Item 1) [A] beneath the operator<br />
cab.<br />
Remove the sensor connector (Item 1) [B] from the<br />
hol<strong>de</strong>r.<br />
Disconnect the sensor connector (Item 1) [B].<br />
Remove the magnet collar mounting bolt (Item 2) [B],<br />
washer (Item 1) [C] and magnet (Item 2) [C] from the<br />
sensor (Item 3) [B].<br />
DO NOT overtighten the magnet mounting<br />
bolt to prevent damage to the magnet.<br />
I–2089–1095<br />
Remove the sensor mounting bolt (Item 4) [B] and nut.<br />
Be careful to not overtighten the sensor<br />
mounting bolt and nut to prevent breakage of<br />
the sensor.<br />
I–2088–1095<br />
Remove the sensor (Item 3) [C].<br />
NOTE: Be sure not to lose the magnet collar<br />
alignment pin (Item 4) [C] which is located in<br />
the sensor (Item 3) [C] when removing the<br />
sensor.<br />
Remove the threa<strong>de</strong>d bushing (Item 5) [C] from the seat<br />
track mounting bolt (Item 1) [D].<br />
Inspect all parts for damage and wear and replace if<br />
necessary.<br />
Reverse the removal procedure to install the seat sensor.<br />
Refer to Page 5–1 for seat removal and installation<br />
procedure.<br />
–8–14–<br />
A<br />
B<br />
C<br />
D<br />
1<br />
2<br />
3<br />
4<br />
4<br />
5<br />
1<br />
3<br />
2<br />
P–03987<br />
P–03988<br />
1<br />
1<br />
P–04041<br />
P–04044<br />
853, 853H BICS Loa<strong>de</strong>r<br />
Service Manual
SEAT SENSOR (Cont’d)<br />
Seat Sensor Test<br />
Use MEL1428 Sensor Tester for the following procedure:<br />
Turn the key to the ON position. DO NOT START THE<br />
ENGINE.<br />
Disconnect the seat sensor connector (Item 1 – Inset)<br />
[A].<br />
Connect MEL1428 Sensor Tester (Item 2) [A] inline as<br />
shown to the seat sensor.<br />
The power light (Item 1) [B] on the sensor tester will<br />
illuminate.<br />
Sit on the operator seat. The sensor test light (Item 1) [C]<br />
should illuminate.<br />
Get off the operator seat. The sensor test light (Item 1) [C]<br />
should go off.<br />
If the above tests fail, there is a problem with the seat<br />
sensor.<br />
Refer to Page 8–14 for the correct procedure to inspect<br />
the Seat Sensor.<br />
Refer to Page 5–1 for seat removal and installation<br />
procedure.<br />
A<br />
B<br />
C<br />
2<br />
1<br />
P–03988<br />
1<br />
1<br />
P–04705<br />
P–04698<br />
P–04699<br />
853,853H BICS Loa<strong>de</strong>r<br />
–8–15– Service Manual
TRACTION LOCK<br />
Removal and Installation<br />
AVOID INJURY OR DEATH<br />
Do not modify the electrical wiring connected<br />
to the traction lock solenoid or any part of the<br />
traction lock system. The traction lock<br />
provi<strong>de</strong>s the locking function of the parking<br />
brake. Service work on the traction lock system<br />
should only be performed by a qualified<br />
technician. Use only genuine Melroe parts if<br />
repair is necessary.<br />
W–2165–0195<br />
Raise the loa<strong>de</strong>r operator cab. (See Page 1–1.)<br />
Remove the Do Not Modify sta–strap (P/N 6665527) from<br />
the electric solenoid connector (Item 1) [A].<br />
Installation: Install a new Do Not Modify sta–strap (P/N<br />
6665527) on the electric solenoid connector.<br />
Remove the two mounting bolts (Item 2) [A] from the<br />
electric solenoid mounting bracket.<br />
Installation: Tighten the mounting bolts to 25–28 ft.–lbs.<br />
(34–38 Nm) torque. Be sure the solenoid mounting<br />
bracket is installed in the same position. The solenoid<br />
mounting surface has a slight angle which tips the top of<br />
the solenoid toward the rear of the loa<strong>de</strong>r when installed<br />
correctly.<br />
Remove the electric solenoid and bracket assembly from<br />
the chaincase cover [B].<br />
Remove and inspect the compression spring (Item 1) [B]<br />
for wear or damage. Replace if necessary. The spring<br />
may also stay with the shaft when the electric solenoid<br />
and bracket are removed from the chaincase.<br />
Installation: Install the compression spring (Item 1) [B]<br />
on the collar located on the electric solenoid.<br />
Remove the traction lock assembly (Item 1) [C] from the<br />
chaincase.<br />
Remove the shaft mounting bolt (Item 1) [D], washer and<br />
spring from the assembly shaft (Item 2) [D]. Remove the<br />
wedge (Item 3) [D] and inspect all parts for damage or<br />
wear. Replace if necessary.<br />
Installation: Thoroughly clean and dry the shaft<br />
mounting bolt (Item 1) [D], the shaft (Item 2) [D] and<br />
wedge (Item 3) [D]. Use LOCTITE 242 when assembling<br />
these parts to the traction lock assembly.<br />
Failure to use LOCTITE may allow the traction<br />
lock assembly to loosen up which can cause<br />
damage to the traction lock system.<br />
–8–16–<br />
A<br />
B<br />
C<br />
D<br />
1<br />
3<br />
1<br />
2<br />
1<br />
2<br />
1<br />
P–04769<br />
P–04773<br />
P–04776<br />
P–04854<br />
853, 853H BICS Loa<strong>de</strong>r<br />
Service Manual
LIFT LOCK BY–PASS VALVE<br />
Removal and Installation<br />
Never work on a machine with the lift arms up<br />
unless the lift arms are secured by a lift arm<br />
support <strong>de</strong>vice. Failure to use an approved lift<br />
arm support <strong>de</strong>vice can allow the lift arms or<br />
attachment to fall and cause injury or <strong>de</strong>ath.<br />
W–2059–0991<br />
When making repairs on hydrostatic and<br />
hydraulic systems, clean the work area before<br />
disassembly and keep all parts clean. Always<br />
use caps and plugs on hoses, tubelines and<br />
ports to keep dirt out. Dirt can quickly damage<br />
the system.<br />
I–2003–0284<br />
Raise the lift arms and install an approved lift arm support<br />
<strong>de</strong>vice. (See Page 1–1.)<br />
Raise the operator cab. (See Page 1–1.)<br />
Drain the fluid from the hydraulic reservoir. (See Page<br />
1–1.)<br />
Remove the control panel. (See Page 3–1.)<br />
Disconnect the tubelines (Items 1 & 2) [A].<br />
Disconnect the tubeline (Item 1) [B].<br />
Remove the two mounting bolts (Item 2) [B].<br />
Installation: Tighten the mounting bolts to 180–200<br />
in.–lbs. (21–23 Nm) torque.<br />
Turn the elbow fitting (Item 1) [C] for clearance.<br />
Disconnect the tubeline (Item 2) [C].<br />
Turn the lift lock by–pass valve so there is clearance to<br />
disconnect the tubeline (Item 1) [D].<br />
Remove the lift lock by–pass valve.<br />
A<br />
B<br />
C<br />
D<br />
1<br />
1<br />
1<br />
2<br />
2<br />
1<br />
2<br />
P–04747<br />
P–04748<br />
P–04749<br />
P–04750<br />
853,853H BICS Loa<strong>de</strong>r<br />
–8–17– Service Manual
LIFT LOCK BY–PASS VALVE (Cont’d)<br />
Removal and Installation (Cont’d)<br />
Remove and replace the by–pass valve mounting bracket<br />
(Item 1) [A] if necessary.<br />
Reverse the removal procedure to install the lift lock<br />
by–pass valve in the loa<strong>de</strong>r.<br />
Always clean up spilled fuel or oil. Keep heat,<br />
flames, sparks or lighted tobacco away from<br />
fuel and oil. Failure to use care around<br />
combustibles can cause explosion or fire<br />
which can result in injury or <strong>de</strong>ath. W–2103–1285<br />
Disassembly and Assembly<br />
Remove the by–pass valve (Item 1) [B] from the valve<br />
block. Inspect the by–pass valve for damage and replace<br />
if necessary.<br />
Remove the check valve (Item 2) [B] from the valve block.<br />
Inspect the check valve for damage and replace if<br />
necessary.<br />
Inspect the hydraulic fittings on the valve block for<br />
damage and replace if necessary.<br />
–8–18–<br />
A<br />
B<br />
1<br />
2<br />
1<br />
P–04745<br />
P–04096<br />
853, 853H BICS Loa<strong>de</strong>r<br />
Service Manual
TILT LOCK VALVE<br />
Removal and Installation<br />
Never work on a machine with the lift arms up<br />
unless the lift arms are secured by a lift arm<br />
support <strong>de</strong>vice. Failure to use an approved lift<br />
arm support <strong>de</strong>vice can allow the lift arms or<br />
attachment to fall and cause injury or <strong>de</strong>ath.<br />
W–2059–0991<br />
When making repairs on hydrostatic and<br />
hydraulic systems, clean the work area before<br />
disassembly and keep all parts clean. Always<br />
use caps and plugs on hoses, tubelines and<br />
ports to keep dirt out. Dirt can quickly damage<br />
the system. I–2003–0284<br />
Raise the lift arms and install an approved lift arm support<br />
<strong>de</strong>vice. (See Page 1–1.)<br />
Raise the operator cab. (See Page 1–1.)<br />
Drain the fluid from the hydraulic reservoir. (See Page<br />
1–1.)<br />
Mark all tubelines for correct installation.<br />
Disconnect the tubelines from fitting (Items 1 & 2) [A].<br />
Disconnect the hose (Item 1) [B].<br />
Disconnect the tubelines from the fittings (Item 1) [C].<br />
Remove the ‘‘Do Not Modify’’ sta–strap (P/N 6665527)<br />
from the electric solenoid connector (Item 2) [C].<br />
Installation: Install a new ‘‘Do Not Modify’’ sta–strap<br />
(P/N 6665527) on the solenoid connector.<br />
Remove the two mounting bolts (Item 3) [C].<br />
Installation: Tighten the mounting bolts to 180–200<br />
in.–lbs. (21–23 Nm) torque.<br />
Remove the tilt lock valve.<br />
A<br />
B<br />
C<br />
2<br />
1<br />
2<br />
1<br />
1<br />
3<br />
P–04752<br />
P–04753<br />
P–04754<br />
853,853H BICS Loa<strong>de</strong>r<br />
–8–19– Service Manual
TILT LOCK VALVE (Cont’d)<br />
Disassembly and Assembly<br />
Remove the solenoid mounting nut (Item 1) [A], solenoid<br />
(Item 2) [A] and solenoid valve (Item 3) [A] from the tilt<br />
lock valve.<br />
Remove the check valve (Item 1) [B] from the lift lock<br />
valve.<br />
Assembly: Tighten the solenoid mounting nut to 80–90<br />
in.–lbs. (9–10 Nm) torque.<br />
Inspect the solenoid valve, check valve and hydraulic<br />
fittings for damage or wear. Replace if necessary.<br />
Refer to Page 8–1 for lift arm by–pass control inspection<br />
procedure.<br />
–8–20–<br />
A<br />
B<br />
3 1<br />
1<br />
2<br />
P–04115<br />
P–04114<br />
853, 853H BICS Loa<strong>de</strong>r<br />
Service Manual
BOSS® DIAGNOSTIC TOOL<br />
Procedure<br />
The tool listed will be nee<strong>de</strong>d to do the following<br />
procedure:<br />
MEL1400 – Diagnostic Tool<br />
Stop the engine.<br />
Lift and block the loa<strong>de</strong>r. (See Page 1–1.)<br />
Remove the dust cap from the diagnostic connector plug.<br />
Connect the diagnostic tool plug (Item 1) [A] into the<br />
loa<strong>de</strong>r connector.<br />
Use the instructions from the BOSS Operation &<br />
Maintenance Manual to make service checks of BOSS<br />
system operating unit and other components [A].<br />
SENDER AND SENSOR<br />
Service Checks<br />
Use the following information when checking the sen<strong>de</strong>rs<br />
and sensor with a volt/ohmmeter:<br />
Component Value<br />
TEMPERATURE SENDER<br />
70 <strong>de</strong>gree F. (21 <strong>de</strong>gree C.)<br />
80 <strong>de</strong>gree F. (27 <strong>de</strong>gree C.)<br />
. . . . . . . . . . . . . 970 ohms<br />
. . . . . . . . . . . . 1013 ohms<br />
ENGINE OIL PRESSURE SENDER<br />
0 PSI . . . . . . . . . . . . . . . . . . . . . . . . . . . . . . 3 ohms Max.<br />
6 PSI (41 kPa) . . . . . . . . . . . . . . . . . . . . . . . 7 ohms Min.<br />
50 PSI (345 kPa) . . . . . . . . . . . . . . . . . . . . . . . . 49 ohms<br />
70 PSI (483 kPa) . . . . . . . . . . . . . . . . . . . . . . . . 59 ohms<br />
TRANSMISSION CHARGE PRESSURE SENDER<br />
0 PSI . . . . . . . . . . . . . . . . . . . . . . . . . . . . . . . . . 0–5 ohms<br />
100 PSI (690 kPa) . . . . . . . . . . . . . . . . . . . . . . . 58 ohms<br />
130 PSI (896 kPa) . . . . . . . . . . . . . . . . . . . . . . . 75 ohms<br />
150 PSI (1034 kPa) . . . . . . . . . . . . . . . . . . . . . 87 ohms<br />
FUEL SENDER<br />
Full . . . . . . . . . . . . . . . . . . . . . . . . . . . . . . . . . . . . 30 ohms<br />
Empty . . . . . . . . . . . . . . . . . . . . . . . . . . . . . . . . 270 ohms<br />
RPM SENSOR<br />
Adjustment<br />
Continuity Resistance of 3000–3500 ohms.<br />
Disconnect the connector [B] from the engine harness.<br />
Loosen the jam nut (Item 1) [B] on the RPM sensor.<br />
Turn the RPM sensor (Item 1) [C] in until it makes contact<br />
with the engine flywheel.<br />
Turn the jam nut until it contacts the flywheel housing. The<br />
jam nut should not be tightened, it needs to turn with the<br />
RPM sensor when the sensor is turned back out for<br />
adjustment.<br />
Turn the RPM sensor and the jam nut out from the<br />
flywheel. Set a clearance of 0.050’’ (1,27 mm) between<br />
the jam nut and the housing with a feeler gauge [C].<br />
Retighten the jam nut.<br />
NOTE: The plastic tip is used as a gauge to set a new<br />
RPM SENSOR. The plastic tip is <strong>de</strong>signed to<br />
come off after the engine is started.<br />
A<br />
B<br />
C<br />
1<br />
1<br />
P–03871<br />
P–05193<br />
P–05192<br />
853,853H BICS Loa<strong>de</strong>r<br />
–8–21– Service Manual<br />
1
-8-22-<br />
853, 853H BICS Loa<strong>de</strong>r<br />
Service Manual
SERVICE CODES (Cont’d)<br />
The following list references the <strong>de</strong>fect co<strong>de</strong>s that are<br />
transmitted to the instrument panel display which can<br />
occur. Some service procedures for correcting the<br />
problems can be found in this manual and other<br />
procedures must be performed ONLY BY QUALIFIED<br />
BOBCAT SERVICE PERSONNEL.<br />
SUBJECT DISPLAY READS<br />
Instructions are necessary before operating or<br />
servicing machine. Read Operation &<br />
Maintenance Manual, Handbook and signs<br />
(<strong>de</strong>cals) on machine. Follow warnings and<br />
instructions in the manuals when making repairs,<br />
adjustments or servicing. Check for correct<br />
function after adjustments, repairs or service.<br />
Failure to follow instructions can cause injury or<br />
<strong>de</strong>ath.<br />
W–2003–1289<br />
CONDITION<br />
Engine Coolant Level ECL 1 SHUTDOWN, No Coolant<br />
Engine Coolant Temp. EC–1.1 SHUTDOWN, Engine Temperature<br />
EC–2.1 WARNING, Engine Temperature<br />
EC 3 Wiring Not Connected<br />
EC 4 Wiring Shorted<br />
EC 5 High Sensor Voltage<br />
EC 7 Sensor Out Of Range<br />
Engine Oil Pressure EP 1 SHUTDOWN, Pressure<br />
EP 2 WARNING, Pressure<br />
EP 3 Wiring Not Connected<br />
EP 4 Wiring Shorted<br />
EP 5 High Sensor Voltage<br />
EP 7 Sensor Out Of Range<br />
Engine Speed ES 1 SHUTDOWN, Engine Speed Too High<br />
ES–2.1 WARNING, Engine Speed Slightly High<br />
ES–6 Sensor No Signal<br />
ES–7 Sensor Out Of Range<br />
Air Filter AF 2 WARNING, Restriction Too High<br />
AF 6 Sensor No Signal<br />
Battery b–2.1 WARNING, Bad Battery<br />
b–2.2 WARNING, Battery Voltage<br />
Fuel Level FUEL2 WARNING, Low Level<br />
FUEL3 Wiring Not Connected<br />
FUEL4 Wiring Shorted<br />
FUEL5 High Sensor Voltage<br />
FUEL7 Sensor Out Of Range<br />
853,853H BICS Loa<strong>de</strong>r<br />
–8–23– Service Manual
SUBJECT DISPLAY READS<br />
CONDITION<br />
Hydrostatic Charge HF1–2 WARNING, High Restriction<br />
Filter Condition HF1–6 Sensor No Signal<br />
Hydrostatic Fluid HP 1 SHUTDOWN, Pressure<br />
HP 2 WARNING, Pressure<br />
HP 3 Wiring Not Connected<br />
HP 4 Wiring Shorted<br />
HP 5 High Sensor Voltage<br />
HP 7 Sensor Out Of Range<br />
Hydrostatic Fluid HC 1 SHUTDOWN, Temperature<br />
Temperature HC 2 WARNING, Temperature<br />
HC 3 Wiring Not Connected<br />
HC 4 Wiring Shorted<br />
HC 5 High Sensor Voltage<br />
HC 7 Sensor Out Of Range<br />
–8–24–<br />
853, 853H BICS Loa<strong>de</strong>r<br />
Service Manual
TROUBLESHOOTING THE BOSS® & LCD DISPLAY<br />
853, 853H BICS Service Manual #6724012 – System Analysis Section Part 1 of 2<br />
SUBJECT<br />
BOSS<br />
LCD Display<br />
Temperature related<br />
shutdown co<strong>de</strong>s<br />
when no heating<br />
occurs.<br />
*<br />
Intermittent co<strong>de</strong> of<br />
ES6 while engine<br />
running.<br />
Display is <strong>de</strong>ad – No<br />
Icons, Bar Graphs,<br />
Hourmeter.<br />
LCD DISPLAY<br />
CONNECTOR<br />
A B C D E<br />
Orange<br />
Ground<br />
Positive Com. 3.5 to 4 Volts<br />
5.0 Volts Regulated Power<br />
During an active<br />
WARNING display,<br />
reset occurs and the<br />
hourmeter becomes<br />
all zero’s.<br />
Garbled message,<br />
missing segments,<br />
etc.<br />
After glow sequence<br />
or after a WARNING<br />
goes away, the Icon<br />
remains ON.<br />
No Bar Graphs, no<br />
Hours.<br />
*<br />
12 volt supply and<br />
BOSS failure.<br />
NOTE: You may have some or all of the<br />
co<strong>de</strong>s listed. You will have high<br />
temps, high press, low voltage<br />
and low fuel.<br />
Orange<br />
SYMPTOM<br />
Purple/Red<br />
Purple/White<br />
Black<br />
Sensor No Signal or<br />
No RPM’s.<br />
Lack of 5.0 volts<br />
regulated power.<br />
12 Volt – Back Light<br />
Negative Com. .5 to 1.5 Volts<br />
Power Display Operation<br />
INDICATES<br />
Low voltage (5.0)<br />
triggered reset.<br />
The display is not fault<br />
tolerant. Also can be<br />
an indication of poor<br />
internal connections.<br />
Bad display or BOSS<br />
is not communicating.<br />
NOTE: The display has caused the<br />
problem by locking the<br />
communication lines and<br />
stopping communications from<br />
the BOSS.<br />
TO CORRECT SYMPTOM<br />
1. Check stored <strong>de</strong>fects with the BOSS tool.<br />
*2. If <strong>de</strong>fect list has EC1, HC1, EC2.1, HC2. EP3,<br />
EP7, HP7, B2.2, low fuel, Fuel 7 and last<br />
occurrence hr. readings are within a hundredth,<br />
the BOSS is <strong>de</strong>fective and must be replaced.<br />
3. Using a voltmeter, check the alternator output.<br />
1. ES6 will occur if the loa<strong>de</strong>r is stalled or shutdown<br />
during run cycle. The co<strong>de</strong> is generated due to the<br />
lack of RPM and the existence of residual<br />
pressure in the system.<br />
1. Check pin A for 5.0 volts. If 5.0 volts is present<br />
replace the display.<br />
2. If no power exists at pin A, install BOSS backup<br />
to confirm the BOSS system.<br />
3. If the problem still exists, check the harness for<br />
continuity.<br />
1. Turn the ignition switch OFF. Re–starting will<br />
return hourmeter reading.<br />
2. If re–starting will not return hourmeter reading,<br />
check pins B & C as stated in Step 5 below.<br />
1. Turn the ignition switch OFF and re–start. A<br />
fault is an invalid message that the display tries<br />
to display. Generally a fault occurs if<br />
communications of two messages are combined<br />
on the display.<br />
1. Turn the key OFF and re–start.<br />
1. Plug in the BOSS tool and start the engine.<br />
2. If data is being received by the BOSS tool, the<br />
BOSS unit is not the cause of the problem.<br />
3. If no data is received at the BOSS tool.<br />
disconnect the LCD display.<br />
*4. If messages are now received at the tool, the<br />
display is the problem. If problem still exists go to<br />
Step 5.<br />
5. Check pins B & C for signal.<br />
6. If there is no signal, install BOSS backup unit.<br />
7. If the problem still exists, check the harness for<br />
continuity.<br />
853,853H BICS Loa<strong>de</strong>r<br />
–8–25– Service Manual
OPERATION SENSING SYSTEM UNIT<br />
Removal and Installation<br />
Raise the loa<strong>de</strong>r operator cab. (See Page 1–1.)<br />
Loosen the nuts (Item 1) [A] from the sensing system unit<br />
(Item 2) [A].<br />
Sli<strong>de</strong> the unit forward in the mounting slots and remove<br />
it from the operator cab.<br />
Use a screwdriver and remove the two connectors (Item<br />
1) [B] from the sensing system unit (Item 2) [B].<br />
Installation: Put the heads of the mounting bolts into the<br />
slots of the operator cab and sli<strong>de</strong> the unit back into place.<br />
Tighten the three mounting nuts to 80–90 in.–lbs. (9–10<br />
Nm) torque.<br />
–8–26–<br />
A<br />
B<br />
1<br />
1<br />
2<br />
2<br />
1<br />
1<br />
P–04043<br />
P–04042<br />
853, 853H BICS Loa<strong>de</strong>r<br />
Service Manual
BOSS® INSTRUMENT PANEL<br />
Removal and Installation<br />
Pry the rubber light mount free from the operator cab<br />
(both si<strong>de</strong>s) [A].<br />
Lower the light from the operator cab to locate the three<br />
instrument panel mounting bolts (Item 1) [B] (both si<strong>de</strong>s.)<br />
Remove the three mounting bolts and pull the left panel<br />
(Item 1) [C] down from the operator cab.<br />
Installation: Be careful to not overtighten the panel<br />
mounting bolts to prevent stripping the threa<strong>de</strong>d holes of<br />
the panels.<br />
Disconnect the wire harness connectors from the panel<br />
and remove the panel.<br />
Remove the three mounting bolts and pull the right panel<br />
(Item 1) [D] down from the operator cab.<br />
Installation: Be careful to not overtighten the panel<br />
mounting bolts to prevent stripping the threa<strong>de</strong>d holes of<br />
the panels.<br />
Disconnect the wire harness connectors from the panel<br />
and remove the panel.<br />
A<br />
B<br />
C<br />
D<br />
1<br />
1<br />
1<br />
P–03995<br />
P–03955<br />
P–03958<br />
P–03959<br />
853,853H BICS Loa<strong>de</strong>r<br />
–8–27– Service Manual<br />
1
PWM MODULE<br />
Description<br />
• Take voltage measurements by probing into wires near<br />
the PWM module shown in figure [A]. All connectors<br />
must remain plugged into their respectful harness.<br />
• Turn the key to the ON position with the engine OFF.<br />
• Turn the switches ON to get their appropriate readings.<br />
(Example: Input from Proportional flow switch – Push<br />
switch full left then full right to get the voltage readings<br />
listed below.)<br />
• Press the auxiliary hydraulic switch (Item 2) [B] twice.<br />
Both Green lights will be ON. Check Wire# 9, 17, 18,<br />
or 19.<br />
NOTE: Item <strong>de</strong>scriptions are listed below as Input to<br />
or Output from the Module. Voltage readings<br />
are approximate. They are affected by battery<br />
condition (system voltage). Voltage readings<br />
for Items 10, 18, and 19 are variable and<br />
correspond to Proportional Flow Switch<br />
travel.<br />
Fig. [A]:<br />
Item Description Volts<br />
1<br />
2<br />
Input for Attachment I.D.<br />
Ground<br />
11.5<br />
0<br />
3<br />
4<br />
Input from Key Switch<br />
Input from *Auxiliary Hydraulic Switch<br />
12.0<br />
9.5<br />
5<br />
6<br />
Output to Momentary Light<br />
Output to Auxiliary Hydraulic Switch<br />
7.5<br />
11.0<br />
7<br />
8<br />
Output to Detent Light<br />
Input from Key Switch (Bleed position)<br />
6.5<br />
12.5<br />
9 Output to **High Flow Solenoid<br />
Non High Flow Loa<strong>de</strong>rs<br />
11.5<br />
0<br />
10<br />
11<br />
Input from Proportional Flow Switch<br />
Ground to Proportional Flow Switch<br />
.5–1.5<br />
0<br />
12<br />
13<br />
Output to Proportional Flow Switch<br />
Input for Loa<strong>de</strong>r Mo<strong>de</strong>l I.D.<br />
2.0<br />
12.0<br />
14<br />
15<br />
Input from Detent Switch<br />
Input from Rear Aux. Base Switch<br />
12.0<br />
11.0<br />
16<br />
17<br />
Input from Rear Aux. Rod Switch<br />
Output to Rear Aux. Diverter Solenoid<br />
11.0<br />
10.0<br />
18<br />
19<br />
Output to Aux. Rod Solenoid<br />
Output to Aux. Base Solenoid<br />
0–6.0<br />
0–6.0<br />
*Input signal is present only as Auxiliary Hydraulic Switch<br />
is pushed.<br />
**Output signal goes to High Flow dash panel switch, then<br />
to solenoid. Used only on H mo<strong>de</strong>ls. Zero voltage on Non<br />
High Flow loa<strong>de</strong>rs.<br />
Key Switch Item 1 [B]<br />
Auxiliary Hydraulic Switch Item 2 [B]<br />
Momentary Light Item 3 [B]<br />
Detent Light Item 4 [B]<br />
High Flow Switch Item 5 [B]<br />
Proportional Flow Switch Item 1 [C]<br />
Detent Switch Item 2 [C]<br />
Rear Aux. Switch (Base & Rod) Item 3 [C]<br />
Revised Mar. 03<br />
–8–28–<br />
A<br />
B<br />
C<br />
3<br />
Left<br />
Steering<br />
Lever<br />
Control<br />
1<br />
5<br />
N–00562<br />
DELUXE HANDLES<br />
P–02130<br />
2<br />
3<br />
4<br />
MC–2265<br />
2<br />
P–03272<br />
1<br />
Right<br />
Steering<br />
Lever<br />
Control<br />
P–02129<br />
853, 853H BICS Loa<strong>de</strong>r<br />
Service Manual
PWM MODULE (Cont’d)<br />
Description (Cont’d)<br />
Later S/N loa<strong>de</strong>rs have additional wires in the PWM<br />
module as shown in Fig. [A]. Loa<strong>de</strong>rs with the module<br />
mounted on the insi<strong>de</strong> left fen<strong>de</strong>r are equipped with the<br />
auxiliary hydraulic <strong>de</strong>activation feature and are listed<br />
below:<br />
Loa<strong>de</strong>r S/N’s 514411603 & Above<br />
514511003 & Above<br />
514611002 & Above<br />
• Take voltage measurements by probing into wires near<br />
the PWM module. All connectors must remain plugged<br />
into their respectful harness<br />
• Sit in the operator’s seat. Turn key to ON position.<br />
Lower the seat bar. Check that the BICS controller<br />
lights are on. Check input voltage (Item 1) [A]. Press<br />
the auxiliary hydraulics switch. The mo<strong>de</strong> switch light<br />
will come ON. Raise the seat bar. The light should be<br />
OFF. Input voltage will drop to less than 1.0 volts.<br />
NOTE: Item <strong>de</strong>scriptions are listed below as Input to<br />
or Output from the Module. Voltage readings<br />
are approximate. They are affected by battery<br />
condition (system voltage).<br />
Fig. [A]:<br />
Item Description Volts<br />
1 Input from BICS Auxiliary Deactivation 12.0<br />
2 For future use<br />
3 For future use<br />
4 For future use<br />
PWM TROUBLESHOOTING<br />
Conditions<br />
• Auxiliary Hydraulic Switch lights will not come ON.<br />
Check the following:<br />
PWM fuse<br />
Wires disconnected, shorted, or cut.<br />
Auxiliary hydraulic switch failure.<br />
Module failure.<br />
Use the voltage tests in the wire i<strong>de</strong>ntification<br />
section to <strong>de</strong>termine the cause.<br />
• Auxiliary Hydraulic Switch lights are flashing. See the<br />
troubleshooting chart. (See Page 8–30.)<br />
Ad<strong>de</strong>d Mar. 03<br />
A<br />
TS–01433<br />
853,853H BICS Loa<strong>de</strong>r<br />
–8–29– Service Manual
PWM TROUBLESHOOTING (Cont’d)<br />
Chart<br />
The PWM module sends a diagnostic co<strong>de</strong> to the Mo<strong>de</strong><br />
Switch lights when the conditions listed in the chart below<br />
occur.<br />
• When the lights are flashing, the key needs to be<br />
turned OFF and then ON. If the problem still exists they<br />
will continue to flash.<br />
• Proportional flow cannot be engaged if the lights are<br />
blinking.<br />
• Continuous flow (<strong>de</strong>tent) can be engaged if alternate<br />
blinking lights are off after the key switch is turned OFF<br />
and then ON (during a proportional flow switch failure).<br />
Momentary LED<br />
(Item 1) [A]<br />
Light Blinking<br />
Light Off<br />
Light Blinking<br />
*Blinking/OFF<br />
*Alternate Blinking Lights<br />
Ad<strong>de</strong>d Mar. 03<br />
Detent LED<br />
(Item 2) [A] PROBLEM AREA PROBLEM CAUSE<br />
Light OFF<br />
Light Blinking<br />
Light Blinking<br />
*OFF/Blinking<br />
Base End Solenoid or Wiring<br />
Rod End Solenoid or Wiring<br />
Diverter Solenoid or Wiring<br />
Proportional Flow Switch<br />
(Right Handle)<br />
–8–30–<br />
A<br />
1<br />
2<br />
• Wires Disconnected<br />
• Wires Shorted<br />
• Wires Cut<br />
• Solenoid failed. Perform solenoid<br />
coil test.<br />
• PWM module failed.<br />
• Wires Disconnected<br />
• Wires Shorted<br />
• Wires Cut<br />
• Solenoid failed. Perform solenoid<br />
coil test.<br />
• PWM module failed.<br />
• Wires Disconnected<br />
• Wires Shorted<br />
• Wires Cut<br />
• Solenoid failed. Perform solenoid<br />
coil test.<br />
• PWM module failed.<br />
• Wires Disconnected<br />
• Wires Shorted<br />
• Wires Cut<br />
• Proportional flow switch failed.<br />
Check voltage to switch.<br />
Perform handle test.<br />
• PWM module failed.<br />
P–03272<br />
853, 853H BICS Loa<strong>de</strong>r<br />
Service Manual
PWM CONTROL HANDLE<br />
Handle Testing<br />
The right si<strong>de</strong> steering lever handle switch (Item 1) [A]<br />
controls the proportional flow to front auxiliary. Test the<br />
switch with a Ohm test meter.<br />
Disconnect the handle switch harness from the controls<br />
harness. Use the chart below to test the handle switch.<br />
Test between<br />
handle wires<br />
White/Black<br />
& White<br />
White/Red<br />
& White<br />
White/Red &<br />
White/Black<br />
Full Left<br />
No<br />
Test<br />
1.3–1.5<br />
Ohms<br />
3.8–4.0<br />
Ohms<br />
Handle Switch Position<br />
Center<br />
4.8–5.2<br />
Ohms<br />
2.6–2.8<br />
Ohms<br />
2.6–2.8<br />
Ohms<br />
Full Right<br />
No<br />
Test<br />
3.8–4.0<br />
Ohms<br />
1.3–1.5<br />
Ohms<br />
NOTE: Push the switch gradually from center to<br />
either left or right. The Ohm reading must<br />
change gradually. Replace the handle switch<br />
assembly if required.<br />
PWM ELECTRIC SOLENOID<br />
Solenoid Coil Testing<br />
The front auxiliary solenoid valves (Item 1) [B] are located<br />
in the hydraulic control valve. Test the solenoid coils with<br />
a Ohm test meter.<br />
Disconnect the coil from the controls harness. The correct<br />
reading is 1–5 Ohms.<br />
Ad<strong>de</strong>d Mar. 03<br />
A<br />
B<br />
1<br />
1<br />
P–02129<br />
N–00076<br />
853,853H BICS Loa<strong>de</strong>r<br />
–8–31– Service Manual
ELECTRICAL/HYDRAULIC CONTROLS REFERENCE<br />
Controls I<strong>de</strong>ntification Chart<br />
Left Si<strong>de</strong><br />
Control Handle<br />
Switches<br />
Switch<br />
Number<br />
1<br />
2<br />
3<br />
4<br />
5<br />
6<br />
7<br />
8<br />
9<br />
10, 11, 12,<br />
13, 14<br />
Solenoid<br />
Number<br />
Activated<br />
RH HFH<br />
1 1 1,8<br />
2 2 2<br />
1 1 1,8<br />
2 2,3 6,7<br />
1 1,3 5,7<br />
1 1,3 5,7<br />
1 1,3 5,7<br />
1 1,3 5,7<br />
1 1,3 5,7<br />
– –– ––<br />
Attachment<br />
Harness<br />
Terminal<br />
Activated<br />
K<br />
K<br />
K<br />
K, A, D<br />
K, A, C<br />
K, E<br />
K, F<br />
K, G<br />
K, H<br />
K<br />
Attachment<br />
Harness<br />
Connector<br />
Viewed from front<br />
(pin si<strong>de</strong> of connector)<br />
of loa<strong>de</strong>r.<br />
Solenoid<br />
Number<br />
1<br />
2<br />
3 (Top)<br />
4 (Bottom)<br />
5<br />
6<br />
7 (Bottom)<br />
8 (Middle)<br />
9 (Top)<br />
Hydraulic<br />
Coupler<br />
Front<br />
Female<br />
Front<br />
Male<br />
Diverter<br />
Bleed – Rear<br />
Male & Female<br />
Rear<br />
Female<br />
Rear<br />
Male<br />
Diverter<br />
High<br />
Flow<br />
Bleed – Rear<br />
Male & Female<br />
Right Si<strong>de</strong><br />
Control Handle<br />
Switches<br />
RH – Loa<strong>de</strong>rs with Rear Hydraulics Option.<br />
HFH – Loa<strong>de</strong>rs with High Flow Hydraulics Option.<br />
* If harness terminals K & L are jumped together, switches 4 thru 9 will function the same as switch 3.<br />
2<br />
2<br />
*<br />
9<br />
3<br />
5<br />
1<br />
1<br />
8<br />
4<br />
6<br />
7<br />
8<br />
5<br />
3<br />
8<br />
5<br />
3<br />
H<br />
MC–02314<br />
Wiring<br />
Color<br />
Dk. Green/<br />
Red<br />
Dk. Green/<br />
Lt. Green<br />
Yellow<br />
Dk. Green/<br />
Yellow<br />
Yellow/<br />
Lt. Green<br />
Yellow/<br />
Brown<br />
Yellow<br />
Lt. Blue/<br />
Red<br />
Dk. Green/<br />
Yellow<br />
NOTE: The Key Switch fully left position activates solenoids number 1, 4 and 9. The high flow rocker switch in<br />
the left si<strong>de</strong> instrument panel must be ON to activate solenoid number 8.<br />
Ad<strong>de</strong>d Mar. 03 –8–32–<br />
853, 853H BICS Loa<strong>de</strong>r<br />
Service Manual
SPECIFICATIONS<br />
Page<br />
Number<br />
DECIMAL & MILLIMETER EQUIVALENTS<br />
Chart . . . . . . . . . . . . . . . . . . . . . . . . . . . . . . . . . . . . . . . . . . . . . . . . . . . . . . . . 9–13<br />
ENGINE SPECIFICATIONS<br />
Camshaft . . . . . . . . . . . . . . . . . . . . . . . . . . . . . . . . . . . . . . . . . . . . . . . . . . . . 9–6<br />
Connecting Rod & Bearing . . . . . . . . . . . . . . . . . . . . . . . . . . . . . . . . . . . . . 9–6<br />
Crankshaft . . . . . . . . . . . . . . . . . . . . . . . . . . . . . . . . . . . . . . . . . . . . . . . . . . . 9–7<br />
Cylin<strong>de</strong>r Head . . . . . . . . . . . . . . . . . . . . . . . . . . . . . . . . . . . . . . . . . . . . . . . . 9–5<br />
Cylin<strong>de</strong>r Liners . . . . . . . . . . . . . . . . . . . . . . . . . . . . . . . . . . . . . . . . . . . . . . . . 9–6<br />
Fuel System . . . . . . . . . . . . . . . . . . . . . . . . . . . . . . . . . . . . . . . . . . . . . . . . . . 9–7<br />
Idler Gear . . . . . . . . . . . . . . . . . . . . . . . . . . . . . . . . . . . . . . . . . . . . . . . . . . . . 9–7<br />
Oil Pump . . . . . . . . . . . . . . . . . . . . . . . . . . . . . . . . . . . . . . . . . . . . . . . . . . . . . 9–7<br />
Pistons, Pins & Rings . . . . . . . . . . . . . . . . . . . . . . . . . . . . . . . . . . . . . . . . . . 9–6<br />
Rocker Arm . . . . . . . . . . . . . . . . . . . . . . . . . . . . . . . . . . . . . . . . . . . . . . . . . . 9–5<br />
Tappets . . . . . . . . . . . . . . . . . . . . . . . . . . . . . . . . . . . . . . . . . . . . . . . . . . . . . . 9–6<br />
Torque for General Metric Bolts . . . . . . . . . . . . . . . . . . . . . . . . . . . . . . . . . 9–8<br />
Valve Springs . . . . . . . . . . . . . . . . . . . . . . . . . . . . . . . . . . . . . . . . . . . . . . . . . 9–5<br />
Valve, Valve Gui<strong>de</strong> & Seat Insert . . . . . . . . . . . . . . . . . . . . . . . . . . . . . . . . 9–5<br />
HYDRAULIC/HYDROSTATIC FLUID SPECIFICATIONS<br />
Specifications . . . . . . . . . . . . . . . . . . . . . . . . . . . . . . . . . . . . . . . . . . . . . . . . . . 9–11<br />
LOADER SPECIFICATIONS<br />
Capacities . . . . . . . . . . . . . . . . . . . . . . . . . . . . . . . . . . . . . . . . . . . . . . . . . . . . 9–4<br />
Drive System . . . . . . . . . . . . . . . . . . . . . . . . . . . . . . . . . . . . . . . . . . . . . . . . . 9–4<br />
Electrical . . . . . . . . . . . . . . . . . . . . . . . . . . . . . . . . . . . . . . . . . . . . . . . . . . . . . 9–4<br />
Engine . . . . . . . . . . . . . . . . . . . . . . . . . . . . . . . . . . . . . . . . . . . . . . . . . . . . . . . 9–3<br />
Hydraulic System . . . . . . . . . . . . . . . . . . . . . . . . . . . . . . . . . . . . . . . . . . . . . 9–4<br />
Loa<strong>de</strong>r Dimensions . . . . . . . . . . . . . . . . . . . . . . . . . . . . . . . . . . . . . . . . . . . . 9–3<br />
Operation & Performance . . . . . . . . . . . . . . . . . . . . . . . . . . . . . . . . . . . . . . 9–3<br />
Tires . . . . . . . . . . . . . . . . . . . . . . . . . . . . . . . . . . . . . . . . . . . . . . . . . . . . . . . . . 9–4<br />
Vibration Data . . . . . . . . . . . . . . . . . . . . . . . . . . . . . . . . . . . . . . . . . . . . . . . . 9–4<br />
U.S. TO METRIC CONVERSION<br />
Chart . . . . . . . . . . . . . . . . . . . . . . . . . . . . . . . . . . . . . . . . . . . . . . . . . . . . . . . . 9–13<br />
STANDARD TORQUE SPECIFICATIONS FOR BOLTS<br />
Chart . . . . . . . . . . . . . . . . . . . . . . . . . . . . . . . . . . . . . . . . . . . . . . . . . . . . . . . . 9–12<br />
TORQUE SPECIFICATIONS FOR LOADER<br />
Specifications . . . . . . . . . . . . . . . . . . . . . . . . . . . . . . . . . . . . . . . . . . . . . . . . . 9–9<br />
SPECIFICATIONS<br />
853, 853H BICS Loa<strong>de</strong>r<br />
–9–1– Service Manual
–9–2–<br />
853, 853H BICS Loa<strong>de</strong>r<br />
Service Manual
LOADER SPECIFICATIONS<br />
LOADER DIMENSIONS<br />
80.9<br />
(2055)<br />
30 o<br />
8.0<br />
(204)<br />
*101.8<br />
(2586)<br />
38.6<br />
(980)<br />
OPERATION & PERFORMANCE<br />
40 o<br />
45 o<br />
• Dimensions are given for loa<strong>de</strong>r equipped with standard tires and dirt bucket.<br />
Dimensions may vary with other types. All dimensions are shown in inches. Respective<br />
metric dimensions are given in millimeters enclosed by parentheses.<br />
• Where applicable, specifications conform to SAE/ISO standards and are subject to<br />
change without notice.<br />
96 o<br />
25.12<br />
(638)<br />
6.2<br />
(157)<br />
23.0<br />
(584)<br />
128.5<br />
(3264)<br />
93.1<br />
(2365)<br />
84.0<br />
(2134)<br />
119.6<br />
(3038)<br />
153.3<br />
(3894)<br />
* Overall Length W/O Bucket<br />
This loa<strong>de</strong>r was <strong>de</strong>signed without counterweights or ballasts. Changes of structure or weight distribution of<br />
the loa<strong>de</strong>r can cause changes in control and steering response and can cause failure of the loa<strong>de</strong>r parts.<br />
Weights<br />
Operating Weight . . . . . . . . . . . . . . . . . . .<br />
Rated Operating Capcity . . . . . . . . . . . . .<br />
Tipping Load . . . . . . . . . . . . . . . . . . . . . . .<br />
6500 lbs. (2950 kg)<br />
1700 lbs. (772 kg)<br />
3420 lbs. (1533 kg)<br />
Travel Speed . . . . . . . . . . . . . . . . . . . . . . . .<br />
Controls<br />
Infinitely variable 0–6.3 MPH (10,1 km/hr.)<br />
Vehicle . . . . . . . . . . . . . . . . . . . . . . . . . . . .<br />
Loa<strong>de</strong>r Function . . . . . . . . . . . . . . . . . . . .<br />
Direction & speed controlled by two hand levers.<br />
Lift, tilt functions controlled by separate foot pedals. Auxiliary functions controlled by<br />
electrical push buttons on steering levers and toggle switch in operator area.<br />
Engine . . . . . . . . . . . . . . . . . . . . . . . . . . . . .<br />
Main Drive . . . . . . . . . . . . . . . . . . . . . . . . .<br />
Service Brake . . . . . . . . . . . . . . . . . . . . . .<br />
Hand lever throttle; key–type starter switch.<br />
Hydrostatic<br />
Two in<strong>de</strong>pen<strong>de</strong>nt hydrostatic drive systems controlled by two hand operated<br />
Secondary Brake . . . . . . . . . . . . . . . . . . . .<br />
Parking Brake . . . . . . . . . . . . . . . . . . . . . .<br />
steering levers.<br />
One of the hydrostatic transmissions.<br />
Spring Actuated mechanical traction lock set when seat bar is up,<br />
key is turned off or when foot pedal is engaged.<br />
ENGINE<br />
Make . . . . . . . . . . . . . . . . . . . . . . . . . . . . . .<br />
Isuzu<br />
Mo<strong>de</strong>l . . . . . . . . . . . . . . . . . . . . . . . . . . . . .<br />
4JB1 PK–03<br />
Fuel . . . . . . . . . . . . . . . . . . . . . . . . . . . . . . .<br />
Diesel<br />
Horsepower . . . . . . . . . . . . . . . . . . . . . . . .<br />
[62 HP (46 kW) Gross] [58 HP (43 kW) Net]<br />
Maximum Governed RPM . . . . . . . . . . . .<br />
2600 RPM<br />
Torque . . . . . . . . . . . . . . . . . . . . . . . . . . . . .<br />
Gross: 130 ft.–lbs. (176 Nm) @ 1600 RPM Net: 127 ft.–lbs. (172 Nm)<br />
Number of Cylin<strong>de</strong>rs . . . . . . . . . . . . . . . . .<br />
Four<br />
Bore/Stroke . . . . . . . . . . . . . . . . . . . . . . . .<br />
3.66/4.02 (93/102)<br />
Displacement . . . . . . . . . . . . . . . . . . . . . . .<br />
169 cu.in. (2769 cu. cm.)<br />
Cooling System . . . . . . . . . . . . . . . . . . . . .<br />
Liquid<br />
Lubrication . . . . . . . . . . . . . . . . . . . . . . . . .<br />
Pressure System W/Filter<br />
Crankcase Ventilation . . . . . . . . . . . . . . . .<br />
External<br />
Air Cleaner . . . . . . . . . . . . . . . . . . . . . . . . .<br />
Dry replaceable cartridge, dual safety element<br />
Ignition . . . . . . . . . . . . . . . . . . . . . . . . . . . .<br />
Diesel–Compression<br />
Low Idle . . . . . . . . . . . . . . . . . . . . . . . . . . .<br />
1150 RPM<br />
High Idle . . . . . . . . . . . . . . . . . . . . . . . . . . .<br />
2800 RPM<br />
26 o<br />
76.2<br />
(1935)<br />
61.5<br />
(1562)<br />
51.8<br />
(1316)<br />
61.5<br />
(1562)<br />
60.9<br />
(1547)<br />
48.3<br />
(1227)<br />
MC–1113<br />
853, 853H BICS Loa<strong>de</strong>r<br />
–9–3– Service Manual
LOADER SPECIFICATIONS (Cont’d)<br />
HYDRAULIC SYSTEM<br />
Pump . . . . . . . . . . . . . . . . . . . . . . . . . . . . . .<br />
Engine driven gear type<br />
Pump Capacity . . . . . . . . . . . . . . . . . . . . .<br />
Hi Flow Pump Capacity (Optional) . . . . .<br />
18.0 GPM (68,1 L/min.) @ 2750 RPM @ 1150 PSI (7929 kPa)<br />
24 GPM (90,8 L/min.) @ 2750 RPM @ 1150 PSI (7929 kPa)<br />
System Main Relief . . . . . . . . . . . . . . . . . .<br />
Hi Flow Main Relief (Optional) . . . . . . . .<br />
2700–2750 PSI (18617–18961 kPa) @ Quick Couplers<br />
3300 PSI (22754 kPa) @ Quick Couplers<br />
Filters . . . . . . . . . . . . . . . . . . . . . . . . . . . . .<br />
Two full flow replaceable 3 media synthetic element<br />
Two 90 micron motor case drain filters<br />
Hydraulic Cylin<strong>de</strong>rs . . . . . . . . . . . . . . . . . . .<br />
Doubleacting<br />
Bore Diameter:<br />
Lift Cylin<strong>de</strong>r (2)<br />
Tilt Cylin<strong>de</strong>r (1)<br />
. . . . . . . . . . . . . . . . . . . .<br />
. . . . . . . . . . . . . . . . . . . .<br />
2.25 (57,2)<br />
3.25 (82,6)<br />
Rod Diameter:<br />
Lift Cylin<strong>de</strong>r (2) . . . . . . . . . . . . . . . . . . . .<br />
1.50 (38,1)<br />
Tilt Cylin<strong>de</strong>r (1)<br />
Stroke:<br />
. . . . . . . . . . . . . . . . . . . .<br />
1.50 (38,1)<br />
Lift Cylin<strong>de</strong>r (2)<br />
Tilt Cylin<strong>de</strong>r (1)<br />
. . . . . . . . . . . . . . . . . . . .<br />
. . . . . . . . . . . . . . . . . . . .<br />
33.5 (851)<br />
18.17 (462)<br />
Control Valve . . . . . . . . . . . . . . . . . . . . . . .<br />
3–spool, open center, series type W/float <strong>de</strong>tent on lift,<br />
single spool electrical control front auxiliary & electrical control rear auxiliary<br />
Fluid Lines . . . . . . . . . . . . . . . . . . . . . . . . .<br />
SAE standard tubes, hoses & fittings<br />
Hydraulic Function Time:<br />
Raise Lift Arms to Maximum Height . . . .<br />
Lower Lift Arms from Maximum Height .<br />
3.9 Seconds<br />
3.4 Seconds<br />
Move Empty Bucket to Dump Position .<br />
Move Bucket to Retracted Position . . . .<br />
2.2 Seconds<br />
1.9 Seconds<br />
Fluid Type . . . . . . . . . . . . . . . . . . . . . . . . . . .<br />
Bobcat Fluid (P/N 6563328); If fluid is not available, use<br />
10W–30/10W–40 Class SE Motor Oil for temperatures above 0oF (–18oC) & 5W–30 Motor Oil for temperatures below 0oF (–18oC). ELECTRICAL<br />
Alternator . . . . . . . . . . . . . . . . . . . . . . . . . .<br />
Belt drive, 55 amps. Open<br />
. . . . . . . . . . . . . . . . . . . . . . . . . . . .<br />
Starter . . . . . . . . . . . . . . . . . . . . . . . . . . . . .<br />
12 volt, 3.89 HP (2,9 kW)<br />
Battery 12 volt, 700 cold crank amps. @ 0 o F (–18 o C) 170 min. reserve capacity<br />
DRIVE SYSTEM<br />
Transmission . . . . . . . . . . . . . . . . . . . . . . .<br />
Final Drive . . . . . . . . . . . . . . . . . . . . . . . . .<br />
Tan<strong>de</strong>m hydro. pumps infinitely variable, driving 2 fully reversing hydrostatic motors<br />
Gear Reduction & #100 HS roller chain &<br />
sprockets in sealed chaincase with oil lubrication<br />
Total Engine to Wheel Reduction . . . . . .<br />
47:27:1<br />
CAPACITIES<br />
Cooling System . . . . . . . . . . . . . . . . . . . . .<br />
Fuel . . . . . . . . . . . . . . . . . . . . . . . . . . . . . . .<br />
22 qts. (20,8 L)<br />
25 gals. (95 L)<br />
Engine Oil W/Filter . . . . . . . . . . . . . . . . . .<br />
Hydraulic Reservoir . . . . . . . . . . . . . . . . . .<br />
8 qts. (7,6 L)<br />
16.0 qts. (15.1 L)<br />
Hydraulic/Hydrostatic System . . . . . . . . .<br />
Chaincase Reservoir . . . . . . . . . . . . . . . .<br />
8 gals. (30,3 L)<br />
9 gals. (34,1 L)<br />
TIRES<br />
Recommen<strong>de</strong>d Pressure . . . . . . . . . . . . .<br />
Inflate tires to the MAXIMUM pressure shown on the si<strong>de</strong> wall of the tire.<br />
DO NOT mix brands of tires used on the same loa<strong>de</strong>r.<br />
VIBRATION DATA<br />
Hand Arm Vibration Less Than 2,5 m/sec2 . . . . . . . . . . . . . . . . . .<br />
RMS<br />
Whole Body Vibration Less Than 0,5 m/sec2 . . . . . . . . . . . . . . . .<br />
RMS<br />
Revised Mar. 03 –9–4–<br />
853, 853H BICS Loa<strong>de</strong>r<br />
Service Manual
ENGINE SPECIFICATIONS<br />
All dimensions are given in inches. Respective metric dimensions are given in millimeters enclosed by parentheses.<br />
Cylin<strong>de</strong>r Head<br />
Distortion . . . . . . . . . . . . . . . . . . . . . . . . . . . . . . . . . . . . . . . . . . . . . . . . . . . . . . . . . . . . . . . . . . . . . . . . . . . . . . . . Std. 0.002 (0,05)<br />
Limit 0.008 (0,20)<br />
Re–Grind . . . . . . . . . . . . . . . . . . . . . . . . . . . . . . . . . . . . . . . . . . . . . . . . . . . . . . . . . . . . . . . . . . . . . . . . . . . . . . . . Limit 0.012 (0,30)<br />
Valve Seat Angle . . . . . . . . . . . . . . . . . . . . . . . . . . . . . . . . . . . . . . . . . . . . . . . . . . . . . . . . . . . . . . . . . . . . . . . . . . . . . . 45 <strong>de</strong>grees<br />
Valve, Valve Gui<strong>de</strong> & Seat Insert<br />
Valve Seat Width<br />
Intake . . . . . . . . . . . . . . . . . . . . . . . . . . . . . . . . . . . . . . . . . . . . . . . . . . . . . . . . . . . . . . . . . . . . . . . . . . . . . . . . . . Std. 0.067 (1,7)<br />
Limit 0.087 (2,2)<br />
Exhaust . . . . . . . . . . . . . . . . . . . . . . . . . . . . . . . . . . . . . . . . . . . . . . . . . . . . . . . . . . . . . . . . . . . . . . . . . . . . . . . . . Std. 0.079 (2,0)<br />
Limit 0.098 (2,5)<br />
Valve Head Depth<br />
Intake . . . . . . . . . . . . . . . . . . . . . . . . . . . . . . . . . . . . . . . . . . . . . . . . . . . . . . . . . . . . . . . . . . . . . . . . . . . . . . . . . Std. 0.029 (0,73)<br />
Limit 0.05 (1,28)<br />
Exhaust . . . . . . . . . . . . . . . . . . . . . . . . . . . . . . . . . . . . . . . . . . . . . . . . . . . . . . . . . . . . . . . . . . . . . . . . . . . . . . . . Std. 0.028 (0,70)<br />
Limit 0.047 (1,2)<br />
Valve Seat Angle . . . . . . . . . . . . . . . . . . . . . . . . . . . . . . . . . . . . . . . . . . . . . . . . . . . . . . . . . . . . . . . . . . . . . . . . . . . . . . 45 <strong>de</strong>grees<br />
Valve Head Thickness . . . . . . . . . . . . . . . . . . . . . . . . . . . . . . . . . . . . . . . . . . . . . . . . . . . . . . . . . . . . . . . . . . . . . . Std. 0.07 (1,8)<br />
Limit 0.059 (1,5)<br />
Valve Stem Diameter<br />
Intake . . . . . . . . . . . . . . . . . . . . . . . . . . . . . . . . . . . . . . . . . . . . . . . . . . . . . . . . . . . . . . . . . . Std. 0.3128–0.3134 (7,945–7,960)<br />
Limit 0.310 (7,87)<br />
Exhaust . . . . . . . . . . . . . . . . . . . . . . . . . . . . . . . . . . . . . . . . . . . . . . . . . . . . . . . . . . . . . . . . . Std. 0.3119–0.3124 (7,922–7,935)<br />
Limit 0.310 (7,87)<br />
Valve & Valve Gui<strong>de</strong> Clearance<br />
Intake . . . . . . . . . . . . . . . . . . . . . . . . . . . . . . . . . . . . . . . . . . . . . . . . . . . . . . . . . . . . . . . . . . Std. 0.0015–0.0027 (0,038–0,069)<br />
Limit 0.008 (0,2)<br />
Exhaust . . . . . . . . . . . . . . . . . . . . . . . . . . . . . . . . . . . . . . . . . . . . . . . . . . . . . . . . . . . . . . . . . Std. 0.0025–0.0038 (0,064–0,097)<br />
Limit 0.010 (0,25)<br />
Valve Gui<strong>de</strong> Height . . . . . . . . . . . . . . . . . . . . . . . . . . . . . . . . . . . . . . . . . . . . . . . . . . . . . . . . . . . . . . . . . . . . . . . . . . . . . . 0.51 (13)<br />
Valve Springs<br />
Free Length<br />
Inner . . . . . . . . . . . . . . . . . . . . . . . . . . . . . . . . . . . . . . . . . . . . . . . . . . . . . . . . . . . . . . . . . . . . . . . . . . . . . . . . . . Std. 1.783 (45,3)<br />
Limit 1.748 (44,4)<br />
Outer . . . . . . . . . . . . . . . . . . . . . . . . . . . . . . . . . . . . . . . . . . . . . . . . . . . . . . . . . . . . . . . . . . . . . . . . . . . . . . . . . . Std. 1.957 (49,7)<br />
Limit 1,898 (48,2)<br />
Inclination<br />
Inner . . . . . . . . . . . . . . . . . . . . . . . . . . . . . . . . . . . . . . . . . . . . . . . . . . . . . . . . . . . . . . . . . . . . . . . . . . . . . . . . . . . Limit 0.118 (3,0)<br />
Outer . . . . . . . . . . . . . . . . . . . . . . . . . . . . . . . . . . . . . . . . . . . . . . . . . . . . . . . . . . . . . . . . . . . . . . . . . . . . . . . . . . . Limit 0.126 (3,2)<br />
Tension<br />
Inner – Set Length . . . . . . . . . . . . . . . . . . . . . . . . . . . . . . . . . . . . . . . . . . . . . . . . . . . . . . . . . . . 1.46 (37) Std. 13 lbs. (5,9 kg)<br />
Limit 11 lbs. (5,02 kg)<br />
Outer – Set Length . . . . . . . . . . . . . . . . . . . . . . . . . . . . . . . . . . . . . . . . . . . . . . . . . . . . . . . . . . 1.54 (39) Std. 46 lbs. (20,9 kg)<br />
Limit 40 lbs. (18,2 kg)<br />
Rocker Arm<br />
Shaft Diameter . . . . . . . . . . . . . . . . . . . . . . . . . . . . . . . . . . . . . . . . . . . . . . . . . . . . . . . . . . . . Std. 0.7478–0.7486 (18,99–19,01)<br />
Limit 0.7427 (18,86)<br />
Rocker Arm I.D. . . . . . . . . . . . . . . . . . . . . . . . . . . . . . . . . . . . . . . . . . . . . . . . . . . . . . . . . . . . Std. 0.7489–0.7497 (19,02–19,04)<br />
Limit 0.7505 (19,06)<br />
Clearance Between Rocker Arm & Shaft . . . . . . . . . . . . . . . . . . . . . . . . . . . . . . . . . . . . . . Std. 0.0003–0.0020 (0,008–0,05)<br />
Limit 0.0078 (0,2)<br />
Push Rod Run–Out . . . . . . . . . . . . . . . . . . . . . . . . . . . . . . . . . . . . . . . . . . . . . . . . . . . . . . . . . . . . . . . . . . . . . . . . Limit 0.012 (0,3)<br />
Tappets<br />
Diameter . . . . . . . . . . . . . . . . . . . . . . . . . . . . . . . . . . . . . . . . . . . . . . . . . . . . . . . . . . . . . . . . . . Std. 0.511–0.5114 (12,98–12,99)<br />
Limit 0.510 (12,95)<br />
Clearance . . . . . . . . . . . . . . . . . . . . . . . . . . . . . . . . . . . . . . . . . . . . . . . . . . . . . . . . . . . . . . . . . . . . . . . . . . . . . . Std. 0.0012 (0,03)<br />
Limit 0.0039 (0,10)<br />
853, 853H BICS Loa<strong>de</strong>r<br />
–9–5– Service Manual
ENGINE SPECIFICATIONS (Cont’d)<br />
All dimensions are given in inches. Respective metric dimensions are given in millimeters enclosed by parentheses.<br />
Piston, Pin & Rings<br />
Piston O.D.<br />
Piston Gra<strong>de</strong> A . . . . . . . . . . . . . . . . . . . . . . . . . . . . . . . . . . . . . . . . . . . . . . . . . . . . . . . . . . . . . . . 3.661–3.662 (92,99–93,015)<br />
Piston Gra<strong>de</strong> C . . . . . . . . . . . . . . . . . . . . . . . . . . . . . . . . . . . . . . . . . . . . . . . . . . . . . . . . . . . . . . . 3.662–3.663 (93,015–93,04)<br />
Clearance in Bore . . . . . . . . . . . . . . . . . . . . . . . . . . . . . . . . . . . . . . . . . . . . . . . . . . . . . . . . . . . Std. 0.001–0.0018 (0,025–0,04)<br />
Clearance Between Ring & Piston Groove<br />
1st Compression . . . . . . . . . . . . . . . . . . . . . . . . . . . . . . . . . . . . . . . . . . . . . . . . . . . . . . . . . . Std. 0.0035–0.0049 (0,09–0,124)<br />
Limit 0.006 (0,15)<br />
2nd Compression . . . . . . . . . . . . . . . . . . . . . . . . . . . . . . . . . . . . . . . . . . . . . . . . . . . . . . . . . . Std. 0.002–0.0033 (0,05–0,084)<br />
Limit 0.006 (0,15)<br />
Oil . . . . . . . . . . . . . . . . . . . . . . . . . . . . . . . . . . . . . . . . . . . . . . . . . . . . . . . . . . . . . . . . . . . . . . . . . Std. 0.001–0.003 (0,03–0,08)<br />
Limit 0.006 (0,15)<br />
Piston Ring Gap<br />
Compression . . . . . . . . . . . . . . . . . . . . . . . . . . . . . . . . . . . . . . . . . . . . . . . . . . . . . . . . . . . . . . . . . . Std. 0.008–0.016 (0,2–0,4)<br />
Limit 0.059 (1,5)<br />
Oil . . . . . . . . . . . . . . . . . . . . . . . . . . . . . . . . . . . . . . . . . . . . . . . . . . . . . . . . . . . . . . . . . . . . . . . . . . . Std. 0.004–0.012 (0,1–0,3)<br />
Limit 0.0059 (1,5)<br />
Piston Pin O.D. . . . . . . . . . . . . . . . . . . . . . . . . . . . . . . . . . . . . . . . . . . . . . . . . . . . . . . . . . . . . . . . . . . . . . . . . . Std. 1.220 (30,99)<br />
Limit 1.219 (30,96)<br />
Inference Fit Clearance . . . . . . . . . . . . . . . . . . . . . . . . . . . . . . . . . . . . . . . . . . . . . . . . . . . . . . . 0.00008–0.0006 (0,002–0,015)<br />
Connecting Rod & Bearing<br />
Connecting Rod Misalignment . . . . . . . . . . . . . . . . . . . . . . . . . . . . . . . . . . . . . . . . . . . . . . . . . . . . . . . . Std. 0.002 (0,05) or less<br />
Limit 0.0079 (0,2)<br />
Small End Bushing I.D. . . . . . . . . . . . . . . . . . . . . . . . . . . . . . . . . . . . . . . . . . . . . . . . . . . . . Std. 12208–1.2211 (31,008–31,06)<br />
Clearance Between Piston Pin &<br />
Small End Bushing . . . . . . . . . . . . . . . . . . . . . . . . . . . . . . . . . . . . . . . . . . . . . . . . . . . . . . . . St. 0.0003–0.00079 (0,008–0,20)<br />
Limit 0.0002 (0,05)<br />
Clearance Between Crankshaft Journal &<br />
Bearing . . . . . . . . . . . . . . . . . . . . . . . . . . . . . . . . . . . . . . . . . . . . . . . . . . . . . . . . . . . . . . . . . . Std. 0.001–0.0026 (0,029–0,066)<br />
Limit 0.004 (0,10)<br />
Cylin<strong>de</strong>r Liners<br />
Cylin<strong>de</strong>r Liner I.D. . . . . . . . . . . . . . . . . . . . . . . . . . . . . . . . . . . . . . . . . . . . . . . . . . . . . . . . . . Std. 3.6622–2.6638 (93,02–93,06)<br />
Limit 3.6653 (93,10)<br />
Inference Fit in Block . . . . . . . . . . . . . . . . . . . . . . . . . . . . . . . . . . . . . . . . . . . . . . . . . . . . . . . . 0.00004–0.00075 (0,001–0,019)<br />
Projection Above Block . . . . . . . . . . . . . . . . . . . . . . . . . . . . . . . . . . . . . . . . . . . . . . . . . . . . . . . . . . . . . . .<br />
Cylin<strong>de</strong>r Liner Bore I.D.<br />
0.0–0.0039 (0,0–0,01)<br />
Piston Gra<strong>de</strong> A . . . . . . . . . . . . . . . . . . . . . . . . . . . . . . . . . . . . . . . . . . . . . . . . . . . . . Min. Dia. 3.6622–3.6630 (93,01–93,04)<br />
Piston Gra<strong>de</strong> C . . . . . . . . . . . . . . . . . . . . . . . . . . . . . . . . . . . . . . . . . . . . . . . . . . . . . Min. Dia. 3.6630–3.6638 (93,04–93,06)<br />
Camshaft<br />
Gear Backlash . . . . . . . . . . . . . . . . . . . . . . . . . . . . . . . . . . . . . . . . . . . . . . . . . . . . . . . . . . . . . . . . Std. 0.004–0.007 (0,10–0,17)<br />
Limit 0.012 (0,3)<br />
End Play . . . . . . . . . . . . . . . . . . . . . . . . . . . . . . . . . . . . . . . . . . . . . . . . . . . . . . . . . . . . . . . . . . Std. 0.0002–0.0045 (0,05–0,114)<br />
Limit 0.0079 (0,2)<br />
Journal Diameter . . . . . . . . . . . . . . . . . . . . . . . . . . . . . . . . . . . . . . . . . . . . . . . . . . . . . . . . Std. 1.9663–1.9675 (49,944–49,975)<br />
Limit 1.9528 (49,60)<br />
Camshaft Bearing I.D. . . . . . . . . . . . . . . . . . . . . . . . . . . . . . . . . . . . . . . . . . . . . . . . . . . . . . . Std. 1.9685–1.9697 (50,0–50,03)<br />
Clearance . . . . . . . . . . . . . . . . . . . . . . . . . . . . . . . . . . . . . . . . . . . . . . . . . . . . . . . . . . . . . . . . . . . . . . . . . . . . . . Std. 0.0020 (0,05)<br />
Limit 0.0047 (0,12)<br />
Camshaft Run–Out . . . . . . . . . . . . . . . . . . . . . . . . . . . . . . . . . . . . . . . . . . . . . . . . . . . . . . . . . . . . . . . . . . . . . . . Limit 0.0039 (0,1)<br />
Cam Lobe Height . . . . . . . . . . . . . . . . . . . . . . . . . . . . . . . . . . . . . . . . . . . . . . . . . . . . . . . . . . . . . . . . . . . . . . . . Std. 1.654 (42,01)<br />
Limit 1.640 (41,66)<br />
–9–6–<br />
853, 853H BICS Loa<strong>de</strong>r<br />
Service Manual
ENGINE SPECIFICATIONS (Cont’d)<br />
All dimensions are given in inches. Respective metric dimensions are given in millimeters enclosed by parentheses.<br />
NOTE: Crankshaft is Tuffri<strong>de</strong> coated and cannot be re–ground.<br />
Crankshaft<br />
End Play . . . . . . . . . . . . . . . . . . . . . . . . . . . . . . . . . . . . . . . . . . . . . . . . . . . . . . . . . . . . . . . . . . . . . . . . . . . . . . . . . Std. 0.004 (0,1)<br />
Limit 0.012 (0,31)<br />
Connecting Rod Journal O.D. . . . . . . . . . . . . . . . . . . . . . . . . . . . . . . . . . . . . . . . . . . . . . . . Std. 2.0833–2.0839 (52,92–52,93)<br />
Limit 2.0829 (52,91)<br />
Main Bearing Journal O.D. . . . . . . . . . . . . . . . . . . . . . . . . . . . . . . . . . . . . . . . . . . . . . . . . . . Std. 2.7526–2.7532 (69,92–69,93)<br />
Limit 2.7524 (69,91)<br />
Clearance Between Journal & Main Bearing . . . . . . . . . . . . . . . . . . . . . . . . . . . . . . . . . . . Std. 0.0014–0.0041 (0,035–0,080)<br />
Limit 0.0043 (0,11)<br />
Crankshaft Run–Out . . . . . . . . . . . . . . . . . . . . . . . . . . . . . . . . . . . . . . . . . . . . . . . . . . . . . . . . . . . . . . . . Std. 0.002 (0,05) or less<br />
Limit 0.003 (0,08)<br />
Idler Gear<br />
End Play . . . . . . . . . . . . . . . . . . . . . . . . . . . . . . . . . . . . . . . . . . . . . . . . . . . . . . . . . . . . . . . . . . . . . . . . . . . . . . . . Std. 0.003 (0,07)<br />
Limit 0.008 (0,2)<br />
Backlash . . . . . . . . . . . . . . . . . . . . . . . . . . . . . . . . . . . . . . . . . . . . . . . . . . . . . . . . . . . . . . . . . . . . Std. 0.004–0.007 (0,10–0,017)<br />
Limit 0.012 (0,3)<br />
Idler Gear Hub O.D. . . . . . . . . . . . . . . . . . . . . . . . . . . . . . . . . . . . . . . . . . . . . . . . . . . . . . . . Std. 1.7695–1.7707 (44,95–44,98)<br />
Limit 1.7656 (44,85)<br />
Clearance Between Hub & Gear . . . . . . . . . . . . . . . . . . . . . . . . . . . . . . . . . . . . . . . . . . . . . . Std. 0.0009–0.003 (0,025–0,085)<br />
Limit 0.0079 (0,2)<br />
Bearing Replacement<br />
Projection . . . . . . . . . . . . . . . . . . . . . . . . . . . . . . . . . . . . . . . . . . . . . . . . . . . . . . . . . . . . . . . . . . . . . . . . . 0.016–0.024 (0,4–0,6)<br />
Height . . . . . . . . . . . . . . . . . . . . . . . . . . . . . . . . . . . . . . . . . . . . . . . . . . . . . . . . . . . . . . . . . . . . . . . . . . 0.933–0.945 (23,7–24,0)<br />
Oil Pump<br />
End Play Between Vane & Body . . . . . . . . . . . . . . . . . . . . . . . . . . . . . . . . . . . . . . . . . . . . . . . Std. 0.0008–0.0028 (0,02–0,07)<br />
Limit 0.0059 (0,15)<br />
Clearance Between Rotor & Vane . . . . . . . . . . . . . . . . . . . . . . . . . . . . . . . . . . . . . . . . . . . . . . . . . . . Std. 0.0055 (0,14) or less<br />
Clearance Between Vane & Body . . . . . . . . . . . . . . . . . . . . . . . . . . . . . . . . . . . . . . . . . . . . . . . Std. 0.0079–0.0105 (0,2–0,27)<br />
Clearance Between Rotor Shaft & Body . . . . . . . . . . . . . . . . . . . . . . . . . . . . . . . . . . . . . . . . . . . . . . . . . . . . Std. 0.0016 (0,04)<br />
Limit 0.0079 (0,2)<br />
Oil Pump Pressure . . . . . . . . . . . . . . . . . . . . . . . . . . . . . . . . . . . . . . . . . . . . . . . . . . . 57–71 PSI (393–490 kPa) @ 1400 RPM<br />
21 PSI (145 kPa) @ Idle RPM<br />
Fuel System<br />
Pump Type . . . . . . . . . . . . . . . . . . . . . . . . . . . . . . . . . . . . . . . . . . . . . . . . . . . . . . . . . . . . . . . . . . . . . . . . . . . . . . . . . . . . Bosch VE<br />
Nozzles . . . . . . . . . . . . . . . . . . . . . . . . . . . . . . . . . . . . . . . . . . . . . . . . . . . . . . . . . . . . . . . . . . . . . . . Bosch Multi–hole (4 orifices)<br />
Injector Pressure (Opening) . . . . . . . . . . . . . . . . . . . . . . . . . . . . . . . . . . . . . . . . . . . . . . . . . . . . . . . . . . . 2630 PSI (18134 kPa)<br />
Supple Pump Pressure<br />
Idle RPM . . . . . . . . . . . . . . . . . . . . . . . . . . . . . . . . . . . . . . . . . . . . . . . . . . . . . . . . . . . . . . . . . . . . . . . . . . . . . . . 37 PSI (255 kPa)<br />
High Idler RPM . . . . . . . . . . . . . . . . . . . . . . . . . . . . . . . . . . . . . . . . . . . . . . . . . . . . . . . . . . . . . . . . . . . . . . . . . 71 PSI (490 kPa)<br />
Injection Pump Timing . . . . . . . . . . . . . . . . . . . . . . . . . . . . . . . . . . . . . . . . . . . . . . . . . . . . . . . . . . . . . . . . . . . . . . . . . . 17° BTDC<br />
853, 853H BICS Loa<strong>de</strong>r<br />
–9–7– Service Manual
ENGINE SPECIFICATIONS (Cont’d)<br />
Torque For General Metric Bolts<br />
Material<br />
Thread Size<br />
(Dia. x Pitch) Head Mark 4 Head Mark 7 Head Mark 10<br />
M 5 x 0.8 3–4 ft.–lbs.<br />
(4–5 Nm)<br />
M 6 x 1.0 6–7 ft.–lbs. 6–9 ft.–lbs.<br />
(8–9 Nm) (8–12 Nm)<br />
M 8 x 1.25 6–9 ft.–lbs. 11–16 ft.–lbs. 18–25 ft.–lbs.<br />
(8–12 Nm) (15–22 Nm) (24–34 Nm)<br />
M 10 x 1.25 13–18 ft.–lbs. 22–30 ft.–lbs. 36–50 ft.–lbs.<br />
(18–24 Nm) (30–41 Nm) (49–68 Nm)<br />
M 12 x 1.25 22–30 ft.–lbs. 40–54 ft.–lbs. 69–87 ft.–lbs.<br />
(30–41 Nm) (54–73 Nm) (94–118 Nm)<br />
M 14 x 1.25 36–50 ft.–lbs. 58–80 ft.–lbs. 116–137 ft.–lbs.<br />
(49–68 Nm) (79–108 Nm) (157–186 Nm)<br />
–9–8–<br />
853, 853H BICS Loa<strong>de</strong>r<br />
Service Manual
TORQUE SPECIFICATIONS FOR LOADER<br />
Specifications<br />
Item Ft.–Lbs. Nm<br />
Air Cleaner Mounting Bolts . . . . . . . . . . . . . . . . . . . . . . . . . . . . . . . . . . . . . . . . . . . . . . . . . . . . . 25–28 34–38<br />
Alternator Pulley Nut . . . . . . . . . . . . . . . . . . . . . . . . . . . . . . . . . . . . . . . . . . . . . . . . . . . . . . . . . . .<br />
50 68<br />
Axle Hub Mounting Bolt . . . . . . . . . . . . . . . . . . . . . . . . . . . . . . . . . . . . . . . . . . . . . . . . . . . . . . . . 175–190 237–258<br />
Axle Sprocket Bolt . . . . . . . . . . . . . . . . . . . . . . . . . . . . . . . . . . . . . . . . . . . . . . . . . . . . . . . . . . . . . 475–525 644–710<br />
Bob–Tach Pivot Pin Bolts . . . . . . . . . . . . . . . . . . . . . . . . . . . . . . . . . . . . . . . . . . . . . . . . . . . . . . . 220–245 198–332<br />
Bob–Tach Lever Pivot Bolt . . . . . . . . . . . . . . . . . . . . . . . . . . . . . . . . . . . . . . . . . . . . . . . . . . . . . . 25–28 34–38<br />
Brake Block Mounting Bolts . . . . . . . . . . . . . . . . . . . . . . . . . . . . . . . . . . . . . . . . . . . . . . . . . . . . . 65–70 88–95<br />
Brake Lever Bolt . . . . . . . . . . . . . . . . . . . . . . . . . . . . . . . . . . . . . . . . . . . . . . . . . . . . . . . . . . . . . . 65–70 88–95<br />
Brake Pad Mounting Bolts . . . . . . . . . . . . . . . . . . . . . . . . . . . . . . . . . . . . . . . . . . . . . . . . . . . . . . 65–70 88–95<br />
Camshaft Gear Bolts . . . . . . . . . . . . . . . . . . . . . . . . . . . . . . . . . . . . . . . . . . . . . . . . . . . . . . . . . .<br />
Camshaft Retainer Plate Bolts . . . . . . . . . . . . . . . . . . . . . . . . . . . . . . . . . . . . . . . . . . . . . . . . . .<br />
72–87<br />
11–17<br />
98–118<br />
15–23<br />
Chaincase to Main Frame Bolts & Nuts . . . . . . . . . . . . . . . . . . . . . . . . . . . . . . . . . . . . . . . . . . .<br />
Connecting Rod Bolts . . . . . . . . . . . . . . . . . . . . . . . . . . . . . . . . . . . . . . . . . . . . . . . . . . . . . . . . . .<br />
Control Pedal Linkage Bolts . . . . . . . . . . . . . . . . . . . . . . . . . . . . . . . . . . . . . . . . . . . . . . . . . . . . .<br />
Control Valve Mounting Bolts & Nuts . . . . . . . . . . . . . . . . . . . . . . . . . . . . . . . . . . . . . . . . . . . . .<br />
Crankshaft Pulley Nut . . . . . . . . . . . . . . . . . . . . . . . . . . . . . . . . . . . . . . . . . . . . . . . . . . . . . . . . . .<br />
Cylin<strong>de</strong>r Head Bolts . . . . . . . . . . . . . . . . . . . . . . . . . . . . . . . . . . . . . . . . . . . . . . . . . . . . . . . . . . .<br />
90–100<br />
58–65<br />
21–25<br />
15–16<br />
123–152<br />
New 57–67<br />
Used 72–80<br />
122–136<br />
79–88<br />
28–34<br />
20–22<br />
167–206<br />
77–91<br />
98–108<br />
Exhaust Manifold Bolts . . . . . . . . . . . . . . . . . . . . . . . . . . . . . . . . . . . . . . . . . . . . . . . . . . . . . . . . . 10–17 14–23<br />
Exhaust Pipe to Exhaust Manifold . . . . . . . . . . . . . . . . . . . . . . . . . . . . . . . . . . . . . . . . . . . . . . . 20–35 27–47<br />
Flywheel Bolts . . . . . . . . . . . . . . . . . . . . . . . . . . . . . . . . . . . . . . . . . . . . . . . . . . . . . . . . . . . . . . . . 83–90 113–122<br />
Front Panel Bolts . . . . . . . . . . . . . . . . . . . . . . . . . . . . . . . . . . . . . . . . . . . . . . . . . . . . . . . . . . . . . . 16–20 22–27<br />
Fuel Injector Holddown Nut . . . . . . . . . . . . . . . . . . . . . . . . . . . . . . . . . . . . . . . . . . . . . . . . . . . . . 23–32 31–43<br />
Glow Plug . . . . . . . . . . . . . . . . . . . . . . . . . . . . . . . . . . . . . . . . . . . . . . . . . . . . . . . . . . . . . . . . . . . . 15–18 20–24<br />
High Pressure Tubeline Fittings . . . . . . . . . . . . . . . . . . . . . . . . . . . . . . . . . . . . . . . . . . . . . . . . .<br />
Hydraulic Housing Mounting Bolts . . . . . . . . . . . . . . . . . . . . . . . . . . . . . . . . . . . . . . . . . . . . . . .<br />
Hydraulic Reservoir Strap Bolts . . . . . . . . . . . . . . . . . . . . . . . . . . . . . . . . . . . . . . . . . . . . . . . . .<br />
Hydrostatic Motor Mounting Bolts . . . . . . . . . . . . . . . . . . . . . . . . . . . . . . . . . . . . . . . . . . . . . . . .<br />
14–29<br />
25<br />
16–20<br />
65–70<br />
19–39<br />
34<br />
22–27<br />
88–95<br />
Hydrostatic Pump Mounting Bolts . . . . . . . . . . . . . . . . . . . . . . . . . . . . . . . . . . . . . . . . . . . . . . . .<br />
Hydrostatic Pump Pulley Bolt . . . . . . . . . . . . . . . . . . . . . . . . . . . . . . . . . . . . . . . . . . . . . . . . . . .<br />
65–70<br />
175–200<br />
88–95<br />
237–271<br />
Idler Gear Bolts . . . . . . . . . . . . . . . . . . . . . . . . . . . . . . . . . . . . . . . . . . . . . . . . . . . . . . . . . . . . . . . 10–12 14–16<br />
Injection Nozzles . . . . . . . . . . . . . . . . . . . . . . . . . . . . . . . . . . . . . . . . . . . . . . . . . . . . . . . . . . . . . . 36–51 46–69<br />
Injector Nozzle Body . . . . . . . . . . . . . . . . . . . . . . . . . . . . . . . . . . . . . . . . . . . . . . . . . . . . . . . . . . . 43–58 59–79<br />
Injection Pump Gear Bolt . . . . . . . . . . . . . . . . . . . . . . . . . . . . . . . . . . . . . . . . . . . . . . . . . . . . . . . 43–51 58–69<br />
Injection Pump Idler Gear Bolt . . . . . . . . . . . . . . . . . . . . . . . . . . . . . . . . . . . . . . . . . . . . . . . . . . 72–87 98–118<br />
Injection Pump Mounting Bolts . . . . . . . . . . . . . . . . . . . . . . . . . . . . . . . . . . . . . . . . . . . . . . . . . . 10–17 14–23<br />
Intake Manifold Bolts . . . . . . . . . . . . . . . . . . . . . . . . . . . . . . . . . . . . . . . . . . . . . . . . . . . . . . . . . . . 10–17 14–23<br />
Main Bearing Cap Bolts . . . . . . . . . . . . . . . . . . . . . . . . . . . . . . . . . . . . . . . . . . . . . . . . . . . . . . . . 116–130 157–176<br />
Main Relief Valve . . . . . . . . . . . . . . . . . . . . . . . . . . . . . . . . . . . . . . . . . . . . . . . . . . . . . . . . . . . . . . 35–40 47–54<br />
Oil Filter Housing Bolts . . . . . . . . . . . . . . . . . . . . . . . . . . . . . . . . . . . . . . . . . . . . . . . . . . . . . . . . . 10–17 157–176<br />
Oil Pan Nuts & Bolts . . . . . . . . . . . . . . . . . . . . . . . . . . . . . . . . . . . . . . . . . . . . . . . . . . . . . . . . . . . 14–19 19–26<br />
Oil Pump Bolts (Hollow) . . . . . . . . . . . . . . . . . . . . . . . . . . . . . . . . . . . . . . . . . . . . . . . . . . . . . . . . 9–12 12–16<br />
Oil Pump Mounting Bolts . . . . . . . . . . . . . . . . . . . . . . . . . . . . . . . . . . . . . . . . . . . . . . . . . . . . . . . 10–17 14–23<br />
Operator Cab Fastening Nuts . . . . . . . . . . . . . . . . . . . . . . . . . . . . . . . . . . . . . . . . . . . . . . . . . . . 40–50 54–68<br />
Operator Cab Pivot Bolts & Nuts . . . . . . . . . . . . . . . . . . . . . . . . . . . . . . . . . . . . . . . . . . . . . . . . 25–35 34–47<br />
Pedal Lock Linkage to Main Frame Bolts . . . . . . . . . . . . . . . . . . . . . . . . . . . . . . . . . . . . . . . . .<br />
7–8 9,5–10,8<br />
Pedal Lock Linkage Tab Bolt . . . . . . . . . . . . . . . . . . . . . . . . . . . . . . . . . . . . . . . . . . . . . . . . . . . .<br />
25 34<br />
Pivot Pins Lock Bolt & Nut . . . . . . . . . . . . . . . . . . . . . . . . . . . . . . . . . . . . . . . . . . . . . . . . . . . . . . 18–20 24–27<br />
Rocker Arm Adjustment Nut . . . . . . . . . . . . . . . . . . . . . . . . . . . . . . . . . . . . . . . . . . . . . . . . . . . . 12–14 16–19<br />
Rocker Arm Bracket Bolts . . . . . . . . . . . . . . . . . . . . . . . . . . . . . . . . . . . . . . . . . . . . . . . . . . . . . . 36–43 49–58<br />
Seat Belt Fastening Bolts . . . . . . . . . . . . . . . . . . . . . . . . . . . . . . . . . . . . . . . . . . . . . . . . . . . . . . . 40–45 54–61<br />
Seat Mounting Bolts . . . . . . . . . . . . . . . . . . . . . . . . . . . . . . . . . . . . . . . . . . . . . . . . . . . . . . . . . . . 9–11 12,2–15<br />
Seat Bar Pivot Bolts . . . . . . . . . . . . . . . . . . . . . . . . . . . . . . . . . . . . . . . . . . . . . . . . . . . . . . . . . . . 25–28 34–38<br />
853, 853H BICS Loa<strong>de</strong>r<br />
–9–9– Service Manual
TORQUE SPECIFICATIONS FOR LOADER (Cont’d)<br />
Specifications (Cont’d)<br />
Item (Cont’d) Ft.–Lbs. Nm<br />
Thermostat Housing Bolts . . . . . . . . . . . . . . . . . . . . . . . . . . . . . . . . . . . . . . . . . . . . . . . . . . . . . . 10–17 14–23<br />
Timing Case Bolts . . . . . . . . . . . . . . . . . . . . . . . . . . . . . . . . . . . . . . . . . . . . . . . . . . . . . . . . . . . . . 11–17 15–23<br />
Timing Case Cover Bolts . . . . . . . . . . . . . . . . . . . . . . . . . . . . . . . . . . . . . . . . . . . . . . . . . . . . . . . 11–17 15–23<br />
Valve Cover Nuts . . . . . . . . . . . . . . . . . . . . . . . . . . . . . . . . . . . . . . . . . . . . . . . . . . . . . . . . . . . . . . 6–13 8–18<br />
Water Jacket Tube (Outsi<strong>de</strong>) . . . . . . . . . . . . . . . . . . . . . . . . . . . . . . . . . . . . . . . . . . . . . . . . . . . . 10–17 14–23<br />
Water Pump Bolts . . . . . . . . . . . . . . . . . . . . . . . . . . . . . . . . . . . . . . . . . . . . . . . . . . . . . . . . . . . . . 11–18 15–24<br />
Wheel Nuts . . . . . . . . . . . . . . . . . . . . . . . . . . . . . . . . . . . . . . . . . . . . . . . . . . . . . . . . . . . . . . . . . . . 105–115 142–156<br />
–9–10–<br />
853, 853H BICS Loa<strong>de</strong>r<br />
Service Manual
HYDRAULIC/HYDROSTATIC FLUID SPECIFICATIONS<br />
Specifications<br />
Use Melroe hydraulic/hydrostatic transmission fluid (P/N 6563328). If this fluid is not<br />
available, use 10W–30 or 10W–40 SAE Motor Oil (5W–30 for 0°F [–18°C] and<br />
Below).<br />
DO NOT use automatic transmission fluids in the loa<strong>de</strong>r or permanent damage to the<br />
transmission will result.<br />
Diesel fuel or hydraulic fluid un<strong>de</strong>r<br />
pressure can penetrate skin or eyes<br />
causing serious injury. Fluid leaks<br />
un<strong>de</strong>r pressure may not be visible.<br />
Use a piece of cardboard or wood to<br />
find leaks. Do not use your bare<br />
hand. Wear safety goggles. If fluid<br />
enters skin or eyes, get immediate<br />
medical attention.<br />
W–2074–1285<br />
When temperatures below zero <strong>de</strong>gree F (–18°C) are common, the loa<strong>de</strong>r must be<br />
kept in a warm building. Extra warm–up time must be used each time the loa<strong>de</strong>r is<br />
started during cold temperature conditions. Cold fluid will not flow easily and it makes<br />
action of the hydraulic function slower. Loss of fluid flow to the hydrostatic<br />
transmission pump (indicated by ‘‘TRANS’’ light ‘‘ON’’) can cause transmission<br />
damage in less than 60 seconds.<br />
During cold weather 32°F (0°C) and<br />
below, do not operate machine until<br />
the engine has run for at least five (5)<br />
minutes at less than half throttle.<br />
This warm–up period is necessary<br />
for foot pedal operation and safe<br />
stopping. Do not operate controls<br />
during warm–up period. When<br />
temperatures are below –20°F<br />
(30°C), the hydrostatic oil must be<br />
heated or kept warm. The<br />
hydrostatic system will not get<br />
enough oil at low temperatures. Park<br />
the machine in an area where the<br />
temperature will be above 0°F<br />
(–18°C), if possible.<br />
W–2027–1285<br />
853, 853H BICS Loa<strong>de</strong>r<br />
–9–11– Service Manual
STANDARD TORQUE SPECIFICATIONS FOR BOLTS<br />
The following table shows standard torque specifications for bolts with zinc<br />
phosphate coating. Bolts purchased from Melroe that have zinc phosphate coating<br />
are specified by the letter ‘‘H’’ following the part number.<br />
THREAD<br />
SIZE SAE GRADE 5 SAE GRADE 8<br />
INCH. .250 80–90 110–120<br />
LBS. (9,0–10,2) (12,4–13,6)<br />
(Nm)<br />
.3125 180–200 215–240<br />
(20,3–22,6) (24,2–27,1)<br />
.375 25–28 35–40<br />
(34–38) (47–54)<br />
.4375 40–45 60–65<br />
(54–61) (81–88)<br />
.500 65–70 90–100<br />
(88–95) (122–136)<br />
.5625 90–100 125–140<br />
(122–136) (170–190)<br />
.625 125–140 175–190<br />
(170–190) (240–260)<br />
FOOT .750 220–245 300–330<br />
LBS. (300–330) (410–450)<br />
(Nm)<br />
.875 330–360 475–525<br />
(450–490) (645–710)<br />
1.000 475–525 725–800<br />
(645–710) (985–1085)<br />
1.125 650–720 1050–1175<br />
(880–975) (1425–1600)<br />
1.250 900–1000 1475–1625<br />
(1200–1360) (2000–2200)<br />
1.375 1200–1350 2000–2200<br />
(1630–1830) (2720–2980)<br />
1.500 1500–1650 2600–2850<br />
(2040–2240) (3530–3870)<br />
1.625 2000–2800 3450–3800<br />
(2720–2980) (4680–5150)<br />
1.750 2500–2750 4300–4800<br />
(3390–3730) (5830–6500)<br />
1.875 3150–3500 5500–6100<br />
(4270–4750) (7450–8300)<br />
2.000 3800–4200 6500–7200<br />
(5150–5700) (8800–9800)<br />
–9–12–<br />
853, 853H BICS Loa<strong>de</strong>r<br />
Service Manual
DECIMAL AND MILLIMETER EQUIVALENTS<br />
FRACTIONS DECIMALS MM FRACTIONS DECIMALS MM<br />
1/32<br />
1/64 0.015625 —<br />
0.03125 —<br />
0.397<br />
0.794 17/32<br />
33/64 0.515625 —<br />
0.53125 —<br />
13.097<br />
13.494<br />
1/16<br />
3/64 0.046875 —<br />
0.0625 —<br />
1.191<br />
1.588 9/16<br />
35/64 0.546875 —<br />
0.5625 —<br />
13.891<br />
14.288<br />
3/32<br />
5/64 0.078125 —<br />
0.09375 —<br />
1.984<br />
2.381 19/32<br />
37/64 0.578125 —<br />
0.59375 —<br />
14.684<br />
15.081<br />
1/8<br />
7/64 0.109375 —<br />
0.1250 —<br />
2.778<br />
3.175 5/8<br />
39/64 0.609375 —<br />
0.6250 —<br />
15.478<br />
15.875<br />
5/32<br />
9/64 0.140625 —<br />
0.15625 —<br />
3.572<br />
3.969 21/32<br />
41/64 0.640625 —<br />
0.65625 —<br />
16.272<br />
16.669<br />
3/16<br />
11/64 0.171875 —<br />
0.1876 —<br />
4.366<br />
4.762 11/16<br />
43/64 0.671875 —<br />
0.6875 —<br />
17.066<br />
17.462<br />
7/32<br />
13/64 0.203125 —<br />
0.21875 —<br />
5.159<br />
5.556 23/32<br />
45/64 0.703125 —<br />
0.71875 —<br />
17.859<br />
18.256<br />
1/4<br />
15/64 0.234375 —<br />
0.2500 —<br />
5.953<br />
6.350 3/4<br />
47/64 0.734375 —<br />
0.7500 —<br />
18.653<br />
19.050<br />
9/32<br />
17/64 0.265625 —<br />
0.28125 —<br />
6.747<br />
7.144 25/32<br />
49/64 0.765625 —<br />
0.78125 —<br />
19.447<br />
19.844<br />
5/16<br />
19/64 0.296875 —<br />
0.3125 —<br />
7.541<br />
7.938 13/16<br />
51/64 0.796875 —<br />
0.8125 —<br />
20.241<br />
20.638<br />
11/32<br />
21/64 0.328125 —<br />
0.34375 —<br />
8.334<br />
8.731 27/32<br />
53/64 0.828125 —<br />
0.84375 —<br />
21.034<br />
21.431<br />
3/8<br />
23/64 0.359375 —<br />
0.3750 —<br />
9.128<br />
9.525 7/8<br />
55/64 0.859375 —<br />
0.8750 —<br />
21.828<br />
22.225<br />
13/32<br />
25/64 0.390625 —<br />
0.40625 —<br />
9.922<br />
10.319 29/32<br />
57/64 0.890625 —<br />
0.90625 —<br />
22.622<br />
23.019<br />
7/16<br />
27/64 0.421875 —<br />
0.4375 —<br />
10.716<br />
11.112 15/16<br />
59/64 0.921875 —<br />
0.9375 —<br />
23.416<br />
23.812<br />
15/32<br />
29/64 0.453125 —<br />
0.46875 —<br />
11.509<br />
11.906 31/32<br />
61/64 0.953125 —<br />
0.96875 —<br />
24.209<br />
24.606<br />
1/2<br />
31/64 0.484375 —<br />
0.5000 —<br />
12.303<br />
12.700 1<br />
63/64 0.984375 —<br />
1.000 —<br />
25.003<br />
25.400<br />
1 mm = 0.03937’’ 0.001’’ = 0.0254 mm<br />
U.S. TO METRIC CONVERSION<br />
TO CONVERT INTO MULTIPLY BY<br />
LINEAR<br />
MEASUREMENT<br />
Miles<br />
Yards<br />
Feet<br />
Feet<br />
Inches<br />
Inches<br />
Inches<br />
Kilometers<br />
Meters<br />
Meters<br />
Centimeters<br />
Meters<br />
Centimeters<br />
Millimeters<br />
1.609<br />
0.9144<br />
0.3048<br />
30.48<br />
0.0254<br />
2.54<br />
25.4<br />
AREA Square Miles<br />
Square Feet<br />
Square Inches<br />
Acre<br />
Square Kilometers<br />
Square Meters<br />
Square Centimeters<br />
Hectare<br />
2.59<br />
0.0929<br />
6.452<br />
0.4047<br />
VOLUME Cubic Yards<br />
Cubic Feet<br />
Cubic Inches<br />
Cubic Meters<br />
Cubic Meters<br />
Cubic Centimeters<br />
0.7646<br />
0.02832<br />
16.39<br />
WEIGHT Tons (Short)<br />
Pounds<br />
Ounces (Avdp.)<br />
Metric Tons<br />
Kilograms<br />
Grams<br />
0.9078<br />
0.4536<br />
28.3495<br />
PRESSURE Pounds/Sq. In. Kilopascal 6.895<br />
WORK Foot–Pounds Newton–Metre 1.356<br />
LIQUID VOLUME Quarts<br />
Gallons<br />
Liters<br />
Liters<br />
0.9463<br />
3.785<br />
LIQUID FLOW Gallons/Minute Liters/Minute 3.785<br />
TEMPERATURE Fahrenheit Celsius 1.Subtract 32°<br />
2. Multiply by 5/9<br />
853, 853H BICS Loa<strong>de</strong>r<br />
–9–13– Service Manual
853, 853H BICS Service Manual #6724012 – Specifications Section<br />
–9–14–<br />
853, 853H BICS Loa<strong>de</strong>r<br />
Service Manual
AFFECTING:<br />
Product BOBCAT LOADER<br />
Mo<strong>de</strong>l<br />
Manual No.<br />
850<br />
NOTICE<br />
SERVICE MANUAL<br />
6724012 (5–95)<br />
®<br />
850–001<br />
Revision Number<br />
20 February 1996<br />
Date<br />
REVISION ROUTE TO<br />
ATTENTION<br />
PARTS MANAGER<br />
SERVICE MANAGER<br />
SALES MANAGER<br />
Insert This Sheet With The Appropriate Manual For Future Reference.<br />
The following pages are a revision to the 850 Service Manual P/N 6724012 (5–95).<br />
Put in the ad<strong>de</strong>d pages as follows:<br />
TAKE OUT PUT IN<br />
Hydraulic/Hydrostatic Schmatic (P/N 6724476)<br />
853H BICS<br />
(Printed February 1996)<br />
X<br />
Printed in U.S.A.
AFFECTING:<br />
Product BOBCAT LOADER<br />
Mo<strong>de</strong>l<br />
Manual No.<br />
853, 853H<br />
NOTICE<br />
SERVICE MANUAL<br />
6724012 (4–95)<br />
®<br />
850–002<br />
Revision Number<br />
5 June 1996<br />
Date<br />
REVISION ROUTE TO<br />
ATTENTION<br />
PARTS MANAGER<br />
SERVICE MANAGER<br />
SALES MANAGER<br />
Insert This Sheet With The Appropriate Manual For Future Reference.<br />
The following pages are a revision to the 853, 853H Service Manual P/N 6724012 (4–95).<br />
Take out the pages shown and put in the revised pages as follows:<br />
TAKE OUT PUT IN<br />
Hydraulic/Hydrostatic Schematic (P/N 6724476) Hydraulic/Hydrostatic Schematic (P/N 6724476)<br />
853H BICS 853H BICS<br />
(Printed April 1995) (Printed February 1996)<br />
Hydraulic/Hydrostatic Schematic (P/N 6724379) Hydraulic/Hydrostatic Schematic (P/N 6724379)<br />
853 BICS 853 BICS<br />
(Printed April 1995) (Printed April 1995) (Revised Legend June 1996)<br />
2–7, 2–8 2–7, 2–8 (Revised June 96)<br />
2–19, 2–20 2–19 (Revised June 96), 2–20<br />
2–31, 2–32 2–31, 2–32 (Revised June 96)<br />
SECTION 3 SECTION 3 (Revised June 96)<br />
4–5, 4–6 4–5, 4–6 (Revised June 96)<br />
CONTENT PAGE (Section 8) CONTENT PAGE (Section 8) (Revised June 96)<br />
8–3, 8–4 8–3, 8–4 (Revised June 96)<br />
X
AFFECTING:<br />
Product BOBCAT LOADER<br />
Mo<strong>de</strong>l<br />
Manual No.<br />
853, 853H<br />
NOTICE<br />
SERVICE MANUAL<br />
6724012 (4–95)<br />
®<br />
850–003<br />
Revision Number<br />
12 July 1996<br />
Date<br />
REVISION ROUTE TO<br />
ATTENTION<br />
PARTS MANAGER<br />
SERVICE MANAGER<br />
SALES MANAGER<br />
Insert This Sheet With The Appropriate Manual For Future Reference.<br />
The following pages are a revision to the 853, 853H Service Manual P/N 6724012 (4–95).<br />
Take out the pages shown and put in the revised pages as follows:<br />
TAKE OUT PUT IN<br />
Hydraulic/Hydrostatic Schematic (P/N 6724476) Hydraulic/Hydrostatic Schematic (P/N 6724476)<br />
853H BICS 853H BICS<br />
(Printed November 1995) (Printed July 1996)<br />
Hydraulic/Hydrostatic Schematic (P/N 6724379) Hydraulic/Hydrostatic Schematic (P/N 6724379)<br />
853 BICS 853 BICS<br />
(Printed April 1995) (Printed July 1996)<br />
X
AFFECTING:<br />
Product BOBCAT LOADER<br />
Mo<strong>de</strong>l<br />
Manual No.<br />
853, 853H<br />
NOTICE<br />
SERVICE MANUAL<br />
6724012 (4–95)<br />
®<br />
850–004<br />
Revision Number<br />
1 June 1997<br />
Date<br />
REVISION ROUTE TO<br />
ATTENTION<br />
PARTS MANAGER<br />
SERVICE MANAGER<br />
SALES MANAGER<br />
Insert This Sheet With The Appropriate Manual For Future Reference.<br />
The following pages are a revision to the 853 & 853H Service Manual P/N 6724012 (4–95).<br />
Take out the pages shown and put in the revised pages as follows:<br />
TAKE OUT PUT IN<br />
853 Cover 853, 853H Cover<br />
i, ii i (Revised June 97), ii<br />
v, vi v (Revised June 97), vi (Revised June 97)<br />
1–3, 1–4 1–3, 1–4 (Revised June 97)<br />
1–7, 1–8 1–7 (Revised June 97), 1–8<br />
HYDRAULIC/HYDROSTATIC SCHEMATIC (P/N 6724379) HYDRAULIC/HYDROSTAIC SCHEMATIC<br />
853 BICS 853 BICS<br />
(Printed July 1996) (Printed June 1997)<br />
HYDRAULIC/HYDROSTATIC SCHEMATIC (P/N 6724476) HYDRAULIC/HYDROSTATIC SCHEMATIC<br />
853H BICS 853H BICS<br />
(Printed July 1996) (Printed June 1997)<br />
2–5, 2–6 2–5 (Revised June 97), 2–6<br />
2–9, 2–10 2–9, 2–10 (Revised June 97)<br />
2–17, 2–18 2–17 (Revised June 97), 2–18<br />
3–53 (Revised June 96), 3–54 (Revised June 96) 3–53 (Revised June 96), 3–54 (Revised June 97)<br />
3–55 (Revised June 96), 3–56 (Revised June 96) 3–55 (Revised June 97), 3–56 (Revised June 96)<br />
5–9, 5–10 5–9 (Revised June 97), 5–10<br />
WIRING DIAGRAM (P/N 6724387) 853 BICS – CAB WIRING DIAGRAM INDEX<br />
Sheet 1 thru 8, 853 & 853H BICS CAB WIRING DIAGRAM – SHEET 1 – 853 BICS<br />
(Printed April 1995) (Printed June 1997)<br />
CAB WIRING DIAGRAM – SHEET 2 – 853 BICS<br />
(Printed June 1997)<br />
853 BICS – ENGINE WIRING DIAGRAM INDEX<br />
ENGINE WIRING DIAGRAM – SHEET 1 – 853 BICS<br />
(Printed June 1997)<br />
ENGINE WIRING DIAGRAM – SHEET 2 – 853 BICS<br />
(Printed June 1997)<br />
853 BICS – BICS WIRING DIAGRAM INDEX<br />
BICS WIRING DIAGRAM – SHEET 1 – 853 BICS<br />
(Printed June 1997)<br />
X
TAKE OUT PUT IN<br />
853 BICS – OPERATOR CONTROLS WIRING<br />
DIAGRAM INDEX<br />
OPERATOR CONTROLS WIRING DIAGRAM<br />
SHEET 1 – 853 BICS<br />
(Printed June 1997)<br />
OPERATOR CONTROLS WIRING DIAGRAM<br />
SHEET 2 – 853 BICS<br />
(Printed June 1997)<br />
OPERATOR CONTROLS WIRING DIAGRAM<br />
SHEET 3 – 853 BICS<br />
(Printed June 1997)<br />
OPERATOR CONTROLS WIRING DIAGRAM<br />
SHEET 4 – 853 BICS<br />
(Printed June 1997)<br />
853 BICS – ATTACHMENT (OPTIONAL) WIRING<br />
DIAGRAM INDEX<br />
ATTACHMENT (OPTIONAL) WIRING DIAGRAM<br />
SHEET 1 – 853 BICS<br />
(Printed June 1997)<br />
ATTACHMENT (OPTIONAL) WIRING DIAGRAM<br />
SHEET 2 – 853 BICS<br />
(Printed June 1997)<br />
7–7, 7–8 7–7 (Revised June 97), 7–8 (Revised June 97)<br />
7–9, 7–10 7–9, 7–10 (Revised June 97)<br />
7–11, 7–12 7–11, 7–12 (Revised June 97)<br />
7–33, 7–34 7–33 (Revised June 97), 7–34<br />
8–1, 8–2 8–1 (Revised June 97), 8–2 (Revised June 97)
AFFECTING:<br />
Product BOBCAT LOADER<br />
Mo<strong>de</strong>l<br />
Manual No.<br />
853, 853H<br />
NOTICE<br />
SERVICE MANUAL<br />
6724012 (4–95)<br />
850–005<br />
Revision Number<br />
7 March 2003<br />
Date<br />
REVISION ROUTE TO<br />
ATTENTION<br />
PARTS MANAGER<br />
SERVICE MANAGER<br />
SALES MANAGER<br />
Insert This Sheet With The Appropriate Manual For Future Reference.<br />
The following pages are a revision to the 853 & 853H Service Manual P/N 6724012 (4–95).<br />
Take out the pages shown and put in the revised pages as follows:<br />
TAKE OUT PUT IN REVISION DESCRIPTION<br />
3–57, 3–58 3–57, 3–58 Text change<br />
7–41, 7–42 7–41, 7–42 Text change<br />
7–71, 7–72 7–71, 7–72 Text change<br />
8–1, 8–2 8–1, 8–2 Text change<br />
8–27 thru 8–32 8–27 thru 8–32 Ad<strong>de</strong>d information<br />
9–3, 9–4 9–3, 9–4 Text change<br />
X