
Create successful ePaper yourself
Turn your PDF publications into a flip-book with our unique Google optimized e-Paper software.
© Disney<br />
Cut<br />
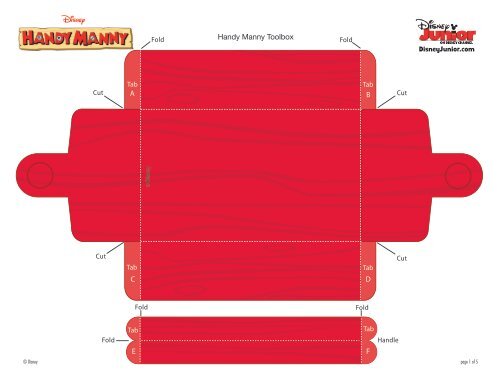
<strong>Handy</strong> <strong>Manny</strong> <strong>Toolbox</strong><br />
Cut Cut<br />
Tab Tab<br />
Fold<br />
Fold<br />
Fold<br />
Tab Tab<br />
A B<br />
© Disney<br />
C D<br />
Tab<br />
Fold<br />
Fold<br />
E F<br />
Tab<br />
Handle<br />
Cut<br />
DisneyJunior.com<br />
page 1 of 5
© Disney<br />
© Disney<br />
© Disney<br />
© Disney<br />
© Disney<br />
<strong>Handy</strong> <strong>Manny</strong> <strong>Toolbox</strong><br />
DisneyJunior.com<br />
page 2 of 5
© Disney<br />
© Disney<br />
© Disney<br />
© Disney<br />
© Disney<br />
<strong>Handy</strong> <strong>Manny</strong> <strong>Toolbox</strong><br />
DisneyJunior.com<br />
page 3 of 5
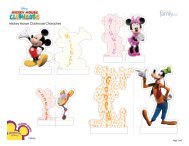
<strong>Toolbox</strong> Instructions<br />
© Disney<br />
Cut<br />
Fold<br />
Cut Cut<br />
Tab Tab<br />
Fold<br />
Fold<br />
Tab<br />
Tab<br />
Handle<br />
E F<br />
Fold<br />
Tab Tab<br />
A B<br />
C D<br />
Fold<br />
Cut<br />
<strong>Handy</strong> <strong>Manny</strong> <strong>Toolbox</strong><br />
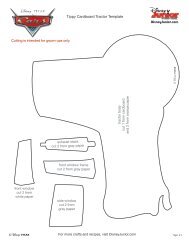
Cutting is intended for grown-ups only.<br />
Step 1: Print out the <strong>Handy</strong> <strong>Manny</strong> toolbox and tools on cardstock<br />
or regular paper. Cut out the toolbox including the four slits indicated<br />
(two on each end of the box) and the handle.<br />
Step 3: Place glue on tabs C and D and glue them to the inside of<br />
the ends of the box.<br />
DisneyJunior.com<br />
Step 2: Fold the toolbox along the dashed white lines away<br />
from you so the red color is on the outside. Place glue on<br />
tab A and glue it to the inside of the end of the box. Place<br />
glue on tab B, and glue it to the inside of the opposite end of<br />
the box.<br />
Glue<br />
Step 4: Cut out the handle and fold along the center white<br />
dashed line so the color is on the outside. Open the two<br />
halves and place glue on the white side of the handle.<br />
Refold the handle and press firmly.<br />
Glue<br />
page 4 of 5
<strong>Toolbox</strong> Instructions<br />
Step 5: Fold the end tabs of the handle marked E and F along the<br />
white dashed line. Place glue on the outer side of the tab and glue<br />
to the inside ends of the toolbox.<br />
© Disney<br />
<strong>Handy</strong> <strong>Manny</strong> <strong>Toolbox</strong><br />
Glue<br />
Step 7: Refold the page and press down firmly. Let the glue dry,<br />
and then cut out each tool along the dashed grey lines. Leave each<br />
tool attached at the fold. Repeat this step with the second page of<br />
tools. Now you can place the tools in the toolbox and let the fun begin!<br />
DisneyJunior.com<br />
Step 6: Next, take a page with tools and fold it in half along<br />
the center grey line. Reopen the page and spread glue over<br />
half of the page (on the white side of the page).<br />
page 5 of 5